


1.拼多商城整合 rabbitmq
当用户下订单时,我们的业务系统直接与数据库通信,把订单保存到数据库中
当系统流量突然激增,大量的订单压力,会拖慢业务系统和数据库系统
我们需要应对流量峰值,让流量曲线变得平缓,如下图

订单存储的解耦
为了进行流量削峰,我们引入 rabbitmq 消息队列,当购物系统产生订单后,可以把订单数据发送到消息队列;而订单消费者应用从消息队列接收订单消息,并把订单保存到数据库

这样,当流量激增时,大量订单会暂存在rabbitmq中,而订单消费者可以从容地从消息队列慢慢接收订单,向数据库保存
使用RocketMQ原生API收发消息代码样例
简单模式

1.主程序
Spring提供的Queue类,是队列的封装对象,它封装了队列的参数信息.
RabbitMQ的自动配置类,会发现这些Queue实例,并在RabbitMQ服务器中定义这些队列.
package cn.tedu.rabbitmqspringboot.m1;

import org.springframework.amqp.core.Queue;
import org.springframework.beans.factory.annotation.Autowired;
import org.springframework.boot.SpringApplication;
import org.springframework.boot.autoconfigure.SpringBootApplication;
import org.springframework.context.annotation.Bean;

import javax.annotation.PostConstruct;

@SpringBootApplication  // @Configuration
public class Main {
    public static void main(String[] args) {
        SpringApplication.run(Main.class, args);
    }

    /*
    新建 Queue 实例,封装队列参数: "helloworld",false,false,false
    import org.springframework.amqp.core.Queue;
     */
    @Bean
    public Queue helloworld() {
        //return new Queue("helloworld"); // true,false,false
        return new Queue("helloworld", false); //false,false,false
    }

    @Autowired
    private Producer p;

    /*
    spring执行流程:
    包扫描创建所有实例 --- 依赖注入 --- @PostConstruct --- 执行后续流程
     */
    @PostConstruct
    public void test() {
        p.send();
    }


}
2.生产者
AmqpTemplate是rabbitmq客户端API的一个封装工具,提供了简便的方法来执行消息操作.
AmqpTemplate由自动配置类自动创建
package cn.tedu.rabbitmqspringboot.m1;

import org.springframework.amqp.core.AmqpTemplate;
import org.springframework.beans.factory.annotation.Autowired;
import org.springframework.stereotype.Component;

@Component
public class Producer {
    @Autowired
    private AmqpTemplate t;
    /*
    自定义的消息发送方法
     */
    public void send() {
        t.convertAndSend("helloworld", "Hello world!");
    }
}
3.消费者
通过@RabbitListener从指定的队列接收消息
使用@RebbitHandler注解的方法来处理消息
package cn.tedu.rabbitmqspringboot.m1;

import org.springframework.amqp.rabbit.annotation.RabbitHandler;
import org.springframework.amqp.rabbit.annotation.RabbitListener;
import org.springframework.stereotype.Component;

@Component
public class Consumer {
    @RabbitListener(queues = "helloworld")
    public void receive(String s) {
        System.out.println("收到:"+s);
    }
}
4.测试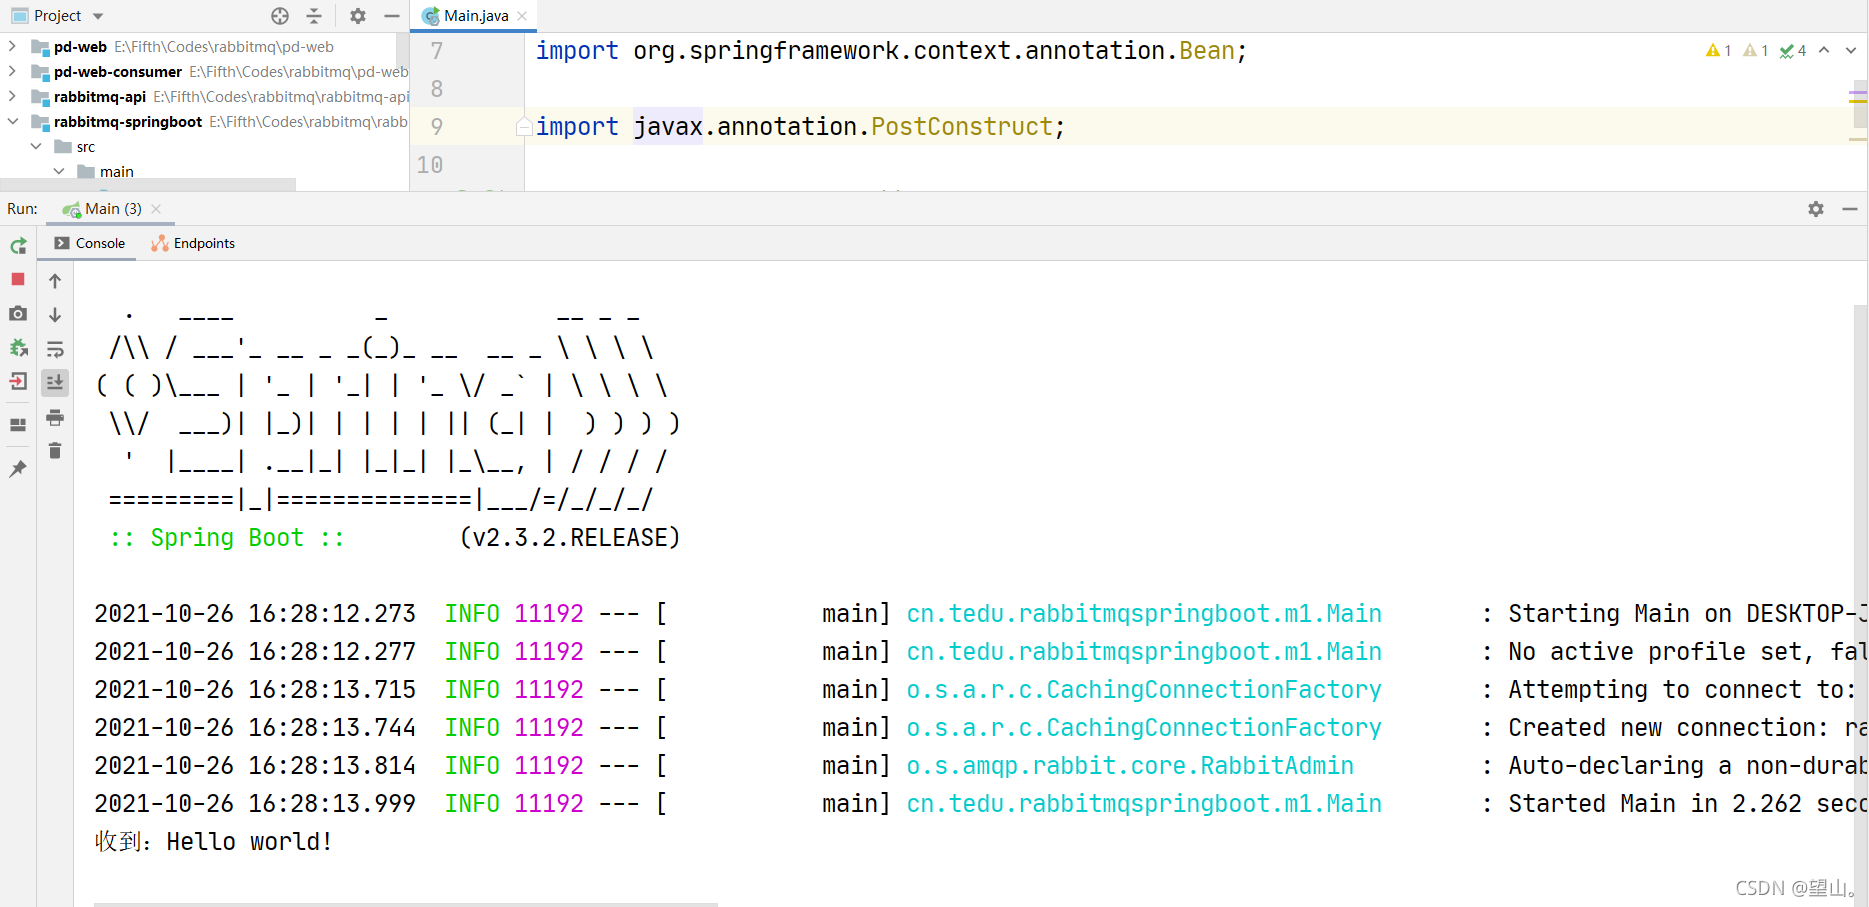
工作模式


轮询发消息
1.主程序
在主程序中创建名为task_queue的持久队列
package cn.tedu.rabbitmqspringboot.m2;

import org.springframework.amqp.core.Queue;
import org.springframework.beans.factory.annotation.Autowired;
import org.springframework.boot.SpringApplication;
import org.springframework.boot.autoconfigure.SpringBootApplication;
import org.springframework.context.annotation.Bean;

import javax.annotation.PostConstruct;
/*
消息合理分发
    1.autoAck=false
      springboot 封装的api,默认就是手动确认模式,springboot会自动发
    2.qos=1 每次只收1条
      yml添加pre-fetch=1(默认是 250)


持久化
    1.队列持久化
    new Queue(队列名,true)
    2.消息数据的持久化
    AmqTemplate.convertAndSend()方法发送的消息,默认就是持久消息

    AmqpTemplate.convertAndSend(队列,消息,消息预处理对象)
    消息预处理对象中,可以获取消息属性。把持久化属性改成非持久,可以发送持久消息
 */
@SpringBootApplication  // @Configuration
public class Main {
    public static void main(String[] args) {
        SpringApplication.run(Main.class, args);
    }

    /*
    新建 Queue 实例,封装队列参数: "helloworld",false,false,false
    import org.springframework.amqp.core.Queue;
     */
    @Bean
    public Queue helloworld() {
        //return new Queue("helloworld"); // true,false,false
        return new Queue("task_queue"); //第一个参数默认为false,false,false
    }

    @Autowired
    private Producer p;

    /*
    spring执行流程:
    包扫描创建所有实例 --- 依赖注入 --- @PostConstruct --- 执行后续流程
     */
    @PostConstruct
    public void test() {
        //在新的线程中执行死循环,不阻塞spring主线程执行
        new Thread(() -> p.send()).start();
    }


}
2.生产者
spring boot封装的 rabbitmq api 中, 发送的消息默认是持久化消息.
如果希望发送非持久化消息, 需要在发送消息时做以下设置:

使用 MessagePostProcessor 前置处理器参数
从消息中获取消息的属性对象
在属性中把 DeliveryMode 设置为非持久化
	//如果需要设置消息为非持久化,可以取得消息的属性对象,修改它的deliveryMode属性
	t.convertAndSend("task_queue", (Object) s, new MessagePostProcessor() {
		@Override
		public Message postProcessMessage(Message message) throws AmqpException {
			MessageProperties props = message.getMessageProperties();
			props.setDeliveryMode(MessageDeliveryMode.NON_PERSISTENT);
			return message;
		}
	});
package cn.tedu.rabbitmqspringboot.m2;


import org.springframework.amqp.core.AmqpTemplate;
import org.springframework.beans.factory.annotation.Autowired;
import org.springframework.stereotype.Component;

import java.util.Scanner;

@Component
public class Producer {
    @Autowired
    private AmqpTemplate t;
    /*
    自定义的消息发送方法
     */
    public void send() {
        while (true){
            System.out.println("输入消息:");
            String s = new Scanner(System.in).nextLine();
            t.convertAndSend("task_queue",s);
        }
    }
}
3.消费者
package cn.tedu.rabbitmqspringboot.m2;

import org.springframework.amqp.rabbit.annotation.RabbitListener;
import org.springframework.stereotype.Component;

@Component
public class Consumer {
    /**
     * 每个@RabbitListener 注解都会注册成为一个消费者
     * @param s
     */
    @RabbitListener(queues = "task_queue")
    public void receive1(String s) {
        System.out.println("消费者1收到:"+s);
    }
    @RabbitListener(queues = "task_queue")
    public void receive2(String s) {
        System.out.println("消费者2收到:"+s);
    }
}
4.测试

发布和订阅模式


绑定 Bindings

1.主程序
spring boot 的自动配置类会自动发现交换机实例, 并在 RabbitMQ 服务器中定义该交换机.
package cn.tedu.rabbitmqspringboot.m3;

import org.springframework.amqp.core.FanoutExchange;
import org.springframework.amqp.core.Queue;
import org.springframework.beans.factory.annotation.Autowired;
import org.springframework.boot.SpringApplication;
import org.springframework.boot.autoconfigure.SpringBootApplication;
import org.springframework.context.annotation.Bean;

import javax.annotation.PostConstruct;

/*
消息合理分发
    1.autoAck=false
      springboot 封装的api,默认就是手动确认模式,springboot会自动发
    2.qos=1 每次只收1条
      yml添加pre-fetch=1(默认是 250)


持久化
    1.队列持久化
    new Queue(队列名,true)
    2.消息数据的持久化
    AmqTemplate.convertAndSend()方法发送的消息,默认就是持久消息

    AmqpTemplate.convertAndSend(队列,消息,消息预处理对象)
    消息预处理对象中,可以获取消息属性。把持久化属性改成非持久,可以发送持久消息
 */
@SpringBootApplication  // @Configuration
public class Main {
    public static void main(String[] args) {
        SpringApplication.run(Main.class, args);
    }
    @Bean
    public FanoutExchange logs(){
        return new FanoutExchange("logs",true,false);
    }

    @Autowired
    private Producer p;

    /*
    spring执行流程:
    包扫描创建所有实例 --- 依赖注入 --- @PostConstruct --- 执行后续流程
     */
    @PostConstruct
    public void test() {
        //在新的线程中执行死循环,不阻塞spring主线程执行
        new Thread(() -> p.send()).start();
    }


}
2.生产者
生产者向指定的交换机 logs 发送数据.
不需要指定队列名或路由键, 即使指定也无效, 因为 fanout 交换机会向所有绑定的队列发送数据, 而不是有选择的发送.
package cn.tedu.rabbitmqspringboot.m3;


import org.springframework.amqp.core.AmqpTemplate;
import org.springframework.beans.factory.annotation.Autowired;
import org.springframework.stereotype.Component;

import java.util.Scanner;

@Component
public class Producer {
    @Autowired
    private AmqpTemplate t;
    /*
    自定义的消息发送方法
     */
    public void send() {
        while (true){
            System.out.println("输入消息:");
            String s = new Scanner(System.in).nextLine();
            //t.convertAndSend("logs","",s);
            t.convertAndSend("logs","",s);
        }
    }
}
3.消费者
消费者需要执行以下操作:
- 定义随机队列(随机命名,非持久,排他,自动删除)
- 定义交换机(可以省略, 已在主程序中定义)
- 将队列绑定到交换机
spring boot 通过注解完成以上操作:
@RabbitListener(bindings = @QueueBinding( //这里进行绑定设置
	value = @Queue, //这里定义随机队列,默认属性: 随机命名,非持久,排他,自动删除
	exchange = @Exchange(name = "logs", declare = "false") //指定 logs 交换机,因为主程序中已经定义,这里不进行定义
))
package cn.tedu.rabbitmqspringboot.m3;

import org.springframework.amqp.rabbit.annotation.Exchange;
import org.springframework.amqp.rabbit.annotation.Queue;
import org.springframework.amqp.rabbit.annotation.QueueBinding;
import org.springframework.amqp.rabbit.annotation.RabbitListener;
import org.springframework.stereotype.Component;

@Component
public class Consumer {


    /**
     * 每个@RabbitListener 注解都会注册成为一个消费者
     * @param s
     */
    @RabbitListener(bindings = @QueueBinding(//队列和交换机绑定
            value = @Queue, //队列,由spring自动设置的参数:随机命名,false(非持久),true(独占),true(自动删除)
            exchange = @Exchange(name = "logs",declare = "false") //交换机,交换机名,不创建交换机(declare = "false")
    ))

    @RabbitListener(queues = "task_queue")
    public void receive1(String s) {
        System.out.println("消费者1收到:"+s);
    }
    @RabbitListener(bindings = @QueueBinding(//队列和交换机绑定
            value = @Queue, //队列,由spring自动设置的参数:随机命名,false(非持久),true(独占),true(自动删除)
            exchange = @Exchange(name = "logs",declare = "false") //交换机,交换机名,不创建交换机(declare = "false")
    ))
    @RabbitListener(queues = "task_queue")
    public void receive2(String s) {
        System.out.println("消费者2收到:"+s);
    }
}
4.测试

路由模式


直连交换机 Direct exchange
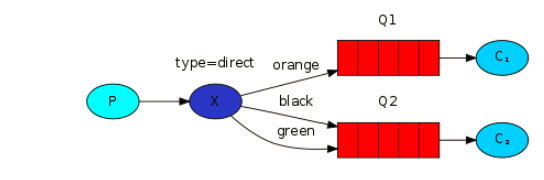
多重绑定 Multiple bindings

完整的代码

与发布和订阅模式代码类似, 只是做以下三点调整:
- 使用 direct 交换机
- 队列和交换机绑定时, 设置绑定键
- 发送消息时, 指定路由键
1.主程序
主程序中使用 DirectExcnahge 对象封装交换机信息, spring boot 自动配置类会自动发现这个对象, 并在 RabbitMQ 服务器上定义这个交换机.
package cn.tedu.rabbitmqspringboot.m4;

import org.springframework.amqp.core.DirectExchange;
import org.springframework.amqp.core.FanoutExchange;
import org.springframework.beans.factory.annotation.Autowired;
import org.springframework.boot.SpringApplication;
import org.springframework.boot.autoconfigure.SpringBootApplication;
import org.springframework.context.annotation.Bean;

import javax.annotation.PostConstruct;

/*
消息合理分发
    1.autoAck=false
      springboot 封装的api,默认就是手动确认模式,springboot会自动发
    2.qos=1 每次只收1条
      yml添加pre-fetch=1(默认是 250)


持久化
    1.队列持久化
    new Queue(队列名,true)
    2.消息数据的持久化
    AmqTemplate.convertAndSend()方法发送的消息,默认就是持久消息

    AmqpTemplate.convertAndSend(队列,消息,消息预处理对象)
    消息预处理对象中,可以获取消息属性。把持久化属性改成非持久,可以发送持久消息
 */
@SpringBootApplication  // @Configuration
public class Main {
    public static void main(String[] args) {
        SpringApplication.run(Main.class, args);
    }
    @Bean
    public DirectExchange logs(){
        return new DirectExchange("direct_logs",false,false);//参数为:交换机名
    }

    @Autowired
    private Producer p;

    /*
    spring执行流程:
    包扫描创建所有实例 --- 依赖注入 --- @PostConstruct --- 执行后续流程
     */
    @PostConstruct
    public void test() {
        //在新的线程中执行死循环,不阻塞spring主线程执行
        new Thread(() -> p.send()).start();
    }


}
2.生产者
生产者向指定的交换机发送消息, 并指定路由键.
package cn.tedu.rabbitmqspringboot.m4;


import org.springframework.amqp.core.AmqpTemplate;
import org.springframework.beans.factory.annotation.Autowired;
import org.springframework.stereotype.Component;

import java.util.Scanner;

@Component
public class Producer {
    @Autowired
    private AmqpTemplate t;
    /*
    自定义的消息发送方法
     */
    public void send() {
        while (true){
            System.out.println("输入消息:");
            String s = new Scanner(System.in).nextLine();
            System.out.println("输入关键词:");
            String k = new Scanner(System.in).nextLine();
            //t.convertAndSend("logs","",s);
            t.convertAndSend("direct_logs",k,s);
        }
    }
}
3.消费者
消费者通过注解来定义随机队列, 绑定到交换机, 并指定绑定键:
package cn.tedu.rabbitmqspringboot.m4;

import org.springframework.amqp.rabbit.annotation.Exchange;
import org.springframework.amqp.rabbit.annotation.Queue;
import org.springframework.amqp.rabbit.annotation.QueueBinding;
import org.springframework.amqp.rabbit.annotation.RabbitListener;
import org.springframework.stereotype.Component;

@Component
public class Consumer {


    /**
     * 每个@RabbitListener 注解都会注册成为一个消费者
     * @param s
     */
    @RabbitListener(bindings = @QueueBinding(//队列和交换机绑定
            value = @Queue, //队列,由spring自动设置的参数:随机命名,false(非持久),true(独占),true(自动删除)
            exchange = @Exchange(name = "direct_logs",declare = "false"), //交换机,交换机名,不创建交换机(declare = "false")
            key = {"error"}
    ))

    @RabbitListener(queues = "task_queue")
    public void receive1(String s) {
        System.out.println("消费者1收到:"+s);
    }
    @RabbitListener(bindings = @QueueBinding(//队列和交换机绑定
            value = @Queue, //队列,由spring自动设置的参数:随机命名,false(非持久),true(独占),true(自动删除)
            exchange = @Exchange(name = "direct_logs",declare = "false"), //交换机,交换机名,不创建交换机(declare = "false")
            key = {"info","warning","error"}
    ))
    @RabbitListener(queues = "task_queue")
    public void receive2(String s) {
        System.out.println("消费者2收到:"+s);
    }
}
4.测试
主题模式


主题模式不过是具有特殊规则的路由模式, 代码与路由模式基本相同, 只做如下调整:
- 使用 topic 交换机
- 使用特殊的绑定键和路由键规则
1.主程序
package cn.tedu.rabbitmqspringboot.m5;

import org.springframework.amqp.core.DirectExchange;
import org.springframework.amqp.core.TopicExchange;
import org.springframework.beans.factory.annotation.Autowired;
import org.springframework.boot.SpringApplication;
import org.springframework.boot.autoconfigure.SpringBootApplication;
import org.springframework.context.annotation.Bean;

import javax.annotation.PostConstruct;

/*
消息合理分发
    1.autoAck=false
      springboot 封装的api,默认就是手动确认模式,springboot会自动发
    2.qos=1 每次只收1条
      yml添加pre-fetch=1(默认是 250)


持久化
    1.队列持久化
    new Queue(队列名,true)
    2.消息数据的持久化
    AmqTemplate.convertAndSend()方法发送的消息,默认就是持久消息

    AmqpTemplate.convertAndSend(队列,消息,消息预处理对象)
    消息预处理对象中,可以获取消息属性。把持久化属性改成非持久,可以发送持久消息
 */
@SpringBootApplication  // @Configuration
public class Main {
    public static void main(String[] args) {
        SpringApplication.run(Main.class, args);
    }
    @Bean
    public TopicExchange logs(){
        return new TopicExchange("topic_logs",false,false);//参数为:交换机名
    }

    @Autowired
    private Producer p;

    /*
    spring执行流程:
    包扫描创建所有实例 --- 依赖注入 --- @PostConstruct --- 执行后续流程
     */
    @PostConstruct
    public void test() {
        //在新的线程中执行死循环,不阻塞spring主线程执行
        new Thread(() -> p.send()).start();
    }


}
2.生产者
package cn.tedu.rabbitmqspringboot.m5;


import org.springframework.amqp.core.AmqpTemplate;
import org.springframework.beans.factory.annotation.Autowired;
import org.springframework.stereotype.Component;

import java.util.Scanner;

@Component
public class Producer {
    @Autowired
    private AmqpTemplate t;
    /*
    自定义的消息发送方法
     */
    public void send() {
        while (true){
            System.out.println("输入消息:");
            String s = new Scanner(System.in).nextLine();
            System.out.println("输入关键词:");
            String k = new Scanner(System.in).nextLine();
            //t.convertAndSend("logs","",s);
            t.convertAndSend("topic_logs",k,s);
        }
    }
}
3.消费者
package cn.tedu.rabbitmqspringboot.m5;

import org.springframework.amqp.rabbit.annotation.Exchange;
import org.springframework.amqp.rabbit.annotation.Queue;
import org.springframework.amqp.rabbit.annotation.QueueBinding;
import org.springframework.amqp.rabbit.annotation.RabbitListener;
import org.springframework.stereotype.Component;

@Component
public class Consumer {


    /**
     * 每个@RabbitListener 注解都会注册成为一个消费者
     * @param s
     */
    @RabbitListener(bindings = @QueueBinding(//队列和交换机绑定
            value = @Queue, //队列,由spring自动设置的参数:随机命名,false(非持久),true(独占),true(自动删除)
            exchange = @Exchange(name = "topic_logs",declare = "false"), //交换机,交换机名,不创建交换机(declare = "false")
            key = {"*.orange.*"}
    ))

    @RabbitListener(queues = "task_queue")
    public void receive1(String s) {
        System.out.println("消费者1收到:"+s);
    }
    @RabbitListener(bindings = @QueueBinding(//队列和交换机绑定
            value = @Queue, //队列,由spring自动设置的参数:随机命名,false(非持久),true(独占),true(自动删除)
            exchange = @Exchange(name = "topic_logs",declare = "false"), //交换机,交换机名,不创建交换机(declare = "false")
            key = {"*.*.rabbit","lazy.#"}
    ))
    @RabbitListener(queues = "task_queue")
    public void receive2(String s) {
        System.out.println("消费者2收到:"+s);
    }
}
4.测试


 897
897


 被折叠的 条评论
为什么被折叠?
被折叠的 条评论
为什么被折叠?
 到【灌水乐园】发言


