


一、问题:
公司新拉了一条专线,外网IP和内网IP都变更了。导致文件服务器直接扑该了,无法预览也无法上传。我们文件服务器通过docker启动的fastdfs容器。
装个命令提示工具
yun install bash-completion -y
二、排查问题,进去看看fastds里面到底有什么
1、查看fastdfs文件服务器docker容器
[root@file-ser-1-225 3B]# docker ps
CONTAINER ID        IMAGE                COMMAND             CREATED             STATUS              PORTS               NAMES
379036e21744        morunchang/fastdfs   "sh storage.sh"     22 hours ago        Up 22 hours                             storage
348d8b43bc3f        morunchang/fastdfs   "sh tracker.sh"     22 hours ago        Up 22 hours                             tracker
fastdfs文件服务器分为storage和tracker两部分。tracker就是调度器,storage就是执行器。那意思就是远程客户端请求文件服务器就是先连接tracker调度器,调度器将选举出来的storage执行器返回给客户端,客户端再去请求storage执行文件操作的请求。
说明这个fastdfs还是一个设计出来就支持分布式部署的工具。
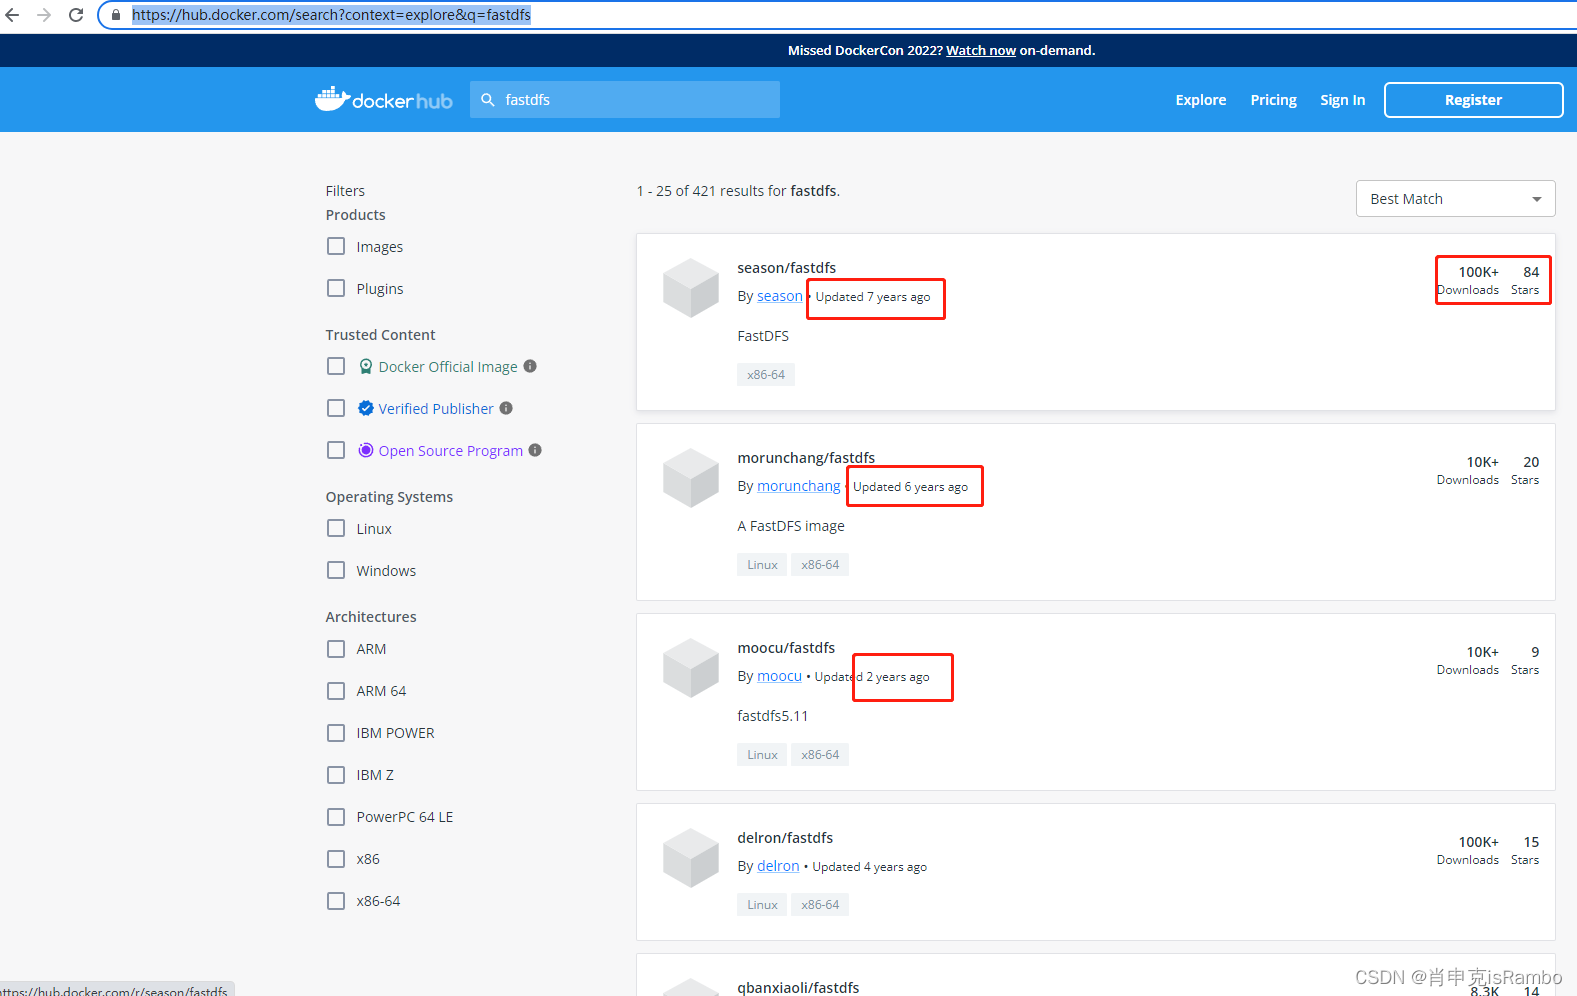
去hub.docker.com搜一下这个镜像:
https://hub.docker.com/search?context=explore&q=fastdfs
morunchang/fastdfs这个镜像是比较老的了。
点进去看看这个镜像
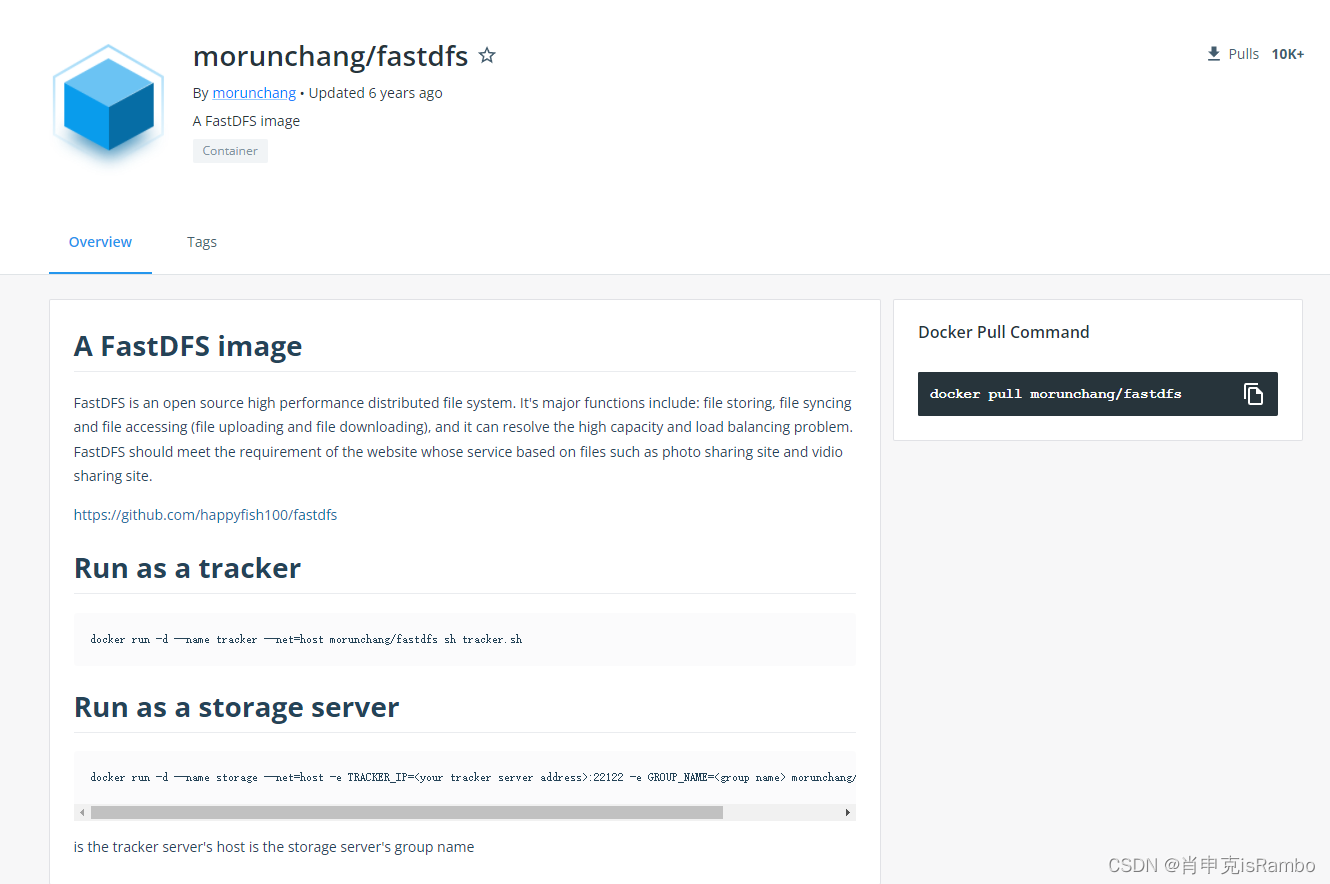
docker pull morunchang/fastdfs
#Run as a tracker
docker run -d --name tracker --net=host morunchang/fastdfs sh tracker.sh
#Run as a storage server
docker run -d --name storage --net=host -e TRACKER_IP=<your tracker server address>:22122 -e GROUP_NAME=<group name> morunchang/
这里的tracker和group name是需要自定义的,自己改。
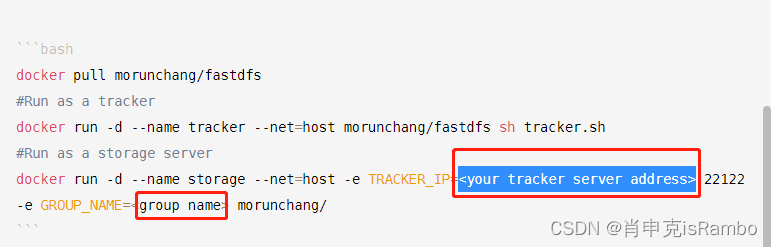
docker pull morunchang/fastdfs
#Run as a tracker
docker run -d --name tracker --net=host morunchang/fastdfs sh tracker.sh
#Run as a storage server
docker run -d --name storage --net=host -v /opt/fastdfs/data:/data/fast_data -v /etc/localtime:/etc/localtime -e TRACKER_IP=192.168.101.225:22122 -e GROUP_NAME=group1 morunchang/
[root@file-ser-1-225 3B]# docker logs -f --tail 100 storage
正常情况下内网ip是没有问题的,我这里启动的时候指定了外网ip就无法启动storage。


在搭建的过程中主要出现这几个错误信息:
-----------response status 2 != 0
[2022-07-06 09:23:33] ERROR - file: tracker_proto.c, line: 48, server: 192.168.101.225:22122, response status 2 != 0
[2022-07-06 09:23:33] ERROR - file: tracker_proto.c, line: 48, server: 192.168.101.225:22122, response status 2 != 0
[2022-07-06 09:23:33] ERROR - file: sockopt.c, line: 867, bind port 23000 failed, errno: 98, error info: Address already in use.
-----------Transport endpoint is not connected
121.218.45.164:22502这里是我启动容器的时候指定的外网地址,对应到内网的也是22122
tracker server 121.218.45.164:22502, recv data fail, errno: 107, error info: Transport endpoint is not connected

[2022-07-06 15:07:36] ERROR - file: storage_nio.c, line: 282, client ip: 192.168.101.3, recv timeout, recv offset: 0, expect length: 0
[2022-07-06 15:07:36] ERROR - file: storage_nio.c, line: 282, client ip: 192.168.101.3, recv timeout, recv offset: 0, expect length: 0
正常情况下进入storage容器查看一下执行器是否正常是这样的
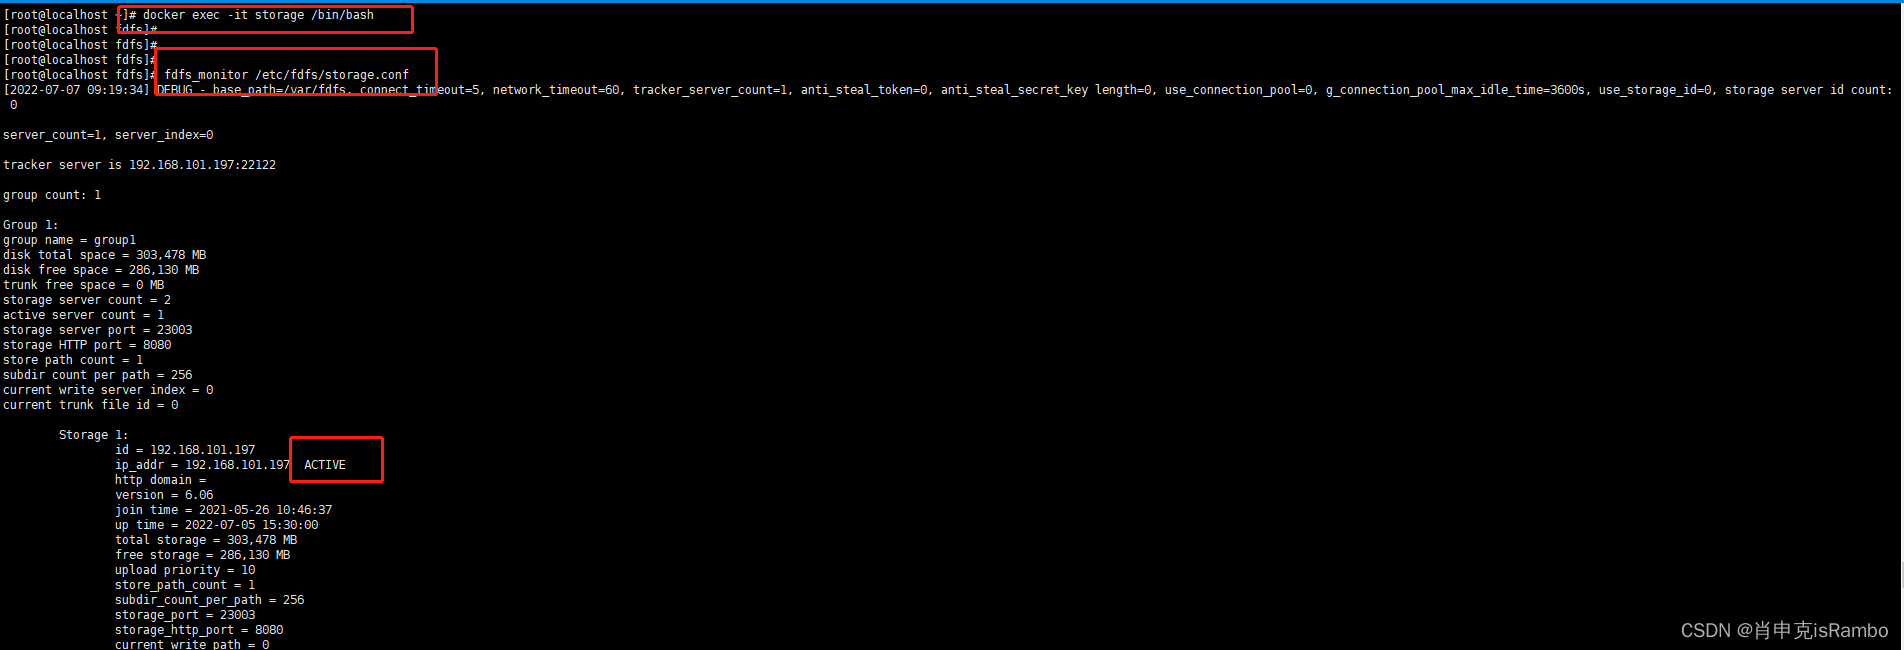
[root@localhost ~]# docker exec -it storage /bin/bash
[root@localhost fdfs]# fdfs_monitor /etc/fdfs/storage.conf
[2022-07-07 09:19:34] DEBUG - base_path=/var/fdfs, connect_timeout=5, network_timeout=60, tracker_server_count=1, anti_steal_token=0, anti_steal_secret_key length=0, use_connection_pool=0, g_connection_pool_max_idle_time=3600s, use_storage_id=0, storage server id count: 0

server_count=1, server_index=0

tracker server is 192.168.101.197:22122

group count: 1

Group 1:
group name = group1
disk total space = 303,478 MB
disk free space = 286,130 MB
trunk free space = 0 MB
storage server count = 2
active server count = 1
storage server port = 23003
storage HTTP port = 8080
store path count = 1
subdir count per path = 256
current write server index = 0
current trunk file id = 0

	Storage 1:
		id = 192.168.101.197
		ip_addr = 192.168.101.197  ACTIVE
		http domain =
		version = 6.06
		join time = 2021-05-26 10:46:37
		up time = 2022-07-05 15:30:00
		total storage = 303,478 MB
		free storage = 286,130 MB
		upload priority = 10
		store_path_count = 1
		subdir_count_per_path = 256
		storage_port = 23003
		storage_http_port = 8080
		current_write_path = 0
		source storage id =
		if_trunk_server = 0
		connection.alloc_count = 256
		connection.current_count = 0
		connection.max_count = 0
		total_upload_count = 143565
		success_upload_count = 143565
		total_append_count = 0
		success_append_count = 0
		total_modify_count = 0
		success_modify_count = 0
		total_truncate_count = 0
		success_truncate_count = 0
		total_set_meta_count = 142009
		success_set_meta_count = 142009
		total_delete_count = 0
		success_delete_count = 0
		total_download_count = 1
		success_download_count = 1
		total_get_meta_count = 0
		success_get_meta_count = 0
		total_create_link_count = 0
		success_create_link_count = 0
		total_delete_link_count = 0
		success_delete_link_count = 0
		total_upload_bytes = 9141535911
		success_upload_bytes = 9141535911
		total_append_bytes = 0
		success_append_bytes = 0
		total_modify_bytes = 0
		success_modify_bytes = 0
		stotal_download_bytes = 181834
		success_download_bytes = 181834
		total_sync_in_bytes = 0
		success_sync_in_bytes = 0
		total_sync_out_bytes = 0
		success_sync_out_bytes = 0
		total_file_open_count = 143566
		success_file_open_count = 143566
		total_file_read_count = 1
		success_file_read_count = 1
		total_file_write_count = 159006
		success_file_write_count = 159006
		last_heart_beat_time = 2022-07-07 09:19:32
		last_source_update = 2022-06-28 17:40:04
		last_sync_update = 1970-01-01 08:00:00
		last_synced_timestamp = 1970-01-01 08:00:00
fdfs配置文件存储地址:
[root@localhost fdfs]# ll /etc/fdfs/
total 104
-rw-r--r--. 1 root root  1521 Jul  5 15:30 client.conf
-rw-r--r--. 1 root root  1909 Apr 27  2020 client.conf.sample
-rw-r--r--. 1 root root   955 Apr 27  2020 http.conf
-rw-r--r--. 1 root root 31172 Apr 27  2020 mime.types
-rw-r--r--. 1 root root  3726 Jul  5 15:30 mod_fastdfs.conf
-rw-r--r--. 1 root root 10244 Jul  5 15:30 storage.conf
-rw-r--r--. 1 root root 10246 Apr 27  2020 storage.conf.sample
-rw-r--r--. 1 root root   105 Apr 27  2020 storage_ids.conf
-rw-r--r--. 1 root root   620 Apr 27  2020 storage_ids.conf.sample
-rw-r--r--. 1 root root  9122 Apr 27  2020 tracker.conf
-rw-r--r--. 1 root root  9138 Apr 27  2020 tracker.conf.sample
网上查资料说这里的storage.conf里面配置也要看一下
tracker_server=192.168.101.197:22122,这里配置外网地址,其实也是没有解决。
[root@localhost conf.d]# cat /etc/fdfs/storage.conf
# is this config file disabled
# false for enabled
# true for disabled
disabled = false

# the name of the group this storage server belongs to
#
# comment or remove this item for fetching from tracker server,
# in this case, use_storage_id must set to true in tracker.conf,
# and storage_ids.conf must be configured correctly.
group_name = group1

# bind an address of this host
# empty for bind all addresses of this host
bind_addr =

# if bind an address of this host when connect to other servers
# (this storage server as a client)
# true for binding the address configured by the above parameter: "bind_addr"
# false for binding any address of this host
client_bind = true

# the storage server port
port = 23003

# connect timeout in seconds
# default value is 30
# Note: in the intranet network (LAN), 2 seconds is enough.
connect_timeout = 5

# network timeout in seconds for send and recv
# default value is 30
network_timeout = 60

# the heart beat interval in seconds
# the storage server send heartbeat to tracker server periodically
# default value is 30
heart_beat_interval = 30

# disk usage report interval in seconds
# the storage server send disk usage report to tracker server periodically
# default value is 300
stat_report_interval = 60

# the base path to store data and log files
base_path=/var/fdfs

# max concurrent connections the server supported,
# you should set this parameter larger, eg. 10240
# default value is 256
max_connections = 1024

# the buff size to recv / send data from/to network
# this parameter must more than 8KB
# 256KB or 512KB is recommended
# default value is 64KB
# since V2.00
buff_size = 256KB

# accept thread count
# default value is 1 which is recommended
# since V4.07
accept_threads = 1

# work thread count
# work threads to deal network io
# default value is 4
# since V2.00
work_threads = 4

# if disk read / write separated
##  false for mixed read and write
##  true for separated read and write
# default value is true
# since V2.00
disk_rw_separated = true

# disk reader thread count per store path
# for mixed read / write, this parameter can be 0
# default value is 1
# since V2.00
disk_reader_threads = 1

# disk writer thread count per store path
# for mixed read / write, this parameter can be 0
# default value is 1
# since V2.00
disk_writer_threads = 1

# when no entry to sync, try read binlog again after X milliseconds
# must > 0, default value is 200ms
sync_wait_msec = 50

# after sync a file, usleep milliseconds
# 0 for sync successively (never call usleep)
sync_interval = 0

# storage sync start time of a day, time format: Hour:Minute
# Hour from 0 to 23, Minute from 0 to 59
sync_start_time = 00:00

# storage sync end time of a day, time format: Hour:Minute
# Hour from 0 to 23, Minute from 0 to 59
sync_end_time = 23:59

# write to the mark file after sync N files
# default value is 500
write_mark_file_freq = 500

# disk recovery thread count
# default value is 1
# since V6.04
disk_recovery_threads = 3

# store path (disk or mount point) count, default value is 1
store_path_count = 1

# store_path#, based on 0, to configure the store paths to store files
# if store_path0 not exists, it's value is base_path (NOT recommended)
# the paths must be exist.
#
# IMPORTANT NOTE:
#       the store paths' order is very important, don't mess up!!!
#       the base_path should be independent (different) of the store paths

# store_path#, based 0, if store_path0 not exists, it's value is base_path
# the paths must be exist
store_path0=/var/fdfs
#store_path1=/var/fdfs2

# subdir_count  * subdir_count directories will be auto created under each
# store_path (disk), value can be 1 to 256, default value is 256
subdir_count_per_path = 256

# tracker_server can ocur more than once for multi tracker servers.
# the value format of tracker_server is "HOST:PORT",
#   the HOST can be hostname or ip address,
#   and the HOST can be dual IPs or hostnames seperated by comma,
#   the dual IPS must be an inner (intranet) IP and an outer (extranet) IP,
#   or two different types of inner (intranet) IPs.
#   for example: 192.168.2.100,122.244.141.46:22122
#   another eg.: 192.168.1.10,172.17.4.21:22122

# tracker_server can ocur more than once, and tracker_server format is
#  "host:port", host can be hostname or ip address
tracker_server=192.168.101.197:22122

#standard log level as syslog, case insensitive, value list:
### emerg for emergency
### alert
### crit for critical
### error
### warn for warning
### notice
### info
### debug
log_level = info

#unix group name to run this program,
#not set (empty) means run by the group of current user
run_by_group =

#unix username to run this program,
#not set (empty) means run by current user
run_by_user =

# allow_hosts can ocur more than once, host can be hostname or ip address,
# "*" (only one asterisk) means match all ip addresses
# we can use CIDR ips like 192.168.5.64/26
# and also use range like these: 10.0.1.[0-254] and host[01-08,20-25].domain.com
# for example:
# allow_hosts=10.0.1.[1-15,20]
# allow_hosts=host[01-08,20-25].domain.com
# allow_hosts=192.168.5.64/26
allow_hosts = *

# the mode of the files distributed to the data path
# 0: round robin(default)
# 1: random, distributted by hash code
file_distribute_path_mode = 0

# valid when file_distribute_to_path is set to 0 (round robin).
# when the written file count reaches this number, then rotate to next path.
# rotate to the first path (00/00) after the last path (such as FF/FF).
# default value is 100
file_distribute_rotate_count = 100

# call fsync to disk when write big file
# 0: never call fsync
# other: call fsync when written bytes >= this bytes
# default value is 0 (never call fsync)
fsync_after_written_bytes = 0

# sync log buff to disk every interval seconds
# must > 0, default value is 10 seconds
sync_log_buff_interval = 1

# sync binlog buff / cache to disk every interval seconds
# default value is 60 seconds
sync_binlog_buff_interval = 1

# sync storage stat info to disk every interval seconds
# default value is 300 seconds
sync_stat_file_interval = 300

# thread stack size, should >= 512KB
# default value is 512KB
thread_stack_size = 512KB

# the priority as a source server for uploading file.
# the lower this value, the higher its uploading priority.
# default value is 10
upload_priority = 10

# the NIC alias prefix, such as eth in Linux, you can see it by ifconfig -a
# multi aliases split by comma. empty value means auto set by OS type
# default values is empty
if_alias_prefix =

# if check file duplicate, when set to true, use FastDHT to store file indexes
# 1 or yes: need check
# 0 or no: do not check
# default value is 0
check_file_duplicate = 0

# file signature method for check file duplicate
## hash: four 32 bits hash code
## md5: MD5 signature
# default value is hash
# since V4.01
file_signature_method = hash

# namespace for storing file indexes (key-value pairs)
# this item must be set when check_file_duplicate is true / on
key_namespace = FastDFS

# set keep_alive to 1 to enable persistent connection with FastDHT servers
# default value is 0 (short connection)
keep_alive = 0

# you can use "#include filename" (not include double quotes) directive to
# load FastDHT server list, when the filename is a relative path such as
# pure filename, the base path is the base path of current/this config file.
# must set FastDHT server list when check_file_duplicate is true / on
# please see INSTALL of FastDHT for detail
##include /home/yuqing/fastdht/conf/fdht_servers.conf

# if log to access log
# default value is false
# since V4.00
use_access_log = false

# if rotate the access log every day
# default value is false
# since V4.00
rotate_access_log = false

# rotate access log time base, time format: Hour:Minute
# Hour from 0 to 23, Minute from 0 to 59
# default value is 00:00
# since V4.00
access_log_rotate_time = 00:00

# if compress the old access log by gzip
# default value is false
# since V6.04
compress_old_access_log = false

# compress the access log days before
# default value is 1
# since V6.04
compress_access_log_days_before = 7

# if rotate the error log every day
# default value is false
# since V4.02
rotate_error_log = false

# rotate error log time base, time format: Hour:Minute
# Hour from 0 to 23, Minute from 0 to 59
# default value is 00:00
# since V4.02
error_log_rotate_time = 00:00

# if compress the old error log by gzip
# default value is false
# since V6.04
compress_old_error_log = false

# compress the error log days before
# default value is 1
# since V6.04
compress_error_log_days_before = 7

# rotate access log when the log file exceeds this size
# 0 means never rotates log file by log file size
# default value is 0
# since V4.02
rotate_access_log_size = 0

# rotate error log when the log file exceeds this size
# 0 means never rotates log file by log file size
# default value is 0
# since V4.02
rotate_error_log_size = 0

# keep days of the log files
# 0 means do not delete old log files
# default value is 0
log_file_keep_days = 0

# if skip the invalid record when sync file
# default value is false
# since V4.02
file_sync_skip_invalid_record = false

# if use connection pool
# default value is false
# since V4.05
use_connection_pool = false

# connections whose the idle time exceeds this time will be closed
# unit: second
# default value is 3600
# since V4.05
connection_pool_max_idle_time = 3600

# if compress the binlog files by gzip
# default value is false
# since V6.01
compress_binlog = true

# try to compress binlog time, time format: Hour:Minute
# Hour from 0 to 23, Minute from 0 to 59
# default value is 01:30
# since V6.01
compress_binlog_time = 01:30

# if check the mark of store path to prevent confusion
# recommend to set this parameter to true
# if two storage servers (instances) MUST use a same store path for
# some specific purposes, you should set this parameter to false
# default value is true
# since V6.03
check_store_path_mark = true

# use the ip address of this storage server if domain_name is empty,
# else this domain name will ocur in the url redirected by the tracker server
http.domain_name=

# the port of the web server on this storage server
http.server_port=8080
fafs系统脚本命令位置:
[root@localhost fdfs]# ll /usr/bin/
total 61848
-rwxr-xr-x.   1 root root        26 Aug  8  2019 fc
-rwxr-xr-x.   1 root root    348824 Apr 27  2020 fdfs_append_file
-rwxr-xr-x.   1 root root    362168 Apr 27  2020 fdfs_appender_test
-rwxr-xr-x.   1 root root    361944 Apr 27  2020 fdfs_appender_test1
-rwxr-xr-x.   1 root root    348440 Apr 27  2020 fdfs_crc32
-rwxr-xr-x.   1 root root    348856 Apr 27  2020 fdfs_delete_file
-rwxr-xr-x.   1 root root    349592 Apr 27  2020 fdfs_download_file
-rwxr-xr-x.   1 root root    349544 Apr 27  2020 fdfs_file_info
-rwxr-xr-x.   1 root root    364864 Apr 27  2020 fdfs_monitor
-rwxr-xr-x.   1 root root    349080 Apr 27  2020 fdfs_regenerate_filename
-rwxr-xr-x.   1 root root   1280064 Apr 27  2020 fdfs_storaged
-rwxr-xr-x.   1 root root    372032 Apr 27  2020 fdfs_test
-rwxr-xr-x.   1 root root    367152 Apr 27  2020 fdfs_test1
-rwxr-xr-x.   1 root root    512296 Apr 27  2020 fdfs_trackerd
-rwxr-xr-x.   1 root root    349784 Apr 27  2020 fdfs_upload_appender
-rwxr-xr-x.   1 root root    350800 Apr 27  2020 fdfs_upload_file
fdfs服务器部署时出错:Failed to start fdfs_trackerd.service: Unit fdfs_trackerd.service not found.
解决方案:
sudo /usr/bin/fdfs_trackerd /etc/fdfs/tracker.conf start
sudo /usr/bin/fdfs_storaged /etc/fdfs/storage.conf start
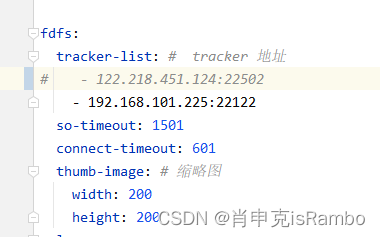
ip更改后fastfds如何更改配置
1.修改/etc/fdfs下client.conf和storaged.conf中的tracker_server的ip地址,更改为你现在的ip地址
2.尝试启动,如果tracker没有启动起来,则去更改 【文件库】基地址/tracker/data (就是log日志所在目录的兄弟目录)下的storage_servers_new.dat与storage_sync_timestamp.dat,将2者的ip地址对应即可。
参考了很多博客的解决办法,基本上没有解决,ip更更删除容器重启后重新指定也不太行:
https://blog.csdn.net/xxwwh/article/details/121038817?utm_medium=distribute.pc_relevant.none-task-blog-2defaultbaidujs_title~default-4-121038817-blog-105245972.pc_relevant_multi_platform_whitelistv1&spm=1001.2101.3001.4242.3&utm_relevant_index=7
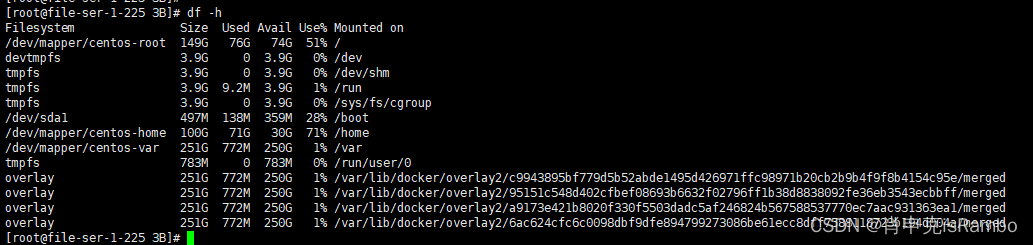
排查一下磁盘的目录是否满了,我这里就遇到pool满了的问题
df -h
既然fastdfs有自带的nginx,进去nginx配置里面看看
[root@localhost conf]# cd /usr/local/nginx/conf
[root@localhost conf]# cat nginx.conf

user  nobody;
worker_processes  2;

error_log  logs/error.log warn;
pid        /var/run/nginx.pid;


events {
    worker_connections  1024;
}
http {
    include       mime.types;
    default_type  application/octet-stream;

    log_format  main  '$remote_addr - $remote_user [$time_local] "$request" '
                      '$status $body_bytes_sent "$http_referer" '
                      '"$http_user_agent" "$http_x_forwarded_for"';

    access_log  logs/access.log  main;

    sendfile        on;
    #tcp_nopush     on;

    keepalive_timeout  65;

    #gzip  on;

    include conf.d/storage.conf;
}
include conf.d/storage.conf;
容器里面的数据目录:/var/fdfs/data/
[root@localhost conf]# cd conf.d/
[root@localhost conf.d]# ll
total 8
-rw-r--r--. 1 root root 248 Jul  5 15:30 storage.conf
-rw-r--r--. 1 root root 381 Jul  3 15:45 storage_https.conf
[root@localhost conf.d]# cat storage.conf
# storage.conf
server {
    listen       8080 ;
    #server_name  _ ;

    location / {
        root   html;
        index  index.html index.htm;
    }

    location ~/group1/ {
        alias   /var/fdfs/data/;
        ngx_fastdfs_module;
    }

}
2、自定义docker-compose
最后想通过挂载的方式将配置文件挂载出来,在外网修改。最后发生storage怎么改,容器重启以后都会被还原。
将容器至于同一个网络环境下。查看是否是网络的问题
将之前的docker启动的容器直接删掉。将文件压缩备份一下。
tar cfz fdsdate.tgz /opt/fastdfs
docker-compose安装
sudo curl -L https://raw.githubusercontent.com/docker/compose/2.6.0/contrib/completion/bash/docker-compose -o /etc/bash_completion.d/docker-compose

docker-compose ps
docker-compose version
docker-compose help

chmod +x /usr/local/bin/docker-compose

docker-compose restart tracker
docker-compose restart storage
docker-compose ps
firewall-cmd --zone=public --add-port=22122/tcp --permanent
firewall-cmd --reload
netstat -anotpul
systemctl restart firewalld

#运行
docker-compose up -d
#删除容器
docker-compose down
脚本
#  docker run -d --name tracker --net=host morunchang/fastdfs sh tracker.sh
version: '3'
services:
  tracker:
    image: morunchang/fastdfs
    restart: always
    hostname: tracker
    command: ['sh','tracker.sh']
    privileged: true
    network_mode: host
#    ports:
#    - 22122:22122
    volumes:
    - /etc/localtime:/etc/localtime
#    - ./tracker.conf:/etc/fdfs/tracker.conf
#  docker run -d --name storage --net=host -v /opt/fastdfs/data:/data/fast_data \
#  -v /etc/localtime:/etc/localtime -e TRACKER_IP=tracker:22122 -e GROUP_NAME=group1 morunchang/fastdfs sh storage.sh
  storage:
    image: morunchang/fastdfs
    restart: always
    hostname: storage
    privileged: true
    network_mode: host
    environment:
#      TRACKER_IP: 'tracker:22122'
#      TRACKER_IP: 'www.javalman.top:22122'
      TRACKER_IP: '192.168.101.225:22122'
      GROUP_NAME: group1
    command: ['sh','storage.sh']
#    ports:
#    - 23000:23000
#    - 8080:8080
    volumes:
    - /opt/fastdfs/data:/data/fast_data
#    - /home/fastdfs_db/fastdfsdata:/data/fast_data
    - /etc/localtime:/etc/localtime
#    - ./storage.conf:/etc/fdfs/storage.conf
#    - ./client.conf:/etc/fdfs/client.conf
    depends_on:
      - tracker
# 进入 storage容器:执行:apt-get update && apt-get install iptables && iptables -t nat -A POSTROUTING -p tcp -m tcp --dport 22122 -d 容器ip -j SNAT --to 外网ip
#  apt-get update && apt-get install iptables && iptables -t nat -A POSTROUTING -p tcp -m tcp --dport 22122 -d 172.19.0.3 -j SNAT --to 124.90.128.71
启动脚本:
docker-compose up -d

[root@file-ser-1-225 3B]# docker  ps
CONTAINER ID        IMAGE                COMMAND             CREATED             STATUS              PORTS               NAMES
b0b9757177a9        morunchang/fastdfs   "sh storage.sh"     24 hours ago        Up 24 hours                             home-storage-1
0534912e471b        morunchang/fastdfs   "sh tracker.sh"     24 hours ago        Up 24 hours                             home-tracker-1
最终问题可能出在网络方面。现在预览是完全好的,直接将80端口暴漏出去,内网外网都可以访问。但是tracker-list配置内网地址,在内网服务器上可以访问和上传,配置外网地址就无法上传。
三、最终方案-服务器迁移
直接迁移到阿里云,大概70个G的文件,迁移时间一个下午。
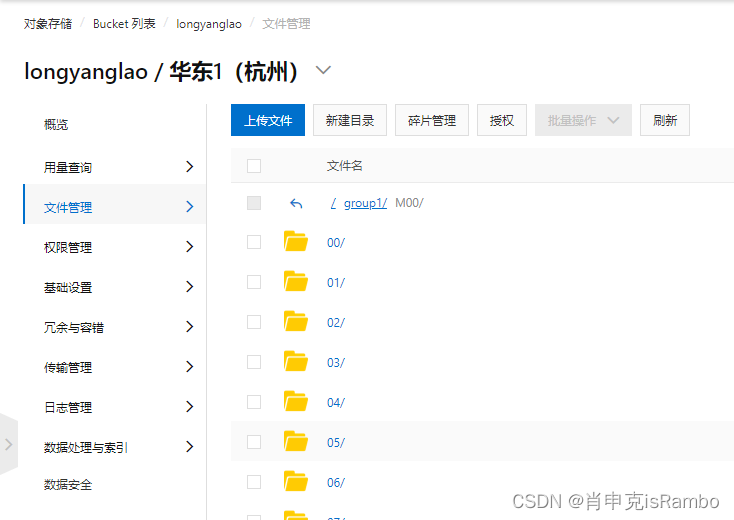
文件服务的地址是拼接域名和文件地址。所以整个目录迁移过去。创建文件桶,创建/group1/M00.将整个挂载出来的文件目录通过阿里云提供的工具cp出去。
[root@file-ser-1-225 home]# cd 111.txt/
[root@file-ser-1-225 111.txt]# touch 111.txt
[root@file-ser-1-225 111.txt]#
[root@file-ser-1-225 111.txt]#
[root@file-ser-1-225 111.txt]# cd ..
[root@file-ser-1-225 home]# ./ossutil64 cp -r 111.txt/ oss://longyanglao/
Succeed: Total num: 1, size: 0. OK num: 1(upload 1 files).

average speed 0(byte/s)

0.125076(s) elapsed
[root@file-ser-1-225 home]# ./ossutil64 cp -r /opt/fastdfs/data/data oss://longyanglao/group1/M00/
Succeed: Total num: 226393, size: 78,860,068,548. OK num: 226393(upload 160600 files, 65793 directories).

average speed 5975000(byte/s)

13196.677786(s) elapsed
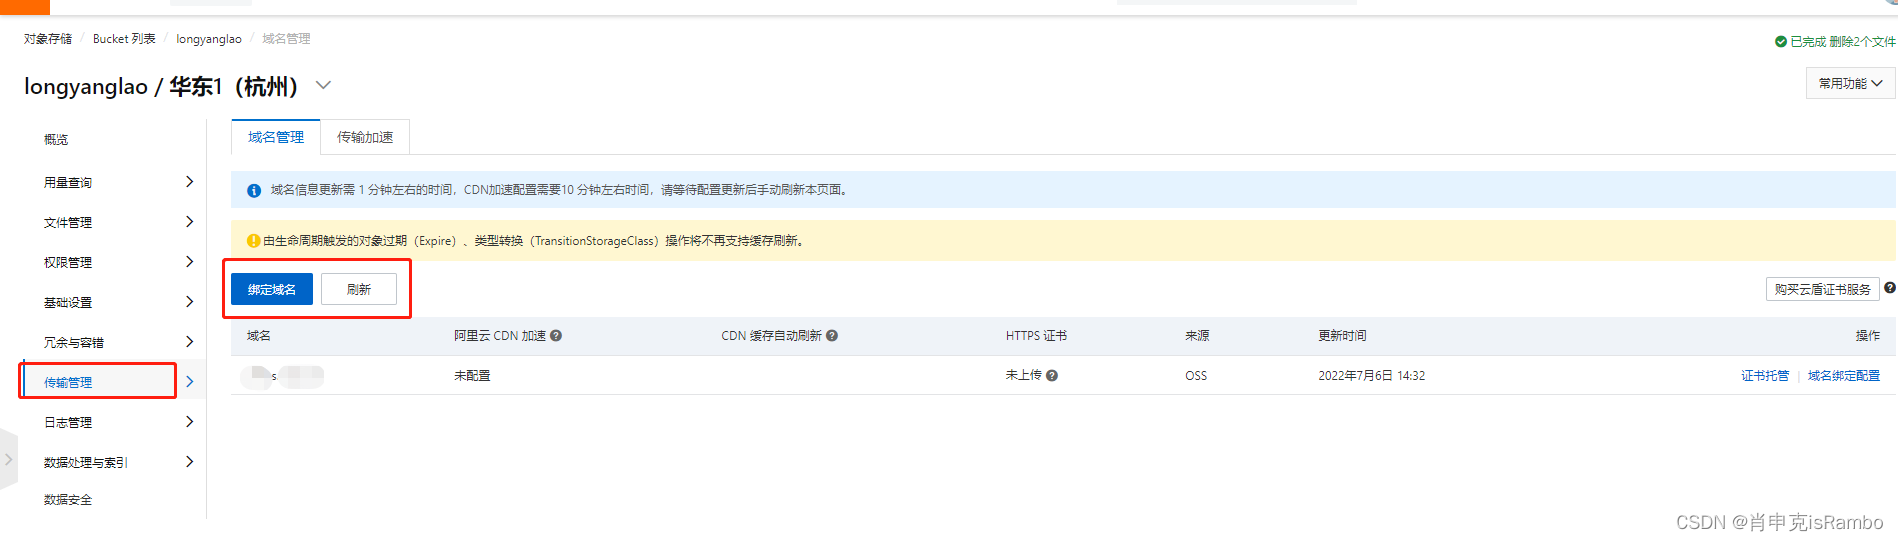
如果老的文件域名不能换,直接通过域名绑定的方式,也可以通过原来的域名解析到阿里云的域名,无感知的文件迁移。
文档:https://help.aliyun.com/document_detail/120075.html
老的文件域名配置CNAME,解析到阿里云的外网文件域名地址。
四、经过后期排查
发现是路由器的配置的问题。
https://support.huawei.com/enterprise/zh/knowledge/EKB1000117843#contentCause


 2404
2404

 被折叠的 条评论
为什么被折叠?
被折叠的 条评论
为什么被折叠?
 到【灌水乐园】发言


