


目录
一、Eureka是什么
Eureka是一个服务注册中心,主要功能包括服务注册和服务发现
- 服务注册:每个服务单元向注册中心注册自身所提供的服务,注册的信息含括:主机与端口号、版本号、通信协议,服务名等。Eureka会维护一个服务清单,同时使用心跳的方式检测清单中的服务是否可用,若不可用则需要从服务清单中剔除,以达到排除故障服务的效果
- 服务发现:服务消费者消费服务是通过服务中介去发现对应点服务提供者。微服务下的服务治理框架下,服务之间的相互调用不再通过具体的实例地址进行直接调用,而是通过向服务名发起请求调用实现
二、单机Eureka配置
Eureka配置主要分为两个部分:
- EurekaServer端
- EurekaClient端
2.1 EurekaServer端配置
1.导入eureka-server依赖
<dependency>
      <groupId>org.springframework.cloud</groupId>
      <artifactId>spring-cloud-starter-netflix-eureka-server</artifactId>
</dependency>
2、修改application.yml配置文件
server:
  port: 7001

eureka:
  instance:
    hostname: localhost #eureka服务端的实例名称
  client:
    #false表示不向注册中心注册自己。
    register-with-eureka: false
    #false表示自己端就是注册中心,我的职责就是维护服务实例,并不需要去检索服务
    fetch-registry: false
    service-url:
    #设置与Eureka Server交互的地址查询服务和注册服务都需要依赖这个地址。
      defaultZone: http://${eureka.instance.hostname}:${server.port}/eureka/
3、启动类添加注释:@EnableEurekaServer
@SpringBootApplication
@EnableEurekaServer
public class EurekaMain7001
{
    public static void main(String[] args)
    {
        SpringApplication.run(EurekaMain7001.class,args);
    }
}
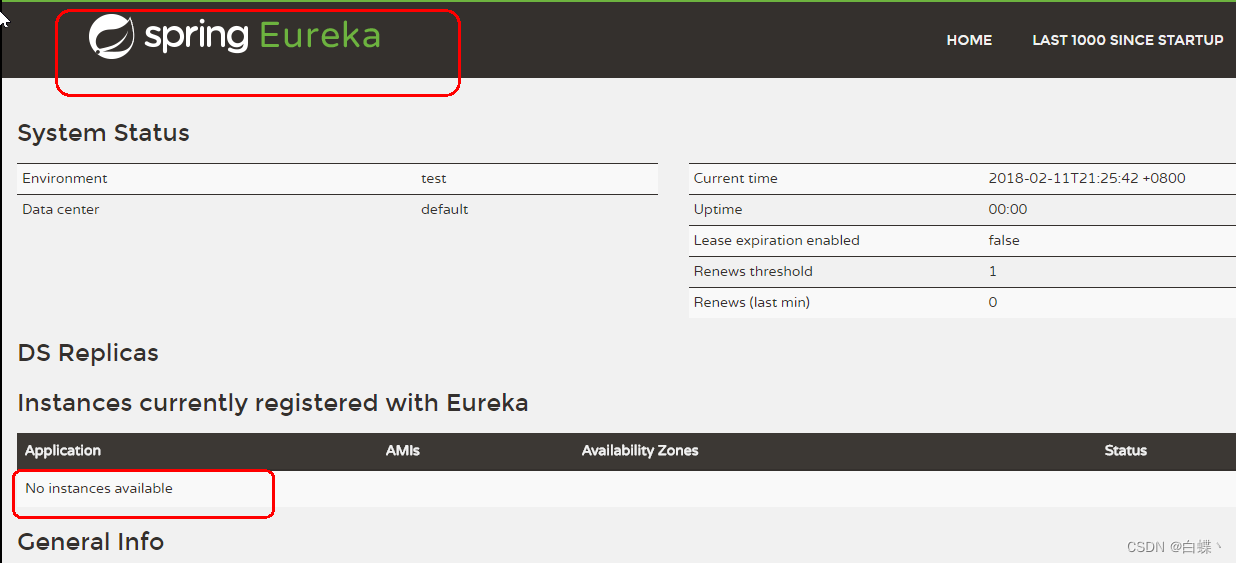
4.结果
2.2 EurekaClient端服务提供者配置
1.导入eureka-client依赖
<dependency>
       <groupId>org.springframework.cloud</groupId>
       <artifactId>spring-cloud-starter-netflix-eureka-client</artifactId>
</dependency>
2.修改application.yml配置文件
eureka:
  client:
    #表示是否将自己注册进EurekaServer默认为true。
    register-with-eureka: true
    #是否从EurekaServer抓取已有的注册信息,默认为true。单节点无所谓,集群必须设置为true才能配合ribbon使用负载均衡
    fetchRegistry: true
    service-url:
      defaultZone: http://localhost:7001/eureka
3.启动类添加注解@EnableEurekaServer
@SpringBootApplication
@EnableEurekaClient
public class PaymentMain8001 {
    public static void main(String[] args) {
        SpringApplication.run(PaymentMain8001.class,args);
    }
}
4.结果
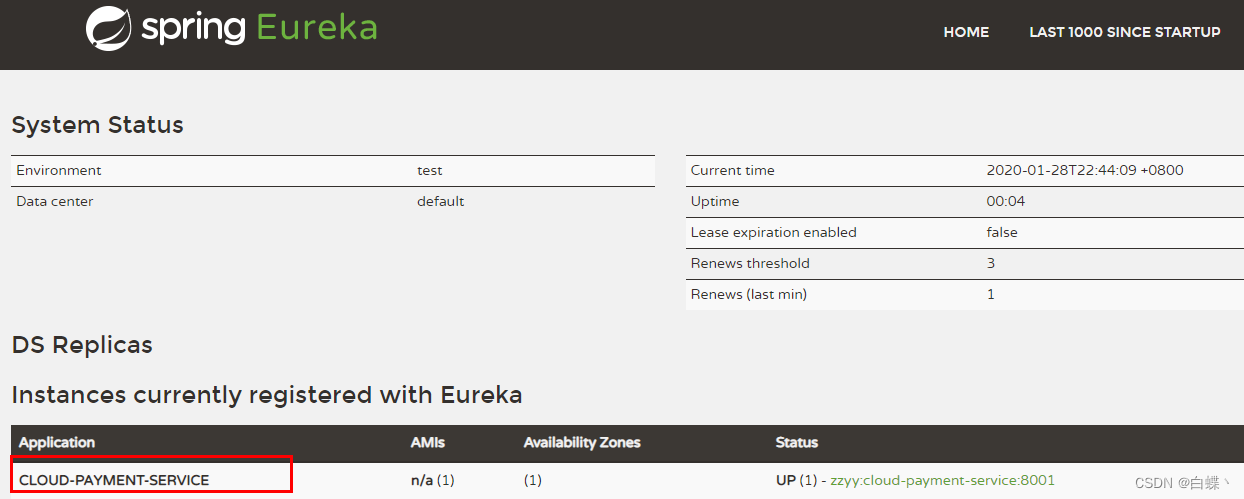
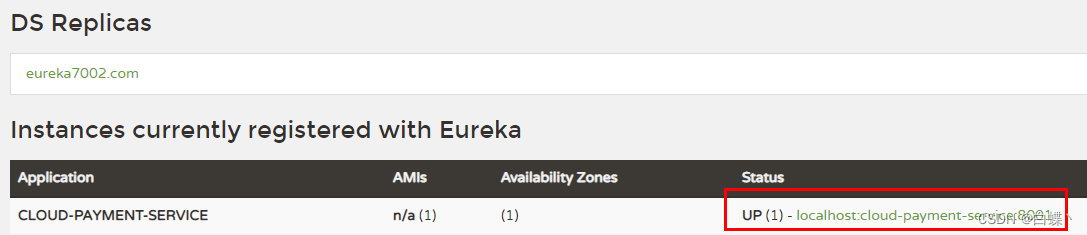
在配置文件中的name决定服务的名称

2.3 EurekaClient端服务消费者配置
1、同样导入依赖
 <dependency>
      <groupId>org.springframework.cloud</groupId>
      <artifactId>spring-cloud-starter-netflix-eureka-client</artifactId>
</dependency>
2、修改application.yml配置文件
eureka:
  client:
    #表示是否将自己注册进EurekaServer默认为true。
    register-with-eureka: true
    #是否从EurekaServer抓取已有的注册信息,默认为true。单节点无所谓,集群必须设置为true才能配合ribbon使用负载均衡
    fetchRegistry: true
    service-url:
      defaultZone: http://eureka7001.com:7001/eureka
3.启动类添加注解@EnableEurekaClient
@SpringBootApplication
@EnableEurekaClient
public class OrderMain80
{
    public static void main(String[] args)
    {
        SpringApplication.run(OrderMain80.class,args);
    }
}
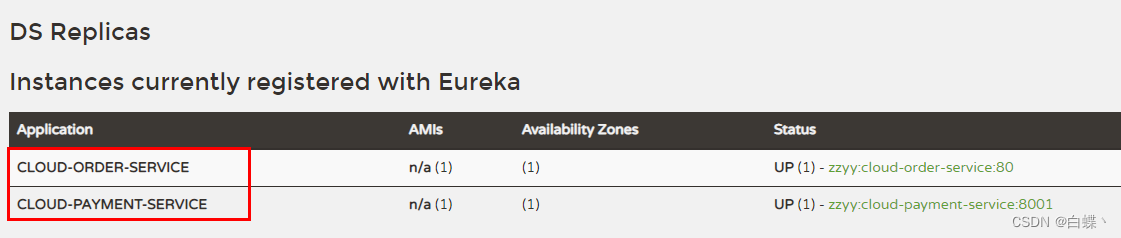
4.Eureack结果
5.这里可以在80端口使用RestTemplate类远程调用8001端口的方法

@Configuration
public class ApplicationContextConfig {
    @Bean
//    @LoadBalanced
    public RestTemplate getRestTemplate(){
        return new RestTemplate();
    }
}
80端口的Controller
@RestController
@Slf4j
public class OrderController {
    public static final String PAYMENT_URL = "http://localhost:8001";
    @Resource
    private RestTemplate restTemplate;
    @PostMapping("/consumer/payment/create")
    public CommonResult<Payment> create(Payment payment){
        return restTemplate.postForObject(PAYMENT_URL+"/payment/create",payment,CommonResult.class);
    }
    @GetMapping("/consumer/payment/get/{id}")
    public CommonResult<Payment> getPayment(@PathVariable("id") Long id){
        return restTemplate.getForObject(PAYMENT_URL+"/payment/get/"+id,CommonResult.class);
    }
}
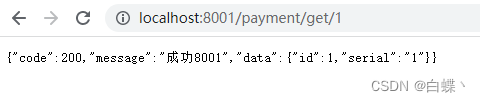
6.调用结果
三、集群Eureka配置

3.1 EurekaServer端
1.这里配置两个EurekaServer端模拟构建集群
根据上面的7001接口,再建立一个7002接口

2.在我们的windows主机上修改域名和ip地址的映射
在路径 C:\Windows\System32\drivers\etcx 下的hosts文件中添加两行:
127.0.0.1  eureka7001.com
127.0.0.1  eureka7002.com
3.修改7001端口和7002端口的application.yml
7001:
server:
  port: 7001

eureka:
  instance:
    hostname: eureka7001.com #eureka服务端的实例名称
  client:
    register-with-eureka: false     #false表示不向注册中心注册自己。
    fetch-registry: false     #false表示自己端就是注册中心,我的职责就是维护服务实例,并不需要去检索服务
    service-url:
      defaultZone: http://eureka7002.com:7002/eureka/
7002:
server:
  port: 7001


eureka:
  instance:
    hostname: eureka7002.com #eureka服务端的实例名称
  client:
    register-with-eureka: false     #false表示不向注册中心注册自己。
    fetch-registry: false     #false表示自己端就是注册中心,我的职责就是维护服务实例,并不需要去检索服务
    service-url:
      defaultZone: http://eureka7001.com:7001/eureka/
4.将80端口的微服务添加到上面两台Eureak集群配置中
server:
  port: 80

spring:
  application:
    name: cloud-order-service

eureka:
  client:
    #表示是否将自己注册进EurekaServer默认为true。
    register-with-eureka: true
    #是否从EurekaServer抓取已有的注册信息,默认为true。单节点无所谓,集群必须设置为true才能配合ribbon使用负载均衡
    fetchRegistry: true
    service-url:
      defaultZone: http://eureka7001.com:7001/eureka,http://eureka7002.com:7002/eureka
3.1 EurekaClient端服务提供者
创建一个和8001端口一样的服务8002端口
1.修改application.yml配置文件(8001端同理)
server:
  port: 8002

spring:
  application:
    name: cloud-payment-service
  datasource:
    type: com.alibaba.druid.pool.DruidDataSource            # 当前数据源操作类型
    driver-class-name: org.gjt.mm.mysql.Driver              # mysql驱动包
    url: jdbc:mysql://localhost:3306/db2019?useUnicode=true&characterEncoding=utf-8&useSSL=false
    username: root
    password: 123456

eureka:
  client:
    #表示是否将自己注册进EurekaServer默认为true。
    register-with-eureka: true
    #是否从EurekaServer抓取已有的注册信息,默认为true。单节点无所谓,集群必须设置为true才能配合ribbon使用负载均衡
    fetchRegistry: true
    service-url:
      defaultZone: http://eureka7001.com:7001/eureka,http://eureka7002.com:7002/eureka  # 集群版
      #defaultZone: http://localhost:7001/eureka  # 单机版


mybatis:
  mapperLocations: classpath:mapper/*.xml
  type-aliases-package: com.atguigu.springcloud.entities    # 所有Entity别名类所在包
2.修改80端口服务调用的Controller
@RestController
@Slf4j
public class OrderController {
	//这里不能写死访问地址,应该写配置的服务名称
    public static final String PAYMENT_URL = "http://CLOUD-PAYMENT-SERVICE";
    @Resource
    private RestTemplate restTemplate;
    @Resource
    private LoadBalancer loadBalancer;
    @Resource
    private DiscoveryClient discoveryClient;
    @PostMapping("/consumer/payment/create")
    public CommonResult<Payment> create(Payment payment){
        return restTemplate.postForObject(PAYMENT_URL+"/payment/create",payment,CommonResult.class);
    }
    @GetMapping("/consumer/payment/get/{id}")
    public CommonResult<Payment> getPayment(@PathVariable("id") Long id){
        return restTemplate.getForObject(PAYMENT_URL+"/payment/get/"+id,CommonResult.class);
    }

}
3.配置负载均衡
在配置类上加上注解@LoadBalanced,如果不加,80端口会一直调用8001的服务,加上注解后,8001,8002交替进行服务
@Configuration
public class ApplicationContextBean
{
    @Bean
    @LoadBalanced //使用@LoadBalanced注解赋予RestTemplate负载均衡的能力
    public RestTemplate getRestTemplate()
    {
        return new RestTemplate();
    }
}
3.2 其他
1.当前的服务名会含有主机名
修改application.yml配置文件
eureka:
  client:
    #表示是否将自己注册进EurekaServer默认为true。
    register-with-eureka: true
    #是否从EurekaServer抓取已有的注册信息,默认为true。单节点无所谓,集群必须设置为true才能配合ribbon使用负载均衡
    fetchRegistry: true
    service-url:
      defaultZone: http://eureka7001.com:7001/eureka,http://eureka7002.com:7002/eureka  # 集群版
      #defaultZone: http://localhost:7001/eureka  # 单机版
  instance:
    instance-id: payment8001
结果
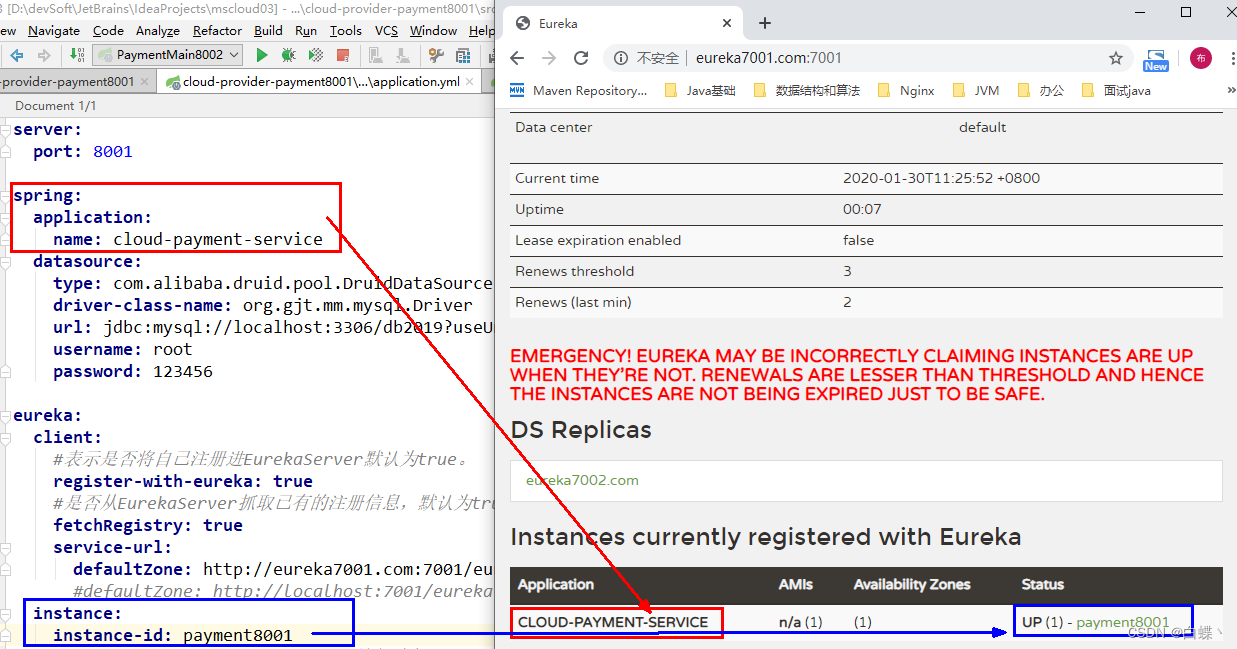
2.设置显示ip
在上面的基础上添加 prefer-ip-address: true
 instance:
    instance-id: payment8001
    prefer-ip-address: true     #访问路径可以显示IP地址

四、服务发现Discovery
1.修改8001的Controller如下
@RestController
@Slf4j
public class PaymentController {
    @Resource
    private PaymentService paymentService;
    @Value("${server.port}")
    private String serverPort;
    @Resource
    private DiscoveryClient discoveryClient;

@PostMapping("/payment/create")
    public CommonResult create(@RequestBody  Payment payment){
        int result = paymentService.create(payment);
        log.info("结果: "+result);
        if(result>0){
            return new CommonResult(200,"成功:"+serverPort,result);
        }else{
            return new CommonResult(444,"失败",null);
        }
    }
    @GetMapping("/payment/get/{id}")
    public CommonResult create(@PathVariable("id") Long id){
        Payment payment = paymentService.getPaymentById(id);
        log.info("结果: "+payment);
        if(payment!=null){
            return new CommonResult(200,"成功"+serverPort,payment);
        }else{
            return new CommonResult(444,"失败",null);
        }
    }
    @GetMapping("/payment/discovery")
    public Object discovery(){
        List<String> services = discoveryClient.getServices();
        for(String element : services){
            log.info("element:"+element);
        }
        List<ServiceInstance> instances = discoveryClient.getInstances("CLOUD-PAYMENT-SERVICE");
        for(ServiceInstance instance : instances){
            log.info(instance.getServiceId()+"\t"+instance.getHost()+"\t"+instance.getPort()+"\t"+instance.getUri());
        }
        return this.discoveryClient;
    }


}
2.修改8001启动类
添加注解@EnableDiscoveryClient
@SpringBootApplication
@EnableEurekaClient
@EnableDiscoveryClient //服务发现
public class PaymentMain8001
{
    public static void main(String[] args)
    {
        SpringApplication.run(PaymentMain8001.class,args);
    }
}
3.结果


五、Eureak自我保护
什么是自我保护模式
默认情况下,如果EurekaServer在一定时间内没有接收到某个微服务实例的心跳,EurekaServer将会注销该实例(默认90秒)。但是当网络分区故障发生(延时、卡顿、拥挤)时,微服务与EurekaServer之间无法正常通信,以上行为可能变得非常危险了——因为微服务本身其实是健康的,此时本不应该注销这个微服务。Eureka通过“自我保护模式”来解决这个问题——当EurekaServer节点在短时间内丢失过多客户端时(可能发生了网络分区故障),那么这个节点就会进入自我保护模式。
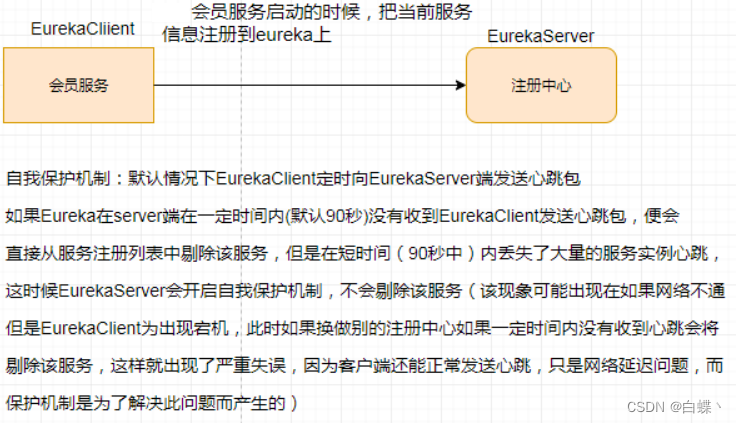
在自我保护模式中,Eureka Server会保护服务注册表中的信息,不再注销任何服务实例。


 1943
1943


 被折叠的 条评论
为什么被折叠?
被折叠的 条评论
为什么被折叠?
 到【灌水乐园】发言


