


Java线程的创建方式以及线程池的使用
一、线程的创建方式一
/**
  * 1.继承thread类,重写run方法
*/
@Test
void test1(){
    new threadDemo().start();
}

class threadDemo extends Thread{
    @Override
    public void run() {
        for (int i = 0; i < 10; i++) {
            System.out.println(i);
        }
    }
}
二、线程的创建方式二
/**
  * 2.实现runnable接口,重写run方法
*/
@Test
void test2(){
    new Thread(new runnableDemo()).start();
}

class runnableDemo implements Runnable{
    @Override
    public void run() {
        for (int i = 0; i < 10; i++) {
            System.out.println(i);
        }
    }
}
三、线程的创建方式三
/**
  * 3.实现Callable接口,重写call方法
*/
@Test
void test3(){
    FutureTask<Integer> futureTask = new FutureTask<>(new callAbleDemo());
    new Thread(futureTask, "threadName").start();

    Integer result = null;
    try {
        // 获取子线程执行的结果,此时主线程会被阻塞,会等到计算结果完成后,容易程序阻塞
        // 可以通过使用CompletableFuture,解决FutureTask的缺陷问题
        result = futureTask.get();
    } catch (InterruptedException e) {
        e.printStackTrace();
    } catch (ExecutionException e) {
        e.printStackTrace();
    }

    System.out.println(result);  // 输出result为45
}


class callAbleDemo implements Callable<Integer>{

    @Override
    public Integer call() throws Exception {
        int sum = 0;
        for (int i = 0; i < 10; i++) {
            sum += i;
        }
        return sum;
    }
}
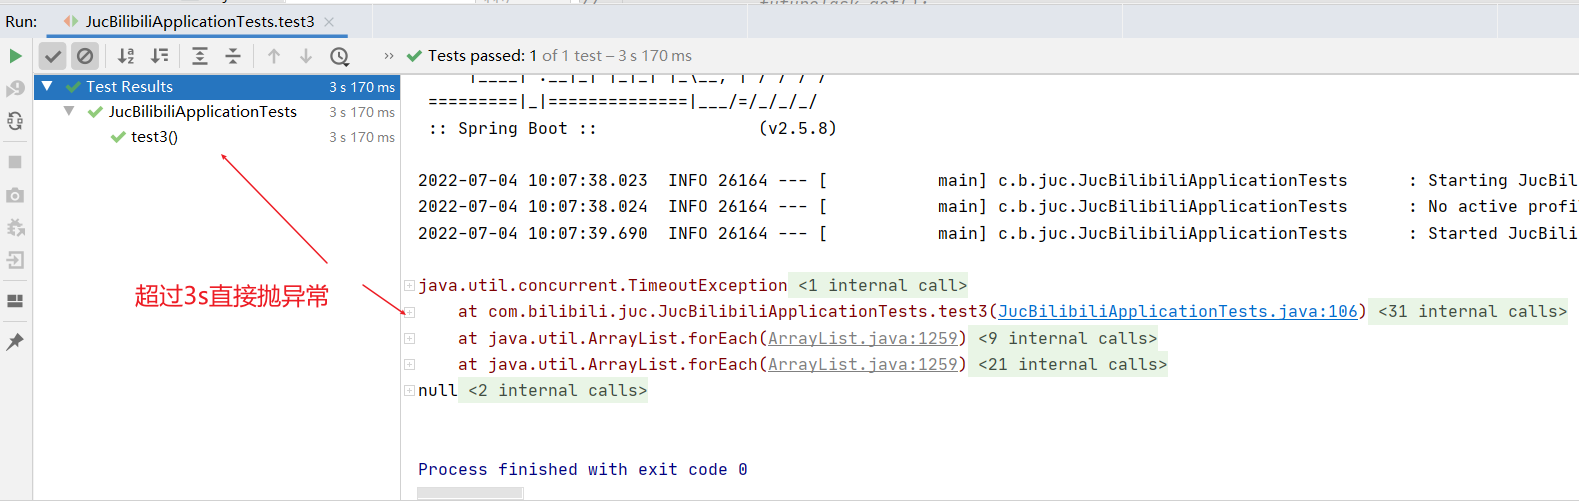
由于futureTask.get()时会阻塞主线程,我们可以指定超时时间,表示在规定时间内仍未完成则直接抛异常,改造后的代码如下:
/**
  * 3.实现Callable接口,重写call方法
*/
@Test
void test3(){
    FutureTask<Integer> futureTask = new FutureTask<>(new callAbleDemo());
    new Thread(futureTask, "threadName").start();

    Integer result = null;
    try {
        // 获取子线程执行的结果,此时主线程会被阻塞,会等到计算结果完成后,容易程序阻塞
        // 可以通过使用CompletableFuture,解决FutureTask的缺陷问题
        // result = futureTask.get();
        result = futureTask.get(3, TimeUnit.SECONDS); // 指定超时时间,如果未执行完直接抛异常
    } catch (InterruptedException e) {
        e.printStackTrace();
    } catch (ExecutionException e) {
        e.printStackTrace();
    } catch (TimeoutException e) {
        e.printStackTrace();
    }

    System.out.println(result);
}

class callAbleDemo implements Callable<Integer>{

    @Override
    public Integer call() throws Exception {
        int sum = 0;
        for (int i = 0; i < 10; i++) {
            sum += i;
        }
        try {
            TimeUnit.SECONDS.sleep(5); // 沉睡5s,模拟耗时操作
        } catch (InterruptedException e) {
            e.printStackTrace();
        }
        return sum;
    }
}
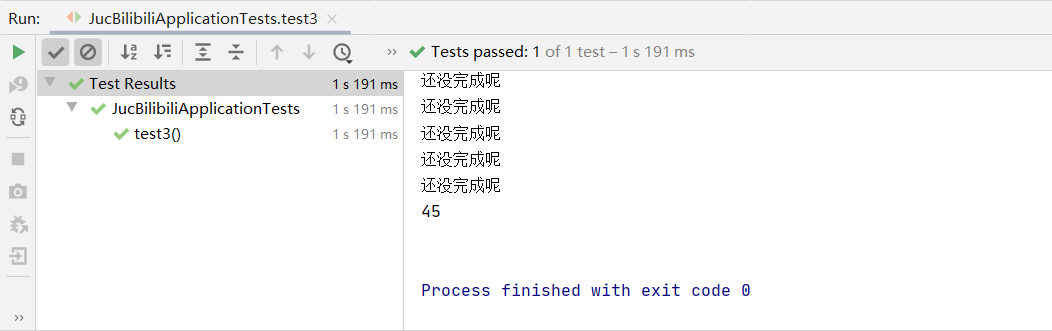
同时我们也可以使用FutureTask的isDone方法,这个方法的作用是不断地轮询判断是否操作已经完成,但是这容易耗费cpu资源,改造后的代码如下:
/**
  * 3.实现Callable接口,重写call方法
*/
@Test
void test3() throws ExecutionException, InterruptedException {
    FutureTask<Integer> futureTask = new FutureTask<>(new callAbleDemo());
    new Thread(futureTask, "threadName").start();

    Integer result = null;

    // isDone轮询,是否已经计算完成,容易耗费cpu资源
    while (true){
        if (futureTask.isDone()){
            // 可以通过使用CompletableFuture,解决FutureTask的缺陷问题
            result = futureTask.get();
            break;
        }else {
            System.out.println("还没完成呢");
        }
    }
    System.out.println(result);
}

class callAbleDemo implements Callable<Integer>{

    @Override
    public Integer call() throws Exception {
        int sum = 0;
        for (int i = 0; i < 10; i++) {
            sum += i;
        }
        try {
            TimeUnit.SECONDS.sleep(1); // 沉睡1s,模拟耗时操作
        } catch (InterruptedException e) {
            e.printStackTrace();
        }
        return sum;
    }
}
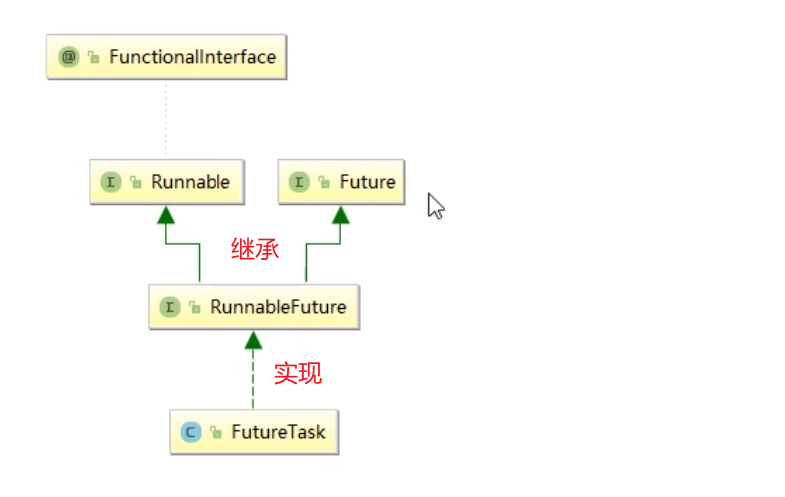
我们可以通过使用CompletableFuture,解决FutureTask的缺陷问题,FutureTask类图关系如下:
CompletableFuture
哔哩哔哩链接:https://www.bilibili.com/video/BV1ar4y1x727?p=22&vd_source=7c5f1f4c039688f19024d50ef51aaed1
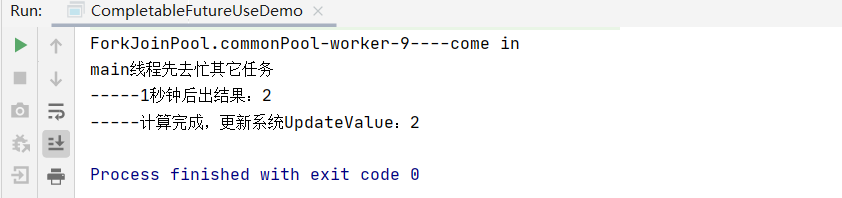
从java8开始引入CompletableFuture,是Future的功能增强版,减少阻塞和轮询,可以传入回调对象,当异步任务完成或者发生异常时,自动调用回调对象的回调方法。
public static void main(String[] args) throws ExecutionException, InterruptedException {

    CompletableFuture.supplyAsync(() -> {
        System.out.println(Thread.currentThread().getName() + "----come in");
        int result = ThreadLocalRandom.current().nextInt(10);
        try {
            TimeUnit.SECONDS.sleep(1);
        } catch (InterruptedException e) {
            e.printStackTrace();
        }
        System.out.println("-----1秒钟后出结果:" + result);
        return result;
    }).whenComplete((v, e) -> {
        if (e == null) {
            System.out.println("-----计算完成,更新系统UpdateValue:" + v);
        }
    }).exceptionally(e -> {
        e.printStackTrace();
        System.out.println("异常情况:" + e.getCause() + "\t" + e.getMessage());
        return null;
    });

    System.out.println(Thread.currentThread().getName() + "线程先去忙其它任务");

    //主线程不要立刻结束,否则CompletableFuture默认使用的线程池会立刻关闭:暂停3秒钟线程
    try {
        TimeUnit.SECONDS.sleep(3);
    } catch (InterruptedException e) {
        e.printStackTrace();
    }
}
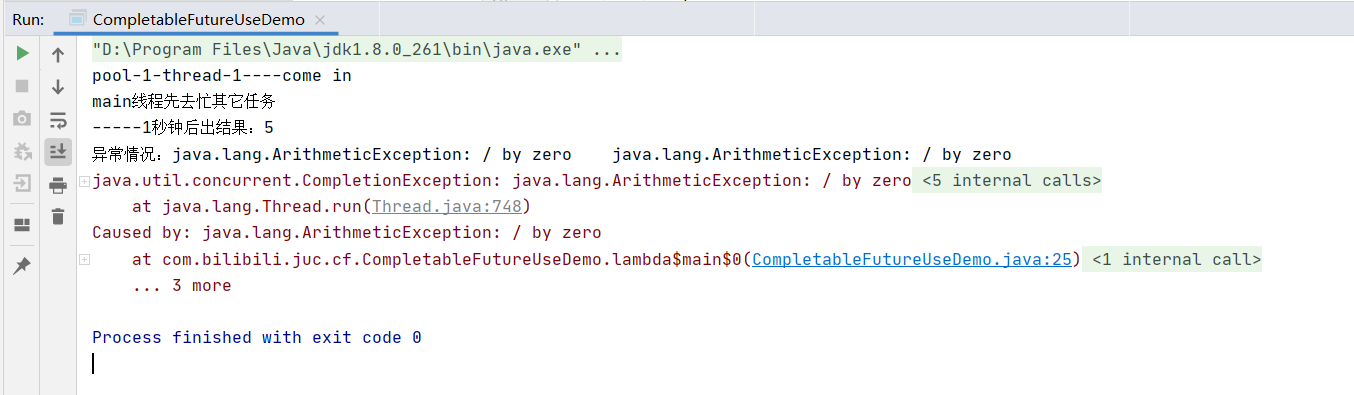
不使用CompletableFuture默认使用的线程池:
public static void main(String[] args) throws ExecutionException, InterruptedException
{
    ExecutorService threadPool = Executors.newFixedThreadPool(3);

    try
    {
        CompletableFuture.supplyAsync(() -> {
            System.out.println(Thread.currentThread().getName() + "----come in");
            int result = ThreadLocalRandom.current().nextInt(10);
            try { TimeUnit.SECONDS.sleep(1); } catch (InterruptedException e) { e.printStackTrace(); }
            System.out.println("-----1秒钟后出结果:" + result);
            if(result > 2)
            {
                int i=10/0;
            }
            return result;
        },threadPool).whenComplete((v,e) -> {
            if (e == null) {
                System.out.println("-----计算完成,更新系统UpdateValue:"+v);
            }
        }).exceptionally(e -> {
            e.printStackTrace();
            System.out.println("异常情况:"+e.getCause()+"\t"+e.getMessage());
            return null;
        });

        System.out.println(Thread.currentThread().getName()+"线程先去忙其它任务");
    }catch (Exception e){
        e.printStackTrace();
    }finally {
        threadPool.shutdown();
    }
    // 主线程不要立刻结束,否则CompletableFuture默认使用的线程池会立刻关闭:暂停3秒钟线程
    // try { TimeUnit.SECONDS.sleep(3); } catch (InterruptedException e) { e.printStackTrace(); }
}
案例:电商比价需求
package com.bilibili.juc.cf;

import lombok.*;
import lombok.experimental.Accessors;

import java.awt.print.Book;
import java.math.BigDecimal;
import java.util.ArrayList;
import java.util.Arrays;
import java.util.List;
import java.util.concurrent.CompletableFuture;
import java.util.concurrent.ExecutionException;
import java.util.concurrent.ThreadLocalRandom;
import java.util.concurrent.TimeUnit;
import java.util.stream.Collectors;

/**
 *
 * 案例说明:电商比价需求,模拟如下情况:
 *
 * 1需求:
 *  1.1 同一款产品,同时搜索出同款产品在各大电商平台的售价;
 *  1.2 同一款产品,同时搜索出本产品在同一个电商平台下,各个入驻卖家售价是多少
 *
 * 2输出:出来结果希望是同款产品的在不同地方的价格清单列表,返回一个List<String>
 * 《mysql》 in jd price is 88.05
 * 《mysql》 in dangdang price is 86.11
 * 《mysql》 in taobao price is 90.43
 *
 * 3 技术要求
 *   3.1 函数式编程
 *   3.2 链式编程
 *   3.3 Stream流式计算
 */
public class CompletableFutureMallDemo
{
    static List<NetMall> list = Arrays.asList(
            new NetMall("jd"),
            new NetMall("dangdang"),
            new NetMall("taobao"),
            new NetMall("pdd"),
            new NetMall("tmall")
    );

    /**
     * step by step 一家家搜查
     * List<NetMall> ----->map------> List<String>
     * @param list
     * @param productName
     * @return
     */
    public static List<String> getPrice(List<NetMall> list,String productName)
    {
        // 格式:《mysql》 in taobao price is 90.43
        return list
                .stream()
                .map(netMall ->
                        String.format(productName + " in %s price is %.2f",
                                netMall.getNetMallName(),
                                netMall.calcPrice(productName)))
                .collect(Collectors.toList());
    }

    /**
     * List<NetMall> ----->List<CompletableFuture<String>>------> List<String>
     * @param list
     * @param productName
     * @return
     */
    public static List<String> getPriceByCompletableFuture(List<NetMall> list,String productName)
    {
        return list.stream().map(netMall ->
                CompletableFuture.supplyAsync(() -> String.format(productName + " in %s price is %.2f",
                netMall.getNetMallName(),
                netMall.calcPrice(productName))))
                .collect(Collectors.toList())
                .stream()
                .map(s -> s.join())
                .collect(Collectors.toList());
    }


    public static void main(String[] args)
    {
        long startTime = System.currentTimeMillis();
        List<String> list1 = getPrice(list, "mysql");
        for (String element : list1) {
            System.out.println(element);
        }
        long endTime = System.currentTimeMillis();
        System.out.println("----costTime: "+(endTime - startTime) +" 毫秒");

        System.out.println("--------------------");

        long startTime2 = System.currentTimeMillis();
        List<String> list2 = getPriceByCompletableFuture(list, "mysql");
        for (String element : list2) {
            System.out.println(element);
        }
        long endTime2 = System.currentTimeMillis();
        System.out.println("----costTime: "+(endTime2 - startTime2) +" 毫秒");
    }
}

class NetMall
{
    @Getter
    private String netMallName;

    public NetMall(String netMallName)
    {
        this.netMallName = netMallName;
    }

    // 查询价格
    public double calcPrice(String productName)
    {
        try { TimeUnit.SECONDS.sleep(1); } catch (InterruptedException e) { e.printStackTrace(); }
        // ThreadLocalRandom.current().nextDouble():0-1之间的随机小数
        // "my".charAt(0)为m,这里与 + 连接,可以连接成一个数字,此处模拟一本书的价格
        return ThreadLocalRandom.current().nextDouble() * 2 + productName.charAt(0);
    }
}

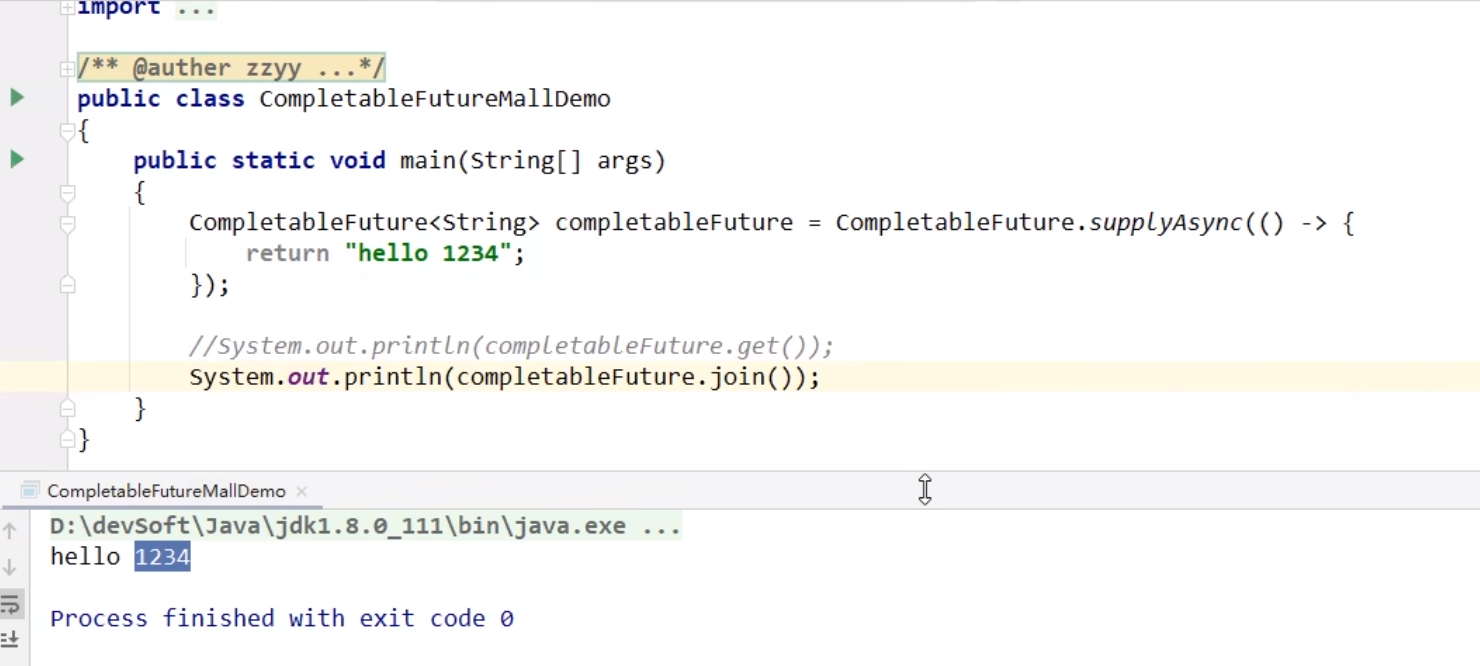
CompletableFuture常用方法
1.获取计算结果和触发计算
join和get方法
都可以获取结果,但是jion在编译期间不会去检查是否有异常

get、join、getNow、complete演示:
public static void main(String[] args) throws ExecutionException, InterruptedException, TimeoutException {
    group1();
}

/**
     * 获得结果和触发计算
     * @throws InterruptedException
     * @throws ExecutionException
     */
private static void group1() throws InterruptedException, ExecutionException, TimeoutException {
    CompletableFuture<String> completableFuture = CompletableFuture.supplyAsync(() -> {
        //暂停几秒钟线程
        try {
            TimeUnit.SECONDS.sleep(3);
        } catch (InterruptedException e) {
            e.printStackTrace();
        }
        return "abc";
    });

    // System.out.println(completableFuture.get()); // 获取结果
    // System.out.println(completableFuture.get(2L,TimeUnit.SECONDS));// 指定超时时间
    // System.out.println(completableFuture.join()); // 都可以获取结果,但是jion在编译期间不会去检查是否有异常

    // 暂停几秒钟线程
    // try { TimeUnit.SECONDS.sleep(2); } catch (InterruptedException e) { e.printStackTrace(); }

    // getNow:立即获取结果不阻塞,如果此时未计算完成,直接返回xxx,计算完成则返回结果
    // System.out.println(completableFuture.getNow("xxx"));

    // complete:是否打断get方法立即返回括号值
    System.out.println(completableFuture.complete("completeValue")+"\t"+completableFuture.get());
}
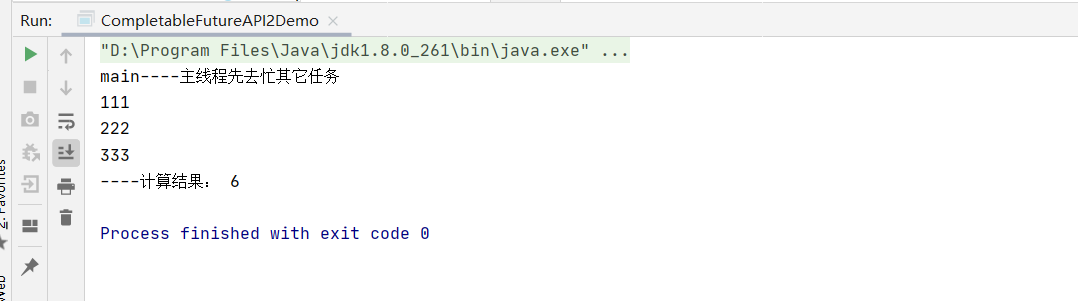
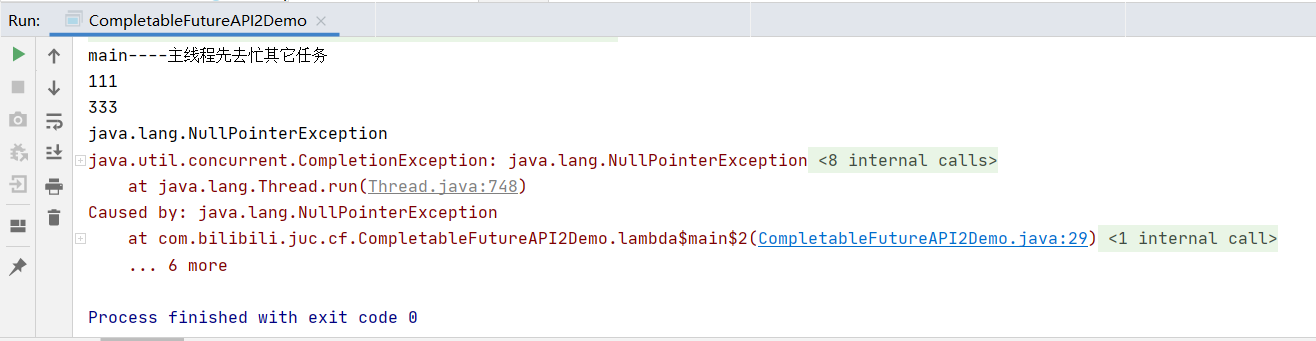
2.对计算结果进行处理
thenApply:计算结果存在依赖关系,这两个线程串行化,如果当前步错(存在异常),不走下一步
handle:计算结果存在依赖关系,这两个线程串行化,如果当前步错(存在异常),也可以走下一步,根据带的异常参数可以进一步处理
public static void main(String[] args){
    ExecutorService threadPool = Executors.newFixedThreadPool(3);

    CompletableFuture.supplyAsync(() ->{
        //暂停几秒钟线程
        try { TimeUnit.SECONDS.sleep(1); } catch (InterruptedException e) { e.printStackTrace(); }
        System.out.println("111");
        return 1;
    },threadPool).thenApply(f -> {
        //            int i = 10/0;
        System.out.println("222");
        return f + 2;
    }).thenApply(f -> {
        System.out.println("333");
        return f + 3;
    }).whenComplete((v,e) -> {
        if (e == null) {
            System.out.println("----计算结果: " + v);
        }
    }).exceptionally(e -> {
        e.printStackTrace();
        System.out.println(e.getMessage());
        return null;
    });

    System.out.println(Thread.currentThread().getName()+"----主线程先去忙其它任务");

    threadPool.shutdown();
}
public static void main(String[] args)
    {
        ExecutorService threadPool = Executors.newFixedThreadPool(3);

        CompletableFuture.supplyAsync(() ->{
            //暂停几秒钟线程
            try { TimeUnit.SECONDS.sleep(1); } catch (InterruptedException e) { e.printStackTrace(); }
            System.out.println("111");
            return 1;
        },threadPool).handle((f,e) -> {
            int i = 10/0;
            System.out.println("222");
            return f + 2;
        }).handle((f,e) -> {
            System.out.println("333");
            return f + 3;
        }).whenComplete((v,e) -> {
            if (e == null) {
                System.out.println("----计算结果: " + v);
            }
        }).exceptionally(e -> {
            e.printStackTrace();
            System.out.println(e.getMessage());
            return null;
        });

        System.out.println(Thread.currentThread().getName()+"----主线程先去忙其它任务");

        threadPool.shutdown();
    }
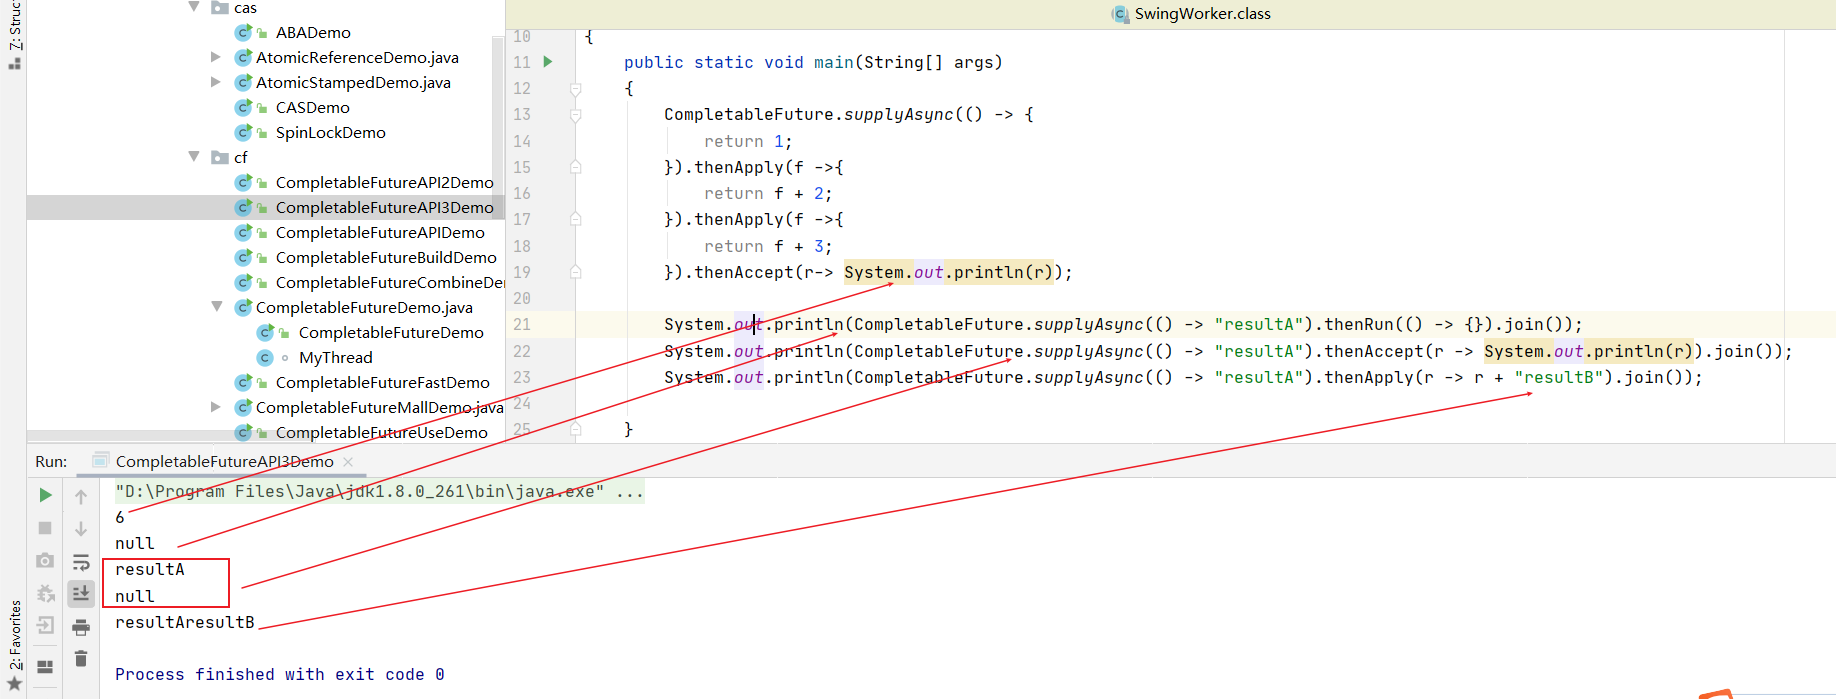
3.对计算结果进行消费
thenRun:任务A执行完执行B,并且B不需要A的结果
thenAccept:接受任务的处理结果,并消费处理,无返回结果,任务A执行完执行B,B需要A的结果,但是任务B无返回值
thenApply:任务A执行完执行B,B需要A的结果,同时任务B有返回值
public static void main(String[] args)
    {
        CompletableFuture.supplyAsync(() -> {
            return 1;
        }).thenApply(f ->{
            return f + 2;
        }).thenApply(f ->{
            return f + 3;
        }).thenAccept(System.out::println); // 6
        // }).thenAccept(r-> System.out.println(r));

    System.out.println(CompletableFuture.supplyAsync(() -> "resultA").thenRun(() -> {}).join());
        System.out.println(CompletableFuture.supplyAsync(() -> "resultA").thenAccept(r -> System.out.println(r)).join());
        System.out.println(CompletableFuture.supplyAsync(() -> "resultA").thenApply(r -> r + "resultB").join());
}
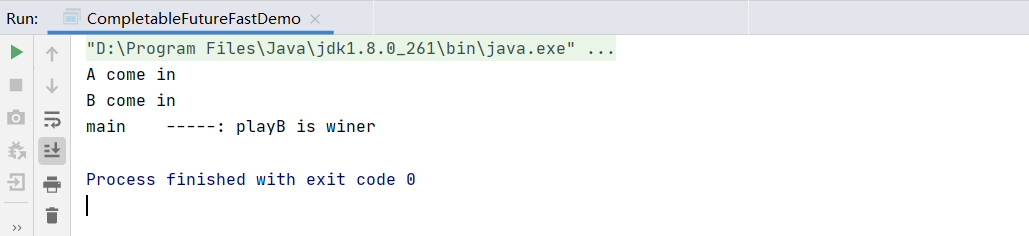
4.对计算速度进行选用
applyToEither:谁快用谁
public static void main(String[] args)
{
    CompletableFuture<String> playA = CompletableFuture.supplyAsync(() -> {
        System.out.println("A come in");
        try { TimeUnit.SECONDS.sleep(3); } catch (InterruptedException e) { e.printStackTrace(); }
        return "playA";
    });

    CompletableFuture<String> playB = CompletableFuture.supplyAsync(() -> {
        System.out.println("B come in");
        try { TimeUnit.SECONDS.sleep(1); } catch (InterruptedException e) { e.printStackTrace(); }
        return "playB";
    });

    CompletableFuture<String> result = playA.applyToEither(playB, f -> {
        return f + " is winer";
    });

    System.out.println(Thread.currentThread().getName()+"\t"+"-----: "+result.join());
}
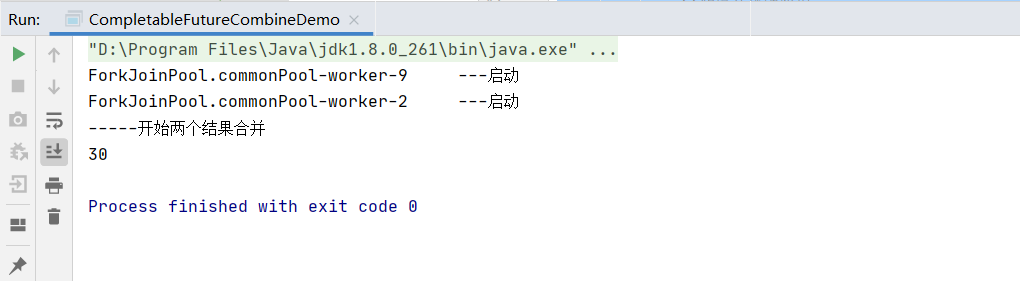
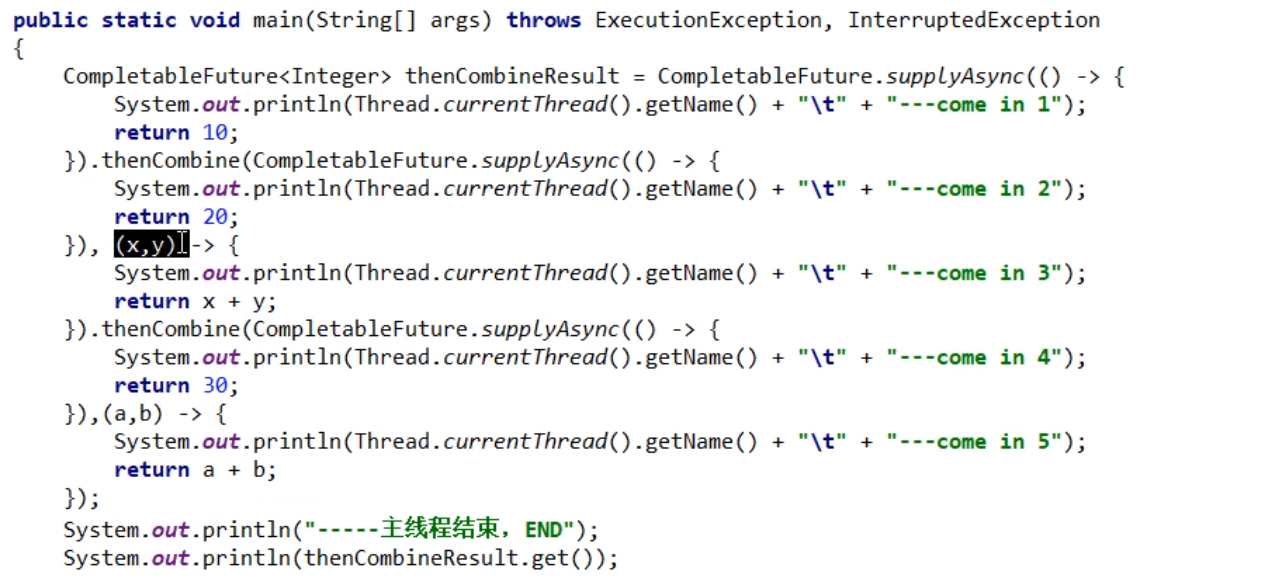
5.对计算结果进行合并
thenCombine:两个CompletionStage任务都完成后,最终能把两个任务的结果一起交给thenCombine来处理,先完成的先等着,等待其他分支任务
public static void main(String[] args)
{
    CompletableFuture<Integer> completableFuture1 = CompletableFuture.supplyAsync(() -> {
        System.out.println(Thread.currentThread().getName() + "\t ---启动");
        //暂停几秒钟线程
        try {
            TimeUnit.SECONDS.sleep(1);
        } catch (InterruptedException e) {
            e.printStackTrace();
        }
        return 10;
    });

    CompletableFuture<Integer> completableFuture2 = CompletableFuture.supplyAsync(() -> {
        System.out.println(Thread.currentThread().getName() + "\t ---启动");
        //暂停几秒钟线程
        try {
            TimeUnit.SECONDS.sleep(2);
        } catch (InterruptedException e) {
            e.printStackTrace();
        }
        return 20;
    });

    CompletableFuture<Integer> result = completableFuture1.thenCombine(completableFuture2, (x, y) -> {
        System.out.println("-----开始两个结果合并");
        return x + y;
    });

    System.out.println(result.join());
}
链式调用:
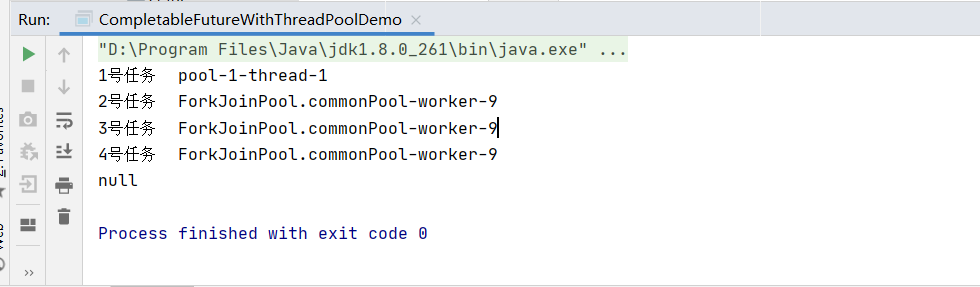
CompletableFuture线程池运行选择
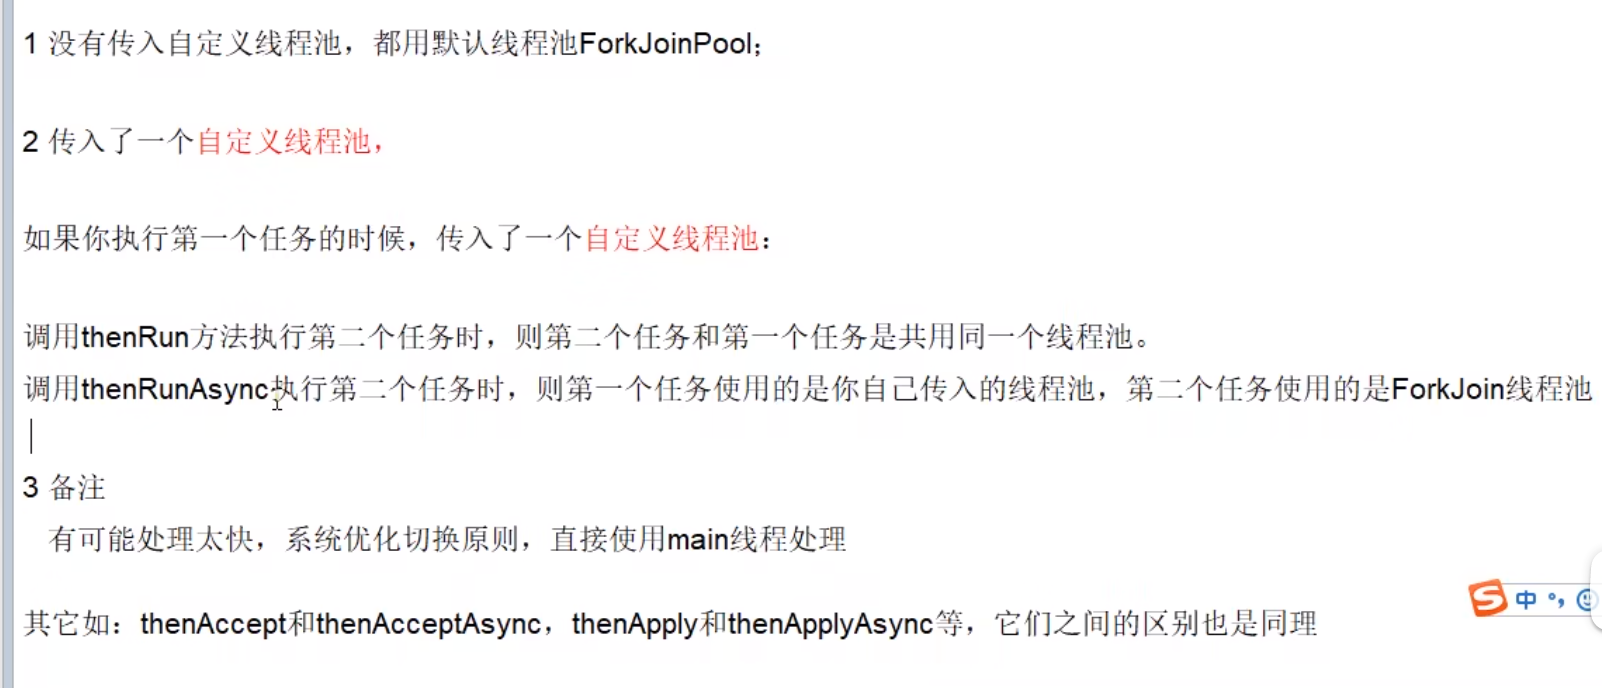
代码演示:
public static void main(String[] args)
{
    ExecutorService threadPool = Executors.newFixedThreadPool(5);

    try
    {
        CompletableFuture<Void> completableFuture = CompletableFuture.supplyAsync(() -> {
            try { TimeUnit.MILLISECONDS.sleep(20); } catch (InterruptedException e) { e.printStackTrace(); }
            System.out.println("1号任务" + "\t" + Thread.currentThread().getName());
            return "abcd";
        },threadPool).thenRunAsync(() -> {
            try { TimeUnit.MILLISECONDS.sleep(20); } catch (InterruptedException e) { e.printStackTrace(); }
            System.out.println("2号任务" + "\t" + Thread.currentThread().getName());
        }).thenRun(() -> {
            try { TimeUnit.MILLISECONDS.sleep(10); } catch (InterruptedException e) { e.printStackTrace(); }
            System.out.println("3号任务" + "\t" + Thread.currentThread().getName());
        }).thenRun(() -> {
            try { TimeUnit.MILLISECONDS.sleep(10); } catch (InterruptedException e) { e.printStackTrace(); }
            System.out.println("4号任务" + "\t" + Thread.currentThread().getName());
        });
        System.out.println(completableFuture.get(2L, TimeUnit.SECONDS));
    }catch (Exception e){
        e.printStackTrace();
    }finally {
        threadPool.shutdown();
    }
}
四、线程的创建方式四
/**
  * 4.通过java提供的工具类Executors创建线程池,不推荐,会存在问题,推荐使用自定义线程池的方式
*/
@Test
void test4(){
    // 创建单个线程的线程池
    ExecutorService executorService = Executors.newSingleThreadExecutor();

    executorService.submit(new Runnable() {
        @Override
        public void run() {
            System.out.println("通过Executors创建线程1");
        }
    });

    executorService.submit(()->{
        System.out.println("通过Executors创建线程2");
    });

    // 销毁线程池
    executorService.shutdown();
    // executorService.shutdownNow();

}

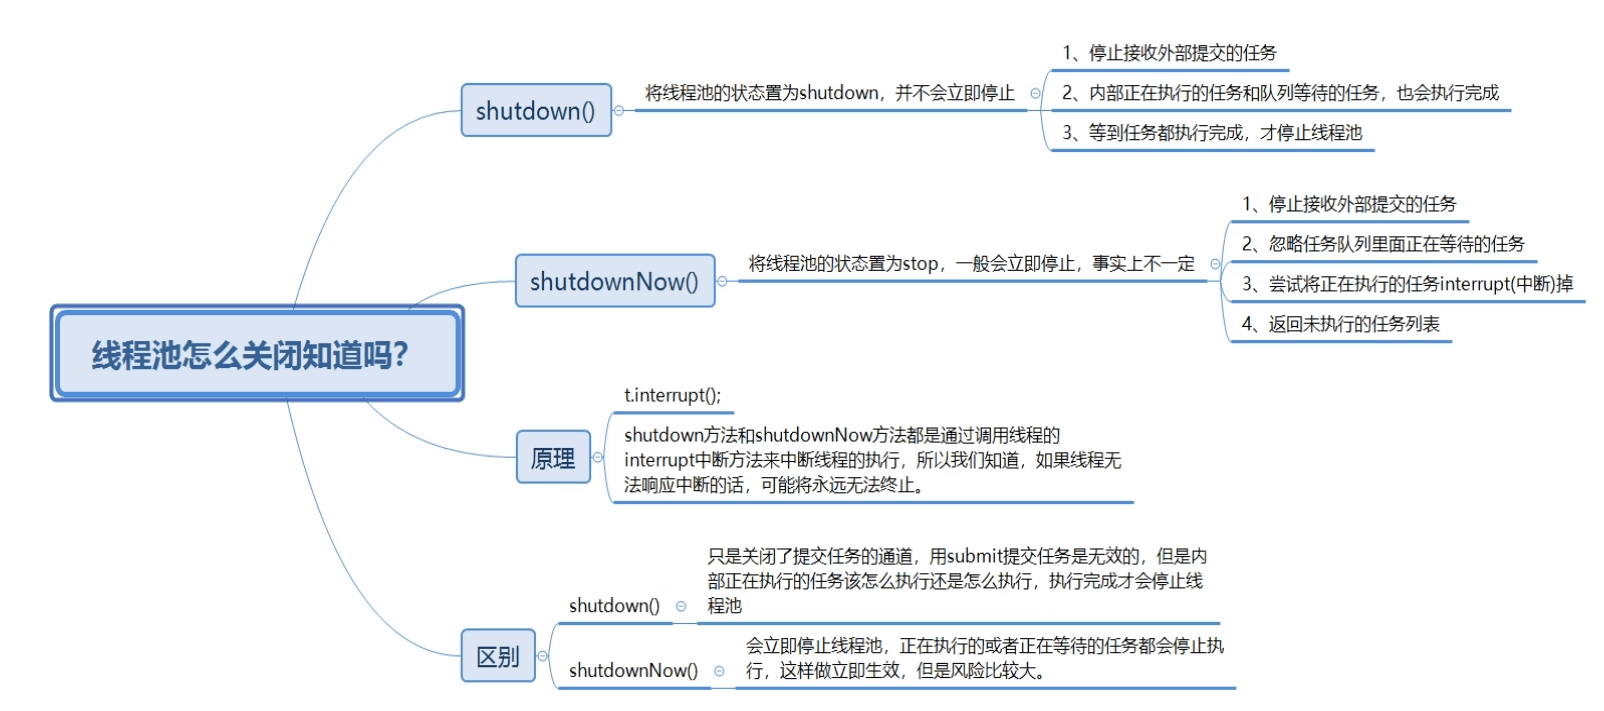
销毁线程池shutdown和shutdownNow的区别
自定义线程池
哔哩哔哩链接:https://www.bilibili.com/video/BV15b4y117RJ?p=67&vd_source=7c5f1f4c039688f19024d50ef51aaed1
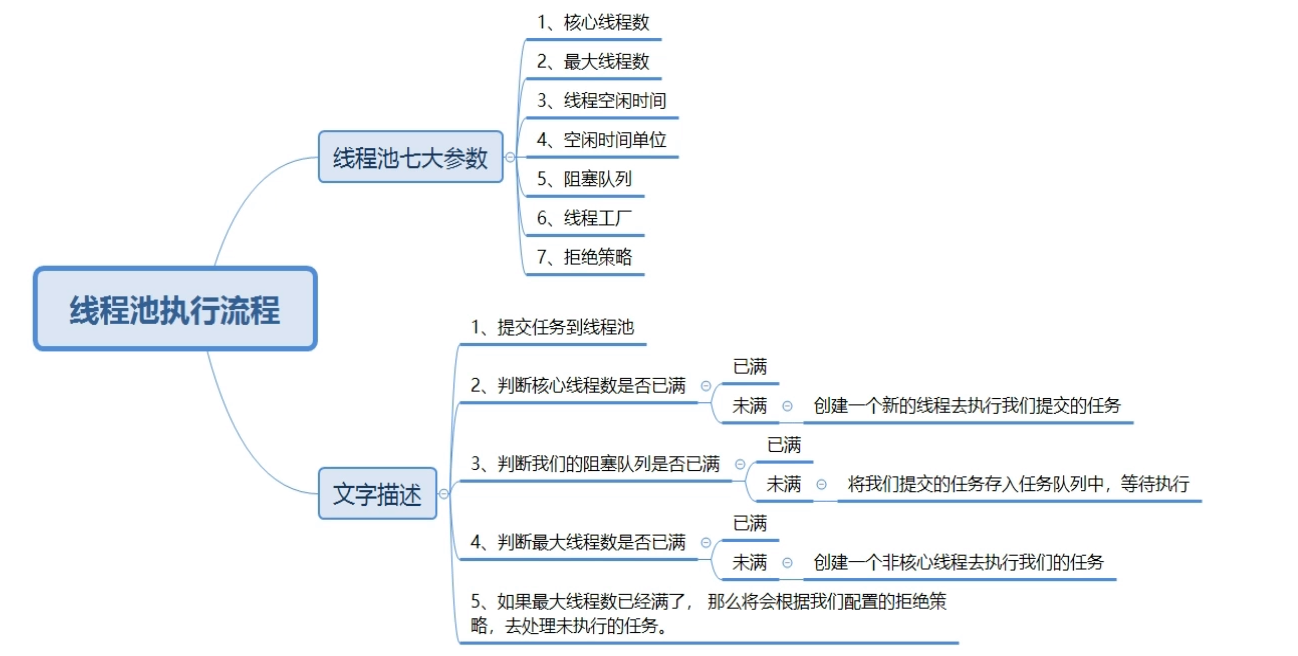
corePoolSize核心线程数目 - 池中会保留的最多线程数maximumPoolSize最大线程数目 - 核心线程+救急线程的最大数目keepAliveTime生存时间 - 救急线程的生存时间,生存时间内没有新任务,此线程资源会释放unit时间单位 - 救急线程的生存时间单位,如秒、毫秒等workQueue阻塞队列- 当没有空闲核心线程时,新来任务会加入到此队列排队,队列满会创建救急线程执行任务threadFactory线程工厂 - 可以定制线程对象的创建,例如设置线程名字、是否是守护线程等handler拒绝策略 - 当所有线程都在繁忙,workQueue 也放满时,会触发拒绝策略- 抛异常 java.util.concurrent.ThreadPoolExecutor.AbortPolicy
- 由调用者(一般为main主线程)执行任务 java.util.concurrent.ThreadPoolExecutor.CallerRunsPolicy
- 丢弃任务 java.util.concurrent.ThreadPoolExecutor.DiscardPolicy
- 丢弃最早排队任务 java.util.concurrent.ThreadPoolExecutor.DiscardOldestPolicy
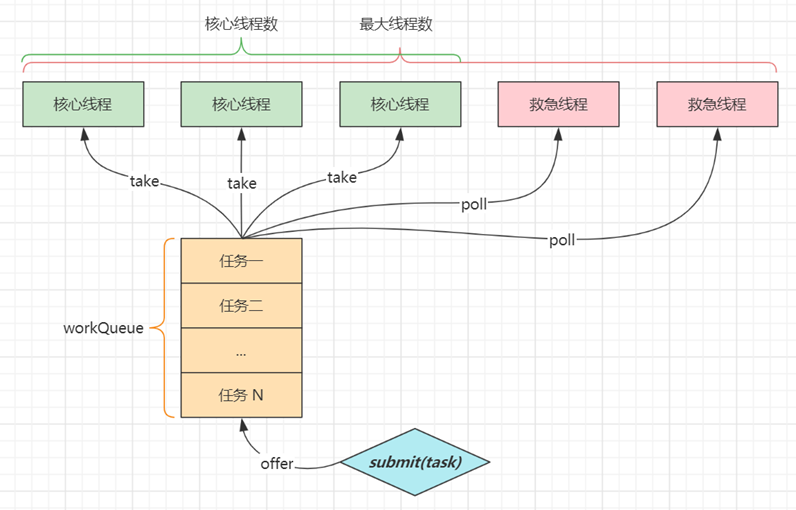
@Test
public void task(){
    ThreadPoolExecutor threadPoolExecutor = new ThreadPoolExecutor(
        2, // 核心线程数
        3, // 最大线程数,核心线程数 + 救急线程数
        0,   // 空闲存活时间
        TimeUnit.SECONDS, // 时间单位
        new ArrayBlockingQueue<>(2), // 工作队列中最多2个任务
        r -> new Thread(r, "myThread" + new AtomicInteger(1).getAndIncrement()), // 线程工厂
        new ThreadPoolExecutor.AbortPolicy() // 拒绝策略
    );

    threadPoolExecutor.submit(()->{
        System.out.println("自定义线程池");
    });
}
ThreadPoolExecutor是JDK中的线程池类,继承自Executor, Executor 顾名思义是专门用来处理多线程相关的一个接口,所有线程相关的类都实现了这个接口,里面有一个execute()方法,用来执行线程,线程池主要提供一个线程队列,队列中保存着所有等待状态的线程。避免了创建与销毁的额外开销,提高了响应的速度。相关的继承实现类图如下。
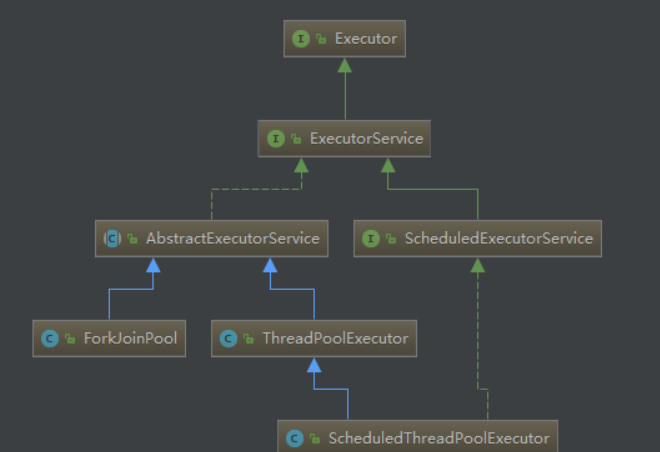
一、线程池接口:ExecutorService为线程池接口,提供了线程池生命周期方法,继承自Executor接口,ThreadPoolExecutor为线程池实现类,提供了线程池的维护操作等相关方法,继承自AbstractExecutorService,AbstractExecutorService实现了ExecutorService接口。
二、线程池的体系结构:
java.util.concurrent.Executor 负责线程的使用和调度的根接口
|–ExecutorService 子接口: 线程池的主要接口
|–ThreadPoolExecutor 线程池的实现类
|–ScheduledExceutorService 子接口: 负责线程的调度
|–ScheduledThreadPoolExecutor : 继承ThreadPoolExecutor,实现了ScheduledExecutorService
工具类 : Executors
Executors为线程池工具类,相当于一个工厂类,用来创建合适的线程池,返回ExecutorService类型的线程池。有如下方法。
ExecutorService newFixedThreadPool() : 创建固定大小的线程池
ExecutorService newCachedThreadPool() : 缓存线程池,线程池的数量不固定,可以根据需求自动的更改数量。
ExecutorService newSingleThreadExecutor() : 创建单个线程池。 线程池中只有一个线程
ScheduledExecutorService newScheduledThreadPool() : 创建固定大小的线程,可以延迟或定时的执行任务
其中AbstractExecutorService是他的抽象父类,继承自ExecutorService,ExecutorService 接口扩展Executor接口,增加了生命周期方法。
创建一个制定大小的线程池,Exectuors工厂实际上就是调用的ExectuorPoolService的构造方法,传入默认参数。
哔哩哔哩链接:https://blog.csdn.net/weixin_43168010/article/details/97613895
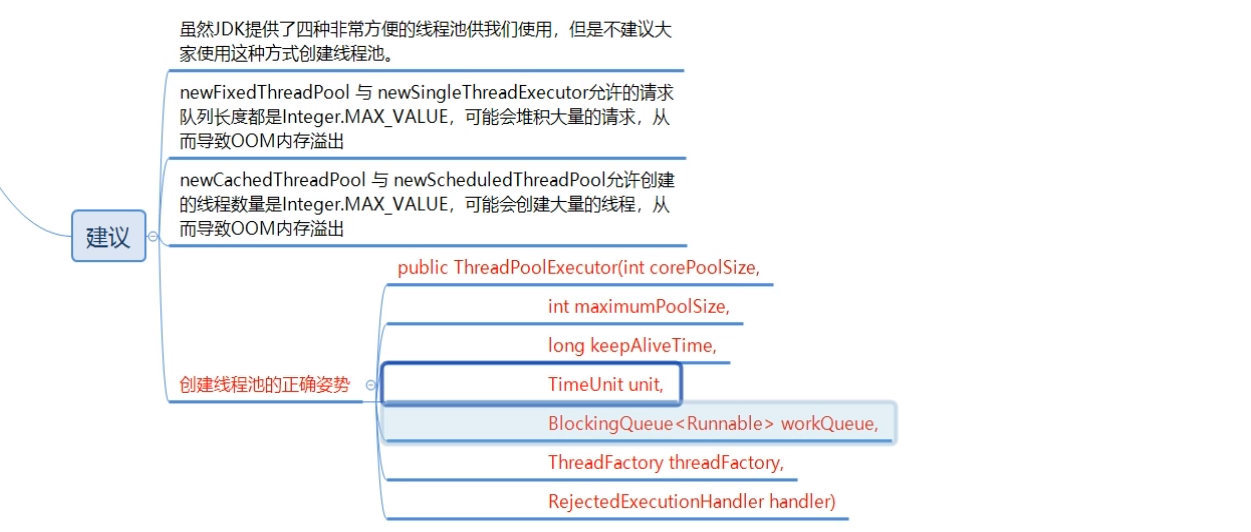
注意:使用工具类Executors创建线程池会存在问题,如newCachedThreadPool方法,核心线程数为0,而最大线程数为整数最大值,即如果任务过多会创建大量的救急线程,导致内存溢出。
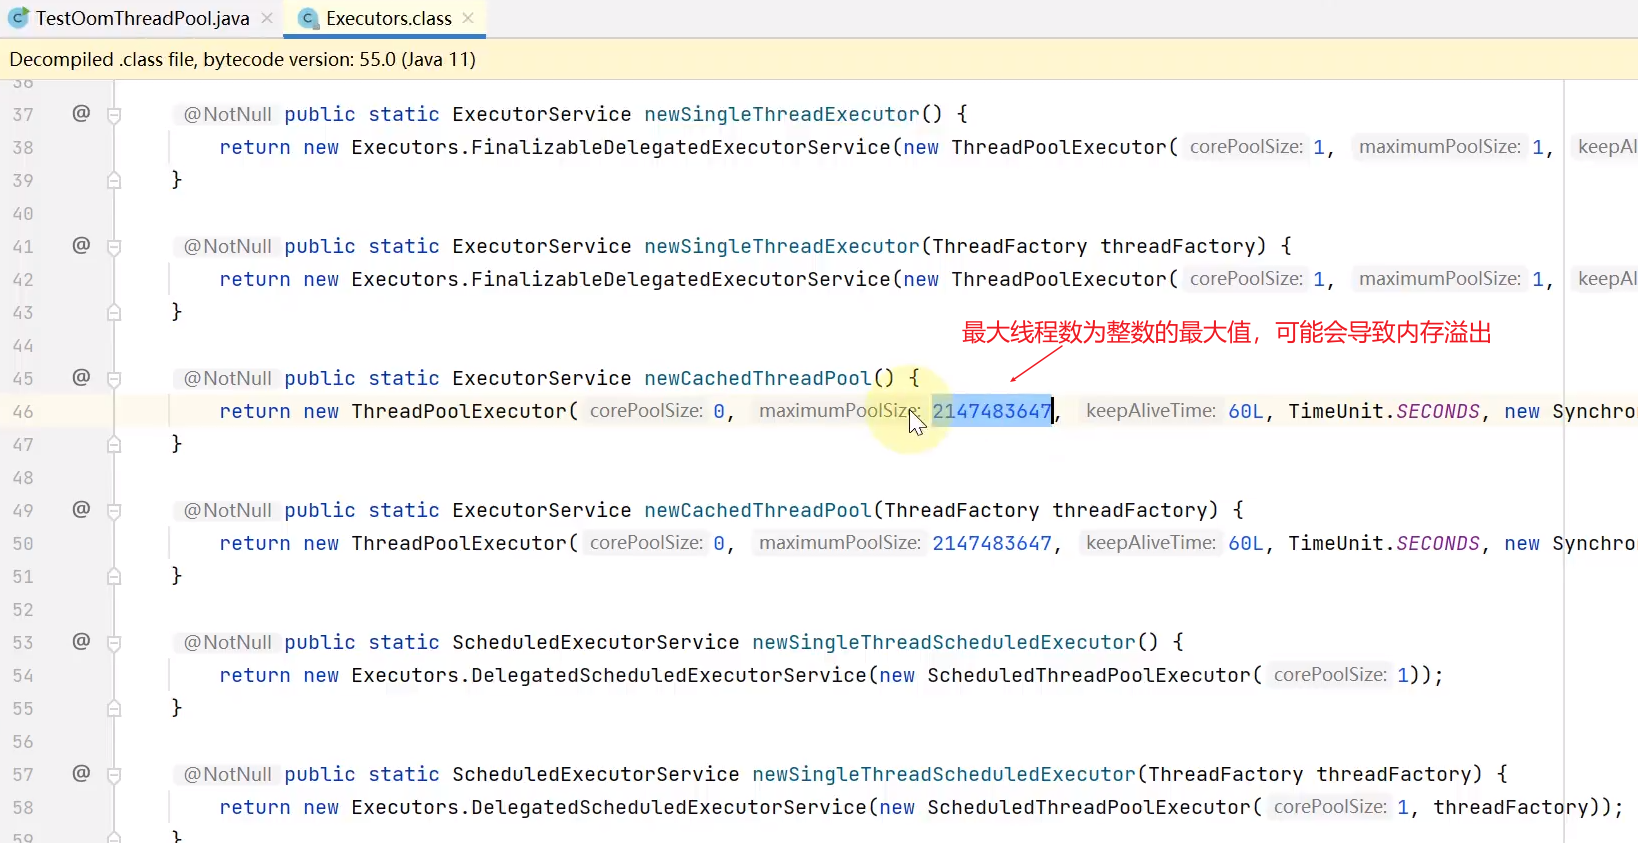
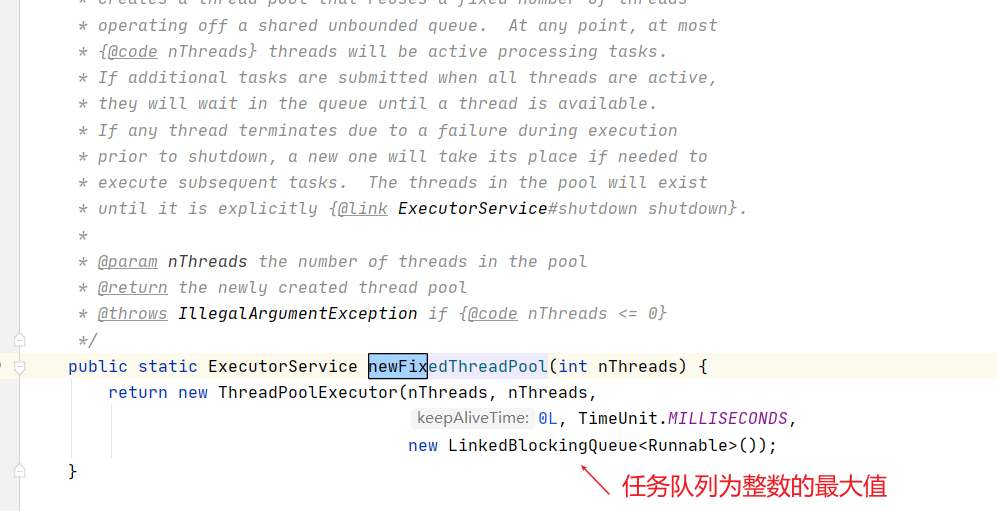
再比如newFixedThreadPool方法,它创建了一个存放整数最大值的任务队列,也可能导致内存溢出。
哔哩哔哩链接:https://www.bilibili.com/video/BV1T44y1H7pu?spm_id_from=333.999.0.0&vd_source=7c5f1f4c039688f19024d50ef51aaed1
newSingleThreadExecutor
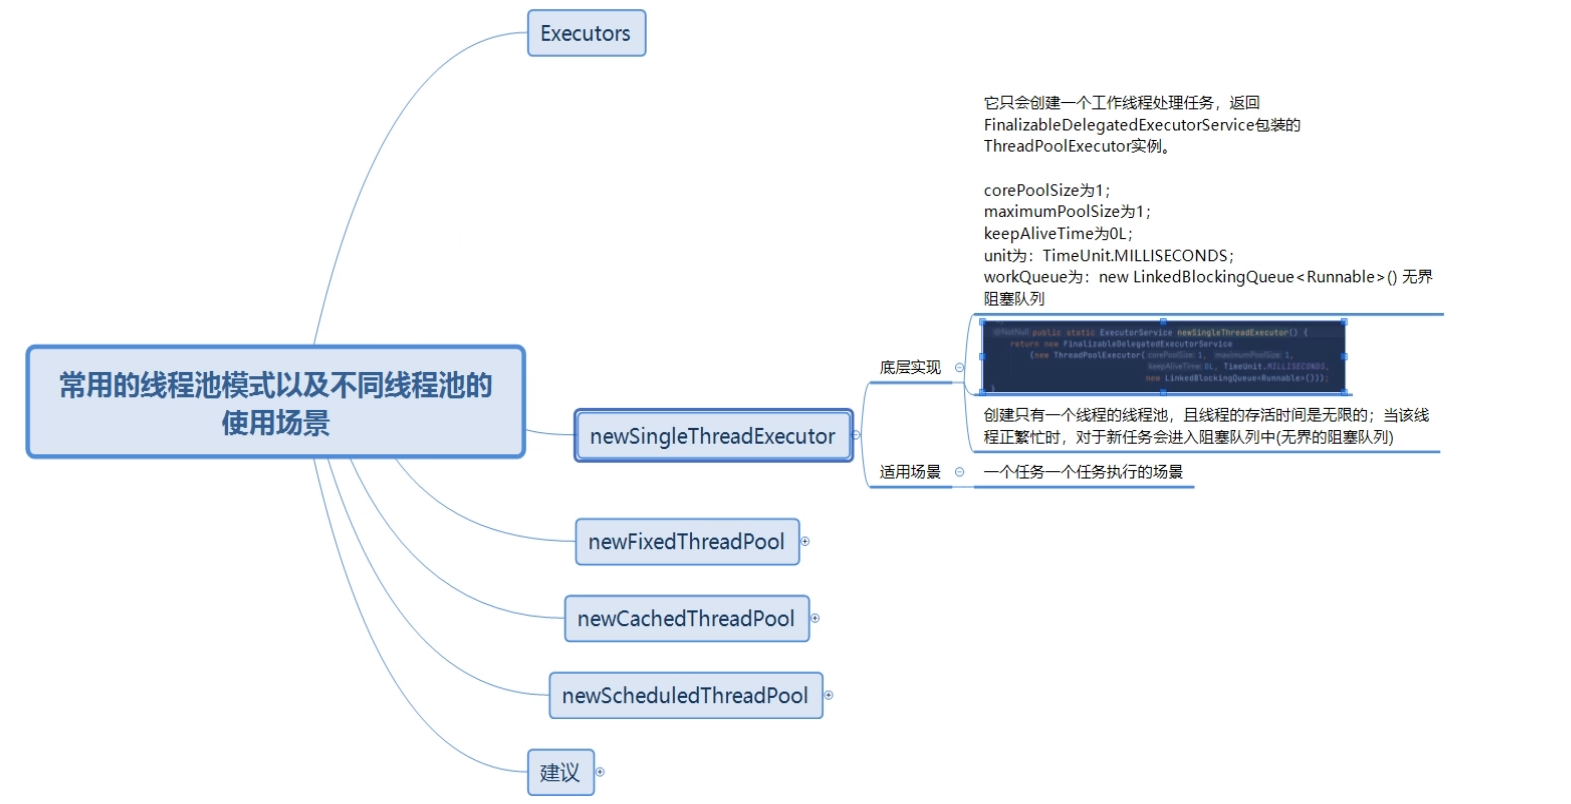
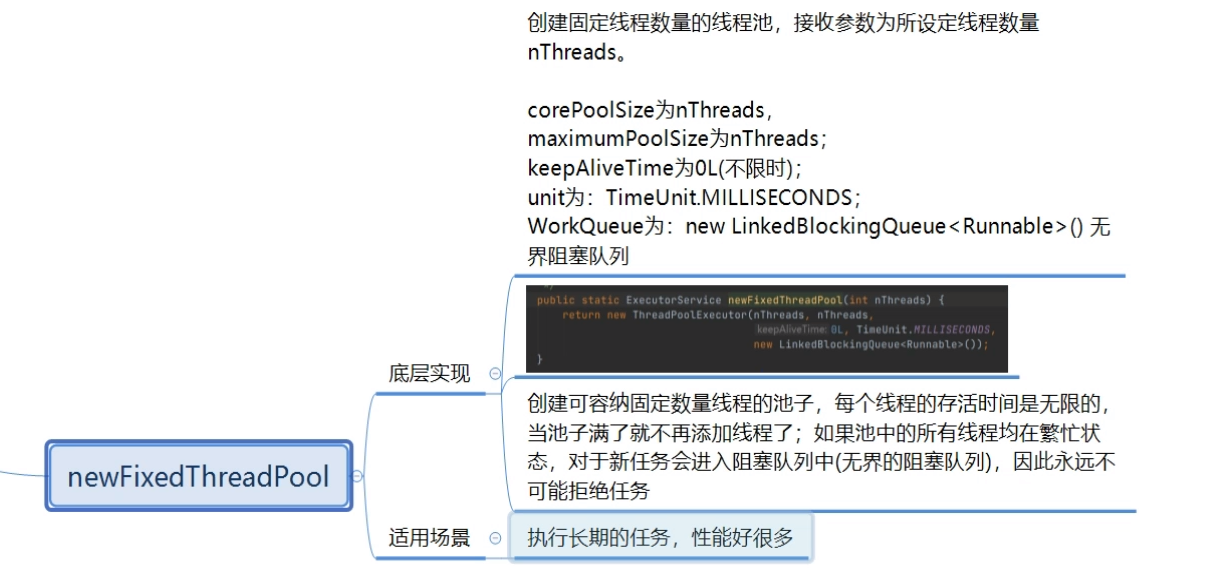
newFixedThreadPool
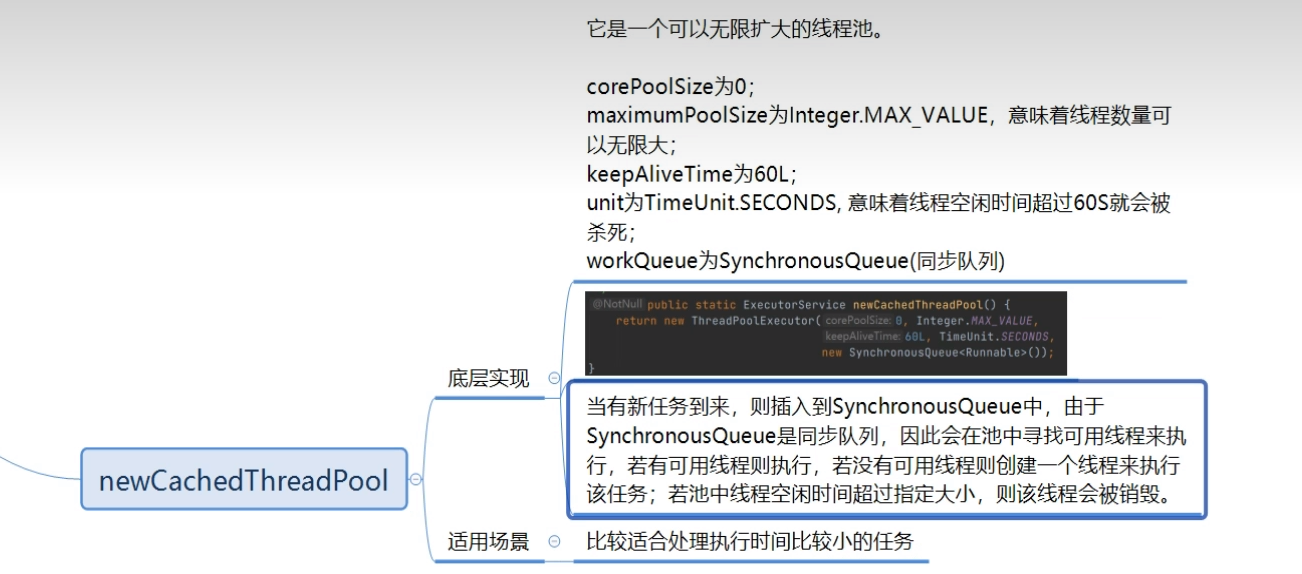
newCachedThreadPool
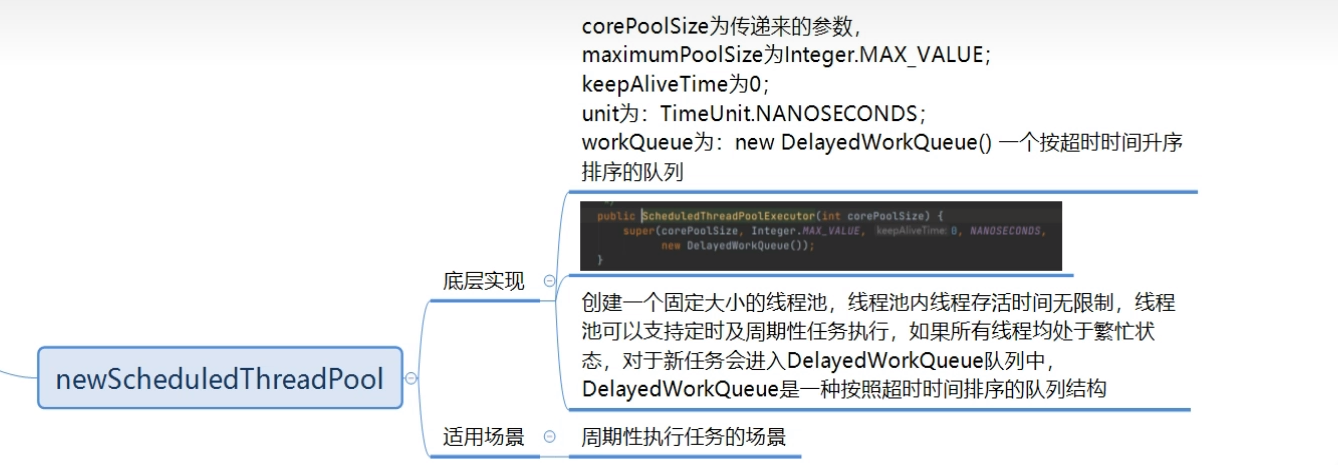
newScheduledThreadPool
建议
Spring下的自定义线程池
ThreadPoolTaskExecutor是spring包下的,是spring为我们提供的线程池类
public ThreadPoolTaskExecutor taskExecutorDing() {
        ThreadPoolTaskExecutor taskExecutorDing = new ThreadPoolTaskExecutor();
        // 固定线程数
        taskExecutorDing.setCorePoolSize(10);
        // 最大线程数
        taskExecutorDing.setMaxPoolSize(50);
        // 指定任务队列数量
        taskExecutorDing.setQueueCapacity(300);
        // 线程空闲时间
        taskExecutorDing.setKeepAliveSeconds(60);
        // 是否允许超时
        taskExecutorDing.setAllowCoreThreadTimeOut(true);
        // 线程名称前缀
        taskExecutorDing.setThreadNamePrefix("taskExecutorDing--");
        /** 设置拒绝策略
         * AbortPolicy
         * -- 默认,当任务添加到线程池中被拒绝时(固定线程池、最大线程数以及任务队列都放满),它将抛出 RejectedExecutionException 异常。
         * CallerRunsPolicy
         * -- 当任务添加到线程池中被拒绝时(固定线程池、最大线程数以及任务队列都放满),由调用者(一般为main主线程)处理被拒绝的任务。
         * DiscardOldestPolicy
         * -- 当任务添加到线程池中被拒绝时(固定线程池、最大线程数以及任务队列都放满),线程池会放弃等待队列中最旧的未处理任务,然后将被拒绝的任务添加到等待队列中(最后面)。
         * DiscardPolicy
         * -- 当任务添加到线程池中被拒绝时(固定线程池、最大线程数以及任务队列都放满),线程池将丢弃被拒绝的任务。
         */
        taskExecutorDing.setRejectedExecutionHandler(new ThreadPoolExecutor.CallerRunsPolicy());
        // 线程池关闭时需等待所有的子任务执行完成才销毁对应的bean
        taskExecutorDing.setWaitForTasksToCompleteOnShutdown(true);
        // 等待的时间
        taskExecutorDing.setAwaitTerminationSeconds(60);
        // 初始化线程池
        taskExecutorDing.initialize();

        return taskExecutorDing;
    }
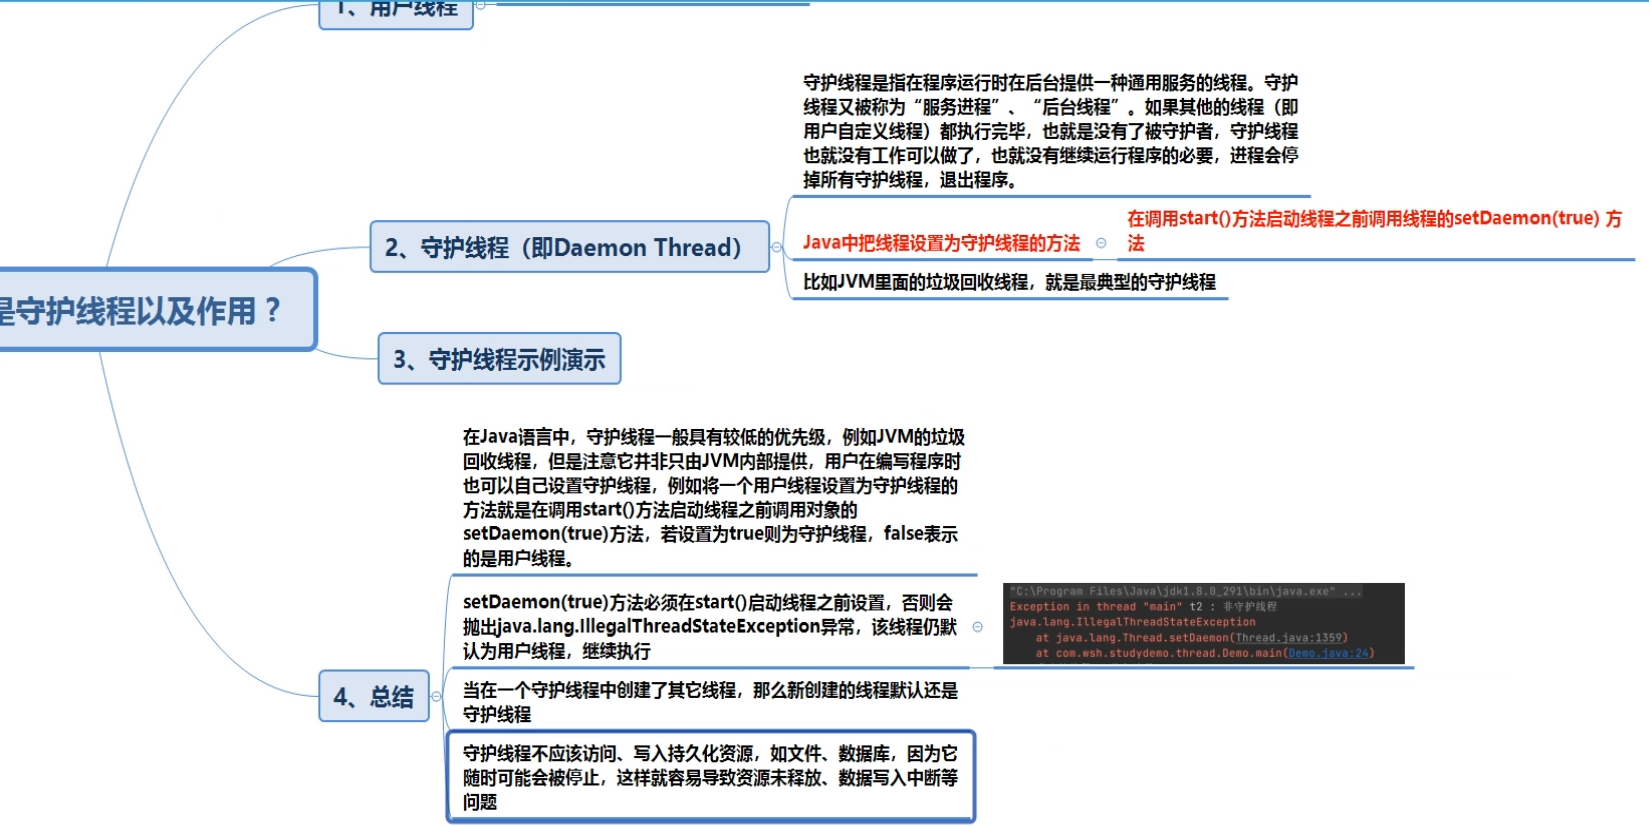
五、守护线程
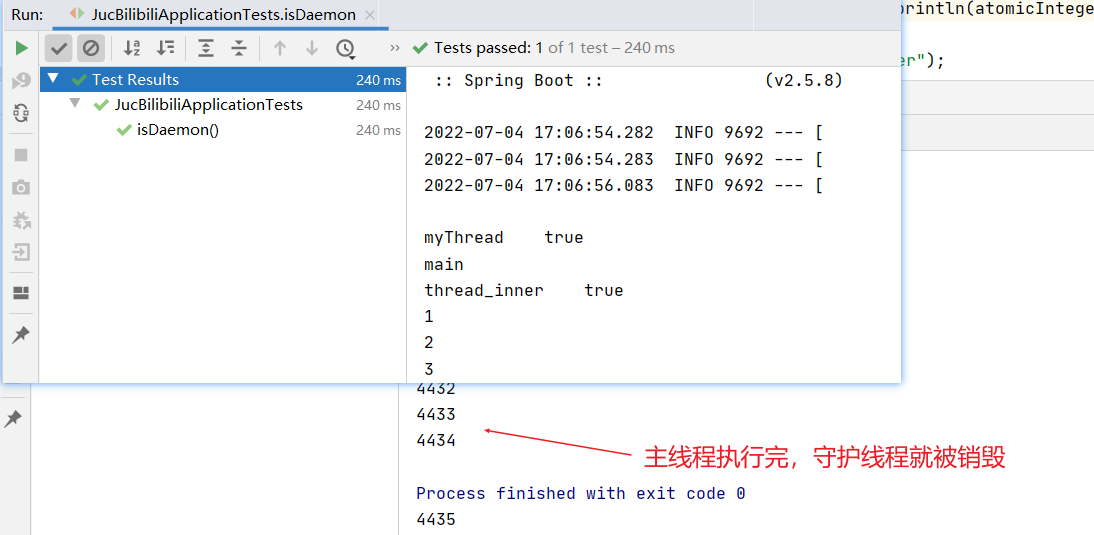
@Test
public void isDaemon(){
    Thread thread = new Thread(() -> {
        // 守护线程内创建的线程也为守护线程
        Thread thread_inner = new Thread(() -> {
            AtomicInteger atomicInteger = new AtomicInteger(1);
            while (true){
                System.out.println(atomicInteger.getAndIncrement());
            }
        },"thread_inner");
        thread_inner.start();
        System.out.println(thread_inner.getName() + "\t" +thread_inner.isDaemon());
    }, "myThread");
    thread.setDaemon(true); // 设置为守护线程
    thread.start();
    System.out.println(thread.getName() + "\t" +thread.isDaemon());
    System.out.println(Thread.currentThread().getName());
}
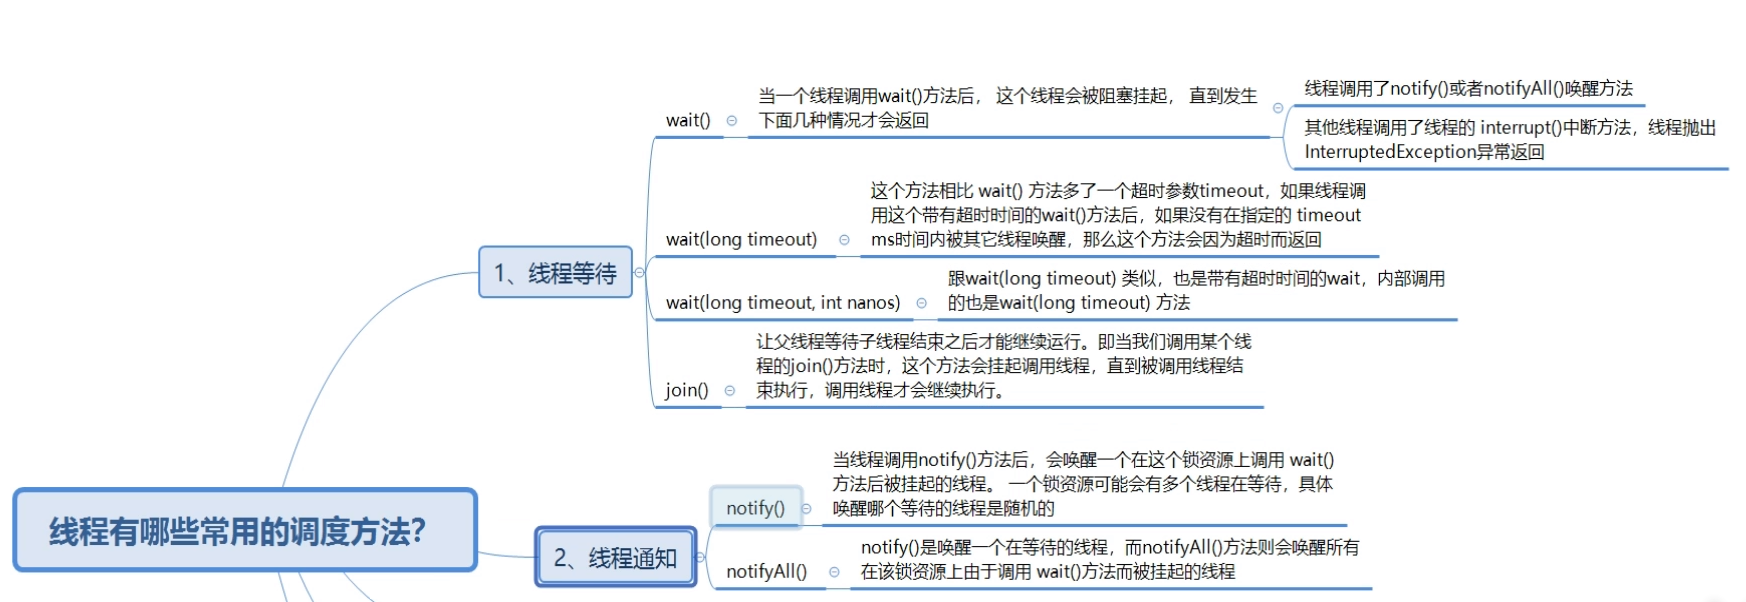
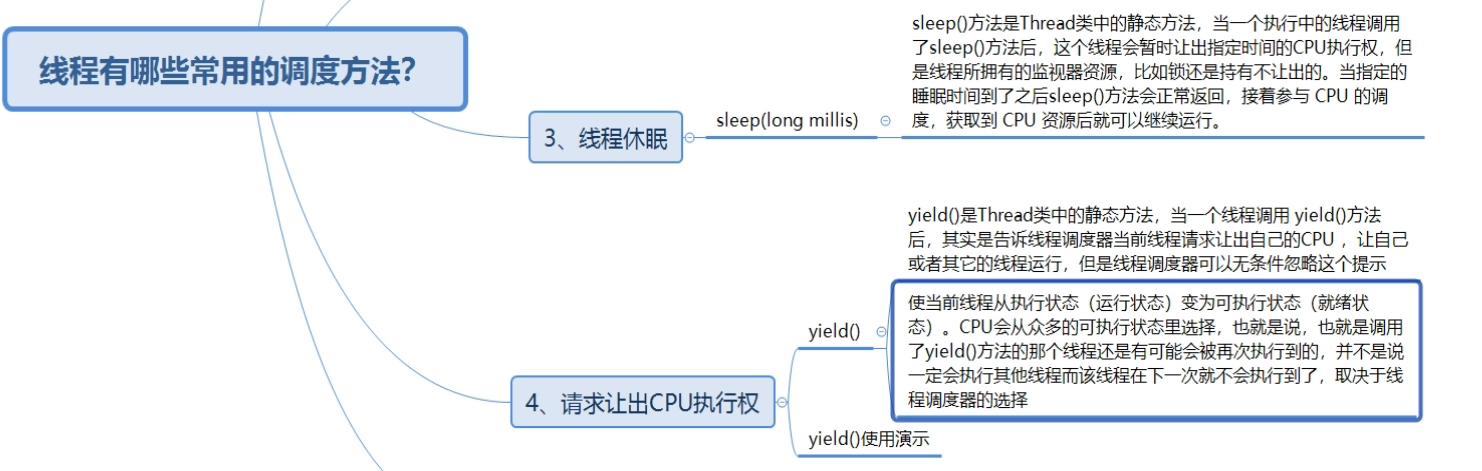
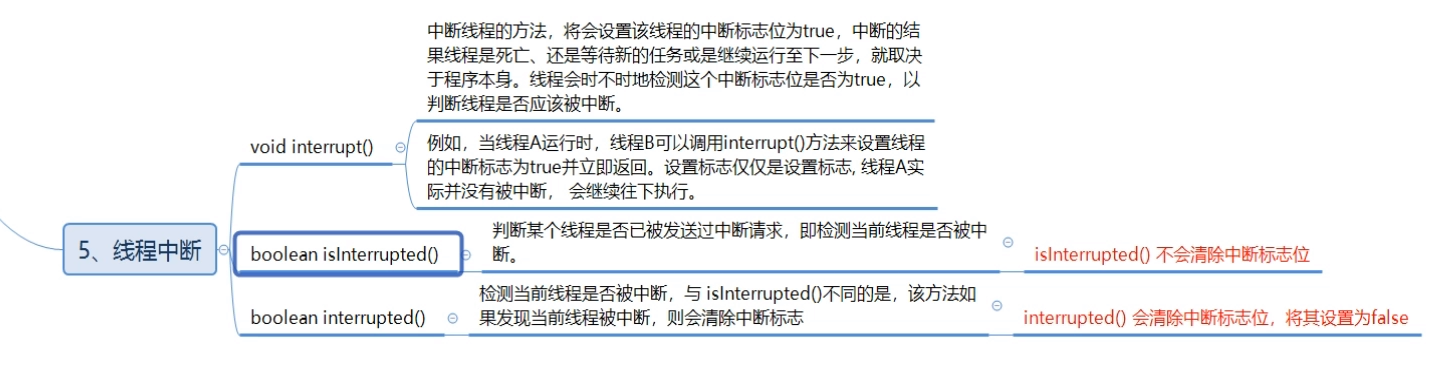
六、线程常用调度方法
哔哩哔哩链接:https://www.bilibili.com/video/BV1Za411C7zN?spm_id_from=333.999.0.0&vd_source=7c5f1f4c039688f19024d50ef51aaed1
七、线程池execute和submit的区别

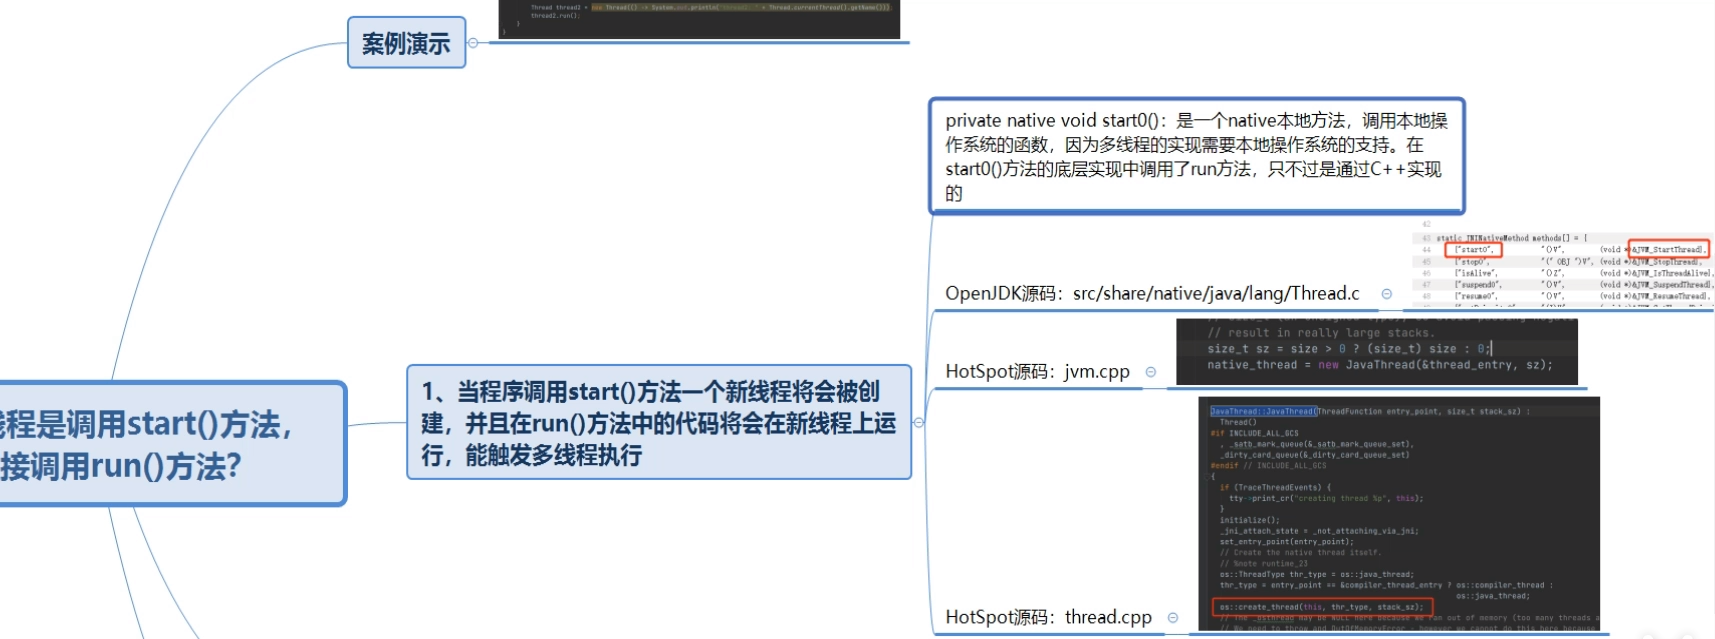
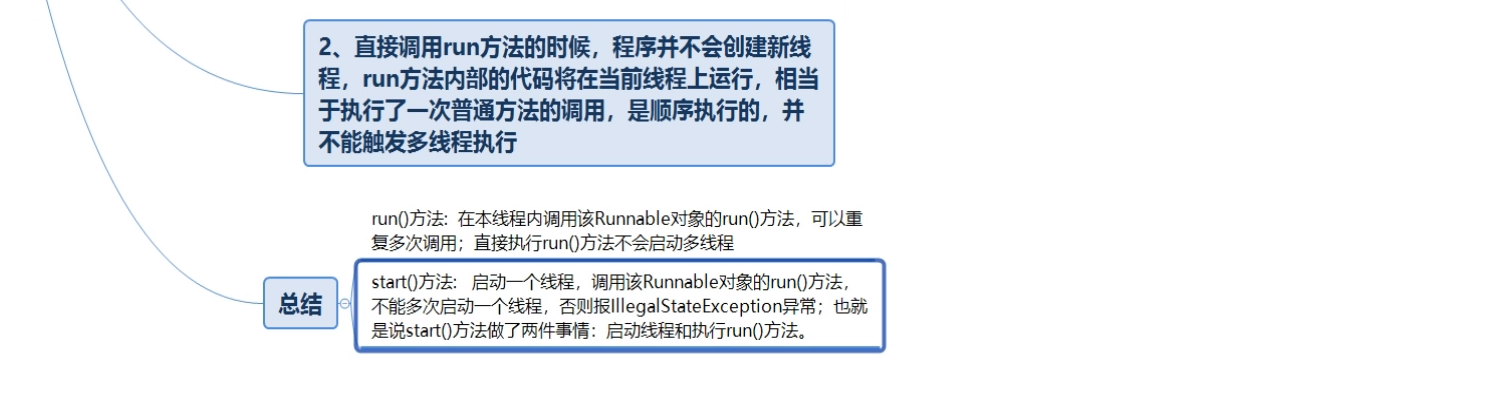
八、为什么启动线程是调用start方法,而不是run方法
哔哩哔哩链接:https://www.bilibili.com/video/BV1h44y1p7xe?spm_id_from=333.999.0.0&vd_source=7c5f1f4c039688f19024d50ef51aaed1
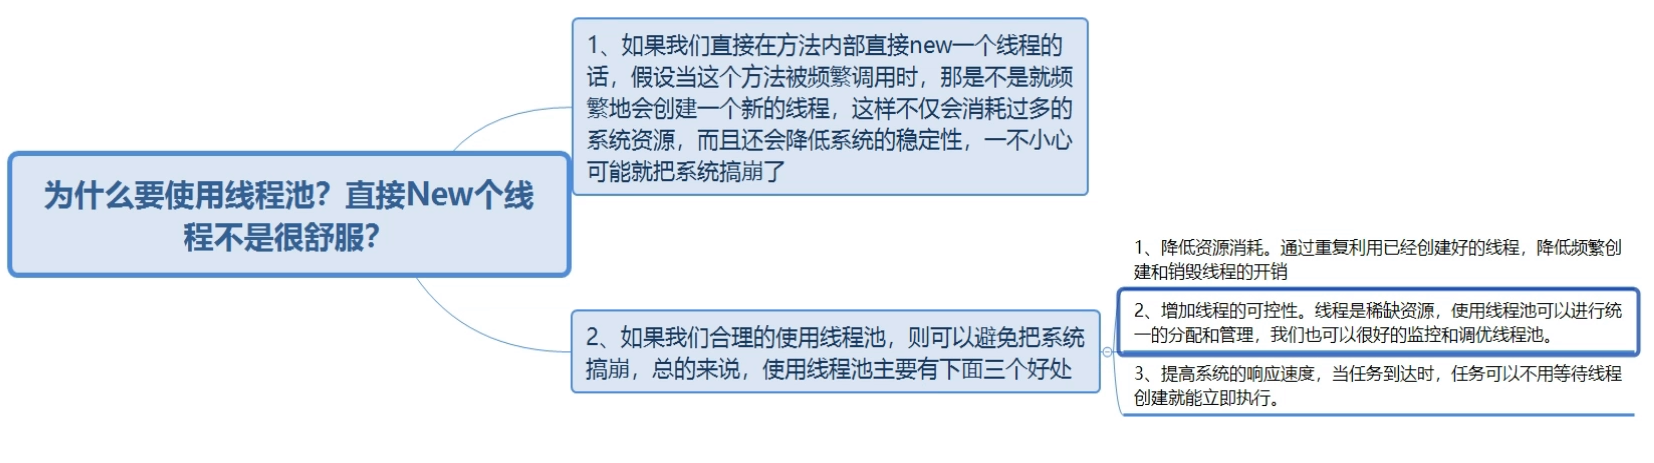
九、为什么使用线程池
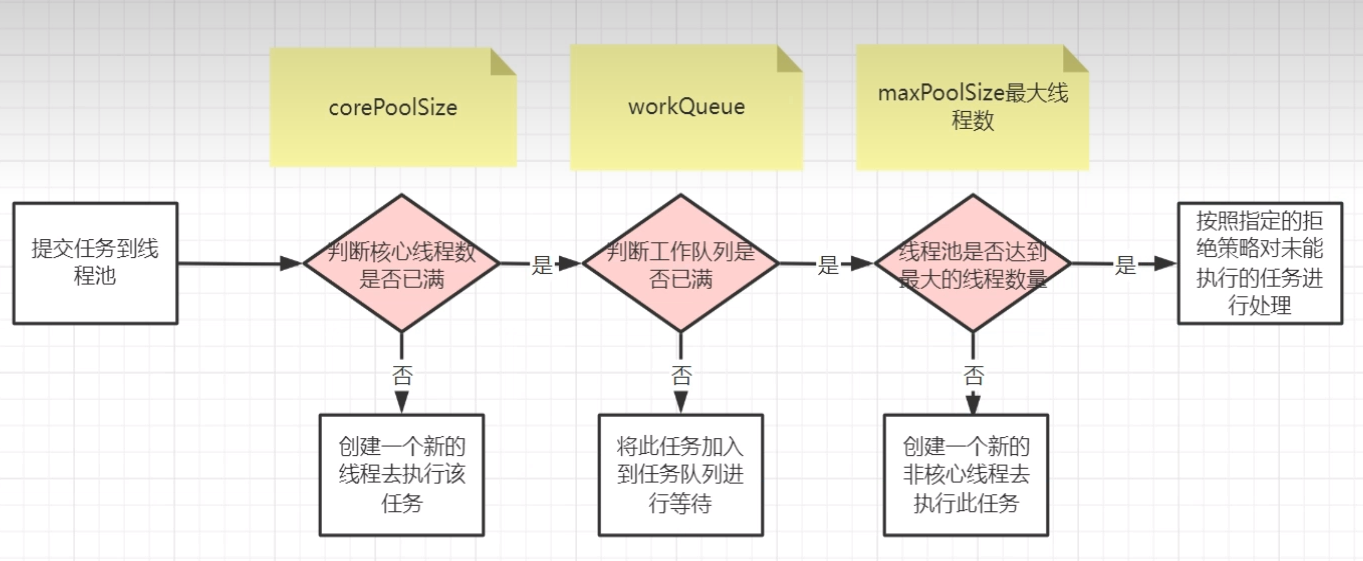
十、线程池执行流程
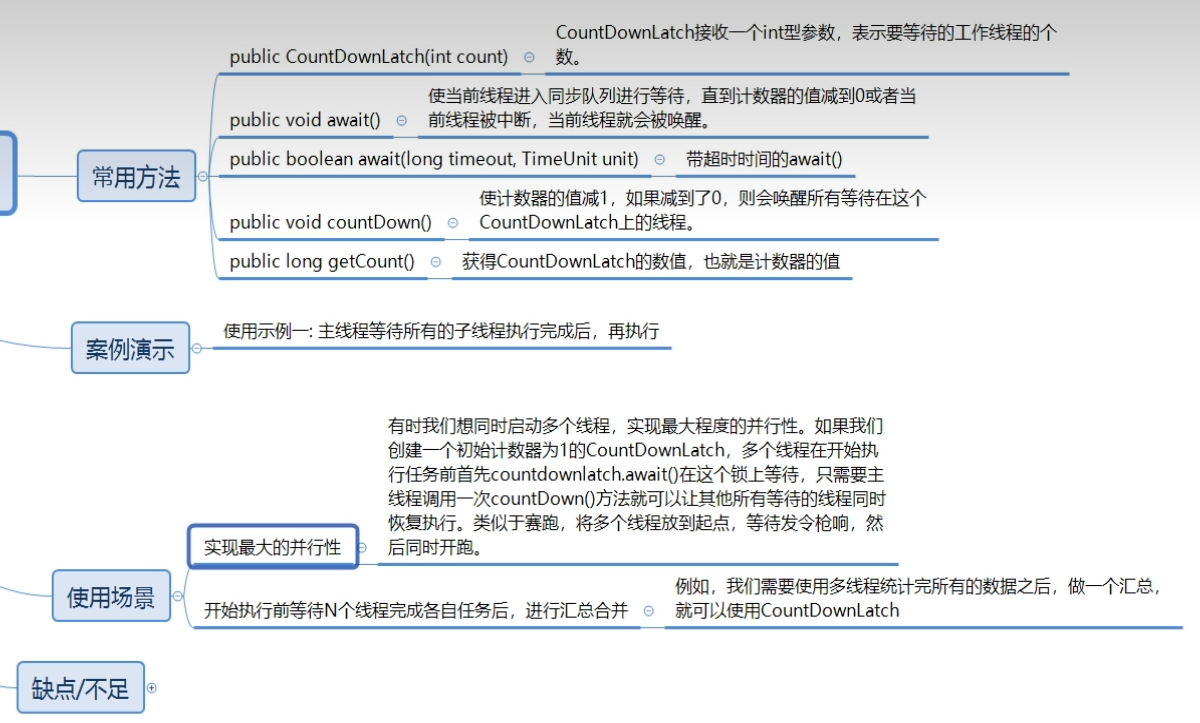
十一、 CountDownLatch的使用
哔哩哔哩链接:https://www.bilibili.com/video/BV1nr4y1a72f?spm_id_from=333.999.0.0&vd_source=7c5f1f4c039688f19024d50ef51aaed1

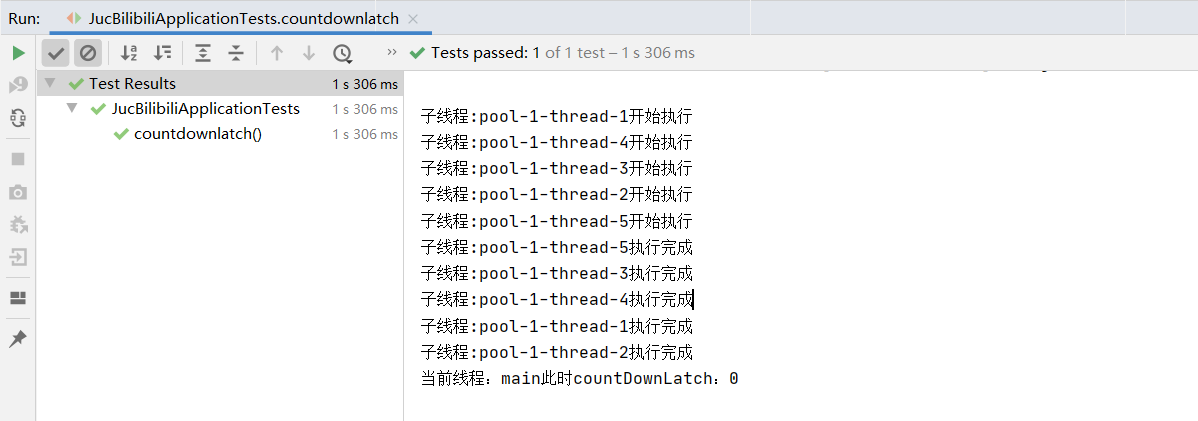
@Test
public void countdownlatch(){
    final int THREAD_NUM = 5;
    // 创建固定线程数的线程池
    ExecutorService executorService = Executors.newFixedThreadPool(THREAD_NUM);
    // 如果有n个子线程,我们就指定CountDownLatch的计数器为n
    final CountDownLatch countDownLatch = new CountDownLatch(THREAD_NUM);
    // 提交任务到线程池
    for (int i = 0; i< THREAD_NUM; i++) {
        executorService.execute(() -> {
            try {
                //模拟每个线程处理业务,耗时一秒钟
                System.out.println("子线程:" +Thread.currentThread() . getName() + "开始执行");
                //模拟每个线程处理业务,耗时一秒钟
                TimeUnit.SECONDS.sleep( 1);
                System. out.println("子线程:" +Thread.currentThread().getName() +"执行完成");
                //当前线程调用此方法,则计数减一
                countDownLatch.countDown();
            }catch (InterruptedException e){
                e.printStackTrace();
            }
        });
    }
    // 阻塞当前线程(此处为main线程),直到计数器的值为0,main线程才开始处理
    try {
        countDownLatch.await();
        System.out.println("当前线程:" + Thread.currentThread().getName()
                           + "此时countDownLatch:" + countDownLatch.getCount());
    } catch (InterruptedException e) {
        e.printStackTrace();
    }
    // 销毁线程池
    executorService.shutdown();
}
十二、喜欢请关注我
至此,我们的Java线程的创建方式以及线程池的使用就讲解完成了。喜欢我的话可以关注我的微信公众号我爱学习呀嘻嘻 ,不定期分享各类资源哦。


 2万+
2万+


 被折叠的 条评论
为什么被折叠?
被折叠的 条评论
为什么被折叠?
 到【灌水乐园】发言


