


一、搭建mybatis
|加入pom文件
    <dependencies>
        <dependency>
            <groupId>org.mybatis</groupId>
            <artifactId>mybatis</artifactId>
            <version>3.5.9</version>
        </dependency>
        <dependency>
            <groupId>org.projectlombok</groupId>
            <artifactId>lombok</artifactId>
            <version>1.18.22</version>
        </dependency>
        <dependency>
            <groupId>ch.qos.logback</groupId>
            <artifactId>logback-classic</artifactId>
            <version>1.2.11</version>
        </dependency>
        <dependency>
            <groupId>org.junit.jupiter</groupId>
            <artifactId>junit-jupiter-api</artifactId>
            <version>5.8.2</version>
            <scope>test</scope>
        </dependency>
        <dependency>
            <groupId>mysql</groupId>
            <artifactId>mysql-connector-java</artifactId>
            <version>8.0.28</version>
        </dependency>
        <dependency>
            <groupId>com.alibaba</groupId>
            <artifactId>druid</artifactId>
            <version>1.2.8</version>
        </dependency>
    </dependencies>
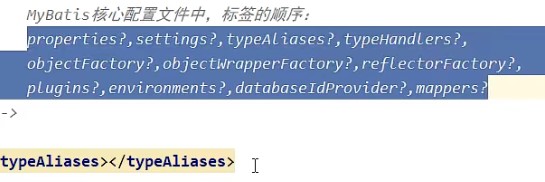
|配置mybatis-config.xml核心配置文件在resources目录下
    <?xml version="1.0" encoding="UTF-8" ?>
<!DOCTYPE configuration
        PUBLIC "-//mybatis.org//DTD Config 3.0//EN"
        "http://mybatis.org/dtd/mybatis-3-config.dtd">
<configuration>
    <environments default="development">
        <environment id="development">
            <transactionManager type="JDBC"/>
            <dataSource type="POOLED">
                <property name="driver" value="com.mysql.cj.jdbc.Driver"/>
                <property name="url" value="jdbc:mysql://localhost:3305/db?useUnicode=true"/>
                <property name="username" value="root"/>
                <property name="password" value="2061"/>
            </dataSource>
        </environment>
    </environments>
<!--    引入映射文件-->
    <mappers>
        <mapper resource="mappers/UserMapper.xml"/>
    </mappers>
</configuration>
|创建mapper接口相当于以前的dao(接口和实现方法),mybatis是面向接口编程。
@Data
@NoArgsConstructor
@AllArgsConstructor
public class User {
   private Integer id;
   private String username;
   private String password;
   private Integer age;
   private String sex;
   private String email;
}
|创建mapper接口名字就叫UserMapper。
|映射文件中的namespace要和mapper接口的全类名一致。
|映射文件中的id要和mapper接口中的方法名一致,才可以匹配sql语句

|创建UserMapper.xml
  <?xml version="1.0" encoding="UTF-8" ?>
<!DOCTYPE mapper
        PUBLIC "-//mybatis.org//DTD Mapper 3.0//EN"
        "http://mybatis.org/dtd/mybatis-3-mapper.dtd">
<mapper namespace="com.jsm.mapper.UserMapper">
   <select id="insertUser">
      insert into t_user1 values(null,'admin','123',23,'男','123@qq.com')
   </select>
</mapper>
|测试
            //加载核心配置文件
        InputStream is = Resources.getResourceAsStream("mybatis-config.xml");
        //获取SqlSessionFactoryBuilder
        SqlSessionFactoryBuilder sqlSessionFactoryBuilder = new SqlSessionFactoryBuilder();
        //获取sqlsessionfactory
        SqlSessionFactory sqlSessionFactory = sqlSessionFactoryBuilder.build(is);
        //获取SqlSession为了访问sql语句,事务自动提交
        SqlSession session = sqlSessionFactory.openSession(true);
        //获取mapper接口对象,可以自动实现接口。返回实现类的对象
        UserMapper mapper = session.getMapper(UserMapper.class);
        //测试功能
        Integer result = mapper.insertUser();
        System.out.println("result:"+result);
    }
|测试查询
    sql语句文件有一个参数resultType(默认的映射关系(com.jsm.pojo.User))和resultTypeMap(自定义的默认关系(多对一或字段名和属性名不一致时用)),设置返回的类型。

    |查询所有返回List<User> getAllUser();

    <!--   getUserById-->
   <select id="getUserById" resultType="com.jsm.pojo.User">
      select * from t_user where id = 9
   </select>
<!--   getAllUser-->
   <select id="getAllUser" resultType="com.jsm.pojo.User">
      select * from t_user
   </select>

        |测试同上
<!--    设置别名-->
    <typeAliases>
        <typeAlias type="com.jsm.pojo.User" alias="User"/>
        <!-- 常用的以包为单位,将包下的所有类设置类型别名,就是类名-->
        <package name="com.jsm.pojo"/>
    </typeAliases>

|映射文件和mapper接口
<!--        以包为单位
            要求:mapper接口所在的包要和映射文件所在的包一致
                mapper接口要和映射文件的名字一致
-->
        <package name="com.jsm.mybatis.xml"/>
二、MyBatis获取参数值的两种方式
|${}     //字符串拼接
#{}      //占位符
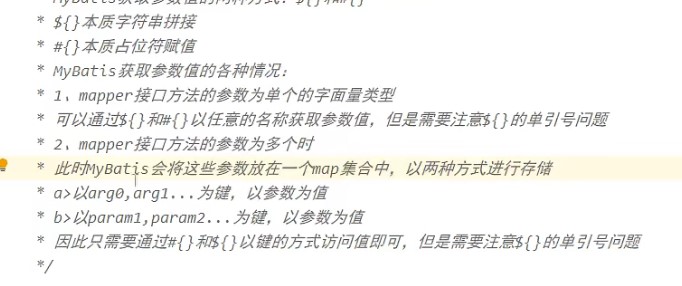
3.若mapper接口方法的参数有多个时,可以手动将参数放在map中
4.mapper接口方法的参数是实体类类型的参数
5.使用注解@param 拥有1和2。
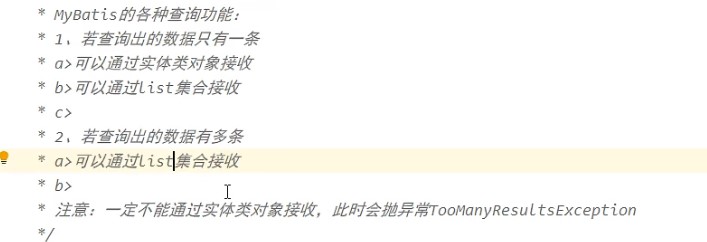
三、mybatis的各种查询功能
 @Test
    @DisplayName("查询aLLidtoMap")
    public void queryAllToMap(){
        SqlSession sqlSession  = SqlSessionUtils.getSqlSession();
        UserMapper paramMapper = sqlSession.getMapper(UserMapper.class);
        System.out.println(paramMapper.getAllMap());
    }


    @Test
    @DisplayName("查询idtoMap")
    public void queryIdToMap(){
        SqlSession sqlSession  = SqlSessionUtils.getSqlSession();
        UserMapper paramMapper = sqlSession.getMapper(UserMapper.class);
        Map<String,Object> map = paramMapper.getIdMap(3);
        System.out.println(map);
    }

    @Test
    @DisplayName("查询Count")
    public void queryCount(){
        SqlSession sqlSession  = SqlSessionUtils.getSqlSession();
        UserMapper paramMapper = sqlSession.getMapper(UserMapper.class);
        System.out.println(paramMapper.getCount());
    }


    @Test
    @DisplayName("查询All")
    public void queryAllParam(){
        SqlSession sqlSession  = SqlSessionUtils.getSqlSession();
        UserMapper paramMapper = sqlSession.getMapper(UserMapper.class);
        List<Params> list = paramMapper.getAll();
        System.out.println(list);
    }


    @Test
    @DisplayName("查询")
    public void queryParam(){
        SqlSession sqlSession  = SqlSessionUtils.getSqlSession();
        UserMapper paramMapper = sqlSession.getMapper(UserMapper.class);
        List<Params> list = paramMapper.getById(3);
        System.out.println(list);
    }


    @Test
    public void addParam(){
        SqlSession session = SqlSessionUtils.getSqlSession();
        ParamMapper paramMapper = session.getMapper(ParamMapper.class);
        Integer params = paramMapper.addParams(new Params(null,"root","123",22,"男","123@qq.com"));
        System.out.println(params);
    }

    @Test
    public void getParamMap(){
        SqlSession session = SqlSessionUtils.getSqlSession();
        ParamMapper paramMapper = session.getMapper(ParamMapper.class);
        Map<String,Object> map = new HashMap<>();
        map.put("username","admin");
        map.put("password","123");
        Params params = paramMapper.getByParamMap(map);
        System.out.println(params);
    }

    @Test
    public void getByNameandPwd() {
        SqlSession session = SqlSessionUtils.getSqlSession();
        ParamMapper paramMapper = session.getMapper(ParamMapper.class);
        Params params = paramMapper.getByParameParam("admin","123");
        System.out.println(params);

    }
    @Test
    public void getByName() {
        SqlSession session = SqlSessionUtils.getSqlSession();
        ParamMapper paramMapper = session.getMapper(ParamMapper.class);
        Params params = paramMapper.getByName("admin");
        System.out.println(params);

    }

    @Test
    public void getParams() {
        SqlSession session = SqlSessionUtils.getSqlSession();
        ParamMapper paramMapper = session.getMapper(ParamMapper.class);
        List<Params> paramsList = paramMapper.getAllParams();
           paramsList.forEach(System.out::println);
    }
}

|
    List<Params> getById(@Param("id") Integer id);
    List<Params> getAll();
    Integer getCount();
    //使用map接收
    Map<String,Object> getIdMap(@Param("id") Integer id);
    //接受多个数据
//    List<Map<String,Object>> getAllMap();
    //或者使用map接受多条数据,得使用不会重复得字段充当键
    @MapKey("id")
    Map<String, Object> getAllMap();
模糊查询不能使用#{}处理参数。如果使用可以用concat()函数处理

         <!--select * from t_user where username like '%${usename}%'-->
        <!--select * from t_user where username like concat('%',#{username},'%')-->
<!--常用-->
        select * from t_user where username like "%"#{username}"%"
|批量删除,不能使用#{}接受参数
    //接口,批量删除
    Integer deleteAll(@Param("ids") String ids);

    <select id="deleteAll" >
        delete  from t_user where id in (${ids})
    </select>
|根据表名查询
     //根据表名查询
    List<Params> getByTable(@Param("tableName") String tableName);

    //只能用${},#{}会自动加单引号
    <select id="getByTable" resultType="Params">
        select * from ${tableName}
    </select>
四、自定义映射resultMap
|如何解决字段名不一样的问题
    1.在sql语句中设置别名
    2.全局配置
        <!--   mybatis全局配置sql映射驼峰 -->
    <settings>
        <setting name="mapUnderscoreToCamelCase" value="true"/>
    </settings>
    3.通过resaultmap自定义映射
        <!--    id:唯一标识。type:设置映射关系中的类型-->
    <resultMap id="empResultMap" type="Emp">
        <id property="eid" column="eid"/>
        <result property="empName" column="emp_name"/>
        <result property="age" column="age"/>
        <result property="sex" column="sex"/>
        <result property="email" column="email"/>
    </resultMap>
    <select id="getAlllEmp" resultMap="empResultMap">
        select * from t_emp
    </select>
处理多对一映射关系
|级联属性赋值,
      <!--    级联赋值-->
    <resultMap id="DeptAndEmp" type="Emp">
        <id property="eid" column="eid"/>
        <result property="empName" column="emp_name"/>
        <result property="age" column="age"/>
        <result property="sex" column="sex"/>
        <result property="email" column="email"/>
        <result property="dept.did" column="did"/>
        <result property="dept.deptName" column="dept_name"/>
    </resultMap>
    <select id="getDeptAndEmp" resultMap="DeptAndEmp">
        select * from t_emp left join t_dept on t_emp.did=t_dept.did where t_emp.eid=#{eid}
    </select>


|也可以使用association标签
<association property = "dept" javaType = "Dept">
    <id property="did" column = "did"/>       <result property = "deptName" column = "dept_name"/>
</association>


|分步查询。(常用)。
    多的一边sql
         <!--    分步查询-->
    <resultMap id="DeptAndEmpS" type="Emp">
        <id property="eid" column="eid"/>
        <result property="age" column="age"/>
        <result property="sex" column="sex"/>
        <result property="email" column="email"/>
<!--        其中column是分步查询的条件,select是令一个接口方法的全类名-->
        <association property="dept" column="did" select="com.jsm.mybatis.mapper.DeptMapper" >
        </association>
    </resultMap>
    <select id="getDeptAndEmpStep" resultMap="DeptAndEmpS">
        select * from t_emp where eid = #{eid};
    </select>

    一的一边
         <!--分步查询第二步-->
    <select id="getDeptAndEmpStep" resultType="Dept">
        select * from t_dept where did = #{did}
    </select>
分布查询可以懒加载
 <settings>
        <setting name="mapUnderscoreToCamelCase" value="true"/>
        <setting name="lazyLoadingEnabled" value="true"/>
    </settings>


|如果有的语句不需要延迟加载就在多的语句加上fetchType="eager/lazy"
对一对应对象,对多对应集合
一对多查询
|connection  属性需要list的类型
|association  属性需要知道属性的类型

   <!--    getDeptAndEmpStep2-->
    <resultMap id="Depts" type="Dept">
        <id property="did" column="did"/>
        <result property="deptName" column="dept_name"/>
        <collection property="emps" ofType="Emp" fetchType="eager">
            <id property="eid" column="eid"/>
            <result property="empName" column="emp_name"/>
            <result property="age" column="age"/>
            <result property="sex" column="sex"/>
            <result property="email" column="email"/>
        </collection>
    </resultMap>
    <select id="getDeptAndEmpStep2" resultMap="Depts">
        select * from t_dept left join t_emp on t_dept.did = t_emp.did  where t_dept.did = #{did}
    </select>


 Dept getDeptAndEmpStep2(@Param("did") Integer did);
一对多分布查询
<!--    一对多的分布查询1-->
    <resultMap id="getDeptAndStep2" type="Dept">
        <id property="did" column="did"/>
        <result property="deptName" column="dept_name"/>
        <association property="emps" column="did" select="com.jsm.mybatis.mapper.EmpMapper.getEmpStep3" fetchType="eager"/>
    </resultMap>
     <select id="getDeptAndEmpStep3" resultMap="getDeptAndStep2">
         select * from t_dept where did =#{did}
     </select>

|<!--一对多分布的第二步-->
    <select id="getEmpStep3" resultType="Emp">
        select * from t_emp where did = #{did}
    </select>


|deptmapper接口中的方法
Dept getDeptAndEmpStep3(@Param("did") Integer did);

|empmapper接口中的方法 。要和dept属性类型一致
 List<Emp> getEmpStep3(@Param("did") Integer did);

|deptPOJO中的属性
   private List<Emp> emps;
五、动态SQL
if标签
|if标签

|    <select id="getDynamic" resultType="Emp">
        select * from t_emp where 1=1
        <if test="empName != null and empName !=''">
          and  emp_name = #{empName}
        </if>
        <if test="age != null and age != ''">
          and  age = #{age}
        </if>
        <if test="sex != null and sex != ''">
          and  sex = #{sex}
        </if>
         <if test="email != null and email != ''">
           and  email = #{email}
         </if>
    </select>
where标签
|where标签
        <select id="getDynamic" resultType="Emp">
        select * from t_emp
        <where>
        <if test="empName != null and empName !=''">
          and  emp_name = #{empName}
        </if>
        <if test="age != null and age != ''">
          and  age = #{age}
        </if>
        <if test="sex != null and sex != ''">
          and  sex = #{sex}
        </if>
         <if test="email != null and email != ''">
           and  email = #{email}
         </if>
         </where>
    </select>
trim

choose、when、otherwise
相当于if。。。 else if。。。ifelse
<!--    when choose otherwise-->
    <select id="getDynamic" resultType="Emp">
        select * from t_emp
            <where>
        <choose>
            <when test="empName != null and empName !=''">
                emp_name = #{empName}
            </when>
            <when test="age != null and age != ''">
                 age = #{age}
            </when>
            <when test="sex != null and sex != ''">
                 sex = #{sex}
            </when>
            <when test="email != null and email != ''">
                email = #{email}
            </when>
          <otherwise>
              eid = 2
          </otherwise>
        </choose>
        </where>
    </select>
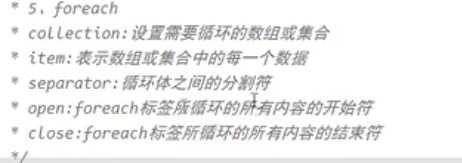
foreach
|通过数组批量删除
    <!--    批量删除-->
    <select id="deleteAllDynamic" resultType="Integer">
<!--        delete from t_emp where-->
<!--       <foreach collection="eids" item="eid" separator="or">-->
<!--           eid = #{eid}-->
<!--       </foreach>-->

        delete from t_emp where eid in
       <foreach collection="eids" item="eid" separator="," open="(" close=")">
           #{eid}
       </foreach>
    </select>
|通过集合添加批量
    <!--    批量集合添加-->
    <select id="addAllDynamic" resultType="Integer">
        insert into t_emp values
      <foreach collection="emps" item="emp" separator=",">
          (null,#{emp.empName},#{emp.age},#{emp.sex},#{emp.email},null)
      </foreach>
    </select>


       //通过集合批量添加
    Integer addAllDynamic(@Param("emps") List<Emp> emps);


          @Test
    @DisplayName("测试动态SQL")
    public void addAllDynamic(){
        SqlSession sqlSession = SqlSessionUtils.getSqlSession();
        DynamicMapper dynamicMapper = sqlSession.getMapper(DynamicMapper.class);
        Emp emp1 = new Emp(null,"jsm",23,"男","123@qq.com",null);
        Emp emp2 = new Emp(null,"七八",22,"男","123@qq.com",null);
        Emp emp3 = new Emp(null,"就是",23,"男","123@qq.com",null);
        List<Emp> list= Arrays.asList(emp1,emp2,emp3);
        System.out.println(dynamicMapper.addAllDynamic(list));
sql片段
|定义sql片段
<sql id = "empColumns">eid,emp_name,age,sex,email</sql>
|只需引入就行
    select <include refid = "empColumns"></include> from t_emp
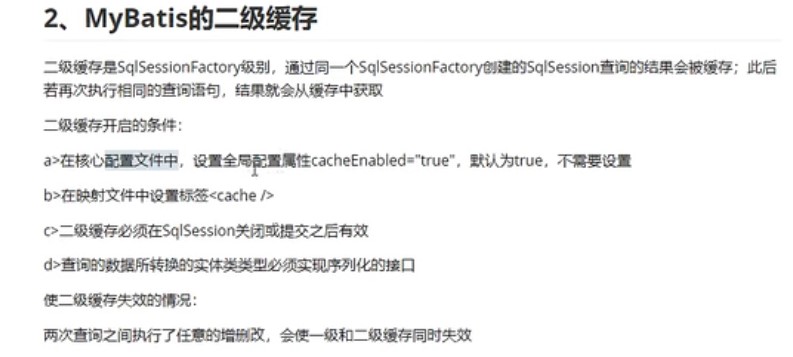
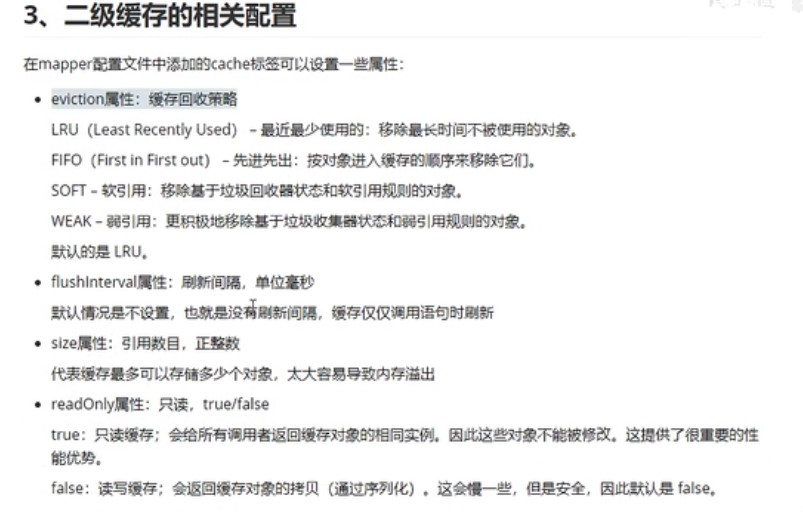
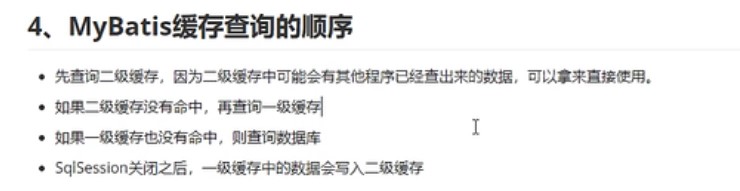
六、mybatis的缓存

添加外部缓存
<!--      外部缓存依赖-->
        <dependency>
            <groupId>org.mybatis.caches</groupId>
            <artifactId>mybatis-ehcache</artifactId>
            <version>1.2.2</version>
        </dependency>
<!--        slf4j日志门面(提供接口)的一个具体实现-->
        <dependency>
            <groupId>ch.qos.logback</groupId>
            <artifactId>logback-classic</artifactId>
            <version>1.2.3</version>
        </dependency>
    </dependencies>
xml
<ehcache xmlns:xsi="http://www.w3.org/2001/XMLSchema-instance" xsi:noNamespaceSchemaLocation="../config/ehcache.xsd">
    <!--当二级缓存的对象 超过内存限制时(缓存对象的个数>maxElementsInMemory),存放入的硬盘文件  -->
    <diskStore path="F:\Ehcache"/>
    <!--
 	maxElementsInMemory:设置 在内存中缓存 对象的个数
    maxElementsOnDisk:设置 在硬盘中缓存 对象的个数
    eternal:设置缓存是否 永远不过期
    overflowToDisk:当内存中缓存的对象个数 超过
	maxElementsInMemory的时候,是否转移到硬盘中
    timeToIdleSeconds:当2次访问 超过该值的时候,将缓存对象失效
    timeToLiveSeconds:一个缓存对象 最多存放的时间(生命周期)
    diskExpiryThreadIntervalSeconds:设置每隔多长时间,通过一个线程来清理硬盘中的缓存
    memoryStoreEvictionPolicy:当超过缓存对象的最大值时,处理的策略;LRU,FIFO,LFU
  -->
    <defaultCache
            maxElementsInMemory="1000"
            maxElementsOnDisk="1000000"
            eternal="false"
            overflowToDisk="false"
            timeToIdleSeconds="100"
            timeToLiveSeconds="100"
            diskExpiryThreadIntervalSeconds="120"
            memoryStoreEvictionPolicy="LRU">
    </defaultCache>
</ehcache>
|引入二级缓存
|首先在mapper.xml文件中添加
    <cache type="org.mybatis.caches.ehcahe.EhcacheCache"
|配置logback文件
   <?xml version="1.0"?>
<configuration debug="true">
    <!-- ch.qos.logback.core.ConsoleAppender 控制台输出 -->
    <appender name="STDOUT" class="ch.qos.logback.core.ConsoleAppender">
        <encoder>
            <pattern>[%-5level] %d{HH:mm:ss} [%thread] %logger{36} - %msg%n</pattern>
        </encoder>
    </appender>
    <!-- 日志级别 -->
    <root level="DEBUG">
        <appender-ref ref="STDOUT" />
    </root>
<!--    指定局部日志级别-->
    <logger name="com.jsm" level="DEBUG"/>
</configuration>
七、mybatis的逆向工程
1、添加pom文件
<!--    依赖mybatis核心包-->
    <dependencies>
        <dependency>
            <groupId>org.mybatis</groupId>
            <artifactId>mybatis</artifactId>
            <version>3.5.7</version>
        </dependency>
    </dependencies>
<!--    控制maven在构建过程中的相关配置-->
    <build>
<!--        构建过程中用到的插件-->
        <plugins>
<!--            具体插件,逆向工程的操作是以构建过程中插件形式出现的-->
            <plugin>
                <groupId>org.mybatis.generator</groupId>
                <artifactId>mybatis-generator-maven-plugin</artifactId>
                <version>1.4.1</version>
<!--                插件的依赖-->
                <dependencies>
<!--                    逆向工程的核心依赖-->
                    <dependency>
                        <groupId>org.mybatis.generator</groupId>
                        <artifactId>mybatis-generator-core</artifactId>
                        <version>1.4.1</version>
                    </dependency>
<!--                    数据库连接池-->
                    <dependency>
                        <groupId>com.mchange</groupId>
                        <artifactId>c3p0</artifactId>
                        <version>0.9.5.5</version>
                    </dependency>
<!--                    mysql驱动-->
                    <dependency>
                        <groupId>mysql</groupId>
                        <artifactId>mysql-connector-java</artifactId>
                        <version>8.0.28</version>
                    </dependency>
                </dependencies>
            </plugin>
        </plugins>
    </build>
|配置文件
    <?xml version="1.0" encoding="UTF-8"?>
<!DOCTYPE generatorConfiguration
        PUBLIC "-//mybatis.org//DTD MyBatis Generator Configuration 1.0//EN"
        "http://mybatis.org/dtd/mybatis-generator-config_1_0.dtd">

<generatorConfiguration>
<!--    targetRuntime:执行生成的逆向工程的版本
             mybatis3Simple:生成基本的CRUD(清晰简洁版)
             mybatis3:生产带条件的CRUD(奢华尊享版)-->

<!--    <classPathEntry location="/Program Files/IBM/SQLLIB/java/db2java.zip" />-->

    <context id="DB2Tables" targetRuntime="MyBatis3">
        <!--开启以下注释可以去掉逆向工程生成代码的注释-->
        <!--        <commentGenerator >-->
        <!--            <property name="suppressAllComments" value="true"/>-->
        <!--        </commentGenerator>-->

        <!--配置数据源-->
        <jdbcConnection driverClass="com.mysql.cj.jdbc.Driver"
                        connectionURL="jdbc:mysql://localhost:3305/db"
                        userId="root"
                        password="2061">
        </jdbcConnection>

        <javaTypeResolver >
            <!-- 是否使用bigDecimal, false可自动转化以下类型(Long, Integer, Short, etc.) -->
            <property name="forceBigDecimals" value="false" />
        </javaTypeResolver>


        <!--pojo配置,targetPackage:pojo所在的包,targetProject:pojo所在的项目路径,如:myproject/src/main/java-->
        <javaModelGenerator targetPackage="com.jsm.mybatis.pojo" targetProject=".\src\main\java">
<!--            是否使用子包-->
            <property name="enableSubPackages" value="true" />
            <property name="trimStrings" value="true" />
        </javaModelGenerator>


        <!--mapper映射文件生成地址-->
        <sqlMapGenerator targetPackage="com.jsm.mybatis.mapper"  targetProject=".\src\main\resources">
            <property name="enableSubPackages" value="true" />
        </sqlMapGenerator>

        <!--mapper接口生成位置-->
        <javaClientGenerator type="XMLMAPPER" targetPackage="com.jsm.mybatis.mapper"  targetProject=".\src\main\java">
            <property name="enableSubPackages" value="true" />
        </javaClientGenerator>

        <!-- 配置表信息 -->
        <!-- schema即为数据库名 tableName为对应的数据库表 domainObjectName是要生成的实体类 enable*ByExample
             是否生成 example类
             参考:
             http://mybatis.org/generator/configreference/table.html-->
        <!-- 更改tableName和domainObjectName就可以 -->
        <table schema="DB2ADMIN" tableName="ALLTYPES" domainObjectName="Customer" >
            <property name="useActualColumnNames" value="true"/>
            <generatedKey column="ID" sqlStatement="DB2" identity="true" />
            <columnOverride column="DATE_FIELD" property="startDate" />
            <ignoreColumn column="FRED" />
            <columnOverride column="LONG_VARCHAR_FIELD" jdbcType="VARCHAR" />
        </table>

    </context>
</generatorConfiguration>
添加mytabis-config.xml
添加jdbc.properties
添加logback.xml
|测试
        @SneakyThrows
    @Test
    public void getAllEmp(){
        InputStream is = Resources.getResourceAsStream("mybatis-config.xml");
        SqlSessionFactory sessionFactory = new SqlSessionFactoryBuilder().build(is);
        SqlSession sqlSession = sessionFactory.openSession(true);
        EmpMapper empMapper = sqlSession.getMapper(EmpMapper.class);
//       List<Emp> list= empMapper.selectByExample(null);
//        list.forEach(emp -> System.out.println(emp));
//        根据条件查询
        EmpExample empExample = new EmpExample();
        empExample.createCriteria().andEmpNameEqualTo("jsm");
        List<Emp> list=empMapper.selectByExample(empExample);
        list.forEach(emp -> System.out.println(emp));
    }
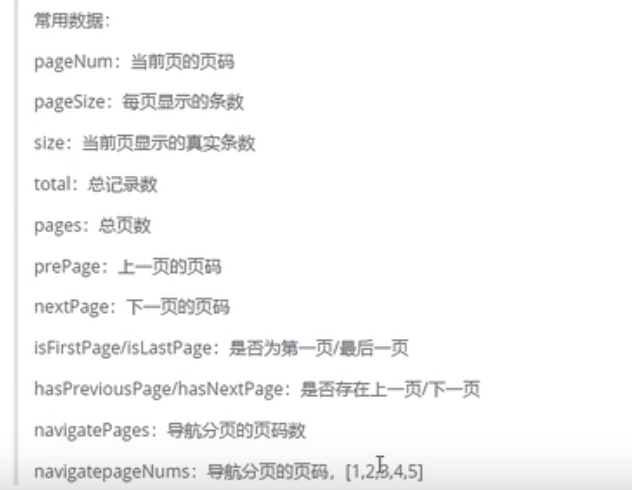
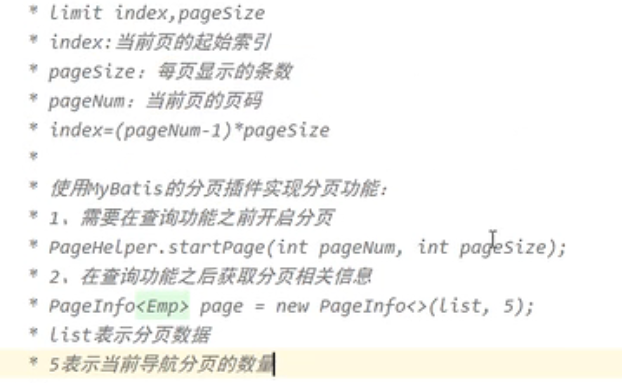
八、分页插件
添加pom.xml文件
 <dependency>
            <groupId>com.github.pagehelper</groupId>
            <artifactId>pagehelper</artifactId>
            <version>5.3.0</version>
        </dependency>
添加mybatis-config.xml文件
<!--    设置分页插件-->
    <plugins>
        <plugin interceptor="com.github.pagehelper.PageInterceptor"/>
    </plugins>
  @SneakyThrows
    @Test
    public void getPages(){
        InputStream is = Resources.getResourceAsStream("mybatis-config.xml");
        SqlSessionFactory sessionFactory = new SqlSessionFactoryBuilder().build(is);
        SqlSession sqlSession = sessionFactory.openSession(true);
        EmpMapper empMapper = sqlSession.getMapper(EmpMapper.class);

        PageHelper.startPage(3,3);
        List<Emp> list=empMapper.selectByExample(null);
        PageInfo<Emp> pageInfo = new PageInfo<>(list,2);
//        list.forEach(emp -> System.out.println(emp));
        System.out.println(pageInfo);
    }
``
添加mybatis-config.xml文件
<!--    设置分页插件-->
    <plugins>
        <plugin interceptor="com.github.pagehelper.PageInterceptor"/>
    </plugins>
[外链图片转存中…(img-pHoZxGYR-1649840425039)]
[外链图片转存中…(img-5eog4NsF-1649840425040)]
  @SneakyThrows
    @Test
    public void getPages(){
        InputStream is = Resources.getResourceAsStream("mybatis-config.xml");
        SqlSessionFactory sessionFactory = new SqlSessionFactoryBuilder().build(is);
        SqlSession sqlSession = sessionFactory.openSession(true);
        EmpMapper empMapper = sqlSession.getMapper(EmpMapper.class);

        PageHelper.startPage(3,3);
        List<Emp> list=empMapper.selectByExample(null);
        PageInfo<Emp> pageInfo = new PageInfo<>(list,2);
//        list.forEach(emp -> System.out.println(emp));
        System.out.println(pageInfo);
    }


 3570
3570


 被折叠的 条评论
为什么被折叠?
被折叠的 条评论
为什么被折叠?
 到【灌水乐园】发言


