


目录:
1.更换国内源
-
打开软件和更新
-
选择下载自

-
点击其他站点

-
点击选择最佳服务器,然后点击选择服务器;或者在中过选项中选择一个服务器,然后再点击选择服务器
-
点击关闭,这时会出现一个页面(……已过期),然后选择更新的那一项

-
这可能需要一段时间,等更新之后窗口会自动关闭。
-
更新软件源
```bash # ctrl+alt+t 打开终端 ,执行如下命令 sudo apt update sudo apt upgrade ``` -
完成
2. 安装搜狗输入法
后来感觉自带的ibus输入法也挺好用,可以选择自带的ibus输入法。此处由读者自行决定。请见[安装搜狗输入法]。
3. 更换主题
- 准备主题、图标
百度云盘地址链接: https://pan.baidu.com/s/1kPSZnlmSrgasNLJYTa-LRw
密码: pjrq
-
在Ubuntu网页中下载资源需先安装百度云盘,按其提示操作即可,此处不再赘述
-
解压、移动下载的UbuntuMacLook.zip文件
#在终端 切换到下载目录,默认是在downloads(下载)目录中 unzip ./UbuntuMacLook.zip sudo mv ./UbuntuMacLook/Sierra-light/ /usr/share/themes/ sudo mv ./UbuntuMacLook/Cupertino-iCons-master/ /usr/share/icons/ -
安装美化工具
# 终端任意目录按行输入以下命令 sudo apt install gnome-tweak-tool sudo apt install gnome-shell-extensions sudo apt install gnome-shell-extension-dashtodock -
alt+F2,输入r重启桌面
-
在程序中找到优化,打开
-
设置为如下图

-
点击扩展,打开dash to dock和User Themes


-
回到外观,将shell设置为如步骤7中的选项
-
再次回到扩展,点击dash to dock旁的齿轮设置为如下


- 完成
4.显示网速、CPU和内存使用率
-
下载indicator-sysmonitor
# 终端任意目录输入如下命令 # 添加下载源 sudo add-apt-repository ppa:fossfreedom/indicator-sysmonitor # 更新软件源 sudo apt update # 下载indicator-sysmonitor sudo apt install indicator-sysmonitor -
在程序中找到 system indicator-sysmonitor,点击
-
这时可以发现右上角已经出现了CPU等信息,右键点击,找到preferences,设置为如下图


-
保存,完成。
5. 终端美化zsh
-
安装zsh
# 终端任意目录输入如下命令 sudo apt install zsh -
安装oh-my-zsh(选一种即可)
sh -c "$(curl -fsSL https://raw.githubusercontent.com/ohmyzsh/ohmyzsh/master/tools/install.sh)"
sh -c "$(wget -O- https://raw.githubusercontent.com/ohmyzsh/ohmyzsh/master/tools/install.sh)"
sh -c "$(fetch -o - https://raw.githubusercontent.com/ohmyzsh/ohmyzsh/master/tools/install.sh)"
- 注意:若显示拒绝链接,则使用以下方法中的一个
sh -c "$(curl -fsSL https://gitee.com/shmhlsy/oh-my-zsh-install.sh/raw/master/install.sh)"
sh -c "$(wget -O- https://gitee.com/shmhlsy/oh-my-zsh-install.sh/raw/master/install.sh)"
sh -c "$(fetch -o -https://gitee.com/shmhlsy/oh-my-zsh-install.sh/raw/master/install.sh)"
-
一路yes即可
-
更换主题
- 配置文件都放在家目录下的.zshrc中

-
ZSH_THEME为指定主题,ohmyzsh内置了上百种主题,效果见GitHub:https://github.com/ohmyzsh/ohmyzsh/wiki/themes
-
我使用的为fletcherm主题,并对其做了一些优化,先将更改后的主题放置此处
链接: https://pan.baidu.com/s/1KIh7K1LoKYCDsvBpwpRmIQ
密码: guor -
这个主题的配置过程为
# 切换到本主题的下载目录 sudo cp ./fletcherm.zsh-theme ~/.oh-my-zsh/themes/ #使用vim前请先下载:sudo apt install vim vim ~/.zshrc # 输入i进入编辑模式 #将ZSH_THEME="……"更改为ZSH_THEME="fletcherm" #点击Esc进入命令模式,输入英文符号:及字母wq,保存退出 -
若想设置自己的主题,将fletcherm更换为自己的主题即可
-
添加语法高亮提示插件和补全插件
-
克隆插件资源
git clone https://github.com/zsh-users/zsh-syntax-highlighting.git ${ZSH_CUSTOM:-~/.oh-my-zsh/custom}/plugins/zsh-syntax-highlightinggit clone git://github.com/zsh-users/zsh-autosuggestions $ZSH_CUSTOM/plugins/zsh-autosuggestions -
在.zshrc中配置文件
# 打开.zshrc文件将下面这句话添加到plugins的括号中git zsh-autosuggestions zsh-syntax-highlighting#保存退出 ```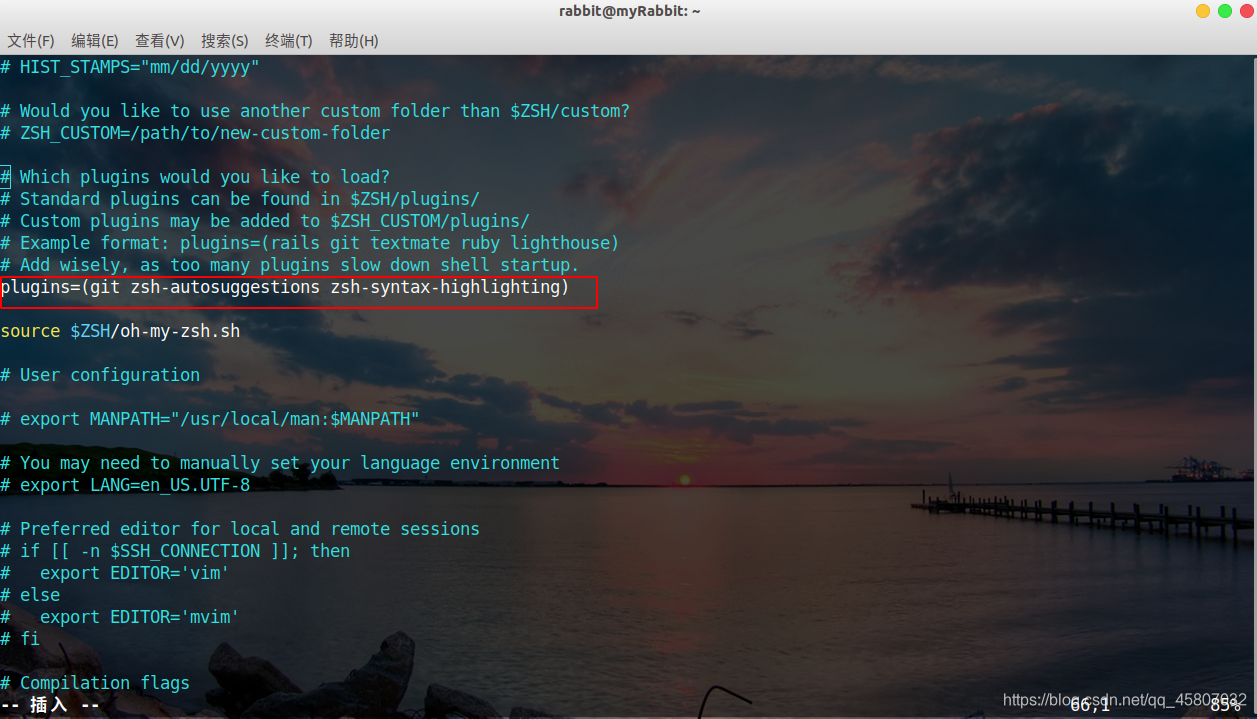
-
-
将zsh设置为默认
sudo chsh -s /bin/zsh -
在终端上方菜单栏编辑中,点击首选项

-
设置为如下图


- 关闭,重启电脑,完成
6. 安装坚果云
-
不知道什么原因,直接下载deb文件安装会打不开,这里采用官方提供的源码安装
# 准备构建环境sudo apt-get install libglib2.0-dev libgtk2.0-dev libnautilus-extension-dev gvfs-bin python3-gi gir1.2-appindicator3-0.1# 下载Nautilus插件源代码包: nutstore_linux_src_installer.tar.gzwget https://www.jianguoyun.com/static/exe/installer/nutstore_linux_src_installer.tar.gz# 解压缩,编译和安装Nautilus插件tar zxf nutstore_linux_src_installer.tar.gzcd nutstore_linux_src_installer && ./configure && makesudo make install# 重启Nautilusnautilus -q # 自动下载和安装坚果云其他二进制组件./runtime_bootstrap -
在程序中便可找到坚果云,然后按照软件提示进行配置即可
-
完成
7. 快照
-
Systemback的作者在16.04之后停止了开发,因此Ubuntu 18.04和18.10不在支持列表中。所以要想下载systemback首先需要从ppa中删除systemback,然后写入Ubuntu16的ppa,然后下载
# 终端任意目录执行以下命令# 移除Ubuntu18的systemback的PPAsudo add-apt-repository --remove ppa:nemh/systemback# 添加Ubuntu16的ppaudo add-apt-repository "deb http://ppa.launchpad.net/nemh/systemback/ubuntu xenial main"# 写入签名秘钥sudo apt-key adv --keyserver keyserver.ubuntu.com --recv-keys 382003C2C8B7B4AB813E915B14E4942973C62A1B# 更新软件源sudo apt update# 下载sudo apt install systemback -
下载后可以在程序中找到,打开
-
输入管理员密码进入
-
点击创建新的

-
此时的快照(备份)就已经做好了。另外,还可以通过创建Live系统来自定义属于你的镜像。
8. 网络配置
(本节内容根据情况自选)
Ubuntu浏览器网络不是很好,经过查询好像是Ubuntu没有DNS缓存的原因,所以在本地安装dnsmasq
# 安装 dnsmasqsudo apt-get install dnsmasq# 打开dnsmasq.conf文件sudo vim /etc/dnsmasq.conf将 resolv-file= 所在的行更换为:resolv-file=/etc/resolv.dnsmasq.conf# 执行命令sudo cp /etc/resolv.conf /etc/resolv.dnsmasq.confsudo vim /etc/resolv.conf在最后加入这一行 :nameserver 127.0.0.1sudo vim /etc/ppp/peers/wvdial在 usepeerdns 前面增加 # 防止resolv.conf的设置被pppoe覆盖。# 重启电脑
9. 通过docker安装TIM/QQ/微信
-
安装docker
# 更新软件源sudo apt-get update# 安装包允许apt通过HTTPS使用仓库sudo apt-get install \ apt-transport-https \ ca-certificates \ curl \ software-properties-common # 添加Docker官方GPG keycurl -fsSL https://download.docker.com/linux/ubuntu/gpg | sudo apt-key add -# 设置docker稳定版仓库sudo add-apt-repository \ "deb [arch=amd64] https://download.docker.com/linux/ubuntu \ $(lsb_release -cs) \ stable"# 更新软件源sudo apt-get update# 安装Docker CEsudo apt-get install docker-ce# 设置docker自启动sudo systemctl enable docker.service# 添加docker用户组sudo groupadd dockersudo usermod -aG docker ${USER}sudo systemctl restart dockernewgrp - docker -
设置镜像加速器
阿里云docker镜像获取地址:https://cr.console.aliyun.com/cn-hangzhou/instances/mirrors ,登录之后在左侧就可有看到镜像加速器,点击,然后根据提示将自己的加速器地址配置到本地即可。

-
获取TIM/微信镜像
# TIM docker pull bestwu/qq:office # 微信 docker pull bestwu/wechat -
生成TIM/wechat容器
# 终端运行如下命令# TIM# 微信docker run -d --name wechat --device /dev/snd --ipc=host \-v /tmp/.X11-unix:/tmp/.X11-unix \-v $HOME/WeChatFiles:/WeChatFiles \-e DISPLAY=unix$DISPLAY \-e XMODIFIERS=@im=fcitx \-e QT_IM_MODULE=fcitx \-e GTK_IM_MODULE=fcitx \-e AUDIO_GID=`getent group audio | cut -d: -f3` \-e GID=`id -g` \-e UID=`id -u` \bestwu/wechat# 注意,这两个命令运行一次便可 -
停止docker中的tim 或者wechat需执行如下命令
docker stop wechatdocker stop tim -
再次打开tim或者wechat执行如下命令
docker start tim docker start timdocker run -d --name qq --ipc=host \ -v ${XDG_RUNTIME_DIR}/pulse/native:${XDG_RUNTIME_DIR}/pulse/native \ -v $HOME/TencentFiles:/TencentFiles \ -v /tmp/.X11-unix:/tmp/.X11-unix \ -e XMODIFIERS=@im=fcitx \ -e QT_IM_MODULE=fcitx \ -e GTK_IM_MODULE=fcitx \ -e PULSE_SERVER=unix:${XDG_RUNTIME_DIR}/pulse/native \ -e XDG_RUNTIME_DIR=${XDG_RUNTIME_DIR} \ -e DISPLAY=unix$DISPLAY \ -e GID=`id -g` \ -e UID=`id -u` \ bestwu/qq:office- 完成。


 2505
2505


 被折叠的 条评论
为什么被折叠?
被折叠的 条评论
为什么被折叠?
 到【灌水乐园】发言


