


Python 数据分析之Numpy学习(一)
一、Numpy的引入
1.1 矩阵/向量的按位运算
需求:矩阵的按位相加
[0,1,4] + [0,1,8] = [0,2,12]
1.1.1 利用python实现矩阵/向量的按位运算
# 1.通过列表实现
list1 = [0, 1, 4]
list2 = [0, 1, 8]
# 列表使用 + 操作是将两个列表进行连接,不是算术运算
list1 + list2

# 结果:
[0, 1, 4, 0, 1, 8]
# 使用循环 + append实现
list_sum = []

# 通过索引进行遍历
for i in range(len(list1)):
    # 通过索引同时遍历list1和list2,方便从2个列表中同时提取数据
    list_sum.append(list1[i] + list2[i])

list_sum
[0, 2, 12]
# 2.通过推导式实现
[list1[i] + list2[i] for i in range(len(list1))]
[0, 2, 12]
对上述的按位相加运算进行扩充:
扩充到两个n位的列表进行按位相加操作,第一个列表的元素是0到n-1的平方,第二个列表的元素是0到n-1的三次方
[0, 1, 4, …] + [0, 1, 8, …] = [0, 2, 12, …]
# 构建一个函数,用来生成 0 到 n-1 的 m 次方列表
def create_list(n,m):    # n是列表中的元素数量,m是所求次方
    return [item ** m for item in range(n)]
# 测试构建的函数
# 生成 10 个元素的平方
create_list(10, 2)
[0, 1, 4, 9, 16, 25, 36, 49, 64, 81]
# 生成 5 个元素的立方
create_list(5, 3)
[0, 1, 8, 27, 64]
# 构建函数用来实现 n 个元素的平方和立方的按位相加
def pySum(n):  # n是列表的元素数量
    list_1 = create_list(n, 2)
    list_2 = create_list(n, 3)
    return [list_1[i] + list_2[i] for i in range(n)]
# 测试Pysum函数
pySum(5)
[0, 2, 12, 36, 80]
pySum(10)
[0, 2, 12, 36, 80, 150, 252, 392, 576, 810]
1.1.2 用numpy实现矩阵/向量的按位运算
# 载入库
import numpy as np
# 构建用Numpy实现按位相加的函数
def npSum(n):
    a = np.arange(n) ** 2
    b = np.arange(n) ** 3
    return a + b
# 测试npSum函数
npSum(5)
array([ 0, 2, 12, 36, 80])
npSum(10)
array([ 0, 2, 12, 36, 80, 150, 252, 392, 576, 810])
1.1.3 numpy与原生python在科学计算上的对比
# (1)溢出的问题
# python实现,正常
pySum(100000)[-3:]
[999920002099982, 999950000799996, 999980000100000]
# numpy实现,出现了溢出问题
npSum(100000)[-3:]
array([ 75983630, 9912572, -55558496])
在Windows操作系统下,用numpy创建的整数类型的数组默认采用的是 np.int32 数据类型,该数据类型能容纳的最大数值是2^31-1,当我们要计算的数值超过该数值,计算结果就会出错,解决方法是采用更大的数据类型 np.int64。
# 修改按位相加函数中的数组的数据类型改为 np.int64
def npSum64(n):
    a = np.arange(n, dtype = np.int64) ** 2
    b = np.arange(n, dtype = np.int64) ** 3
    return a + b
# 测试npSum64函数是否还会出现溢出问题,结果是输出正确结果
npSum64(100000)[-3:]
array([999920002099982, 999950000799996, 999980000100000], dtype=int64)
# (2)代码简洁程度:numpy代码比python代码实现按位相加要更简洁
# (3) numpy与原生python在科学计算上的性能差异
# %timeit    #精确计算其后代码执行的时间长度,是jupyter上的一个特殊的命令(魔法命令)
%timeit pySum(100000)
36.4 ms ± 922 μs per loop (mean ± std. dev. of 7 runs, 10 loops each)
%timeit npSum64(100000)
1.03 ms ± 11.6 μs per loop (mean ± std. dev. of 7 runs, 1,000 loops each)
两者执行相差:35.7 / 1,相差三十多倍,随着计算的复杂程度的提高,numpy节约的时间越多
总结:从上述情况来看,在实现科学计算上,不管是从代码的简洁程度还是执行效率上来看,numpy的表现较好
1.2 Numpy的简介
NumPy是一个开源的Python科学计算库,它包括:
- 一个强大的N维数组对象ndrray;
- 比较成熟的函数库;
- 用于整合C/C++和Fortran代码的工具包;
- 实用的线性代数、傅里叶变换和随机数生成函数
NumPy支持高维度数组与矩阵运算,此外也针对数组运算提供大量的数学函数库。
Numpy成为事实上的Scipy、Pandas、Scikit-Learn、Tensorflow、PaddlePaddle等框架的"通用底层语言"。
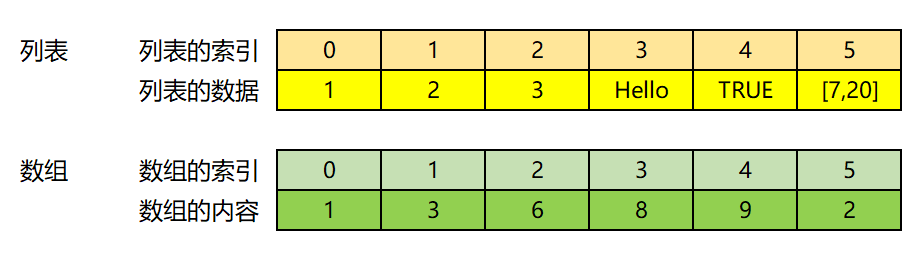
Numpy的array和Python的List的一个区别,是它元素必须都是同一种数据类型,比如都是数字int类型,这也是Numpy高性能的一个原因。
1.2.1 Python的缺点和Numpy的改进
标准Python中用列表(list)可以用来当作数组使用,但是列表中所保存的是对象(任意对象)的指针。对于数值运算来说这种结构比较浪费内存和CPU计算时间。
NumPy提供了以下对象,解决标准Python的不足:
①ndarray:N维数组(简称数组)对象,存储单一数据类型的N维数组
②ufunc:通用函数对象,对数组进行处理的函数。
1.2.2 Ndarray的理解
NumPy中的ndarray是一个多维数组对象,它是一个快速而灵活的大数据集容器,它由两部分组成:
①实际的数据;
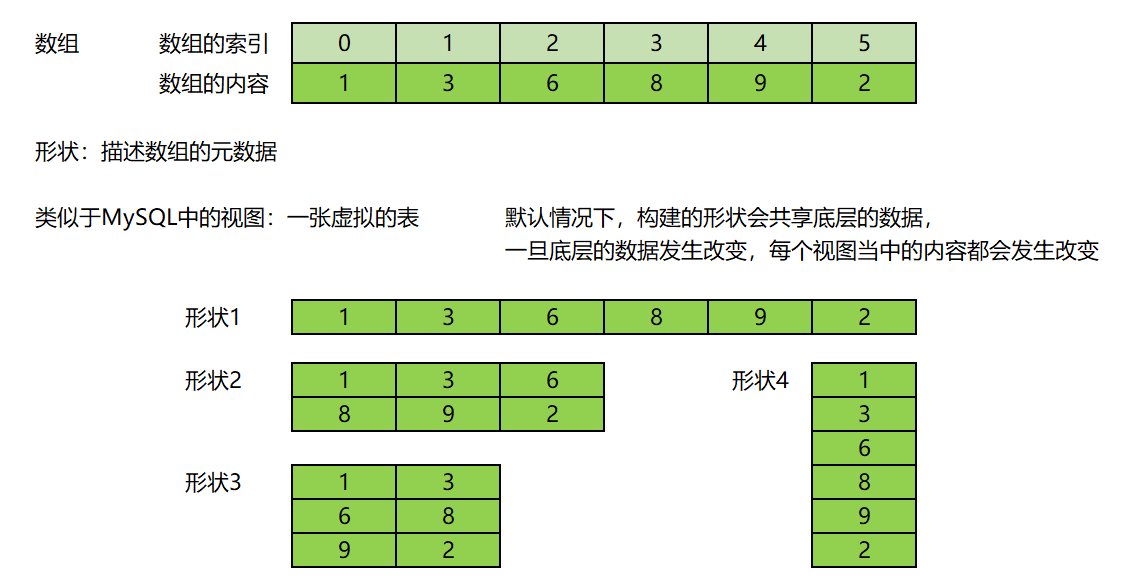
②描述这些数据的元数据。(相当于形状)
大部分的数组操作仅仅修改元数据部分,而不改变底层的实际数据。
形状:描述数组的元数据
二、创建Ndarray
2.1 一维数组的创建
2.1.1 np.array创建数组
# ?np.array
array(object, dtype=None, *, copy=True, order='K', subok=False, ndmin=0, like=None)
- object:用来转换为数组的对象,一般是容器/序列类对象
- dtype:数据类型,一般不专门设置,因为np会自动识别对象的数据类型
注意:array是个函数,后面要写成()
# 1.列表转数组
arr1 = np.array([1, 2, 3, 4, 5])
arr1   # 直接写是访问对象,直接访问对象是用逗号隔开
array([1, 2, 3, 4, 5])
# 用print输出,输出结果用空格隔开
print(arr1)
[1 2 3 4 5]
列表直接访问和用print输出没有区别,都是用逗号隔开,但是数组不一样
# 观察arr1的数据类型
type(arr1)     # numpy.ndarray
numpy.ndarray
# 2.元组转数组
np.array((1
最低0.47元/天 解锁文章


 被折叠的 条评论
为什么被折叠?
被折叠的 条评论
为什么被折叠?
 到【灌水乐园】发言


