


在Canvas的CanvasRenderingContext2D对象中是没有提供绘制箭头的方法,言外之意,在Canvas中要绘制箭头是需要自己封装函数来处理。那今天的主题就是来看怎么封装绘制箭头的函数。
了解一些基础知识
平常我们常常看到的一些箭头样式如下图所示
:

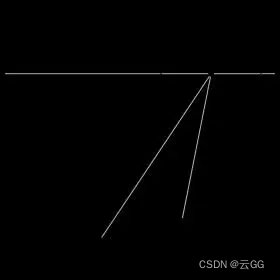
在绘制箭头最关键之处就是处理箭头:
其包括几个部分:
--一条直线,从起点P1到终点P2
--终点P2向这条直线两侧扩展,将会产生一个P3和P4点
--另外P2P3或者P2P4构成箭头斜线率
--箭头斜线和直线有一个夹角theta(θ)
--指定箭头的长度d
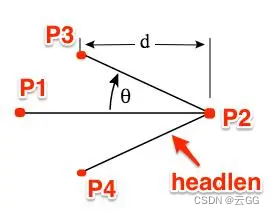
从上图上我们可以看出,控制一个箭头,可以通过这几个参数来控制:
--起点P1((fromX, fromY))
--终点P2((toX, toY))
--斜线长度headlen
--夹角theta(θ)
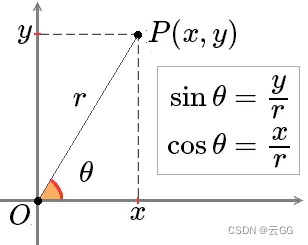
对于箭头的P3和P4点,我们就需要通过相应的三角函数计算得来。
那么P3的坐标可以轻易计算出来(错误):
p3[0] = P2[0] - Math.cos(θ * Math.PI / 180); // P3对应的X坐标
p3[1] = p2[1] - Math.sin(θ * Math.PI / 180); // P3对应的Y坐标
个人补充: 上面应该是错误的。根据上图公式求x,y的值应该是: x=cosθ * r, y=sinθ * r, 所以应该是:
p3[0] = P2[0] - Math.cos(θ * Math.PI / 180) * headlen; // P3对应的X坐标
p3[1] = p2[1] - Math.sin(θ * Math.PI / 180) * headlen; // P3对应的Y坐标
用同样的方法可以计算出P4坐标(错误):
p4[0] = P2[0] - Math.cos(θ * Math.PI / 180); // P4对应的X坐标
p3[1] = p2[1] + Math.sin(θ * Math.PI / 180); // P4对应的Y坐标
同样计P4坐标时headlen也要参与运算:
p4[0] = P2[0] - Math.cos(θ * Math.PI / 180) * headlen; // P4对应的X坐标
p3[1] = p2[1] + Math.sin(θ * Math.PI / 180) * headlen; // P4对应的Y坐标
除此之外,还有一个关键,就是箭头的角度。获取箭头的角度,可以直接通过atan2(y,x)来获取。这也就涉及到三角函数中的反正切函数。
在三角函数中,两个参数的函数atan2是正切函数tan的一个变种。对于任意不同时等于0的实参数x和y,atan2(y,x)所表达的意思是坐标原点为起点,指向(x,y)的射线在坐标平面上与x轴正方向之间的角的角度。
当y>0时,射线与x轴正方向的所得的角的角度指的是x轴正方向绕逆时针方向到达射线旋转的角的角度;
而当y<0时,射线与x轴正方向所得的角的角度指的是x轴正方向绕顺时针方向达到射线旋转的角的角度。在几何意义上,atan2(y, x) 等价于 atan(y/x),但 atan2 的最大优势是可以正确处理 x=0 而 y≠0
的情况,而不必进行会引发除零异常的 y/x 操作。
简单的用下图来阐述:
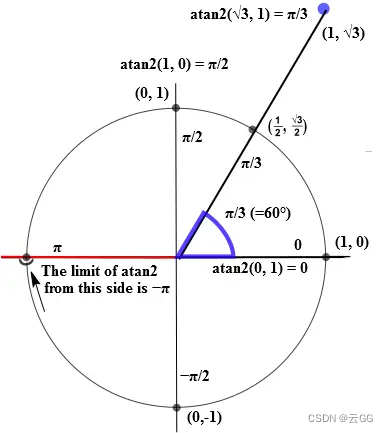
在一个单位圆内atan2函数在各点的取值。圆内标注代表各点的取值的幅度表示。图片中,从最左端开始,角度的大小随着逆时针方向逐渐从-π增大到+π,并且角度大小在点位于最右端时,取值为0。另外要注意的是,函数atan2(y,x)中参数的顺序是倒置的,atan2(y,x)计算的值相当于点(x,y)的角度值。
简单的了解了反正切函数,我们回到我们的主题中。
先来看一张图:
通过Math.atan2()函数计算出angle:
angle = Math.atan2(toY - fromY, toX - fromX)
为了和θ的单位值相匹配,将上面的公式进行一下转换:
angle = Math.atan2(toY - fromY, toX - fromX) * 180 / Math.PI; //弧度转角度
除此之外,还需要计算出箭头两条侧边线的夹角:
angle1 = (angle + theta) * Math.PI / 180; //角度转弧度
angle2 = (angle - theta) * Math.PI / 180; //角度转弧度
封装绘制箭头函数
通过前面的内容,可能对绘制箭头有一定的理论基础,接下来,我们看如何封装箭头函数。
drawArrow(ctx, fromX, fromY, toX, toY, theta, headlen, width, color)
这里我们传了九个参数:
ctx:Canvas绘图环境
fromX, fromY:起点坐标(也可以换成p1,只不过它是一个数组)
toX, toY:终点坐标 (也可以换成p2,只不过它是一个数组)
theta:三角斜边一直线夹角
headlen:三角斜边长度
width:箭头线宽度
color:箭头颜色
根据前面的内容,我们可以这样来写这个函数:
function drawArrow(ctx, fromX, fromY, toX, toY,theta,headlen,width,color) {
	theta = typeof(theta) != 'undefined' ? theta : 30;
	headlen = typeof(theta) != 'undefined' ? headlen : 10;
	width = typeof(width) != 'undefined' ? width : 1;
	color = typeof(color) != 'color' ? color : '#000';
	// 计算各角度和对应的P2,P3坐标
	var angle = Math.atan2(fromY - toY, fromX - toX) * 180 / Math.PI,
	angle1 = (angle + theta) * Math.PI / 180,
	angle2 = (angle - theta) * Math.PI / 180,
	topX = headlen * Math.cos(angle1),
	topY = headlen * Math.sin(angle1),
	botX = headlen * Math.cos(angle2),
	botY = headlen * Math.sin(angle2);
	ctx.save();
	ctx.beginPath();
	var arrowX = fromX - topX,
	arrowY = fromY - topY;
	ctx.moveTo(arrowX, arrowY);
	ctx.moveTo(fromX, fromY);
	ctx.lineTo(toX, toY);
	arrowX = toX + topX;
	arrowY = toY + topY;
	ctx.moveTo(arrowX, arrowY);
	ctx.lineTo(toX, toY);
	arrowX = toX + botX;
	arrowY = toY + botY;
	ctx.lineTo(arrowX, arrowY);
	ctx.strokeStyle = color;
	ctx.lineWidth = width;
	ctx.stroke();
	ctx.restore();
}
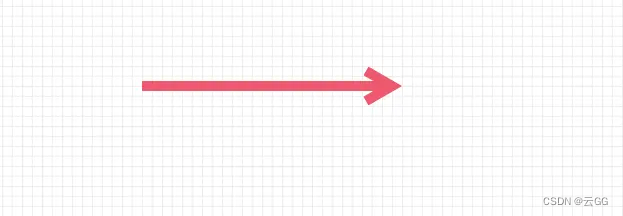
这个时候,只需要调用这个封装好的函数,我们就可以轻松的绘制一条向右的箭头:
drawArrow(ctx, 150, 100, 400,100,30,30,10,'#f36');
改变不同的坐标,可以得到不同方向的箭头:
// 向右箭头
drawArrow(ctx, myCanvas.width / 2, myCanvas.height / 2, myCanvas.width / 2 + 150, myCanvas.height / 2,30,30,4,'#f36');
// 向下箭头
drawArrow(ctx, myCanvas.width / 2, myCanvas.height / 2, myCanvas.width / 2, myCanvas.height / 2 + 150,30,30,4,'#f66');
// 向左箭头
drawArrow(ctx, myCanvas.width / 2, myCanvas.height / 2, myCanvas.width / 2 - 150, myCanvas.height / 2,30,30,4,'#0f6');
// 向上箭头
drawArrow(ctx, myCanvas.width / 2, myCanvas.height / 2, myCanvas.width / 2, myCanvas.height / 2 - 150,30,30,4,'#d6f');
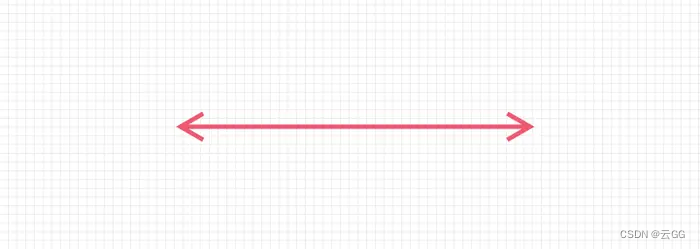
有的时候,我们需要线的两头都要有箭头形状,在上面的基础上,稍加修改,增加一个反项的代码即可:
function drawArrow(ctx, fromX, fromY, toX, toY, theta, headlen, width, color) {
	theta = typeof(theta) != 'undefined' ? theta : 30;
	headlen = typeof(theta) != 'undefined' ? headlen : 10;
	width = typeof(width) != 'undefined' ? width : 1;
	color = typeof(color) != 'color' ? color : '#000';
	var angle = Math.atan2(fromY - toY, fromX - toX) * 180 / Math.PI,
	angle1 = (angle + theta) * Math.PI / 180,
	angle2 = (angle - theta) * Math.PI / 180,
	topX = headlen * Math.cos(angle1),
	topY = headlen * Math.sin(angle1),
	botX = headlen * Math.cos(angle2),
	botY = headlen * Math.sin(angle2);
	ctx.save();
	ctx.beginPath();
	var arrowX = fromX - topX,
	arrowY = fromY - topY;
	ctx.moveTo(arrowX, arrowY);
	ctx.lineTo(fromX, fromY);
	arrowX = fromX - botX;
	arrowY = fromY - botY;
	ctx.lineTo(arrowX, arrowY);
	ctx.moveTo(fromX, fromY);
	ctx.lineTo(toX, toY);
	// Reverse length on the other side
	arrowX = toX + topX;
	arrowY = toY + topY;
	ctx.moveTo(arrowX, arrowY);
	ctx.lineTo(toX, toY);
	arrowX = toX + botX;
	arrowY = toY + botY;
	ctx.lineTo(arrowX, arrowY);
	ctx.strokeStyle = color;
	ctx.lineWidth = width;
	ctx.stroke();
	ctx.restore();
}
调用函数:
drawArrow(ctx, myCanvas.width / 2 - 200, myCanvas.height / 2, myCanvas.width / 2 + 200,myCanvas.height / 2,30,30,5,'#f36');
看到的效果如下:
上面我们看到的仅是一种箭头方式,文章开头,提到箭头方式有多种方式。那么我们可以将drawArrow功强变得更为强大一些。
drawHead:封装一个专门绘制箭头头部的函数,而且提供了四种样式做为选择
drawArrow: 封装直线箭头,并且提供两个方向
drawArcedArrow:函数一个曲线箭头


 1262
1262

 被折叠的 条评论
为什么被折叠?
被折叠的 条评论
为什么被折叠?
 到【灌水乐园】发言


