


异常封装类 如何统一后端响应的数据格式
1. 背景
后端作为数据的处理和响应,如何才能和前端配合好,能够高效的完成任务,其中一个比较重要的点就是后端返回的数据格式。
没有统一的响应格式:
// 第一种:
{
    "data": -1
}

// 第二种:
{
  "timestamp": "2021-07-08T08:05:15.423+00:00",
  "status": 500,
  "error": "Internal Server Error",
  "path": "/wrong"
}

// 第三种:
hello,javadaily
如果你作为一个后端开发的人员将这样式的数据返回给前端的话,那你肯定会被骂屎,如果前后端都是你干那当我没说,所以一个格式规范的响应是至关重要的
有统一的响应格式:
// 规范的返回响应的格式
{
  "message":"ok",
  "code": 0,
  "data":{
      "id": 007,
      "userName": "xdm"
  }
}
认识到了响应格式的规范性那么我们就来讲解一个如何实现
2. 代码实现
-
实现逻辑
- 编写一个异常信息枚举类(自定义错误码),将所有可能出现的异常信息通过枚举的方式列出来,方便后续使用
- 编写一个通用的异常返回类(构建一个语法糖)参数可以是自定义的也可以是枚举类传入的
- 编写一个异常返回的工具类,包含成功的返回和失败的返回
- 编写一个基础的异常类来继承运行时异常(目的就是为了能被全局异常处理器捕获到)
- 编写一个全局异常处理器通过ExceptionHandler来识别到不同的异常(自定的异常还是运行时异常)
-
具体实现
-
自定义错误码
public enum ErrorCode { SUCCESS(0, "ok"), PARAMS_ERROR(40000, "请求参数错误"), NOT_LOGIN_ERROR(40100, "未登录"), NO_AUTH_ERROR(40101, "无权限"), NOT_FOUND_ERROR(40400, "请求数据不存在"), SYSTEM_ERROR(50000, "系统内部异常"), OPERATION_ERROR(50001, "操作失败"); /** * 错误信息 */ private final String message; /** * 状态码 */ private final int code; ErrorCode(int code, String message) { this.message = message; this.code = code; } public String getMessage() { return message; } public int getCode() { return code; } } -
通用的异常返回类
// 在返回的类型中 数据data的响应是一个泛型 public class BaseResponse<T> implements Serializable { private static final long serialVersionUID = -3209965291812271422L; // 异常详细信息 private String message; // 异常编码 private int code; // 异常数据 泛型 private T data; public BaseResponse(int code, T data, String message) { this.code = code; this.data = data; this.message = message; } // 不传错误信息的构造方法 public BaseResponse(int code, T data) { this(code, data, ""); } // 通过枚举类来作为异常参数传入 public BaseResponse(ErrorCode errorCode) { this(errorCode.getCode(), null, errorCode.getMessage()); } } -
返回工具类
public class ResultUtils { /** * 成功的返回 需要使用泛型进行数据的返回 * @param data * @return * @param <T> */ public static <T> BaseResponse<T> success(T data) { return new BaseResponse(0, data, "ok"); } /** * 失败的返回 使用自定义错误码 * @param errorCode * @return */ public static BaseResponse error(ErrorCode errorCode) { return new BaseResponse(errorCode.getCode(), null, errorCode.getMessage()); } /** * 失败的返回 没有使用自定义错误码 自定义的异常信息 + 错误码 * @param code * @param message * @return */ public static BaseResponse error(int code, String message) { return new BaseResponse(code, null, message); } /** * 自定义错误码 + 自定义的异常信息 * @param errorCode * @param message * @return */ public static BaseResponse error(ErrorCode errorCode, String message) { return new BaseResponse(errorCode.getCode(), null, message); } } -
基础的异常类来继承运行时异常(实现全局异常处理)
public class BusinessException extends RuntimeException { /** * 错误码 */ private final int code; /** * 错误码和错误信息的构造方法 * @param code * @param message */ public BusinessException(int code, String message) { super(message); this.code = code; } /** * 通过传入的自定义错误码 */ public BusinessException(ErrorCode errorCode) { super(errorCode.getMessage()); this.code = errorCode.getCode(); } /** * 自定义错误码 + 自定义异常消息 * @param errorCode * @param message */ public BusinessException(ErrorCode errorCode, String message) { super(message); this.code = errorCode.getCode(); } public int getCode() { return code; } } -
全局异常处理器
@RestControllerAdvice // 实现bean注入
@Slf4j

/**
 * 全局异常处理器
 */
public class GlobalExceptionHandler {

    /**
     * 自定义的异常
     * @param e
     * @return
     */
    @ExceptionHandler(BusinessException.class)
    public BaseResponse<?> businessExceptionHandler(BusinessException e) {
        log.error("BusinessException: ", e);
        return ResultUtils.error(e.getCode(), e.getMessage());
    }

    /**
     * 运行时异常  系统异常
     * @param e
     * @return
     */
    @ExceptionHandler(RuntimeException.class)
    public BaseResponse<?> runtimeExceptionHandler(RuntimeException e) {
        log.error("RuntimeException: ", e);
        return ResultUtils.error(ErrorCode.SYSTEM_ERROR, "系统错误");
    }
}
至此一个全局异常的处理我们就实现了,能够在后续的代码编写中方便的返回我们的数据并且规范
-
3. 具体使用
在正确的返回,最终结果的返回的时候我们只需要使用异常工具类调用其中的成功的响应方法即可;失败的返回我们需要通过抛出异常的形式进行返回,然后全局异常处理器就能捕获到异常并输出。
 @PostMapping("/register")
	// 这里使用通用的异常类的类型
    public BaseResponse<Long> userRegister(@RequestBody UserRegisterRequest userLoginRequest) {
        if(userLoginRequest == null) {
            // 这里通过基础异常类来进行返回它继承的是运行时异常会被全局异常处理器捕获到
            // 传入的参数就是我们自定义的错误码(枚举)
            throw new BusinessException(ErrorCode.PARAMS_ERROR);
        }
        String userAccount = userLoginRequest.getUserAccount();
        String userPassword = userLoginRequest.getUserPassword();
        String checkPassword = userLoginRequest.getCheckPassword();
        if(StringUtils.isAnyBlank(userAccount, userPassword, checkPassword)) {
            throw new BusinessException(ErrorCode.PARAMS_ERROR);
        }
        long result = userService.userRegister(userAccount, userPassword, checkPassword);
        // 成功的返回 使用异常工具类
        return ResultUtils.success(result);
    }
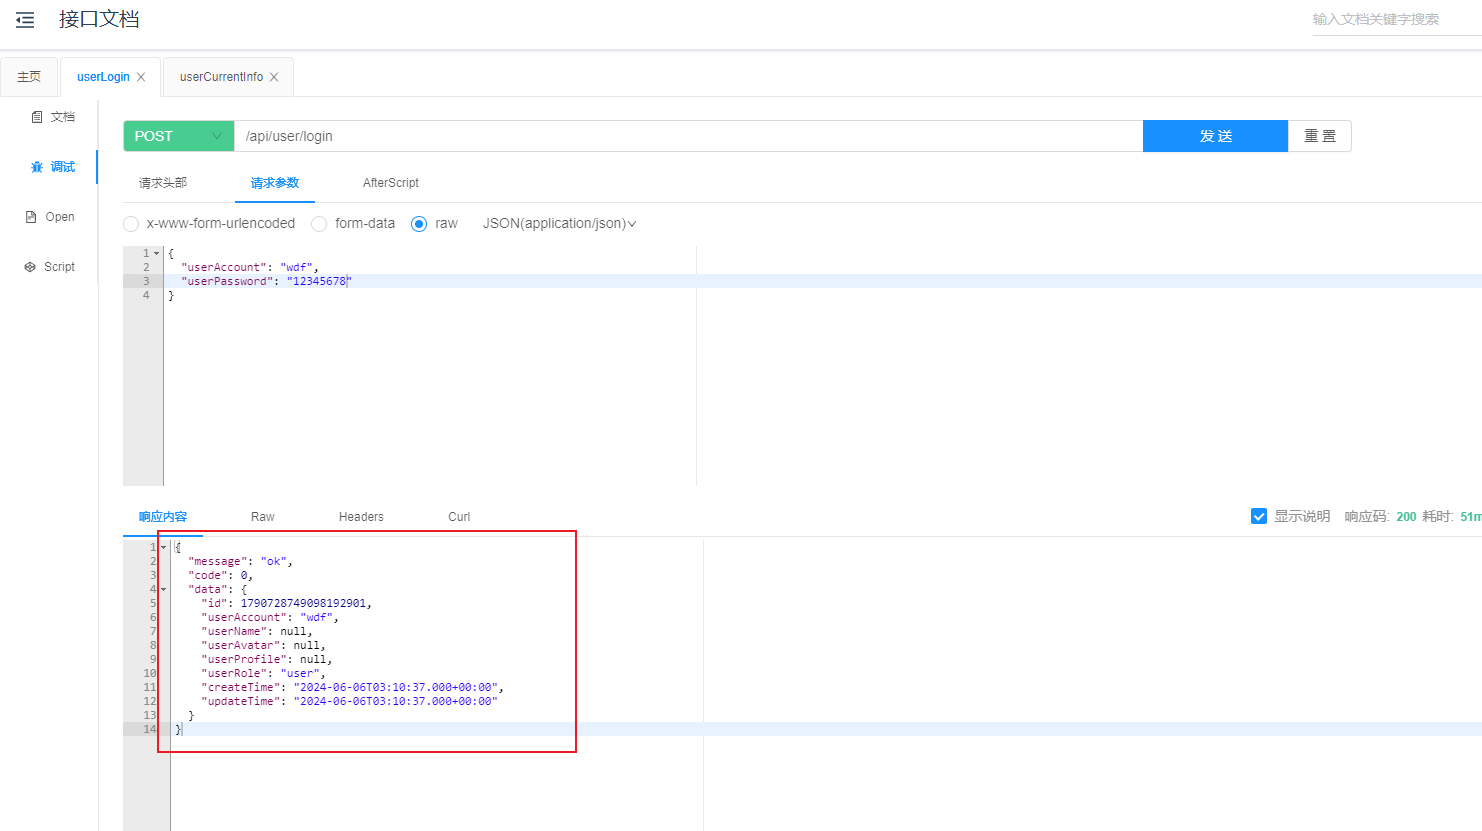
我们在使用在线接口文档进行测试的时候就能看到返回的数据是我们想要的格式
总结:
到这里整个异常类的统一处理就实现了,我们可以将这段代码自己保留下来然后直接复制到其他的项目上复用,这样你距离cv工程师又又又近了一步。


 被折叠的 条评论
为什么被折叠?
被折叠的 条评论
为什么被折叠?
 到【灌水乐园】发言


