


先简单回顾上篇所介绍的知识点:
Angular相关命令:
- 脚手架的安装: npm i -g @angular/cli --force
- 生成项目包: ng new 包名 生成过程中的选项 都直接回车选用默认项即可.
- 启动命令: ng s -o
- 生成组件: ng g c 组件名
Angular的一些用法:
- 插值: {{}}
- 属性的绑定: [属性名]="值" 或 属性名="{{值}}"
- 事件: (事件名)="方法名()"
- 双向数据绑定: [(ngModel)]="值" 必须到app.module.ts中注册 Forms 模块才可用
- 样式: [ngStyle]="{样式名:值}" 和 [ngClass]="{样式类: true/false}"
- 条件渲染: *ngIf="条件"
- 列表渲染: *ngFor="let item of items; let i=index; trackBy=函数"
话不多说直入主题
管道 pipe_______________________________
vue中对应的概念: 过滤器 filter
写法: {{ 值 | 过滤器}}
本质是 函数的语法糖写法, 实际上完成的任务: 函数(值) 语法糖: {{值|函数}}
Angular 与 Vue 不同之处:
- vue官方不提供任何过滤器, 需要自定义.
- angular 官方提供了一些常用 管道, 也支持自定义.
App文件夹下新建ng g c myc01组件
HTML文件:
(系统过滤器)
<!-- 系统管道 -->
<ul>
  <li>全小写: {{ "Nice To MEET You" | lowercase }}</li>
  <li>全大写: {{ "Nice To MEET You" | uppercase }}</li>
  <li>首字母大写: {{ "Nice To MEET You" | titlecase }}</li>
  <li>分数: {{ 0.555555 | percent }}</li>
  <li>分数(保留2位小数,整数位随意): {{ 0.055555 | percent: "0.2" }}</li>
  <li>分数(保留2位小数,2位整数): {{ 0.055555 | percent: "2.2" }}</li>
  <li>千进制的钱: {{ 123456.78 | currency }}</li>
  <li>千进制的钱(自定义符号): {{ 123456.78 | currency: "¥" }}</li>
  <!-- 单位: 毫秒 -->
  <li>日期: {{ 1619489367000 | date }}</li>
  <!-- 自定义格式: y年 M月 d日 H小时24  h小时12 m分 s秒 -->
  <li>自定义日期: {{ 1619489367000 | date: "yyyy-MM-dd HH:mm:ss" }}</li>

</ul>
新建ng g c myc02组件
HTML文件:
(自定义管道)
组件的HTML文件
<p>myc02 works!</p>

<!-- 自定义管道 -->
<!-- abs: 能够把数字转化成 正数,  称为 绝对值 -->
<div>{{ 9 | abs }}</div>
<div>{{ -9 | abs }}</div>

<!--
  管道的生成命令:
  ng generate pipe 管道名
  简写:
  ng g p 管道名
 -->

<!-- 新的管道: pf   得到数字的平方 -->
<!-- ng g p pf -->
<div>{{ 2 | pf }}</div>
<div>{{ 6 | pf }}</div>

<!-- 带有参数: 求次幂 -->
<!-- ng g p pow -->
<div>{{ 2 | pow: 2 }}</div>
<div>{{ 2 | pow: 10 }}</div>

<!-- 多参数: 利用 : 可以间隔多个参数 -->
<!-- ng g p add -->
<div>{{ 10 | add: 2:4:65:55 }}</div>
然后再在app文件夹下创建一个pipe文件夹(名字自定义见名知意即可)
然后 在pipe文件夹下运行 :ng g p 管道名字 (生成管道的命令: ng g p 管道名 , 全称: ng generate pipe 管道名)
会生成一个含管道名字的.ts文件 在里面定义过滤器函数如:
abs
import { Pipe, PipeTransform } from '@angular/core';

@Pipe({
  name: 'abs',
})
export class AbsPipe implements PipeTransform {
  // {{值|abs}} 此写法是一个语法糖, 真正执行的是:
  // new AbsPipe().transform(值)
  transform(value: number): number {
    // 参数 value 是 number 类型
    // 返回值 也是 numer类型
    return value > 0 ? value : -value;
  }
}
pf
import { Pipe, PipeTransform } from '@angular/core';

@Pipe({
  name: 'pf',
})
export class PfPipe implements PipeTransform {
  // ng g p pf
  transform(value: number): number {
    return value * value;
  }
}
pow
import { Pipe, PipeTransform } from '@angular/core';

@Pipe({
  name: 'pow',
})
export class PowPipe implements PipeTransform {
  // {{ 2 | pow: 2 }}
  transform(value: number, ...args: number[]): number {
    // number[] :  代表数组类型, 其中的值都是number类型
    return Math.pow(value, args[0]);
  }
}
add
import { Pipe, PipeTransform } from '@angular/core';

@Pipe({
  name: 'add',
})
export class AddPipe implements PipeTransform {
  //{{ 10 | add: 2:4:65:55 }}
  transform(value: number, ...args: number[]): number {
    args.forEach((item) => (value += item));
    return value;
  }
}
注意:每个管道都需 ng g p 管道名字 再定义函数
自定义指令_______________
vue中: directive
利用 指令 快速操作 指令所在 元素的 DOM
Angular生成命令:
ng generate directive 指令名
简写: ng g d 指令名
新建ng g c myc03组件
HTML文件:自定义指令
<p>myc03 works!</p>

<!--  -->
<ul>
  <!-- 利用 appHide 可以隐藏元素 -->
  <!-- ng g d hide -->
  <li appHide>妮妮</li>
  <!--
    生成指令命令: ng generate directive 指令名
    简称: ng g d 指令名
   -->
  <!-- app前缀是自带的, 实际执行: ng g d green -->
  <li appGreen>波波</li>
  <li>可可</li>
  <li>媛媛</li>
  <li>欢欢</li>
</ul>

<div>
  <input type="text" /><br />
  <!-- 自动获取焦点 -->
  <!-- 元素具有 focus() 方法, 调用即可获得焦点 -->
  <!-- ng g d focus -->
  <input type="text" appFocus /><br />
  <input type="text" /><br />
  <input type="text" /><br />
</div>
然后再在app文件夹下创建directive文件夹 再再directive文件夹下运行命令 ng g d 指令名
(这里的指令名不需要加app前缀) 运行命令后会生成对应的.ts文件 需要在其中定义指令的内容
ng g d green -----green.directive.ts文件
import { Directive, ElementRef } from '@angular/core';

@Directive({
  selector: '[appGreen]',
})
export class GreenDirective {
  // <li appGreen>波波</li>
  // 指令所在的元素, 此处就是 li 会自动作为初始化的参数传入构造方法
  constructor(e: ElementRef) {
    // 此处需要声明类型, 固定类型为 ElementRef
    console.log(e);
    e.nativeElement.style.color = 'green';
    e.nativeElement.style.border = '1px solid purple';
  }
}
ng g d hide ---hide.directive.ts文件
import { Directive, ElementRef } from '@angular/core';

@Directive({
  selector: '[appHide]',
})
export class HideDirective {
  constructor(e: ElementRef) {
    e.nativeElement.style.display = 'none';
  }
}
ng g d focus ---focus.directive.ts文件
import { Directive, ElementRef } from '@angular/core';

@Directive({
  selector: '[appFocus]',
})
export class FocusDirective {
  constructor(e: ElementRef) {
    console.log(e);
    // focus: 在 input 的 原型链 的 原型链 中
    e.nativeElement.focus();
  }
}
生命周期_____________________
Vue中组件的生命周期:
组件: 准备创建 ->创建完毕 -> 准备挂载 -> 挂载完毕 -> 准备更新 ->更新完毕 -> 将要销毁 ->销 毁完毕
钩子函数: 每个周期都会触发对应的函数, 这类函数叫 钩子函数
新建ng g c myc04组件
在其ts文件中:
import { Component, OnInit } from '@angular/core';

@Component({
  selector: 'app-myc04',
  templateUrl: './myc04.component.html',
  styleUrls: ['./myc04.component.css'],
})
export class Myc04Component implements OnInit {
  count = 1;

  constructor() {}

  ngOnInit(): void {
    // 相当于vue 的 created 周期
    console.log('ngOnInit: 开始初始化');
  }

  // 下方两个周期 合并之后, 就是 vue 的 mounted 周期, 挂载完毕
  ngAfterContentInit(): void {
    console.log('ngAfterContentInit: 数据初始化完毕');
  }

  ngAfterViewInit(): void {
    console.log('ngAfterViewInit: UI界面初始化完毕');
  }

  //更新
  ngAfterContentChecked(): void {
    console.log('ngAfterContentChecked: 数据更新');
  }

  ngAfterViewChecked(): void {
    console.log('ngAfterViewChecked: UI界面更新');
  }
//销毁
  ngOnDestroy(): void {
    console.log('ngOnDestroy: 开始销毁');
  }
}
组件间参数传递__________________________
父子传参
vue中:
子组件: props: ['name'] 声明需要一个 name 参数
使用时父组件: <tag name="博客"/>即可将name值传递给子组件
创建组件: ng g c myc05
在app.component.html中 给出要传递的值
<app-myc05 name="dongdong" [age]="18"></app-myc05>
在myc05.component.ts中设置接收的值
import { Component, Input, OnInit } from '@angular/core';

@Component({
  selector: 'app-myc05',
  templateUrl: './myc05.component.html',
  styleUrls: ['./myc05.component.css'],
})
export class Myc05Component implements OnInit {
  // 声明接受外来参数的属性: name
  // 外来传入 属性名:类型 = 默认值;
  @Input() name: string = '默认值';
  //@Input(): 特殊标识, 代表此属性来自外部传入

  @Input() age: number = 0;

  constructor() {}

  ngOnInit(): void {}
}
在myc05.component.html中接收值并显示
<p>myc05 works!</p>

<h1>name:{{ name }}</h1>
<h1>age:{{ age }}</h1>
子父传参
Vue中:
在父中声明一个函数, 利用子的事件方式, 传递函数给子
就实现了 函数是父的, 但是在子中使用
子中, 触发获取的父的函数, 传入的参数是子的. 函数体是父的. 把子的值传递到父的函数中 特殊的触发方式: $emit
父组件:
//父组件
<template>
//定义函数在子组件上
    <ratingselect @select-type="onSelectType"></ratingselect>
</template>
<script>
    data () {
      return {
        selectType: 0,
    },
    methods: {
//定义函数内容
      onSelectType (type) {
        this.selectType = type
      }
    }
</script>
子组件:
// 子组件
<template>
  <div>
//通过点击传入参数
    <span @click="select(0, $event)"  :class="{'active': selectType===0}"></span>
    <span @click="select(1, $event)"  :class="{'active': selectType===1}"></span>
    <span @click="select(2, $event)"  :class="{'active': selectType===2}"></span>
  </div>
</template>
<script>
    data () {
      return {
        selectType: 0,
    },
    methods: {
        select (type, event) {
            this.selectType = type
//接收父组件传来的函数并传入参数type
            this.$emit('select-type', type)
      }
    }
</script>
Angular中:
创建组件: ng g c myc06
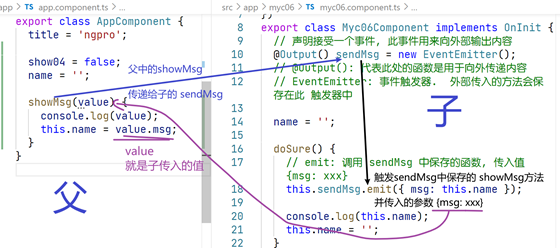
先在父级app.component.ts中定义函数内容
import { Component } from '@angular/core';

@Component({
  selector: 'app-root',
  templateUrl: './app.component.html',
  styleUrls: ['./app.component.css'],
})
export class AppComponent {
  title = 'ngpro';

  show04 = false;
  name = '';
//定义函数并设置接收的参数
  showMsg(value) {
    console.log(value);
    this.name = value.msg;
  }
}
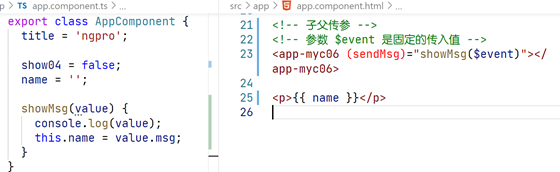
再再父级app.component.html中将函数传递给子组件
<!-- 子父传参 -->
<!-- 参数 $event 是固定的传入值 -->
<app-myc06 (sendMsg)="showMsg($event)"></app-myc06>

<!--将接收的子组件参数显示在父组件上-->
<p>{{ name }}</p>
子组件myc06.component.ts中接收父组件传递来的函数并传入参数
import { Component, EventEmitter, OnInit, Output } from '@angular/core';

@Component({
  selector: 'app-myc06',
  templateUrl: './myc06.component.html',
  styleUrls: ['./myc06.component.css'],
})
export class Myc06Component implements OnInit {
  // 声明接受一个事件, 此事件用来向外部输出内容
  @Output() sendMsg = new EventEmitter();
  // @Output(): 代表此处的函数是用于向外传递内容
  // EventEmitter: 事件触发器.  外部传入的方法会保存在此 触发器中

  name = '';

  doSure() {
    // emit: 调用 sendMsg 中保存的函数, 传入值  {msg: xxx}
    this.sendMsg.emit({ msg: this.name });

    console.log(this.name);
    this.name = '';
  }

  constructor() {}

  ngOnInit(): void {}
}
子组件myc06.component.html中定义点击事件触发函数传入参数
<div style="padding: 20px; border: 1px solid purple; width: 400px">
  <b>这里是 myc06</b>
  <div>
    <!-- 双向绑定数据 -->
    <input type="text" [(ngModel)]="name" />
    <br />
    <!-- 点击触发函数将参数传递给父组件 -->
    <button (click)="doSure()">确定</button>
  </div>
</div>
兄弟传参
Vue中, 有3种方式实现
依赖共同的父组件: 例如 A 有 B C 两个子; B -> A -> C (通过子传父,父传子)
事件车: eventBus. 利用共同的 Vue 对象共享变量
Vuex: 可以在任意关系的组件之间共享数据
在vue中, 就是 Vuex 全局状态共享
在angular中, 此知识点叫 服务
新建组件: ng g c myc07 和 ng g c myc08
在app.component.html 中将组件myc07,myc08引入
<app-myc07></app-myc07>
<hr>
<app-myc08></app-myc08>
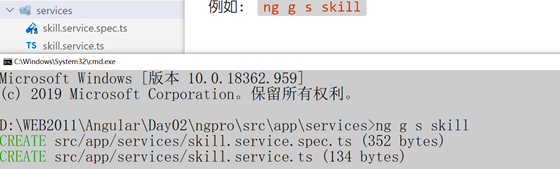
在app文件夹下创建services文件夹 然后在该文件夹下运行(全称:ng generate service 服务名)命令 ng g s 服务名
例如: ng g s skill
然后在skillls.service.ts中定义全局变量
import { Injectable } from '@angular/core';

@Injectable({
  providedIn: 'root',
})
export class SkillService {
  //定义的全局变量
  skills = ['vue', 'angular', 'react', 'jQuery', 'Vuex', 'UniApp'];

  constructor() { }
}
然后在myc07.component.ts ,myc08.component.ts文件中分别引入全局变量
import { Component, OnInit } from '@angular/core';
import { SkillService } from '../services/skill.service';

@Component({
  selector: 'app-myc08',
  templateUrl: './myc08.component.html',
  styleUrls: ['./myc08.component.css'],
})
export class Myc08Component implements OnInit {
  // TS语言的语法:  变量:类型名;
  skillS: SkillService;

  // 构造方法: 声明依赖. 当前组件实例化必须要 1个 SkillService 类型的值
  // 组件是NG的系统自动实例化: 会识别依赖 然后注入对应的值
  constructor(skillS: SkillService) {
    // skills 是形参, 属于局部变量. 只能在当前方法中使用
    // 要想到 html 中使用, 则必须保存到 属性 中
    this.skillS = skillS;
  }

  ngOnInit(): void {}
}

/**
 * TS语言的依赖注入机制
 *
 * 基本的例子:
 * - 依赖: 人要活着  要喝水 吃饭 呼吸
 * - 注入: 要活着,必须 提供 水 饭 空气
 */

// show函数, 需要一个 string 类型的参数 -- 依赖
function show(name: string) {}

// 使用:  注入
show('mike');

class Demo {
  // 构造函数: 声明依赖  当前类初始化要 1个 string类型的值
  constructor(name: string) {}
}

// 注入: 使用时, 必须提供 1个 string 类型的值
new Demo('true');
import { Component, OnInit } from '@angular/core';
//引入服务
import { SkillService } from '../services/skill.service';

@Component({
  selector: 'app-myc07',
  templateUrl: './myc07.component.html',
  styleUrls: ['./myc07.component.css'],
})
export class Myc07Component implements OnInit {
  // 实际工作时, 一个服务中有非常多的内容需要使用
  skillS: SkillService;

  constructor(skillS: SkillService) {
    console.log(skillS);
    // 属性 = 局部变量;   因为局部变量不能在html中使用, 必须变成属性
    this.skillS = skillS;
  }

  ngOnInit(): void {}
}
07语法糖写法
import { Component, OnInit } from '@angular/core';
import { SkillService } from '../services/skill.service';

@Component({
  selector: 'app-myc07',
  templateUrl: './myc07.component.html',
  styleUrls: ['./myc07.component.css'],
})
export class Myc07Component implements OnInit {


  //语法糖写法   等价于之前的写法

  constructor(public skills: SkillService) { }


  ngOnInit(): void { }
}
最后将引入的数据显示到页面上
myc07.component.html
<p>myc07 works!</p>

<ul>
  <li *ngFor="let item of skillS.skills; let i = index">
    <span>{{ item }}</span>

    <!-- 这里点击删除  对应的08文件中也会删除 实现了兄弟间共享数据 -->
    <button (click)="skillS.skills.splice(i, 1)">删除</button>
  </li>
</ul>
myc08.component.html
<p>myc08 works!</p>

<ul>
  <li *ngFor="let item of skillS.skills; let i = index">
    <span>{{ item }}</span>


    <!-- 这里点击删除  对应的07文件中也会删除 实现了兄弟间共享数据 -->
    <button (click)="skillS.skills.splice(i, 1)">删除</button>
  </li>
</ul>
如此一来就实现了兄弟间传参
系统服务________________________
官方默认提供了非常多 强大的服务, 例如: 网络服务
网络服务
网络模块默认未加载, 必须到 app.module.ts 中加载网络模块


创建组件: ng g c myc10
myc10.component.ts中使用网络模块
import { HttpClient } from '@angular/common/http';
import { Component, OnInit } from '@angular/core';


//
//// TypeScript语言是类型严格语言
// 此语言中, 必须掌握 自定义对象类型的声明

// interface 类型名{}
interface Res {
  code: number;
  message: string;
  result: Result[];
}

interface Result {
  image: string;
  path: string;
  passtime: string;
  title: string;
}

@Component({
  selector: 'app-myc10',
  templateUrl: './myc10.component.html',
  styleUrls: ['./myc10.component.css'],
})
export class Myc10Component implements OnInit {
  // 此处声明依赖: 需要网络服务 HttpClient 的支持
  // 这是语法糖写法
  constructor(public http: HttpClient) { }

  result: Result[] = [];

  // 相当于vue 的 created 周期
  ngOnInit(): void {
    // axios.get(url).then(res=>{})
    const url = 'https://api.apiopen.top/getWangYiNews';

    // 差别:用 subscribe单词 替换了then, 效果是一样的
    this.http.get(url).subscribe((res: Res) => {
      // 变量:any  代表此变量是任意类型, 则vscode不会检测此类型 使用时是否有错误
      // 返回值的类型, 应该自己声明, 这样才标准
      console.log(res);

      this.result = res.result;
    });
  }
}

/**
 * jQuery  - ajax
 * vue -- axios
 * react - fetch
 * angular - 网络服务
 */
获取数据后就可以挂载到页面上显示了
跨域问题_______________________
angular的服务器提供 proxy 代理方式解决跨域问题
生成组件: ng g c myc11
在app.module.ts中引入HttpClientModule模块


在组件的ts文件中发送请求(以一个跨域的连接为例
import { HttpClient } from "@angular/common/http";
import { Component, OnInit } from '@angular/core';
@Component({
  selector: 'app-myc10',
  templateUrl: './myc10.component.html',
  styleUrls: ['./myc10.component.css']
})
export class Myc10Component implements OnInit {
  constructor(public http: HttpClient) { }

  ngOnInit(): void {
    //不使用代理的url
    const url = 'https://m.douyu.com/api/room/list?page=1&type=yz';


    this.http.get(url).subscribe((res) => {
      console.log(res);
    });
  }

}
此时会出现跨域错误

开始解决跨域错误
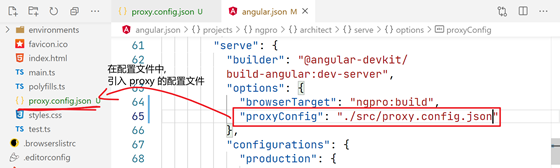
在 src 目录下, 新建 proxy.config.json 文件
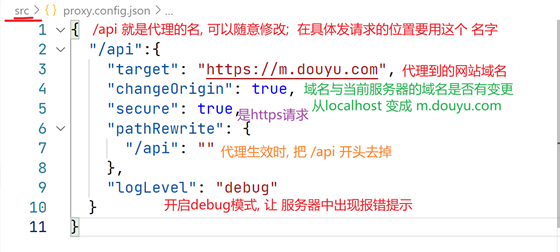
{
"/api":{
"target": "https://m.douyu.com",
"changeOrigin": true,
"secure": true,
"pathRewrite": {
"/api": ""
},
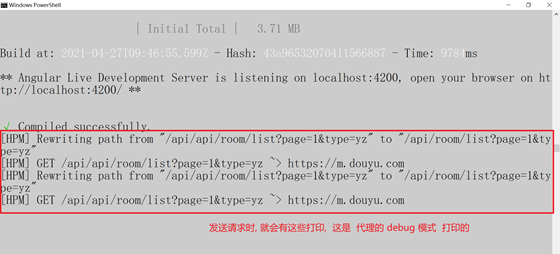
"logLevel": "debug"
}
}
在angular.json中配置proxy文件
myc11.component.ts代码中, 把请求的地址 改成 代理方式
//注意引入网络模块
import { HttpClient } from "@angular/common/http";
import { Component, OnInit } from '@angular/core';
@Component({
  selector: 'app-myc10',
  templateUrl: './myc10.component.html',
  styleUrls: ['./myc10.component.css']
})
export class Myc10Component implements OnInit {
  constructor(public http: HttpClient) { }

  ngOnInit(): void {
    //不使用代理的url
    // const url = 'https://m.douyu.com/api/room/list?page=1&type=yz';

    // 使用代理的 /api 代替 https://m.douyu.com

    const url = '/api/api/room/list?page=1&type=yz';

    this.http.get(url).subscribe((res) => {
      console.log(res);
    });
  }

}
综上做一个新的例子 重新生成项目 ng new work
创建组件 ng g c work
在app.module.ts中


app.component.html中引入子组件
<app-work></app-work>
work.component.ts 获取页面数据以及一些函数
import { HttpClient } from '@angular/common/http';
import { Component, OnInit } from '@angular/core';

@Component({
  selector: 'app-work',
  templateUrl: './work.component.html',
  styleUrls: ['./work.component.css'],
})
export class WorkComponent implements OnInit {
  //网络服务的语法糖写法
  constructor(public http: HttpClient) { }

  // 定义函数传递参数 方便获取url不同页数
  getUrl(pno: number) {
    return (
      'http://101.96.128.94:9999/mfresh/data/news_select.php?pageNum=' + pno
    );
  }
  //ngfor不能直接遍历数字 将页数转换为数组
  range(num: number) {
    const arr = [];
    for (let i = 1; i <= num; i++) {
      arr.push(i);
    }
    return arr;
  }
  //点击不同的页数  发送请求
  getData(pno: number) {
    const url = this.getUrl(pno);

    this.http.get(url).subscribe((res: News) => {
      this.news = res;
    });
  }

  news: News; //没写值 则默认值为 undefined

  //初始化是获取数据
  ngOnInit(): void {
    const url = this.getUrl(1);

    this.http.get(url).subscribe((res: News) => {
      console.log(res);
      // 常见波浪线问题: 返回值的类型默认是 Object, 就是 空{},  必须认为声明类型, vscode 才会正常识别
      this.news = res;
    });
  }
}

/////
///// 非必备操作, 但是TS支持类型
///// 应该对返回值进行类型声明
// 在使用时, 可以提供更多的便捷
interface News {
  data: NewsData[];
  pageCount: number;
  pageNum: number;
  pageSize: number;
  totalRecord: number;
}

interface NewsData {
  content: string;
  nid: string;
  pubTime: string;
  title: string;
}
work.component.html构建页面
<p>work works!</p>

<!-- 利用if判断, 在网络数据没有之前, 不要渲染这些DOM, 防止报错 -->
<div class="news" *ngIf="news">
    <div>
        <div *ngFor="let item of news.data; let i = index" class="cell">
            <span>{{ item.title }}</span>
            <!-- 管道写法 -->
            <span>{{ item.pubTime | date: "yyyy-MM-dd" }}</span>
        </div>
    </div>
    <div class="pages">
        <span (click)="getData(news.pageNum - 1)" *ngIf="news.pageNum > 1">上一页</span>
        <span class="disable" *ngIf="news.pageNum == 1">上一页</span>
        <span (click)="getData(item)" [ngClass]="{ cur: news.pageNum == item }"
            *ngFor="let item of range(news.pageCount)">{{ item }}</span>
        <span (click)="getData(news.pageNum + 1)" *ngIf="news.pageNum < news.pageCount">下一页</span>
        <span class="disable" *ngIf="news.pageNum >= news.pageCount">下一页</span>
    </div>
</div>
work.component.css修饰页面
.news {
    width: 700px;
    margin: 0 auto;
  }

  .cell {
    padding: 5px;
    border-bottom: 1px gray dashed;
    display: flex;
    justify-content: space-between;
  }

  .pages {
    text-align: center;
    margin-top: 10px;

    user-select: none;
  }

  .pages > span {
    display: inline-block;
    margin: 2px;
    padding: 2px 8px;
    border: 1px solid gray;
    color: gray;
    border-radius: 3px;
  }

  .pages > span:not(.cur):not(.disable):hover {
    color: orange;
    border-color: orange;
    cursor: pointer;
  }

  .pages > .cur {
    color: white;
    background-color: orange;
    border-color: orange;
  }

  /* 不可用状态 */
  .pages > .disable {
    color: lightgray;
    border-color: lightgray;
  }
掌控子元素________________
在 Vue 中: 利用 ref 属性 绑定一个变量 到 一个组件上, 然后就可以利用变量操作组件
创建组件: ng g c myc01
在myc01.component.ts中定义事件和变量
import { Component, OnInit } from '@angular/core';

@Component({
  selector: 'app-myc01',
  templateUrl: './myc01.component.html',
  styleUrls: ['./myc01.component.css'],
})
export class Myc01Component implements OnInit {
  num = 1;

  show() {
    alert('我是myc01');
  }

  constructor() {}

  ngOnInit(): void {}
}
在myc01.component.html中构建子元素基本结构
<p>myc01 works!</p>

<div>{{ num }}</div>
在app.component.html中给子元素myc01绑定唯一标识
<!-- 掌控子元素 -->
<button (click)="changeSon()">修改子元素内容</button>
<!-- # 用于为子元素快速添加唯一标识, 类似于id -->
<!-- 这里的 abc 随意起名, 不和其他元素重复即可. -->
<app-myc01 #abc></app-myc01>
在app.component.ts中通过viewchild查找指点绑定的元素通过事件控制其子元素事件和变量
//导入ViewChild
import { Component, ViewChild } from '@angular/core';

import { Myc01Component } from './myc01/myc01.component';

@Component({
  selector: 'app-root',
  templateUrl: './app.component.html',
  styleUrls: ['./app.component.css'],
})
export class AppComponent {
  title = 'ngpro';

  // ViewChild: 查找指定id的元素
  // 找到 #abc的元素, 绑定给 xyz 变量
  @ViewChild('abc') xyz: Myc01Component;

  //定义事件函数控制子元素
  changeSon() {
    console.log(this.xyz);

    this.xyz.num = 100;

    this.xyz.show();
  }
}


 1069
1069


 被折叠的 条评论
为什么被折叠?
被折叠的 条评论
为什么被折叠?
 到【灌水乐园】发言


