


NDB使用
安装:
- npm i ndb --global
- package中定义:“debug”: “ndb server.js”
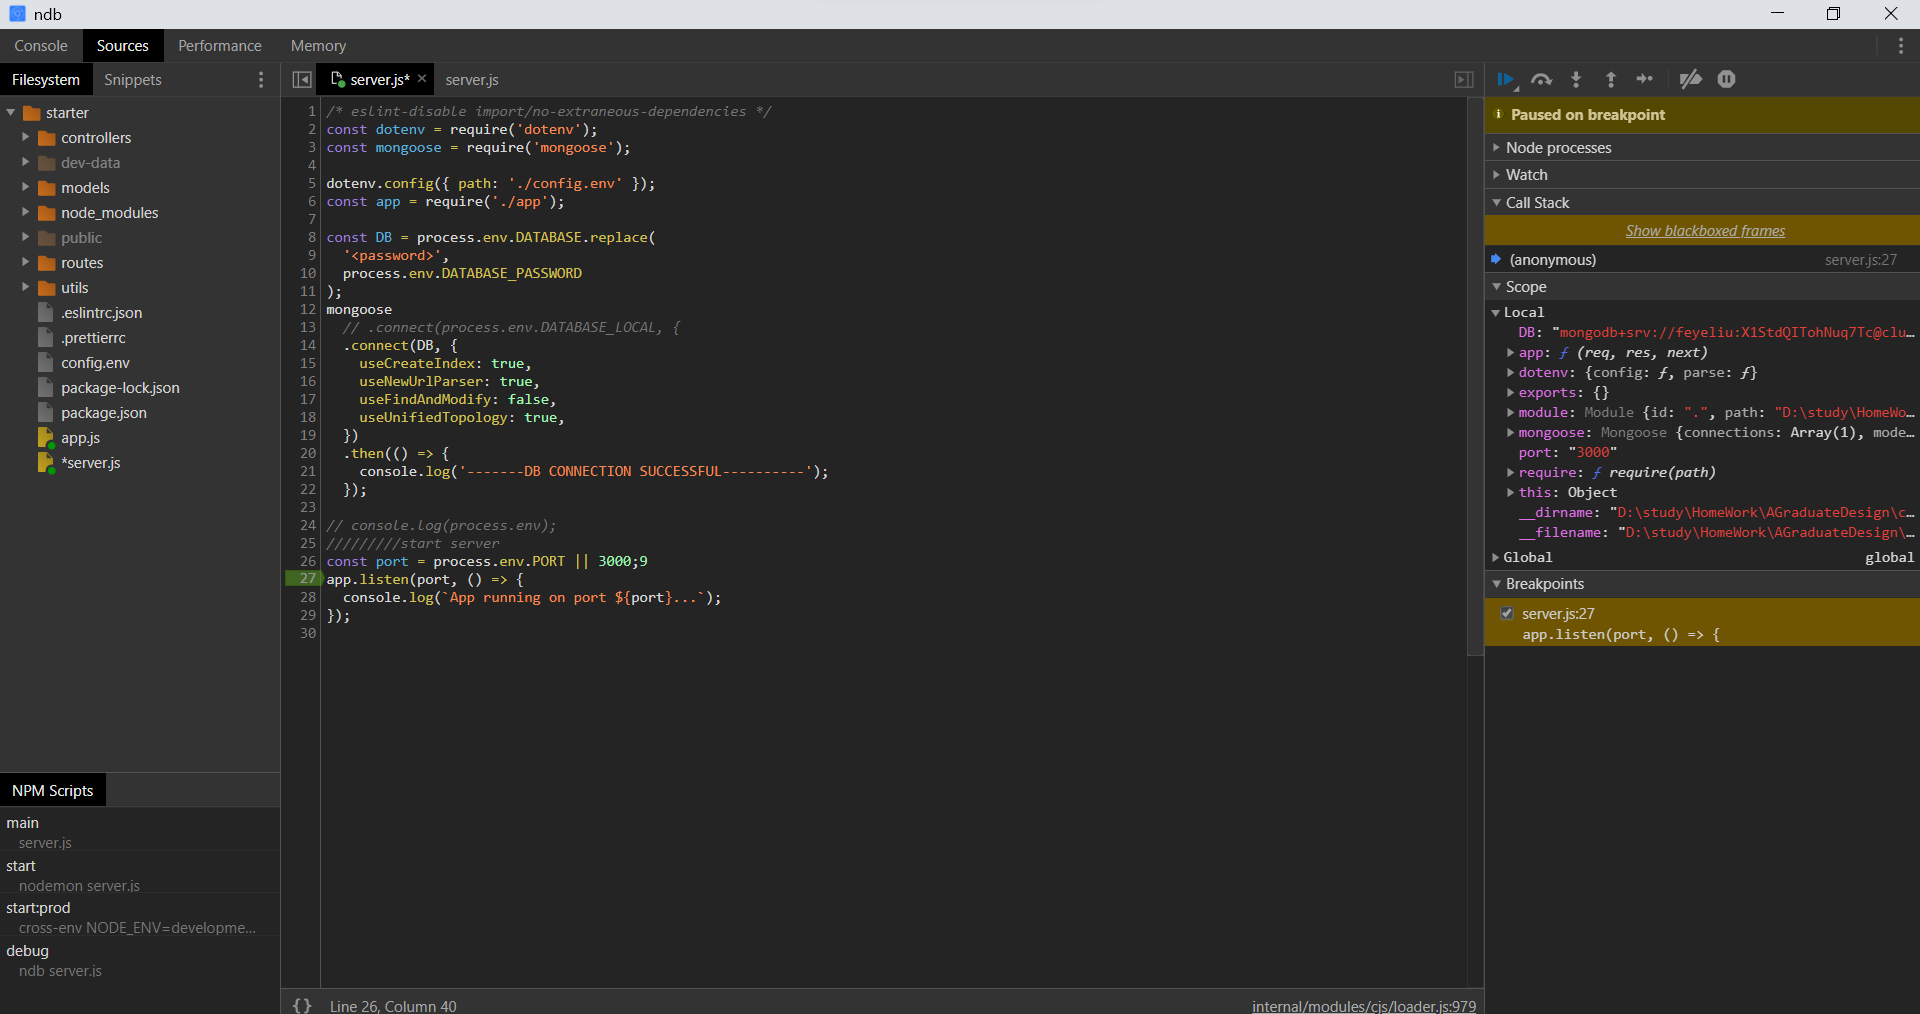
设置断点
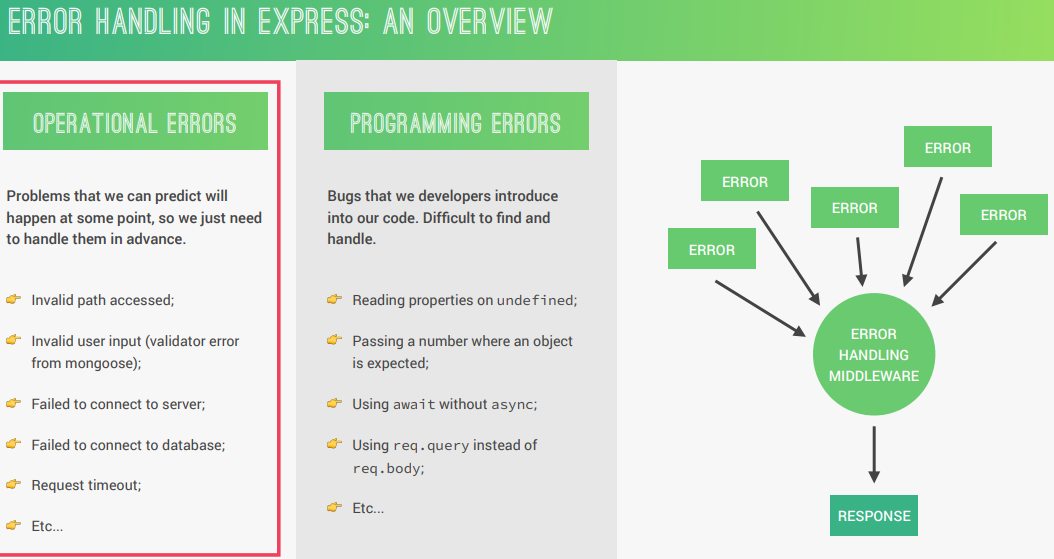
解决错误
错误场景:
解决未定义路由
将无法被解析的请求放在所有路由定义后面,这样就可以自动运行到它。
//all方法可以接受所有请求的方法
app.all('*', (req, res, next) => {
  res.status(404).json({
    status: 'fial',
    msg: `Can't find ${req.originalUrl} on this server`,
  });
});
将其集成到一个文件
重构error
重构error对象,这样就使catch中的错误信息可以被统一传入,只要发生错误就进入这个函数
class AppError extends Error {
  constructor(message, statusCode) {
    super(message);
    this.statusCode = statusCode;
    this.status = `${statusCode}`.startsWith('4') ? 'fail' : 'error';
    this.isOperational = true;
	//推到栈顶
    Error.captureStackTrace(this, this.constructor);
  }
}
module.exports = AppError;
//结构:err, req, res, next
module.exports = (err, req, res, next) => {
  //   console.log(err.stack);
  err.statusCode = err.statuseCode || 500;
  err.status = err.status || 'error';

  res.status(err.statusCode).json({
    status: err.status,
    msg: err.message,
  });
};
传入错误信息
app.all('*', (req, res, next) => {
  next(new AppError(`Can't find ${req.originalUrl} on this server`, 404));
});

app.use(globalErrorHandler);
集成trycatch
module.exports = fn => {
  return (req, res, next) => {
    fn(req, res, next).catch(next);
  };
};
这样可以不使用trycatch语法块,而是使用链式函数,将try的内容返回
exports.getAllTours = catchAsync(async (req, res, next) => {
  const features = new APIFeatures(Tour.find(), req.query)
  const tours = await features.query;

  // SEND RESPONSE
  res.status(200).json({
    status: 'success',
    results: tours.length,
    data: {
      tours
    }
  });
});//在后面自动接了catch
区分开发环境的错误与客户端的错误
- Programming or other unknown error: don’t leak error details
- 将可被处理的错误推到客户端,其加了 this.isOperational = true;
const sendErrorDev = (err, res) => {
  res.status(err.statusCode).json({
    status: err.status,
    error: err,
    message: err.message,
    stack: err.stack
  });
};

const sendErrorProd = (err, res) => {
  // Operational, trusted error: send message to client
  if (err.isOperational) {
    res.status(err.statusCode).json({
      status: err.status,
      message: err.message
    });

    // Programming or other unknown error: don't leak error details
  } else {
    // 1) Log error
    console.error('ERROR 💥', err);

    // 2) Send generic message
    res.status(500).json({
      status: 'error',
      message: 'Something went very wrong!'
    });
  }
};

module.exports = (err, req, res, next) => {
  // console.log(err.stack);

  err.statusCode = err.statusCode || 500;
  err.status = err.status || 'error';

  if (process.env.NODE_ENV === 'development') {
    sendErrorDev(err, res);
  } else if (process.env.NODE_ENV === 'production') {
  //避免重新分配err=。。。,因此将其进行深拷贝
    let error = { ...err };

    if (error.name === 'CastError') error = handleCastErrorDB(error);
    if (error.code === 11000) error = handleDuplicateFieldsDB(error);
    if (error.name === 'ValidationError')
      error = handleValidationErrorDB(error);
    if (error.name === 'JsonWebTokenError') error = handleJWTError();
    if (error.name === 'TokenExpiredError') error = handleJWTExpiredError();

    sendErrorProd(error, res);
  }
};
区分不同类型的错误
const AppError = require('./../utils/appError');

const handleCastErrorDB = err => {
  const message = `Invalid ${err.path}: ${err.value}.`;
  return new AppError(message, 400);
};

const handleDuplicateFieldsDB = err => {
  const value = err.errmsg.match(/(["'])(\\?.)*?\1/)[0];
  console.log(value);

  const message = `Duplicate field value: ${value}. Please use another value!`;
  return new AppError(message, 400);
};

const handleValidationErrorDB = err => {
  const errors = Object.values(err.errors).map(el => el.message);

  const message = `Invalid input data. ${errors.join('. ')}`;
  return new AppError(message, 400);
};

const handleJWTError = () =>
  new AppError('Invalid token. Please log in again!', 401);

const handleJWTExpiredError = () =>
  new AppError('Your token has expired! Please log in again.', 401);
将无法处理的各类错误放入监听器处理
由于错误类型过多,因此对进程添加监听器方便处理没有添加catch的错误
process.on('uncaughtException', err => {
  console.log('UNCAUGHT EXCEPTION! 💥 Shutting down...');
  console.log(err.name, err.message);
  process.exit(1);
});

process.on('unhandledRejection', err => {
  console.log('UNHANDLED REJECTION! 💥 Shutting down...');
  console.log(err.name, err.message);
  server.close(() => {
    process.exit(1);
  });
});
登陆验证
密码加密
使用 npm i bcryptjs
使用中间件进行加密,加密行为置于保存行为之前
//在获取数据和保存数据间执行的中间件
userSchema.pre('save', async function (next) {
  if (!this.isModified('password')) return next;

  //传入要加密的数据,加密程度
  this.password = await bcrypt.hash(this.password, 12);
  this.passwordConfirm = undefined;
  next();
});
JWT-Token
官网:官
jwt简介:跳转到博客
Token简介:点点获取知识
实现注册
- npm i jsonwebtoken
在环境变量中设置加密字符串,使用jwt的sign方法进行token生成
//传入要加密的内容,加密代码,过期时间
  const token = jwt.sign({ id: newUser._id }, process.env.JWT_SECRET, {
    expiresIn: process.env.JWT_EXPIRES,
  });
  res.status(201).json({
    status: 'success',
    token,
    newuser: newUser,
  });
实现登录
使用一个实例方法,使其在全文档可用,由于其定义于整个文档,因此this指向document,但是由于password被设置为无法选中,因此无法使用this.指向
//创建一个实例方法,检查密码是否一致
userSchema.methods.correctPassword = async function (
  candidatePassword,
  userPassword
) {
  return await bcrypt.compare(candidatePassword, userPassword);
};
实现登录操作
调用 jwt.sign() 生成 JWT 字符串,三个参数分别是:用户信息对象。加密秘钥、配置对象
const signToken = (id) =>
  jwt.sign({ id }, process.env.JWT_SECRET, {
    expiresIn: process.env.JWT_EXPIRES,
  });

exports.login = catchAsync(async (req, res, next) => {
  const { email, password } = req.body;
  console.log(req.body);
  //检查是否存在email和password
  if (!email || !password) {
    //不加return这里会发送两次请求,错误报告和res
    return next(new AppError('Please provide your email and password!', 400));
  }
  //检查是否正确,此处password为不可被选中的,因此需要加一个加号
  const user = await User.findOne({ email: email }).select('+password');
  //对比密码
  if (!user || !(await user.correctPassword(password, user.password))) {
    return next(new AppError('Incorrect email or password', 401));
  }

  //发送token
  const token = signToken(user._id);
  res.status(200).json({
    status: 'success',
    token,
  });
});
实现每次请求的确认
首先在需要验证的路由前加入中间件进行验证
在请求头加入Authorization,一般结构:Bearer+token
在函数中获取Authorization: req.headers.authorization
将其与原始密匙进行解码:jwt.verify(token, process.env.JWT_SECRET), 此时可以获取到我们所加密的对象
接下来进行比对各种条件
exports.protect = catchAsync(async (req, res, next) => {
  // 获取token
  let token;
  if (
    req.headers.authorization &&
    req.headers.authorization.startsWith('Bearer')
  ) {
    token = req.headers.authorization.split(' ')[1];
  }
  if (!token) {
    return next(new AppError('you are not logged in!', 401));
  }

  // 验证token
  const decoded = await promisify(jwt.verify)(token, process.env.JWT_SECRET);
  console.log(decoded);

  //检查用户是否存在,防止在登陆后用户删除账户,此时再进行验证还可以登录的情况
  const freshUser = await User.findById(decoded.id);
  if (!freshUser) {
    return next(new AppError('The token is not exsist', 401));
  }

  // 检测用户是否更改密码,传入token的时间戳,对比其与数据库中更改账户的最新实践,如果小于数据库的时间戳,则说明密码被更改
  if (freshUser.changedPasswordAfter(decoded.iat)) {
    return next(new AppError('User recently changed password,log again!', 401));
  }
  //验证通过
  req.user = freshUser;
  next();
});


 2万+
2万+


 被折叠的 条评论
为什么被折叠?
被折叠的 条评论
为什么被折叠?
 到【灌水乐园】发言


