


1、添加路由
 路由代码:
路由代码:
{
    path: '/course',
    component: Layout,
    redirect: '/course/list',
    name: '课程管理',
    meta: { title: '课程管理', icon: 'example' },
    children: [
      {
        path: 'list',
        name: '课程列表',
        component: () => import('@/views/edu/course/list'),
        meta: { title: '课程列表', icon: 'table' }
      },
      {
        path: 'info',
        name: '添加课程',
        component: () => import('@/views/edu/course/info'),
        meta: { title: '添加课程', icon: 'tree' }
      },
      {
        path: 'info/:id',
        name: 'EduCourseInfoEdit',
        component: () => import('@/views/edu/course/info'),
        meta: { title: '编辑课程基本信息', noCache: true },
        hidden: true
      },
      {
        path: 'chapter/:id',
        name: 'EduCourseChapterEdit',
        component: () => import('@/views/edu/course/chapter'),
        meta: { title: '编辑课程大纲', noCache: true },
        hidden: true
      },
      {
        path: 'publish/:id',
        name: 'EduCoursePublishEdit',
        component: () => import('@/views/edu/course/publish'),
        meta: { title: '发布课程', noCache: true },
        hidden: true
      }
    ]
  },
2、添加组件—新建前端页面

使用的是element-ui前端步骤条组件:https://element.eleme.cn/#/zh-CN/component/steps
2.1、完善前端info.vue(课程信息页面)
页面效果:

2.2.1、前端代码:
<template>

  <div class="app-container">

    <h2 style="text-align: center;">发布新课程</h2>

    <el-steps :active="1" process-status="wait" align-center style="margin-bottom: 40px;">
      <el-step title="填写课程基本信息"/>
      <el-step title="创建课程大纲"/>
      <el-step title="最终发布"/>
    </el-steps>

    <el-form label-width="120px">

      <el-form-item>
        <el-button :disabled="saveBtnDisabled" type="primary" @click="saveOrUpdate">保存并下一步</el-button>
      </el-form-item>
    </el-form>
  </div>
</template>
2.1.2、js代码
<script>
export default {
    data(){
        return {
            saveBtnDisabled:false
        }
    },
    created(){

    },
    methods:{
        saveOrUpdate(){
            //跳转到下一步
            this.$router.push({path:'/course/chapter/1'})
        }
    }
}
</script>
2.2、完善前端chapter.vue(完善大纲信息页面)
效果图:

2.2.1、前端代码:
<template>

  <div class="app-container">

    <h2 style="text-align: center;">发布新课程</h2>

    <el-steps :active="2" process-status="wait" align-center style="margin-bottom: 40px;">
      <el-step title="填写课程基本信息"/>
      <el-step title="创建课程大纲"/>
      <el-step title="发布课程"/>
    </el-steps>

    <el-form label-width="120px">

      <el-form-item>
        <el-button @click="previous">上一步</el-button>
        <el-button :disabled="saveBtnDisabled" type="primary" @click="next">下一步</el-button>
      </el-form-item>
    </el-form>
  </div>
</template>
2.2.2、js代码
<script>
export default {
    data(){
        return {
            saveBtnDisabled:false
        }
    },
    created(){

    },
    methods:{
        previous(){
            this.$router.push({path:'course/info/:id'})
        },
        next(){
            this.$router.push({path:'/course/publish/:id'})
        }
    }
}
</script>
2.3、完善前端publish.vue(课程发布页面)
效果:

2.3.1、前端代码:
<template>

  <div class="app-container">

    <h2 style="text-align: center;">发布新课程</h2>

    <el-steps :active="3" process-status="wait" align-center style="margin-bottom: 40px;">
      <el-step title="填写课程基本信息"/>
      <el-step title="创建课程大纲"/>
      <el-step title="发布课程"/>
    </el-steps>

    <el-form label-width="120px">

      <el-form-item>
        <el-button @click="previous">返回修改</el-button>
        <el-button :disabled="saveBtnDisabled" type="primary" @click="publish">发布课程</el-button>
      </el-form-item>
    </el-form>
  </div>
</template>
2.3.2、js代码
<script>
export default {
    data(){
        return {
            saveBtnDisabled:false
        }
    },
    created(){

    },
    methods:{
        previous(){
            this.$router.push({path:'/course/chapter/:id'})
        },
        publish(){
            this.$router.push({path:'/course/list'})
        }
    }
}
</script>
3、添加api接口course.js,在前端页面中调用后端接口

3.1、定义course.js 接口中的代码
import request from '@/utils/request'

export default {
    //1、添加课程信息
    addCourseInfo(courseInfo){
        return request({
            url:'eduservice/course/addCourseInfo',
            method:'post',
            data:courseInfo
        })
    }
}
3.2、完善前端info.vue的页面:
3.2.1、完善表单:
 完善后效果图:

3.2.2、定义表单中数据

courseInfo:{
        title: '',
         subjectId: '',
         teacherId: '',
         lessonNum: 0,
         description: '',
         cover: '',
         price: 0
}
3.2.3、引入api

import course from '@/api/edu/course'
3.2.4、完善方法:

	course.addCourseInfo(this.courseInfo)
                .then(response=>{
                    //提示
                    this.$message({
                        type:'success',
                        message:'添加课程信息成功'
                    });
                    //跳转到下一步
                    this.$router.push({path:'/course/chapter/1'})
                })
完善后info.vue页面代码:
<template>

  <div class="app-container">

    <h2 style="text-align: center;">发布新课程</h2>

    <el-steps :active="1" process-status="wait" align-center style="margin-bottom: 40px;">
      <el-step title="填写课程基本信息"/>
      <el-step title="创建课程大纲"/>
      <el-step title="发布课程"/>
    </el-steps>

   <el-form label-width="120px">
        <el-form-item label="课程标题">
            <el-input v-model="courseInfo.title" placeholder=" 示例:机器学习项目课:从基础到搭建项目视频课程。专业名称注意大小写"/>
        </el-form-item>

        <!-- 所属分类 TODO -->

        <!-- 课程讲师 TODO -->

        <el-form-item label="总课时">
            <el-input-number :min="0" v-model="courseInfo.lessonNum" controls-position="right" placeholder="请填写课程的总课时数"/>
        </el-form-item>

        <!-- 课程简介 TODO -->
        <el-form-item label="课程简介">
            <el-input v-model="courseInfo.description" placeholder=" 请输入课程简介信息"/>
        </el-form-item>

        <!-- 课程封面 TODO -->

        <el-form-item label="课程价格">
            <el-input-number :min="0" v-model="courseInfo.price" controls-position="right" placeholder="免费课程请设置为0元"/> 元
        </el-form-item>

        <el-form-item>
            <el-button :disabled="saveBtnDisabled" type="primary" @click="saveOrUpdate">保存并下一步</el-button>
        </el-form-item>
    </el-form>

  </div>
</template>

<script>
import course from '@/api/edu/course'
export default {
    data(){
        return {
            saveBtnDisabled:false,
            courseInfo:{
                title: '',
                subjectId: '',
                teacherId: '',
                lessonNum: 0,
                description: '',
                cover: '',
                price: 0
            }
        }
    },
    created(){

    },
    methods:{
        saveOrUpdate(){
             course.addCourseInfo(this.courseInfo)
                .then(response=>{
                    //提示
                    this.$message({
                        type:'success',
                        message:'添加课程信息成功'
                    });
                    //跳转到下一步
                    this.$router.push({path:'/course/chapter/1'})
                })
        }
    }
}
</script>
4、完善后端接口
在EduCourseCourse中完善:

//返回添加之后的课程id,为了后面添加大纲使用
String id = courseService.saveCourseInfo(courseInfoVo);
return R.ok().data("courseId",id);
业务层接口
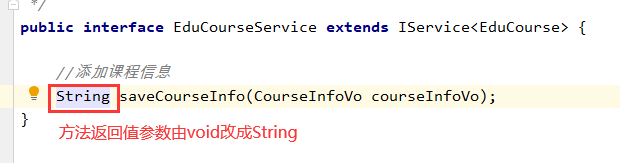 业务层接口实现类


 337
337


 被折叠的 条评论
为什么被折叠?
被折叠的 条评论
为什么被折叠?
 到【灌水乐园】发言


