了解了HTTP协议和HTML文档 , 我们其实就明白了一个Web应用的本质就是:
浏览器发送一个HTTP请求 ;
服务器收到请求 , 生成一个HTML文档 ;
服务器把HTML文档作为HTTP响应的Body发送给浏览器 ;
浏览器收到HTTP响应 , 从HTTP Body取出HTML文档并显示 .
所以 , 最简单的Web应用就是先把HTML用文件保存好 ,
用一个现成的HTTP服务器软件 , 接收用户请求 , 从文件中读取HTML , 返回 .
Apache、Nginx、Lighttpd等这些常见的静态服务器就是干这件事情的 .
如果要动态生成HTML , 就需要把上述步骤自己来实现 .
不过 , 接受HTTP请求、解析HTTP请求、发送HTTP响应都是苦力活 ,
如果我们自己来写这些底层代码 , 还没开始写动态HTML呢 , 就得花个把月去读HTTP规范 .
正确的做法是底层代码由专门的服务器软件实现 , 我们用Python专注于生成HTML文档 .
因为我们不希望接触到TCP连接、HTTP原始请求和响应格式 ,
所以 , 需要一个统一的接口来实现这样的服务器软件 , 让我们专心用Python编写Web业务 .
这个接口就是WSGI , wsgi也是基于socket server编写 .
WSGI(Web Server Gateway Interface,web服务器网关接口)
主要规定了服务器端和应用程序之间的接口,
即规定了请求的URL到后台处理函数之间的映射该如何实现 .
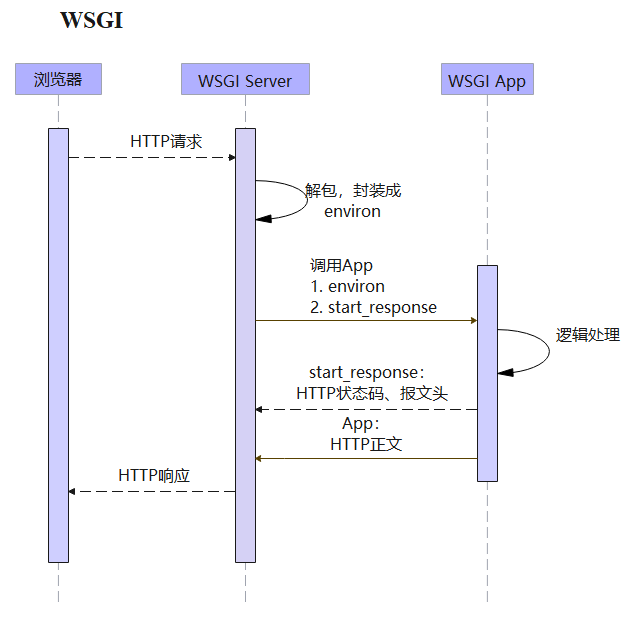
* 1. 浏览器到WSGI Server:浏览器发送的请求会先到WSGI Server。
* 2. environ:WSGI Server会将HTTP请求中的参数等信息封装到environ(一个字典)中。
* 3. WSGI Server到WSGI App:App就是我们自己编写的后台程序,每个URL会映射到对应的入口处理函数 ( 或其他可调用对象),WSGI Server调用后台App时,会将environ和WSGI Server中自己的一个start_response函数注入到后台App中。
* 4. 逻辑处理:后台函数(或其他可调用对象)需要接收environ和start_response,进行逻辑处理后返回一个可迭代对象,可迭代对象中的元素为HTTP正文。
* 5. WSGI App到WSGI Server:后台函数处理完后,会先调用start_response函数将HTTP状态码、报文头等信息(响应头)返回给WSGI Server,然后再将函数的返回值作为HTTP正文(响应body)返回给WSGI Server。
* 6. WSGI Server到浏览器:WSGI Server将从App中得到的所有信息封装为一个response返回给浏览器
wsgiref是Python基于WSGI协议开发的服务模块 . ( Django使用 )
wsgiref是Python自带的内置库,它用来开发者对wsgi进行测试用的,wsgiref性能较低在生产环会替换其他的库 .
官方文档 : https : / / docs . python . org / zh-tw / 3.10 /library/wsgiref.html
* 1. 实例程序
from wsgiref. simple_server import make_server, demo_app
"""
默认情况下会将所有url都传入demo_app进行处理,具体可参考demo_app源码
app参数可以是任何可调用对象,但是内部处理需要参考demo_app源码,
即environ处理、start_response调用、返回值类型
"""
ws = make_server( '127.0.0.1' , 9999 , demo_app)
ws. serve_forever( )
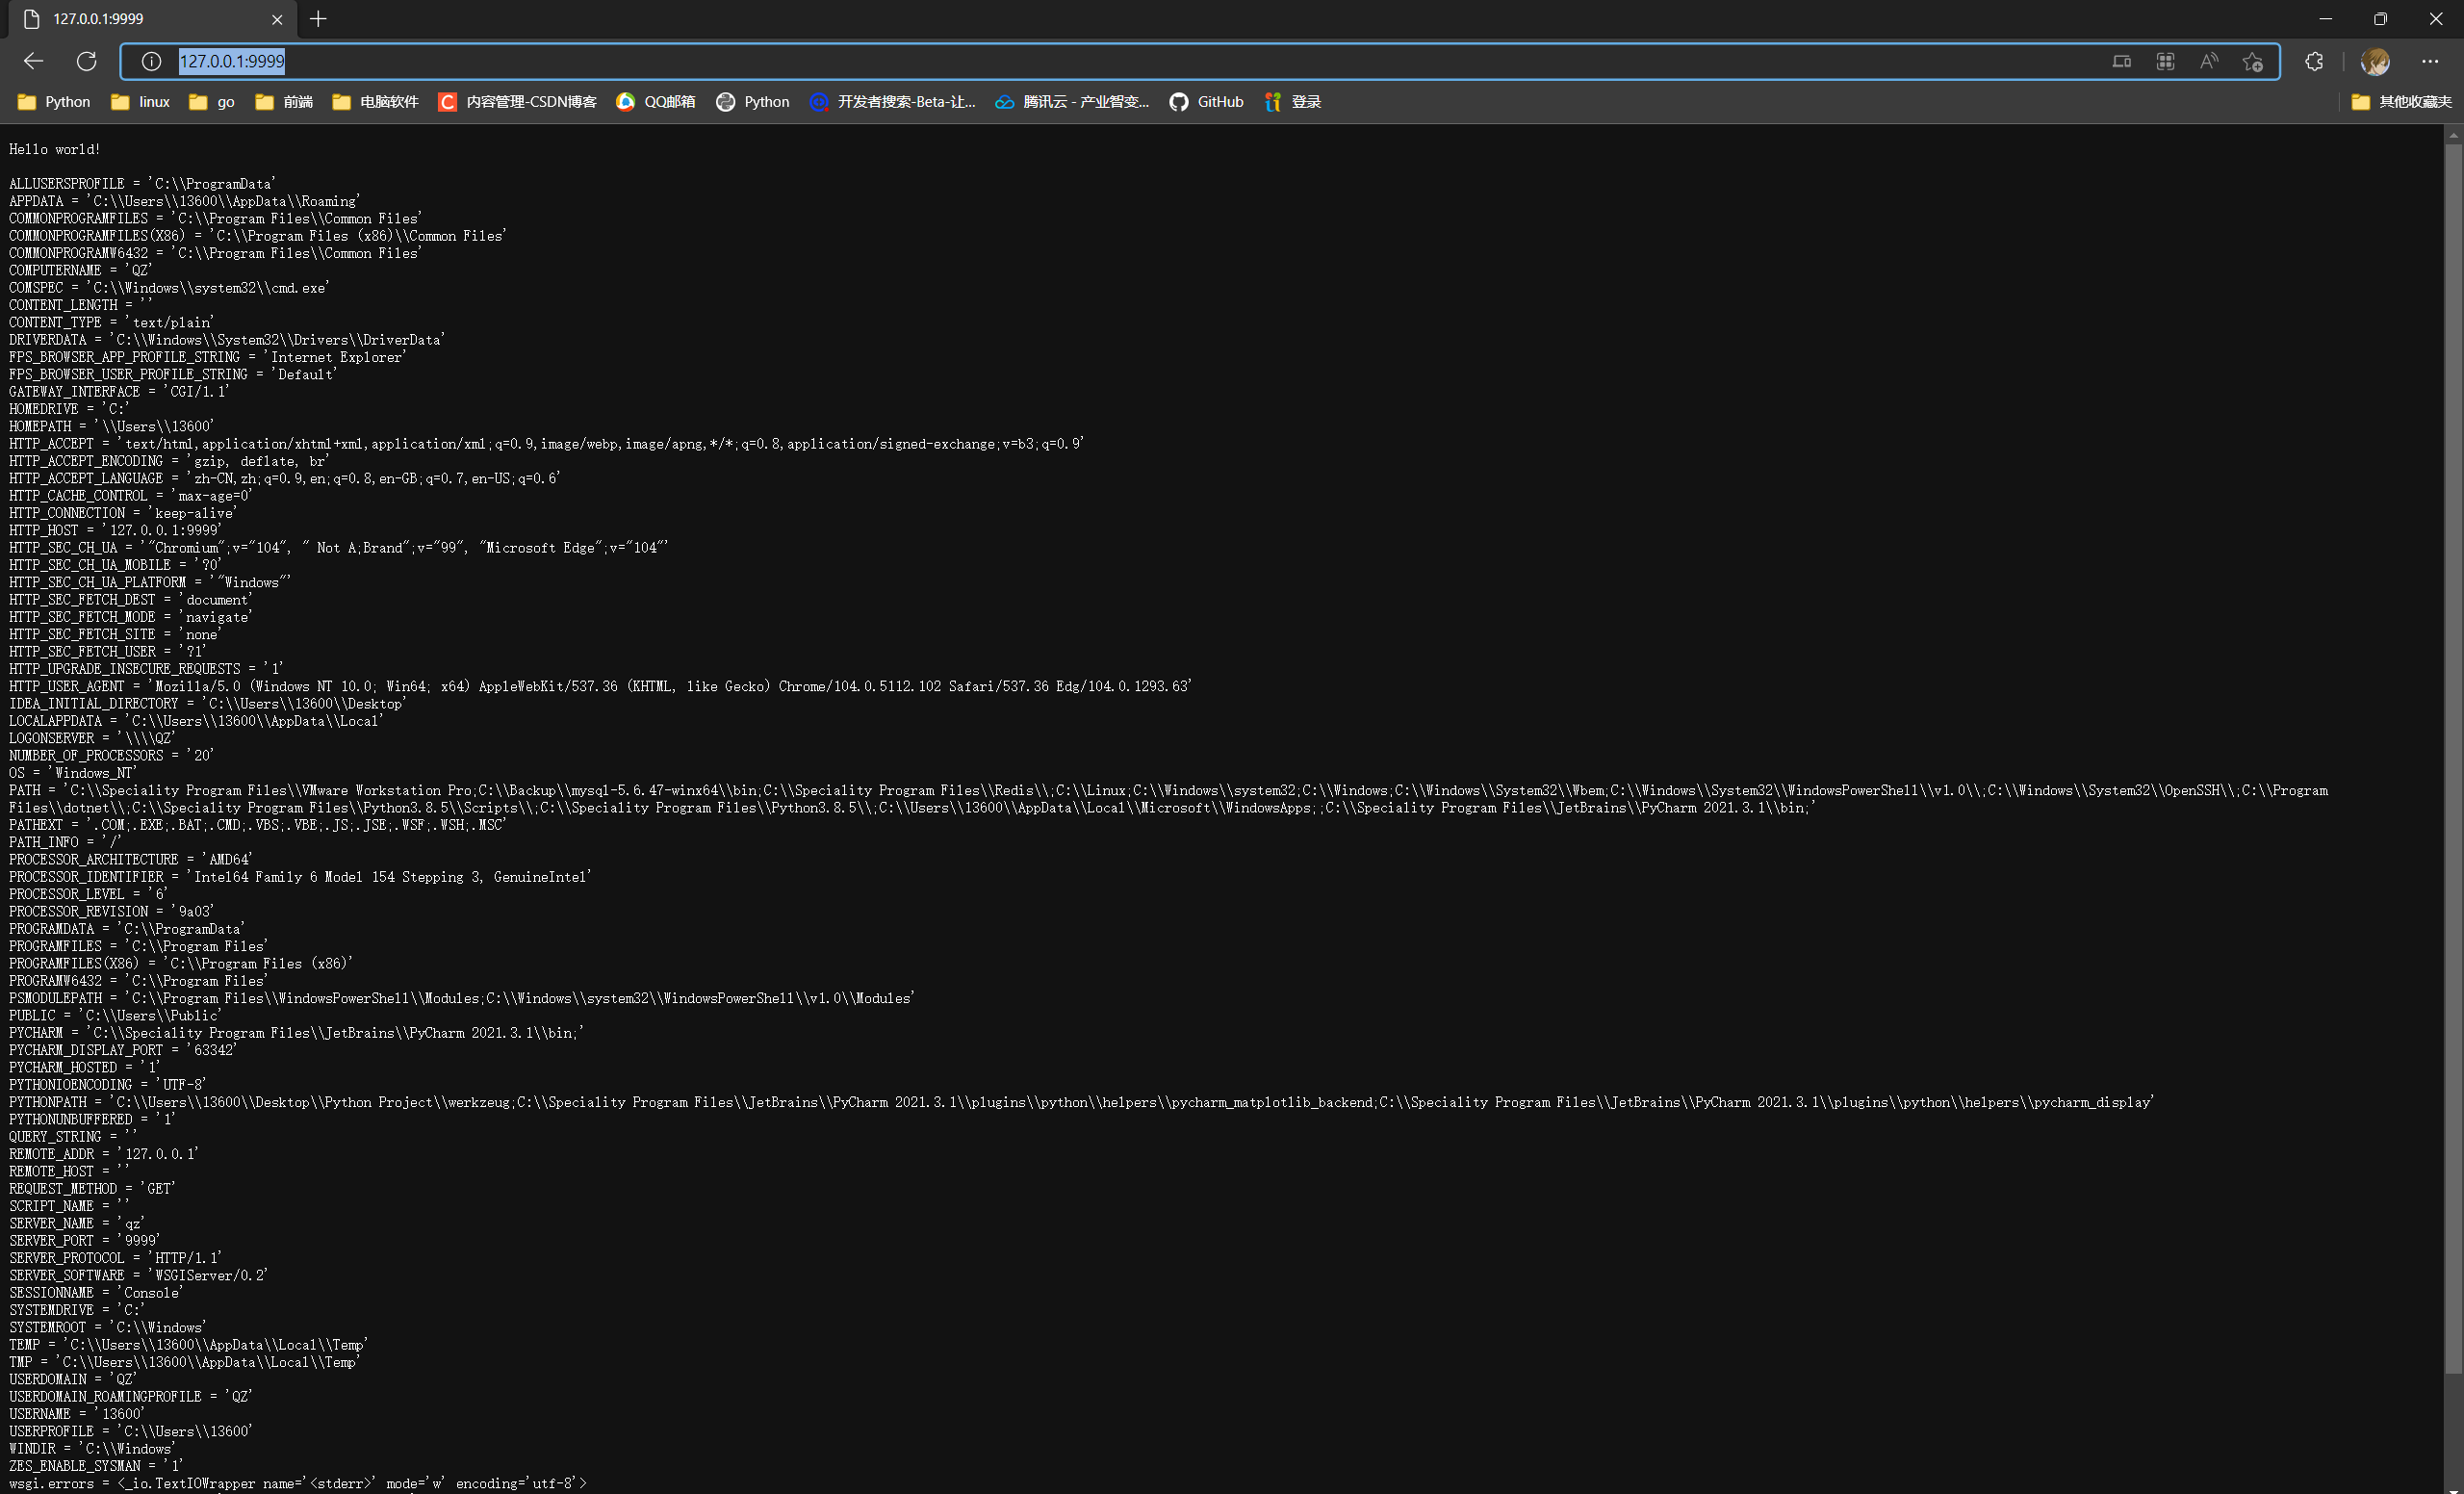
* 2. 运行实例程序 , 在浏览器中输入 : http : / / 127.0 .0 .1 : 9999 / 访问服务器中的应用 , 会返回结果 .
请求地址
PATH_INFO = '/'
请求方式
REQUEST_METHOD = 'GET'
. . .
* 3. 实例应用源码分析
print函数修改了file参数的值 , 标准化输出到终端改为输出到内存中进行缓存 ,
stdout . getvalue ( ) 会取出所有内存中缓存的值 .
def demo_app( environ, start_response) :
from io import StringIO
stdout = StringIO( )
print( "Hello world!" , file = stdout)
print( file= stdout)
h = sorted( environ.items( ))
for k, v in h:
print( k, '=' , repr( v) , file = stdout)
start_response( "200 OK" , [ ( 'Content-Type' , 'text/plain; charset=utf-8' ) ] )
return [ stdout.getvalue( ) .encode( "utf-8" ) ]
WSGI接口定义非常简单,它只要求Web开发者实现一个函数,就可以响应HTTP请求。
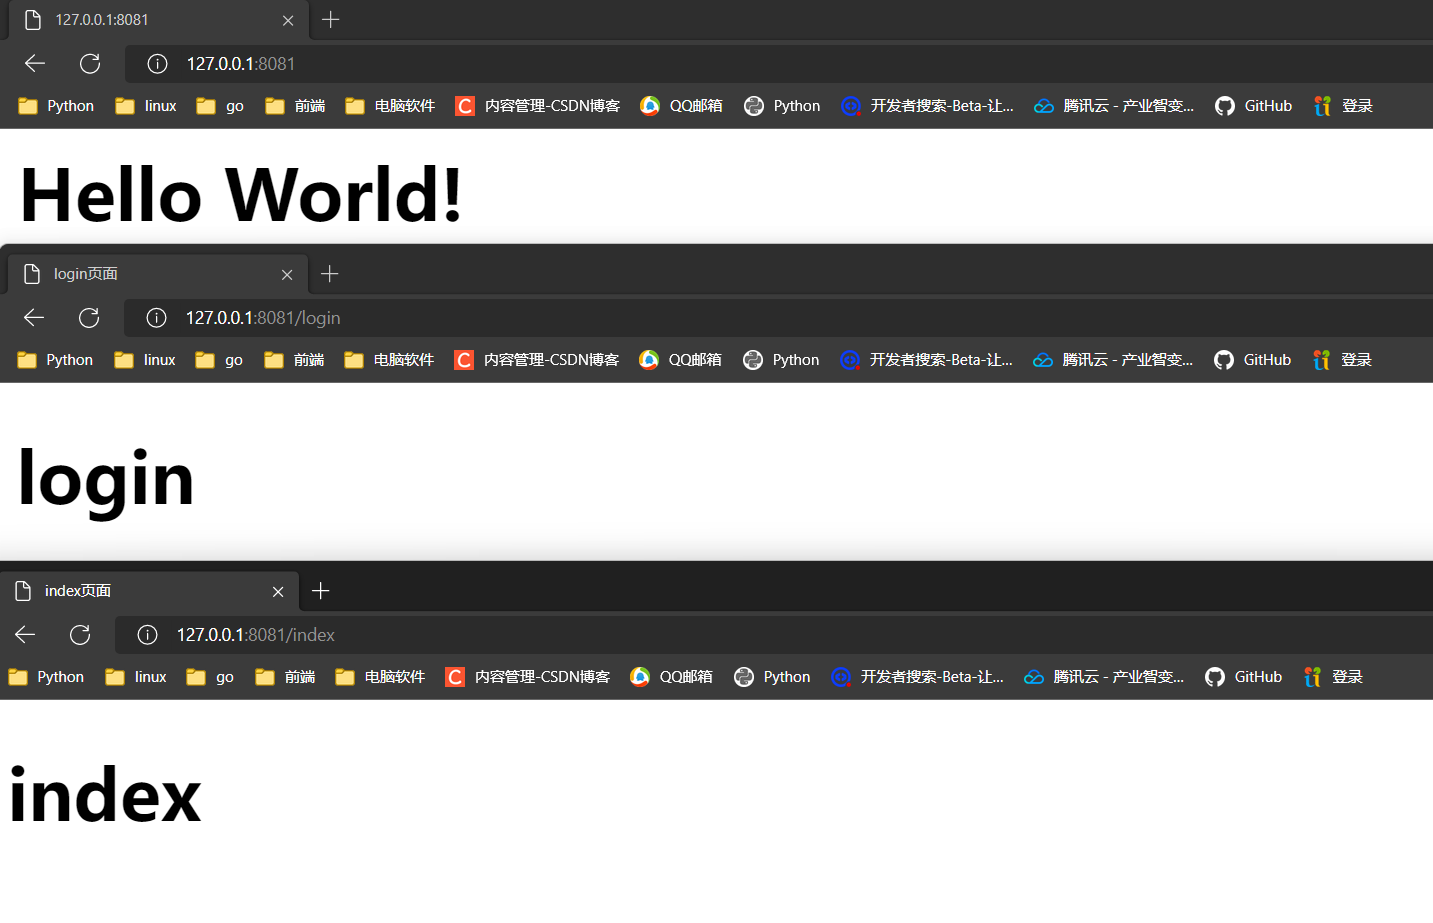
* 1. 在项目新建login . html页面
<! DOCTYPE html > < htmllang = " en" > < head> < metacharset = " UTF-8" > < title> </ title> </ head> < body> < h1> </ h1> </ body> * 2. 在项目新建index . html页面
</ html> <! DOCTYPE html > < htmllang = " en" > < head> < metacharset = " UTF-8" > < title> </ title> </ head> < body> < h1> </ h1> </ body> </ html> * 3. 自定义app应用
from wsgiref. simple_server import make_server, demo_app
def myapp ( environ, start_response) :
print ( environ. get( 'PATH_INFO' ) )
if environ. get( 'PATH_INFO' ) == '/index' :
with open ( 'index.html' , mode= 'rb' ) as wf:
data = wf. read( )
elif environ. get( 'PATH_INFO' ) == '/login' :
with open ( 'login.html' ) == '/login' as wf:
data = wf. read( )
else :
data = b'<h1>Hello World!</h1>'
start_response( '200 OK' , [ ( 'Content-Type' , 'text/html' ) ] )
return [ data]
ws = make_server( '127.0.0.1' , 8081 , myapp)
ws. serve_forever( )
* 4. 运行程序在浏览器中测试 , 分别输入以下地址查看结果 :
127.0 .0 .1 : 8081
127.0 .0 .1 : 8081 /login
127.0 .0 .1 : 8081 /index
werkzeug是一个WSGI工具包 , 封装了很多WEB框架的东西 , 例如 Request , Response . . .
werkzeug可以作为一个WEB框架的底层库 , 可以当成是一个微型的WSGI框架 .
* 1. 安装werkzeug模块
命令 : pip install werkzeug
PS C:\ Users\ 13600 \ Desktop\ Python Project\ psutils> pip install werkzeug
Collecting werkzeug
Downloading Werkzeug-2.2.2-py3-none-any.whl ( 232 kB)
| ████████████████████████████████| 232 kB 409 kB/s
Collecting MarkupSafe>= 2.1 .1
.. .
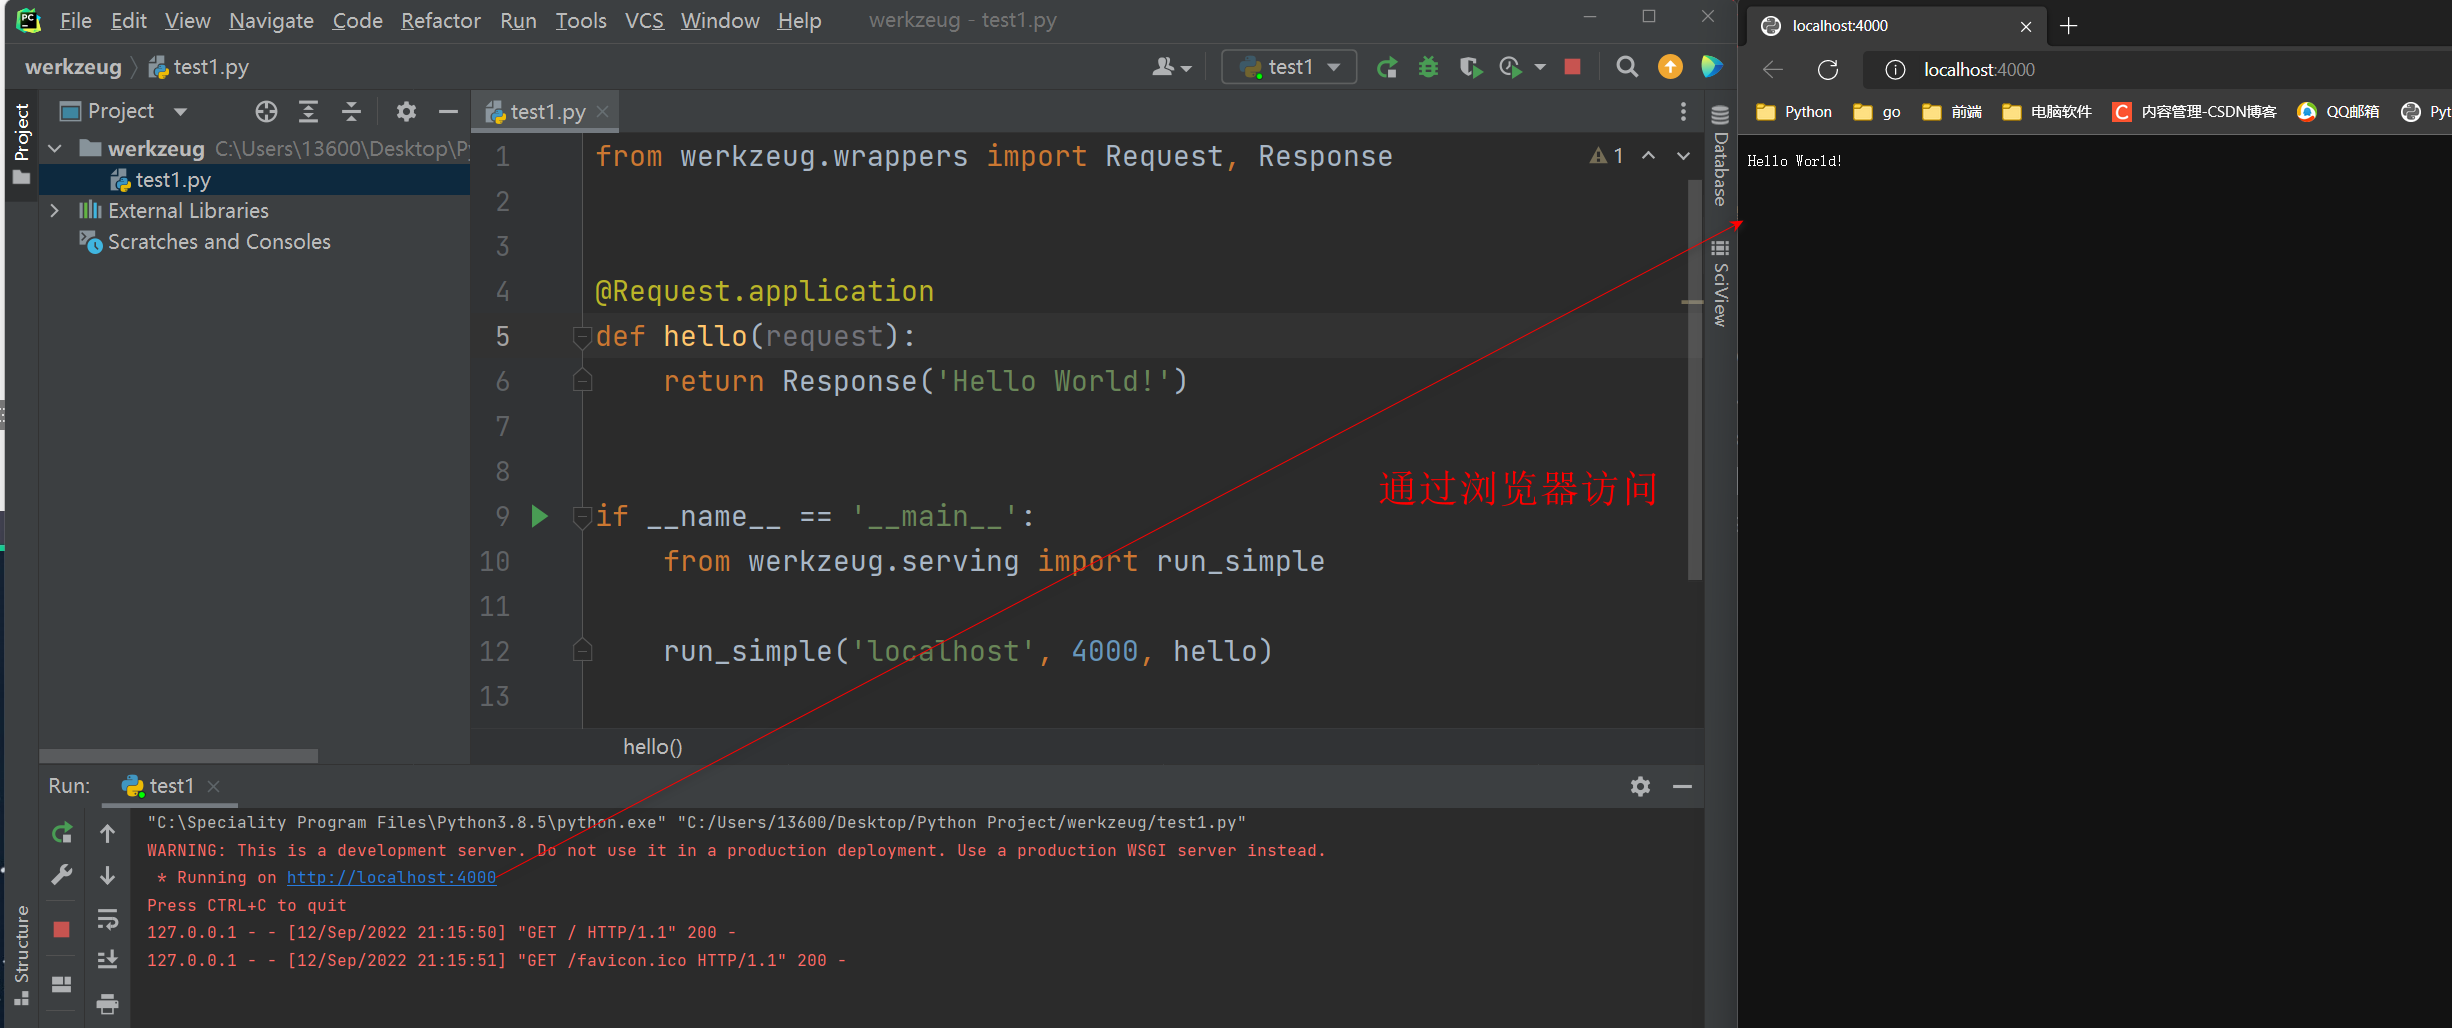
* 2. 简单的WEB服务
from werkzeug. wrappers import Request, Response
@Request. application
def hello ( request) :
return Response( 'Hello World!' )
if __name__ == '__main__' :
from werkzeug. serving import run_simple
run_simple( 'localhost' , 4000 , hello)
* 3. 程序测试
Flask是基于jinja2模板和Werkzeug WSGI服务的一个微型架构 .
Werkzeug的本质是Socket服务端 , 接收http请求并对请求进行预处理 , 然后触发Flask框架 ,
开发人员基于Flask框架提供的功能对请求进行相对处理 , 返回给用户浏览器 ,
需要返回模板页面时 , 可借助jinja2模板对模板和数据进行渲染 ,
将渲染后的字符串返回给用户浏览器 .
Flask的宗旨是在保持核心简单而易于拓展 .
默认情况下 , Flask不包含数据库抽象层 , 表单验证 , 等功能 ,
然而 , Flask支持用拓展来给应用添加这些功能
* 1. 安装Flask模块
命令 : pip install flask
PS C:\ Users\ 13600 \ Desktop\ Python Project\ werkzeug> pip install flask
Collecting flask issue with the package mentioned above, not pip.
Downloading Flask-2.2.2-py3-none-any.whl ( 101 kB)
━━━━━━━━━━━━━━━━━━━━━━━━━━━━━━━━━━━━━━━━ 101.5 /101.5 kB 449.4 kB/s eta 0 :00:00
* 2. 实例程序
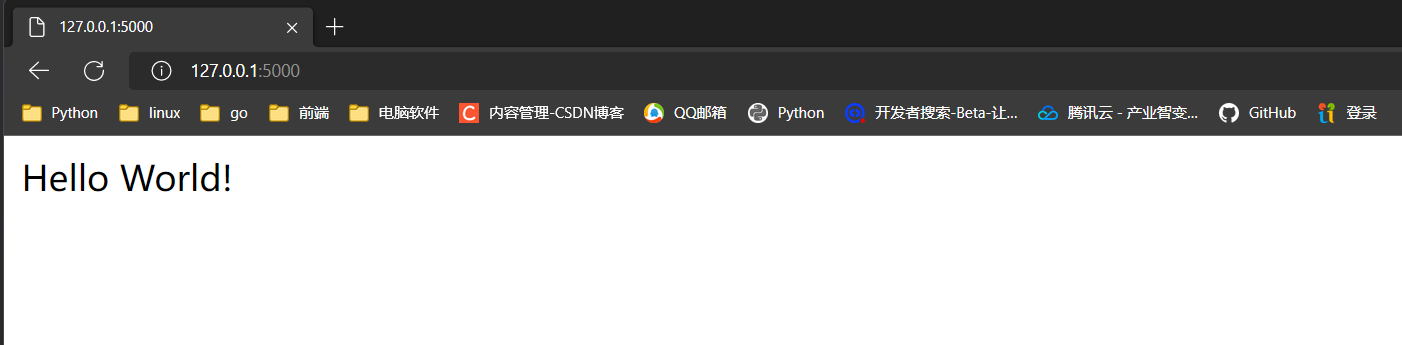
from flask import Flask
app = Flask( __name__)
@app. route ( '/' )
def index ( ) :
return 'Hello World!'
if __name__ == '__main__' :
app. run( )
* 3. 运行程序 , 终端提示 :
"C:\Speciality Program Files\Python3.8.5\python.exe" "C:/Users/13600/Desktop/Python Project/werkzeug/test1.py"
 * Serving Flask app 'test1'
 * Debug mode: off
WARNING: This is a development server. Do not use it in a production deployment. Use a production WSGI server instead.
 * Running on http://127.0.0.1:5000
Press CTRL+C to quit
* 4. 在浏览器中测试 , Flask端口默认是 5000 , 输入地址 : 127.0 .0 .1 : 5000
app = Flask( __name__)
def __init__ (
self,
import_name: str ,
static_url_path: t. Optional[ str ] = None ,
static_folder: t. Optional[ t. Union[ str , os. PathLike] ] = "static" ,
static_host: t. Optional[ str ] = None ,
host_matching: bool = False ,
subdomain_matching: bool = False ,
template_folder: t. Optional[ str ] = "templates" ,
instance_path: t. Optional[ str ] = None ,
instance_relative_config: bool = False ,
root_path: t. Optional[ str ] = None ,
) :
super ( ) . __init__(
import_name= import_name,
static_folder= static_folder,
static_url_path= static_url_path,
template_folder= template_folder,
root_path= root_path,
)
. . .
@app.route( '/' )
def index( ) :
return 'Hello World!'
@setupmethod
def route ( self, rule: str , ** options: t. Any) - > t. Callable[ [ T_route] , T_route] :
"""
注释文档
"""
def decorator ( f: T_route) - > T_route:
endpoint = options. pop( "endpoint" , None )
self. add_url_rule( rule, endpoint, f, ** options)
return f
return decorator
if __name__ == '__main__' :
app.run( )
run ( ) 会先执行类的__call__方法 , 在执行run方法 .
def wsgi_app ( self, environ: dict , start_response: t. Callable) - > t. Any:
ctx = self. request_context( environ)
error: t. Optional[ BaseException] = None
try :
try :
ctx. push( )
response = self. full_dispatch_request( )
except Exception as e:
error = e
response = self. handle_exception( e)
except :
error = sys. exc_info( ) [ 1 ]
raise
return response( environ, start_response)
finally :
if "werkzeug.debug.preserve_context" in environ:
environ[ "werkzeug.debug.preserve_context" ] ( _cv_app. get( ) )
environ[ "werkzeug.debug.preserve_context" ] ( _cv_request. get( ) )
if error is not None and self. should_ignore_error( error) :
error = None
ctx. pop( error)
def __call__ ( self, environ: dict , start_response: t. Callable) - > t. Any:
return self. wsgi_app( environ, start_response)
def run (
self,
host: t. Optional[ str ] = None ,
port: t. Optional[ int ] = None ,
debug: t. Optional[ bool ] = None ,
load_dotenv: bool = True ,
** options: t. Any,
) - > None :
. . .
if not host:
if sn_host:
host = sn_host
else :
host = "127.0.0.1"
if port or port == 0 :
port = int ( port)
elif sn_port:
port = int ( sn_port)
else :
port = 5000
from werkzeug. serving import run_simple
try :
run_simple( t. cast( str , host) , port, self, ** options)
. . .
flask的路由在全局对象request中 , request变量会随意访问的应用而更改 .
Flask与Django不一样 , Flask默认不会重定向 , 注意末尾 '/' .
request对象方法 :
. path 获取地址 , / , / login
. url 获取http请求协议 + ip地址 + 端口 , http : / / 127.0 .0 .1 : 5000 /
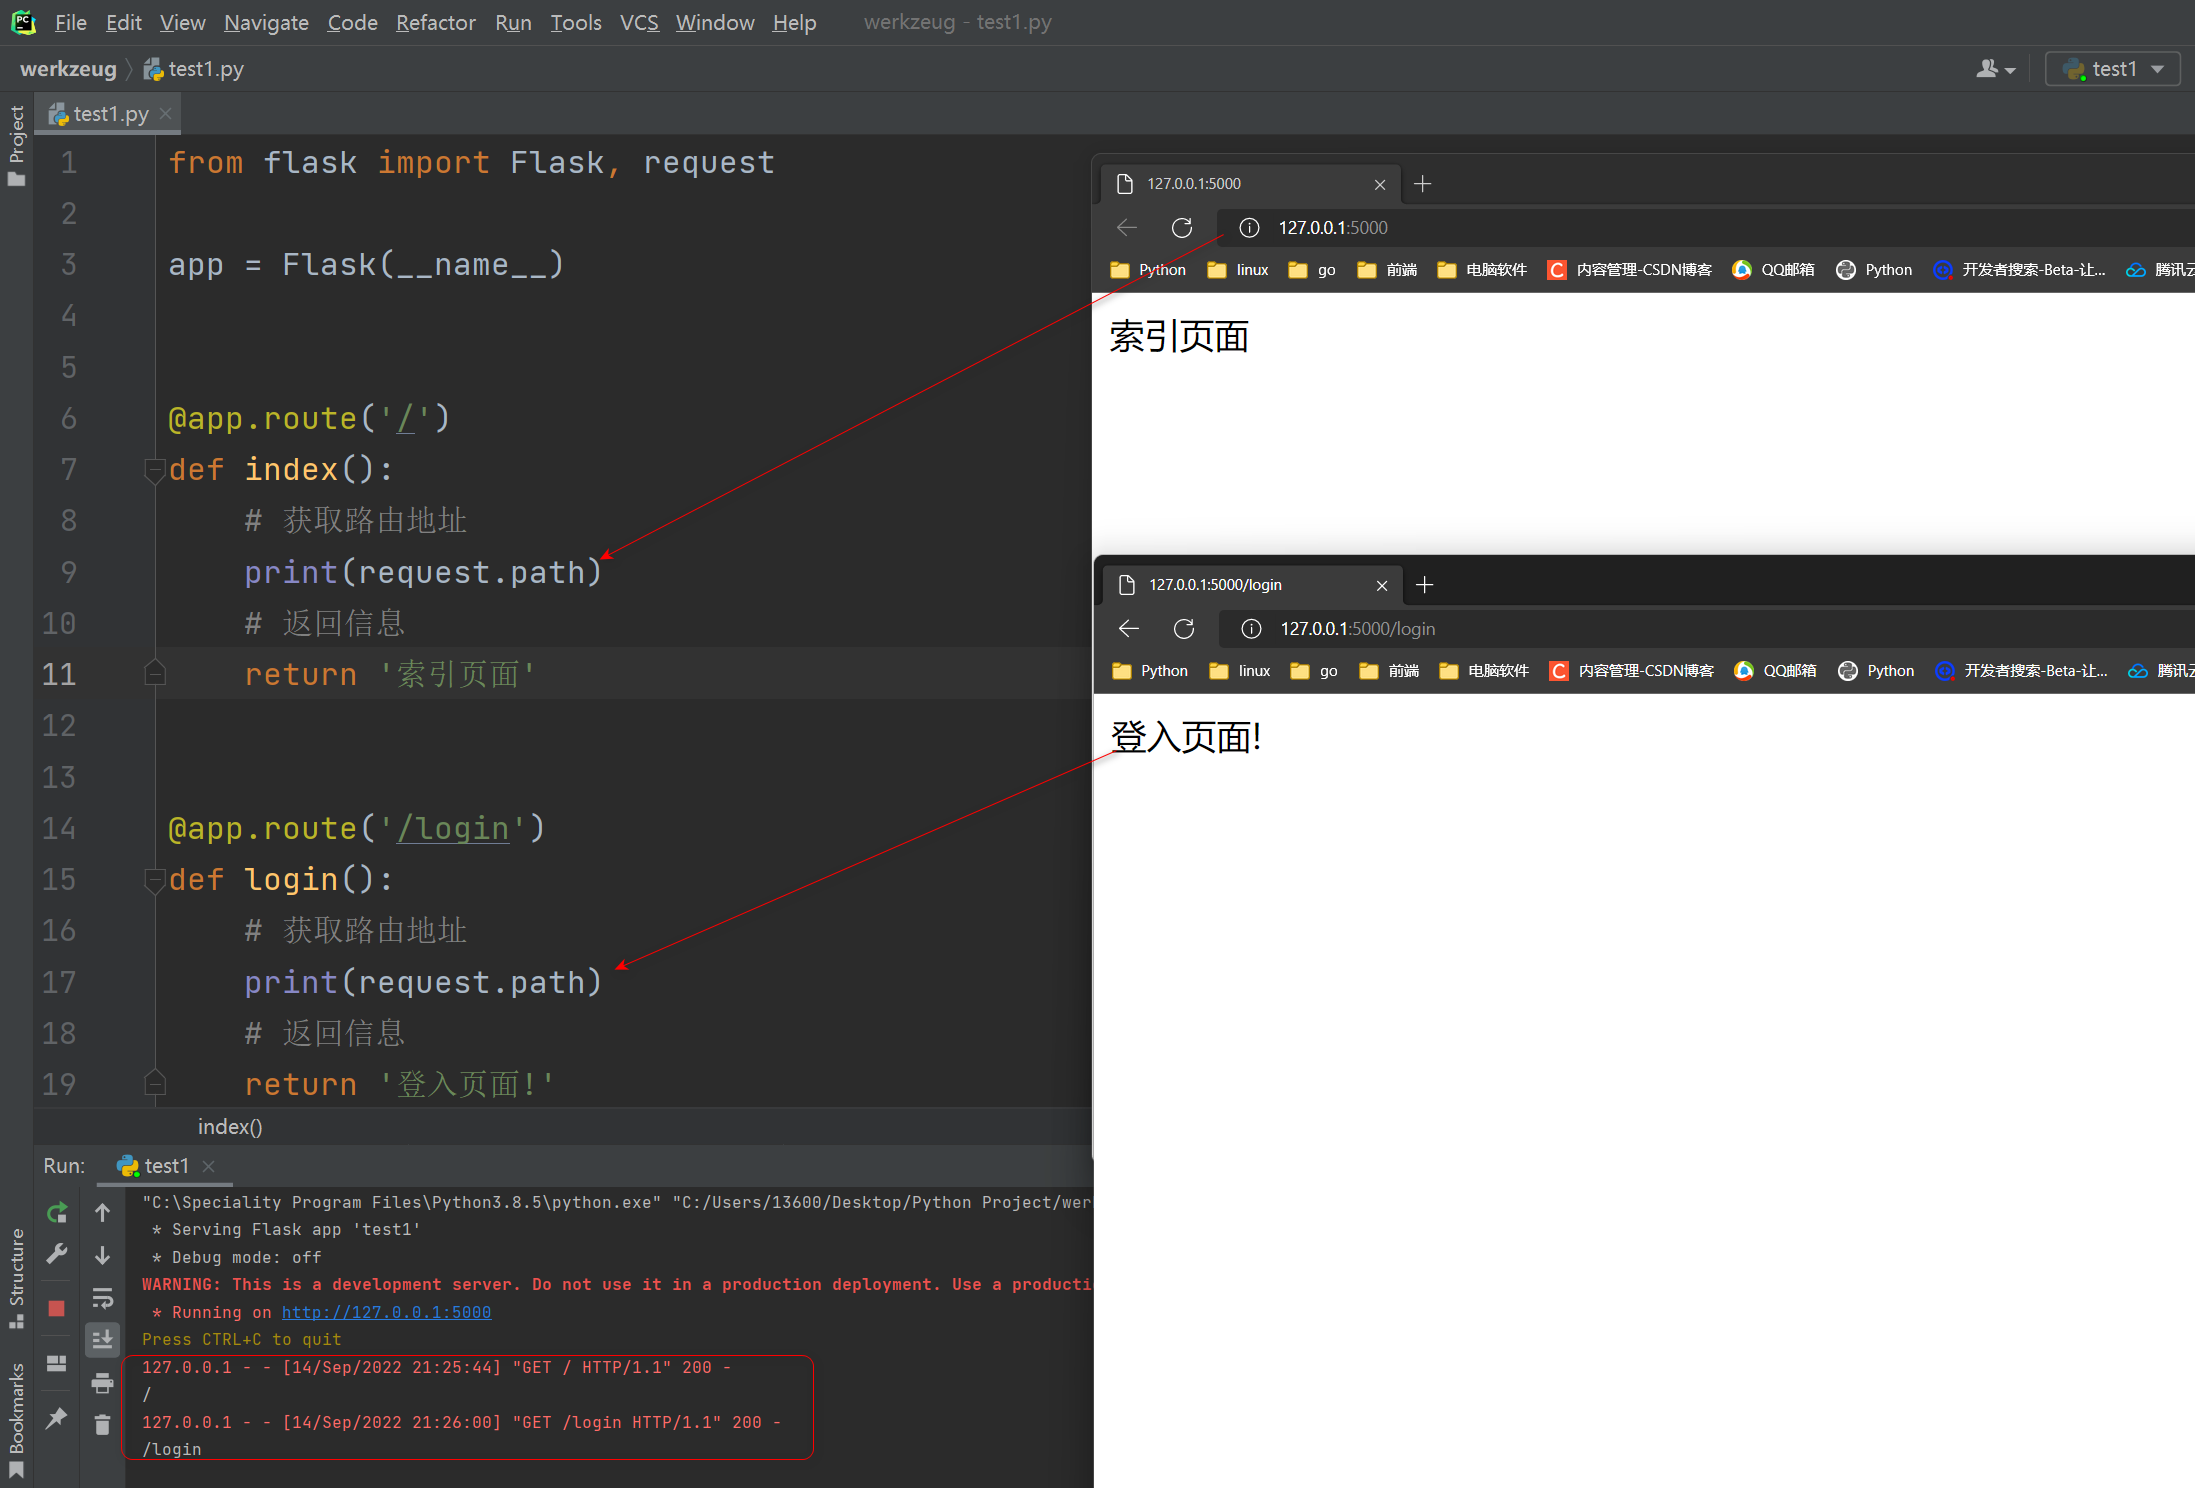
from flask import Flask, request
app = Flask( __name__)
@app. route ( '/' )
def index ( ) :
print ( request. path)
return '索引页面'
@app. route ( '/login' )
def login ( ) :
print ( request. path)
return '登入页面!'
if __name__ == '__main__' :
app. run( )
在浏览器中测试 :
http : / / 127.0 .0 .1 : 5000
http : / / 127.0 .0 .1 : 5000 /login
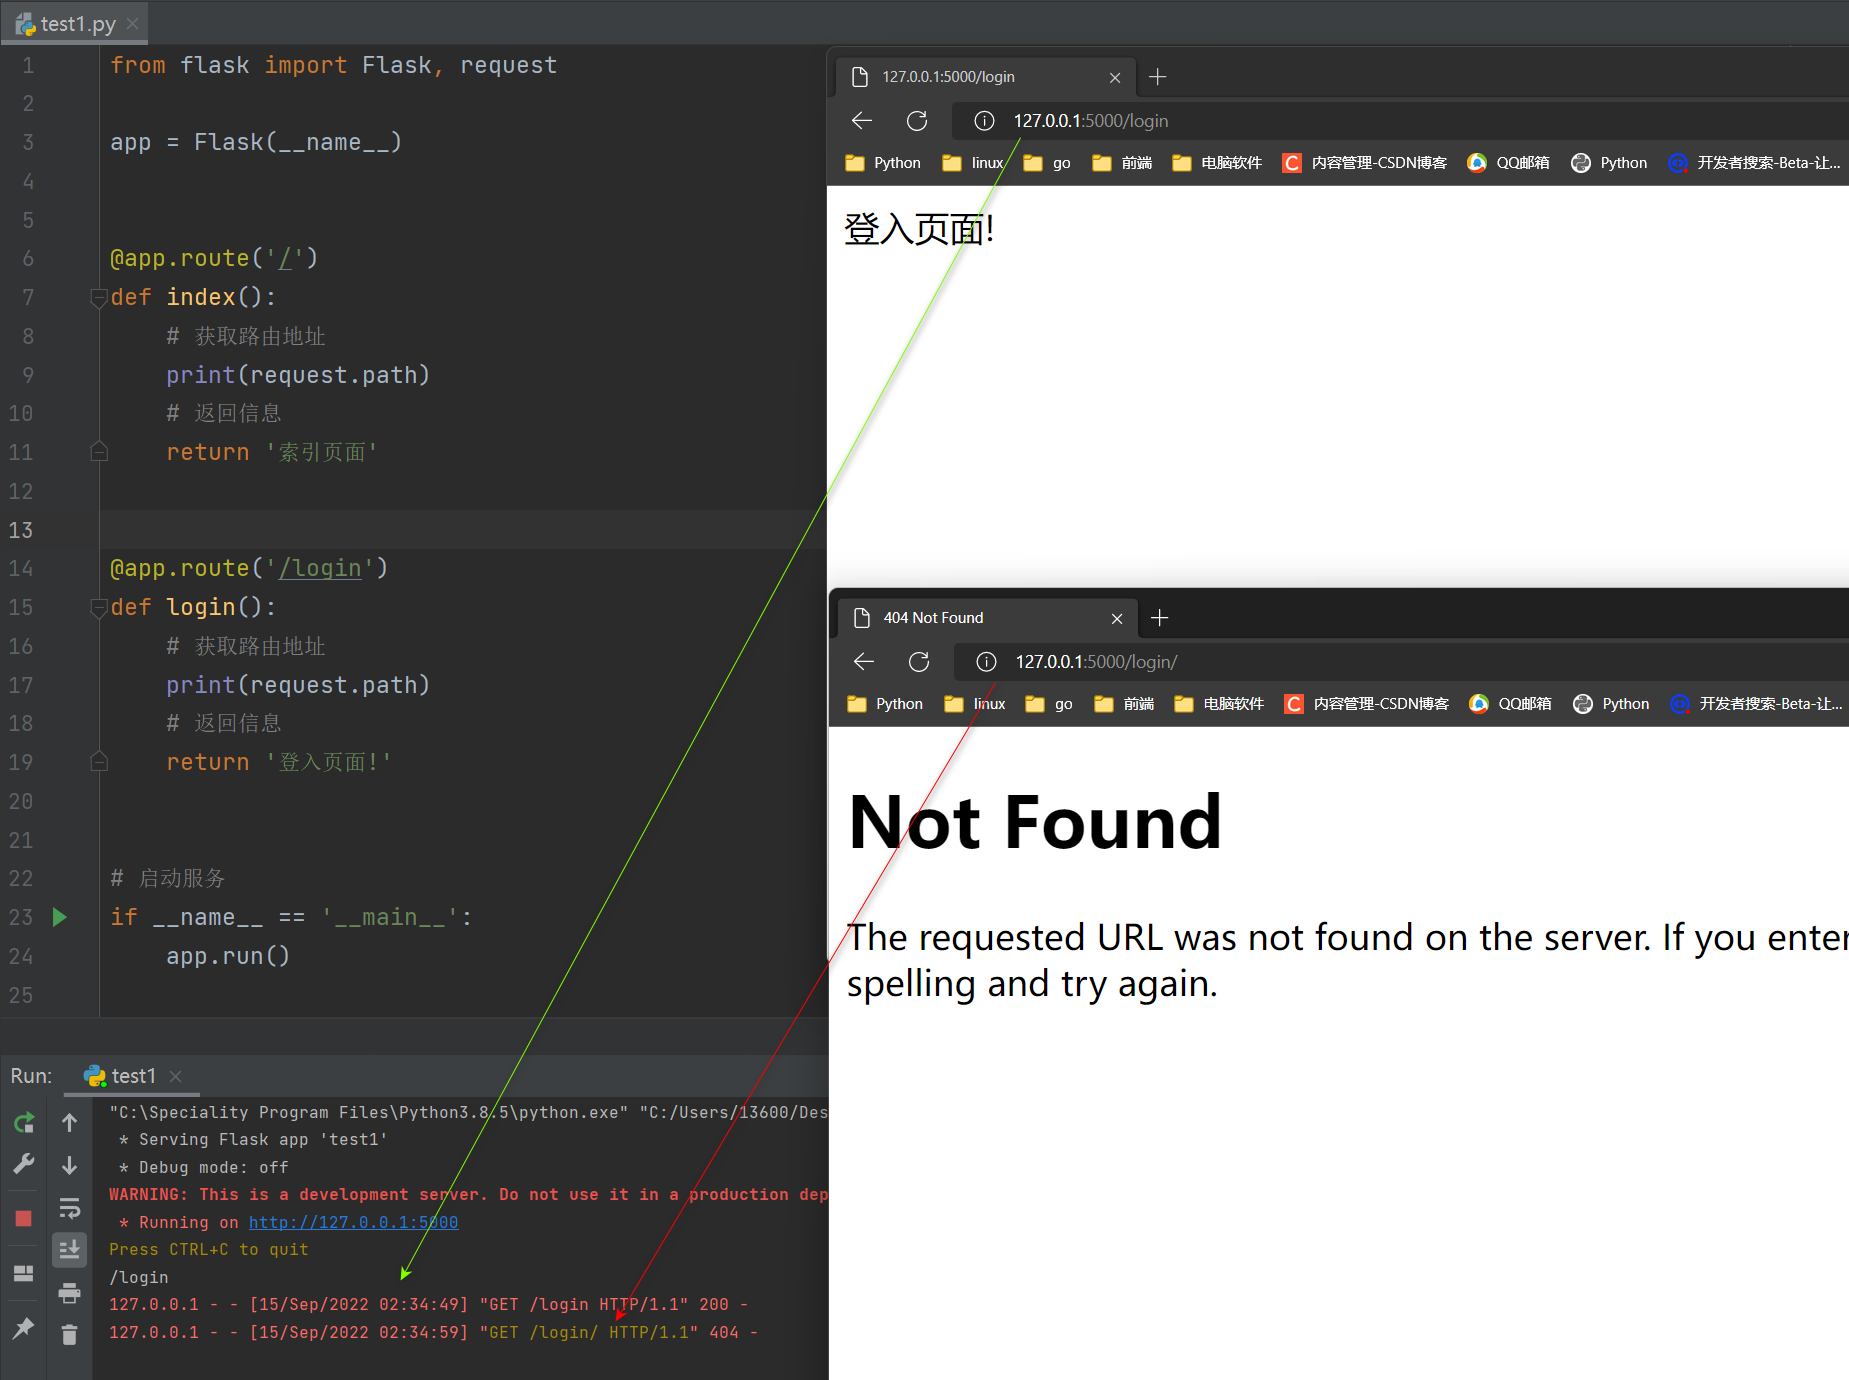
Flask默认不会重定向 , 注意末尾 '/' .
在浏览器中测试 :
http : / / 127.0 .0 .1 : 5000 /login
http : / / 127.0 .0 .1 : 5000 /login/
转化器的作用是获取url中地址信息 , 并转为指定类型 .
需要匹配的路径信息使用 < > 中括号括起来的 , 并在 < > 括号中定义一个接收到值的变量 .
< 类型 : 变量 > 中括号中可以指定数据转换的类型 .
flask自带六种类型的装换器 ( 所以类都继承BaseConverter类 ) :
string : 接受任何不包含‘ / ’的文本 , 默认装换器 .
any
path : 接收包含‘ / ’的文本
int : 接收正整数
float : 接收正浮点数
uuid : 接受uuid随机字符串
from flask import Flask, request
app = Flask( __name__)
converters = app. url_map. converters
for k, v in converters. items( ) :
print ( k, v)
"""
default <class 'werkzeug.routing.converters.UnicodeConverter'>
string <class 'werkzeug.routing.converters.UnicodeConverter'>
any <class 'werkzeug.routing.converters.AnyConverter'>
path <class 'werkzeug.routing.converters.PathConverter'>
int <class 'werkzeug.routing.converters.IntegerConverter'>
float <class 'werkzeug.routing.converters.FloatConverter'>
uuid <class 'werkzeug.routing.converters.UUIDConverter'>
"""
数据的转换类型默认为字符串类型 , 字符串 .
from flask import Flask
app = Flask( __name__)
@app. route ( '/index/<id_num>' )
def index ( id_num) :
print ( id_num, type ( id_num) )
return 'index'
if __name__ == '__main__' :
app. run( )
from flask import Flask
app = Flask( __name__)
@app. route ( '/index/<int:id_num>' )
def index ( id_num) :
print ( id_num, type ( id_num) )
return 'index'
if __name__ == '__main__' :
app. run( )
import uuid
print ( uuid. uuid4( ) )
一些案例 :
@ app . route ( '/index/<path:id_num>' ) x1 / x2 < class 'str' >
只能匹配带小数点的数
@ app . route ( '/index/<float:id_num>' ) 1.1 < class 'float' >
# 必须是uuid字符串
@ app . route ( '/index/<uuid:id_num>' ) d9b328c6-ed5f- 4 a07-b801- 3 a3031dd29ad < class 'uuid.UUID' >
还可能遇到路由中验证手机号 / 邮箱等业务,这种情况下需要使用正则来自定义转换器 .
* 1. 导入自定转换器集成自werkzeug . routing中的BaseConverter类
* 2. 编写自定义转换器类 , 在类设置匹配规则 .
* 3. 将自定义转换器添加到app . url_map . converters中 , app . url_map . converters是一个字典
所有的转换器都是继承BaseConverter类 .
class BaseConverter:
"" "Base class for all converters."" "
regex = "[^/]+"
weight = 100
part_isolating = True
def __init__( self, map: "Map" , *args: t.Any, **kwargs: t.Any) -> None:
self.map = map
def to_python( self, value: str) -> t.Any:
return value
def to_url( self, value: t.Any) -> str:
if isinstance( value, ( bytes, bytearray)) :
return _fast_url_quote( value)
return _fast_url_quote( str( value) .encode( self.map.charset))
flask模块自定义转换器
from flask import Flask
from werkzeug. routing import BaseConverter
app = Flask( __name__)
class PhoneConverter ( BaseConverter) :
regex = '^1[3-9]\d{9}$'
def __init__ ( self, url_map) :
super ( PhoneConverter, self) . __init__( url_map)
def to_python ( self, value: str ) :
value = int ( value)
return value
app. url_map. converters[ 'phone' ] = PhoneConverter
print ( app. url_map. converters[ 'phone' ] )
@app. route ( '/index/<phone:id_num>' )
def index ( id_num) :
print ( id_num, type ( id_num) )
return 'index'
if __name__ == '__main__' :
app. run( )
在浏览器中输入测试路由 :
http : / / 127.0 .0 .1 : 5000 /index/ 13123456789 查看结果访问成功
http : / / 127.0 .0 .1 : 5000 /index/ 1312345678 Not Found 没有查到
另一种使用方法 , 在路由中使用转换器时写正则表达式 .
from flask import Flask, url_for
from werkzeug. routing import BaseConverter
app = Flask( import_name= __name__)
class RegexConverter ( BaseConverter) :
"""
自定义URL匹配正则表达式
"""
def __init__ ( self, map , regex) :
super ( RegexConverter, self) . __init__( map )
self. regex = regex
def to_python ( self, value) :
print ( value)
return value
def to_url ( self, value) :
val = super ( RegexConverter, self) . to_url( value)
print ( val)
return val
app. url_map. converters[ 'regex' ] = RegexConverter
@app. route ( '/index/<regex("\d+"):nid>' )
def index ( nid) :
print ( url_for( 'index' , nid= nid) )
return 'Index'
if __name__ == '__main__' :
app. run( )
在浏览器中输入测试路由 :
http : / / 127.0 .0 .1 : 5000 /index/ 123 查看终端显示信息
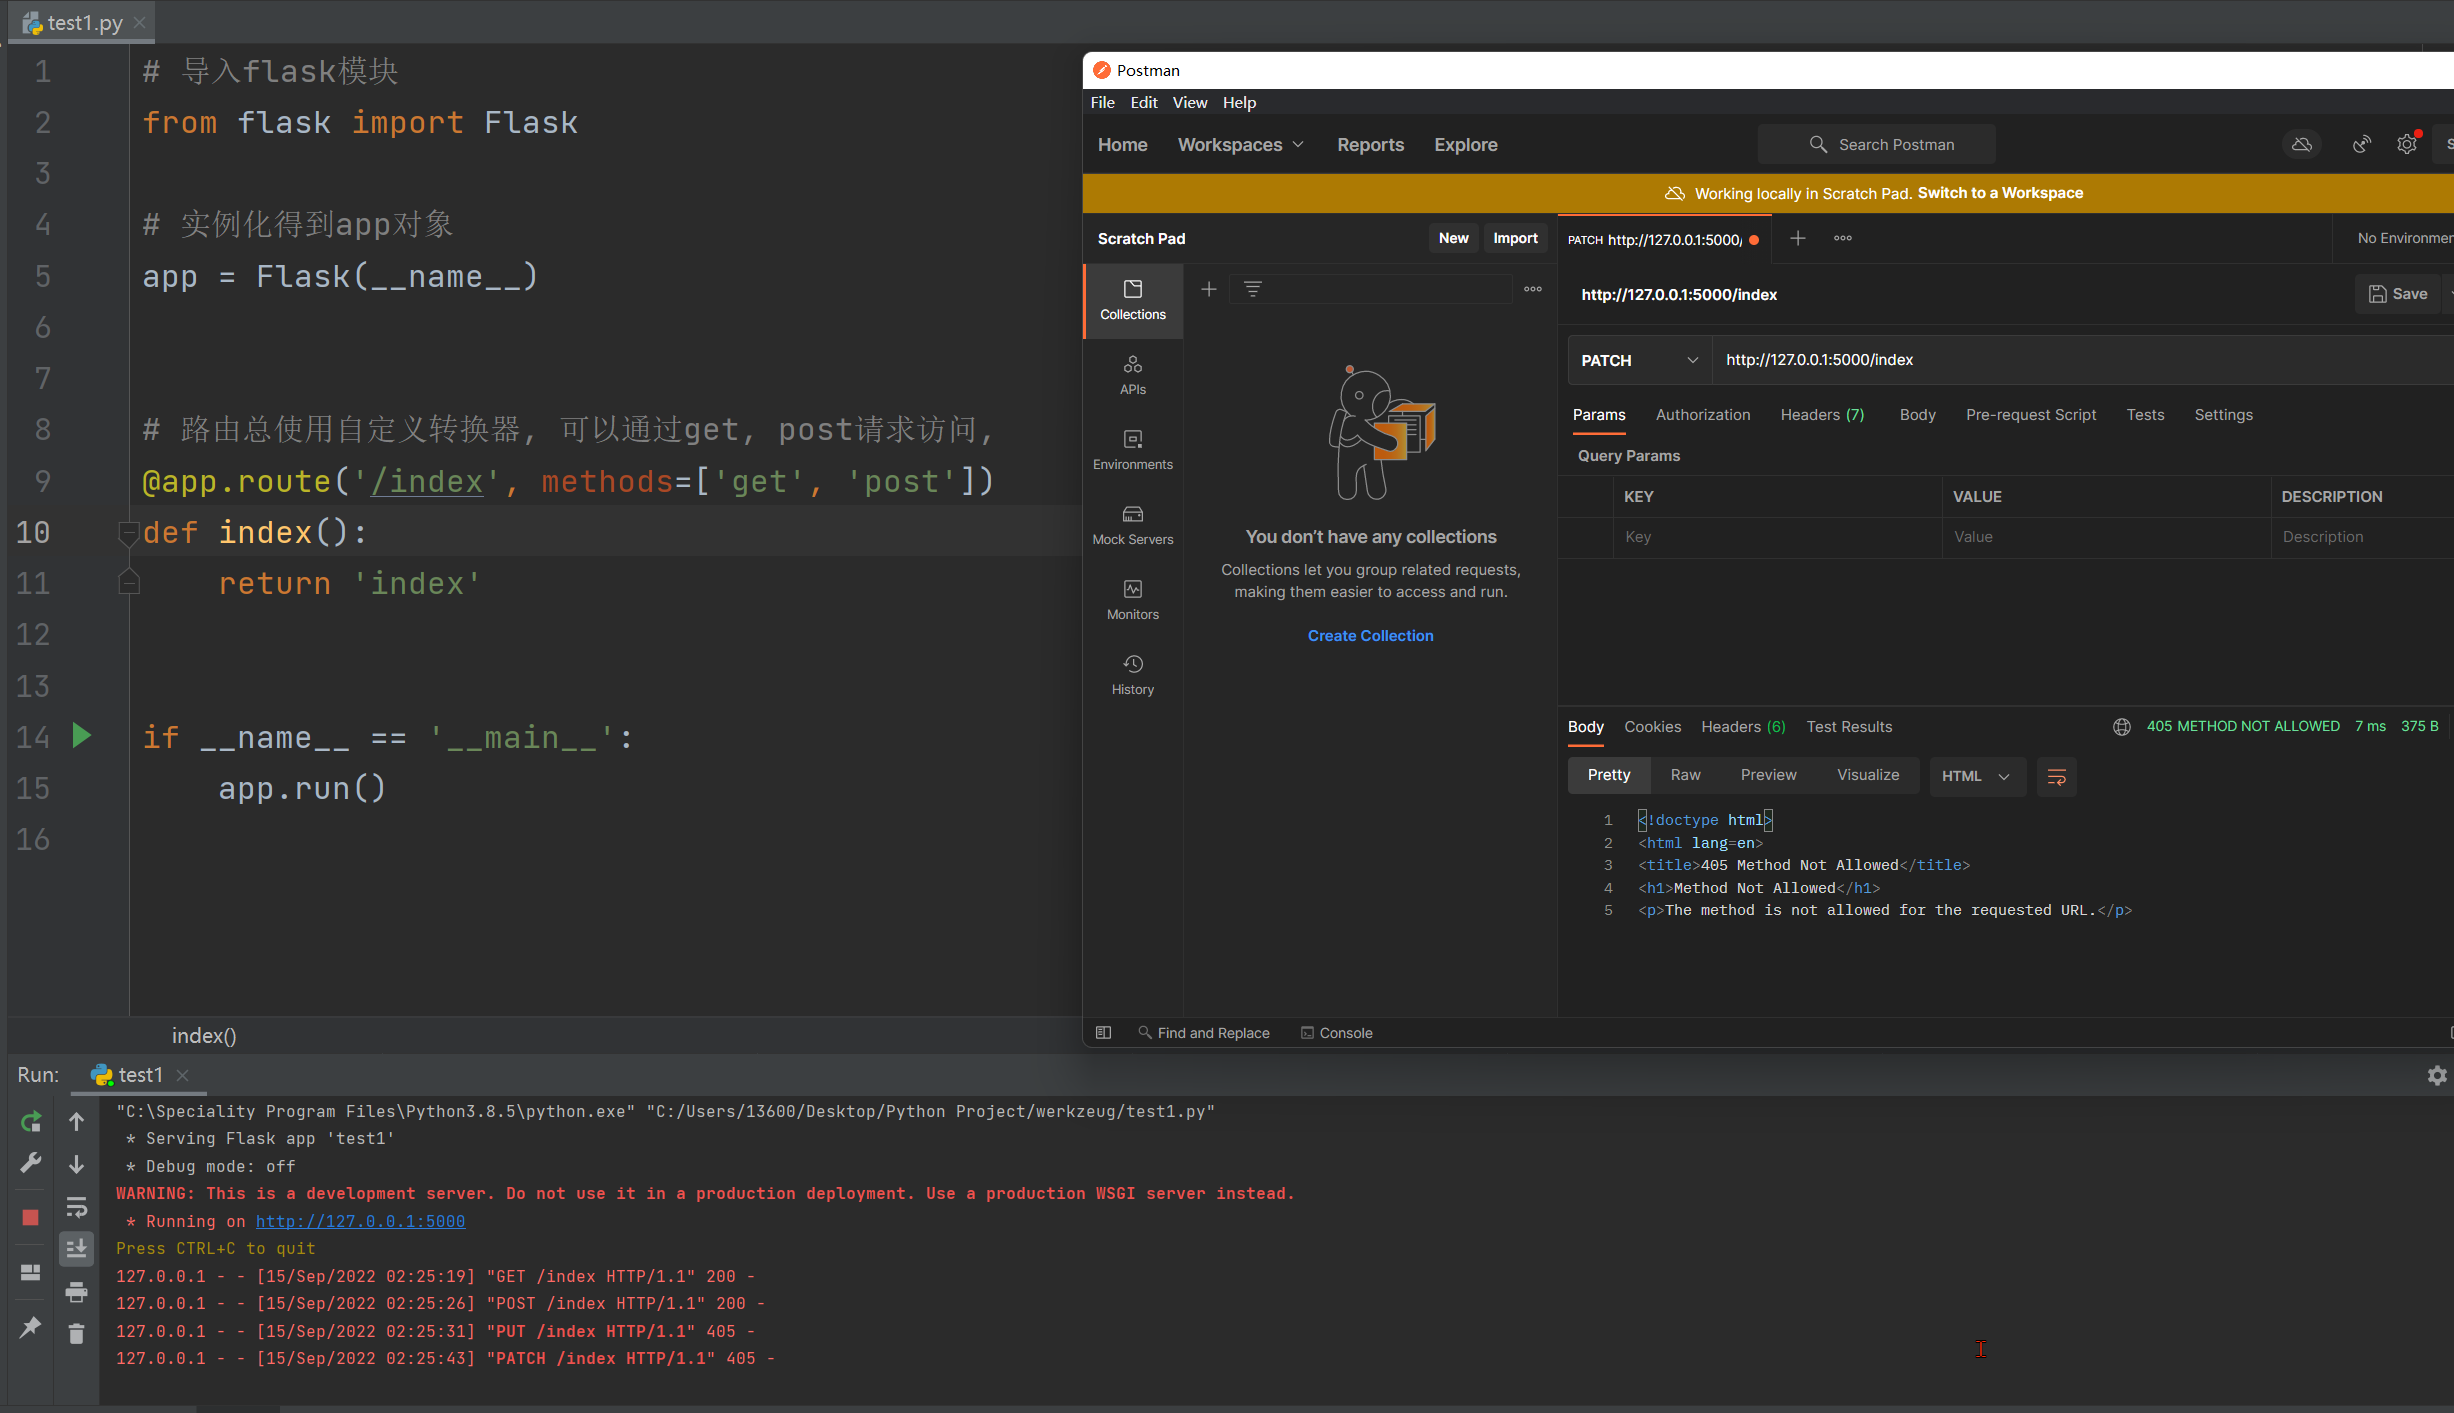
可以在路由装饰器中使用method参数指定访问应用的请求方式 .
@ app . route ( '路由' , methods = [ '请求方法, 支持大小写' , . . . ] )
from flask import Flask
app = Flask( __name__)
@app. route ( '/index' , methods= [ 'get' , 'post' ] )
def index ( ) :
return 'index'
if __name__ == '__main__' :
app. run( )
在postman中测试查看结果 , 可以通过get , post请求访问 : http : / / 127.0 .0 .1 : 5000 /index
在路由装饰器中通过endpoint参数为路径设置别名 ,
可以在任何应用中中可以通过url_for函数反向解析获取 .
导入url_for函数 : from flask import url_for
from flask import Flask, url_for, redirect
app = Flask( __name__)
@app. route ( '/index' , endpoint= 'i1' )
def index ( ) :
index_url = url_for( 'i1' )
test1_url = url_for( 't1' )
print ( index_url, test1_url)
return redirect( test1_url)
@app. route ( '/test1' , endpoint= 't1' )
def test1 ( ) :
return 'test1'
if __name__ == '__main__' :
app. run( )
@setupmethod
def route ( self, rule: str , ** options: t. Any) - > t. Callable[ [ T_route] , T_route] :
def decorator ( f: T_route) - > T_route:
endpoint = options. pop( "endpoint" , None )
self. add_url_rule( rule, endpoint, f, ** options)
return f
return decorator
参数self , 是app
参数rule , 为路由
参数options , 接受其他的关键字参数 , 如methods .
endpoint 别名设置被单独弹出
路由最终是通过app . add_url_rule ( 路由 , 别名 , 被装饰的函数 , * * options ) 实现
@setupmethod
def add_url_rule (
self,
rule: str ,
endpoint: t. Optional[ str ] = None ,
view_func: t. Optional[ ft. RouteCallable] = None ,
provide_automatic_options: t. Optional[ bool ] = None ,
** options: t. Any,
) - > None :
if endpoint is None :
endpoint = _endpoint_from_view_func( view_func)
options[ "endpoint" ] = endpoint
methods = options. pop( "methods" , None )
if methods is None :
methods = getattr ( view_func, "methods" , None ) or ( "GET" , )
if isinstance ( methods, str ) :
raise TypeError(
"Allowed methods must be a list of strings, for"
' example: @app.route(..., methods=["POST"])'
)
methods = { item. upper( ) for item in methods}
. . .
def _endpoint_from_view_func( view_func: t.Callable) -> str:
assert view_func is not None, "expected view func if endpoint is not provided."
return view_func.__name__
通过源码得知 , 在没有给路由起别名的时候 , 会默认使用函数名作为别名 .
那么意味着在其他应用中可以直接通过默认的别名反向解析得到路由 .
from flask import Flask, url_for, redirect
app = Flask( __name__)
@app. route ( '/index' , endpoint= 'i1' )
def index ( ) :
index_url = url_for( 'i1' )
test1_url = url_for( 'test1' )
print ( index_url, test1_url)
return redirect( test1_url)
@app. route ( '/test1' )
def test1 ( ) :
return 'test1'
if __name__ == '__main__' :
app. run( )
由源码得出 , 路由设置是通过app . add_url_rule方法显示的 .
from flask import Flask
app = Flask( __name__)
def test1 ( ) :
return 'test1'
app. add_url_rule( '/test1' , view_func= test1)
if __name__ == '__main__' :
app. run( )
不设置别名默认使用被装饰器装饰的函数名作为别名 .
如果出现别名一样Flask运行启动就会报错 , 提示报错 别名已经存在 . . .
@ app . route和app . add_url_rule参数
defaults = None , 默认值 ,
当URL中无参数,函数需要参数时,使用defaults = { 'k' : 'v' } , 将v赋值给k ( 变量 ) .
函数中接收defaults中的k最为参数 .
from flask import Flask
app = Flask( __name__)
@app. route ( '/' , defaults= { 'name' : 'kid' } )
def index ( name) :
print ( name)
return 'hello'
if __name__ == '__main__' :
app. run( )
@ app . route和app . add_url_rule参数
strict_slashes = None , 默认值 ,
对URL最后的 / 符号是否严格要求 , 默认严格,False,就是不严格
from flask import Flask
app = Flask( __name__)
@app. route ( '/index/' , strict_slashes= False )
def index ( ) :
return 'hello'
if __name__ == '__main__' :
app. run( )
浏览器中测试 :
http : / / 127.0 .0 .1 : 5000 /index
http : / / 127.0 .0 .1 : 5000 /index/
两个地址都可以访问 , 否则第二个地址访问会报错 .
@ app . route和app . add_url_rule参数
redirect_to = None , 默认值 ,
重定向到指定地址 .
* 测试的时候一定要关闭浏览器的缓存功能
from flask import Flask
app = Flask( __name__)
@app. route ( '/' , redirect_to= 'https:www.baidu.com' )
def index ( ) :
pass
if __name__ == '__main__' :
app. run( )
return '字符串' 或 字符串格式html
return render_template ( 'html文件' )
return redirect ( '地址' )
from flask import Flask
app = Flask( __name__)
@app. route ( '/' )
def index ( ) :
return 'index'
在浏览器中测试 : http : / / 127.0 .0 .1 : 5000
页面展示 : index
from flask import Flask
app = Flask( __name__)
@app. route ( '/' )
def index ( ) :
html_str = '<p style="color:red">你好</p>'
return html_str
if __name__ == '__main__' :
app. run( )
在浏览器中测试 : http : / / 127.0 .0 .1 : 5000
页面展示 : 你好 ( 红色的 , css渲染 )
在生成app对象的时候有一个参数template_folder , 模板文件夹设置 ,
这个参数默为 : template_folder : t . Optional [ str ] = "templates" ,
项目下的templates目录作为html的存放目录 ,
可以通过render_template函数将templates下的html文件返回给浏览器 .
def render_template (
template_name_or_list: t. Union[ str , Template, t. List[ t. Union[ str , Template] ] ] ,
** context: t. Any
. . .
在返回页面的时候 , 可以将后端的数据关键字参数形式 , 返回给页html页面 . ( 详情见第 6.3 小节 )
* 1. 在项目下新建templates目录
* 2. 在templates目录下新建index . html模板
<! DOCTYPE html > < htmllang = " en" > < head> < metacharset = " UTF-8" > < title> </ title> </ head> < body> < h1> </ h1> </ body> </ html> * 3. 导入render_template函数 , 通过render_template函数函数将页面返回 .
from flask import Flask, render_template
app = Flask( __name__)
@app. route ( '/index' )
def index ( ) :
return render_template( 'index.html' )
if __name__ == '__main__' :
app. run( )
* 4. 在浏览器中测试 : http : / / 127.0 .0 .1 : 5000 /index
页面展示 : index . htm页面信息
可以通过redirect函数重定向 , 可以重定向到自己的网页 , 也可以重定向到网络上的地址 .
定向到网络上的地址 redirect ( 'https://www.baidu.com' ) 需要带协议部分 ( http , https )
重定向到自己的网页 redirect ( '/home' )
导入redirect : from flask import redirect
from flask import Flask, redirect
app = Flask( __name__)
@app. route ( '/index/<num_str>' )
def index ( num_str) :
if num_str == '1' :
return redirect( 'https://www.baidu.com' )
elif num_str == '2' :
return redirect( '/home' )
@app. route ( '/home' )
def home ( ) :
return 'home'
if __name__ == '__main__' :
app. run( )
在浏览器中测试 :
输入 127.0 .0 .1 : 5000 /index/ 1 跳转到百度页面
输入 127.0 .0 .1 : 5000 /index/ 2 跳转home页面
* 1. 新建Python项目前后端交互案例
* 2. 在项目下新建templates目录 , 用于存放html模板
Flask中session的使用 , session是一个全局的函数 , ( 操作和字典相似 ) .
存储用户信息 :
session [ key ] = value
获取用户信息
session . get ( key )
步骤 :
1. 从request . method获取请求方式 , 得到请求方式字符串 , 大写 !
2. 判断请求方法是get还是post .
3. 如果是get , 返回登入页面 , 在templates目录下创建login . html登入页面 .
4. 如果是post , 从表单中获取数据 , 做登入校验 , 校验成功 , 保存登入信息到session , 返回index主页 .
5. 校验失败返回登入页面 ,
session保存用户信息需要设置密码否则会报错 .
RuntimeError : The session is unavailable because no secret key was set . Set the secret_key on the application to something unique and secret .
* 1. 在项目下创建main . py
from flask import Flask, request, render_template, redirect, session
app = Flask( __name__)
app. secret_key = 'qwer'
@app. route ( '/login' , methods= [ 'get' , 'post' ] )
def login ( ) :
print ( request. method)
if request. method == 'GET' :
return render_template( 'login.html' )
if request. method == 'POST' :
user = request. form. get( 'user' )
pwd = request. form. get( 'pwd' )
if user == 'kid' and pwd == '123' :
session[ 'user_info' ] = user
return redirect( '/index' )
else :
return render_template( 'login.html' , error= '账户或密码错误!' )
@app. route ( '/index' )
def index ( ) :
return 'index主页'
if __name__ == '__main__' :
app. run( )
* 2. 在templates目录下创建login . html模板页面
<! DOCTYPE html > < htmllang = " en" > < head> < metacharset = " UTF-8" > < title> </ title> </ head> < body> < div> < h1> </ h1> < formmethod = " post" > < p> < inputtype = " text" name = " user" > </ p> < p> < inputtype = " password" name = " pwd" > < spanstyle = " color : red; " > </ span> </ p> < p> < button> </ button> </ p> </ form> </ div> </ body> </ html> 1. 判断用户是否登入 , 如果没有登入 , 重定向到login登入页面 . 要求用户登入 .
2. 有用户登入 , 返回index主页面 , 并将数据数据提供给index主页面渲染 .
使用render_template不进可以返回html页面 , 还可以将后端数据提交给前端 .
前端使用模板语法获取变量使用 , 与django不同的是 , Flask中支持python的方法使用 , 可以使用 ( ) .
* 1. 完善index应用
all_user = {
1 : { 'name' : 'kid' , 'age' : 18 , 'gender' : '男' , 'text' : '德玛西亚' } ,
2 : { 'name' : 'qq' , 'age' : 19 , 'gender' : '男' , 'text' : '诺克萨斯' } ,
3 : { 'name' : 'aa' , 'age' : 20 , 'gender' : '女' , 'text' : '艾欧尼亚' }
}
@app. route ( '/index' )
def index ( ) :
user = session. get( 'user_info' , None )
if not user:
return redirect( '/login' )
return render_template( 'index.html' , user_dict= all_user)
* 2. 在templates目录下创建index . html模板页面
<! DOCTYPE html > < htmllang = " en" > < head> < metacharset = " UTF-8" > < title> </ title> </ head> < body> < div> < tableborder = " 1" > < thead> < tr> < th> </ th> < th> </ th> < th> </ th> < th> </ th> < th> </ th> < th> </ th> </ tr> </ thead> < tbody> < tr> < th> </ th> < th> </ th> < th> </ th> < th> </ th> < th> </ th> < th> < ahref = " /detail/{{k}}" > </ a> </ th> </ tr> </ tbody> </ table> </ div> </ body> </ html>
* 1. 主页面中点击查看详情 , 跳转至个detail人详情页面 , 携带用户id号
* 2. 判断用户状态 , 如果没有登入 , 重定向到登入页面
* 3. 如果有用户登入 , 返回个人详情页面
* 1. 在Flask框架中添加detail详情页面
@app. route ( '/detail/<int:pid>' )
def detail ( pid) :
user = session. get( 'user_info' , None )
if not user:
return redirect( '/login' )
user_detail = all_user. get( pid, None )
if not user_detail:
return '用户信息不存在'
return render_template( 'detail.html' , user_detail= user_detail)
* 2. 在templates目录下创建detail . html模板页面
<! DOCTYPE html > < htmllang = " en" > < head> < metacharset = " UTF-8" > < title> </ title> </ head> < body> < p> </ p> < p> </ p> < p> </ p> < p> </ p> </ body> </ html> from flask import Flask, request, render_template, redirect, session
app = Flask( __name__)
app. secret_key = 'qwer'
all_user = {
1 : { 'name' : 'kid' , 'age' : 18 , 'gender' : '男' , 'text' : '德玛西亚' } ,
2 : { 'name' : 'qq' , 'age' : 19 , 'gender' : '男' , 'text' : '诺克萨斯' } ,
3 : { 'name' : 'aa' , 'age' : 20 , 'gender' : '女' , 'text' : '艾欧尼亚' }
}
@app. route ( '/login' , methods= [ 'get' , 'post' ] )
def login ( ) :
print ( request. method)
if request. method == 'GET' :
return render_template( 'login.html' )
if request. method == 'POST' :
user = request. form. get( 'user' )
pwd = request. form. get( 'pwd' )
if user == 'kid' and pwd == '123' :
session[ 'user_info' ] = user
print ( '更新用户状态' )
return redirect( '/index' )
else :
return render_template( 'login.html' , error= '账户或密码错误!' )
@app. route ( '/index' )
def index ( ) :
user = session. get( 'user_info' , None )
if not user:
return redirect( '/login' )
return render_template( 'index.html' , user_dict= all_user)
@app. route ( '/detail/<int:pid>' )
def detail ( pid) :
user = session. get( 'user_info' , None )
if not user:
return redirect( '/login' )
user_detail = all_user. get( pid, None )
if not user_detail:
return '用户信息不存在'
return render_template( 'detail.html' , user_detail= user_detail)
if __name__ == '__main__' :
app. run( )
自己给应用添加装饰器 , 那么需要注意装饰器执行的顺序 .
下例程序为index主页添加登入 .
from flask import Flask, request, render_template, redirect, session, url_for
app = Flask( __name__)
app. secret_key = 'qwer'
all_user = {
1 : { 'name' : 'kid' , 'age' : 18 , 'gender' : '男' , 'text' : '德玛西亚' } ,
}
def verification ( index) :
def func ( * args, ** kwargs) :
user = session. get( 'user_info' , None )
if not user:
return redirect( '/login' )
else :
res = index( * args, ** kwargs)
return res
return func
@app. route ( '/login' , methods= [ 'get' , 'post' ] )
def login ( ) :
print ( request. method)
if request. method == 'GET' :
return render_template( 'login.html' )
if request. method == 'POST' :
user = request. form. get( 'user' )
pwd = request. form. get( 'pwd' )
if user == 'kid' and pwd == '123' :
session[ 'user_info' ] = user
print ( '更新用户状态' )
return redirect( '/index' )
else :
return render_template( 'login.html' , error= '账户或密码错误!' )
@app. route ( '/index' )
@verification
def index ( ) :
print ( url_for( 'func' ) )
return render_template( 'index.html' , user_dict= all_user)
if __name__ == '__main__' :
app. run( )
def _endpoint_from_view_func ( view_func: t. Callable) - > str :
assert view_func is not None , "expected view func if endpoint is not provided."
print ( view_func. __name__)
return view_func. __name__
@ 路由装饰器
@ 登入装饰器
def 运行的应用index
. . .
装饰器至下往上加载
1. 运行运行的应用名 , 被作为参数传递给登入装饰器 , 返回func函数名 , 装饰的是index .
2. func函数名被路由装饰器最为参数进行传递 , 装饰的是func函数
运行至上往下运行 .
1. 请求来了先执行func函数的登入校验
2. 校验通过执行index函数
路由装饰装饰了下一个装饰器放回的函数 , 这个是否默认的别名就是路由装饰器装饰的函数名 .


 1211
1211


 被折叠的 条评论
为什么被折叠?
被折叠的 条评论
为什么被折叠?
 到【灌水乐园】发言


