目录
一、WaterFlow简介
WaterFlow是HarmonyOS中的瀑布流容器组件,由"行"和"列"分割的单元格所组成,通过容器自身的排列规则,将不同大小的"项目"自上而下,如瀑布般紧密布局。这种布局方式特别适合展示图片画廊、商品列表等内容不规则的场景。
二、基础用法
2.1 创建简单的双列瀑布流
最基本的瀑布流创建方式如下:
WaterFlow() {
  ForEach(this.dataArray, (item) => {
    FlowItem() {
      Column() {
        Image(item.imageUrl)
          .width('100%')
          .borderRadius(8)
        Text(item.title)
          .fontSize(14)
      }
    }
    .width('100%')
    .height(item.height)
  })
}
.columnsTemplate('1fr 1fr') // 创建两列布局
.columnsGap(10) // 设置列间距
.rowsGap(10) // 设置行间距
2.2 自动计算列数
可以使用repeat(auto-fill, size)实现根据容器宽度自动计算列数:
WaterFlow() {
  // 瀑布流内容
}
.columnsTemplate('repeat(auto-fill, 120)') // 每列120vp宽度,自动计算列数
三、数据源管理
3.1 创建数据源类
推荐使用实现IDataSource接口的数据源类与LazyForEach结合使用:
export class WaterFlowDataSource implements IDataSource {
  private dataArray: any[] = [];
  private listeners: DataChangeListener[] = [];

  constructor() {
    // 初始化数据
    for (let i = 0; i < 100; i++) {
      this.dataArray.push({
        id: i,
        title: `标题${i}`,
        height: 100 + Math.floor(Math.random() * 100)
      });
    }
  }

  // 获取索引对应的数据
  public getData(index: number): any {
    return this.dataArray[index];
  }

  // 获取数据总数
  public totalCount(): number {
    return this.dataArray.length;
  }

  // 注册数据变化监听器
  registerDataChangeListener(listener: DataChangeListener): void {
    if (this.listeners.indexOf(listener) < 0) {
      this.listeners.push(listener);
    }
  }

  // 取消注册数据变化监听器
  unregisterDataChangeListener(listener: DataChangeListener): void {
    const pos = this.listeners.indexOf(listener);
    if (pos >= 0) {
      this.listeners.splice(pos, 1);
    }
  }

  // 通知数据添加
  notifyDataAdd(index: number): void {
    this.listeners.forEach(listener => {
      listener.onDataAdd(index);
    })
  }

  // 添加数据方法
  public addLastItem(): void {
    const index = this.dataArray.length;
    this.dataArray.push({
      id: index,
      title: `标题${index}`,
      height: 100 + Math.floor(Math.random() * 100)
    });
    this.notifyDataAdd(index);
  }
}
3.2 使用LazyForEach加载数据
@Component
struct WaterFlowExample {
  dataSource: WaterFlowDataSource = new WaterFlowDataSource();

  build() {
    WaterFlow() {
      LazyForEach(this.dataSource, (item) => {
        FlowItem() {
          // 内容组件
        }
        .width('100%')
        .height(item.height)
      }, item => item.id.toString())
    }
  }
}
四、高级功能
4.1 底部加载更多
使用footer参数和onReachEnd事件实现触底加载:
@Component
struct WaterFlowExample {
  @State isLoading: boolean = false;
  @State isEnd: boolean = false;

  @Builder
  footerBuilder() {
    Column() {
      if (this.isLoading) {
        Row({ space: 5 }) {
          LoadingProgress().width(20).height(20)
          Text('加载中...').fontSize(14)
        }
        .height(40)
      } else if (this.isEnd) {
        Text('已经到底了').fontSize(14)
        .height(40)
      }
    }
    .width('100%')
    .justifyContent(FlexAlign.Center)
  }

  build() {
    WaterFlow({ footer: this.footerBuilder() }) {
      // 瀑布流内容
    }
    .onReachEnd(() => {
      if (this.isEnd) return;
      this.isLoading = true;

      // 模拟网络请求
      setTimeout(() => {
        // 添加更多数据
        for (let i = 0; i < 10; i++) {
          this.dataSource.addLastItem();
        }

        // 判断是否加载完毕
        if (this.dataSource.totalCount() > 200) {
          this.isEnd = true;
        }

        this.isLoading = false;
      }, 1000);
    })
  }
}
4.2 分组布局
使用sections参数实现不同列数的混合布局:
@Component
struct WaterFlowSectionsExample {
  @State sections: WaterFlowSections = new WaterFlowSections();

  aboutToAppear() {
    // 初始化分组
    this.sections.splice(0, 0, [
      {
        itemsCount: 3,  // 第一组包含3个项目
        crossCount: 1,  // 单列布局
        margin: { top: 10, bottom: 10 },
        columnsGap: 0,
        rowsGap: 8
      },
      {
        itemsCount: 6,  // 第二组包含6个项目
        crossCount: 2,  // 双列布局
        margin: { top: 0, bottom: 10 },
        columnsGap: 8,
        rowsGap: 8
      },
      {
        itemsCount: 12, // 第三组包含12个项目
        crossCount: 3,  // 三列布局
        margin: { top: 0, bottom: 10 }
      }
    ]);
  }

  build() {
    WaterFlow({ sections: this.sections }) {
      LazyForEach(this.dataSource, (item, index) => {
        FlowItem() {
          // 内容组件,可根据索引判断显示不同样式
        }
      })
    }
  }
}
4.3 性能优化
使用onGetItemMainSizeByIndex提前计算项目尺寸提高性能:
{
  itemsCount: 20,
  crossCount: 2,
  onGetItemMainSizeByIndex: (index: number) => {
    // 提前计算高度,避免布局计算开销
    return this.itemHeightArray[index % this.itemHeightArray.length];
  }
}
4.4 滑动窗口模式
使用layoutMode选择更高效的布局模式:
- ALWAYS_TOP_DOWN:默认模式,滚动位置依赖所有上方项目的布局
- SLIDING_WINDOW:移动窗口式布局,仅考虑视窗内的布局,对大数据集性能更好
WaterFlow()
  .layoutMode(WaterFlowLayoutMode.SLIDING_WINDOW)
4.5 边缘渐隐效果
设置边缘渐隐效果增强视觉体验:
WaterFlow()
  .fadingEdge(true, {fadingEdgeLength: LengthMetrics.vp(80)})
五、交互与控制
5.1 设置滚动控制器
使用Scroller控制瀑布流滚动:
@Component
struct WaterFlowExample {
  scroller: Scroller = new Scroller();

  build() {
    Column() {
      // 添加控制按钮
      Row({ space: 10 }) {
        Button('滚动到顶部')
          .onClick(() => {
            this.scroller.scrollToIndex(0);
          })

        Button('滚动到中间')
          .onClick(() => {
            this.scroller.scrollToIndex(50);
          })
      }

      WaterFlow({ scroller: this.scroller }) {
        // 瀑布流内容
      }
    }
  }
}
5.2 监听滚动事件
WaterFlow()
  .onScrollIndex((first: number, last: number) => {
    console.log(`当前显示范围: ${first} - ${last}`);
  })
  .onScrollStart(() => {
    console.log('开始滚动');
  })
  .onScrollStop(() => {
    console.log('停止滚动');
  })
六、实战案例:图片瀑布流
下面是一个完整的图片瀑布流示例:
@Entry
@Component
struct ImageWaterFlow {
  scroller: Scroller = new Scroller();
  dataSource: WaterFlowDataSource = new WaterFlowDataSource();
  @State isLoading: boolean = false;
  @State isEnd: boolean = false;

  aboutToAppear() {
    // 初始化数据
    this.loadImages();
  }

  loadImages() {
    this.isLoading = true;

    // 模拟网络请求
    setTimeout(() => {
      for (let i = 0; i < 20; i++) {
        this.dataSource.addImageItem();
      }
      this.isLoading = false;
    }, 1000);
  }

  @Builder
  footerBuilder() {
    Column() {
      if (this.isLoading) {
        Row({ space: 10 }) {
          LoadingProgress().width(24).height(24)
          Text('正在加载更多图片...').fontSize(14)
        }
        .height(50)
      } else if (this.isEnd) {
        Text('已经没有更多图片了').fontSize(14)
        .height(50)
      }
    }
    .width('100%')
    .justifyContent(FlexAlign.Center)
  }

  build() {
    Column() {
      Row() {
        Text('图片瀑布流').fontSize(20).fontWeight(FontWeight.Bold)
      }
      .width('100%')
      .justifyContent(FlexAlign.Center)
      .height(56)

      WaterFlow({ footer: this.footerBuilder(), scroller: this.scroller }) {
        LazyForEach(this.dataSource, (item: ImageItem) => {
          FlowItem() {
            Column() {
              Stack() {
                Image(item.imageUrl)
                  .width('100%')
                  .objectFit(ImageFit.Cover)
                  .borderRadius({ topLeft: 8, topRight: 8 })

                if (item.isNew) {
                  Text('New')
                    .fontSize(12)
                    .backgroundColor('#FF3B30')
                    .fontColor(Color.White)
                    .borderRadius(4)
                    .padding(4)
                    .position({ x: 8, y: 8 })
                }
              }

              Column({ space: 4 }) {
                Text(item.title)
                  .fontSize(14)
                  .fontWeight(FontWeight.Medium)
                  .maxLines(2)

                Row() {
                  Row({ space: 4 }) {
                    Image('/assets/user_avatar.png')
                      .width(16)
                      .height(16)
                      .borderRadius(8)
                    Text(item.author)
                      .fontSize(12)
                      .fontColor('#666')
                  }

                  Row({ space: 4 }) {
                    Image('/assets/like_icon.png')
                      .width(14)
                      .height(14)
                    Text(item.likes.toString())
                      .fontSize(12)
                      .fontColor('#666')
                  }
                }
                .width('100%')
                .justifyContent(FlexAlign.SpaceBetween)
              }
              .padding(8)
            }
            .borderRadius(8)
            .backgroundColor(Color.White)
            .width('100%')
          }
          .width('100%')
          .height(item.height)
        })
      }
      .columnsTemplate('1fr 1fr')
      .columnsGap(12)
      .rowsGap(12)
      .padding(16)
      .layoutWeight(1)
      .backgroundColor('#F5F5F5')
      .onReachEnd(() => {
        if (this.isLoading || this.isEnd) return;

        if (this.dataSource.totalCount() > 100) {
          this.isEnd = true;
        } else {
          this.loadImages();
        }
      })
    }
    .width('100%')
    .height('100%')
  }
}

// 数据源实现省略
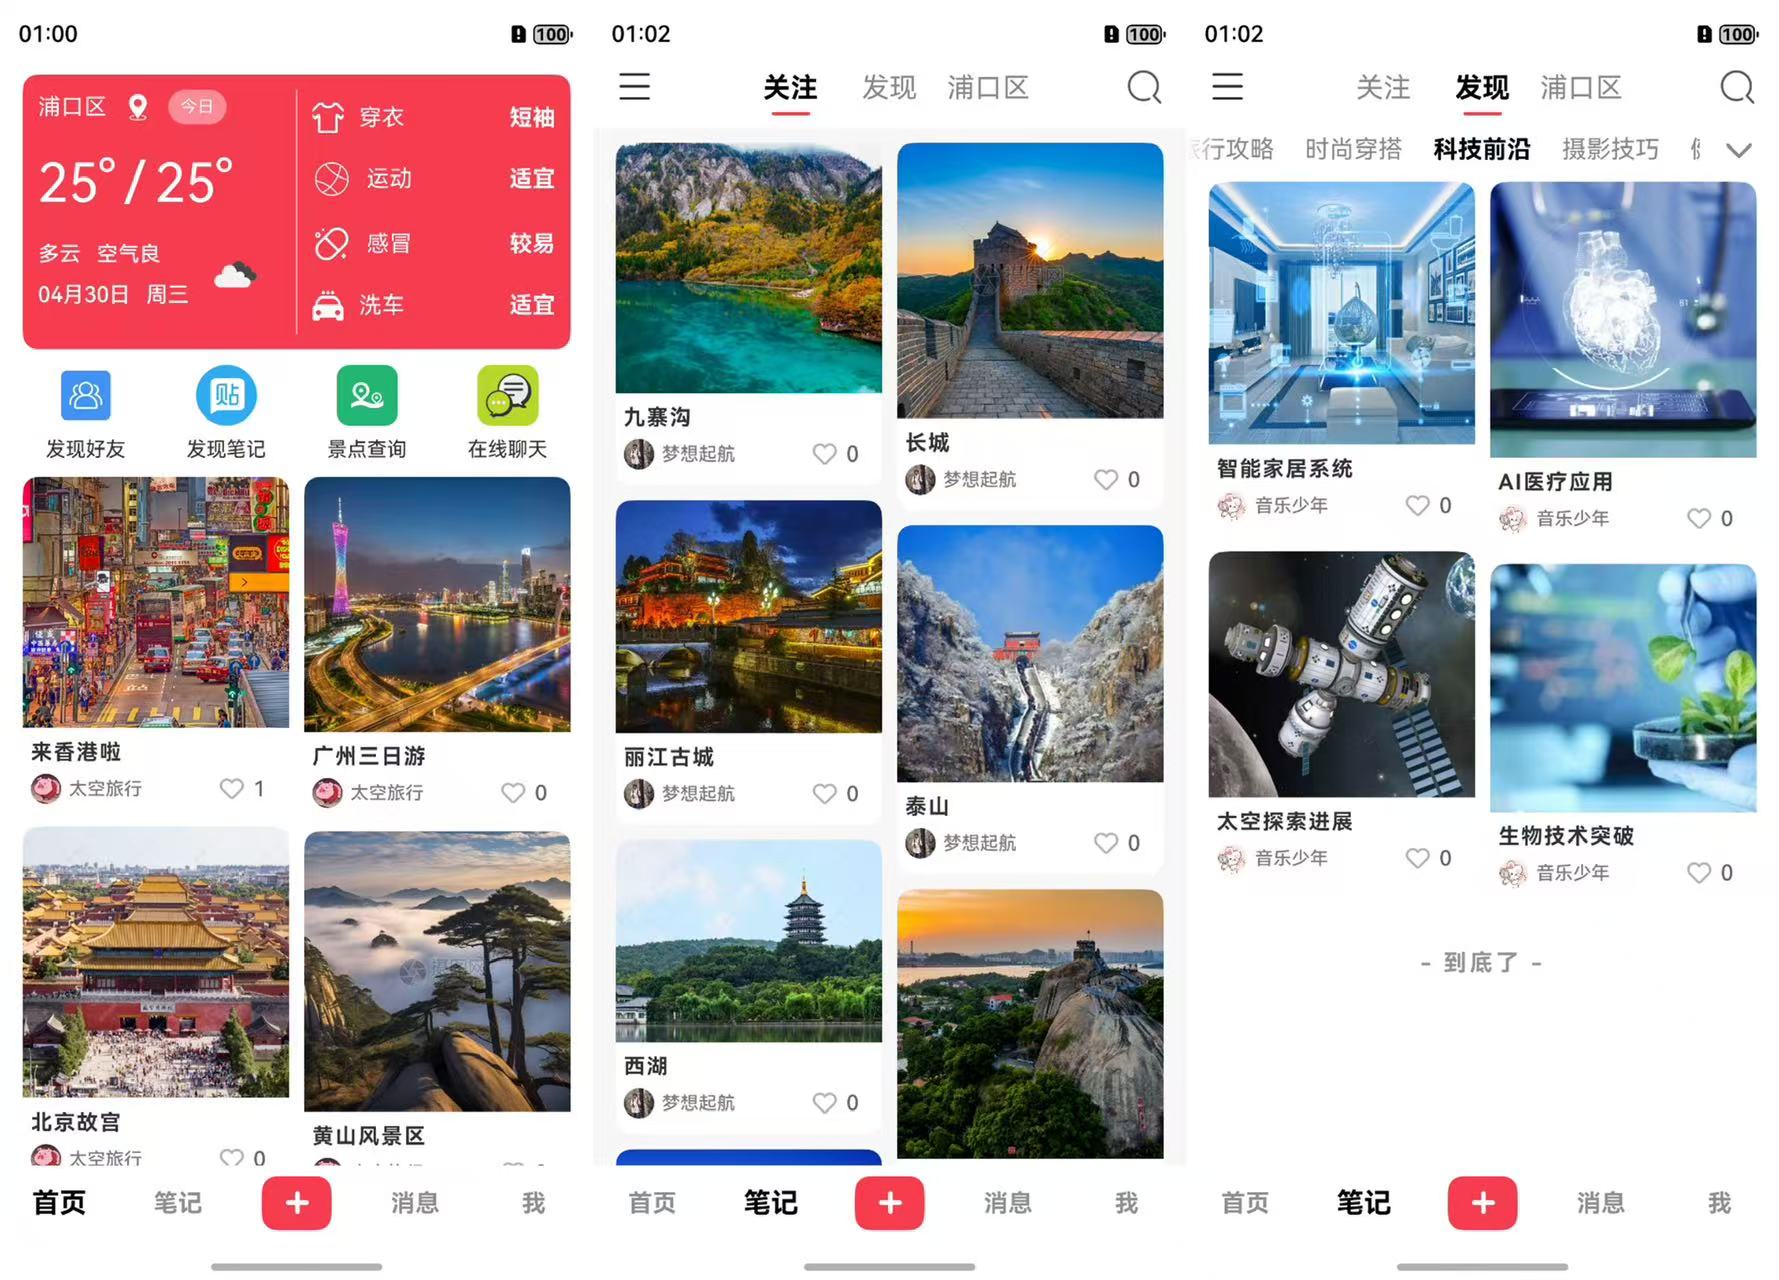
笔记列表呈现瀑布流实际效果图:

七、注意事项
- WaterFlow组件仅支持FlowItem子组件
- 使用分组布局时会忽略columnsTemplate和rowsTemplate属性
- 如果同时设置itemConstraintSize和FlowItem的constraintSize,则取两者之间的适当值
- 滑动窗口模式不支持使用滚动条,但性能更好
- 使用onGetItemMainSizeByIndex会覆盖FlowItem设置的主轴长度
- 分组布局中务必保证所有分组子节点总数与实际子节点数一致
八、最佳实践
- 对于大数据集,优先使用滑动窗口布局模式
- 提前计算并缓存元素尺寸,使用onGetItemMainSizeByIndex提高性能
- 实现组件复用机制,减少内存占用
- 图片加载使用懒加载方式,避免一次性加载过多图片
- 当数据量大时使用分页加载机制,避免一次性加载全部数据
通过本教程,您已经掌握了HarmonyOS中WaterFlow瀑布流组件的各种用法和技巧。这个组件为开发复杂的内容展示界面提供了强大而灵活的布局方案,希望能帮助您更好地开发HarmonyOS应用!


 1019
1019

 被折叠的 条评论
为什么被折叠?


