


JQuery
一、JQuery是什么
1、JQuery介绍
JQuery是一个快速、简洁的JavaScript框架
2006年1月由John Resig发布。jQuery设计的宗旨是“write Less,Do More”,即倡导写更少的代码,做更多的事 情。它封装JavaScript常用的功能代码,提供一种简便的JavaScript设计模式,优化HTML文档操作、事件处理、动画设计和Ajax交互。
jQuery是一个js库,免费开源易用,提供了我们开发中常用到的操作DOM的API,解决了我们使用js操作 DOM常遇到的一些问题,强大的选择器,简化我们的操作
2、JQuery引入
-
本地引入
-
下载JQuery的js文件,在本地进行引用(推荐)
-
官网地址:https://jquery.com/
-
<!--
jquery.js  开发版(不压缩)
jquery.min.js  产品版(压缩过)
jquery.slim.js 简化版(去掉了动画功能和ajax功能)
-->
<script src="js/jquery-3.6.0.js"></script>
-
-
在线引入
-
使用公网url进行引用(当网络条件不好的时候会引用失败)
-
<script src="https://code.jquery.com/jquery-3.6.0.js"></script>
-
3、Jquery文档就绪事件
//通过选择器选择documen内置对象,当document对象ready也就是加载完成的时候,调用方法。(类似于原生js的window.onload)
$(document).ready(function() {
	// 开始写 jQuery 代码...
});
//或者
$().ready(function() {
	// 开始写 jQuery 代码...
});
//或者
$(funtion() {
	// 开始写 jQuery 代码...
});
二、JQuery选择器
对象之间的转换
//注意就是js对象就不能用jquery中的方法
//name值为hobby的元素
var ck = $("[name='hobby']");
for (var i = 0; i < ck.length; i++) {
	//ck[i] jquery对象-->javaScript对象
	console.log(ck[i].value);
	//$(ck[i]) javaScript对象-->jquery对象
	console.log($(ck[i]).val());
}
1、基本选择器
- 标签选择器$(“a”)
- ID选择器$(“#id”)
- 类选择器$(“.class”)
- 通配选择器(“*”) 代表所有元素
2、层级选择器
- 后代选择器$(“ul li”)
- 父子选择器$(“ul>li”)
- 兄弟选择器
- prve+next 后面第一个兄弟元素
- prve~next 后面所有兄弟元素
- 组合选择器(“elem1,elem2”)
3、简单过滤选择器
| 选择器 | 功能 | 示例 |
|---|---|---|
| :first | 获取第一个元素 | $(“li:first”) |
| :last | 获取最后一个元素 | $(“li:last”) |
| :not | 去除所有与给定选择器匹配的元素 | $(“input:not(:checked)”) |
| :even | 匹配所有索引值为偶数的元素,从 0 开始计数 | $(“tr:even”) |
| :odd | 匹配所有索引值为奇数的元素,从 0 开始计数 | $(“tr:odd”) |
| :eq | 匹配一个给定索引值的元素 | $(“tr:eq(1)”) |
| :gt | 匹配所有大于给定索引值的元素 | $(“tr:gt(0)”) |
| :lt | 匹配所有小于给定索引值的元素 | $(“tr:lt(2)”) |
| :header | 匹配如 h1, h2, h3之类的标题元素 | $(“:header”).css(“color”, “red”); |
| :animated | 匹配所有正在执行动画效果的元素 |
//只有对不在执行动画效果的元素执行一个动画特效
$("#run").click(function(){
   //没有执行动画的
  $("div:not(:animated)").animate({ left: "+=20" }, 1000);
});
- 表格的隔行变色
- 奇数行背景色改变为red色
- 偶数行背景色改变为yellow色
<!DOCTYPE html>
<html>
	<head>
		<meta charset="utf-8">
		<title>隔行变色-CSS</title>
		<style type="text/css">
			.datalist{
				border:1px solid #007108;
				font-family:Arial;
				border-collapse:collapse;
				background-color:#d9ffdc;
				font-size:14px;
			}

			.datalist th{
				border:1px solid #007108;
				background-color:#00a40c;
				color:#FFFFFF;
				font-weight:bold;
				padding-top:4px; padding-bottom:4px;
				padding-left:12px; padding-right:12px;
				text-align:center;
			}

			.datalist td{
				border:1px solid #007108;
				text-align:left;
				padding-top:4px;
				padding-bottom:4px;
				padding-left:10px;
				padding-right:10px;

			}
		</style>


		<script src="https://code.jquery.com/jquery-3.6.0.js"></script>
		<script>
			$(function(){
				//奇数行背景色改变为red色
				$("tr:odd").css("background-color","red");
				//偶数行背景色改变为yellow色
				$("tr:even").css("background-color","yellow");
			})
		</script>


	</head>
	<body>
		<table class="datalist" summary="list of members in EE Studay" id="oTable">
			<tr>
				<th scope="col">Name</th>
				<th scope="col">Class</th>
				<th scope="col">Birthday</th>
				<th scope="col">Constellation</th>
				<th scope="col">Mobile</th>
			</tr>
			<tr>					<!-- 奇数行 -->
				<td>isaac</td>
				<td>W13</td>
				<td>Jun 24th</td>
				<td>Cancer</td>
				<td>1118159</td>
			</tr>
		    <tr class="altrow">		<!-- 偶数行 -->
				<td>fresheggs</td>
				<td>W610</td>
				<td>Nov 5th</td>
				<td>Scorpio</td>
				<td>1038818</td>
			</tr>
			<tr>					<!-- 奇数行 -->
				<td>girlwing</td>
				<td>W210</td>
				<td>Sep 16th</td>
				<td>Virgo</td>
				<td>1307994</td>
			</tr>
			<tr class="altrow">		<!-- 偶数行 -->
				<td>tastestory</td>
				<td>W15</td>
				<td>Nov 29th</td>
				<td>Sagittarius</td>
				<td>1095245</td>
			</tr>
		</table>
	</body>
</html>
4、内容选择器
| 选择器 | 功能 | 示例 |
|---|---|---|
| :contains | 匹配包含给定的元素 | $(“div:contains(‘John’)”) |
| :empty | 匹配所有不包含子元素或者文本的空元素 | $(“td:empty”) |
| :parent | 匹配含有子元素或者文本的元素 | $(“td:parent”) |
| :has | 匹配含有选择器所匹配的元素的元素 | $(“div:has§”) |
| :hidden | 匹配所有不可见元素 | $(“tr:hidden”) |
| :visible | 匹配所有可见元素 | $(“tr:visible”) |
- 隐藏标签
<!DOCTYPE html>
<html>
<head>
<meta charset="utf8">
<title></title>
<script src="js/jquery-3.6.0.js"></script>
<script>
//等待dom元素加载完毕,类似于js原生代码的window.onload
$(document).ready(function() {
//选择所有button元素,当button被点击时,调用函数
$("button").click(function() {
//选择所有p标签,将p标签隐藏
$("p").hide();
})
});
</script>
<style>
.div1 {
width: 200px; height: 200px; backgroundcolor: red;
}
</style>
</head>
<body>
<p>段落1</p>
<p>段落2</p>
<p>段落2</p>
<p>段落3</p>
<button>点击我隐藏所有段落 </button>
</body>
</html>
5、属性过滤选择器
| 选择器 | 功能 | 示例 |
|---|---|---|
| [attribute] | 匹配包含给定属性的元素 | $(“div[id]”) |
| [attribute=value] | 匹配给定的属性是某个特定值的元素 | $(“input[name=‘sex’]”); |
| [attribute!=value] | 匹配所有不含有指定的属性 | $(“input[name!=‘sex’]”); |
| [attribute^=value] | 匹配给定的属性是以某些值开始的元素 | $(“input[name^=‘sex’]”); |
| [attribute$=value] | 匹配给定的属性是以某些值结尾的元素 | ( " i n p u t [ n a m e ("input[name ("input[name=‘sex’]"); |
| [attribute*=value] | 匹配给定的属性是以包含某些值的元素 | $(“input[name*=‘se’]”); |
| [selector1]… | 复合属性选择器,需要同时满足多个条件时使用 |
//格式:[selector1][selector2][selectorN]
//找到所有含有 id 属性,并且它的 name 属性是以 man 结尾的
$("input[id][name$='man']")
6、子元素过滤选择器
| 选择器 | 功能 | 示例 |
|---|---|---|
| :nth-child | 匹配其父元素下的第N个子或奇偶元素 | $(“ul li:nth-child(2)”) |
| :first-child | 匹配第一个子元素 | $(“ul li:first-child”) |
| :last-child | 匹配最后一个子元素 | $(“ul li:last-child”) |
| :only-child | 匹配某个元素是父元素中唯一的子元素 | $(“ul li:only-child”) |
7、表单对象过滤器
| 选择器 | 功能 | 示例 |
|---|---|---|
| :enabled | 匹配所有可用元素 | $(“input:enabled”) |
| :disabled | 匹配所有不可用元素 | $(“input:disabled”) |
| :checked | 匹配所有选中的被选中元素(复选框、单选框等,不包括select中的option) | $(“input:checked”) |
| :selected | 匹配所有选中的option元素 | $(“select option:selected”) |
8、表单选择器
| 选择器 | 功能 | 示例 |
|---|---|---|
| :input | 匹配所有 input, textarea, select 和 button 元素 | $(“:input”) |
| :text | 匹配所有的单行文本框 | $(“:text”) |
| :password | 匹配所有密码框 | $(“:password”) |
| :radio | 匹配所有单选按钮 | $(“:radio”) |
| :checkbox | 匹配所有复选框 | $(“:checkbox”) |
| :submit | 匹配所有提交按钮 | $(“:submit”) |
| :image | 匹配所有图像域 | $(“:image”) |
| :reset | 匹配所有重置按钮 | $(“:reset”) |
| :button | 匹配所有按钮 | $(“:button”) |
| :file | 匹配所有文件域 | $(“:file”) |
三、JQuery事件
1、页面载入事件
//ready(fn)
//当DOM载入就绪可以查询及操纵时绑定一个要执行的函数
$(document).ready(function(){
  // 在这里写你的代码...
});
2、常用事件
| 事件 | 功能 |
|---|---|
| click() | 单击时触发该事件 |
| dblclick() | 双击时触发该事件 |
| mouseenter() | 当鼠标穿过元素时触发(不进行事件穿透) |
| mouseleave() | 当鼠标离开元素时触发 |
| hover() | (穿过元素,离开元素) |
| mousedown() | 当鼠标穿过元素并鼠标按下触发 |
| mouseup() | 当鼠标穿过元素鼠标松下触发 |
| focus() | 获得焦点时触发 |
| blur() | 失去焦点时触发 |
| change() | 当文本框内容发生改变并失去焦点时触发 |
<!DOCTYPE html>
<html>
	<head>
		<meta charset="utf-8">
		<title></title>
		<style>
			#div1{
				width: 200px;
				height: 200px;
				border: 1px solid saddlebrown;
			}
			#div2{
				width: 100px;
				height: 100px;
				margin: 50px;
				border: 1px solid seagreen;
			}
		</style>
		<script src="js/jquery-3.6.0.js"></script>
		<script>
			$(function(){
				/**
				 * mouseenter()获取焦点事件
				 * mouseleave()失去焦点事件
				 * 不会进行事件穿透
				 *
				 * hover() 获取失去焦点事件有两个参数
				 * 		第一个参数是获取焦点
				 * 		第二个参数是失去焦点
				 */
				/* $("#div1").mouseenter(function(){
					$("#div1").css("background-color","red");
					console.log("1");
				})
				$("#div1").mouseleave(function(){
					$("#div1").css("background-color","rgb(255,255,255)");
					console.log("2");
				}) */

				$("#div1").hover(function(){
					$("#div1").css("background-color","red");
				},function(){
					$("#div1").css("background-color","rgb(255,255,255)");
				})
				$("#div2").hover(function(){
					$("#div2").css("background-color","yellow");
				},function(){
					$("#div2").css("background-color","rgb(255,255,255)");
				})


				/**
				 * moudedown()当获得焦点并按下鼠标时触发
				 * mouseup()当鼠标松开时触发
				 */
				$("#div1").mousedown(function(){
					$("#div1").css("background-color","red");
					//console.log("1");
				})
				$("#div1").mouseup(function(){
					$("#div1").css("background-color","rgb(255,255,255)");
					//console.log("2");
				})

				/**
				 * focus()获得焦点
				 * blur()失去焦点
				 */
				$("#input1").focus(function(){
					$("#input1").css("background-color","red");
					console.log("1");
				})
				$("#input1").blur(function(){
					$("#input1").css("background-color","rgb(255,255,255)");
					console.log("2");
				})

				//change()当文本框内容改变并失去焦点时触发
				/* $("#input1").change(function(){
					$("#input1").css("background-color","red");
				}) */
			})
		</script>
	</head>
	<body>
		<div id="div1">
			<div id="div2">

			</div>
		</div>
		<input id="input1" type="text">
	</body>
</html>
案例
- 当鼠标移动到表格的行上时,行变色,单元格的字体变色;双击行删除该行
<!--
Jquery方法下面有JavaScript方法可以对比
-->
<!DOCTYPE html>
<html>
	<head>
		<meta charset="utf-8">
		<title></title>
		<style type="text/css">
			.datalist{
				border:1px solid #007108;
				font-family:Arial;
				border-collapse:collapse;
				background-color:#d9ffdc;
				font-size:14px;
			}

			.datalist th{
				border:1px solid #007108;
				background-color:#00a40c;
				color:#FFFFFF;
				font-weight:bold;
				padding-top:4px; padding-bottom:4px;
				padding-left:12px; padding-right:12px;
				text-align:center;
			}

			.datalist td{
				border:1px solid #007108;
				text-align:left;
				padding-top:4px;
				padding-bottom:4px;
				padding-left:10px;
				padding-right:10px;

			}
			.change_color{
				background-color: red;
				color: #FFFFFF;
			}
		</style>

		<script src="js/jquery-3.6.0.js"></script>

		<script>
			$(function(){
				$("tr").dblclick(function(){
					//查找当前元素下有没有td表头是th不能删除
					if($(this).find("td").length != 0){
						$(this).remove();
					}else{
						alert("表头不能删除!");
					}
				})
				$("tr").hover(function(){
					$(this).addClass("change_color");
				},function(){
					$(this).removeClass();
				})
			});
		</script>


	</head>
	<body>
		<table class="datalist" summary="list of members in EE Studay" id="oTable">
			<tr>
				<th scope="col">Name</th>
				<th scope="col">Class</th>
				<th scope="col">Birthday</th>
				<th scope="col">Constellation</th>
				<th scope="col">Mobile</th>
			</tr>
			<tr>					<!-- 奇数行 -->
				<td>isaac</td>
				<td>W13</td>
				<td>Jun 24th</td>
				<td>Cancer</td>
				<td>1118159</td>
			</tr>
		    <tr class="altrow">		<!-- 偶数行 -->
				<td>fresheggs</td>
				<td>W610</td>
				<td>Nov 5th</td>
				<td>Scorpio</td>
				<td>1038818</td>
			</tr>
			<tr>					<!-- 奇数行 -->
				<td>girlwing</td>
				<td>W210</td>
				<td>Sep 16th</td>
				<td>Virgo</td>
				<td>1307994</td>
			</tr>
			<tr class="altrow">		<!-- 偶数行 -->
				<td>tastestory</td>
				<td>W15</td>
				<td>Nov 29th</td>
				<td>Sagittarius</td>
				<td>1095245</td>
			</tr>
		</table>
	</body>
</html>


<!--
JavaScript 的方法实习可以两则做一个对比
-->
<!DOCTYPE html>
<html>
	<head>
		<meta charset="utf-8">
		<title>表格改变</title>
		<style>
			td,
			th {
				margin: auto;
				line-height: 50px;
				text-align: center;
				margin: auto;
				width: 175px;
			}

			table {
				margin: auto;
				width: 700px;
				background-color: ;
			}
		</style>
		<script>
			function change_color() {
				var td = event.srcElement;
				var tr = td.parentElement;
				tr.style.backgroundColor = "black";
				tr.style.color = "white";
				console.log();
			}

			function recovery_color() {
				var td = event.srcElement;
				var tr = td.parentElement;
				tr.style.backgroundColor = "white";
				tr.style.color = "black";
			}

			function delete_tr() {
				var td = event.srcElement;
				if (td.tagName == "TH") {
					alert("表头不能删除")
				} else {
					var tr = td.parentElement;
					tr.remove();
				}

			}
		</script>
	</head>
	<body>
		<table border="1px">
			<tr onmouseover="change_color(); " onmouseout="recovery_color();" ondblclick="delete_tr();">
				<th>课程</th>
				<th>单价</th>
				<th>数量</th>
				<th>总价</th>
			</tr>
			<tr onmouseover="change_color(); " onmouseout="recovery_color();" ondblclick="delete_tr();">
				<td>JAVA</td>
				<td>35.0</td>
				<td>5</td>
				<td>175.0</td>
			</tr>
			<tr onmouseover="change_color(); " onmouseout="recovery_color();" ondblclick="delete_tr();">
				<td>PYTHON</td>
				<td>35.0</td>
				<td>5</td>
				<td>175.0</td>
			</tr>
			<tr onmouseover="change_color(); " onmouseout="recovery_color();" ondblclick="delete_tr();">
				<td>C</td>
				<td>35.0</td>
				<td>5</td>
				<td>175.0</td>
			</tr>
		</table>
	</body>
</html>
四、JQuery操作DOM元素
jQuery 中非常重要的部分,就是操作 DOM 的能力。
jQuery 提供一系列与 DOM 相关的方法,这使访问和操作元素和属性变得很容易。
DOM对象和JQuery对象的相互转换:
- 使用$把JS对象转换成jQuery对象:
–$(dom)转成jQuery对象;
-
使用下标[n]或get(n)方法把jQuery对象转换成JS的DOM节点对象(这些都是dom对象,可以使用dom中的方法,但 不能再使用Jquery的方法):
–$(dom)[0];
–$(dom).get(0);
//JQuery对DOM做了封装,所以dom对象和JQuery对象不同,则他们获取节点的方式就自然不同了
//name值为hobby的元素
var ck = $("[name='hobby']");
for (var i = 0; i < ck.length; i++) {
	//ck[i] jquery对象-->dom对象
	console.log(ck[i].value);
    //$(ck[i]) dom对象-->jquery对象
	console.log($(ck[i]).val());
}
1、获得DOM节点
获取元素节点:
可以通过选择器获得
获取文本节点:
- text()-设置或返回所选元素 的文本内容
- text()只输出标签内的文本内容,和js的innerText方法一样
- html()-获得html标签包括其中文本
- 打印当前标签内的文本内容,如果有子标签,则把子标签本身和子标签内的文本一起打印
- 这给和js的innerHTML差不多
- val()-返回value值
- clone()复制节点
获得父节点:
- parent() 获取上级的一个元素
- parents() 获得一组先祖节点
- 不加参数时会获取上级的所有元素(一直到html)
- 加参数时获取到上级的指定元素
<!DOCTYPE html>
<html>
	<head>
		<meta charset="utf-8">
		<title></title>
		<style>
			.color {
				color: aqua;
			}

			.red {
				color: red;
			}
		</style>
		<script src="js/jquery-3.6.0.js"></script>

		<script>
			$(function() {
				$("#btn").click(function() {
					/**
					 * 修改内容
					 * text()改变原来内容不能识别标签
					 * html()改变原来内容能识别标签
					 */
					$("p span").text("<b>段落1</b>");
					$("p span").html("<b>段落1</b>");
					/**
					 * 修改属性
					 * attr()
					 * 	带一个参数时
					 * 		获取该参数的值
					 *
					 * 带两个参数时
					 * 		第一个参数是参数名,第二个参数是参数值
					 * 			当参数不存在时就是添加,当参数存在时就是覆盖
					 */
					$("p span").attr("class", "color");
					console.log($("p span").attr("class")); //color
					$("p span").attr("class", "red");
					console.log($("p span").attr("class")); //red

					//val()获取value值
					console.log($("#btn").val()); //确定
					/**
					 * clone()复制一个节点出来
					 * 个人觉得我直接获取节点的html()然后在追加也能实现复制的效果
					 * 所以我觉得这个函数意义并不大
					 */
					//把p标签复制出来
					var p = $("p").clone();
					//var p = $("p").html();//也能实现复制
					//然后把p插入到p元素之后
					$("p").after(p);

					/**
					 * 获取上级元素
					 * 	parent() 获取上级的一个元素
					 * 	parents()
					 * 		不加参数时会获取上级的所有元素(一直到html)
					 * 		加参数时获取到上级的指定元素
					 */

					//获取上级元素p
					console.log($("span").parent());
					//获取所有上级元素一直到html
					console.log($("span").parents());
					//获取先祖元素body
					console.log($("span").parents("body"));
				})
			})
		</script>
	</head>
	<body>
		<div>
			<p>
				<span>段落1</span>
			</p>
			<input type="text">
			<input type="button" id="btn" value="确定">
		</div>
	</body>
</html>
获得兄弟节点
- prev() 获取当前节点前一个兄弟节点
- next() 获取当前节点后一个兄弟节点
- prevAll() 获取当前节点前所有兄弟节点
- nextAll() 获取当前节点后所有兄弟节点
- prevUntil() 获取两个节点之间的兄弟节点
<!DOCTYPE html>
<html>
	<head>
		<meta charset="utf-8">
		<title></title>
		<script src="js/jquery-3.6.0.js"></script>

		<script>
			$(function() {
				$("#btn").click(function() {
					//获取当前节点前一个兄弟节点
					console.log($("#p2").prev().html()); //段落1
					//获取当前节点前后一个兄弟节点
					console.log($("#p2").next().html()) //段落3
					//获取当前节点前所有兄弟节点
					console.log($("#p3").prevAll()) //节点p2、节点p1
					//获取p3和p1之间的元素,如果没有元素获取前面全部元素
					console.log($("#p3").prevUntil("#p1"));
					//获取当前节点后的所有兄弟节点
					console.log($("#p1").nextAll());
					/**
					 * siblings()
					 * 获得满足条件的所有的兄弟节点
					 * 	不加参数
					 * 		获取所有兄弟节点
					 * 	加参数,选择器一样
					 * 		获取满足条件的兄弟元素
					 */
					//
					console.log($("#p2").siblings());
					//获取所有兄弟节点使用test类选择器的元素
					console.log($("#p2").siblings(".test"));
				});
			});
		</script>
	</head>
	<body>
		<div id="div1">
			<p id="p1" class="test">段落1</p>
			<p id="p2">段落2</p>
			<p id="p3">段落3</p>
		</div>
		<button type="button" id="btn">确定</button>
	</body>
</html>
获得子节点
- children() 获取子节点
- 没参数,获取所有直接子节点
- 有参数,获取指定参数的子节点
- find() 获取指定的子孙节点
<!DOCTYPE html>
<html>
	<head>
		<meta charset="utf-8">
		<title></title>
		<script src="js/jquery-3.6.0.js"></script>

		<script>
			$(function() {
				/**
				 * children() 获取子元素
				 * 没参数,获取所有子元素
				 * 有参数,获取指定参数的子元素
				 */
				//获取所有子元素
				console.log($("#div1").children());
				//获取id为p2的子元素
				console.log($("#div1").children("#p2"));
				//find()获取指定子孙元素
				console.log($("#div1").find("span"));
			});
		</script>
	</head>
	<body>
		<div id="div1">
			<p id="p1">段落1</p>
			<p id="p2">段落2</p>
			<p id="p3">
				<span>段落3</span>
			</p>
		</div>
	</body>
</html>
2、新增DOM节点
- append() 在指定元素内部最后插入新元素
- appendTo() 把新元素插入到指定元素内部最后
- prepend() 在指定元素内部最前插入新元素
- prependTo() 把新元素插入到指定元素内部最前
- before()在当前元素之前插入新元素
- insertBefore()把新元素插入到指定元素前
- after()在当前元素之后插入新元素
- insertAfter()把新元素插入到指定元素后
注:追加都有在指定位置追加新元素 和 把新元素追加到指定位置 对应 需要注意他们之间的参数位置
<!DOCTYPE html>
<html>
	<head>
		<meta charset="utf-8">
		<title></title>
		<script src="js/jquery-3.6.0.js"></script>

		<script>
			$(function() {
				/**
				 * children() 获取子元素
				 * 没参数,获取所有子元素
				 * 有参数,获取指定参数的子元素
				 */
				//获取所有子元素
				console.log($("#div1").children());
				//获取id为p2的子元素
				console.log($("#div1").children("#p2"));
				//find()获取指定子孙元素
				console.log($("#div1").find("span"));
				/**
				 * 尾部插入
				 * append() 在指定元素内部最后插入新元素
				 * appendTo() 把新元素插入到指定元素内部最后
				 */
				$("#div1").append("<p>新增段落1</p>");
				$("<p>新增段落2</p>").appendTo("#div1");
				/**
				 * 头部插入
				 * 和尾部插入同理
				 */
				$("#div1").prepend("<p>新增段落3</p>");
				$("<p>新增段落4</p>").prependTo("#div1");
				/**
				 * before()在当前元素之前插入新元素
				 * insertBefore()把新元素插入到指定元素前
				 * after()在当前元素之后插入新元素
				 * insertAfter()把新元素插入到指定元素后
				 */
				$("#p2").before("<p>新增段落5</p>");
				$("<p>新增段落6</p>").insertBefore("#p2");
				$("#p2").after("<p>新增段落7</p>");
				$("<p>新增段落8</p>").insertAfter("#p2");
			})
		</script>
	</head>
	<body>
		<div id="div1">
			<p id="p1">段落1</p>
			<p id="p2">段落2</p>
			<p id="p3">
				<span>段落3</span>
			</p>
		</div>
	</body>
</html>
3、更新DOM节点
- replaceWith() 指定的元素被替换为新元素
- replaceAll() 把新元素给指定元素替换了
- 使用attr()、html()、text()方法都可以进行参数更新
注:和上面新增一样都有一个与之对应,需要注意的就是参数位置
<!--
replaceWith()、replaceAll()测试
-->
<!DOCTYPE html>
<html>
	<head>
		<meta charset="utf-8">
		<title></title>
		<script src="js/jquery-3.6.0.js"></script>

		<script>
			$(function() {
				$("#btn").click(function() {
					/**
					 * replaceWith() 指定的元素被替换为新元素
					 * replaceAll() 把新元素给指定元素替换了
					 */
					//$("#li1").replaceWith("<li>替换的新列表项</li>");
					$("<li>替换的新列表项</li>").replaceAll("#li1");
				})
			})
		</script>
	</head>
	<body>
		<ul>
			<li id="li1">列表项1</li>
			<li>列表项2</li>
		</ul>
		<button type="button" id="btn">确定</button>
	</body>
</html>
4、删除DOM节点
- remove() 删除指定元素,会删除所有属性,绑定的事件等追加回来之后绑定的事件那些就不存在了
- detach() 删除指定元素,不会删除绑定事件等追加回来之后绑定的事件那些还存在
- empty() 删除所有的后代节点
<!DOCTYPE html>
<html>
	<head>
		<meta charset="utf-8">
		<title></title>
		<script src="js/jquery-3.6.0.js"></script>

		<script>
			$(function() {
				$("#btn").click(function() {
					$("#li1").hover(function() {
						/**
						 * css() 修改css的值提供了键值对的方式可以设置多个参数
						 * 		如果只有一个参数的时候是获取参数的值
						 */
						$("#li1").css({
							"color": "red",
							"background-color": "yellow"
						});
					}, function() {
						$("#li1").css({
							"color": "black",
							"background-color": "white"
						});
						//获取背景色
						console.log($("#li1").css("background-color"));
					})

					/**
					 * 删除元素
					 * 	remove()
					 * 		删除指定元素,会删除所有属性,绑定的事件等
					 * 		追加回来之后绑定的事件那些就不存在了
					 * 	detach()
					 * 		删除指定元素,不会删除绑定事件等
					 * 		追加回来之后绑定的事件那些还存在
					 * 	empty()
					 * 		删除所有的后代节点
					 */
					var li1 = $("#li1");
					//追加回来绑定的hover事件就不存在
					//li1.remove();
					//追加回来绑定的hover事件还存在
					li1.detach();
					$("ul").append(li1);
					//删除所有后代节点
					$("ul").empty();
				})
			})
		</script>
	</head>
	<body>
		<ul>
			<li id="li1">列表1</li>
			<li>列表2</li>
		</ul>
		<button type="button" id="btn">确定</button>
	</body>
</html>
5、更改CSS
- addClass() 添加clas
- removeClass() 去除class
- toggleClass() 添加去除class
- 触发该事件就是将 class状态取反
- css()添加css样式
- 提供的键值对格式添加多个属性
- 如果只有一个参数是返回参数值
<!DOCTYPE html>
<html>
	<head>
		<meta charset="utf-8">
		<title></title>
		<style>
			.color1 {
				color: red;
			}
		</style>
		<script src="js/jquery-3.6.0.js"></script>
		<script>
			$(function() {
				/**
				 * addClass()添加class
				 * removeClass()去除class
				 * toggleClass()添加去除class
				 * 		第一次触发添加,第二次触发去除
				 */
				$("#btn1").click(function() {
					$("#p1").addClass("color1");
				})
				$("#btn2").click(function() {
					$("#p1").removeClass("color1");
				})
				$("#btn3").click(function() {
					$("#p1").toggleClass("color1");
				})

				/**
				 * css()添加css样式
				 * 	提供的键值对格式添加多个属性
				 * 如果只有一个参数是返回参数值
				 */
				$("#btn4").click(function() {
					//$("#p1").css("background-color", "yellow");
					//添加多个属性
					$("#p1").css({
						"background-color": "yellow",
						"color": "red",
						"font-size": "30px"
					})
				})

			})
		</script>
	</head>
	<body>
		<p id="p1">段落1</p>
		<button type="button" id="btn1">addClass</button>
		<button type="button" id="btn2">removeClass</button>
		<button type="button" id="btn3">toggleClass</button>
		<button type="button" id="btn4">css</button>
	</body>
</html>
二、动画效果
都可以设置变化速度,可以取"slow"、“fast” 或毫秒值
1、显示隐藏
会逐渐改变width,height,opacity(透明度)逐渐改变
- hide() 隐藏
- show() 显示
- toggle() 隐藏显示切换
2、淡入淡出
opacity(透明度)逐渐改变
- fadeOut() 淡入
- fadeIm() 淡出
- fadeToggle()淡入淡出切换
3、滑动
height逐渐改变
- slideUp() 向上滑动
- slideDown() 向下滑动
- slideToggle()向上向下切换
4、自定义动画
- ainmate()自定义动画
- 参数是一个键值对可以自定义设置改变
<!DOCTYPE html>
<html>
	<head>
		<meta charset="utf-8">
		<title></title>
		<style>
			div{
				width: 100px;
				height: 100px;
				background-color: red;
			}
		</style>
		<script src="js/jquery-3.6.0.js"></script>

		<script>
			$(function(){
				/**
				 * 会逐渐改变width,height,opacity(透明度)逐渐改变
				 * 都可以自定义毫秒数隐藏
				 * hide()隐藏
				 * show()显示
				 * toggle()隐藏显示切换
				 */
				$("#btn1").click(function(){
					$("#div1").hide(1000);
				})
				$("#btn2").click(function(){
					$("#div1").show(1000);
				})
				$("#btn3").click(function(){
					$("#div1").toggle(1000);
				})
				/**
				 * opacity(透明度)逐渐改变
				 * fadeOut()淡入
				 * fadeIm()淡出
				 * fadeToggle()淡入淡出切换
				 */
				$("#btn4").click(function(){
					$("#div1").fadeOut(1000);

				})
				$("#btn5").click(function(){
					$("#div1").fadeIn(1000);
				})
				$("#btn6").click(function(){
					$("#div1").fadeToggle(1000);
				})
				/**
				 * height逐渐改变
				 * slideUp() 向上滑动
				 * slideDown() 向下滑动
				 * slideToggle()向上向下切换
				 */
				$("#btn7").click(function(){
					$("#div1").slideUp(1000);
				})
				$("#btn8").click(function(){
					$("#div1").slideDown(1000);
				})
				$("#btn9").click(function(){
					$("#div1").slideToggle(1000);
				})
				/**
				 * ainmate()自定义动画
				 * 	参数是一个键值对可以自定义设置改变
				 */
				$("#btn10").click(function(){
					$("#div1").animate({
						"margin-top":"100px"
					});
				})
			})
		</script>
	</head>
	<body>
		<div id="div1"></div>
		<button type="button" id="btn1">hide</button>
		<button type="button" id="btn2">show</button>
		<button type="button" id="btn3">toggle</button>
		<button type="button" id="btn4">fadeOut</button>
		<button type="button" id="btn5">fadeIn</button>
		<button type="button" id="btn6">fadeToggle</button>
		<button type="button" id="btn7">slideUp</button>
		<button type="button" id="btn8">slideDown</button>
		<button type="button" id="btn9">slideToggle</button>
		<button type="button" id="btn10">animate</button>
	</body>
</html>
三、案例
1、购物车案例
- 全选
- 选中全选所有被全选
- 当下面所有选中时全选按钮会被选中
- 当全选后取消一个了会自动取消一个全选
- 反选,实现反选
- 新增一行默认将第一行新增
- 删除行把选中删除,有什么都没选中时删除提示
- 复制行把选中复制,有什么都没选中时复制提示
- 修改数量
- 点击修改时数量会变成文本框供用户输入数量
- 修改完成时移除文本框的时候会变成原来的文本显示
- 删除,删除本行
<html>
	<head>
		<title>jQuery操作表格</title>
		<meta charset="UTF-8" />
		<!--声明css代码域-->
		<style type="text/css">
			tr {
				height: 40px;
			}
		</style>
		<script src="js/jquery-3.6.0.js"></script>
		<script>
			$(function() {
				//全选,全不选
				$("#chks").click(function() {
					//prop() 获取元素集合中第一个元素集合的指定值或设置值
					var flag = $("#chks").prop("checked");
					console.log(flag);
					$("input[name='chk']").each(function() {
						$(this).prop("checked", flag);
					});
				});

				//判断是不是全选了
				$("input[name='chk']").change(function() {
					testing();
				});

				function testing() {
					//当有一个值为没有选就把权限按钮设置为false否则就为true
					$("input[name='chk']").each(function() {
						var flag = $(this).prop("checked");
						//console.log(flag);
						if (flag == false) {
							$("#chks").prop("checked", flag);
							//函数结束 return false跳出循环,return true是进入下一个循环(相当与continue)
							return false;
						}
						$("#chks").prop("checked", flag);
					});
				}
				//反选
				$("#fx").click(function() {
					$("input[name='chk']").each(function() {
						//把当前值取反
						$(this).prop("checked", !($(this).prop("checked")));
					});
					//检测是否全选
					testing();
				});

				//新增一行
				$("#addRow").click(function() {
					var input = $("input[name='chk']");
					console.log(input);
					//获得第一行
					var tr = $(input[0]).parent().parent();
					console.log(tr);
					//获得表格元素
					var table = tr.parent();
					//在表格最后添加行
					table.append(tr.clone());
				});

				//删除行
				$("#delRow").click(function() {
					var input = $("input[name='chk']");
					var count = 0;
					input.each(function() {
						//如果行是选择中话就直接删除
						if ($(this).prop("checked") == true) {
							$(this).parent().parent().remove();
							count++;
						}
					});
					if (count == 0) {
						alert("请选择行再删除");
					}
				});

				//复制行
				$("#copyRow").click(function() {
					var input = $("input[name='chk']");
					//获得表格标签
					var table = $("table");
					var count = 0;
					input.each(function() {
						//如果行选中了直接复制到文件末尾
						if ($(this).prop("checked") == true) {
							//让复制的新行行默认没有被选中
							$(this).prop("checked", false);
							//复制选中的行
							var tr = $(this).parent().parent().clone();
							//把复制的行追加到表格内末尾
							table.append($(this).parent().parent().clone());
							//把当前选中的恢复
							$(this).prop("checked", true);
							count++;
						}
					});
					if (count == 0) {
						alert("请选择行再复制");
					}
				});

				//修改数量
				$("[value='修改数量']").click(function() {
					//获得数量那一个元素节点
					var td = $(this).parent().prev();
					//获得存储的数量
					var num = td.text();
					//修改为文本框,添加失去焦点事件
					td.html("<input type='text' οnblur='text();' value=" + num + ">");
				})

				//删除
				$("[value='删除']").click(function() {
					//获得当前行
					var tr = $(this).parent().parent();
					//删除当前行
					tr.remove();
				})
			});

			//将当前元素转换为文本
			function text() {
				var current = $(event.srcElement);
				//获得当前元素节点(输入框)的值
				var value = current.val();
				//把当前元素变成数字
				current.parent().html(value);
			}
		</script>
	</head>
	<body>
		<h3>jQuery操作表格</h3>
		<hr />
		<input type="button" id="fx" value="反选" />
		<input type="button" id="addRow" value="新增一行" />
		<input type="button" id="delRow" value="删除行" />
		<input type="button" id="copyRow" value="复制行" />
		<table border="1px" cellpadding="10px" cellspacing="0" id="ta">
			<tr>
				<td width="50px"><input type="checkbox" name="chks" id="chks" value="1" /></td>
				<td width="200px">书名</td>
				<td width="200px">作者</td>
				<td width="200px">数量</td>
				<td width="200px">操作</td>
			</tr>
			<tr id="">
				<td><input type="checkbox" name="chk" id="" value="2" /></td>
				<td>《Java编程之道》</td>
				<td>wollo</td>
				<td>10</td>
				<td>
					<input type="button" name="aa" id="" value="修改数量" />
					<input type="button" name="" id="" value="删除" />
				</td>
			</tr>
			<tr>
				<td><input type="checkbox" name="chk" id="" value="3" /></td>
				<td>《Python和我的故事》</td>
				<td>赵老师</td>
				<td>10</td>
				<td>
					<input type="button" name="" id="" value="修改数量" />
					<input type="button" name="" id="" value="删除" />
				</td>
			</tr>
			<tr>
				<td><input type="checkbox" name="chk" id="" value="4" /></td>
				<td>《web开发详解》</td>
				<td>张老师</td>
				<td>30</td>
				<td>
					<input type="button" name="" id="" value="修改数量" />
					<input type="button" name="" id="" value="删除" />
				</td>
			</tr>
		</table>
	</body>
</html>
2、登录注册案例
prop() 获得或设置匹配元素的值
//设置conste中outerText的值为"白羊座"
conste.prop("outerText", "白羊座");
trigger() 匹配的元素上触发某类事件
//触发#close元素的单价事件
$("#close").trigger("click");
JSON.stringify() 方法是将一个 JavaScript 对象或值转换为 JSON 字符串
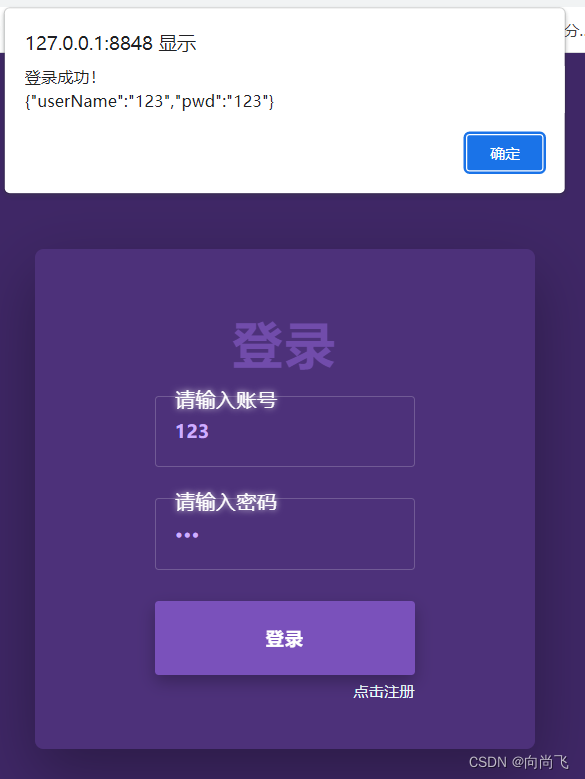
该案例使用了JQuery和BootStrap框架,登录页面是直接在www.jq22.com上面下载使用的,注册页面是使用bootstrap框架进行修改的,使用jquery进行了简单的数据处理,主要是用来练习前端的主要制作都是使用的插件和框架实现的,实现功能如下!
- 登录
- 获得登录之后打印用户和密码
- 判断了账号密码为空的情况下
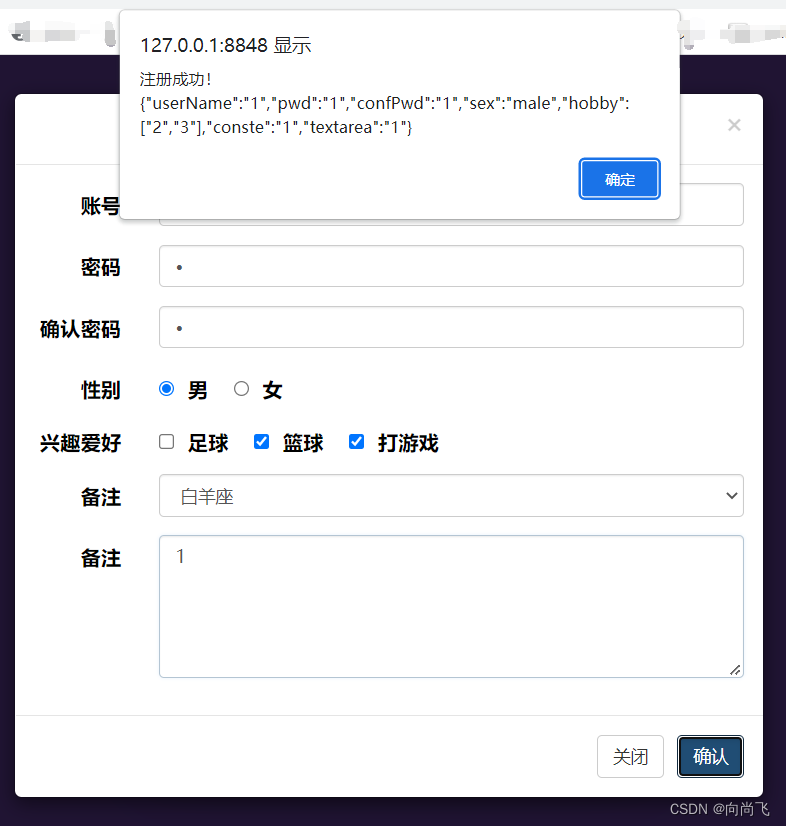
- 注册
- 点击注册弹出模态框
- 在模态框中实现注册
- 做了账号密码为空和两次密码不一致处理
- 当注册成功会弹出所有注册信息,还会把注册成功的自动填充到登录页面文本框
- 然后关闭模态框
效果图
源码
<!DOCTYPE html>
<html>
<head>
<meta charset="UTF-8">
<title>login</title>
<script src="js/jquery-3.6.0.js"></script>
<script src="js/bootstrap.min.js"></script>
<link rel="stylesheet" href="css/bootstrap.min.css">
<style>
body {
all: initial;
font-family: 'Roboto', sans-serif;
letter-spacing: 0.02em;
}
* {
box-sizing: border-box;
}
main {
position: fixed;
top: 0;
left: 0;
width: 100%;
height: 100%;
display: -webkit-box;
display: -ms-flexbox;
display: flex;
-webkit-box-pack: center;
-ms-flex-pack: center;
justify-content: center;
-webkit-box-align: center;
-ms-flex-align: center;
align-items: center;
background: #3f2766;
}
.form {
display: -webkit-box;
display: -ms-flexbox;
display: flex;
-webkit-box-align: center;
-ms-flex-align: center;
align-items: center;
-webkit-box-pack: center;
-ms-flex-pack: center;
justify-content: center;
position: relative;
width: 400px;
height: 400px;
-ms-flex-negative: 0;
flex-shrink: 0;
padding: 20px;
border-radius: 5px;
}
.form__loader {
display: -webkit-box;
display: -ms-flexbox;
display: flex;
position: absolute;
left: 0;
top: 0;
height: 100%;
width: 100%;
-webkit-box-pack: center;
-ms-flex-pack: center;
justify-content: center;
-webkit-box-align: center;
-ms-flex-align: center;
align-items: center;
z-index: -4;
-webkit-transition: all 0.5s ease;
transition: all 0.5s ease;
}
.form__content {
text-align: center;
display: -webkit-box;
display: -ms-flexbox;
display: flex;
-webkit-box-pack: center;
-ms-flex-pack: center;
justify-content: center;
-webkit-box-orient: vertical;
-webkit-box-direction: normal;
-ms-flex-direction: column;
flex-direction: column;
position: relative;
opacity: 0;
-webkit-transform: translateY(10px);
transform: translateY(10px);
-webkit-transition: all 0.5s ease 0.7s;
transition: all 0.5s ease 0.7s;
}
.form__cover {
position: absolute;
left: 0;
top: 0;
height: 100%;
width: 100%;
z-index: -4;
border-radius: 7px;
overflow: hidden;
-webkit-transition: all 0.3s ease 0.8s;
transition: all 0.3s ease 0.8s;
box-shadow: 0 0 0 0 rgba(0, 0, 0, 0);
}
.form__cover:after {
content: '';
position: absolute;
left: 0;
top: 0;
height: 100%;
width: 100%;
background: #4d317a;
z-index: -4;
border-radius: 50%;
-webkit-transition: all 1.5s ease 0.3s;
transition: all 1.5s ease 0.3s;
-webkit-transform: scale(0);
transform: scale(0);
}
.form__cover:before {
content: '';
position: absolute;
left: 0;
top: 0;
height: 100%;
width: 100%;
background: white;
z-index: -5;
border-radius: 50%;
-webkit-transition: all 0.5s ease;
transition: all 0.5s ease;
-webkit-transform: scale(0);
transform: scale(0);
}
body.on-start .form__cover:before {
-webkit-transform: scale(0.15);
transform: scale(0.15);
}
body.document-loaded .form__loader {
-webkit-transform: scale(0);
transform: scale(0);
opacity: 0;
visibility: hidden;
}
body.document-loaded .form__content {
opacity: 1;
-webkit-transform: none;
transform: none;
}
body.document-loaded .form__cover {
box-shadow: 0 20px 50px rgba(0, 0, 0, 0.3);
}
body.document-loaded .form__cover:after {
-webkit-transform: scale(2);
transform: scale(2);
}
body.document-loaded .form__cover:before {
-webkit-transition: opacity 0.3s ease 0.8s, -webkit-transform 2s ease;
transition: opacity 0.3s ease 0.8s, -webkit-transform 2s ease;
transition: transform 2s ease, opacity 0.3s ease 0.8s;
transition: transform 2s ease, opacity 0.3s ease 0.8s, -webkit-transform 2s ease;
-webkit-transform: scale(2);
transform: scale(2);
opacity: 0;
}
h1 {
font-size: 40px;
margin: 15px 0 20px 0;
letter-spacing: 0.05em;
color: #714cab;
font-weight: 700;
}
.styled-button {
-webkit-appearance: none;
-webkit-user-select: none;
cursor: pointer;
font-size: 14px;
width: 100%;
padding: 20px;
outline: none;
background: none;
position: relative;
color: #492e72;
border-radius: 3px;
margin-bottom: 25px;
border: none;
text-transform: uppercase;
font-weight: 700;
letter-spacing: 0.1em;
background: #714cac;
-webkit-transition: all 0.3s ease;
transition: all 0.3s ease;
overflow: hidden;
}
.styled-button__real-text-holder {
position: relative;
}
.styled-button__real-text {
color: transparent;
display: inline-block;
}
.styled-button__text-holder {
position: absolute;
left: 0;
top: 0;
height: 100%;
width: 100%;
display: -webkit-box;
display: -ms-flexbox;
display: flex;
-webkit-box-align: center;
-ms-flex-align: center;
align-items: center;
-webkit-box-pack: center;
-ms-flex-pack: center;
justify-content: center;
-webkit-transition: all 0.3s ease;
transition: all 0.3s ease;
}
.styled-button__moving-block {
-webkit-transition: all 0.3s ease;
transition: all 0.3s ease;
position: absolute;
left: 0;
top: 0;
height: 100%;
width: 100%;
overflow: hidden;
}
.styled-button__moving-block.back {
color: white;
-webkit-transform: translateX(-100%);
transform: translateX(-100%);
}
.styled-button__moving-block.back .styled-button__text-holder {
-webkit-transform: translateX(100%);
transform: translateX(100%);
}
.styled-button:hover,
.styled-button:active {
box-shadow: 0 8px 20px rgba(0, 0, 0, 0.3);
background: #7a51bb;
}
.styled-button:hover .face,
.styled-button:active .face {
-webkit-transform: translateX(100%);
transform: translateX(100%);
}
.styled-button:hover .face .styled-button__text-holder,
.styled-button:active .face .styled-button__text-holder {
-webkit-transform: translateX(-100%);
transform: translateX(-100%);
}
.styled-button:hover .back,
.styled-button:active .back {
-webkit-transform: translateX(0);
transform: translateX(0);
}
.styled-button:hover .back .styled-button__text-holder,
.styled-button:active .back .styled-button__text-holder {
-webkit-transform: translateX(0);
transform: translateX(0);
}
.styled-button:active {
box-shadow: 0 0 5px rgba(0, 0, 0, 0.3);
}
.styled-input {
width: 100%;
position: relative;
margin-bottom: 25px;
border: 1px solid rgba(255, 255, 255, 0.2);
border-radius: 3px;
-webkit-transition: all 0.3s ease;
transition: all 0.3s ease;
}
.styled-input__circle {
position: absolute;
left: 0;
top: 0;
width: 100%;
height: 100%;
z-index: -2;
overflow: hidden;
border-radius: 3px;
}
.styled-input__circle:after {
content: '';
position: absolute;
left: 16.5px;
top: 19px;
height: 14px;
width: 14px;
z-index: -2;
border-radius: 50%;
background: rgba(255, 255, 255, 0.15);
box-shadow: 0 0 10px rgba(255, 255, 255, 0);
-webkit-transition: opacity 1s ease, -webkit-transform 0.6s ease;
transition: opacity 1s ease, -webkit-transform 0.6s ease;
transition: transform 0.6s ease, opacity 1s ease;
transition: transform 0.6s ease, opacity 1s ease, -webkit-transform 0.6s ease;
}
.styled-input__input {
width: 100%;
-webkit-appearance: none;
font-size: 14px;
outline: none;
background: none;
padding: 18px 15px;
color: #ceafff;
border: none;
font-weight: 600;
letter-spacing: 0.035em;
}
.styled-input__placeholder {
position: absolute;
left: 0;
top: 0;
width: 100%;
height: 100%;
display: -webkit-box;
display: -ms-flexbox;
display: flex;
-webkit-box-align: center;
-ms-flex-align: center;
align-items: center;
z-index: -1;
padding-left: 45px;
color: white;
}
.styled-input__placeholder-text {
-webkit-perspective: 500px;
perspective: 500px;
display: inline-block;
}
.styled-input__placeholder-text .letter {
display: inline-block;
vertical-align: middle;
position: relative;
-webkit-animation: letterAnimOut 0.25s ease forwards;
animation: letterAnimOut 0.25s ease forwards;
text-shadow: 0 0 5px;
}
.styled-input__placeholder-text .letter.active {
-webkit-animation: letterAnimIn 0.25s ease forwards;
animation: letterAnimIn 0.25s ease forwards;
}
.styled-input:hover {
border-color: rgba(255, 255, 255, 0.4);
}
.styled-input.filled {
border-color: rgba(255, 255, 255, 0.2);
}
.styled-input.filled .styled-input__circle:after {
-webkit-transform: scale(37);
transform: scale(37);
opacity: 0;
}
@-webkit-keyframes letterAnimIn {
0% {
-webkit-transform: translate(0, 0);
transform: translate(0, 0);
}
25% {
-webkit-transform: translate(0, 10px);
transform: translate(0, 10px);
color: red;
}
45% {
-webkit-transform: translate(0, 10px);
transform: translate(0, 10px);
opacity: 0;
color: red;
}
55% {
-webkit-transform: translate(0, 10px);
transform: translate(0, 10px);
opacity: 0;
}
56% {
-webkit-transform: translate(-30px, -27px);
transform: translate(-30px, -27px);
opacity: 0;
color: #00ff6b;
}
76% {
color: #00ff6b;
opacity: 1;
-webkit-transform: translate(-30px, -27px);
transform: translate(-30px, -27px);
}
100% {
-webkit-transform: translate(-30px, -27px);
transform: translate(-30px, -27px);
opacity: 1;
}
}
@keyframes letterAnimIn {
0% {
-webkit-transform: translate(0, 0);
transform: translate(0, 0);
}
25% {
-webkit-transform: translate(0, 10px);
transform: translate(0, 10px);
color: red;
}
45% {
-webkit-transform: translate(0, 10px);
transform: translate(0, 10px);
opacity: 0;
color: red;
}
55% {
-webkit-transform: translate(0, 10px);
transform: translate(0, 10px);
opacity: 0;
}
56% {
-webkit-transform: translate(-30px, -27px);
transform: translate(-30px, -27px);
opacity: 0;
color: #00ff6b;
}
76% {
color: #00ff6b;
opacity: 1;
-webkit-transform: translate(-30px, -27px);
transform: translate(-30px, -27px);
}
100% {
-webkit-transform: translate(-30px, -27px);
transform: translate(-30px, -27px);
opacity: 1;
}
}
@-webkit-keyframes letterAnimOut {
0% {
-webkit-transform: translate(-30px, -27px);
transform: translate(-30px, -27px);
opacity: 1;
}
25% {
-webkit-transform: translate(-30px, -40px);
transform: translate(-30px, -40px);
opacity: 0;
}
}
45% {
-webkit-transform: translate(0, 10px);
transform: translate(0, 10px);
opacity: 0;
}
55% {
-webkit-transform: translate(0, 10px);
transform: translate(0, 10px);
opacity: 0;
color: red;
}
56% {
-webkit-transform: translate(0, 10px);
transform: translate(0, 10px);
color: red;
}
100% {
-webkit-transform: translate(0, 0);
transform: translate(0, 0);
}
}
@keyframes letterAnimOut {
0% {
-webkit-transform: translate(-30px, -27px);
transform: translate(-30px, -27px);
opacity: 1;
}
25% {
-webkit-transform: translate(-30px, -40px);
transform: translate(-30px, -40px);
opacity: 0;
}
45% {
-webkit-transform: translate(0, 10px);
transform: translate(0, 10px);
opacity: 0;
}
55% {
-webkit-transform: translate(0, 10px);
transform: translate(0, 10px);
opacity: 0;
color: red;
}
56% {
-webkit-transform: translate(0, 10px);
transform: translate(0, 10px);
color: red;
}
100% {
-webkit-transform: translate(0, 0);
transform: translate(0, 0);
}
}
.spinner {
position: relative;
margin: auto;
width: 50px;
height: 50px;
-webkit-transition: all 0.2s ease 0s;
transition: all 0.2s ease 0s;
}
.spinner__circular {
-webkit-animation: rotate 1.5s linear infinite;
animation: rotate 1.5s linear infinite;
-webkit-animation-play-state: paused;
animation-play-state: paused;
-webkit-transform-origin: center center;
transform-origin: center center;
position: absolute;
width: 100%;
height: 100%;
top: 0;
left: 0;
margin: auto;
}
.spinner__path {
stroke-dasharray: 1, 200;
stroke-dashoffset: 0;
-webkit-animation: dash 1.3s ease forwards 0.5s;
animation: dash 1.3s ease forwards 0.5s;
opacity: 0;
stroke-linecap: round;
stroke: #7b23ff;
-webkit-animation-play-state: running;
animation-play-state: running;
}
@-webkit-keyframes dash {
0% {
stroke-dasharray: 1, 200;
stroke-dashoffset: 0;
opacity: 0;
}
50% {
stroke-dasharray: 40, 200;
opacity: 1;
}
100% {
stroke-dasharray: 125, 200;
opacity: 1;
}
}
@keyframes dash {
0% {
stroke-dasharray: 1, 200;
stroke-dashoffset: 0;
opacity: 0;
}
50% {
stroke-dasharray: 40, 200;
opacity: 1;
}
100% {
stroke-dasharray: 125, 200;
opacity: 1;
}
}
#register_a {
margin-top: -20px;
color: azure;
font-size: 12px;
}
#register_a:hover {
color: rgb(118, 206, 253);
}
</style>
</head>
<body>
<main>
<form class="form">
<div class="form__cover"></div>
<div class="form__loader">
<div class="spinner active">
<svg class="spinner__circular" viewBox="25 25 50 50">
<circle class="spinner__path" cx="50" cy="50" r="20" fill="none" stroke-width="4"
stroke-miterlimit="10"></circle>
</svg>
</div>
</div>
<div class="form__content">
<h1>登录</h1>
<div class="styled-input">
<input type="text" class="styled-input__input" id="userName" name="nickname">
<div class="styled-input__placeholder"> <span
class="styled-input__placeholder-text">请输入账号</span> </div>
<div class="styled-input__circle"></div>
</div>
<div class="styled-input">
<input type="password" class="styled-input__input" id="pwd">
<div class="styled-input__placeholder"> <span
class="styled-input__placeholder-text">请输入密码</span> </div>
<div class="styled-input__circle"></div>
</div>
<button id="login_submit" type="button" class="styled-button">
<span class="styled-button__real-text-holder">
<span class="styled-button__real-text">登录</span>
<span class="styled-button__moving-block face">
<span class="styled-button__text-holder">
<span class="styled-button__text">登录</span>
</span> </span><span class="styled-button__moving-block back">
<span class="styled-button__text-holder">
<span class="styled-button__text">登录</span>
</span>
</span>
</span>
</button>
<a id="register_a" class="text-right" data-toggle="modal" data-target="#register">
点击注册
</a>
</div>
</form>
</main>
<div id="register" class="modal fade" tabindex="-1" role="dialog" aria-labelledby="gridSystemModalLabel">
<div class="modal-dialog" role="document">
<div class="modal-content">
<div class="modal-header">
<button type="button" class="close" data-dismiss="modal" aria-label="Close"><span
aria-hidden="true">×</span></button>
<h4 class="modal-title text-center" id="gridSystemModalLabel">注册</h4>
</div>
<div class="modal-body">
<form class="form-horizontal" action="">
<div class="form-group">
<label for="inputEmail3" class="col-sm-2 control-label">账号</label>
<div class="col-sm-10">
<input type="email" class="form-control" name="userName" placeholder="请输入账号">
</div>
</div>
<div class="form-group">
<label for="inputPassword3" class="col-sm-2 control-label">密码</label>
<div class="col-sm-10">
<input type="password" class="form-control" name="pwd" placeholder="请输入密码">
</div>
</div>
<div class="form-group">
<label for="inputPassword3" class="col-sm-2 control-label">确认密码</label>
<div class="col-sm-10">
<input type="password" class="form-control" name="confPwd" placeholder="请确认密码">
</div>
</div>
<div class="form-group">
<label for="inputPassword3" class="col-sm-2 control-label">性别</label>
<div class="col-sm-10">
<input type="radio" id="" name="sex" value="male">
<label class="control-label">男 </label>
<input type="radio" id="" name="sex" value="female">
<label class="control-label">女 </label>
</div>
</div>
<div class="form-group">
<label for="inputPassword3" class="col-sm-2 control-label">兴趣爱好</label>
<div class="col-sm-10">
<input type="checkbox" name="hobby" value="1">
<label class="control-label">足球 </label>
<input type="checkbox" name="hobby" value="2">
<label class="control-label">篮球 </label>
<input type="checkbox" name="hobby" value="3">
<label class="control-label">打游戏</label>
</div>
</div>
<div class="form-group">
<label for="inputPassword3" class="col-sm-2 control-label">备注</label>
<div class="col-sm-10">
<select class="form-control" id="">
<option value="1" name="conste">白羊座</option>
<option value="2" name="conste">金牛座</option>
</select>
</div>
</div>
<div class="form-group">
<label for="inputPassword3" class="col-sm-2 control-label">备注</label>
<div class="col-sm-10">
<textarea name="remarks" class="form-control" id="" cols="30" rows="5"></textarea>
</div>
</div>
</form>
</div>
<div class="modal-footer">
<button id="close" type="button" class="btn btn-default" data-dismiss="modal">关闭</button>
<button id="register_btn" type="button" class="btn btn-primary">确认</button>
</div>
</div><!-- /.modal-content -->
</div><!-- /.modal-dialog -->
</div><!-- /.modal -->
<script>
//登录控制
$(function() {
$("#login_submit").click(function() {
//获取账号
var userName = $("#userName").val();
//获取密码
var pwd = $("#pwd").val();
var str = [];
str = {
"userName": userName,
"pwd": pwd
}
//
if (userName != "" && pwd != "") {
//JSON.stringify 方法是将一个 JavaScript 对象或值转换为 JSON 字符串
alert("登录成功!\n" + JSON.stringify(str));
} else {
alert("账号或密码不能为空!");
}
})
//注册控制
$("#register_btn").click(function() {
var str = [];
//账号
var userName = $("input[name='userName']");
//密码
var pwd = $("input[name='pwd']");
//确认密码
var confPwd = $("input[name='confPwd']");
//性别
var sex = $("input[name='sex']:checked");
//爱好
var hobby = $("input[name='hobby']:checked");
var hv = [];
var i = 0;
hobby.each(function() {
hv[i] = $(this).val();
i++;
});
//星座
var conste = $("option[name='conste']:selected");
//备注
var textarea = $("textarea[name='remarks']");
str = {
"userName": userName.val(),
"pwd": pwd.val(),
"confPwd": confPwd.val(),
"sex": sex.val(),
"hobby": hv,
"conste": conste.val(),
"textarea": textarea.val()
}
//账号密码不能为空
if (userName.val() == "" || pwd.val() == "" || confPwd.val() == "") {
alert("账号密码不能为空");
return;
}
//两次输入密码要一致
if (pwd.val() != confPwd.val()) {
alert("两次密码不一致");
return;
}
alert("注册成功!\n" + JSON.stringify(str));
//将注册好的账号密码自动填充到登录哪里
//获取账号
var userNameLogin = $("#userName");
//获取密码
var pwdLogin = $("#pwd");
//让账号和密码框都获得焦点
userNameLogin.trigger("focus");
pwdLogin.trigger("focus");
//把注册的值填充到登录哪里
userNameLogin.val(userName.val());
pwdLogin.val(pwd.val());
//清空表单
userName.val("");
pwd.val("");
confPwd.val("");
sex.prop("checked", false);
hobby.each(function() {
$(this).prop("checked", false);
});
conste.prop("outerText", "白羊座");
textarea.val("");
//模态框关闭
//trigger() 匹配的元素上触发某类事件
$("#close").trigger("click");
});
});
'use strict';
var placeholders = document.querySelectorAll('.styled-input__placeholder-text'),
inputs = document.querySelectorAll('.styled-input__input');
placeholders.forEach(function(el, i) {
var value = el.innerText,
html = '';
for (var _iterator = value, _isArray = Array.isArray(_iterator), _i = 0, _iterator = _isArray ?
_iterator :
_iterator[Symbol.iterator]();;) {
var _ref;
if (_isArray) {
if (_i >= _iterator.length) break;
_ref = _iterator[_i++];
} else {
_i = _iterator.next();
if (_i.done) break;
_ref = _i.value;
}
var w = _ref;
if (!value) value = ' ';
html += '<span class="letter">' + w + '</span>';
}
el.innerHTML = html;
});
inputs.forEach(function(el) {
var parent = el.parentNode;
el.addEventListener('focus', function() {
parent.classList.add('filled');
placeholderAnimationIn(parent, true);
}, false);
el.addEventListener('blur', function() {
if (el.value.length) return;
parent.classList.remove('filled');
placeholderAnimationIn(parent, false);
}, false);
});
function placeholderAnimationIn(parent, action) {
var act = action ? 'add' : 'remove';
var letters = parent.querySelectorAll('.letter');
letters = [].slice.call(letters, 0);
if (!action) letters = letters.reverse();
letters.forEach(function(el, i) {
setTimeout(function() {
var contains = parent.classList.contains('filled');
if (action && !contains || !action && contains) return;
el.classList[act]('active');
}, 50 * i);
});
}
setTimeout(function() {
document.body.classList.add('on-start');
}, 100);
setTimeout(function() {
document.body.classList.add('document-loaded');
}, 1800);
</script>
</body>
</html>
JavaScript一些案例
两个段落进行颜色替换
<!DOCTYPE html>
<html>
	<head>
		<meta charset="utf-8" />
		<title>test</title>
		<style>
			.p1{
				color: red;
			}
			.p2{
				color: blue;
			}
		</style>
		<script>
			window.onload = function(){
				var btn = document.getElementById("btn");
				btn.onclick = function(){
					var p1 = document.getElementsByClassName('p1');
					var p2 = document.getElementsByClassName('p2');
					var pt1 = p1[0];
					var pt2 = p2[0];
					// console.log(p1[0]);
					// console.log(p2[0]);
					// console.log(p1[0].className);
					pt1.setAttribute("class","p2");
					pt2.setAttribute("class","p1");
				}
			}
		</script>
	</head>
	<body>
		<p class="p1">这是第一段落</p>
		<p class="p2">这是第二段落</p>
		<input id="btn" type="button" value="替换">
	</body>
</html>
实现类似表格的添加删除和移动操作
<!--
添加
	默认是在末尾添加
	如果双击选择元素了就在选中段落前添加段落
删除
	双击选择了点击删除就删除了那一行
移动
	双击选择了就可以向上移动段落,移动到顶部了又会回到底部

单击段落可以取消选择

这个只是为了熟练操作没有考虑周全,就比如如果段落顺序变为了无序了就无法循环移动了
我使用了class查找了在移动的,应该直接找到上一个节点移动的,就会解决这种问题了,在做到顶部的判断就可以循环移动了
-->
<!DOCTYPE html>
<html>
	<head>
		<meta charset="utf-8">
		<title>添加</title>
		<script>
			var countp = 0; //当前对象的前一个位置
			var current = ""; //当前选中对象
			window.onload = function() {
				var count = 1; //总数量
				var currentCount = 1; //当前数量
				var dCount = 0; //被删除数量
				var btn = document.getElementById("btn");
				var btnd = document.getElementById("btnd");
				var btnm = document.getElementById("btnm");
				//添加
				btn.onclick = function() {
					//如果没有选择就在最后添加
					if (current == "") {
						//插入标签元素
						var p = document.createElement("p");
						//插入文本元素
						var node = document.createTextNode("这是第" + count + "段落");
						//将文本节点添加到标签节点中
						p.appendChild(node);
						p.setAttribute("class", "p" + count);
						p.setAttribute("ondblclick", "change_color();")
						p.setAttribute("onclick", "recovery_color()");
						//获取父元素
						var father = document.getElementById("div1");
						//在父元素上面添加
						father.appendChild(p);
						count++;
						countp++;
					} else {
						//插入标签元素
						var p = document.createElement("p");
						//插入文本元素
						var node = document.createTextNode("这是第" + count + "段落");
						//将文本节点添加到标签节点中
						p.appendChild(node);
						p.setAttribute("class", "p" + count);
						p.setAttribute("ondblclick", "change_color();")
						p.setAttribute("onclick", "recovery_color()");
						//获取父元素
						var father = document.getElementById("div1");
						//在父元素上面添加
						father.insertBefore(p, current);

						count++;
						countp++;
					}

				}
				//删除
				btnd.onclick = function() {
					if (current != "") {
						var className = current.className;
						currentCount = parseInt(className.substring(className.length - 1, className.length))
						dCount++;
						current.remove();
						countp--;
					}
				}
				//移动
				btnm.onclick = function() {

					if (current != "") {
						while (true) {
							if (countp == 0) {
								countp = count - 1;
								var className = current.className;
								if (countp == parseInt(className.substring(className.length - 1, className.length))) {
									countp--;
								}
							} else {
								countp--;
								//如果到自身了就在减一次
								var className = current.className;
								if (countp == parseInt(className.substring(className.length - 1, className.length))) {
									countp--;
								}
							}
							//console.log(current);
							var father = document.getElementById("div1");
							//前面的不等于空才替换,等于空继续向前面查找
							var pnb = document.getElementsByClassName("p" + countp);
							console.log(pnb);
							//console.log(pnb.length);
							console.log(countp);
							if (pnb.length != 0) {
								father.insertBefore(current, pnb[0]);
								break;
							}
							if (countp == 0) {
								father.insertBefore(current, pnb[0]);
								break;
							}
						}
					}

				}
			}

			function change_color() {
				current = event.srcElement; //当前对象
				console.log(current);
				current.style.backgroundColor = "aqua";
				//获取当前对象的className
				var className = current.className;
				//获取现在是p多少
				countp = parseInt(className.substring(className.length - 1, className.length));
				console.log(countp);
			}

			function recovery_color() {
				current = event.srcElement;
				current.style.backgroundColor = "white";
				current = "";
			}
		</script>
		<style>
			.g {
				background-color: ;
			}
		</style>
	</head>
	<body>
		<div id="div1">
		</div>
		<div>
			<input id="btn" type="button" value="添加">
			<input id="btnd" type="button" value="删除">
			<input id="btnm" type="button" value="移动">
		</div>
	</body>

</html>
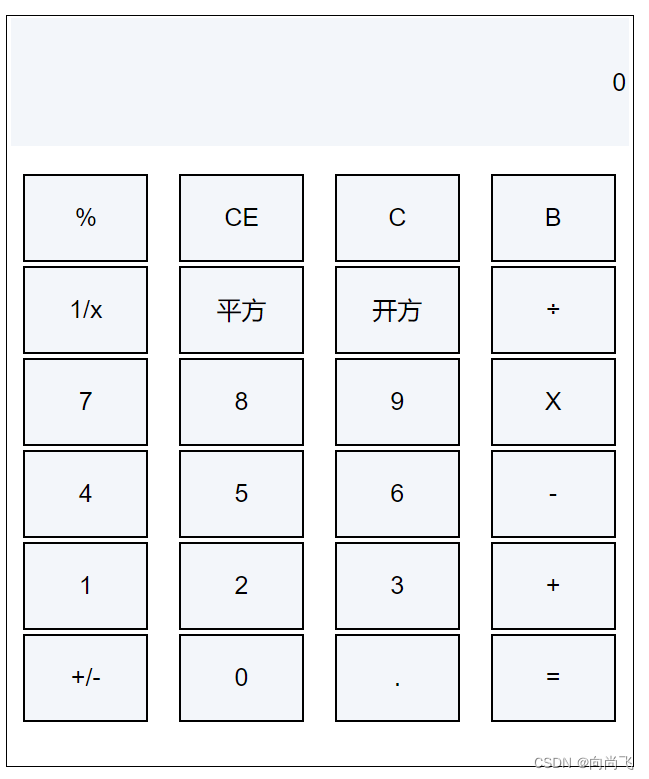
计算器案例
效果图:
<!--
使用JavaScript实现了一个计算器能进行四则运算和退格操作
-->

<!DOCTYPE html>
<html lang="en">

<head>
    <meta charset="UTF-8">
    <meta http-equiv="X-UA-Compatible" content="IE=edge">
    <meta name="viewport" content="width=device-width, initial-scale=1.0">
    <title>计算器</title>
	<style>
		#mainDiv {
		    position: relative;
		    width: 500px;
		    height: 600px;
		    background-color: rgb(255, 255, 255);
		    margin: auto;
		    margin-top: 30px;
		    border: rgb(0, 0, 0) solid 1px;
		}

		#table {
		    width: 500px;
		    height: 400px;
		    position: relative;
		    margin-top: 20px;
		}

		input {
		    width: 100px;
		    height: 70px;
		    font-size: 20px;
		    background-color: rgb(243, 246, 250);
		    position: relative;
		    margin: auto;
		    margin-left: 10px;
		}

		#value {
		    width: 490px;
		    height: 100px;
		    position: relative;
		    margin: auto;
		    margin-top: 2px;
		    margin-left: 3px;
		    border: 0px;
			text-align: right;
		}
		td>input:hover{
			background-color: rgb(207, 227, 250);
		}
	</style>

	<script>
		/**
		 * 可以直接写一个计算函数,直接计算值
		 * 输入=的时候直接调用改函数就行了,就可以不用我这么麻烦了
		 * 开始写的时候思路不够清晰,导致我后面添加一个按键的功能那么麻烦
		 * 但是我后面也进行了简单的修改了,修复了一些bug,写了一个完善的计算函数还是添加了
		 */
		var sumInstruct = ""; //总显示的字符串
		var currentSumValue = 0.0; //当前总字符串的值
		var currentValue = ""; //当前数值
		var symbol = ""; //符号
		var count = 0; //用于计算输入了多少个数

		/**
		 * 把数值存放到text框里面
		 * @param {改变的值} value
		 */
		function saveValue(value) {
		    var mainObject = document.getElementById("value");
		    mainObject.value = value;
		}

		/**
		 * 响应用户输入的指令
		 * @param {用户操作指令} instruct
		 */
		function takeValue(instruct) {
			//输入退格的时候不用计算值
		    if (instruct != 'b') {
				sumInstruct += instruct;
		        processingValue(instruct);
		    }
		    switch (instruct) {
		        case 1:
		        case 2:
		        case 3:
		        case 4:
		        case 5:
		        case 6:
		        case 7:
		        case 8:
		        case 9:
		        case 0:
		        case '.':
		            saveValue(sumInstruct);
		            break;
		        case "+":
		        case "-":
		        case "*":
		        case "/":
		        case "%":
		            symbolA(symbol);
		            saveValue(sumInstruct);
		            break;
		        case "=":
		            //sumInstruct += instruct;
		            symbolA(symbol);
		            sumInstruct += currentSumValue;
		            saveValue(sumInstruct);
		            break;
		        case "c":
		            currentSumValue = 0;
		            currentValue = "";
		            sumInstruct = "";
		            count = 0;
		            symbol = "";
		            saveValue(0);
		            break;
		        case "b":
		            lastHandle();
		            saveValue(sumInstruct);
		            break;
		    }
		}


		/**
		 * 计算当前的总值
		 * @param {当前算数符号} symbol
		 */
		function symbolA(symbol) {
		    if (count != 1) {
		        switch (symbol) {
		            case '+':
		                currentSumValue += currentValue;
		                currentValue = "";
		                break;
		            case "-":
		                currentSumValue -= currentValue;
		                currentValue = "";
		                break;
		            case "*":
		                currentSumValue *= currentValue;
		                currentValue = "";
		                break;
		            case "/":
		                currentSumValue /= currentValue;
		                currentValue = "";
		                break;
		            case "%":
		                currentSumValue %= currentValue;
		                currentValue = "";
		                break;
		        }
		    }

		}

		/**
		 * 计算当前的数值
		 * 如果是数值就存放到currentValue中,
		 * 如果是符号就把currentValue转换为数值,并把符号存入symbol中
		 * @param {当前输入的指令} instruct
		 */
		function processingValue(instruct) {
		    if ((instruct >= 0 && instruct <= 9) || instruct == '.') {
		        currentValue += instruct;
		        //alert(currentValue);
		    } else {
		        var flag = currentValue.lastIndexOf('.'); //从尾部查找'.'存在的位置,如果不存在则在flag=-1
		        //如果有小数点转换为浮点型数据,如果没有就转换为整数型数据
		        if (flag != -1) {
		            currentValue = parseFloat(currentValue);
		            //alert(currentValue);
		        } else {
		            currentValue = parseInt(currentValue);
		        }
		        //当符号为空代表这个是第一个数字,作为求总的初值
		        if (count == 0) {
		            currentSumValue = currentValue;
		            //alert(currentValue);
		            //alert(currentSumValue);
		            currentValue = "";
		        }
		        //sybol只存四则符号
		        if (instruct == '+' || instruct == '-' || instruct == '*' || instruct == '/' || instruct == '%') {
		            symbol = instruct;
		        }
		        count++;
		    }
		}

		/**
		 * 计算当前文本框的总数值
		 * @param {当前文本框显示的值} sumInstruct
		 */
		function calculationSum(sumInstruct){
			var currentChar;//当前字符
			currentSumValue = 0.0;//计算前总值归零
			count = 0;//值为0
			//var temporary = sumInstruct;//临时存放一下数值
			console.log(sumInstruct);
			for(var i = 0;i <= sumInstruct.length;i++){
				currentChar = sumInstruct.charAt(i);
				//console.log(currentChar);
				processingValue(currentChar);
				//console.log("currentValue"+currentChar);
				//console.log("currentSumValue"+currentSumValue);
				//如果是遇见了运算符了,证明就是一个当前数值计算完毕
				if(!((currentChar >='0' && currentChar <= '9') || currentChar == '.')){
					console.log("if" + currentChar);
					if(count!=1){
						symbolA(symbol);
					}
				}
			}
			//sumInstruct = temporary;
			//console.log(temporary);
			console.log(sumInstruct);
		}

		function lastHandle() {
		    var endChar = sumInstruct.charAt(sumInstruct.length - 1); //删除的字符
		    //alert(endChar);
		    //当前的字符串改变
		    sumInstruct = sumInstruct.substring(0, sumInstruct.length - 1);
		    /**
		     * 当前的值的改变
		     *   1.如果删除的是数值
		     *        把当前值字符串最后一个截取一个
		     *   2.删除的是符号
		     *        当前符号为,改变改变后的尾部查找的第一符号
		     *        截取当前符号后面的数字,当前值为这个
		     */
		    if ((endChar >= '0' && endChar <= '9') || endChar == '.') {
		        //alert(endChar);
		        currentValue = currentValue.substring(0, currentValue.length - 1);
		    } else {
				calculationSum(sumInstruct);
		        /* var i;
		        var ch;
		        for (i = sumInstruct.length - 1; i > 0; i--) {
		            ch = sumInstruct.charAt(i);
		            //遇见最后一个符号就改变当前符号
		            if (!(ch >= '0' && ch <= '9' || ch == '.')) {
		                break;
		            }
		        }
		        if (i != -1) {
		            symbol = ch; //改变当前符号
		            //改变当前值
		            currentValue = sumInstruct.substring(sumInstruct.lastIndexOf(symbol) + 1);
		            symbolA(symbol);
		        } */
		    }
		    //当前的总值改变
		    //当前的符号改变
		}
	</script>

</head>

<body>
    <div id="mainDiv">
        <div id="valueDiv">
            <input type="text" id="value" value="0">
        </div>
        <div id="buttonDiv">
            <table id="table">
                <tr>
                    <td><input type="button" value="%" id="" onclick="takeValue('%')"></td>
                    <td><input type="button" value="CE" id=""></td>
                    <td><input type="button" value="C" onclick="takeValue('c')" id=""></td>
                    <td><input type="button" value="B" onclick="takeValue('b')" id=""></td>
                </tr>
                <tr>
                    <td><input type="button" value="1/x" id=""></td>
                    <td><input type="button" value="平方" id=""></td>
                    <td><input type="button" value="开方" id=""></td>
                    <td><input type="button" value="÷" id="" onclick="takeValue('/')"></td>
                </tr>
                <tr>
                    <td><input type="button" value="7" id="value7" onclick="takeValue(7)"></td>
                    <td><input type="button" value="8" id="value8" onclick="takeValue(8)"></td>
                    <td><input type="button" value="9" id="value9" onclick="takeValue(9)"></td>
                    <td><input type="button" value="X" id="" onclick="takeValue('*')"></td>
                </tr>
                <tr>
                    <td><input type="button" value="4" id="value4" onclick="takeValue(4)"></td>
                    <td><input type="button" value="5" id="value5" onclick="takeValue(5)"></td>
                    <td><input type="button" value="6" id="value6" onclick="takeValue(6)"></td>
                    <td><input type="button" value="-" id="" onclick="takeValue('-')"></td>
                </tr>
                <tr>
                    <td><input type="button" value="1" id="value1" onclick="takeValue(1)"></td>
                    <td><input type="button" value="2" id="value2" onclick="takeValue(2)"></td>
                    <td><input type="button" value="3" id="value3" onclick="takeValue(3)"></td>
                    <td><input type="button" value="+" id="" onclick="takeValue('+')"></td>
                </tr>
                <tr>
                    <td><input type="button" value="+/-" id=""></td>
                    <td><input type="button" value="0" onclick="takeValue(0)" id=""></td>
                    <td><input type="button" value="." onclick="takeValue('.')" id=""></td>
                    <td><input type="button" value="=" onclick="takeValue('=')" id=""></td>
                </tr>
            </table>
        </div>
    </div>
</body>

</html>
- 总:让我体会到了一点,写之前一定要理一下思路不要拿着就开跑,前面写的能实现了,不要后面觉得有好的思路实现了最好不要去修改之前的,那样真的容易出现修改修改就全部都错了,有好的思路只对后面新增的功能进行优化就行了。
BootStrap框架
- BootStrap框架是基于JQuery框架之上的所以使用时需要导入JQuery包
- 中文官网https://www.bootcss.com/
- JQuery插件网:https://www.jq22.com/
- 使用BootStrap框架做了一个浏览器汇总的网页效果如下
![[外链图片转存失败,源站可能有防盗链机制,建议将图片保存下来直接上传(img-SbsoajAy-1657284436622)(C:\Users\dianfei\AppData\Roaming\Typora\typora-user-images\image-20220708091003655.png)]](https://img-blog.csdnimg.cn/cef856bb3b664a2d956321b43da96978.png)
源码:
<!--该网页主要分为四个部分
1、导航栏
2、轮播图
3、缩略图
4、标签页
-->
<!DOCTYPE html>
<html>
	<head>
		<meta charset="utf-8">
		<title>浏览器汇总</title>
		<link rel="stylesheet" href="css/bootstrap.min.css">
		<script src="js/jquery-3.6.0.js"></script>
		<script src="js/bootstrap.min.js"></script>

		<style>
			.container-fluid{
				margin-left: 150px;
			}
			.navbar{
				border-radius: 0px;
			}
			img {
				width: 100%;
				height: 450px;
				margin: auto;
			}

			#carousel-example-generic {
				margin-top: -20px;
			}

			.thumbnail img {
				width: 140px;
				height: 140px;
			}

			#thumbnail div {
				border: none;
			}
			#thumbnail{
				margin-top: 30px;
			}

			.btn {
				width: 90px;
				height: 35px;
				line-height: 24px;
			}

			.caption>h3,
			p {
				text-align: center;
			}
		</style>

		<script>
			$(function(){
				$("#nav_ul li a").click(function(){
					var href = $(this).attr("href");
					console.log(href);
					$("#tab_ul li a[href='" + href +"']").tab('show');
					console.log($("#tab_ul li a[href='"+href+"']"));
				})
			})
		</script>

	</head>
	<body>

		<!--导航条-->

		<nav class="navbar navbar-inverse navbar-fixed-top" id="nav">
			<div class="container-fluid">
				<!-- Brand and toggle get grouped for better mobile display -->
				<div class="navbar-header">
					<button type="button" class="navbar-toggle collapsed" data-toggle="collapse"
						data-target="#bs-example-navbar-collapse-1" aria-expanded="false">
						<span class="sr-only">Toggle navigation</span>
						<span class="icon-bar"></span>
						<span class="icon-bar"></span>
						<span class="icon-bar"></span>
					</button>
					<a class="navbar-brand" href="#">浏览器汇总</a>
				</div>

				<!-- Collect the nav links, forms, and other content for toggling -->
				<div class="collapse navbar-collapse" id="bs-example-navbar-collapse-1">
					<ul class="nav navbar-nav">
						<li class="active"><a href="#">综述 <span class="sr-only">(current)</span></a></li>
						<li><a href="#">简述</a></li>
						<li class="dropdown">
							<a href="#" class="dropdown-toggle" data-toggle="dropdown" role="button"
								aria-haspopup="true" aria-expanded="false">特点 <span class="caret"></span></a>
							<ul class="dropdown-menu" id="nav_ul">
								<li><a href="#Chrome">Chrome</a></li>
								<li><a href="#Firefox">Firefox</a></li>
								<li><a href="#Safari">Safari</a></li>
								<li><a href="#Opera">Opera</a></li>
								<li><a href="#IE">IE</a></li>
							</ul>
						</li>
						<li><a href="#">关于</a></li>
					</ul>
				</div><!-- /.navbar-collapse -->
			</div><!-- /.container-fluid -->
		</nav>

		<div>

			<!--轮播图-->
			<div id="carousel-example-generic" class="carousel slide" data-ride="carousel">
				<!-- Indicators -->
				<ol class="carousel-indicators">
					<li data-target="#carousel-example-generic" data-slide-to="0" class="active"></li>
					<li data-target="#carousel-example-generic" data-slide-to="1"></li>
					<li data-target="#carousel-example-generic" data-slide-to="2"></li>
					<li data-target="#carousel-example-generic" data-slide-to="3"></li>
					<li data-target="#carousel-example-generic" data-slide-to="4"></li>
				</ol>

				<!-- Wrapper for slides -->
				<div class="carousel-inner" role="listbox">
					<div class="item active">
						<img src="img/chrome-big.jpg" alt="chrome">
						<div class="carousel-caption">
							<h2>Chrome</h2>
						</div>
					</div>
					<div class="item">
						<img src="img/firefox-big.jpg" alt="firefox">
						<div class="carousel-caption">
							<h2>Firefox</h2>
						</div>
					</div>
					<div class="item">
						<img src="img/safari-big.jpg" alt="safari">
						<div class="carousel-caption">
							<h2>Safari</h2>
						</div>
					</div>
					<div class="item">
						<img src="img/opera-big.jpg" alt="opera">
						<div class="carousel-caption">
							<h2>Opera</h2>
						</div>
					</div>
					<div class="item">
						<img src="img/ie-big.jpg" alt="IE">
						<div class="carousel-caption">
							<h2>IE</h2>
						</div>
					</div>
				</div>

				<!-- Controls -->
				<a class="left carousel-control" href="#carousel-example-generic" role="button" data-slide="prev">
					<span class="glyphicon glyphicon-chevron-left" aria-hidden="true"></span>
					<span class="sr-only">Previous</span>
				</a>
				<a class="right carousel-control" href="#carousel-example-generic" role="button" data-slide="next">
					<span class="glyphicon glyphicon-chevron-right" aria-hidden="true"></span>
					<span class="sr-only">Next</span>
				</a>
			</div>
		</div>

		<缩略图>
		<div class="container" id="thumbnail">
			<div class="row">
				<div class="col-md-4">
					<div class="thumbnail">
						<img src="img/chrome-logo-small.jpg" alt="chrome">
						<div class="caption">
							<h3>Chrome</h3>
							<p>Google Chrome,又称Google浏览器,是一个由Google(谷歌)公司开发的网页浏览器。</p>
							<p><a href="#" class="btn btn-default" role="button">点击下载</a></p>
						</div>
					</div>
				</div>
				<div class="col-md-4">
					<div class="thumbnail">
						<img src="img/firefox-logo-small.jpg" alt="chrome">
						<div class="caption">
							<h3>Chrome</h3>
							<p>Google Chrome,又称Google浏览器,是一个由Google(谷歌)公司开发的网页浏览器。</p>
							<p><a href="#" class="btn btn-default" role="button">点击下载</a></p>
						</div>
					</div>
				</div>
				<div class="col-md-4">
					<div class="thumbnail">
						<img src="img/safari-logo-small.jpg" alt="chrome">
						<div class="caption">
							<h3>Chrome</h3>
							<p>Google Chrome,又称Google浏览器,是一个由Google(谷歌)公司开发的网页浏览器。</p>
							<p><a href="#" class="btn btn-default" role="button">点击下载</a></p>
						</div>
					</div>
				</div>
			</div>

			<div class="row">
				  <hr>
			  </div>

			  <!--标签页-->
			<div>

			  <!-- Nav tabs -->
			  <ul class="nav nav-tabs" role="tablist" id="tab_ul">
			    <li role="presentation" class="active"><a href="#Chrome" aria-controls="Chrome" role="tab" data-toggle="tab">Chrome</a></li>
			    <li role="presentation"><a href="#Firefox" aria-controls="Firefox" role="tab" data-toggle="tab">Firefox</a></li>
			    <li role="presentation"><a href="#Safari" aria-controls="Safari" role="tab" data-toggle="tab">Safari</a></li>
			    <li role="presentation"><a href="#Opera" aria-controls="Opera" role="tab" data-toggle="tab">Opera</a></li>
				<li role="presentation"><a href="#IE" aria-controls="IE" role="tab" data-toggle="tab">IE</a></li>
			  </ul>

			  <!-- Tab panes -->
			  <div class="tab-content">
			    <div role="tabpanel" class="tab-pane active" id="Chrome">
					<h3 class="col-sm-7">IE 你懂的</h3>
					<span class="col-sm-7">Internet Explorer,原称Microsoft Internet Explorer(6版本以前)和Windows Internet Explorer(7,8,9,10版本), 简称IE,是美国微软公司推出的一款网页浏览器。它采用的排版引擎(俗称内核)为Trident。</span>
					<img class="col-sm-5" src="img/chrome-logo.jpg" alt="chrome">
				</div>
			    <div role="tabpanel" class="tab-pane" id="Firefox">
					<img class="col-sm-5" src="img/firefox-logo.jpg" alt="chrome">
					<h3 class="col-sm-7">IE 你懂的</h3>
					<span class="col-sm-7">Internet Explorer,原称Microsoft Internet Explorer(6版本以前)和Windows Internet Explorer(7,8,9,10版本), 简称IE,是美国微软公司推出的一款网页浏览器。它采用的排版引擎(俗称内核)为Trident。</span>
				</div>
			    <div role="tabpanel" class="tab-pane" id="Safari">
					<h3 class="col-sm-7">IE 你懂的</h3>
					<span class="col-sm-7">Internet Explorer,原称Microsoft Internet Explorer(6版本以前)和Windows Internet Explorer(7,8,9,10版本), 简称IE,是美国微软公司推出的一款网页浏览器。它采用的排版引擎(俗称内核)为Trident。</span>
					<img class="col-sm-5" src="img/safari-logo.jpg" alt="chrome">
				</div>
			    <div role="tabpanel" class="tab-pane" id="Opera">
					<img class="col-sm-5" src="img/opera-logo.jpg" alt="chrome">
					<h3 class="col-sm-7">IE 你懂的</h3>
					<span class="col-sm-7">Internet Explorer,原称Microsoft Internet Explorer(6版本以前)和Windows Internet Explorer(7,8,9,10版本), 简称IE,是美国微软公司推出的一款网页浏览器。它采用的排版引擎(俗称内核)为Trident。</span>
				</div>
				 <div role="tabpanel" class="tab-pane" id="IE">
					 <h3 class="col-sm-7">IE 你懂的</h3>
					 <span class="col-sm-7">Internet Explorer,原称Microsoft Internet Explorer(6版本以前)和Windows Internet Explorer(7,8,9,10版本), 简称IE,是美国微软公司推出的一款网页浏览器。它采用的排版引擎(俗称内核)为Trident。</span>
					 <img class="col-sm-5" src="img/ie-logo.jpg" alt="chrome">
				 </div>
			  </div>
			</div>
		</div>
	</body>
</html>


 173
173


 被折叠的 条评论
为什么被折叠?
被折叠的 条评论
为什么被折叠?
 到【灌水乐园】发言


