


目录
3.8Spring Security中Remember Me
1、项目搭建
 //springSecurity依赖
        <dependency>
            <groupId>org.springframework.boot</groupId>
            <artifactId>spring-boot-starter-security</artifactId>
        </dependency>
        <dependency>
            <groupId>org.springframework.boot</groupId>
            <artifactId>spring-boot-starter-thymeleaf</artifactId>
        </dependency>
        <dependency>
            <groupId>org.springframework.boot</groupId>
            <artifactId>spring-boot-starter-web</artifactId>
        </dependency>
        <dependency>
            <groupId>org.thymeleaf.extras</groupId>
            <artifactId>thymeleaf-extras-springsecurity5</artifactId>
        </dependency>
        <dependency>
            <groupId>com.baomidou</groupId>
            <artifactId>mybatis-plus-boot-starter</artifactId>
            <version>3.5.0</version>
        </dependency>

        <dependency>
            <groupId>mysql</groupId>
            <artifactId>mysql-connector-java</artifactId>
        </dependency>
        <dependency>
            <groupId>org.projectlombok</groupId>
            <artifactId>lombok</artifactId>
            <optional>true</optional>
        </dependency>
        <dependency>
            <groupId>org.springframework.boot</groupId>
            <artifactId>spring-boot-starter-test</artifactId>
            <scope>test</scope>
        </dependency>
        <dependency>
            <groupId>org.springframework.security</groupId>
            <artifactId>spring-security-test</artifactId>
            <scope>test</scope>
        </dependency>
2、内存认证
InMemoryUserDetailsManager就是UserDetailsService接口的一个实现类,它将登录页传来的用户名密码和内存中用户名密码做匹配认证。
//security配置类
@Configuration
public class SecurityConfig {
//    定义认证逻辑
    @Bean
    public UserDetailsService userDetailsService(){
//        1.使用内存进行认证
        InMemoryUserDetailsManager manager = new InMemoryUserDetailsManager();
//        2.创建用户
        UserDetails user1 = User.withUsername("admin").password("amin").authorities("admin").build();
        UserDetails user2 = User.withUsername("root").password("root").authorities("admin").build();
//        3、将用户保存到内存中
        manager.createUser(user1);
        manager.createUser(user2);
        return manager;
    }
//  密码编码器
    @Bean
    public PasswordEncoder passwordEncoder(){
        return NoOpPasswordEncoder.getInstance(); //不解析密码
    }
}
3、自定义认证逻辑
3.1基本概念
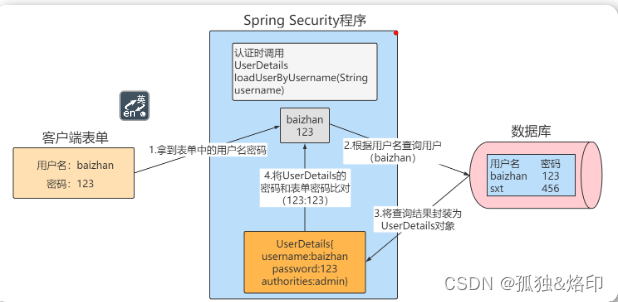
UserDetailsService的实现类必须重写loadUserByUsername方法,该方法定义了具体的认证逻辑,参数username是前端传来的用户名,我们需要根据传来的用户名查询到该用户(一般是从数据库查询),并将查询到的用户封装成一个UserDetails对象,该对象是Spring Security提供的用户对象,包含用户名、密码、权限。Spring Security会根据UserDetails对象中的密码和客户端提供密码进行比较。相同则认证通过,不相同则认证失败。
3.2使用数据库进行认证
NoOpPasswordEncoder:不进行密码加密,已经弃用
//security配置类
@Configuration
public class SecurityConfig {
//  密码编码器
    @Bean
    public PasswordEncoder passwordEncoder(){
        return NoOpPasswordEncoder.getInstance(); //不解析密码
    }
}
由于表名和列名与实体类不一致所以使用mybatis-plus中的@TableName指定表名,@TableField指定列名
@Data
@TableName(value = "person")
public class People {
    private Integer id;
    @TableField(value = "username")
    private String userName;
    private String password;
    private String  sex;
    private Integer age;
    private String address;
}
使用mybatis-plus必须继承BaseMapper<T>或者实体类继承Model<T>
@Mapper
public interface PeopleMapper extends BaseMapper<People> {
}
自定义service层需继承UserDetailsService实现其中的loadUserByUsername,根据传过来的username查询数据库,将查询到的user封装成UserDetails返回
@Service
public class MySecurityService implements UserDetailsService {
    @Autowired
    @Qualifier(value = "peopleMapper")
    private PeopleMapper peopleMapper;

    @Override
    public UserDetails loadUserByUsername(String username) throws UsernameNotFoundException {
//       1、查询条件
        QueryWrapper<People> wrapper = new QueryWrapper<People>().eq("username", username);
//      2、查询用户
        People people = peopleMapper.selectOne(wrapper);
        if(people==null){
            return null;
        }
//      3、封装UserDetails对象
        UserDetails user = User.withUsername(people.getUserName()).password(people.getPassword()).authorities("admin").build();
        return user;
    }
}
3.3PasswordEncoder认证加密
Spring Security要求容器中必须有PasswordEncoder实例,之前使用的NoOpPasswordEncoder是PasswordEncoder的实现类,意思是不解析密码,使用明文密码。
Spring Security官方推荐的密码解析器是BCryptPasswordEncoder
 //  密码编码器加密
    @Bean
    public PasswordEncoder passwordEncoder() {
        return new BCryptPasswordEncoder(); //加密密码
    }
数据库中存放加密后的密码,明文密码不能登录

15:43:58.704 WARN --- [http-nio-8080-exec-7] o.s.security.crypto.bcrypt.BCryptPasswordEncoder :Encoded password does not look like BCrypt
3.4自定义登录页面
Spring Security给我们提供了登录页面,但在实际项目中,更多的是使用自己的登录页面。Spring Security也支持用户自定义登录页面。SecurityConfig需要继承WebSecurityConfigurerAdapter重写protected void configure(HttpSecurity http) throws Exception{}方法定义登录页面,public void configure(WebSecurity web) throws Exception {}方法放行静态资源
//  Spring Security自定义登录页面
    @Override
    protected void configure(HttpSecurity http) throws Exception {
//      登录页表单
        http.formLogin()
                .loginPage("/login.html")//自定义登录页面
                .usernameParameter("username")//表单中的用户名
                .passwordParameter("password")//表单中的密码
                .loginProcessingUrl("/login")//登录路径
                .successForwardUrl("/main")//登录成功
                .failureForwardUrl("/fail");//登陆失败
//      需要认证的资源
        http.authorizeHttpRequests()
                .antMatchers("/login.html").permitAll()//登录页不需要认证
                .anyRequest().authenticated();//其余所有请求都需要认证
//      关闭csrf
        http.csrf()
                .disable();//关闭csrf
    }

    @Override
    public void configure(WebSecurity web) throws Exception {
        web.ignoring()
                .antMatchers("/css/**"); //放行静态资源
    }
3.5CSRF防护
CSRF:跨站请求伪造,通过伪造用户请求访问受信任的站点从而进行非法请求访问,是一种攻击手段。 Spring Security为了防止CSRF攻击,默认开启了CSRF防护,这限制了除了GET请求以外的大多数方法。
我们要想正常使用Spring Security需要突破CSRF防护。CSRF为了保证不是其他第三方网站访问,要求访问时携带参数名为_csrf值为令牌,令牌在服务端产生,如果携带的令牌和服务端的令牌匹配成功,则正常访问。
解决方案:
方案一:关闭CSRF防护(不推荐)
//   关闭csrf
        http.csrf().disable();//关闭csrf
方案二:突破CSRF防护(使用令牌)
<form action="/login" method="post">
    <!--令牌-->
    <input hidden="hidden" name="_csrf" th:value="${_csrf.token}" th:if="${_csrf}"/>
    用户名:<input type="text" name="username"/> <br>
    密码:<input type="text" name="password"/><br>
    <input type="submit" value="提交">
</form>
3.6SecurityContext 获取会话中的用户信息
通过SecurityContextHolder获取SecurityContext对象,在通过SecurityContext对象获取认证后的Authentication对象,在通过getPrincipal()获取UserDetails对象
 @RequestMapping(value = {"/user/username"})
    @ResponseBody
    public String getUserName(){
//      获securityContext对象
        SecurityContext securityContext = SecurityContextHolder.getContext();
//      获取认证对象
        Authentication authentication = securityContext.getAuthentication();
//      获取UserDetails对象
        UserDetails user = (UserDetails) authentication.getPrincipal();
        return user.getUsername();
    }
3.7自定义Handler处理器
自定义登陆成功处理器:
需要实现AuthenticationSuccessHandler处理器重写onAuthenticationSuccess()方法,通过authentication.getPrincipal()方法可以获取UserDetails对象
//登录成功处理器
public class LoginSuccessHandler implements AuthenticationSuccessHandler {
    @Override
    public void onAuthenticationSuccess(HttpServletRequest request, HttpServletResponse response, Authentication authentication) throws IOException, ServletException {
//       拿到用户登录的信息
        UserDetails user = (UserDetails) authentication.getPrincipal();
        System.out.println("username:"+user.getUsername());
        System.out.println("password:"+user.getPassword());
        System.out.println("登录成功后其他操作。。");
        response.sendRedirect("/main");
    }
}
自定义登录失败处理器:
需要继承AuthenticationFailureHandler处理器重写onAuthenticationFailure()方法
//登录失败处理器
public class LoginFailHandler implements AuthenticationFailureHandler {
    @Override
    public void onAuthenticationFailure(HttpServletRequest request, HttpServletResponse response, AuthenticationException exception) throws IOException, ServletException {
        System.out.println("登陆失败日志。。。");
        response.sendRedirect("/fail");
    }
}
自定义退出登录处理器
public class MyLogoutSuccessHandler implements LogoutSuccessHandler {
  @Override
  public void onLogoutSuccess(HttpServletRequest request, HttpServletResponse response, Authentication authentication) throws IOException, ServletException {
    System.out.println("清除一些数据...");
    response.sendRedirect("/login.html");
   }
}
*****退出登录:
由于CSRF放行所有的get请求所有不会捕捉到<a>标签中的get请求,所以当是有<a href="/logour">退出</a>时显示找不到"/logout"
//       退出登录
        http.logout()
                .logoutUrl("/logout")
                .logoutSuccessUrl("/login.html")
                .clearAuthentication(true) //清除认证 默认为true
                .invalidateHttpSession(true); //销毁httpSession对象 默认为true
解决方法:
方法一:关闭csrf防护
//      关闭csrf
//        http.csrf()
//                .disable();//关闭csrf
方法二:对所有的请求路径拦截匹配
//       退出登录
        http.logout()
                .logoutRequestMatcher(new AntPathRequestMatcher("/logout"))
                .logoutSuccessUrl("/login.html")
                .clearAuthentication(true) //清除认证 默认为true
                .invalidateHttpSession(true); //销毁httpSession对象 默认为true
SecurityConfig配置类:
//提交的表单校验
http.formLogin()
                .loginPage("/login.html")//自定义登录页面
                .usernameParameter("username")//表单中的用户名
                .passwordParameter("password")//表单中的密码
                .loginProcessingUrl("/login")//登录路径
//                .successForwardUrl("/main")//登录成功
                .successHandler(new LoginSuccessHandler()) //自定义登录成功处理器
//                .failureForwardUrl("/fail");//登陆失败
                .failureHandler(new LoginFailHandler());//自定义登录失败处理器

//需要认证的资源
        http.authorizeHttpRequests()
                .antMatchers("/login.html").permitAll()//登录页不需要认证
                .antMatchers("/fail").permitAll()//失败页面不需要认证
                .anyRequest().authenticated();//其余所有请求都需要认证

//退出登录配置
http.logout()
   .logoutRequestMatcher(new AntPathRequestMatcher("/logout"))
   .clearAuthentication(true) //清除认证状态,默认为true
   .invalidateHttpSession(true) // 销毁HttpSession对象,默认为 true
   .logoutSuccessHandler(new MyLogoutSuccessHandler()); //自定义退出成功处理器
3.8Spring Security中Remember Me
Spring Security中Remember Me为“记住我”功能,即下次访问系统时无需重新登录。当使用“记住我”功能登录后,Spring Security会生成一个令牌,令牌一方面保存到数据库中,另一方面生成一个叫remember-me的Cookie保存到客户端。之后客户端访问项目时自动携带令牌,不登录即可完成认证。

@Configuration
public class RememberMeConfig {
    @Autowired
    private DataSource dataSource;

//  令牌
    @Bean
    public PersistentTokenRepository getPersistentTokenRepository(){
        //为Spring Security自带令牌控制器设置数据源
        JdbcTokenRepositoryImpl tokenRepository = new JdbcTokenRepositoryImpl();
        tokenRepository.setDataSource(dataSource);
        //自动创建令牌表 第一次启动需要,第二次删除
        tokenRepository.setCreateTableOnStartup(true);
        return  tokenRepository;

    }

}
    @Autowired
    private UserDetailsService userDetailsService;
    @Autowired
    private PersistentTokenRepository repository; //令牌


   //记住我
        http.rememberMe()
                .userDetailsService(userDetailsService) //交予哪个对象
                .tokenRepository(repository) //令牌
                .tokenValiditySeconds(10); //保存时间


 1万+
1万+


 被折叠的 条评论
为什么被折叠?
被折叠的 条评论
为什么被折叠?
 到【灌水乐园】发言


