


仿网易云移动应用
是总结了b站 写网页的叮叮 老师的《【前端实战项目】手把手教你从零开始做一个网易云音乐,月嫂级毕业设计教程》视频的笔记哦 搭配观看效果翻番!
https://www.bilibili.com/video/BV1c44y1g7ac
vue3
- 仿网易云移动应用
- 1. 准备项目
- 2. 编写项目
- 2.1 针对不同设备编写rem适配
- 2.2 首页布局
- 2.3 歌单详情页ItemMusic.vue
- 2.4 全局底部组件(播放歌曲)FooterMusic.vue
- 2.5 歌词详情页组件MusicDetail.vue
- 2.6 歌曲搜索组件
- 2.7 用户登录页面及个人中心页面
1. 准备项目
1.1 代码与文档
后端接口github:https://neteasecloudmusicapi.vercel.app/
后端接口文档:https://neteasecloudmusicapi.vercel.app/#/
1.2 解压安装依赖并部署
安装依赖:npm install
部署项目:node app.js
完成后会看到3000端口已启用
1.3 创建本地项目
create vue cloud-app
2. 编写项目
2.1 针对不同设备编写rem适配
在/public/js编写rem.js文件
function remSize(){
    // 获取设备宽度
    var deviceWidth = document.documentElement.clientWidth || window.innerWidth
    if(deviceWidth >= 750){
        deviceWidth = 750
    }
    if(deviceWidth <= 320){
        deviceWidth = 320
    }
    // 750px-->1rem=100px,350px-->1rm=50px
    document.documentElement.style.fontSize = (deviceWidth/7.5) + 'px'
    // 字体大小15px
    document.querySelector('body').style.fontSize = 0.3 + "rem"
}
remSize()
// 当窗口发生变化调用进行适配
window.onresize=function(){
    remSize()
}
引入index.html适配–>
<!DOCTYPE html>
<html lang="">
  <head>
    <meta charset="utf-8">
    <meta http-equiv="X-UA-Compatible" content="IE=edge">
    <meta name="viewport" content="width=device-width,initial-scale=1.0">
    <link rel="icon" href="<%= BASE_URL %>favicon.ico">
    <title><%= htmlWebpackPlugin.options.title %></title>
  </head>
  <body>
    <noscript>
      <strong>We're sorry but <%= htmlWebpackPlugin.options.title %> doesn't work properly without JavaScript enabled. Please enable it to continue.</strong>
    </noscript>
    <div id="app"></div>
    <script src="<%= BASE_URL %>js/rem.js"></script>
    <!-- built files will be auto injected -->
  </body>
</html>
2.2 首页布局
(思想:拆分首页为一个个组件进行组件化开发)
2.2.1 准备工作
1 引入icon图标库,放到index.html
//at.alicdn.com/t/font_3157290_rizszwyrvya.js
<!DOCTYPE html>
<html lang="">
  <head>
    <meta charset="utf-8">
    <meta http-equiv="X-UA-Compatible" content="IE=edge">
    <meta name="viewport" content="width=device-width,initial-scale=1.0">
    <link rel="icon" href="<%= BASE_URL %>favicon.ico">
    <script src="//at.alicdn.com/t/font_3157290_rizszwyrvya.js"></script>
    <title><%= htmlWebpackPlugin.options.title %></title>
  </head>
  <body>
    <noscript>
      <strong>We're sorry but <%= htmlWebpackPlugin.options.title %> doesn't work properly without JavaScript enabled. Please enable it to continue.</strong>
    </noscript>
    <div id="app"></div>
    <script src="<%= BASE_URL %>js/rem.js"></script>
    <!-- built files will be auto injected -->
  </body>
</html>
2 有色图标的引用需要使用symbol引用
在/views/home.vue中
<svg class="icon" aria-hidden="true">
  <use xlink:href="#icon-xxx"></use>
</svg>
<template>
  <div class="home">
    <svg class="icon" aria-hidden="true">
      <use xlink:href="#icon-xxx"></use>
    </svg>
  </div>
</template>

<script>
// @ is an alias to /src

export default {
  name: 'Home',
  components: {

  }
}
</script>
3 各式图标
菜单 #icon-31liebiao
搜索 #icon-sousuo
每日推荐 #icon-tuijian
私人FM #icon-zhibo
歌单 #icon-gedan
排行榜 #icon-paihangbang
播放量 #icon-24gl-play
左箭头 #icon-zuojiantou
右箭头 #icon-youjiantou
分享 #icon-fenxiang
播放 #icon-bofanganniu
暂停 #icon-weibiaoti–
歌单 #icon-zu
爱心 #icon-aixin
下载 #icon-iconfontzhizuobiaozhun023146
唱片 #icon-yinlechangpian
评论区 #icon-iconfontzhizuobiaozhun023110
循环方式 #icon-liebiao-
循环 #icon-xunhuan
上一首 #icon-shangyishoushangyige
播放 #icon-bofang1
下一首 #icon-xiayigexiayishou
暂停 #icon-zanting
4 调整全局格式
/src/App.vue 设置全局盒子大小和图标宽高
顺手下载cssrem插件方便展示px(并设置默认rem为50)
<template>
  <router-view/>
</template>

<style lang="less">
* {
  margin: 0;
  padding: 0;
  box-sizing: border-box;// 怪异模式则相当于将盒子的大小固定好,再将内容装入盒子。盒子的大小并不会被 padding 所撑开
}
.icon{
  // svg引入必须通过宽高设置
  width: .5rem;
  height: .5rem;
}
</style>
5 引入vant组件库
1 安装依赖
https://vant-contrib.gitee.io/vant/#/zh-CN
安装vue3 版本
npm i vant
安装组件
npm i babel-plugin-import -D
babel.config.js 中添加配置–>plugins…
module.exports = {
  presets: [
    '@vue/cli-plugin-babel/preset'
  ],
  "plugins": [
    [
      "import",
      {
        "libraryName": "vant",
        "libraryDirectory": "es",
        "style": true
      }
    ]
  ]
}
2 示例
如引入button按钮样式需更改main.js并重启项目
import { createApp } from 'vue'
import App from './App.vue'
import router from './router'
import store from './store'
import { Button } from 'vant';

const app = createApp(App)
app.use(Button)
app.use(store)
app.use(router).mount('#app')
示例:新建一个SwpierTop.vue进行体验,需到Home.vue进行组件注册
<template>
  <van-button type="primary">主要按钮</van-button>
  <van-button type="success">成功按钮</van-button>
  <van-button type="default">默认按钮</van-button>
  <van-button type="warning">警告按钮</van-button>
  <van-button type="danger">危险按钮</van-button>
</template>
5 创建插件进行组建的统一管理
为方便管理,在/src下编写一个/plugins/index.js插件
通过getVant函数对需要app.use组件的参数进行传递,在需要添加组件时只需王index.js添加即可
index.js编写
import { Swipe, SwipeItem, Button } from 'vant'
// 将引入的组件放入数组,方便app.use循环获得数组里的组件名称
let plugins = [
	Swipe, SwipeItem, Button
]
// 函数传参并导出
export default function getVant(app){
	plugins.forEach((item)=>{
		return app.use(item)
	})
}
main.js使用
import { createApp } from 'vue'
import App from './App.vue'
import router from './router'
import store from './store'
import getVant from './plugins'

const app = createApp(App)
getVant(app)
app.use(store)
app.use(router).mount('#app')
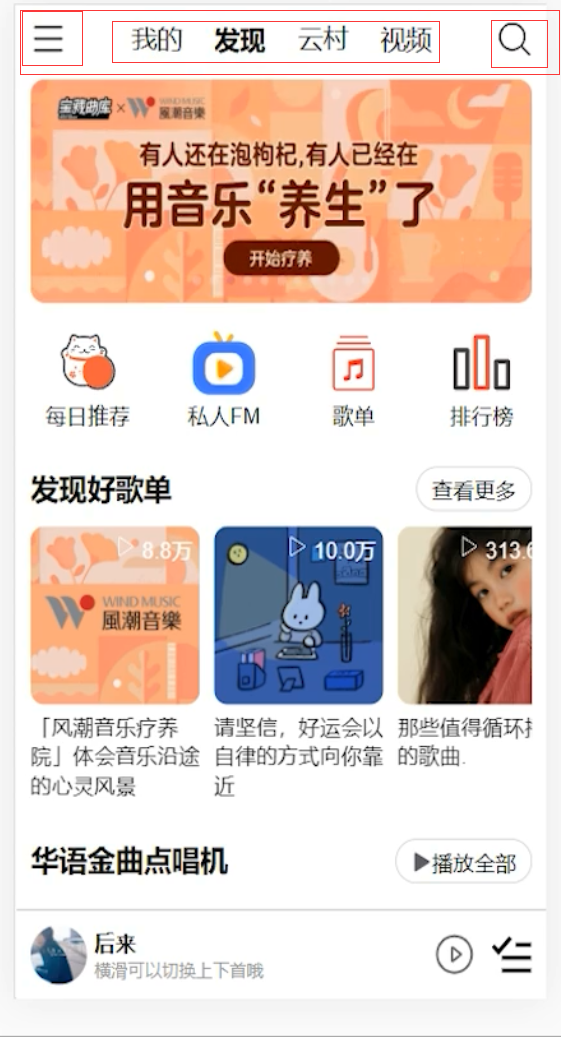
2.2.2 首页头部导航组件TopNav.vue
1 组件分析
components新建home文件夹 在其中新建头部组件TopNav.vue
在头部组件中可以继续细分成两个小组件
2 引入组件至Home.vue
<template>
  <TopNav/>
</template>
<script>
// @ is an alias to /src
import TopNav from '@/components/home/TopNav.vue'
export default {
  name: 'Home',
  components: {
    TopNav,
  }
}
</script>
3 TopNav.vue编写
<template>
  <div class="topNav">
    <div class="topLeft">
      <svg class="icon"
           aria-hidden="true">
        <use xlink:href="#icon-31liebiao"></use>
      </svg>
    </div>

    <div class="topContent">
      <span>我的</span>
      <span class="active">发现</span>
      <span>云村</span>
      <span>视频</span>
    </div>

    <div class="topRight">
      <svg class="icon"
           aria-hidden="true">
        <use xlink:href="#icon-sousuo"></use>
      </svg>
    </div>
  </div>
</template>

<style lang="less" scoped>
.topNav {
  width: 100%;
  height: 1rem;
  padding: 0.2rem;
  display: flex;
  justify-content: space-between; // 均匀排列每个元素首个元素放置于起点,末尾元素放置于终点
  align-items: center;
  .topContent {
    width: 65%;
    height: 100%;
    display: flex;
    justify-content: space-around; // 均匀排列每个元素每个元素周围分配相同的空间
    // align-items: center;
    font-size: 0.36rem;
    .active {
      font-weight: 900;
    }
  }
}
</style>
2.2.3 首页轮播图组件SwpierTop.vue
1 编写SwpierTop.vue懒加载轮播图组件组件
<template>
  <div id="swiperTop">
    <van-swipe :autoplay="3000"
               lazy-render>
      <van-swipe-item v-for="image in images"
                      :key="image">
        <img :src="image" />
      </van-swipe-item>
    </van-swipe>
  </div>
</template>
<script>
export default {
  setup () {
    const images = [
      'https://img.yzcdn.cn/vant/apple-1.jpg',
      'https://img.yzcdn.cn/vant/apple-2.jpg',
    ];
    return { images };
  },
};
</script>
<style lang="less">
#swiperTop {
  .van-swipe {
    width: 100%;
    height: 3rem;
    .van-swipe-item {
      padding: 0 0.2rem;
      img {
        width: 100%;
        height: 100%;
        border-radius: 0.2rem;
      }
    }
    .van-swipe__indicator--active {
      background-color: rgb(219, 130, 130);
    }
  }
}
</style>
2 引入axios以获取数据
npm i axios
浅尝axios获取数据 并利用onMounted生命周期钩子和 reactive修改images为响应式获取数据
<template>
  <div id="swiperTop">
    <van-swipe :autoplay="3000"
               lazy-render>
      <van-swipe-item v-for="image in state.images"
                      :key="image">
        <img :src="image.pic" /> // 获取state对象中的pic路径
      </van-swipe-item>
    </van-swipe>
  </div>
</template>
<script>
import axios from 'axios'
import { reactive, onMounted } from 'vue'// 生命周期钩子 reactive修改images为响应式获取数据
export default {
  setup () {
    const state = reactive({ // 新建一个对象
      images: [
        'https://img.yzcdn.cn/vant/apple-1.jpg',
        'https://img.yzcdn.cn/vant/apple-2.jpg',
      ]
    });
    onMounted(() => {
      axios.get('http://localhost:3000/banner?type=2').then((res) => {
        console.log(res);
        state.images = res.data.banners // 给images赋值
				console.log(state.images);
      })
    })
    return { state };
  },
};
</script>
<style lang="less">
#swiperTop {
  .van-swipe {
    width: 100%;
    height: 3rem;
    .van-swipe-item {
      padding: 0 0.2rem;
      img {
        width: 100%;
        height: 100%;
        border-radius: 0.2rem;
      }
    }
    .van-swipe__indicator--active {
      background-color: rgb(219, 130, 130);
    }
  }
}
</style>
3 封装axios请求
总请求地址 /src/request/index.js
import axios from "axios";
let service = axios.create({
	baseURL:"http://localhost:3000/",
	timeout:"5000"
})
export default service
home页面请求实例 /src/request/api/home.js
import service from "..";
// 获取首页轮播图数据
export function getBanner(){
	return service({
		method:"GET",
		url:"/banner?type=2"
	})
}
4 在SwpierTop.vue中使用vue3的方式调用封装好的getBanner()进行请求
...
import { getBanner } from '../../request/api/home';
...
 onMounted(async () => {
  // axios.get('http://localhost:3000/banner?type=2').then((res) => {
  //   console.log(res);
  //   state.images = res.data.banners // 给images赋值
  //   console.log(state.images);
  // })
  let res = await getBanner() // 等待数据返回
  state.images = res.data.banners // 给images赋值
  console.log(res)
})
...
2.2.4 首页图标列表组件IconList.vue
1 编写IconList.vue图标组件
<template>
  <div class="iconList">
    <div class="iconItem">
      <svg class="icon"
           aria-hidden="true">
        <use xlink:href="#icon-tuijian"></use>
      </svg>
      <span>每日推荐</span>
    </div>
    <div class="iconItem">
      <svg class="icon"
           aria-hidden="true">
        <use xlink:href="#icon-zhibo"></use>
      </svg>
      <span>私人FM</span>
    </div>
    <div class="iconItem">
      <svg class="icon"
           aria-hidden="true">
        <use xlink:href="#icon-gedan"></use>
      </svg>
      <span>歌单</span>
    </div>
    <div class="iconItem">
      <svg class="icon"
           aria-hidden="true">
        <use xlink:href="#icon-paihangbang"></use>
      </svg>
      <span>排行榜</span>
    </div>
  </div>
</template>
<style lang="less" scoped>
.iconList {
  width: 100%;
  height: 2rem;
  margin-top: 0.2rem;
  display: flex;
  justify-content: space-around;
  align-items: center;
  .iconItem {
    width: 25%;
    height: 100%;
    display: flex;
    flex-direction: column;
    align-items: center;
    .icon {
      width: 1rem;
      height: 1rem;
    }
  }
}
</style>
2 将组件放入home.vue
2.2.5 发现歌单组件MusicList.vue
1 编写MusicList.vue发现歌单组件
<template>
  <div class="musicList">
    <div class="musicTop">
      <div class="title">发现好歌单</div>
      <div class="more">查看更多</div>
    </div>
  </div>
</template>
<script>
export default {

}
</script>
<style lang="less" scoped>
.musicList{
	widows: 100%;
	height: 5rem;
	padding: 0.2rem;
	.musicTop{
		width: 100%;
		height: 0.6rem;
		display: flex;
		justify-content: space-between;
		margin-bottom: 0.2rem;
		.title{
			font-size: 0.4rem;
			font-weight: 900;
		}
		.more{
			border: 1px solid #ccc;
			text-align: center;
			line-height: 0.6rem;
			padding: 0 0.2rem;
			border-radius: 0.4rem;
		}
	}
}
</style>
2 封装获取歌单请求/request/api/index.js
// 获取发现歌单数据
export function getMusicList(){
	return service({
		method:"GET",
		url:"/personalized?limit=10"
	})
}
3 在MusicList.vue使用vue2的方式调用封装好的getMusicList()进行请求
...
<script>
import { getMusicList } from '@/request/api/home'
export default {
  data () {
    return {
      musicList: []
    }
  },
  methods: {
    async getMusicList () {
      let res = await getMusicList()
      console.log(res)
    }
  },
  mounted () {
		this.getMusicList()
  }
}
</script>
...
4 需要对获取到的数据采用轮播图懒加载的自定义滑块形式展示的样式进行编写
<template>
  <div class="musicList">
    <div class="musicTop">
      <div class="title">发现好歌单</div>
      <div class="more">查看更多</div>
    </div>
    <div class="musicContent">
      <van-swipe :loop="false"
                 :width="130"
                 class="my-swpier"
                 :show-indicators="false">
        <!-- 去掉指示器圆圈 -->
        <van-swipe-item v-for="item in musicList"
                        :key="item">
          <!-- 利用musicList对展示进行循环赋值 -->
          <img :src="item.picUrl"
               alt="" />
          <span class="playCount">
            <svg class="icon"
                 aria-hidden="true">
              <use xlink:href="#icon-24gl-play"></use>
            </svg>
            {{changeCount(item.playCount)}}
          </span>
          <span class="name">
            {{item.name}}
          </span>
        </van-swipe-item>
      </van-swipe>
    </div>
  </div>
</template>
<script>
import { getMusicList } from '@/request/api/home'
export default {
  data () {
    return {
      musicList: []
    }
  },
  methods: {
    async getMusicList () {
      let res = await getMusicList()
      console.log(res)
      this.musicList = res.data.result
    },
    changeCount: function (num) {
      // 处理大于num播放量并返回一位小数再加上单位,使用时用函数将参数包裹即可
      if (num >= 100000000) {
        return (num / 100000000).toFixed(1) + "亿"
      } else if (num >= 10000) {
        return (num / 10000).toFixed(1) + "万"
      }
    }
  },
  mounted () {
    this.getMusicList()
  }
}
</script>
<style lang="less" scoped>
.musicList {
  widows: 100%;
  height: 5rem;
  padding: 0.2rem;
  .musicTop {
    width: 100%;
    height: 0.6rem;
    display: flex;
    justify-content: space-between;
    margin-bottom: 0.2rem;
    .title {
      font-size: 0.4rem;
      font-weight: 900;
    }
    .more {
      border: 1px solid #ccc;
      text-align: center;
      line-height: 0.6rem;
      padding: 0 0.2rem;
      border-radius: 0.4rem;
    }
  }
  .musicContent {
    width: 100%;
    height: 5rem;
    padding: 0.2rem;
    .van-swipe-item {
      //   margin-right: 0.14rem;
      padding-right: 0.2rem;
      position: relative;
      height: 3.8rem;
      img {
        width: 100%;
        height: 2.4rem;
        border-radius: 0.2rem;
        //   position: absolute;
      }
      .playCount {
        position: absolute;
        z-index: 100;
        right: 0.3rem;
        color: white;
        margin-top: 0.06rem;
        .icon {
          width: 0.3rem;
          height: 0.3rem;
        }
      }
      .name {
        //   position: absolute;
        bottom: 0px;
      }
    }
  }
}
</style>
5 在MusicList.vue改为vue3的方式进行编写
<template>
  <div class="musicList">
    <div class="musicTop">
      <div class="title">发现好歌单</div>
      <div class="more">查看更多</div>
    </div>
    <div class="musicContent">
      <van-swipe :loop="false"
                 :width="130"
                 class="my-swpier"
                 :show-indicators="false">
        <!-- 去掉指示器圆圈 -->
        <van-swipe-item v-for="item in state.musicList"
                        :key="item">
          <!-- 利用musicList对展示进行循环赋值 -->
          <img :src="item.picUrl"
               alt="" />
          <span class="playCount">
            <svg class="icon"
                 aria-hidden="true">
              <use xlink:href="#icon-24gl-play"></use>
            </svg>
            {{changeCount(item.playCount)}}
          </span>
          <span class="name">
            {{item.name}}
          </span>
        </van-swipe-item>
      </van-swipe>
    </div>
  </div>
</template>
<script>
import { getMusicList } from '@/request/api/home'
import { reactive, onMounted } from 'vue'
export default {
  setup () {
    const state = reactive({
      musicList: []
    })
    function changeCount (num) {
      // 处理大于num播放量并返回一位小数再加上单位,使用时用函数将参数包裹即可
      if (num >= 100000000) {
        return (num / 100000000).toFixed(1) + "亿"
      } else if (num >= 10000) {
        return (num / 10000).toFixed(1) + "万"
      }
    }
    onMounted(async () => {
      let res = await getMusicList()
      console.log(res)
      state.musicList = res.data.result
    })
    return { state, changeCount }
  }
}
</script>
...
2.3 歌单详情页ItemMusic.vue
2.3.1 编写发现歌单组件跳转后显示的ItemMusic.vue歌单详情页面
<template>
	<div>
		歌单详情页
	</div>
</template>
2.3.2 在/src/router/index.js中新增路由
...
{
    path: '/itemMusic',
    name: 'ItemMusic',
    component: () => import(/* webpackChunkName: "ItemMusic" */ '../views/ItemMusic.vue')
}
...
2.3.3 在首页歌单推荐栏的轮播图循环处添加路由跳转并携带参数
...
<van-swipe-item v-for="item in state.musicList"
                        :key="item">
      <router-link :to="{path:'/itemMusic',query:{id:item.id}}">
        <!-- 利用musicList对展示进行循环赋值 -->
        <img :src="item.picUrl"
             alt="" />
        <span class="playCount">
          <svg class="icon"
               aria-hidden="true">
            <use xlink:href="#icon-24gl-play"></use>
          </svg>
          {{changeCount(item.playCount)}}
        </span>
        <span class="name">
          {{item.name}}
        </span>
      </router-link>
    </van-swipe-item>
</van-swipe>
...
因为加了路由链接所以歌单推荐字体变成蓝色,需要在App.vue中配置样式
a {
  color: black;
}
2.3.4 在ItemMusic.vue歌单详情页面接收参数
通过useRoute方法中获取到的query对象中的value属性的id
<template>
  <div>
    歌单详情页
  </div>
</template>
<script>
import { useRoute } from 'vue-router'
import { onMounted } from 'vue'
export default {
  setup () {
    onMounted(() => {
      let id = useRoute().query.id
      console.log(id)
    })
  }
}
</script>
2.3.5 在/src/request/api中新建item.js封装新的axios请求
import service from "..";

// 获取歌单详情页头部数据
export function getMusicItemTop(data){
	return service({
		method:"GET",
		url:`/playlist/detail?id=${data}`
	})
}
2.3.6 ItemMusic.vue引用封装好的请求并返回的获取的数据
<template>
  <div>
    歌单详情页
  </div>
</template>
<script>
import { useRoute } from 'vue-router'
import { onMounted, reactive } from 'vue'
import { getMusicItemTop } from '@/request/api/item.js'
export default {
  setup () {
    const state = reactive({
      playlist: {}
    })
    onMounted(async () => {
      let id = useRoute().query.id
      console.log(id)
      let res = await getMusicItemTop(id)
      console.log(res)
      state.playlist = res.data.playlist
    })
    return { state }
  }
}
</script>
2.3.7 新建一个/src/components/item/ItemMusicTop.vue歌单详情页组件页
ItemMusic.vue共为两个子组件
1 歌单详情页头部ItemMusicTop.vue
将ItemMusicTop.vue作为子组件引入ItemMusic.vue,并将playlist作为参数传入子组件,子组件进行接收使用
<template>
  <div class="itemMusicTop">
    <img :src="playlist.coverImgUrl"
         alt=""
         class="bimg">
    <div class="itemLeft">
      <svg class="icon"
           aria-hidden="true"
           @click="$router.go(-1)">
        <!-- 路由返回上一级 -->
        <use xlink:href="#icon-zuojiantou"></use>
      </svg>
      <span>歌单</span>
    </div>
    <div class="itemRight">
      <svg class="icon"
           aria-hidden="true">
        <use xlink:href="#icon-sousuo"></use>
      </svg>
      <svg class="icon"
           aria-hidden="true">
        <use xlink:href="#icon-31liebiao"></use>
      </svg>
    </div>
  </div>
  <div class="itemTopContent">
    <div class="contentLeft">
      <img :src="playlist.coverImgUrl"
           alt="" />
      <div class="palyCount">
        <svg class="icon"
             aria-hidden="true">
          <use xlink:href="#icon-gl-play-copy"></use>
        </svg>
        <span>{{ changeCount(playlist.playCount) }}</span>
      </div>
    </div>
    <div class="contentRight">
      <p class="rightP_one">{{ playlist.name }}</p>
      <div class="right_img">
        <img :src="playlist.creator.backgroundUrl"
             alt="" />
        <span>{{ playlist.creator.nickname }}</span>
        <svg class="icon"
             aria-hidden="true">
          <use xlink:href="#icon-youjiantou"></use>
        </svg>
      </div>
      <p class="rightP_two">
        <span>{{ playlist.description }}</span>
        <svg class="icon"
             aria-hidden="true">
          <use xlink:href="#icon-youjiantou"></use>
        </svg>
      </p>
    </div>
  </div>
  <div class="itemTopFooter">
    <div class="footerItem">
      <svg class="icon"
           aria-hidden="true">
        <use xlink:href="#icon-iconfontzhizuobiaozhun023110"></use>
      </svg>
      <span>{{ playlist.commentCount }}</span>
    </div>
    <div class="footerItem">
      <svg class="icon"
           aria-hidden="true">
        <use xlink:href="#icon-fenxiang"></use>
      </svg>
      <span>{{ playlist.shareCount }}</span>
    </div>
    <div class="footerItem">
      <svg class="icon"
           aria-hidden="true">
        <use xlink:href="#icon-iconfontzhizuobiaozhun023146"></use>
      </svg>
      <span>下载</span>
    </div>
    <div class="footerItem">
      <svg class="icon"
           aria-hidden="true">
        <use xlink:href="#icon-show_duoxuan"></use>
      </svg>
      <span>多选</span>
    </div>
  </div>
</template>
<script>
export default {
  setup (props) {
    // console.log(props);
    // 通过props进行传值,判断如果数据拿不到,就获取sessionStorage中的
    props.playlist.creator = ""

    // 对播放量的处理
    function changeCount (num) {
      if (num >= 100000000) {
        return (num / 100000000).toFixed(1) + "亿";
      } else if (num >= 10000) {
        return (num / 10000).toFixed(1) + "万";
      }
    }
    return { changeCount }
  },
  props: ['playlist']
}
</script>
<style lang="less" scoped>
.itemMusicTop {
  width: 100%;
  height: 1rem;
  display: flex;
  justify-content: space-between;
  align-items: center;
  // padding: 0.2rem;
  position: relative;
  .itemLeft,
  .itemRight {
    width: 25%;
    height: 100%;
    display: flex;
    justify-content: space-between;
    align-items: center;
    margin: 0 0.2rem;
    span {
      font-size: 0.4rem;
      color: white;
    }
    .icon {
      fill: white; // 填充图标为白色
    }
  }
  .bimg {
    width: 100%;
    height: 11rem;
    position: fixed;
    z-index: -1; // 降一层
    filter: blur(0.4rem); // 虚化
  }
}
.itemTopContent {
  width: 100%;
  height: 3rem;
  padding: 0.2rem;
  margin-top: 0.4rem;
  display: flex;
  justify-content: space-between;
  .contentLeft {
    width: 36%;
    height: 2.6rem;
    position: relative;

    img {
      width: 2.6rem;
      height: 2.6rem;
      border-radius: 0.2rem;
      position: absolute;
      z-index: -1;
    }
    .palyCount {
      position: absolute;
      right: 0.1rem;
      margin-top: 0.1rem;
      .icon {
        width: 0.26rem;
        height: 0.26rem;
        margin-top: -0.02rem;
        vertical-align: middle;
      }
      span {
        font-size: 0.26rem;
        color: #fff;
      }
    }
  }
  .contentRight {
    width: 60%;
    height: 2.6rem;
    display: flex;
    flex-direction: column;
    justify-content: space-between;
    .rightP_one {
      font-size: 0.3rem;
      font-weight: 900;
      color: #fff;
      font-family: '微软雅黑';
    }
    .right_img {
      width: 100%;
      height: 0.6rem;
      line-height: 0.6rem;
      color: #ccc;
      img {
        width: 0.6rem;
        height: 0.6rem;
        border-radius: 50%;
        vertical-align: middle;
      }
      span {
        margin-left: 0.1rem;
      }
      .icon {
        width: 0.26rem;
        height: 0.26rem;
        margin-top: -0.08rem;
        vertical-align: middle;
      }
    }
    .rightP_two {
      width: 100%;
      height: 0.6rem;
      display: flex;
      align-items: center;
      justify-content: space-between;
      span {
        display: inline-block;
        width: 95%;
        height: 100%;
        overflow: hidden;
        text-overflow: ellipsis;
        display: -webkit-box;
        -webkit-line-clamp: 2;
        -webkit-box-orient: vertical;
        font-size: 0.24rem;
        color: #ccc;
      }
      .icon {
        width: 0.24rem;
        height: 0.24rem;
      }
    }
  }
}
.itemTopFooter {
  width: 100%;
  height: 1.4rem;
  display: flex;
  justify-content: space-around;
  margin-top: 0.2rem;
  .footerItem {
    display: flex;
    flex-direction: column;
    align-items: center;
    color: #fff;
    .icon {
      fill: #fff;
    }
    span {
      margin-top: 0.1rem;
    }
  }
}
</style>
为了防止刷新导致的数据丢失,可以将数据存储在浏览器的sessionStorage
ItemMusic.vue↓
...
onMounted(async () => {
let id = useRoute().query.id
console.log(id)
let res = await getMusicItemTop(id)
console.log(res)
state.playlist = res.data.playlist
	// 为了防止刷新导致的数据丢失,可以将数据存储在浏览器的sessionStorage
	sessionStorage.setItem('itemDetail', JSON.stringify(state))
})
...
ItemMusicTop↓
...
setup (props) {
    // console.log(props);
    // 通过props进行传值,判断如果数据拿不到,就获取sessionStorage中的,由于作者信息层级较深,可以先行从sessionStorage中获取
    if (props.playlist.creator = "") {
			props.playlist.creator = JSON.parse(sessionStorage.getItem().playlist).creator
    }
...
2 歌单详情页歌单列表ItemMusciList.vue
将ItemMusciList.vue作为子组件加入ItemMusci.vue,并未它新增一个axios请求
// 获取歌单详情页歌曲数据
export function getMusicItemList(data){
	return service({
		method:"GET",
		url:`/playlist/track/all?id=${data}&limit=20&offset=0`
	})
}
在ItemMusci.vue引用封装好的方法获取歌单页歌曲信息并通过路由传递给ItemMusciList.vue
针对收藏量需要额外从歌曲详情数据playlist传递一个subscribedCount到ItemMusciList.vue
<template>
  <ItemMusicTop :playlist="state.playlist" />
  <ItemMusicList :itemList="state.itemList"
                 :subscribedCount="state.playlist.subscribedCount" />
</template>
<script>
import { useRoute } from 'vue-router'
import { onMounted, reactive } from 'vue'
import { getMusicItemTop, getMusicItemList } from '@/request/api/item.js'
import ItemMusicTop from '@/components/item/ItemMusicTop.vue'
import ItemMusicList from '@/components/item/ItemMusicList.vue'
export default {
  setup () {
    const state = reactive({
      playlist: {}, // 歌单信息
      itemList: []	// 歌曲信息
    })
    onMounted(async () => {
      let id = useRoute().query.id
      console.log(id)
      // 获取歌单头部数据
      let res = await getMusicItemTop(id)
      console.log(res)
      state.playlist = res.data.playlist
      // 获取歌单歌曲数据
      let resList = await getMusicItemList(id)
      console.log(resList)
      state.itemList = resList.data.songs
      // 为了防止刷新导致的数据丢失,可以将数据存储在浏览器的sessionStorage
      sessionStorage.setItem('itemDetail', JSON.stringify(state))
    })
    return { state }
  },
  components: {
    ItemMusicTop,
    ItemMusicList
  }
}
</script>
在ItemMusciList.vue接收ItemMusci.vue传递的参数
由于作者可能为多人,所以需要判断并循环;mv条件是不为0便显示图标;收藏信息是来自传递来的subscribedCount歌单详情信息对象而不是歌曲信息对象
<template>
  <div class="itemMusicList">
    <div class="itemListTop">
      <div class="listLeft">
        <svg class="icon"
             aria-hidden="true">
          <use xlink:href="#icon-bofanganniu"></use>
        </svg>
        <span>播放全部<span>(共{{ itemList.length }}首)</span></span>
      </div>
      <div class="listRight">
        <svg class="icon"
             aria-hidden="true">
          <use xlink:href="#icon-jiahao"></use>
        </svg>
        <span>收藏({{ subscribedCount }})</span>
      </div>
    </div>
    <div class="itemList">
      <div class="item"
           v-for="(item, i) in itemList"
           :key="i">
        <div class="itemLeft"
             @click="playMusic(i)">
          <span class="leftSpan">{{ i + 1 }}</span>
          <div>
            <p>{{ item.name }}</p>
            <span v-for="(item1, index) in item.ar"
                  :key="index">{{
              item1.name
            }}</span>
          </div>
        </div>
        <div class="itemRight">
          <svg class="icon bofang"
               aria-hidden="true"
               v-if='item.mv !=0'>
            <use xlink:href="#icon-shipin"></use>
          </svg>
          <svg class="icon liebiao"
               aria-hidden="true">
            <use xlink:href="#icon-31liebiao"></use>
          </svg>
        </div>
      </div>
    </div>
  </div>
</template>
<script>
import { mapMutations } from 'vuex';
export default {
  setup (props) {
    console.log(props);
  },
  props: ["itemList", "subscribedCount"],
  methods: {
    playMusic: function (i) {
      this.updatePlayList(this.itemList)
      this.updatePlayListIndex(i)
    },
    ...mapMutations(['updatePlayList', 'updatePlayListIndex'])
  }
};
</script>
<style lang="less" scoped>
.itemMusicList {
  width: 100%;
  height: 10rem;
  background-color: #fff;
  padding: 0 0.2rem;
  margin-top: 0.2rem;
  border-top-left-radius: 0.4rem;
  border-top-right-radius: 0.4rem;
  .itemListTop {
    width: 100%;
    height: 1rem;
    display: flex;
    justify-content: space-between;
    align-items: center;
    .listLeft {
      width: 3rem;
      height: 100%;
      display: flex;
      justify-content: space-between;
      align-items: center;
      .icon {
        stroke: #333333;
        stroke-width: 20;
      }
      span {
        font-weight: 700;
        span {
          font-weight: 400;
          font-size: 0.24rem;
          color: #999;
        }
      }
    }
    .listRight {
      display: flex;
      align-items: center;
      background-color: red;
      padding: 0.2rem;
      border-radius: 0.4rem;
      color: #fff;
      .icon {
        width: 0.3rem;
        height: 0.3rem;
        fill: #fff;
        margin-right: 0.1rem;
        stroke: #fff;
        stroke-width: 50;
      }
    }
  }
  .itemList {
    width: 100%;
    .item {
      width: 100%;
      height: 1.4rem;
      display: flex;
      justify-content: space-between;
      align-items: center;
      .itemLeft {
        width: 85%;
        height: 100%;
        display: flex;
        align-items: center;
        .leftSpan {
          display: inline-block;
          width: 0.2rem;
          text-align: center;
        }
        div {
          p {
            width: 4.54rem;
            height: 0.4rem;
            overflow: hidden;
            text-overflow: ellipsis;
            white-space: nowrap;
            font-weight: 700;
          }
          span {
            font-weight: 400;
            font-size: 0.24rem;
            color: #999;
          }
          margin-left: 0.3rem;
        }
      }
      .itemRight {
        width: 20%;
        height: 100%;
        display: flex;
        // justify-content: space-between;
        align-items: center;
        position: relative;
        .icon {
          fill: #999;
        }
        .bofang {
          position: absolute;
          left: 0;
        }
        .liebiao {
          position: absolute;
          right: 0;
        }
      }
    }
  }
}
</style>
2.4 全局底部组件(播放歌曲)FooterMusic.vue
2.4.1 初步编辑FooterMusic.vue并添加进App.vue
<template>
  <div class="footMusic">

  </div>
</template>
<style lang="less" scoped>
.footMusic {
  width: 100%;
  height: 1.4rem;
  border-color: white;
  position: fixed;
	z-index: 11;
  bottom: 0;
  border-top: 0.02rem solid #999;
}
</style>
<template>
  <router-view />
  <FooterMusic />
</template>
<script>
import FooterMusic from '@/components/item/FooterMusic.vue'
export default {
  components:{
    FooterMusic
  }
}
</script>
2.4.2 组件播放列表播放的歌曲信息需要存储到vuex中的store中,并定义一个默认歌曲数组和默认歌曲数组下标
歌曲信息的id与全局底部组件获取其他歌曲接口id非同一项
import { createStore } from 'vuex'

export default createStore({
  state: {
    // 播放列表
     playList: [{
      // 在未选中歌曲传递到这个播放列表时的默认值
      al:{
        id: 143304781,
        name: "分分钟需要你",
        pic: 109951167277371040,
        picUrl: "https://p2.music.126.net/87RxesqmAtpiMsLYwa65sA==/109951167277371038.jpg",
        pic_str: "109951167277371038"
      },
      // 通过这个id传递给播放音乐接口播放音乐
      id: 1937096193,
      name: "分分钟需要你"
    }],
    playListIndex: 0, // 默认数组下标
  },
  mutations: {
  },
  actions: {
  },
  modules: {
  }
})
2.4.3 FooterMusic.vue将从store取出的数据进行按钮和歌曲信息的初步渲染与样式编辑
<template>
  <div class="footerMusic">
    <div class="footerLeft ">
      <!--歌曲详细信息都在store传递的playList的al对象中,并使用playListIndex作为下标区分不同的歌曲-->
      <img :src="playList[playListIndex].al.picUrl"
           alt="">
      <div>
      <!--<p>{{playList[playListIndex].al.name}}</p> 如果取得是al数组当中的name,会导致歌曲名称错误-->
        <p>{{playList[playListIndex].name}}</p>
        <span>横滑可以切换上下首</span>
      </div>
    </div>
    <div class="footerRight">
      <svg class="icon"
           aria-hidden="true">
        <use xlink:href="#icon-bofanganniu"></use>
      </svg>
      <svg class="icon"
           aria-hidden="true">
        <use xlink:href="#icon-zu"></use>
      </svg>
    </div>
  </div>
</template>
<script>
import { mapState } from 'vuex'
export default {
  computed: {
    // 利用辅助函数解构vuex中存储的数据
    ...mapState(['playList', 'playListIndex'])
  }
}
</script>
<style lang="less" scoped>
.footerMusic {
  width: 100%;
  height: 1.4rem;
  background-color: #fff;
  position: fixed;
  bottom: 0;
  border-top: 1px solid #999;
  display: flex;
  padding: 0.2rem;
  justify-content: space-between;
  .footerLeft {
    width: 60%;
    height: 100%;
    display: flex;
    justify-content: space-around;
    align-items: center;
    img {
      width: 1rem;
      height: 1rem;
      border-radius: 50%;
    }
  }
  .footerRight {
    width: 20%;
    height: 100%;
    display: flex;
    justify-content: space-between;
    align-items: center;
    .icon {
      width: 0.6rem;
      height: 0.6rem;
    }
  }
}
</style>
2.4.4 全局底部组件FooterMusic.vu音乐播放功能
1 利用ref父传子的特性定义一个ref给播放svg图像调用
<audio ref="audio"
           :src="` https://music.163.com/song/media/outer/url?id=${playList[playListIndex].id}.mp3`"></audio>
打印查看确实获取了audio中歌曲对象的详细属性,利用其中的paused和play属性实现播放和暂停
mounted(){
    console.log(this.$refs)
  }
2 定义一个调用audio中play播放属性的函数并放入svg调用
<svg class="icon"
       aria-hidden="true">
    <use xlink:href="#icon-bofanganniu" @click="play"></use>
</svg>
...
 methods: {
    play: function () {
      this.$refs.audio.play()
    }
}
3 在点击播放图标后需要切换播放图标为暂停图标,所以需要在全局store中定义一个布尔值,并在mutations定义一个方法根据点击按钮时传递的值改变按钮状态
state:{
    ...
    isPlay: true, // 播放按钮状态
}
mutations: {
    updateIsPlay:function(state, value){
      state.isPlay = value
    }
}
4 在全局底部组件FooterMusic.vue分别解构store定义的isPlay值与updateIsPlay方法
export default {
  computed: {
    // 利用辅助函数解构vuex中存储的数据
    ...mapState(['playList', 'playListIndex', 'isPlay'])
  },
  mounted () {
    console.log(this.$refs)
  },
  methods: {
    play: function () {
      // 判断音乐播放状态
      if (this.$refs.audio.paused) {
        this.$refs.audio.play()
        this.updateIsPlay(false)
      } else {
        this.$refs.audio.pause()
        this.updateIsPlay(true)
      }
    },
    ...mapMutations(['updateIsPlay'])
  }
}
5 在图标标签调用点击按钮后传递布尔值的方法的判断
<svg class="icon"
       aria-hidden="true"
       @click="play"
       v-if="isPlay">
    <use xlink:href="#icon-bofanganniu"></use>
</svg>
<svg class="icon"
       aria-hidden="true"
       @click="play"
       v-else>
    <use xlink:href="#icon-weibiaoti--"></use>
</svg>
<svg class="icon"
       aria-hidden="true">
    <use xlink:href="#icon-zu"></use>
</svg>
2.4.5 全局底部组件FooterMusic.vu根据点击歌单列表不同歌曲切换音乐
1 需要在store中更新获取整个歌单的歌曲列表playList数据和歌曲列表下标playListIndex属性
mutations: {
    ...
    updatePlayList:function(state, value){
      state.playList = value
      console.log(state.playList)
    },
    updatePlayListIndex:function(state, value){
      state.playListIndex = value
    }
},
2 在歌曲详情页的歌曲列表组件ItemMusicList进行操作
在歌曲列表组的左侧列表盒子添加点击方法进行传参,(i)便是歌单对应的下标
<div class="itemLeft"
             @click="playMusic(i)">
  <span class="leftSpan">{{ i + 1 }}</span>
  <div>
    <p>{{ item.name }}</p>
    <span v-for="(item1, index) in item.ar"
          :key="index">{{
      item1.name
    }}</span>
  </div>
</div>
定义传参与更新方法
methods: {
    playMusic: function (i) {
      this.updatePlayList(this.itemList)
      this.updatePlayListIndex(i)
    },
    ...mapMutations(['updatePlayList', 'updatePlayListIndex'])
}
3 在全局底部组件FooterMusic.vue中进行应对音乐列表发生改变的操作
监听歌曲列表下标playListIndex属性以便随之更改并自动播放歌曲
watch:{
    playListIndex:function(){
      // 监听歌曲列表下标playListIndex属性,如果前者发生更改便自动播放歌曲并根据歌曲状态更改播放图标
      this.$refs.audio.autoplay = true
      if(this.$refs.audio.paused){
        this.updateIsPlay(false)
      }
    },
    playList: function () {
      // 为防止进入新歌单点击第一首歌时由于获取的下标为零导致误判为同一首歌而产生的不自动播放第一首歌的情况
      // 可以根据获取当前播放状态是否为暂停,是的话便切换歌曲并更新图标
      if (this.isPlay) {
        this.$refs.audio.autoplay = true
        this.updateIsPlay(false)
      }
    }
}
2.5 歌词详情页组件MusicDetail.vue
2.5.1 导入vant弹出层组件Popup
利用vant弹出层的右侧弹出实现点击底部组件进入歌词详情页
放入/src/plugins/index.js即可
import { Swipe, SwipeItem, Button, Popup  } from 'vant'
// 将引入的组件放入数组,方便app.use循环获得数组里的组件名称
let plugins = [
	Swipe, SwipeItem, Button, Popup
]
// 函数传参并导出
export default function getVant(app){
	plugins.forEach((item)=>{
		return app.use(item)
	})
}
2.5.2 编辑点击弹出显示详情页detailShow相关
1 store中添加属性和方法,并在FooterMusic.vue解构-略
state: {
    ...
    detailShow: false // 详情页显示
},
mutations: {
    ...
    updateDetailShow:function(state) {
      state.detailShow = !state.detailShow
    }
},
2 在FooterMusic.vue的左侧组件添加点击弹出事件
<div class="footerLeft" @click="updateDetailShow">
      ...
</div>
3 在FooterMusic.vue的audio下添加弹出层
<van-popup v-model:show="detailShow"
               position="right"
               :style="{ height: '100%',width: '100%' }">
    内容
</van-popup>
2.5.3 歌词详情页组件MusicDetail.vue相关
1 新建歌词详情页组件MusicDetail.vue并引入注册FooterMusic.vue并传值
...
<van-popup v-model:show="detailShow"
               position="right"
               :style="{ height: '100%',width: '100%' }">
  <MusicDetail :musicList="playList[playListIndex]"/>
</van-popup>
...
import MusicDetail from '@/components/item/MusicDetail.vue'
...
components:{
    MusicDetail
}
2 在歌词详情页组件MusicDetail.vue接收参数初步实现样式
<template>
  <img :src="musicList.al.picUrl"
       alt=""
       class="bgimg">
  <div class="detailTop">
    <div class="detailTopLeft">
      <svg class="icon liebiao"
           aria-hidden="true">
        <use xlink:href="#icon-zuojiantou"></use>
      </svg>
      <div class="leftMarquee">
        <p>{{musicList.al.name}}</p>
        <span v-for="item in musicList.ar"
              :key="item">{{item.name}}</span>
        <svg class="icon"
             aria-hidden="true">
          <use xlink:href="#icon-youjiantou1"></use>
        </svg>
      </div>
    </div>
    <div class="detailTopRight">
      <svg class="icon"
           aria-hidden="true">
        <use xlink:href="#icon-fenxiang"></use>
      </svg>
    </div>
  </div>
</template>
<script>
export default {
  mounted () {
    console.log(this.musicList)
  },
  props: ['musicList']
}
</script>
<style lang="less" scoped>
.bgimg {
  width: 100%;
  height: 100%;
  position: absolute;
  z-index: -1;
  filter: blur(80px);
}
.detailTop {
  width: 100%;
  height: 1rem;
  display: flex;
  padding: 0.2rem;
  justify-content: space-between;
  align-items: center;
  fill: #fff;
  .detailTopLeft {
    display: flex;
    align-items: center;
    .leftMarquee {
      width: 3rem;
      height: 100%;
      margin-left: 0.4rem;
      span {
        color: #999;
      }
      .icon {
        width: 0.3rem;
        height: 0.3rem;
        fill: #999;
      }
    }
  }
}
</style>
3 头部箭头返回上一级
需要更改store存储的决定vant弹出层组件Popup的detailShow为true
在method中结构updateDetailShow方法,并在图标处点击事件继承方法即可
...
<svg class="icon liebiao"
           aria-hidden="true"
           @click="updateDetailShow">
    <use xlink:href="#icon-zuojiantou"></use>
</svg>
...
methods:{
	...mapMutations(['updateDetailShow'])
},
4 集成歌名跑马灯
安装依赖 npm install vue3-marquee@latest --save
<Vue3Marquee style="color:#fff">
  {{musicList.al.name}}
</Vue3Marquee>
...
import { Vue3Marquee } from 'vue3-marquee'
import 'vue3-marquee/dist/style.css'
export default {
  components: {
    Vue3Marquee,
  },
}
5 唱片与磁针静态页面编写
...
<!--中部组件-->
<div class="detailContent">
<img src="@/assets/needle-ab.png"
     alt=""
     class="img_needle">
<img src="@/assets/cd.png"
     alt=""
     class="img_cd">
<img :src="musicList.al.picUrl"
     alt=""
     class="img_ar">
</div>
...
.detailContent {
  width: 100%;
  height: 9rem;
  display: flex;
  flex-direction: column;
  align-items: center;
  position: relative;
  .img_needle {
    width: 2rem;
    height: 3rem;
    position: absolute;
    left: 46%;
    transform-origin: 0 0;
    transform: rotate(-13deg);
    transition: all 2s;
  }

  .img_cd {
    width: 5rem;
    height: 5rem;
    position: absolute;
    bottom: 2.3rem;
    z-index: -1;
  }
  .img_ar {
    width: 3.2rem;
    height: 3.2rem;
    border-radius: 50%;
    position: absolute;
    bottom: 3.14rem;
  }
}
6 底部按钮组件的上下排各五个按钮静态图标
不包含底部歌曲进度组件和歌曲播放功能
...
<!--底部组件-->
  <div class="detailFooter">
    <!--底部组件的头部-->
    <div class="footerTop">
      <svg class="icon"
           aria-hidden="true">
        <use xlink:href="#icon-aixin"></use>
      </svg>
      <svg class="icon"
           aria-hidden="true">
        <use xlink:href="#icon-iconfontzhizuobiaozhun023146"></use>
      </svg>
      <svg class="icon"
           aria-hidden="true">
        <use xlink:href="#icon-yinlechangpian"></use>
      </svg>
      <svg class="icon"
           aria-hidden="true">
        <use xlink:href="#icon-iconfontzhizuobiaozhun023110"></use>
      </svg>
      <svg class="icon"
           aria-hidden="true">
        <use xlink:href="#icon-liebiao-"></use>
      </svg>
    </div>
    <!--底部组件的中部-->
    <div class="footerContent"></div>
    <!--底部组件的底部-->
    <div class="footer">
      <svg class="icon"
           aria-hidden="true">
        <use xlink:href="#icon-xunhuan"></use>
      </svg>
      <svg class="icon"
           aria-hidden="true">
        <use xlink:href="#icon-shangyishoushangyige"></use>
      </svg>
      <svg class="icon bofang"
           aria-hidden="true">
        <use xlink:href="#icon-bofang1"></use>
      </svg>
      <svg class="icon"
           aria-hidden="true">
        <use xlink:href="#icon-xiayigexiayishou"></use>
      </svg>
      <svg class="icon"
           aria-hidden="true">
        <use xlink:href="#icon-zu"></use>
      </svg>
    </div>
  </div>
...
.detailFooter {
  width: 100%;
  height: 3rem;
  position: absolute;
  bottom: 0.2rem;
  display: flex;
  flex-direction: column;
  justify-content: space-between;
  .footerTop {
    width: 100%;
    height: 1rem;
    display: flex;
    justify-content: space-around;
    align-items: center;
    .icon {
      width: 0.36rem;
      height: 0.36rem;
      fill: rgb(245, 234, 234);
    }
    .icon {
      width: 0.6rem;
      height: 0.6rem;
    }
  }
  .range {
    width: 100%;
    height: 0.06rem;
  }
  .footer {
    width: 100%;
    height: 1rem;
    display: flex;
    justify-content: space-around;
    align-items: center;
    .icon {
      fill: rgb(245, 234, 234);
    }
    .bofang {
      width: 1rem;
      height: 1rem;
    }
  }
}
7 底部组件播放歌曲功能
将全局底部组件FooterMusic.vue的播放音乐方法play和同步其组件中播放和暂停图标属性isPlay
所以在全局底部组件FooterMusic.vue的弹出层组件处多添加这两项需要传递的参数
<van-popup v-model:show="detailShow"
               position="right"
               :style="{ height: '100%',width: '100%' }">
  <MusicDetail :musicList="playList[playListIndex]" :play="play" :isPlay="isPlay"/>
</van-popup>
在歌曲详情页MusicDetail.vue中解构传递的参数
props: ['musicList', 'play', 'isPlay'],
在播放按钮处新增暂停按钮并使用点击事件和v-if、else判断状态并播放暂停音乐
<svg class="icon"
           aria-hidden="true"
					 v-if="isPlay"
           @click="play">
    <use xlink:href="#icon-bofang1"></use>
</svg>
<svg class="icon"
       aria-hidden="true"
				 v-else
       @click="play">
    <use xlink:href="#icon-zanting"></use>
</svg>
8 中部组件磁针动态效果
利用动态class,点击播放暂停时将磁针transform: rotate(-13deg)改为transform: rotate(0deg)即可实现磁针移动到唱片的效果
...
<img src="@/assets/needle-ab.png"
         alt=""
         class="img_needle"
:class="{img_needle_active:!isPlay}" />
...
.img_needle_active {
    width: 2rem;
    height: 3rem;
    position: absolute;
    left: 46%;
    transform-origin: 0 0;
    transform: rotate(0deg);
    transition: all 2s;
}
9 中部组件唱片动态效果
利用css3中keyframes决定图片转动幅度,animation-play-state决定动画是否启动
.img_ar_active {
    animation-play-state: running; // 控制动画启动
  }
  .img_ar_paused {
    animation-play-state: paused; // 控制动画暂停
  }
@keyframes rotate_ar {
    0% {
      transform: rotateZ(0deg); // 绕Z轴旋转0°
    }
    100% {
			transform: rotateZ(0deg); // 绕Z轴旋转360°
    }
}
将动画css添加入图片css中进行调用
.img_ar {
    width: 3.2rem;
    height: 3.2rem;
    border-radius: 50%;
    position: absolute;
    bottom: 3.14rem;
		animation: rotate_ar 10s linear infinite; // 调用下面定义好的旋转动画,十秒一圈匀速无限循环
}
利用动态css决定播放与暂停状态下调用图片转动css
<img :src="musicList.al.picUrl"
         alt=""
         class="img_ar"
:class="{img_ar_active:!isPlay,img_ar_paused:isPlay}">
10 中部组件点击唱片后显示歌词
/src/request/api/item.js定义获取歌词的axios请求
// 获取歌曲的歌词
export function getMusiclyLyric(data){
	return service({
		method:"GET",
		url:`/lyric?id=${data}`
	})
}
在vuex中定义获取歌词的方法getLyric,写在actions中
actions: {
    getLyric:async function(context, value) {
      let res = await getMusiclyLyric(value)
      console.log(res)
    }
},
在全局底部组件FooterMusic.vue组件定义updated方法中使用dispatch进行store中方法getLyric的调用并传递歌曲对象中的id使用this.形式给方法以获取歌词
updated () {
    this.$store.dispatch("getLyric", this.playList[this.playListIndex].id)
},
同样在页面渲染时也需要调用这个方法getLyric并传参
mounted () {
    console.log(this.$refs)
    this.$store.dispatch("getLyric", this.playList[this.playListIndex].id)
},
在store的state中定义一个歌词对象用以保存歌词数据lyricList,并在mutations定义更改歌词时的方法updateLyricList
state:{
…
lyricList: {}, // 歌词
}
mutations: {
updateLyricList:function(state, value) {
state.lyricList = value
},
},
在store的actions中已经定义好的方法getLyric获取到歌词数据时便会同时根据传递的歌曲id提交store中歌词对象lyricList的值
actions: {
    getLyric:async function(context, value) {
      let res = await getMusiclyLyric(value)
      console.log(res)
      context.commit("updateLyricList", res.data.lrc)
    }
},
歌曲详情页MusicDetail.vue中定义判断显示歌词还是唱片的方法,先隐藏以实验歌词是否传递过来,并解构lyricList进行赋值
...
<div class="detailContent" v-show="isLyricShow">
...
</div>
...
data () {
    return {
      isLyricShow: false
    }
},
computed:{
	...mapState(["lyricList"])
},
创建中部组件的歌词组件,切割获取为数组的歌词
<!--中部组件——歌词-->
...
<div class="musicLyric}" >
	<p v-for="item in lyric" :key="item">
		<!--获取歌词进行输出-->
		{{item.lrc}}
	</p>
</div>
...
computed: {
    ...mapState(["lyricList"]),
    lyric: function () {
      let arr;
      // 为防止报空在歌词数据传递来后再操作
      if (this.lyricList.lyric) {
        // 以换行符切割数组,正则表达式为换行符
        // 利用map循环,执行一次返回一个新的数组赋值给arr
        arr = this.lyricList.lyric.split(/[(\r\n)\r\n]+/).map((item, i) => {
          // 返回的新数组进行slice切割包头不包尾
          let min = item.slice(1, 3)
          let sec = item.slice(4, 6)
          let mill = item.slice(7, 10)
          let lrc = item.slice(11, item.length)
          // 用Number转化"]"为数字以判断毫秒最后一位是否为数字
          if (isNaN(Number(mill))) {
            // 毫秒最后一位为数字便不切割最后一位,并且歌词提前一位切割以便切割掉右中括号
            mill = item.slice(7, 9)
            lrc = item.slice(10, item.length)
          }
          // console.log(min, sec, Number(mill), lrc)
          // 便于输出将数组返回为数组内的不同对象进行输出
          return { min, sec, mill, lrc }
        })
      }
			console.log(arr);
      return arr
    }
},
...
.musicLyric {
  width: 100%;
  height: 8rem;
	display: flex;
	flex-direction: column;
	align-items: center;
	margin-top: .2rem;
	overflow: scroll; // 溢出屏幕转为滚动条
  p {
		color: #fff;
		margin-bottom: .3rem;
  }
}
11 歌词跟随播放进度高亮提示
在未到下一句歌词前的所有时间高亮当前歌词 currentTime 当前播放时间; duration 总时长
需要将当前歌词时间转变为毫秒返回
lyric: function () {
  let arr;
  if (this.lyricList.lyric) {
    arr = this.lyricList.lyric.split(/[(\r\n)\r\n]+/).map((item, i) => {
      let min = item.slice(1, 3)
      let sec = item.slice(4, 6)
      let mill = item.slice(7, 10)
      let lrc = item.slice(11, item.length)
      // 将当前歌词时间转变为毫秒返回
      let time = parseInt(min) * 60 * 1000 + parseInt(sec) * 1000 + parseInt(mill)
      if (isNaN(Number(mill))) {
        mill = item.slice(7, 9)
        lrc = item.slice(10, item.length)
        // 将当前歌词时间转变为毫秒返回
        time = parseInt(min) * 60 * 1000 + parseInt(sec) * 1000 + parseInt(mill)
      }
      // console.log(min, sec, Number(mill), lrc)
      return { min, sec, mill, lrc, time }
    })
}
为在歌词详情页能获取当前歌词时间,现在store的state中定义一个currentTime进行接收
...
currentTime: 0, // 当前播放时间
...
updateCurrentTime:function(state, value) {
  state.currentTime = value
}
因为歌词时间是在全局底部组件FooterMusic.vue中触发来获取,所以在其中定义一个定时器实时触发获取audio中当前播放时间currentTime值,触发完成获取到具体时间之后便会存储至store中,随后歌词信息页MusicDetail.vue即可根据获取到的当前具体播放时间currentTime与转为毫秒级别的时间time比对从而展示歌词高亮
data () {
    return {
      // 暂停状态就清除定时器
      interval: 0
    }
},
...
mounted () {
    console.log(this.$refs)
    this.$store.dispatch("getLyric", this.playList[this.playListIndex].id)
    this.updateTime()
},
...
methods: {
    play: function () {
      // 判断音乐播放状态
      if (this.$refs.audio.paused) {
        this.$refs.audio.play()
        this.updateIsPlay(false)
        // 播放状态触发进行传值
        this.updateTime()
      } else {
        this.$refs.audio.pause()
        this.updateIsPlay(true)
        // 暂停状态就清除定时器
        clearInterval(this.interval)
      }
    },
    // 定时器自动获取当前播放时间
    updateTime: function () {
      this.interval = setInterval(() => {
        this.updateCurrentTime(this.$refs.audio.currentTime)
      }, 1000)
    },
    ...mapMutations(['updateIsPlay', 'updateDetailShow', 'updateCurrentTime']),
},
歌词详情页MusicDetail.vue定义方法判断高亮歌词必须大于当前时间,小于下一句时间pre
...
computed: {
  ...
    arr.forEach((item, i) => {
      // 如果歌词pre为NaN啧说明已经到最后一句,只需保持显示状态即可
      if (i === arr.length - 1 || isNaN(arr[i + 1].time)) {
        // 如果歌词时间已到结尾则不需要继续执行
        item.pre = 100000
      } else {
        // 下一句歌词的时间的开始pre是上一句歌词时间time的结束
        item.pre = arr[i + 1].time
      }
    })
  }
  console.log(arr);
  return arr
 }
},
...
编写获取到时间的歌词样式展示高亮,从store中解构的currentTime必须大于歌词的等于当前歌词的时间,并小于等于下语句歌词的时间
...
<!--中部组件——歌词-->
<div class="musicLyric">
    <p v-for="item in lyric"
       :key="item"
       :class="{active:(currentTime * 1000 >= item.time && currentTime * 1000 <= item.pre)}">
      <!--从store中解构的currentTime必须大于歌词的等于当前歌词的时间,并小于等于下语句歌词的时间-->
      <!--获取歌词进行输出-->
      {{item.lrc}}
    </p>
</div>
...
computed: {
    ...mapState(["lyricList", 'currentTime']),
    ...
},
...
.musicLyric {
  ...
  p {
    color: #fff;
    margin-bottom: 0.3rem;
  }
  .active {
    color: #fff;
    font-size: 0.6rem;
  }
}
12 歌词跟随播放进度滚动
判断当前歌词的p标签与歌词详情页顶部组件的距离来固定歌词位置
利用ref注册引用信息,监听实时变化的currentTime的值
<!--中部组件——歌词-->
<div class="musicLyric" ref="musicLyric">
  ...
</div>
...
watch: {
    currentTime: function () {
      let p = document.querySelector("p.active")
      console.log([p]);
      // 先获取到p再进行操作
      if (p) {
        if (p.offsetTop > 300) {
          this.$refs.musicLyric.scrollTop = p.offsetTop - 300
        }
      }
      console.log([this.$refs.musicLyric]);
    }
},
13 唱片和歌词切换
默认显示唱片,点击唱片后将唱片显示改为false以显示歌词,在点击左上角箭头退出歌词详情页时将false重置为true即可实现再次进入歌词详情页时显示唱片
<!--头部组件-->
<div class="detailTop">
<div class="detailTopLeft">
  <svg class="icon liebiao"
       aria-hidden="true"
       @click="backHome">
    <use xlink:href="#icon-zuojiantou"></use>
  </svg>
  ...
</div>
</div>
<!--中部组件——歌词-->
<div class="musicLyric"
   ref="musicLyric"
   v-show="isLyricShow">
...
</div>
<!--中部组件——唱片-->
<div class="detailContent"
   v-show="!isLyricShow">
...
<img :src="musicList.al.picUrl"
     alt=""
     class="img_ar"
     @click="isLyricShow=true"
     :class="{img_ar_active:!isPlay,img_ar_paused:isPlay}">
</div>
...
data () {
    return {
      isLyricShow: false
    }
},
...
methods: {
    backHome:function(){
      this.isLyricShow = false
      this.updateDetailShow()
    },
    ...mapMutations(['updateDetailShow'])
  },
13 切歌
根据歌曲信息的下标+1或者-1来实现切换歌曲,从store中获取歌曲下标和歌曲列表进行操作
如果在播放第一首歌时点击上一首便会切换至最后一首形成循环
<div class="footer">
  ...
  <svg class="icon"
       aria-hidden="true"
       @click="goPlay(-1)">
    <use xlink:href="#icon-shangyishoushangyige"></use>
  </svg>
  ...
  <svg class="icon"
       aria-hidden="true"
       @click="goPlay(1)">
    <use xlink:href="#icon-xiayigexiayishou"></use>
  </svg>
  ...
</div>
...
computed: {
  ...mapState(["lyricList", 'currentTime', 'playListIndex', 'playList']),
  ...
},
...
methods: {
    ...
    goPlay: function (num) {
      let index = this.playListIndex + num
      if (index < 0) {
        // 播放第一首歌时点击上一首时切换为最后一首
        index = this.playList.length - 1
        // 播放最后一首歌时点击下一首时切换为第一首
      } else if (index = this.playList.length) {
        index = 0
      }
      this.updatePlayListIndex(index)
    },
    ...mapMutations(['updateDetailShow', 'updatePlayListIndex'])
},
...
14 歌曲进度条
最大值在store中设置获取
state: {
    ...
    duration: 0, // 歌曲总时长
},
mutations: {
    ...
    updateDuration:function(state, value) {
      state.duration = value
    }
},
...
在全局底部组件FooterMusic.vue中获取总时长值,并随时需要用duration更新进度条并将addDuration传入歌曲详情页MusicDetail.vue
...
<MusicDetail :musicList="playList[playListIndex]"
                   :play="play"
                   :isPlay="isPlay"
                   :addDuration="addDuration" />
...
updated () {
    ...
    // 即使在未进入歌曲详情页也需要获取总时长
    this.addDuration()
},
methods: {
    ...
    addDuration: function () {
      this.updateDuration(this.$refs.audio.duration)
    },
    // 定时器自动获取当前播放时间
    ...
    ...mapMutations(['updateIsPlay', 'updateDetailShow', 'updateCurrentTime', 'updateDuration']),
},
歌曲详情页MusicDetail.vue接收addDuration,编辑进度条最大最小值、步数和绑定值
<!--底部组件的中部-->
<div class="footerContent">
  <input type="range"
         class="range"
         min="0"
         :max="duration"
         v-model="currentTime"
         step="0.05" />
</div>
...
computed: {
    ...mapState(["lyricList", 'currentTime', 'playListIndex', 'playList', 'duration']),
    ...
}
...
mounted () {
    // console.log(this.musicList)
    // console.log(this.lyricList.lyric)
    this.addDuration()
},
...
props: ['musicList', 'play', 'isPlay', 'addDuration'],
在播放完当前歌曲后自动播放下一首
...
 watch: {
    currentTime: function (newValue) {
      let p = document.querySelector("p.active")
      console.log([p]);
      // 先获取到p再进行操作
      if (p) {
        if (p.offsetTop > 300) {
          this.$refs.musicLyric.scrollTop = p.offsetTop - 300
        }
      }
      if (newValue === this.duration) {
        // 最后一首完毕后返回第一首
        if (this.playListIndex === this.playList.length - 1) {
          this.updatePlayListIndex(0)
          // 默认列表自动循环
          this.play()
        } else {
          this.updatePlayListIndex(this.playListIndex + 1)
        }
      }
      console.log([this.$refs.musicLyric]);
    }
},
...
2.6 歌曲搜索组件
2.6.1 搜索组件Search.vue
添加路由
{
    path: '/search',
    name: 'Search',
    component: () => import(/* webpackChunkName: "Search" */ '../views/Search.vue')
}
头部导航组件TopNav.vue添加路由跳转
...
<div class="topRight">
  <svg class="icon"
       aria-hidden="true"
       @click="$router.push('/search')">
    <use xlink:href="#icon-sousuo"></use>
  </svg>
</div>
...
编写搜索组件Search.vue
<template>
  <!--头部搜索组件-->
  <div class="searchTop">
    <svg class="icon"
         aria-hidden="true"
	     @click="$router.go(-1)">
      <use xlink:href="#icon-zuojiantou"></use>
    </svg>
    <input type="text"
           placeholder="张国荣" />
  </div>
</template>
<style lang="less" scoped>
.searchTop {
  width: 100%;
  height: 1.2rem;
  padding: 0.2rem;
  display: flex;
  align-items: center;
  input {
    margin-left: 0.2rem;
    border: none;
    border-bottom: 1px solid #ccc;
    width: 90%;
    padding: 0.1rem;
  }
}
</style>
2.6.2 搜索历史表组件
1 存储搜索历史相关
输入歌手名并按回车键搜索,将搜索记录存为本地浏览器的数组展示,并清空搜索框的记录
<template>
  <!--头部搜索组件-->
  <div class="searchTop">
    <svg class="icon"
         aria-hidden="true"
		 @click="$router.go(-1)">
      <use xlink:href="#icon-zuojiantou"></use>
    </svg>
    <input type="text"
           placeholder="张国荣"
           v-model="searchKey"
           @keydown.enter="enterKey" />
  </div>
  <div class="searchHistory">
    <span class="searchSpan">搜索历史</span>
    <span v-for="item in keyWordList"
          :key="item"
          class="spanKey">
      {{item}}
    </span>
    <svg class="icon"
         aria-hidden="true">
      <use xlink:href="#icon-shanchu"></use>
    </svg>
  </div>
</template>
<script>
export default {
  data () {
    return {
      keyWordList: [],
      searchKey: ""
    }
  },
  mounted () {
		// 获取存储在浏览器的搜索历史,获取为空则获取一个空数组
    this.keyWordList = JSON.parse(localStorage.getItem('keyWordList')) || []
  },
  methods: {
    enterKey: function () {
	 // 判断是否为空
      if (this.searchKey !== null) {
        // 将新关键字添加到最前面
        this.keyWordList.unshift(this.searchKey)
        // 去重
        this.keyWordList = [...new Set(this.keyWordList)]
        // 固定长度
        if (this.keyWordList.length > 5) {
          this.keyWordList.splice(this.keyWordList.length - 1, 1)
        }
        // 将搜索关键字存储在浏览器
        localStorage.setItem("keyWordList", JSON.stringify(this.keyWordList))
        // 添加完之后清空
        this.searchKey = ""
      }
    }
  },
}
</script>
<style lang="less" scoped>
.searchTop {
  width: 100%;
  height: 1.2rem;
  padding: 0.2rem;
  display: flex;
  align-items: center;
  input {
    margin-left: 0.2rem;
    border: none;
    border-bottom: 1px solid #ccc;
    width: 90%;
    padding: 0.1rem;
  }
}
.searchHistory {
  width: 100%;
  padding: 0.2rem;
  position: relative;
  .searchSpan {
    font-weight: 700;
  }
  .spanKey {
    padding: 0.1rem 0.2rem;
    background-color: #888;
    border-radius: 0.4rem;
    margin: 0.1rem 0.2rem;
	display: inline-block;
  }
  .icon {
    width: 0.4rem;
    height: 0.4rem;
    position: absolute;
    right: 0.2rem;
  }
}
</style>
2 删除搜索历史相关
...
<svg class="icon"
        aria-hidden="true"
		@click="delHistory">
  <use xlink:href="#icon-shanchu"></use>
</svg>
...
methods: {
    ...
    delHistory: function () {
      // 清空搜索历史
      this.keyWordList = []
      // 清空浏览器存储
      localStorage.removeItem('keyWordList')
    }
},
3 搜索获取数据
封装home.js搜索axios请求getSearchMusic
// 获取搜索数据
export function getSearchMusic(data){
	return service({
		method:"GET",
		url:`/search?keywords=${data}`
	})
}
在回车存储关键字方法enterKey中引用axios请求getSearchMusic
将返回的数据放入搜索列表searchList中进行调用
data () {
    return {
        ...
		searchList: []
    }
},
...
enterKey: async function () {
  // 判断是否为空
  if (this.searchKey !== null) {
    ...
    // axios请求获取搜索结果
    let res = await getSearchMusic(this.searchKey)
    console.log(res);
    this.searchList = res.data.result.songs
    ...
  }
},
通过存储的搜索历史进行搜索
...
<div class="searchHistory">
    ...
    <span v-for="item in keyWordList"
          :key="item"
          class="spanKey"
          @click="searchHistory(item)">
      {{item}}
    </span>
    ...
</div>
...
searchHistory: async function (item) {
  let res = await getSearchMusic(item)
  console.log(res);
  this.searchList = res.data.result.songs
},
...
2.6.3 搜索歌曲列表组件
盒子类似,可以从歌曲详情组件copy,需注意类似ar、mv等字段命名需要更改,否则会出现数据渲染不完整的情况
store中定义在搜索歌曲列表需要通过push方法将点击的歌曲信息置于目前歌曲列表的最后一位的pushPlayList方法
mutations: {
    pushPlayList:function(state, value) {
      state.playList.push(value)
    },
    ...
},
在搜索歌曲列表组件中调用pushPlayList方法
<!--中部列表组件-->
...
<div class="itemList">
    <div class="item"
         v-for="(item, i) in searchList"
         :key="i">
      <div class="itemLeft"
           @click="updateIndex(item)">
        <span class="leftSpan">{{ i + 1 }}</span>
        <div>
          <p>{{ item.name }}</p>
          <span v-for="(item1, index) in item.artists"
                :key="index">{{
              item1.name
            }}</span>
        </div>
      </div>
      <div class="itemRight">
        <svg class="icon bofang"
             aria-hidden="true"
             v-if='item.mvid !=0'>
          <use xlink:href="#icon-shipin"></use>
        </svg>
        <svg class="icon liebiao"
             aria-hidden="true">
          <use xlink:href="#icon-31liebiao"></use>
        </svg>
      </div>
    </div>
</div>
...
updateIndex: function (item) {
  this.$store.commit("pushPlayList", item)
		// 将列表中的最后一首传入
  this.$store.commit("updatePlayListIndex", this.$store.playList.length - 1)
}
...
2.7 用户登录页面及个人中心页面
2.7.1 路由规则
新建用户登录页面Login.vue和个人中心页面UserInfo并添加入路由——略
在首页的头部组件TopNav.vue的我的标签中添加路由跳转
 <div class="topContent">
      <span @click="$router.push('userInfo')">我的</span>
      <span class="active">发现</span>
      <span>云村</span>
      <span>视频</span>
</div>
1 判断用户进入个人中心页面时是否登录
在store中新建字段判断是否登录
state: {
    ...
    isLogin: false // 默认未登录
},
定义一个路由在用户详情页利用路由守卫判断登录状态判断是否需要登录
import store from '@/store/index.js'
...
{
    path: '/userInfo',
    name: 'UserInfo',
    beforeEnter: (to, from, next) => {
      if (store.state.isLogin) {
        next()
      } else {
        next('/login')
      }
    },
    component: () => import('../views/UserInfo.vue')
}
2 判断当前页面是否需要全局底部组件件FooterMusic.vue的显示
在store中新建字段判断是否需要全局底部组件件FooterMusic.vue
state: {
    ...
    isFooterMusic: true // 默认显示全局底部组件
},
定义路由全局路由守卫判断是否需要全局底部组件FooterMusic.vue显示
...
router.beforeEach((to, from) => {
  if(to.path == '/login') {
    store.state.isFooterMusic = false
  }else{
    store.state.isFooterMusic = true
  }
})
...
在App.vue中引用规则
<template>
  <router-view />
  <FooterMusic v-show="$store.state.isFooterMusic" />
</template>
2.7.2 登录页面
1 静态页面
<template>
  <div class="login">
    <div class="loginTop">欢迎登录</div>
    <div class="loginContent">
      <input type="text"
             name="phone"
             class="phone"
             placeholder="请输入手机号码" />
      <input type="password"
             name="passworld"
             class="passworld"
             placeholder="请输入密码" />
      <button class="btn">登录</button>
    </div>
  </div>
</template>

<style lang="less" scoped>
.login {
  width: 100%;
  height: 13.34rem;
  padding: 0.2rem;
  display: flex;
  flex-direction: column;
  align-items: center;
  background-color: rgb(248, 97, 97);
  .loginTop {
    margin-top: 1rem;
    font-size: 1rem;
    color: #fff;
  }
  .loginContent {
    width: 100%;
    height: 300px;
    display: flex;
    flex-direction: column;
    align-items: center;
    justify-content: space-around;
    margin-top: 2rem;
    .phone,
    .passworld {
      width: 5rem;
      height: 1rem;
      border: 0.02rem solid #999;
    }
    .btn {
      width: 2rem;
      height: 0.6rem;
    }
  }
}
</style>
2 用户登录
在home.js封装axios登录请求
// 用户手机号密码登录
export function getPhoneLogin(data){
	return service({
		method:"GET",
		url:`/login/cellphone?phone=${data.phone}&password=${data.password}`
	})
}
在store的actions异步获取登录信息并返回res
import { getPhoneLogin } from '../request/api/home'
...
actions: {
    ...
    getLogin:async function(context, value) {
      let res = await getPhoneLogin(value)
      // console.log(res);
      return res
    }
},
登录页面Login.vue调用登录方法并引用store的返回值res进行操作
<template>
  <div class="login">
    <div class="loginTop">欢迎登录</div>
    <div class="loginContent">
      <input type="text"
             name="phone"
             class="phone"
             v-model="phone"
             placeholder="请输入手机号码" />
      <input type="password"
             name="password"
             class="password"
             v-model="password"
             placeholder="请输入密码" />
      <button class="btn"
              @click="Login">登录</button>
    </div>
  </div>
</template>
<script>
export default {
  data () {
    return {
      phone: '',
      password: ''
    }
  },
  methods: {
    Login: async function () {
      let res = await this.$store.dispatch('getLogin', { phone: this.phone, password: this.password })
      // 接收store的res返回值
      // 返回code为200时登录成功跳转个人中心页面
      if (res.data.code === 200) {
        this.$router.push('/userInfo')
      }
    }
  }
}
</script>
...
同时需要更改store中判断是否需要登录的状态值
mutations: {
    ...
    updateIsLogin:function(state, value) {
      state.isLogin = true
    }
},
登录页面Login.vue判断是否需要更改登录状态值并做出响应
methods: {
    Login: async function () {
      let res = await this.$store.dispatch('getLogin', { phone: this.phone, password: this.password })
      // 接收store的res返回值
      // 返回code为200时登录成功跳转个人中心页面
      if (res.data.code === 200) {
        this.$store.commit('updateIsLogin', true)
        this.$router.push('/userInfo')
      } else {
        alert("手机号或密码错误")
        this.password = ''
      }
    }
}
3 保持登录状态
在store中添加token字段以利用token判断是否登录
state: {
    ...
    token: "" // token
},
mutations: {
    ...
    updateToken:function(state, value) {
      state.token = value
      // 同时存入浏览器
      localStorage.setItem("token", state.token)
    }
},
在登录页面Login.vue调用保存tokendefangfa
...
methods: {
    Login: async function () {
      let res = await this.$store.dispatch('getLogin', { phone: this.phone, password: this.password })
      // 接收store的res返回值
      // 返回code为200时登录成功跳转个人中心页面
      if (res.data.code === 200) {
        this.$store.commit('updateIsLogin', true)
        // 在页面跳转前保存token
        this.$store.commit('updateToken', res.data.token)
        this.$router.push('/userInfo')
      } else {
        alert("手机号或密码错误")
        this.password = ''
      }
    }
}
...
在个人中心页面的路由守卫处判断vuex和浏览器是否都具有token
...
{
    path: '/userInfo',
    name: 'UserInfo',
    beforeEnter: (to, from, next) => {
      // 判断vuex和浏览器是否都具有token
      if (store.state.isLogin || store.state.token || localStorage.getItem('token')) {
        next()
      } else {
        next('/login')
      }
    },
    component: () => import('../views/UserInfo.vue')
}
...
2.7.3 个人中心页面
1 获取用户详情信息
封装axios获取用户详情请求getUserInfo
// 获取用户详情
export function getUserInfo(data){
	return service({
		method:"GET",
		url:`/user/detail?uid=${data}`
	})
}
在store定义存储用户信息
state: {
    ...
    user: {} // 用户信息
},
mutations: {
    ...
    updateUser:function(state, value) {
      state.user = value
    }
},
在登陆页面完成后未跳转时存储用户信息
methods: {
    Login: async function () {
      let res = await this.$store.dispatch('getLogin', { phone: this.phone, password: this.password })
      console.log(res);
      // 接收store的res返回值
      // 返回code为200时登录成功跳转个人中心页面
      if (res.data.code === 200) {
        this.$store.commit('updateIsLogin', true)
        // 在页面跳转前保存token
        this.$store.commit('updateToken', res.data.token)
        // 存储用户信息
        let result = await getUserInfo(res.data.account.id)
        this.$store.commit('updateUser', result)
        console.log(result);
        this.$router.push('/userInfo')
      } else {
        alert("手机号或密码错误")
        this.password = ''
      }
    }
}
2 个人中心页面UserInfo.vue
在个人中心页面UserInfo.vue使用store中的用户详情数据
<template>
  <div class="userInfoTop">
    <img :src="user.data.profile.avatarUrl"
         alt=""
         class="profileImg">
    <div class="profileNickname">
      {{user.data.profile.nickname}}
    </div>
  </div>

</template>
<script>
import { mapState } from 'vuex'
export default {
  computed: {
    ...mapState(['user']),
  },
  mounted () {
    console.log(this.user);
  },
}
</script>
<style lang="less" scoped>
.userInfoTop {
  width: 100%;
  height: 2rem;
  display: flex;
  flex-direction: column;
  align-items: center;
  justify-content: space-around;
  .profileImg {
    width: 1rem;
    height: 1rem;
    border-radius: 50%;
  }
  .profileNickname {
    font-weight: 700;
    font-size: 0.4rem;
  }
}
</style>
至此,视频内容部分完结,以下是添加内容


 1496
1496

 被折叠的 条评论
为什么被折叠?
被折叠的 条评论
为什么被折叠?
 到【灌水乐园】发言


