


文章目录
学习视频: 尚硅谷SpringBoot3视频
SpringBoot3-数据访问
1.整合SSM场景
SpringBoot 整合
Spring、SpringMVC、MyBatis进行数据访问场景开发
1.1创建SSM整合项目

勾选之后会导入以下包
<!-- https://mvnrepository.com/artifact/org.mybatis.spring.boot/mybatis-spring-boot-starter -->
<dependency>
    <groupId>org.mybatis.spring.boot</groupId>
    <artifactId>mybatis-spring-boot-starter</artifactId>
    <version>3.0.1</version>
</dependency>
<dependency>
    <groupId>mysql</groupId>
    <artifactId>mysql-connector-java</artifactId>
    <scope>runtime</scope>
</dependency>
1.2配置数据源
spring.datasource.driver-class-name=com.mysql.cj.jdbc.Driver
spring.datasource.type=com.zaxxer.hikari.HikariDataSource
spring.datasource.url=jdbc:mysql://localhost:3306/test
spring.datasource.username=root
spring.datasource.password=root
安装MyBatisX 插件,帮我们生成Mapper接口的xml文件即可
在接口处 : Alt + 回车
1.3配置MyBatis
必须把mapper的xml文件映射位置在配置文件定义!
而驼峰命名转换建议也开启
#指定mapper映射文件位置
mybatis.mapper-locations=classpath:/mapper/*.xml
#驼峰命名转换
mybatis.configuration.map-underscore-to-camel-case=true
1.4CRUD编写
- 编写Bean
package com.atguigu.boot.ssm.bean;

import lombok.Data;

@Data
public class TUser {
    private Integer id;
    private String loginName;
    private String nickName;
    private String passwd;
}
- 编写Mapper
public interface UserMapper {

    public TUser getUserById(@Param("id") Long id);

}
- 使用
mybatisx插件,快速生成MapperXML
<?xml version="1.0" encoding="UTF-8" ?>
<!DOCTYPE mapper PUBLIC "-//mybatis.org//DTD Mapper 3.0//EN" "http://mybatis.org/dtd/mybatis-3-mapper.dtd" >
<mapper namespace="com.atguigu.boot.ssm.mapper.UserMapper">


    <select id="getUserById" resultType="com.atguigu.boot.ssm.bean.TUser">
        select * from t_user where id=#{id}
    </select>
</mapper>
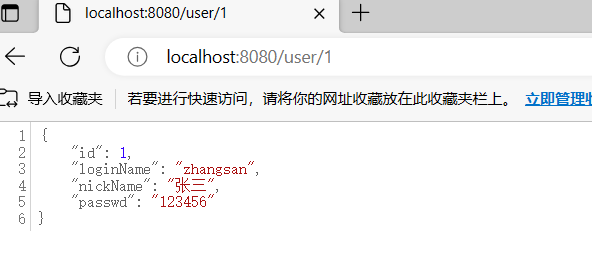
- 测试CRUD
UserController
@RestController
public class UserController {
    @Autowired
    UserMapper userMapper;
    @GetMapping("/user/{id}")
    public TUser getUser(@PathVariable("id") Long id){
        TUser user = userMapper.getUserById(id);
        return user;
    }
}
/**
 * 1.@MapperScan告诉Mybatis,扫描哪个包下面的所有接口
 * 2.使用mybatis.mapper-locations 告诉mybatis,每个接口的xml文件都在哪里
 */
@MapperScan(basePackages = "com.atguigu.boot.ssm.mapper")
@SpringBootApplication
public class Boot05SsmApplication {

    public static void main(String[] args) {
        SpringApplication.run(Boot05SsmApplication.class, args);
    }

}
运行结果:
2.自动配置原理
- 导入
mybatis-spring-boot-starter- 配置数据源信息
- 配置mybatis的
mapper接口扫描与xml映射文件扫描- 编写bean,mapper,生成xml,编写sql 进行crud。事务等操作依然和Spring中用法一样
- 效果:
- 所有sql写在xml中
- 所有mybatis配置写在application.properties下面
-
jdbc场景的自动配置:-
mybatis-spring-boot-starter导入spring-boot-starter-jdbc,jdbc是操作数据库的场景 -
Jdbc场景的几个自动配置-
org.springframework.boot.autoconfigure.jdbc.DataSourceAutoConfiguration
- 数据源的自动配置
- 所有和数据源有关的配置都绑定在
DataSourceProperties - 默认使用
HikariDataSource
-
org.springframework.boot.autoconfigure.jdbc.JdbcTemplateAutoConfiguration
- 给容器中放了
JdbcTemplate操作数据库
- 给容器中放了
-
org.springframework.boot.autoconfigure.jdbc.JndiDataSourceAutoConfiguration
-
org.springframework.boot.autoconfigure.jdbc.XADataSourceAutoConfiguration
- 基于XA二阶提交协议的分布式事务数据源
-
org.springframework.boot.autoconfigure.jdbc.DataSourceTransactionManagerAutoConfiguration
- 支持事务
-
-
具有的底层能力:数据源、
JdbcTemplate、事务
-
-
MyBatisAutoConfiguration:配置了MyBatis的整合流程-
mybatis-spring-boot-starter导入mybatis-spring-boot-autoconfigure(mybatis的自动配置包), -
默认加载两个自动配置类:
-
org.mybatis.spring.boot.autoconfigure.MybatisLanguageDriverAutoConfiguration
-
org.mybatis.spring.boot.autoconfigure.MybatisAutoConfiguration
- 必须在数据源配置好之后才配置
- 给容器中
SqlSessionFactory组件。创建和数据库的一次会话 - 给容器中
SqlSessionTemplate组件。操作数据库
-
-
MyBatis的所有配置绑定在
MybatisProperties -
每个Mapper接口的代理对象是怎么创建放到容器中。详见**@MapperScan**原理:
- 利用
@Import(MapperScannerRegistrar.class)批量给容器中注册组件。解析指定的包路径里面的每一个类,为每一个Mapper接口类,创建Bean定义信息,注册到容器中。
- 利用
-
如何分析哪个场景导入以后,开启了哪些自动配置类。
找:
classpath:/META-INF/spring/org.springframework.boot.autoconfigure.AutoConfiguration.imports文件中配置的所有值,就是要开启的自动配置类,但是每个类可能有条件注解,基于条件注解判断哪个自动配置类生效了。
快速定位生效的配置
#开启调试模式,详细打印开启了哪些自动配置
debug=true
# Positive(生效的自动配置)  Negative(不生效的自动配置)
3.扩展:整合其他数据源
3.1 Druid 数据源
暂不支持 SpringBoot3
- 导入
druid-starter - 写配置
- 分析自动配置了哪些东西,怎么用
#数据源基本配置
spring.datasource.url=jdbc:mysql://192.168.200.100:3306/demo
spring.datasource.driver-class-name=com.mysql.cj.jdbc.Driver
spring.datasource.username=root
spring.datasource.password=123456
spring.datasource.type=com.alibaba.druid.pool.DruidDataSource

# 配置StatFilter监控
spring.datasource.druid.filter.stat.enabled=true
spring.datasource.druid.filter.stat.db-type=mysql
spring.datasource.druid.filter.stat.log-slow-sql=true
spring.datasource.druid.filter.stat.slow-sql-millis=2000
# 配置WallFilter防火墙
spring.datasource.druid.filter.wall.enabled=true
spring.datasource.druid.filter.wall.db-type=mysql
spring.datasource.druid.filter.wall.config.delete-allow=false
spring.datasource.druid.filter.wall.config.drop-table-allow=false
# 配置监控页,内置监控页面的首页是 /druid/index.html
spring.datasource.druid.stat-view-servlet.enabled=true
spring.datasource.druid.stat-view-servlet.login-username=admin
spring.datasource.druid.stat-view-servlet.login-password=admin
spring.datasource.druid.stat-view-servlet.allow=*

# 其他 Filter 配置不再演示
# 目前为以下 Filter 提供了配置支持,请参考文档或者根据IDE提示(spring.datasource.druid.filter.*)进行配置。
# StatFilter
# WallFilter
# ConfigFilter
# EncodingConvertFilter
# Slf4jLogFilter
# Log4jFilter
# Log4j2Filter
# CommonsLogFilter
附录:示例数据库
CREATE DATABASE IF NOT EXISTS test;
USE test;
CREATE TABLE `t_user`
(
    `id`         BIGINT(20)   NOT NULL AUTO_INCREMENT COMMENT '编号',
    `login_name` VARCHAR(200) NULL DEFAULT NULL COMMENT '用户名称' COLLATE 'utf8_general_ci',
    `nick_name`  VARCHAR(200) NULL DEFAULT NULL COMMENT '用户昵称' COLLATE 'utf8_general_ci',
    `passwd`     VARCHAR(200) NULL DEFAULT NULL COMMENT '用户密码' COLLATE 'utf8_general_ci',
    PRIMARY KEY (`id`)
);
insert into t_user(login_name, nick_name, passwd) VALUES ('zhangsan','张三','123456');
SpringBoot3-基础特性
1. SpringApplication
1.1 自定义 banner
- 类路径添加banner.txt或设置spring.banner.location就可以定制 banner
1.2.自定义 SpringApplication
import org.springframework.boot.Banner;
import org.springframework.boot.SpringApplication;
import org.springframework.boot.autoconfigure.SpringBootApplication;

@SpringBootApplication
public class MyApplication {

    public static void main(String[] args) {
        //1.SpringApplication:Boot应用的核心API入口
        //SpringApplication.run(Boot306FeaturesApplication.class,args);

        //1.自定义SpringApplication的底层设置
        SpringApplication application = new SpringApplication(MyApplication.class);
        //程序化调整SpringApplication的参数
        //application.setDefaultProperties();
        //这个配置不优先
        //2.调整SpringApplication的参数
        application.setBannerMode(Banner.Mode.OFF);
        //3.SpringApplication运行起来
        application.run(args);
    }
1.3FluentBuilder API
流式方式启动SpringApplication
new SpringApplicationBuilder()
    .sources(Parent.class)
    .child(Application.class)
    .bannerMode(Banner.Mode.OFF)
    .run(args);
2.Profiles
环境隔离能力;快速切换开发、测试、生产环境
步骤:
- 标识环境:指定哪些组件、配置在哪个环境生效
- 切换环境:这个环境对应的所有组件和配置就应该生效
2.1 使用
2.1.1 指定环境
- Spring Profiles 提供一种隔离配置的方式,使其仅在特定环境生效;
- 任何
@Component,@Configuration或@ConfigurationProperties可以使用@Profile标记,来指定何时被加载。【容器中的组件都可以被@Profile标记】
2.1.2 环境激活
1.配置激活指定环境; 配置文件
spring.profiles.active=production,hsqldb
2.也可以使用命令行激活。--spring.profiles.active=dev,hsqldb
3.还可以配置默认环境; 不标注@Profile 的组件永远都存在。
- 以前默认环境叫default
spring.profiles.default=test
4.推荐使用激活方式激活指定环境
2.1.3 环境包含
注意:
spring.profiles.active和spring.profiles.default只能用到 无 profile 的文件中,如果在application-dev.yaml中编写就是无效的- 也可以额外添加生效文件,而不是激活替换。比如:
spring.profiles.include[0]=common
spring.profiles.include[1]=local
最佳实战:
-
生效的环境 = 激活的环境/默认环境 + 包含的环境
-
项目里面这么用
- 基础的配置
mybatis、log、xxx:写到包含环境中 - 需要动态切换变化的
db、redis:写到激活的环境中
- 基础的配置
2.2 Profile 分组
创建prod组,指定包含db和mq配置
spring.profiles.group.prod[0]=db
spring.profiles.group.prod[1]=mq
使用--spring.profiles.active=prod ,就会激活prod,db,mq配置文件
2.3Profile 配置文件
-
application-{profile}.properties可以作为指定环境的配置文件。 -
激活这个环境,配置就会生效。最终生效的所有配置是
application.properties:主配置文件,任意时候都生效application-{profile}.properties:指定环境配置文件,激活指定环境生效
如果发生配置冲突:profile优先级 > application
3.外部化配置
场景:线上应用如何快速修改配置,并应用最新配置?
- SpringBoot 使用 配置优先级 + 外部配置 简化配置更新、简化运维。
- 只需要给
jar应用所在的文件夹放一个application.properties最新配置文件,重启项目就能自动应用最新配置
3.1 配置优先级
Spring Boot 允许将配置外部化,以便可以在不同的环境中使用相同的应用程序代码。
我们可以使用各种外部配置源,包括Java Properties文件、YAML文件、环境变量和命令行参数。
@Value可以获取值,也可以用@ConfigurationProperties将所有属性绑定到java object中
以下是 SpringBoot 属性源加载顺序。 后面的会覆盖前面的值。由低到高,高优先级配置覆盖低优先级
- 默认属性(通过
SpringApplication.setDefaultProperties指定的) - @PropertySource指定加载的配置(需要写在@Configuration类上才可生效)
- 配置文件(
application.properties/yml等) RandomValuePropertySource支持的random.*配置(如:@Value(“${random.int}”))- OS 环境变量
- Java 系统属性(
System.getProperties()) - JNDI 属性(来自
java:comp/env) ServletContext初始化参数ServletConfig初始化参数SPRING_APPLICATION_JSON属性(内置在环境变量或系统属性中的 JSON)- 命令行参数
- 测试属性。(
@SpringBootTest进行测试时指定的属性) - 测试类
@TestPropertySource注解 - Devtools 设置的全局属性。(
$HOME/.config/spring-boot)
结论:配置可以写到很多位置,常见的优先级顺序:
命令行>配置文件>springapplication配置
配置文件优先级如下:(后面覆盖前面)
jar包内的application.properties/yml- jar 包内的
application-{profile}.properties/yml - jar 包外的
application.properties/yml - jar 包外的
application-{profile}.properties/yml
建议:用一种格式的配置文件。如果.properties和.yml同时存在,则.properties优先
结论:包外 > 包内; 同级情况:profile配置 > application配置
所有参数均可由命令行传入,使用--参数项=参数值,将会被添加到环境变量中,并优先于配置文件。
比如java -jar app.jar --name="Spring",可以使用@Value("${name}")获取
演示场景:
- 包内: application.properties
server.port=8000 - 包内: application-dev.properties
server.port=9000 - 包外: application.properties
server.port=8001 - 包外: application-dev.properties
server.port=9001
启动端口?:命令行 > 9001 > 8001 > 9000 > 8000
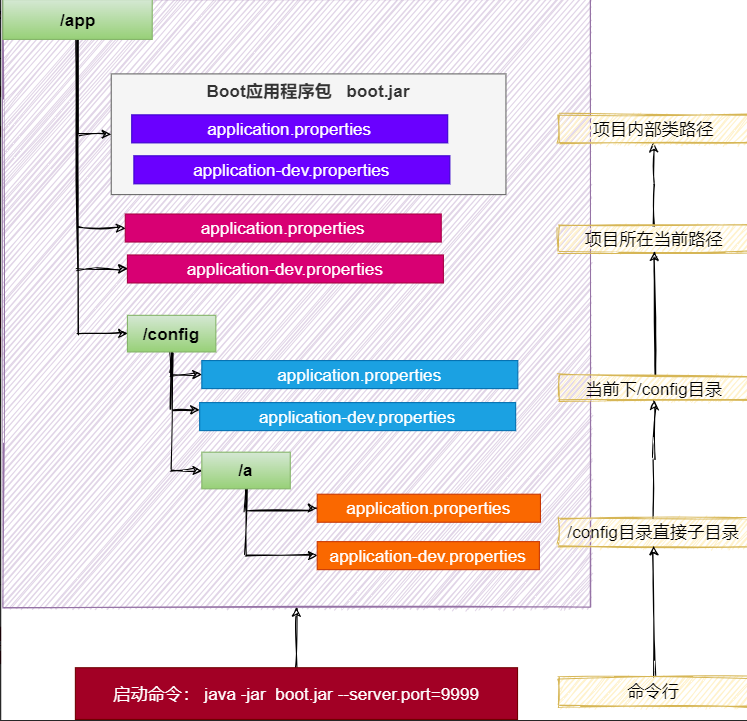
3.2. 外部配置
SpringBoot 应用启动时会自动寻找application.properties和application.yaml位置,进行加载。顺序如下:(后面覆盖前面)
1.类路径: 内部
- 类根路径
- 类下/config包
2.当前路径(项目所在的位置)
- 当前路径
- 当前下/config子目录
- /config目录的直接子目录
最终效果:优先级由高到低,前面覆盖后面
-
命令行 > 包外config直接子目录 > 包外config目录 > 包外根目录 > 包内目录
-
同级比较:
- profile配置 > 默认配置
- properties配置 > yaml配置
规律:最外层的最优先。
- 命令行 > 所有
- 包外 > 包内
- config目录 > 根目录
- profile > application
配置不同就都生效(互补),配置相同高优先级覆盖低优先级
3.3. 导入配置
使用spring.config.import可以导入额外配置
spring.config.import=my.properties
my.property=value
无论以上写法的先后顺序,my.properties的值总是优先于直接在文件中编写的my.property。
3.4. 属性占位符
配置文件中可以使用 ${name:default}形式取出之前配置过的值。
app.name=MyApp
app.description=${app.name} is a Spring Boot application written by ${username:Unknown}
4. 单元测试-JUnit5
4.1 整合
SpringBoot 提供一系列测试工具集及注解方便我们进行测试。
spring-boot-test提供核心测试能力,spring-boot-test-autoconfigure 提供测试的一些自动配置。
我们只需要导入spring-boot-starter-test 即可整合测试
<dependency>
    <groupId>org.springframework.boot</groupId>
    <artifactId>spring-boot-starter-test</artifactId>
    <scope>test</scope>
</dependency>
spring-boot-starter-test 默认提供了以下库供我们测试使用
4.2测试
4.2.0 组件测试
直接@Autowired容器中的组件进行测试
4.2.1 注解
JUnit5的注解与JUnit4的注解有所变化
https://junit.org/junit5/docs/current/user-guide/#writing-tests-annotations
- @Test:表示方法是测试方法。但是与JUnit4的@Test不同,他的职责非常单一不能声明任何属性,拓展的测试将会由Jupiter提供额外测试
- @ParameterizedTest:表示方法是参数化测试,下方会有详细介绍
- @RepeatedTest:表示方法可重复执行,下方会有详细介绍
- @DisplayName:为测试类或者测试方法设置展示名称
- @BeforeEach:表示在每个单元测试之前执行
- @AfterEach:表示在每个单元测试之后执行
- @BeforeAll:表示在所有单元测试之前执行
- @AfterAll:表示在所有单元测试之后执行
- @Tag:表示单元测试类别,类似于JUnit4中的@Categories
- @Disabled:表示测试类或测试方法不执行,类似于JUnit4中的@Ignore
- @Timeout:表示测试方法运行如果超过了指定时间将会返回错误
- @ExtendWith:为测试类或测试方法提供扩展类引用
import static org.junit.jupiter.api.Assertions.fail;
import static org.junit.jupiter.api.Assumptions.assumeTrue;

import org.junit.jupiter.api.AfterAll;
import org.junit.jupiter.api.AfterEach;
import org.junit.jupiter.api.BeforeAll;
import org.junit.jupiter.api.BeforeEach;
import org.junit.jupiter.api.Disabled;
import org.junit.jupiter.api.Test;

class StandardTests {

    @BeforeAll
    static void initAll() {
    }

    @BeforeEach
    void init() {
    }

    @DisplayName("😱")
    @Test
    void succeedingTest() {
    }

    @Test
    void failingTest() {
        fail("a failing test");
    }

    @Test
    @Disabled("for demonstration purposes")
    void skippedTest() {
        // not executed
    }

    @Test
    void abortedTest() {
        assumeTrue("abc".contains("Z"));
        fail("test should have been aborted");
    }

    @AfterEach
    void tearDown() {
    }

    @AfterAll
    static void tearDownAll() {
    }

}
4.2.2 断言
| 方法 | 说明 |
|---|---|
| assertEquals | 判断两个对象或两个原始类型是否相等 |
| assertNotEquals | 判断两个对象或两个原始类型是否不相等 |
| assertSame | 判断两个对象引用是否指向同一个对象 |
| assertNotSame | 判断两个对象引用是否指向不同的对象 |
| assertTrue | 判断给定的布尔值是否为 true |
| assertFalse | 判断给定的布尔值是否为 false |
| assertNull | 判断给定的对象引用是否为 null |
| assertNotNull | 判断给定的对象引用是否不为 null |
| assertArrayEquals | 数组断言 |
| assertAll | 组合断言 |
| assertThrows | 异常断言 |
| assertTimeout | 超时断言 |
| fail | 快速失败 |
4.2.3 嵌套测试
JUnit 5 可以通过 Java 中的内部类和@Nested 注解实现嵌套测试,从而可以更好的把相关的测试方法组织在一起。在内部类中可以使用@BeforeEach 和@AfterEach 注解,而且嵌套的层次没有限制。
@DisplayName("A stack")
class TestingAStackDemo {

    Stack<Object> stack;

    @Test
    @DisplayName("is instantiated with new Stack()")
    void isInstantiatedWithNew() {
        new Stack<>();
    }

    @Nested
    @DisplayName("when new")
    class WhenNew {

        @BeforeEach
        void createNewStack() {
            stack = new Stack<>();
        }

        @Test
        @DisplayName("is empty")
        void isEmpty() {
            assertTrue(stack.isEmpty());
        }

        @Test
        @DisplayName("throws EmptyStackException when popped")
        void throwsExceptionWhenPopped() {
            assertThrows(EmptyStackException.class, stack::pop);
        }

        @Test
        @DisplayName("throws EmptyStackException when peeked")
        void throwsExceptionWhenPeeked() {
            assertThrows(EmptyStackException.class, stack::peek);
        }

        @Nested
        @DisplayName("after pushing an element")
        class AfterPushing {

            String anElement = "an element";

            @BeforeEach
            void pushAnElement() {
                stack.push(anElement);
            }

            @Test
            @DisplayName("it is no longer empty")
            void isNotEmpty() {
                assertFalse(stack.isEmpty());
            }

            @Test
            @DisplayName("returns the element when popped and is empty")
            void returnElementWhenPopped() {
                assertEquals(anElement, stack.pop());
                assertTrue(stack.isEmpty());
            }

            @Test
            @DisplayName("returns the element when peeked but remains not empty")
            void returnElementWhenPeeked() {
                assertEquals(anElement, stack.peek());
                assertFalse(stack.isEmpty());
            }
        }
    }
}
4.2.4 参数化测试
参数化测试是JUnit5很重要的一个新特性,它使得用不同的参数多次运行测试成为了可能,也为我们的单元测试带来许多便利。
利用@ValueSource等注解,指定入参,我们将可以使用不同的参数进行多次单元测试,而不需要每新增一个参数就新增一个单元测试,省去了很多冗余代码。
@ValueSource: 为参数化测试指定入参来源,支持八大基础类以及String类型,Class类型
@NullSource: 表示为参数化测试提供一个null的入参
@EnumSource: 表示为参数化测试提供一个枚举入参
@CsvFileSource:表示读取指定CSV文件内容作为参数化测试入参
@MethodSource:表示读取指定方法的返回值作为参数化测试入参(注意方法返回需要是一个流)
@ParameterizedTest
@ValueSource(strings = {"one", "two", "three"})
@DisplayName("参数化测试1")
public void parameterizedTest1(String string) {
    System.out.println(string);
    Assertions.assertTrue(StringUtils.isNotBlank(string));
}


@ParameterizedTest
@MethodSource("method")    //指定方法名
@DisplayName("方法来源参数")
public void testWithExplicitLocalMethodSource(String name) {
    System.out.println(name);
    Assertions.assertNotNull(name);
}

static Stream<String> method() {
    return Stream.of("apple", "banana");
}


 465
465


 被折叠的 条评论
为什么被折叠?
被折叠的 条评论
为什么被折叠?
 到【灌水乐园】发言


