


0001、1000集GO语言Flag毒誓
唤醒手腕UP猪Pig目标花费1000集进行讲解Go语言视频学习教程(有趣的灵魂,适合小白,不适合巨佬),从2023年3月19日开始,将会一直每天更新,准备在2024年5月1日之前更新完1000集Golang课程,更新不完直播吃完一整只烤卤猪(80斤)全盛晚饭。
最新2023年GoLang视频课程:目标花费1000集进行讲解Go语言视频学习教程(更新中)注入灵魂般的有趣,适合小白,不适合巨佬
0002、Golang编程语言历史
什么是谷歌工程师 20 % 时间?
谷歌工程师 20 % 时间 工作方式,允许工程师拿出 20 % 的时间来研究自己喜欢的项目。

语音服务 Google Now、谷歌新闻 Google News、谷歌地图 Google Map 上的交通信息等,全都是 20 % 时间的产物。Go 语言最开始也是 20 % 时间的产物。
Go 语言 3 位创始人是谁?
| Robert Griesemer(罗伯特 · 格利茨默) | Rob Pike(罗伯 · 派克) | Ken Thompson(肯 · 汤普森) |
|---|
Robert Griesemer:在开发 Go 之前是 Google V8、Chubby 和 HotSpot JVM 的主要贡献者。
Rob Pike:曾是贝尔实验室(Bell Labs)的 Unix 团队,和 Plan 9 操作系统计划的成员。他与 Thompson 共事多年,并共创出广泛使用的 UTF-8 字元编码。
Ken Thompson:主要是 B 语言、C 语言的作者、Unix 之父。1983 年图灵奖(Turing Award)和 1998 年美国国家技术奖(National Medal of Technology)得主。他和 Dennis Ritchie 是 Unix 的原创者。

为什么 Go 语言 叫做 Go 语言?
这是一封由 Rob Pike 在 2007 年 9 月 25 号,星期二,下午 3:12 回复给 Robert Griesemer、Ken Thompson 的有关编程语言讨论主题的邮件,邮件正文大意为:在开车回家的路上我得到了些灵感。给这门编程语言取名为 go,它很简短,易书写。工具类可以命名为:goc、 gol、goa。交互式的调试工具也可以直接命名为 go 。语言文件后缀名为 .go 等等。
这就是 Go 语言名字的来源,自此之后 Robert、Rob 和 Ken 三个人开始在 Google 内部进行了研发,一直到了 2009 年,Go 正式开源了,Go 项目团队将 2009 年 11 月 10 日,即该语言正式对外开源的日字作为其官方生日。源代码最初托管在 http://code.google.com 上,之后几年才逐步的迁移到 GitHub 上。
Go 语言 LOGO 是什么?

Go 语言的 logo 是 Rob Pike 的妻子 Renee French 设计的,她是一位才华横溢的插画家。
某梗 Golang Logo 灵感也来自于 《海贼王》

GO 语言 / C 语言 / Python 比较
Go 语言以其近 C 的执行性能和近解析型语言的开发效率,以及近乎于完美的编译速度,已经风靡全球。很多人将 Go 语言称为 21 世纪的 C 语言,因为 Go 不仅拥有 C 的简洁和性能,而且针对多处理器系统应用程序的编程进行了优化,很好的提供了 21 世纪互联网环境下服务端开发的各种实用特性。

0003、下载安装GO语言环境
谷歌公司 Golang 官方网站:https://go.dev/

.dev 域名主要是为开发者设计的,要求强制使用 HTTPS 来阻止广告恶意程序和 ISP 植入的跟踪代码。
特别注意:官方网站首次访问会比较慢,要耐心等一段时间等浏览器加载完毕。
中国地区 Golang 官网:https://golang.google.cn/
.CN 域名是中国国家顶级域名,是以 .cn 为后缀的域名,包括在 .CN 下直接注册的二级域名和在 .CN 二级域下注册的三级域名。
Java : JDK java develop kits
Python:python 解析器(cpython)
Golang 环境包下载(详细的安装教程 B 站有讲解)
下载链接:https://golang.google.cn/dl/

Go语言环境包目录结构

配置环境变量

补充 path 环境变量:%GOROOT%\bin
Windows操作系统中的PATH环境变量(Path Environment Variable)是一个非常重要的系统环境变量,在系统中起着非常重要的作用。
path 环境变量作用
查找可执行文件: PATH环境变量指定了一组目录的路径,操作系统会在这些路径中查找可执行文件(例如.exe、.bat、.cmd等),因此,当您在命令提示符或运行对话框中输入一个命令时,操作系统会按照PATH中的顺序搜索这些目录,以找到并执行相应的可执行文件。这使得您可以在任何目录下运行系统中已安装的可执行文件,而不必提供完整的路径。
便于运行脚本和命令: 如果您编写了自定义的批处理文件(.bat或.cmd)或脚本文件,可以将这些文件所在的目录添加到PATH中,这样您可以从任何位置运行它们,而不必在命令行中输入完整路径。
简化开发环境配置: 对于开发人员来说,PATH环境变量对于配置开发工具和编程环境非常重要。将编程语言的解释器、编译器、开发工具和相关的库文件所在的目录添加到PATH中,可以使开发过程更加顺利,无需每次都手动指定路径。
系统资源管理: 某些系统和应用程序需要访问特定的工具或资源文件,这些文件可能位于不同的目录中。通过使用PATH环境变量,可以简化对这些资源的管理和访问。
注意:编辑PATH环境变量时要小心,不要删除现有的重要路径,以免影响系统或应用程序的正常运行。
0004、编写HelloWorld程序
合格的程序员脱发皆由 Helloworld 开始 - - - 唤醒手腕
package main

import "fmt"

func main() {
	fmt.Println("Hello, 世界")
}
在Go语言中,go run和go build是两个常用的命令,它们用于不同的目的,并且在开发过程中有不同的用途。以下是它们的主要区别:
go run
进行对你写的程序代码进行编译操作,在编译后立即执行程序,生成一个临时文件,并没有可执行文件生成。
go run用于直接运行Go源代码文件,而不需要显式地生成可执行文件。- 当您使用
go run命令时,它会编译您的代码并立即执行生成的可执行文件,然后输出程序的标准输出(如果有的话)。 - 这在开发和测试阶段非常方便,因为它允许您快速查看和调试代码的输出,而无需手动编译并运行可执行文件。
示例用法
go run main.go
go build
go build用于编译Go源代码文件,并生成可执行文件,该可执行文件可以在需要时运行。- 当您使用
go build命令时,它会将Go源代码编译成一个可执行文件(默认情况下与源代码文件名相同),该可执行文件位于当前目录。 - 这适用于将Go应用程序部署到生产环境或与其他工具集成,因为它生成了一个独立的可执行文件,您可以多次运行它而无需重新编译。
示例用法
go build -o myapp main.go
总之,go run主要用于快速开发和测试,而go build用于生成可执行文件,以便将Go应用程序部署到不同的环境中。在实际开发中,这两个命令通常会结合使用,先使用go run来验证代码,然后使用go build生成可执行文件以进行部署。
注意:使用
go build生成了可执行文件,那么不论当前的环境有没有 go 开发语言环境,都可以执行该可执行文件。
0005、安装Goland开发者工具
JetBrains 公司并没有一个名为 “Goland” 的产品。然而,我认为你可能在提到 “GoLand”,这是 JetBrains 为 Go 编程语言开发的一款集成开发环境(IDE)。
GoLand 是一个专门为 Go 语言开发者设计的集成开发环境,它提供了一系列功能和工具,旨在提高 Go 语言开发的效率和质量。
安装 go 开发者工具
安装 go 开发者工具:goland vscode(微软)goland 下载官网:https://www.jetbrains.com

go env
go env 命令用于打印查看Go开发包的环境配置信息
go env
Go 环境配置信息
GOBIN		编译器和链接器的安装目录,存放可执行文件的目录的绝对路径。
GOROOT		Golang 安装目录。
GOPATH		Golang 工作目录。
GOROOT 和 GOPATH 是与 Go 编程语言相关的两个重要环境变量。它们用于配置和管理 Go 开发环境。
GOROOT 环境变量
GOROOT是指定 Go 语言安装目录的环境变量。它表示 Go 编译器和标准库的安装路径。- 在你安装 Go 语言时,你需要指定一个目录作为 Go 的根目录,这个目录通常包含了 Go 的可执行文件、标准库和其他必要文件。
- 通常情况下,Go 会自动设置
GOROOT环境变量,但你也可以手动设置它,以确保你的开发环境使用正确的 Go 安装目录。
GOPATH 环境变量
GOPATH是 Go 语言工作区的根目录。它用于存储你的 Go 项目和相关的库。- 当你使用
go get命令来下载和安装第三方库时,这些库将被存储在GOPATH下的特定目录结构中。 GOPATH中通常包含三个主要子目录:src:用于存放你的 Go 项目源代码。pkg:用于存放编译后的包对象文件。bin:用于存放可执行文件(例如,通过go install构建的可执行文件)。
需要注意的是,Go 1.11 版本引入了 Go Modules,这是一种更现代的依赖管理机制,允许开发者在不依赖于 GOPATH 的情况下管理项目依赖。在使用 Go Modules 的项目中,你不再需要设置 GOPATH,而是可以在项目目录中使用 go.mod 和 go.sum 文件来管理依赖。
总之,GOROOT 和 GOPATH 是 Go 开发环境中的两个重要概念,它们分别表示 Go 安装目录和工作区的根目录。但随着 Go 语言的发展,Go Modules 已经成为更常见和推荐的依赖管理方式,因此在新的项目中,你可能不需要设置 GOPATH。
0006、安装vscode开发者工具
Vscode 官方网站:https://code.visualstudio.com/

上节课 Goland 开发者工具(x)
go: go.mod file not found in current directory or any parent directory; see ‘go help modules’
GO111MODULE 是 Go 1.11 引入的新版模块管理方式。GO111MODULE 环境变量用于开启或关闭 Go 语言中的模块支持,它有 off、on、auto 三个可选值,默认为 auto。
-
GO111MODULE=off
无模块支持,go 会从 $GOPATH 文件夹和 vendor 目录中寻找依赖项。 -
GO111MODULE=on
模块支持,go 忽略 $GOPATH 文件夹,只根据 go.mod 下载依赖。 -
GO111MODULE=auto
在 $GOPATH/src 外层且根目录有 go.mod 文件时,开启模块支持;否者无模块支持。
go: no module declaration in go.mod. To specify the module path:
go mod edit -module=example.com/mod
0007、fmt.print打印函数
fmt 包实现了类似C语言 printf 和 scanf 的格式化 I/O。
go 内置包 - fmt 包:fmt.print

什么是格式化输出?简单说就是挖个坑,再拿东西去填(什么样的坑,就填什么东西)
Golang 占位符介绍
| %v | 值的默认格式 variable |
|---|---|
| %t | true 或 false bool |
| %b | 表示二进制 binary |
| %o | 表示八进制 octonary |
| %d | 表示十进制 decimal |
| %x | 表示为十六进制 使用 a-f hex |
| %X | 表示为十六进制 使用 A-F hex |
| %c | 表示值对应的 unicode 码值 code |
| %f | 表示浮点数(默认精度为 6) |
0008、Go语言变量命名规则
变量名的首字母是:下划线 _ 、字母
变量名的非首字母部分是:下划线 _ 、字母、数字
例如:
_a、b1、a_
注意:理论上汉字也可以作为变量名称,但是不推荐使用汉字作为变量名,原因是你懂的。
package main

import "fmt"

func main() {
	var 蔡徐坤 = "鸡你太美"
	fmt.Printf("%v", 蔡徐坤)
}
Go语言 25个关键字

包相关: import、 package
声明相关: var、 const、 type、 struct、 interface、 func、 chan、 map、 go
循环相关: for、 range
条件判断相关: if、 else、 switch、 select、 case
中断或返回: return、 goto(嵌套 for 循环 goto 大法)、 fallthrough、 break、default、 continue
延迟执行: defer
Go 语言保留字
常量: true、false、iota(自动递增数字的常量定义)、nil(例如:python None、java null、c++ NULL)
整型:int、 int8 占1个字节、 int16 占2个字节、 int32 占4个字节、 int64 占8个字节
无符号整型:uint、 uint8、 uint16、 uint32、 uint64、 uintptr
浮点型:float32、 float64、 complex64、 complex128
其他:bool、byte、 rune(unicode 字符问题)、string、 error
函数: make、len、cap、new、append、copy、close、delete、complex、real、imag、panic、 recover
int 		类型大小为 8 字节 和计算机系统保持一致
int8	 	类型大小为 1 字节
int16		类型大小为 2 字节
int32 		类型大小为 4 字节
int64 		类型大小为 8 字节
package main

import "fmt"
import "unsafe"

func main() {
	var i1 int = 0
	var i2 int8 = 0
	var i3 int16 = 0
	var i4 int32 = 0
	var i5 int64 = 0
	fmt.Println(unsafe.Sizeof(i1))
	fmt.Println(unsafe.Sizeof(i2))
	fmt.Println(unsafe.Sizeof(i3))
	fmt.Println(unsafe.Sizeof(i4))
	fmt.Println(unsafe.Sizeof(i5))
}
注意:unsafe.Sizeof() 只返回数据类型的大小,不管引用数据的大小,单位为 Byte
unsafe 是什么?
unsafe 库让 golang 可以像 C 语言一样操作计算机内存,但这并不是 golang 推荐使用的,能不用尽量不用,就像它的名字所表达的一样,它绕过了 golang 的内存安全原则,是不安全的,容易使你的程序出现莫名其妙的问题,不利于程序的扩展与维护。
查看计算机是几位的?
cmd > systeminfo

系统类型:x64-based PC
0009、算数运算符和关系运算符
注意:如果你学过任何一门编程语言,都可以十倍速观看了解即可!
Go 算数运算符
var a = 1314
var b = 520
fmt.Println(a + b)
fmt.Println(a - b)
fmt.Println(a*b, a/b, a%b)

a++
b++
fmt.Println(a)
fmt.Println(b)
C++ 随堂测试?
int a = 0;
a = a+++++a;
cout << a;
int a = 1
a = (a++)+(++a)*a+(++(++a))*((a++)++)+a;
cout << a;
Go 关系运算符
var a = 1314
var b = 520
fmt.Println(a<=b)
fmt.Println(a>=b)
fmt.Println(a==b)
fmt.Println(a!=b)
0010、逻辑运算符和短路特性
逻辑运算符

| 逻辑运算符 | 表示 |
|---|---|
! 逻辑非运算符 | !条件表达式 |
逻辑或运算符 | 条件表达式① |
&& 逻辑与运算符 | 条件表达式① && 条件表达式② |
逻辑运算符短路特性
就是说,逻辑运算符 && 和 || 在执行时,如果前边的条件结果能够决定整个表达式的结果,那么就不会执行下一条语句。
比如 && ,前边的条件语句执行的结果为 false,那么后边的结果就不需要执行。因为后边的条件语句不论结果是什么,整个表达式的结果都为 false 值。
package main

import "fmt"

func main() {
	var a = 1
    var b = 0

    if a > 0 && a / b > 0 {
		fmt.Println("OK")
	}
	fmt.Println("end")
}
b == 0 因此假设代码执行到
&&运算符之后,那么代码会报错。
同理,在 || 语句中,假设前边的条件语句为 true,那么整个表达式的结果就为 true,而无需执行后面的条件语句。
package main

import "fmt"

func main() {
	var a = 1
    var b = 0

	if a < 0 || a / b > 0 {
		fmt.Println("OK")
	}
	fmt.Println("end")

}
b = 0 因此假设代码执行到
&&运算符之后,那么代码会报错。
0011、计算机原码和反码和补码
二进制数表示
当前电子计算机技术全部采用的是二进制,因为它只使用 0、1 两个数字符号,非常简单方便,易于用电子方式实现。
1个字节表示 无符号的二进制数
1 => 0000 0001
1个字节表示 有符号的二进制数
二进制的最高位是符号位:0 表示正数 1 表示负数
+1 => 0000 0001
-1 => 1000 0001
int8 取值范围 -128 ~ 127
计算机内部处理的信息,都是采用二进制数来表示的。二进制(Binary)数用 0 和 1 两个数字及其组合来表示任何数。进位规则是“逢 2 进 1”,数字 1 在不同的位上代表不同的值,按从右至左的次序,这个值以二倍递增。
其实还有一种很好理解的解释?
1.int8 占 1 个字节(byte) 也就是 8 个二进制位(bit)
2.每个二进制位可以存储 0 和 1 两个数 ,8 个二进制位就有 2 ^ 8 = 256种组合(可以存储 256 个数)
3.int8 为有符号,所以正数和负数将平分 256 个数。256 / 2 = 128
4.负数为 128 个数,最小值为- 128。  eg:1111 1111 -127、0000 0000 +0、1000 0000 -128
5.正数为 128 个数,0 占一个数。	  eg:最大值为 +127	0111 1111	+127
原码 + 反码 + 补码
正数的原码 | 反码 | 补码都一样。
负数的反码 = 它的原码符号位不变,其他位取反。
1000 0001   (-1 原码)
1111 1110	(-1 反码)
另一种演示
*111 1111
	-
*000 0001
	=
*111 1110
+1    原码(0000 0001) 反码(0000 0001) 补码(0000 0001)
-1    原码(1000 0001) 反码(1111 1110) 补码(1111 1111)  负数的补码 = 它的反码 + 1
0 的 反码 和 补码 都是 0 important
作用:在计算机运算的时,都是以补码的方式来运算。
加法运算:3 + 2
减法运算:3 - 2 = 1 + (-2)
补码运算
因为补码是可以连同符号位一起运算,所以运算法则等同于无符号二进制运算:
 00000011    3 二进制补码表示
 00000010    2 二进制补码表示
 00000101    转换成 10 进制是 5  结果正确!
3 + (-2)
 00000011    +3 二进制补码表示

 10000010    -2 二进制原码表示
 11111101	 -2 二进制反码表示
 11111110    -2 二进制补码表示

 00000011    +3 二进制补码表示
 11111110    -2 二进制补码表示
100000001    转换成 10 进制是 1  结果正确!
特别注意:补码的运算是连同符号位一起运算的。
在计算机中各种运算都是 CPU 来完成的,计算机的 CPU 是不会算减法的。CPU在算术运算上只能做加法和移位和取反运算。

过 13 个小时	 =>	过 1 个小时
倒退 1 个小时 => 过 11 个小时
十进制演示
0 1 (binary 二进制)
0 1 2 3 4 5 6 7 8 9 (decimal 十进制)
(+2) + (-2) = 0
2 - 2
(-2) 反码 => (-7)	eg. 9 - 2 = 7
(-7) + 1 = (-8)
(+2) + (-8) = 10 => 0
0012、位运算和位运算符
位运算?
现代计算机中所有的数据二进制的形式存储在设备中,位运算就是计算机对二进制的0和1进行操作。
位运算符
位运算符是将数值转换为二进制进行计算。我们无须手动将数值转换为二进制,只需对数值使用位运算符即可。
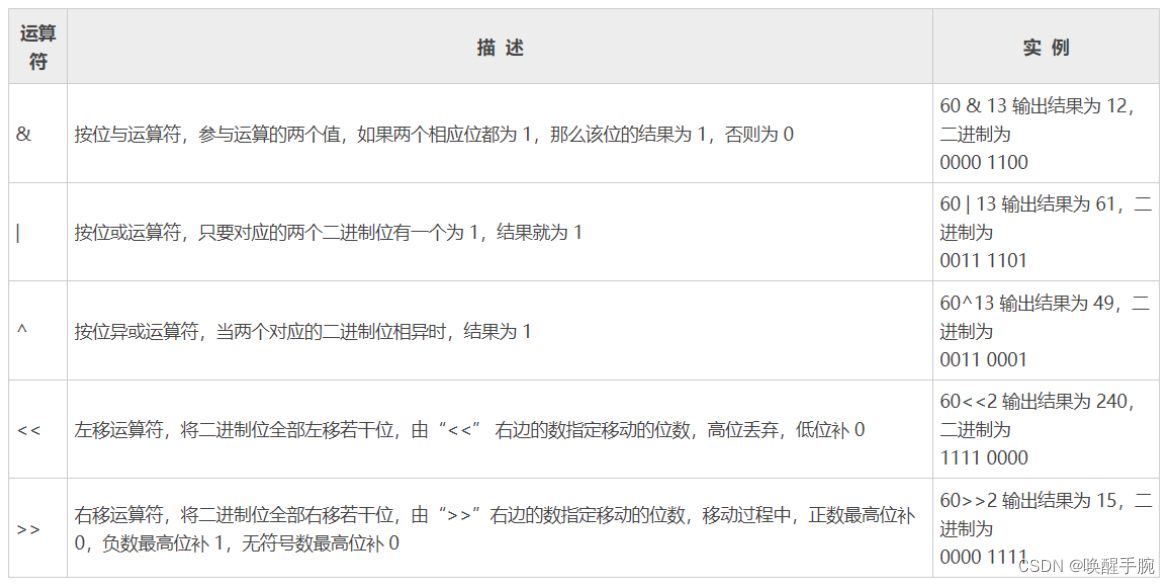
左移<<:左移一位,相当于原数乘2;左移n位,原数乘2^n
右移>>:右移一位,相当于原数除2;右移n位,原数除2^n
注意:假如有余数,余数会被抹掉。除操作的余数是忽略的,得到的结果是商。
var a = 60 // 60 = 0011 1100
var b = 13 // 13 = 0000 1101
var c = 0
c = a & b
fmt.Printf("c的十进制值为 %d\n", c) // 12
fmt.Printf("c的二进制值为 %b\n", c) // 1100
c = a | b
fmt.Printf("c的十进制值为 %d\n", c) // 61
fmt.Printf("c的二进制值为 %b\n", c) // 111101
c = a ^ b
fmt.Printf("c的十进制值为 %d\n", c) // 49
fmt.Printf("c的二进制值为 %b\n", c) // 110001
c = a << 2
fmt.Printf("c的十进制值为 %d\n", c) // 240
fmt.Printf("c的二进制值为 %b\n", c) // 15
c = a >> 2
fmt.Printf("c的十进制值为 %d\n", c) // 15
fmt.Printf("c的二进制值为 %b\n", c) // 1111
判断奇偶
只要根据最未位是 0 还是 1 来决定,为 0 就是偶数,为 1 就是奇数。
因此可以用 if ((a & 1) == 0) 代替 if (a % 2 == 0) 来判断 a 是不是偶数。
**** ***1  奇数
0000 0001

0000 0001  1
0000 0000  0
0013、指针运算符和位运算符
取地址运算符
每个变量在运行时都拥有一个地址,这个地址代表变量在内存中的位置。Go 语言的取地址符是 &,放到一个变量前使用就会返回相应变量的内存地址。
package main

import "fmt"

func main() {
	var a int = 10

	fmt.Println(a)
	fmt.Printf("变量的地址: %X \n", &a)

	a = a + 1

	fmt.Println(a)
	fmt.Printf("变量的地址: %X \n", &a)
}
输出结果是变量 a 所在的内存地址。
指针是什么?
一个指针变量就是一个值的内存地址。那么就可以通过这个变量的地址(指针)去访问它。
在使用指针前你需要声明指针。
指针的声明
var name *var-type
var-type 为指针类型(指针类型就是指针所指向了一个什么类型的变量),name 为指针名,* 号用于指定变量是一个指针。
Go 语言中的值类型(int、float、bool、string、array、struct)都有对应的指针类型,如:*int、*int64、*string等。

package main

import "fmt"

func main() {
	var a int = 10
	var b *int = &a

	fmt.Printf("变量a的值:%v, 变量a的内存地址:%v   \n", a, &a)
	fmt.Printf("指针b的值:%v, 指针b的内存地址:%v   \n", b, &b)
	fmt.Printf("指针b读取变量a的值:%v", *b)
}
指针使用流程
1. 定义指针变量。
2. 指针变量赋值。
3. 访问指针变量中地址指向的值:在指针前面加上 * 号来获取指针指向的地址块的内容。
补充:运算符优先级

0014、Go语言电脑关机整蛊程序
打开记事本案例
package main

import (
   "fmt"
   "os/exec"
)

func main() {
   var cmd = exec.Command("notepad")
   err := cmd.Run()
   if err != nil {
      fmt.Printf("error is : %s", err)
   } else {
      fmt.Println("exec successfully")
   }
   return
}
os/exec 包是 Golang 语言中用于调用执行外部命令的库。
exec.Command
exec.Command() 函数用于使用给定的参数来执行名为 name 的程序,返回结果是一个 Cmd 指针对象。
自动关机
package main

import (
	"fmt"
	"os/exec"
)

func main() {
	var arg = []string{"-s", "-t", "120"}
	var cmd = exec.Command("shutdown", arg...)
	var err = cmd.Run()
	if err != nil {
		fmt.Println("error tips:", err)
	}
	return
}
0015、整蛊程序血淋淋教训
在1000集 课程中,穿插相关的有趣案例等等。基础知识 / 数据库 (redis ,mysql, mongodb)/ Linux 云服务器 / beego / go 云原生与微服务 等等(1000集内容会非常丰富)
假如我明天还能继续录的话,我会继续录,但是我的几个朋友,正在拿刀来的路上。呜呜呜~~~~
Comand 常用函数
Run():Run starts the specified command and waits for it to complete. 阻塞
start():Start starts the specified command but does not wait for it to complete.
CombinedOutput():CombinedOutput runs the command and returns its combined standard.
0016、Go语言var声明变量
Go语言是静态类型语言,因此变量(variable)是有明确类型的,编译器也会检查变量类型的正确性。
在数学概念中,变量表示没有固定值且可改变的数。高中函数中的自变量 x 不是固定的。但从计算机系统实现角度来看,变量是一段或多段用来存储数据的内存。
使用 var 关键字:声明变量 variable var
var name type = 表达式
var 声明变量的关键字 name 变量名 type 变量类型
需要注意的是,Go语言和大部分其他编程语言不同,在声明变量时,将变量类型放在变量名称后面。
int a = 1;  						 c++
String name = "hello";  			 java
String name = new String("hello");   java
go 指针类型
var a, b *int
Go语言在声明变量时,自动对变量对应的内存区域进行初始化操作。每个变量会初始化其类型的默认值,例如:
- 整型和浮点型变量的默认值为 0 和 0.0。
- 字符串变量的默认值为空字符串。
- 布尔型变量默认为 false。
- 切片、函数、指针变量的默认为 nil。
浮点数初始化关键点
由于Go语言和C语言一样,编译器会尽量提高精确度,以避免计算中的精度损失。所以这里如果不指定 f 变量的类型,Go语言编译器会将 f 类型推导为 float64,我们这里不需要 float64 的精度,所以需要强制指定类型为 float32。
reflect 内置包 TypeOf()
reflect - Go 反射机制
标准格式
Go语言 声明变量 标准格式:
var 变量名 变量类型 = 表达式
变量声明以关键字 var 开头,后置变量类型,行尾无须分号。为什么不同语言会这样?这就好比国内的车驾驶员在车的左侧,国外的车型驾驶员在车的右侧。
批量格式 / 组合格式
觉得每行都用 var 声明变量比较烦琐?没关系,还有一种为懒人提供的定义变量的方法:
var (
    a int
    b string
    c []float32
    b struct {
        x int
    }
)
使用关键字 var 和括号,可以将一组变量定义组合起来声明。
简短格式
简短模式(short variable declaration)SVD - 变量定义和初始化语法。
名字 := 表达式
注意点:1. 需要初始化 2. 不提供数据类型 3. 只能用在函数内部
和 var 形式声明语句一样,简短变量声明语句。同时也可以用来声明和初始化一组变量:
i, j := 0, 1
package main

import "fmt"

func main(){
	var a, b int
	b = 1
	fmt.Println("a = ", a, ", b = ", b)

	var c int = 1
	fmt.Println("c = ", c)

	d := 1
	fmt.Println("d = ", d)

	x, y, z, _ := 1, 2, 3, 4;
	fmt.Printf("x = %d, y = %d, z = %d \n", x, y, z)
}
因为简洁和灵活的特点,简短变量声明被广泛用于大部分的 局部变量 的声明和初始化。var 形式的声明语句往往是用于需要显式指定变量类型地方,或者因为变量稍后会被重新赋值而初始值无关紧要的地方。
0017、Go语言匿名变量
匿名变量不占用命名空间,不会分配内存。匿名变量与匿名变量之间也不会因为多次声明而无法使用。
注意:匿名变量在编译阶段完成的事情,并不会在运行时去实际赋值,所以不应该叫做变量。
匿名变量作用
package main

import "fmt"

func VendingMachine() (water, noodles, sweet string) {
	return "元气森林", "康师傅泡面", "口香糖"
}

func main() {
	var water, noodle, sweet string = VendingMachine()
	fmt.Println(water, noodle, sweet)
}
1、Go语言支持返回多个值(多重返回)
2、如果只想获取某个值,不用像其他语言声明所有变量(匿名变量)
匿名变量的特点是一个下画线 _,本身就是一个特殊的标识符,被称为空白标识符。它可以像其他标识符那样用于变量的声明或赋值(任何类型都可以赋值给它),但任何赋给这个标识符的值都将被抛弃,因此这些值不能在后续的代码中使用,也不可以使用这个标识符作为变量对其它变量进行赋值或运算。使用匿名变量时,只需要在变量声明的地方使用下画线替换即可。
在编码过程中,可能会遇到没有名称的变量、类型或方法。虽然这不是必须的,但有时候这样做可以极大地增强代码的灵活性,这些变量被统称为匿名变量。
0018、Go 简单数据类型互相转换
go 在不同类型的变量之间赋值时,需要显式转换。简单理解,就是 go 的数据类型不能自动转换。
Go 数据类型
- 基础类型:整数、浮点数、复数、布尔值、字符串、常量
- 聚合类型:数组、结构体 struct
- 引用类型:指针、切片 slice、映射 map、函数、通道
- 接口类型:接口
变量转换方式
底层相同结构类型的变量转换方式
T(v) 将值 v 转换为类型 T; int(v) float64(v)
注意:采用这种方式转换 两个变量的类型在底层具有相同数据结构类型
var a byte = 'W' // 字符类型   GO: 字符类型(byte 类型,rune 类型)
b := string(a)   // 转换为字符串类型
var a int8 = 10  // int8 类型
b := float32(a)  // 转换成浮点数类型
引用:字符串转数字 Go语言strconv 库的 Atoi
高精度转低精度内存溢出情况
package main

import "fmt"

func main() {
	var a int16 = 520
	var b, c, d int8
	b = int8(a) + 127 // 【编译时通过】但是结果会溢出,
	c = int8(a) + 128 // 【编译不会通过】数据类型为int8,int8 的范围 -128 ~ 127
	d = int8(a)
	fmt.Println(a)
	fmt.Println(b)
	fmt.Println(c)
	fmt.Println(d)
}
520 int16 2 个字节 16 位 有一位是符号位 15 位是数据位

int8 1 个字节 8 位 有一位是符号位 7 位是数据位
int8(520) 1 个字节 8 位

0019、字符串和基本数据类型转换
在实际开发中我们往往需要对一些常用的数据类型进行转换,如 string 、 int 、 int64 、 float 等数据类型之间的转换, Go 语言中的 strconv 包为我们提供了字符串和基本数据类型之间的转换功能。
a = Type(b)
Type 要显式转换的类型。b 要转换的变量。两个变量的类型在底层需要具有相同(相似)的数据结构。比如:int 和 float64 byte 和 string(strconv string convert)
整数和字符串之前转换用到的两个函数
strconv.Itoa(): 整型转字符串
func Itoa(i int) string
Itoa() 函数用于将 int 类型数据转换为对应的字符串类型
func main() {
    num := 100
    str := strconv.Itoa(num)
    fmt.Printf("类型:%T 值:%v  \n", str, str)
}
strconv.Atoi(): 字符串转整型
func Atoi(s string) (i int, err error)
Atoi() 函数用于将字符串类型的整数转换为 int 类型
Atoi() 函数有两个返回值,i 为转换成功的整型,err 在转换成功是为空转换失败时为相应的错误信息。
ascii to integer
scanf、scan、scanln / Printf Print Println(c++ cin >> a / scanf)
上节课 Itoa() / Atoi() 整型 和 字符串
0020、strconv.Parse系列函数
strconv 内置包 Parse系列函数:解决 字符转非整型(也可以转整形)的数值。
parse 单词意思:vt. 从语法上描述或分析(词句等)
Parse 系列函数用于将字符串转换为指定类型的值,其中包括 ParseBool() 、 ParseFloat() 、 ParseInt() 、 ParseUint()、ParseComplex。
strconv.ParseBool()
ParseBool() 函数用于将字符串转换为 bool 类型的值,它只能接受 1 、 0 、 t 、 f 、 T 、 F 、 true 、 false 、 True 、 False 、 TRUE 、 FALSE ,其它的值均返回错误。函数签名如下:
func ParseBool(str string) (value bool, err error)
package main

import (
	"fmt"
	"strconv"
)

func main() {
	var str string = "true"
	res, err := strconv.ParseBool(str)
	if err != nil {
		fmt.Println(err)
	} else {
		fmt.Println(res)
	}
}
strconv.ParseInt() 类似:Atoi()
ParseInt() 函数用于返回字符串表示的整数值(可以包含正负号),函数签名:
func ParseInt(s string, base int, bitSize int) (i int64, err error)
参数说明:
base 指定进制,取值范围是 2 到 36。如果 base 为 0,则会从字符串前置判断,“0x”是 16 进制,“0”是 8 进制,否则是 10 进制。
bitSize 指定类型,0、8、16、32、64 分别代表 int 、 int8 、 int16 、 int32 、 int64 。
package main

import (
	"fmt"
	"strconv"
)

func main() {
	var str string = "-100"
	res, err := strconv.ParseInt(str, 10, 8)
	if err != nil {
		fmt.Println(err)
	} else {
		fmt.Println(res)
	}
}
strconv.ParseUint()
ParseUint() 函数的功能类似于 ParseInt() 函数
区别:ParseUint() 函数不接受正负号,用于无符号整型。函数签名:
func ParseUint(s string, base int, bitSize int) (n uint64, err error)


base 指定进制,取值范围是 2 到 36。如果 base 为 0,则会从字符串前置判断,“0x”是 16 进制,“0”是 8 进制,否则是 10 进制。

bitSize 指定类型,0、8、16、32、64 分别代表 int 、 int8 、 int16 、 int32 、 int64 。
package main

import (
	"fmt"
	"strconv"
)

func main() {
	var str string = "100"
	res, err := strconv.ParseuInt(str, 10, 8)
	if err != nil {
		fmt.Println(err)
	} else {
		fmt.Println(res)
	}
}
strconv.ParseFloat()
ParseFloat() 函数用于将一个表示浮点数的字符串转换为 float 类型.函数签名:
func ParseFloat(s string, bitSize int) (f float64, err error)
参数说明:
如果 s 合乎语法规则,函数会返回最为接近 s 表示值的一个浮点数(使用IEEE754无偏舍入)。
bitSize 指定类型,32 表示 float32,64 表示 float64;
package main

import (
	"fmt"
	"strconv"
)

func main() {
	var str string = "520.1314"
	res, err := strconv.ParseFloat(str, 64)
	if err != nil {
		fmt.Println(err)
	} else {
		fmt.Println(res)
	}
}
strconv.ParseComplex()
ParseComplex() 函数用于将一个表示复数的字符串转换为 complex 类型。函数签名:
func ParseComplex(s string, bitSize int) (complex128, error)
package main

import (
	"fmt"
	"strconv"
)

func main() {

	var str string = "100+1i"	// 注意:字符串表达式不能带有空格
	res, err := strconv.ParseComplex(str, 64)
	if err != nil {
		fmt.Println(err)
	} else {
		fmt.Println(res)
	}
}
常见 error
// ErrRange indicates that a value is out of range for the target type.
var ErrRange = errors.New("value out of range")

// ErrSyntax indicates that a value does not have the right syntax for the target type.
var ErrSyntax = errors.New("invalid syntax")
IEEE754 标准
IEEE754标准提供了如何在计算机内存中,以二进制的方式存储十进制浮点数的具体标准。IEEE754标准发布于1985年. 包括 javascript, Java, C在内的许多编程语言在实现浮点数时, 都遵循IEEE754标准。
parse 系列:字符串 转 给定类型数据(bool / int64 / uint64 / float64 / complex128)
0021、strconv.Format系列函数
Format 系列函数实现了将给定类型数据格式化为字符串类型的功能,其中包括 FormatBool() 、 FormatInt() 、 FormatUint()、 FormatFloat()、FormatComplex 。
fmt.Printf:print format
fmt.scanf:scan format
FormatBool()
FormatBool() 函数可以一个 bool 类型的值转换为对应的字符串类型。函数签名:
func FormatBool(b bool) string
func main() {
	num := true
	str := strconv.FormatBool(num)
	fmt.Printf("type:%T,value:%v\n ", str, str)
}
FormatInt()
FormatInt() 函数用于将整型数据转换成指定进制并以字符串的形式返回。函数签名:
func FormatInt(i int64, base int) string
其中,参数 i 必须是 int64 类型,参数 base 必须在 2 到 36 之间,返回结果中会使用小写母“a”到“z”表示大于 10 的数字。
func main() {
	var num int64 = 100
	str := strconv.FormatInt(num, 16)
	fmt.Printf("type:%T,value:%v\n ", str, str)
}
base 为什么是 2 ~ 36 之间?
0123456789 10个数字 + abcdefghijklmnopqrstuvwxyz 26个字母
FormatUint()
FormatUint() 函数与 FormatInt() 函数的功能类似,但是参数 i 必须是无符号的 uint64 类型,函数签名如下。
FormatUint() 函数用于将无符号整型数据转换成指定进制并以字符串的形式返回。函数签名:
func FormatUint(i uint64, base int) string
func main() {
	var num uint64 = 110
	str := strconv.FormatUint(num, 16)
	fmt.Printf("type:%T,value:%v\n", str, str)
}
FormatFloat()
FormatFloat() 函数用于将 float64 浮点数转换为字符串类型。函数签名:
func FormatFloat(f float64, fmt byte, prec, bitSize int) string
bitSize 表示参数 f 的来源类型(32 表示 float32、64 表示 float64)
fmt 表示格式 科学计数法
'b' (-ddddp±ddd, a binary exponent),
'e' (-d.dddde±dd, a decimal exponent),
'E' (-d.ddddE±dd, a decimal exponent),
'f' (-ddd.dddd, no exponent),
'g' ('e' for large exponents, 'f' otherwise),
'G' ('E' for large exponents, 'f' otherwise),
'x' (-0xd.ddddp±ddd, a hexadecimal fraction and binary exponent), or
'X' (-0Xd.ddddP±ddd, a hexadecimal fraction and binary exponent).
prec 控制精度
The special precision -1 uses the smallest number of digits
在 Go 编程中,用来表示小数的有两种类型:
float32(单精度类型,占据 4 个字节 byte,32 个二进制位 bit)

float64(双精度类型,占据 8 个字节 byte,64 个二进制位 bit)

exponent:指数 fraction:小数
func main() {
	var num float64 = 3.1415926
	str := strconv.FormatFloat(num, 'E', -1, 64)
	fmt.Printf("type:%T,value:%v\n", str, str)
	// type:string,value:3.1415926E+00
}
FormatComplex()
略~~~
0022、fmt.Scan扫描函数
控制台输出:
fmt.Printfmt.Printffmt.Println
fmt包下的三个扫描函数,类似于java中是Scanner一样,在Go语言中使用&变量名称来进行获值。
cin >> a   c++
a = input("a = ")   matlab  / python
| 函数 | 参数 | 使用细节 | 返回值 |
|---|---|---|---|
| Scanf | 格式化字符串, 内存空间地址(可传多个) | 传入的值必须满足格式的要求 | 成功的值数量, 失败的原因 |
| Scan | 内存空间地址(可传多个) | 识别换行符为空格 | 成功的值数量, 失败的原因 |
| Scanln | 内存空间地址(可传多个) | 识别换行符为完成 | 成功的值数量, 失败的原因 |

fmt.Scan
输入:读取以空白符分割的值返回到地址中进行修改,换行视为空白符。
返回值:错误处理,返回值中有一个int类型的值是返回正确的数量,有一个err是错误的原因
package main

import "fmt"

func main() {
	var (
		name  string
		age   int
		money float64
	)

	n, err := fmt.Scan(&name, &age, &money)

	if err != nil {
		fmt.Println("错误:", err, "成功的值数量:", n)
	} else {
		fmt.Println(n, name, age, money)
	}
}
wrist
21
520.1314
注意:当出现输入错误则之后全部错误
Scan scans text read from standard input, storing successive space-separated values into successive arguments. Newlines count as space. It returns the number of items successfully scanned. If that is less than the number of arguments, err will report why.
扫描扫描从标准输入读取的文本,将连续的空格分隔值存储到连续的参数中。换行算作空格。它返回成功扫描的项目数。如果这小于参数的数量,err将报告原因。
fmt.Scanf
格式化读入,暗含强制类型转换。Scanf扫描从标准输入读取的文本,将空格分隔的连续值存储到由格式决定的连续参数中。
Scanf scans text read from standard input, storing successive space-separated values into successive arguments as determined by the format. It returns the number of items successfully scanned. If that is less than the number of arguments, err will report why. Newlines in the input must match newlines in the format. The one exception: the verb %c always scans the next rune in the
input, even if it is a space (or tab etc.) or newline.
Scanf 扫描从标准输入读取的文本,将连续的空格分隔值存储到由格式确定的连续参数中。它返回成功扫描的项目数。如果这小于参数的数量,则err将报告原因。输入中的换行符必须与格式中的换行符匹配。一个例外:动词%c总是扫描输入中的下一个符文,即使它是空格(或制表符等)或换行符。
package main

import "fmt"

func main() {
	var (
		name  string
		age   int
		money float64
	)

	n, err := fmt.Scanf("%s %d %f", &name, &age, &money)

	if err != nil {
		fmt.Println("错误:", err, "成功的值数量:", n)
	} else {
		fmt.Println(n, name, age, money)
	}
}
n, err := fmt.Scanf("\nname=%s\nage=%d\nmoney=%f", &name, &age, &money)
注意:当出现输入错误则之后全部错误
案例用途
n, err := fmt.Scanf("name=%s & age=%d & money=%f", &name, &age, &money)
name=wristwaking & age=12 & money=200
fmt.Scanln
Scanln 类似 Scan,但它在遇到换行时才停止扫描。最后一个数据后面必须有换行或者到达结束位置。使用场景就是只要换行就结束。
返回错误和Scan一样。
Scanln is similar to Scan, but stops scanning at a newline and after the final item there must be a newline or EOF.
ScanIn类似于Scan,但在换行处停止扫描,并且在最后一项之后必须有换行符或EOF。
0023、Go语言变量作用域
作用域:已声明标识符所表示的常量、类型、变量、函数或包在源代码中的作用范围。
Go语言中变量可以在 3 个地方声明:
- 局部变量:函数内部声明 / 定义的变量叫局部变量,作用域仅限于函数内部。
- 全局变量:函数外部声明 / 定义的变量叫全局变量,可以在整个包甚至外部包(导出)中使用。全局变量和局部变量的名称可以相同,但是函数内会优先使用局部变量。
- 参数变量:在函数中,作为局部变量来使用。
局部变量 local variable
什么是局部变量?在函数体内声明的变量称之为局部变量,它们的作用域只在函数体内,参数和返回值变量也是局部变量。
注意点:局部变量不是一直存在的,它只在定义它的函数被调用后存在,函数调用结束后这个局部变量就会被销毁。
package main

import (
	"fmt"
)

var age int = 20
var name string = "wrist"

func test() {
	age := 10
	name := "waking"
	fmt.Println("age = ", age)
	fmt.Println("name = ", name)
}

func main() {
	fmt.Println("age = ", age)
	fmt.Println("name = ", name)
	fmt.Println("-----")
	test()
}
全局变量 global variable
定义:函数外部定义的变量都属于全局变量。全局变量声明必须以 var 开头。
生效范围:当前 package 内。
注意:如果想要其他 package 访问,全局变量以大写开头。
utils > hello.go
package utils

var hello string = "hello world"
utils > tool.go
package utils

import (
   "fmt"
   "time"
)

var Watch string = time.DateTime

func Hello() {
   fmt.Println(hello)
}
main.go
package main

import "awesomeProject/utils"

func main() {
	utils.Hello()
}
参数变量 parameter variable
定义:函数调用时传递的变量。
生效范围:函数范围。
在定义函数时函数名后面括号中的变量叫做形式参数(简称形参)。
特别重要:形式参数只在函数调用时才会生效,函数调用结束后就会被销毁,在函数未被调用时,函数的形参并不占用实际的存储单元,也没有实际值。
形式参数会作为函数的局部变量来使用。
package main

import "fmt"

var a int = 30

func main() {
	var a int = 10
	var b int = 20
	var c int = 0

	fmt.Printf("main() 函数中 a = %d \n", a)
	fmt.Println("-----")
	c = sum(a, b)
	fmt.Println("-----")
	fmt.Printf("main() 函数中 c = %d \n", c)
}

func sum(a, b int) int {
	fmt.Printf("sum() 函数中 a = %d \n", a)
	fmt.Printf("sum() 函数中 b = %d \n", b)
	return a + b
}
0024、Go语言只因你太美整蛊程序
os/exec 包是 Golang 中用于调用执行外部命令的库。
os.UserConfigDir()
UserConfigDir returns the default root directory to use for user-specific configuration data. Users should create their own application-specific subdirectory within this one and use that.
UserConfigDir 返回用于特定于用户的配置数据的默认根目录。用户应该在这个目录中创建自己的特定于应用程序的子目录并使用它。
dir, err = os.UserConfigDir()
// C:\Users\Administrator\AppData\Roaming
os.UserCacheDir()
UserCacheDir returns the default root directory to use for user-specific cached data. Users should create their own application-specific subdirectory within this one and use that.
UserCacheDir返回用于特定于用户的缓存数据的默认根目录。用户应该在这个目录中创建自己的特定于应用程序的子目录并使用它。
dir, err = os.UserCacheDir()
// C:\Users\Administrator\AppData\Local
os.Hostname()
Hostname returns the host name reported by the kernel.
返回内核报告的主机名。
func Hostname() (name string, err error) {
	return hostname()
}
os.UserHomeDir()
UserHomeDir returns the current user’s home directory.
UserHomeDir返回当前用户的主目录。
dir, err = os.UserHomeDir()
// C:\Users\Administrator
太到位了~~~ 直鸡心灵
package main

import (
	"bufio"
	"fmt"
	"io"
	"net/http"
	"os"
)

var imageURL string = ""

func getImage(path string) {
	res, err := http.Get(imageURL)
	if err != nil {
		return
	}
	defer res.Body.Close()
	reader := bufio.NewReader(res.Body)

	file, err := os.Create(path)
	if err != nil {
		panic(err)
	}
	writer := bufio.NewWriter(file)
	written, err := io.Copy(writer, reader)
	if err != nil {
		panic(err)
	} else {
		fmt.Println(written)
	}
}

func main() {
	userHomePath, err := os.UserHomeDir()
	if err != nil {
		return
	} else {
		deskTopPath := "\\Desktop"
		getImage(userHomePath + deskTopPath + "\\鸡你太美" + ".jpeg")
	}
}
bufio包实现了有缓冲的I/O。它包装一个io.Reader或io.Writer接口对象,创建另一个也实现了该接口,且同时还提供了缓冲和一些文本I/O的帮助函数的对象。
bufio包原理
io 操作本身的效率并不低,低的是频繁的访问本地磁盘的文件。所以bufio就提供了缓冲区(分配一块内存),读和写都先在缓冲区中,最后再读写文件,来降低访问本地磁盘的次数,从而提高效率。
通过缓存可以提高效率,把文件读取进缓存(内存)后再读取的时候可避免文件系统的I/O,从而提高速度。同理,当进行写操作时会先把文件写入缓存(内存),然后由缓存写入文件系统。缓冲区的设计目的是为了存储多次的写入,最后一次性将缓冲区内容写入文件。
func NewReaderSize(rd io.Reader, size int) *Reader
NewReaderSize() 函数的功能是按照指定的缓冲区长度创建 Reader 对象。参数 rd 是 io.Reader 接口,参数 size 是指定的缓冲区字节长度。
defer、panic、recover
GO没有提供“try-catch-finally”这样的异常处理机制
0025、Go语言const声明常量
什么是常量 constant ?
常量是指在程序运行过程中其值不能改变的量。
Go 语言声明常量
| 类型 | 类型定义方式 | 不同类型(底层的数据结构要相同相似)基本运算?(例如:算数运算 / 逻辑运算 / 比较运算) |
|---|---|---|
| 有类型常量 | 显式类型定义 const a int = 1 | 不能 NO  |
| 无类型常量 | 隐式类型定义 const b = 2 | 能 Yes  |
在 Go 语言中,常量分为有类型常量和无类型常量。
Golang 中的常量使用关键字 const 定义,用于存储不会改变的数据,常量是在编译时被创建的,即使定义在函数内部也是如此,并且只能是布尔型、数字型(整数型、浮点型和复数)和字符串型。
由于编译时的限制,定义常量的表达式必须为能被编译器求值的常量表达式。
常量的定义格式和变量的声明语法类似:const name [type] = value,例如:
const pi = 3.14159 // 相当于 math.Pi 的近似值
在Go语言中,你可以省略类型说明符 [type],因为编译器可以根据变量的值来推断其类型。
- 显式类型定义: const b string = “hello” (有类型常量)
- 隐式类型定义: const b = “hello” (无类型)
常量的值必须是能够在编译时就能够确定的,可以在其赋值表达式中涉及计算过程,但是所有用于计算的值必须在编译期间就能获得。
- 正确的做法:const a = 2/3
- 错误的做法:const b = time.Now().String() // 引发构建错误: time.Now().String()
批量组合声明常量
和变量声明一样,可以批量声明多个常量:
const (
    e  = 2.7182818
    pi = 3.1415926
)
const a = 1
注意:一个常量被声明后可以不使用,但是变量一旦声明则必须使用。
无类型常量
一个常量的声明也可以包含一个类型和一个值,但是如果没有显式指明类型,这个常量就是:从属类型待定的常量。
const a = 520
const b = 0.1314
const c = a + b
fmt.Println(a, b, c)

fmt.Println(reflect.TypeOf(a), reflect.TypeOf(b), reflect.TypeOf(c))
Go语言的常量虽然可以是任何基本数据类型,但许多常量并不从属某一具体类型。
上节课遗漏点!!!
只有常量可以是无类型的。当一个无类型的常量被赋值给一个变量的时候,或者出现在有明确类型的变量声明的右边,无类型的常量将会被隐式转换为对应的类型。
对于常量面值,不同的写法可能会对应不同的类型。例如0、0.0、0i和\u0000虽然有着相同的常量值,但是它们分别对应无类型的整数、无类型的浮点数、无类型的复数和无类型的字符等不同的常量类型。同样,true和false也是无类型的布尔类型,字符串面值常量是无类型的字符串类型。
从属类型待定的常量共有6种,分别是无类型布尔、无类型整数、无类型文字符号、无类型浮点数、无类型复数、无类型字符串。
const a = 1+1i
编译器为这些没有明确基础类型的数字常量提供比基础类型更高精度的算术运算,当赋值给特定类型时精度会有影响。
当你把有无类型的常量,赋值给一个变量的时候,无类型的常量会被隐式的转化成对应的类型。
为什么常量不能被访问?
 go语言的常量地址是不允许访问的

 func main() {
	const watch float64 = math.Pi

	fmt.Println(&watch)
}

 # command-line-arguments
.\main.go:11:15: invalid operation: cannot take address of watch (constant 3.14159 of type float64)
GO常量注意点
1∶常量使用const修饰,代表永远是只读,不能修改,对值进行保护。
2:const只能修饰boolean,number (int相关类型、浮点类型、complex)和string。只能是布尔、整数、浮点、复数和字符串
3∶语法: const identifier [type] = value,其中type可以省略。(无类型  有类型)
所有常量的运算都可以在编译期完成,这样不仅可以减少运行时的工作,也方便其他代码的编译优化,当操作数是常量时,一些运行时的错误也可以在编译时被发现,例如整数除零、字符串索引越界、任何导致无效浮点数的操作等。
常量间的所有算术运算、逻辑运算和比较运算的结果也是常量,对常量的类型转换操作或以下函数调用都是返回常量结果:len、cap、real、imag、complex 和 unsafe.Sizeof。
算术运算  加减乘除

const a = 520
const b = 0.1314
const c = a > b         无类型 bool    比较运算

const a = true
const b = false
const c bool = a && b   有类型 bool    逻辑运算

const c = len("唤醒手腕")
字面量
编程语言源程序中表示固定值的符号叫做字面量,也称字面常量。一般使用裸字符序列来表示不同类型的值。字面量可以被编程语言编译器直接转换为某个类型的值。
Go的字面量可以出现在两个地方:一是用于常量和变量的初始化,二是用在表达式中作为函数调用实参。变量初始化语句中如果没有显式地指定变量类型,则Go编译器会结合字面量的值自动进行类型推断。Go中的字面量只能表达基本类型的值,Go不支持用户自定义字面量。
问题?
const pi = math.Sqrt(10.0)
const pi = x
进行编译 得到二进制程序 所占空间 大小?
0026、Go语言常量和变量内存空间
堆和栈的数据都是动态变化的,字面量是不会变的,一般不会存储在这个区域。对于字符串和大一点的数字一般存储在 全局区,然后通过地址引用。小一点的数字可能被直接编码成汇编指令的常量,所以在代码段。
0027、Go语言iota常量生成器
常量声明可以使用 iota 常量生成器初始化,它用于生成一组以相似规则初始化的常量,但是不用每行都写一遍初始化表达式。在一个 const 声明语句中,在第一个声明的常量所在的行,iota 将会被置为 0,然后在每一个有常量声明的行 ,iota 加一。
a b c 0 , 1, 2 批量组合
const (
    a = 0
    b = 1
    c = 2
)
const (
    a = iota   // 第 0 行  0
    b = iota   // 第 1 行  1
    c = iota   // 第 2 行  2
)

const d = iota   0

fmt.Println(a, b, c, d)  //0 1 2 0
常量 无类型常量 untyped constant 有类型常量 typed constant
iota,特殊常量,可以认为是一个可以被 go 编译器修改的常量。 可变常量
iota 只能在常量表达式中使用
const a int = iota

var a int = iota     (错误)
fmt.Println(iota)    (错误)
编译错误: undefined: iota
关键词 const 会触发 iota 初始化
const a = iota // a = 0
const (
  b = iota     // b = 0  第 0
  c            // c = 1  第 1
)
package main

import "fmt"

func main() {
	const a float64 = iota
	const b int64 = iota
	const c string = iota // err
	fmt.Println(a, b)
}
自定义类型
自增长常量经常包含一个自定义枚举类型,允许你依靠编译器完成自增设置。
type LevelPoint int

const (
    levelE LevelPoint = iota // 0
    levelD        // 1
	levelC        // 2
    levelB        // 3
    levelA        // 4
)
可跳过的值
处理音频输出:音频可能无论什么都没有任何输出,或者它可能是单声道,立体声,或是环绕立体声的。
逻辑定义没有任何输出为 0、单声道为 1、立体声为 2、环绕立体声(5 个通道是全带宽通道)
我们可以使用下划线(匿名常量(不正确):Go 没有匿名常量这种概念, “_”本身就是一个特殊的标识符,被称为空白标识符)跳过不想要的值。
type AudioOutput int

const (
    OutMute AudioOutput = iota // 0    无声音
    OutMono                    // 1    单声道
    OutStereo                  // 2    立体声
    _
    _
    OutSurround                // 5    环绕立体声
)
const 隐式重复前一个表达式

type PointPrize int

const (
	Good PointPrize = 1 << iota
	Well
	Beautiful
	perfect
	Wonderful
	Amazing
)
因为当你在一个 const 组中仅仅有一个标示符在一行的时候,它将使用增长的 iota 取得前面的表达式并且再运用它。所谓的隐性重复最后一个非空的表达式列表。
iota 匿名变量
type ByteSize int64

const (
	_           = iota
	KB ByteSize = 1 << (10 * iota)
	MB
	GB
	TB
)
定义在一行的情况
const (
    A, B = iota + 1, iota + 2  	 第 0 行
	_, _
	_, _
    C, D                       	 第 3 行
    E, F
)
iota 同一行多次调用不自增,iota 在下一声明行增长。
// A: 1
// B: 2
// C: 2
// D: 3
// E: 3
// F: 4
中间插队
const (
    i = iota   第 0 行  iota = 0
    j = 3.14   第 1 行  iota = 1
    k = iota   第 2 行  iota = 2
    p          第 3 行  iota = 3
)
那么打印出来的结果是 i=0,j=3.14,k=2,p=3
-
iota在const关键字出现时将被重置为0,只能在常量的表达式中使用。 -
const中每新增一行常量声明将使iota计数一次(iota可理解为const语句块中的行索引)。
底层具有相同相似的数据结构,无类型常量隐式转换进行给变量常量进行赋值的时候,考虑数据值(数据准确精度)的流失问题。
package main

func main() {
	const a = 1
	var b float64 = a
	println(a, b)

	const c = 2.0
	const d int64 = c
	println(c, d)

	var e int = 1
	var f float64 = float64(e)
	println(e, f)

	var i float64 = 2.2
	var j int = int(i)
	println(i, j)
}
package main

import (
	ikun "math"
)

func main() {
	const pi float64 = ikun.Pi
	const a = iota
	println(pi)
}
buildin 内建包
所谓内建函数,就是 Go 语言内部预定义实现的函数。调用它们的方式与调用普通函数并无差异,并且在使用它们之前也不需要导入任何代码包。
println()函数就是一个内建函数,与之对应的还有print()函数,这两个函数的区别是println()函数会自动换行,而print()函数不会自动换行。像常见的还有len()、append()等函数。

内建包 buildin.go 函数
close :channel 通讯。关闭 channel

delete : map 中删除实例

len 和 cap :len 用于返回字符串、slice 和数组的长度

new :各种类型的内存分配

make :内建类型(map、slice 和 channel)的内存分配

copy :复制 slice

append :追加 slice

panic 和 recover :异常处理机制

print 和 println :底层打印函数,不引入 fmt 包的情况下也可以使用(调试)

complex、real 和 imag :处理 复数
0028、Go语言常见环境变量
go env -w 环境变量=值
go env 查看 go 相关环境变量
(√)set GO111MODULE=auto
(√)set GOARCH=amd64
(√)set GOBIN=
(√)set GOCACHE=C:\Users\Administrator\AppData\Local\go-build
(√)set GOENV=C:\Users\Administrator\AppData\Roaming\go\env
(√)set GOEXE=.exe
(√)set GOEXPERIMENT=
set GOFLAGS=
(√)set GOHOSTARCH=amd64
(√)set GOHOSTOS=windows
set GOINSECURE=
(√)set GOMODCACHE=C:\Users\Administrator\go\pkg\mod
(√ 私)set GONOPROXY=
(√ 私)set GONOSUMDB=
(√)set GOOS=windows
(√)set GOPATH=C:\Users\Administrator\go
(√ 私)set GOPRIVATE=
(√)set GOPROXY=https://mirrors.aliyun.com/goproxy/
(√)set GOROOT=E:\Golang\go
(√)set GOSUMDB=sum.golang.org
set GOTMPDIR=  临时文件目录
(√)set GOTOOLDIR=E:\Golang\go\pkg\tool\windows_amd64
(√)set GOVCS=
(√)set GOVERSION=go1.20.2
set GCCGO=gccgo
set GOAMD64=v1
set AR=ar
set CC=gcc
set CXX=g++
(√)set CGO_ENABLED=0         Cgo 标值  0 1
set GOMOD=
set GOWORK=
set CGO_CFLAGS=-O2 -g
set CGO_CPPFLAGS=
set CGO_CXXFLAGS=-O2 -g
set CGO_FFLAGS=-O2 -g
set CGO_LDFLAGS=-O2 -g
set PKG_CONFIG=pkg-config
set GOGCCFLAGS=-m64 -fno-caret-diagnostics -Qunused-arguments -Wl,--no-gc-sections -fmessage-length=0 -fdebug-prefix-map=C:\Users\Administrator\AppData\Local\Temp\go-build2675537148=/tmp/go-build -gno-record-gcc-switches
$GO111MODULE
开启或关门 go mod支持 有三个值 auto、on、off 默认是 auto
$GOARCH
$GOARCH(architecture 架构) 表示目标机器(目标机器:是指你打算运行你的 Go 应用程序的机器)的处理器架构,它的值可以是 386、amd64 或 arm。
跨平台交叉编译
如果想要跨平台编译go程序,只需在build的时候制定目标主机的os和arch,如下例子所示所示
GOOS=windows GOARCH=386 go build -o hello.exe hello.go
$GOHOSTARCH $GOHOSTOS
常见 Golang SDK
go1.20.2.windows-386.zip
go1.20.2.windows-amd64.zip
go1.20.2.windows-arm64.zip
$GOCACHE
cache 缓存
GOCACHE=C:\Users\Administrator\AppData\Local\go-build
这是 go build 产生的缓存,用于将来构建中重用的信息,这可以加快编译速度/
使用"go clean -cache"命令清除编译缓存。
go clean -cache
第一次 go build 编译过慢的问题?
$GOENV
set GOENV=C:\Users\Administrator\AppData\Roaming\go\env
Go 环境配置文件的位置。(用户配置记录)
在变量环境中设置 GOENV=off 将禁用默认的配置文件。


go: GOENV can only be set using the OS environment.

$GOEXE
可执行文件名后缀(如Windows上为“.exe”) .exe executable
$GOOS
GO Operation System:$GOOS 表示目标机器的操作系统,它的值可以是 darwin(苹果公司2000年发布的一个开源操作系统)、freebsd(FreeBSD是一种 UNIX 操作系统)、linux 或 windows。
$GOPROXY
set GOPROXY=https://goproxy.io,direct
通俗易懂:设置镜像库的地址
GOPROXY设置的是,go get 下载依赖时使用的代理地址列表。该环境变量也可以设置多个值,多个值之间使用逗号 , 或竖杠 | 分隔。GOPROXY的默认值为:proxy.golang.org,direct
当用 go 命令查找依赖模块时,它会按顺序访问 GOPROXY 列表中的每个代理,直到收到成功的响应或出现终端错误。
GOPROXY存在两个关键字来代替 代理 URL
off:不允许从任何源下载依赖的模块
direct: 直接从版本控制存储库下载,而不是使用代理。
$GOROOT
$GOROOT表示 Go 的安装目录
Windows 下默认会将 Go 安装到 `c:\Go` 目录下。
Linux 下默认会将 Go 安装到 `usr/local/go` 目录下。
$GOSUMDB
set GOSUMDB=off
可以用来配置你使用哪个校验服务器和公钥来做依赖包的校验,默认值是sum.golang.org
GOSUMDB=off 不做校验
它的值是 Go checksum database,用于在拉取模块版本时(无论是从源站拉取还是通过 Go module proxy 拉取)保证拉取到的模块版本数据未经过篡改,如若发现不一致,也就是可能存在篡改,将会立即中止。
GOSUMDB 的默认值为:sum.golang.org,在国内也是无法访问的,但是 GOSUMDB 可以被 Go 模块代理所代理。因此我们可以通过设置 GOPROXY 来解决。如果想要禁止 Go 在后续操作中校验模块版本,则可以将其设置为 off。
$GOVERSION
当前 Go SDK 环境 版本:GOVERSION
$GOMODCACHE
set GOMODCACHE=D:\workspace\go\pkg\mod
go命令存放下载模块的目录
$GOPRIVATE
用来控制 go 命令把哪些仓库看做是私有的仓库,当拉取所配置库的资源时候,就可以跳过 proxy server 忽略校验检查,这个变量的值支持用逗号分隔,可以填写多个值。
$GONOPROXY
$GONOSUMDB
$GOPRIVATE $GONOPROXY $GONOSUMDB
这三个环境变量都是用在当前项目依赖了私有模块,例如像是你公司的私有 git 仓库,又或是 github 中的私有库,都是属于私有模块,都是要进行设置的,否则会拉取失败。
GOPROXY 指定的 Go 模块代理或由 GOSUMDB 指定 Go checksum database 都无法访问到的模块时的场景。
建议直接设置 GOPRIVATE,它的值将作为 GONOPROXY 和 GONOSUMDB 的默认值
$GOEXPERIMENT
golang 1.20 引入 新特性arena,支持手动分配和释放内存。
- 定义环境变量: export GOEXPERIMENT=arenas
- 运行程序同时开启: GOEXPERIMENT=arenas go run main.go
$GOVCS
Go 1.16引入了一个新的配置变量GOVCS,让用户可以指定哪些Module可以使用特定的版本控制工具。
$GOINSECURE
在Go 1.14中增加了新的环境变量,用于指定哪些域名下的仓库不去校验CA证书。
0029、Go语言GOBIN环境变量
$GOBIN 环境变量:用于存储可执行文件的目录的绝对路径。若配置了$GOBIN 当 go install 命令生成的是可执行文件时候,可执行文件会存放在此目录下。
说起 go 可执行文件目录? 最先想到:$GOROOT/bin 路径,我们 go.exe 编译器的安装位置,默认是 $GOROOT/bin 路径。

其他版本 SDK $GOROOT/bin 目录
- go.exe 编译、运行、构建都可以使用这个命令
- godoc.exe 查看包或者函数的源码
- gofmt.exe 格式化 Go 程序
配置 $GOBIN 环境变量
go env -w GOBIN=E:\Golang\go\bin
go build
go build:编译包 GO 源码,生成可执行文件(前提有 main 包 main 函数)。

默认生成可执行文件的目录是当前目录包下

go build 只对 main 包有效( main 函数),在当前目录编译生成一个可执行的二进制文件

go build .\uitl.go
# command-line-arguments
runtime.main_main·f: function main is undeclared in the main package
go build ( ··· blank )
编译器 检索当前目录下 所有 main 包 源文件 , 生成可执行文件(前提有 main 包 main 函数)
go install
go install:编译包 GO 源码,主要用来生成库文件和生成可执行文件

一 是编译包文件(无main包),将编译后的包文件放到 pkg 目录下($GOPATH/pkg)

二 是编译生成可执行文件(有main包),没有配置 GOBIN,将可执行文件放到 $GOPATH/bin 目录($GOPATH/bin) ,若配置了 GOBIN 就在 GOBIN 目录
go install ( ··· blank )
编译器 检索当前目录下 所有 go 源文件, main 生成可执行文件,编译包文件(无 main 包) $GOPATH/pkg
go build vs go install 相同点
都能编译生成可执行文件(.exe)
差异
go build :只能生成可执行文件。
go mod 的特性实在 1.11 版本中提出的,在 1.16 版本中默认开启了这项功能,主要有两个功能。
一、不需要将当前的代码设置在 $GOPATH/src 目录下就能完成编译。(需要有 go.mod)
二、golang 对第三方的包管理更为合适。
① 解释
默认不打开 go mod 功能时,所有的代码都需要在 $GOPATH/src 目录下才能完成编译与安装,而引入了go mod功能之后,只需要当前代码是某个存在go.mod的目录,就可以进行编译。
② 解释
在 go mod 出现之前,golang使用的包管理的逻辑是直接将包安装在 $GOPATH/src 目录下,这样不利用对多个包的版本的统一管理,还会导致第三方的包和自定义的包的混用。
而 vender 出现之后,虽然勉强解决了这个问题,但是又存在着每写一份代码,都需要下载一套使用到的包的对应版本,增加了磁盘的占用量,降低了代码的利用率。而 go mod 则是将各个版本的包下载到指定目录,同时记录版本信息,方便了统一管理。
go install 默认路径
C:\Users\Administrator>go help install
usage: go install [build flags] [packages]

Install compiles and installs the packages named by the import paths.

Executables are installed in the directory named by the GOBIN environment variable, which defaults to $GOPATH/bin or $HOME/go/bin if the GOPATH environment variable is not set. Executables in $GOROOT are installed in $GOROOT/bin or $GOTOOLDIR instead of $GOBIN.
Command gofmt
Gofmt formats Go programs. It uses tabs for indentation and blanks for alignment. Alignment assumes that an editor is using a fixed-width font.
Without an explicit path, it processes the standard input. Given a file, it operates on that file; given a directory, it operates on all .go files in that directory, recursively. (Files starting with a period are ignored.) By default, gofmt prints the reformatted sources to standard output.
gofmt [flags] [path ...]
Gofmt 格式化 Go 程序。它使用制表符进行缩进,使用空格进行对齐。对齐假设编辑器使用固定宽度的字体。如果没有显式路径,它将处理标准输入。给定一个文件,它对该文件进行操作;给定一个目录,它递归地操作该目录中的所有 .go 文件。(以句点开头的文件将被忽略) 默认情况下,gofmt 将重新格式化的源打印到标准输出。
GOPATH 默认路径
| 操作系统 | GOPATH 默认目录 | 案例目录 |
|---|---|---|
| window 操作系统 | %USERPROFILE%/go | C:\Users\Administrator\go |
| linux 操作系统 | $HOME/go | /home/admin/go |
C:\Users\Administrator>go build
package .: no Go files in C:\Users\Administrator
包名和目录名保证一致,但这不是强制规定;同一目录下,所有 go 源文件必须使用相同的包名称
GOPATH bin / pkg / src
go build / go install ( 目录名 !!!不是包名 )
E:\Golang\go\src\目录名 (from $GOROOT)   优先
C:\Users\Administrator\go\src\目录名 (from $GOPATH)  其次
0030、有道翻译血淋淋教训
C:\Users\Administrator>go help install
usage: go install [build flags] [packages]

Install compiles and installs the packages named by the import paths.

Executables are installed in the directory named by the GOBIN environment variable, which defaults to $GOPATH/bin or $HOME/go/bin if the GOPATH environment variable is not set. Executables in $GOROOT are installed in $GOROOT/bin or $GOTOOLDIR instead of $GOBIN.
可执行文件安装在由GOBIN环境变量命名的目录中,没有 $GOBIN,默认为 $GOPATH/bin,如果没有设置GOPATH环境变量, 目录为 $HOME/go/bin。$GOROOT 目录下的可执行文件被安装在$GOROOT/bin 或 $GOTOOLDIR 目录下,而不是 $GOBIN 目录下。
windows   C:\Users\Administrator\go\bin	    GOPATH
liunx     /home/admin/go/bin				GOPATH
0031、Go语言GOPATH模式
GOPATH 是什么?
GOPATH 是 Go 语言中使用的一个环境变量,它使用绝对路径提供项目的工作目录(工作区),是存放 Golang 项目代码的文件路径。
| 操作系统 | GOPATH 默认目录 | 案例目录 |
|---|---|---|
| window 操作系统 | %USERPROFILE%/go | C:\Users\Administrator\go |
| linux 操作系统 | $HOME/go | /home/admin/go |
GOPATH 模式
注意:Go1.11 前就使用 GOPATH 模式,但是在 Go1.11 后,就开始逐步建议使用 Go modules,不再推荐 GOPATH 模式了。
GOPATH目录下一共包含了 3 个子目录,分别是:
bin:存储所编译生成的二进制文件。  go install  =>  exe
pkg:存储编译后库文件。
src:存储所有 .go文件或源代码。在编写 Go 应用程序,程序包和库时,一般会以`$GOPATH/src/xxx.com/xxx`的路径进行存放。

go install 目录
如果安装的是一个库(非main包),则会生成 .a 文件到 $GOPATH/pkg 下对应的平台目录中。
因此在使用 GOPATH 模式下,我们需要将 Go 语言程序代码存放在 $GOPATH/src 固定目录下,并且如果执行 go get 来拉取外部依赖,会自动下载并安装到 $GOPATH/src 目录下。
github.com/go-sql-driver/mysql
go get Git 环境
go: missing Git command. See https://golang.org/s/gogetcmd
为什么弃用 GOPATH 模式?
在 GOPATH 的 $GOPATH/src 下进行 .go 文件或源代码的存储,我们可以称其为 GOPATH 的模式。
这个模式,看起来好像没有什么问题,那么为什么我们要弃用呢?
GOPATH 模式下没有版本控制的概念,具有致命的缺陷,会造成问题:
在执行 go get 的时候去拉去一个依赖,无法传达任何的版本信息的期望,也就是说无法知道当前获取的是哪个版本。
无法同步一致第三方版本号,在运行 Go 应用程序的时候,无法保证其它人与所期望依赖的第三方库是相同的版本。
没办法处理 v1、v2、v3 等等不同版本的引用问题,因为 GOPATH 模式下的导入路径都是一样的,都是`github.com/xxx/xxx`。
Go 语言官方从 Go1.11 起开始推进 Go modules(前身 vgo),Go1.13 起不再推荐使用 GOPATH 的使用模式,Go modules 渐趋稳定,因此新项目也没有必要继续使用 GOPATH 模式。
总结 GOPATH 模式
go build go install .exe go.mod
在使用 GOPATH 模式下,我们需要将应用代码存放在固定的 $GOPATH/src 目录下,且如果执行go get使用第三方类库的时候会自动下载并安装到$GOPATH目录下。
项目的Golang代码,和第三方的Golang文件混在一起, 每个如果项目都需要同样的依赖,那么我们就会在不同的GoPath的src中下载大量重复的第三方依赖包,这同样会占用大量的磁盘空间。
GOPATH = "路径1"     A       第三方库  x        路径1/src

GOPATH = "路径2"     B       第三方库  x        路径2/src
GO module 模式 继往开来了!!!
GO111MODULE=off
无模块支持,go 会从 $GOPATH 文件夹和 vendor 目录中寻找依赖项。
GO111MODULE=on
模块支持,go 忽略 $GOPATH 文件夹,只根据 go.mod 下载依赖。
GO111MODULE=auto
自动(auto)的规则在 go 的 1.13 版本之后,扫描当前目录文件夹中是否存在go.mod文件,如果存在则启用,不存在则关闭。
go mod init      生成 go.mod 文件
go mod download  下载 go.mod 文件中指明的所有依赖
go mod tidy      整理现有的依赖
go mod graph     查看现有的依赖结构
go mod edit      编辑 go.mod 文件
go mod vendor    导出项目所有的依赖到vendor目录
go mod verify    校验一个模块是否被篡改过
go mod why       查看为什么需要依赖某模块
0032、Go语言Vendor机制
1.5 版本推出了 vendor 机制。所谓 vendor 机制,就是项目的根目录下可以有一个 vendor 目录,里面存放了该项目的依赖的 package。
SDK 1.5
发布 1.5 版本时,就说可以使用自身提供的 vendor 特性,但是需要设置如下环境变量:GO15VENDOREXPERIMENT=1

发布 1.6 版本时,该环境变量的值已经默认设置为 1 了,该值可以使用 go env 命令查看。

发布 1.7 版本时,将去掉该环境变量,默认开启 vendor 特性。
1.9 版本推出了实验性质的包管理工具 dep。
1.11 版本推出 modules 机制,简称 mod。modules 的原型其实是 vgo,关于 vgo,可以自行搜索。
govendor
govendor 是一个基于 vendor 机制实现的 Go 包依赖管理命令行工具。使用广泛且具有代表性的主要有:godep、glide、govendor
使用条件
vendor 机制是处于GOPATH体系中的,只有项目在 GOPATH/src 下,vendor才有意义才起作用。注意 vendor 仍然需要GOPATH设定下来实现,但是慢慢脱离了GOPATH/src 的依赖查找,import 优先查找。
1. 当前GOPATH/项目根/vendor目录
2. GOROOT/src
3. GOPATH/src
govendor 使用安装
go get -u github.com/kardianos/govendor
可执行文件 govendor.exe 安装在 $GOROOT/bin 环境变量 path
govendor 命令

govendor 相关参数

vendor 优点
将依赖的外部包引进工程下的 vendor 目录,可以直接在其他机器直接编译,而不用再去构建外部包的编译环境,一个一个的 go get 获取外部依赖包。
防止了go get 重新拉取的外部包的版本可能和期望的不一致,从而导致编译错误问题。
vendor 缺点
无法精确的引用外部包进行版本控制,不能指定引用某个特定版本的外部包。只是在开发时,将其拷贝过来,但是一旦外部包升级,vendor下的代码不会跟着升级。
0033、GO111MODULE环境变量
上节课回顾 => vendor
GOPATH / src
vendor :包共享模式 => 单独工程独立维护模式(单独工程 vendor 目录 vendor.json)
GOPATH 工作区:包共享模式( 共享 GOPATH/src 依赖包、GOROOT / src 内置包 sdk 内置包)
vendor 保证了工程目录下代码的完整性,将工程代码 复制 到 其他 Go 编译环境,不需要再去 go get 拉取下载第三方依赖包。让项目代码直接就能 go install / go build 编译。
保证了工程目录下代码的完整性?
依赖包 和 代码包 都是放在同一工程目录下 其中:依赖包(工程目录 / vendor)
GO 中包的定义与介绍
GO 中包分为3种:1. 系统内置包(GOROOT/src) 2. 自定义包(程序员自己写的) 3. 第三方包(go get)
MODULE 模块介绍
module 模块是一个相关Go包的集合,它是源代码更替和版本控制的单元。模块由源文件形成的go.mod文件的根目录定义,包含go.mod文件的目录也被称为模块根。
Go modules 是 Go 语言的依赖解决方案,发布于 Go1.11,成长于 Go1.12,丰富于 Go1.13,正式于 Go1.14 推荐在生产上使用。
Go modules 目前集成在 Go 的 SDK 中,只要安装了 Go,自然而然也就可以使用 Go modules 了,而 Go modules 的出现也解决了在 Go1.11 前的几个常见争议问题:
- Go 语言依赖包管理问题(依赖包 版本控制问题)
- “淘汰” GOPATH 模式
- 统一社区中的其它的依赖管理工具(提供迁移功能)

包管理工具 go mod 要求 golang - SDK 最低版本是 1.11
GO15VENDOREXPERIMENT=1 1.6 默认为1 1.7 就删除了环境变量配置,默认开启 vendor 模式。
当 GO111MODULE=off 时,go命令行将不会支持 module 功能,寻找依赖包的方式将会沿用旧版本那种通过 vendor 目录或者 GOPATH 模式来查找。
当 module 功能启用时,存储下载的依赖包,具体位置在 $GOPATH/pkg/mod 路径。
开启 GO111MODULE?
GO111MODULE 是 go 开启 mod 包管理工具的一个环境配置,共有三个配置项,分别是 off 、on 、auto 。开启 mod 包管理模式,可以使用选项 on 或 auto。
go env -w GO111MODULE=auto
go env -w GO111MODULE=on
GO111MODULE=off
无模块支持,go 会 vendor 目录中 / GOROOT/src / 从 $GOPATH /src 文件夹和 寻找依赖项。
GO111MODULE=on
模块支持,go 忽略 $GOPATH 文件夹,只根据 go.mod 下载依赖。
GO111MODULE=auto
自动(auto)的规则在 go 的 1.13 版本之后,扫描当前目录文件夹中是否存在go.mod文件,如果存在则启用,不存在则关闭。
回忆:GOPATH go build go install ( 非 GOPATH / src go.mod)
C:\Users\Administrator>go help mod
Go mod provides access to operations on modules.

Note that support for modules is built into all the go commands,
not just 'go mod'. For example, day-to-day adding, removing, upgrading,
and downgrading of dependencies should be done using 'go get'.
See 'go help modules' for an overview of module functionality.

Usage:

        go mod <command> [arguments]

The commands are:

        download    download modules to local cache
        edit        edit go.mod from tools or scripts
        graph       print module requirement graph
        init        initialize new module in current directory
        tidy        add missing and remove unused modules
        vendor      make vendored copy of dependencies       完成 vendor 依赖拷贝
        verify      verify dependencies have expected content
        why         explain why packages or modules are needed
go mod init      生成 go.mod 文件
go mod download  下载 go.mod 文件中指明的所有依赖
go mod tidy      整理现有的依赖
go mod graph     查看现有的依赖结构
go mod edit      编辑 go.mod 文件
go mod vendor    导出项目所有的依赖到vendor目录
go mod verify    校验一个模块是否被篡改过
go mod why       查看为什么需要依赖某模块
go.mod 创建初始化
官方文档:https://golang.google.cn/doc/modules/gomod-ref 官网演示
Each Go module is defined by a go.mod file that describes the module’s properties, including its dependencies on other modules and on versions of Go.
每个 Go 模块都由一个 Go.mod 文件所定义,用来描述模块相关的属性,包括它对于其他模块和Go版本的依赖。
Go generates a go.mod file when you run the go mod init command.
生成 go.mod 文件
go mod init example/mymodule
0034、Go语言go.mod文件
go.mod 文件
类似于   JAVA  -   Java  -   springboot   =>  pom.xml
类似于  前端 Node  js  -  npm  =>   package.json
go mod init 初始化
如果在 $GOPATH 工作区外
go: cannot determine module path for source directory xxx (outside GOPATH, module path must be specified)
go mod init wrist.com/webproject
假如在 $GOPATH 工作区内
要进行初始化 模块,我们需要指定 模块名
go mod init
$GOPATH/src/wrist.com/webproject => cmd => go mod init [模块名]
默认 会以 $GOPATH/src 后面这层路径 wrist.com/webproject 作为模块名
go.mod 关键词
- module         语句指定模块(路径)
- go             编译模块下包的go sdk 最低版本
- require        语句指定的依赖项模块
- replace        语句可以替换依赖项模块
- exclude        语句可以忽略依赖项模块
Go modules 开启了之后,依赖的第三方包被下载到了$GOPATH/pkg/mod路径下。
module 关键词
Declares the module’s module path, which is the module’s unique identifier
声明模块的模块路径,即模块的唯一标识符。
The module path becomes the import prefix for all packages the module contains.
该模块的路径将成为该模块所包含的所有包的导入前缀。
go 关键词
Indicates that the module was written assuming the semantics of the Go version specified by the directive.
表示该模块是根据该指令指定的Go版本的语义编写的。
minimum-go-version
The minimum version of Go required to compile packages in this module.
编译此模块中的包所需 Go SDK 的最低版本。 java => pom
require 关键词
Declares a module as a dependency of the current module 将一个模块声明为当前模块的依赖项
require example.com/othermodule v1.2.3
v1.2.3
 | | |_ _ _ 修订号
 | |
 | |_ _ _ _ 次版本号
 |
 |_ _ _ _ _ 主版本号
伪版本号 v0.0.0-20171201202039-1bf9dbcd8cbe
YYYYMMDDHHmmss hash 字符串
YYYYMMDDHHmmss 主干分支 master latest commit time 最近一次提交时间
hash 字符串 commit id prefix
exclude 关键词
Specifies a module or module version to exclude from the current module’s dependency graph.
指定要从当前模块的依赖关系图中排除的模块或模块版本。
exclude module-path module-version
你今天吃了头孢,告诉厨师我不能喝酒,那你不喝酒就行了呀!!!require => 间接依赖
require 导入模块
exclude 排除模块

replace 关键词
注意点:当您将一个模块路径替换为另一个模块路径时,不要更改您要替换的模块中的包的导入语句。
replace module-path [module-version] => replacement-path [replacement-version]
-
module-path 原模块路径
The module path of the module to replace.
-
module-version 原模块版本
Optional. A specific version to replace. If this version number is omitted, all versions of the module are replaced with the content on the right side of the arrow.
-
replacement-path 目标模块路径
The path at which Go should look for the required module.
This can be a module path or a path to a directory on the file system local to the replacement module.
If this is a module path, you must specify a replacement-version value. If this is a local path, you may not use a replacement-version value.
-
replacement-version 目标模块版本
The version of the replacement module. The replacement version may only be specified if replacement-path is a module path (not a local directory).
该 replace 指令在以下情况下很有用:
- 您正在开发一个新模块,其代码尚未在存储库中。您想要使用本地版本对客户端进行测试。
- 您已经确定了依赖项的问题,克隆了依赖项的存储库,并且正在使用本地存储库测试修复。
retract 关键词
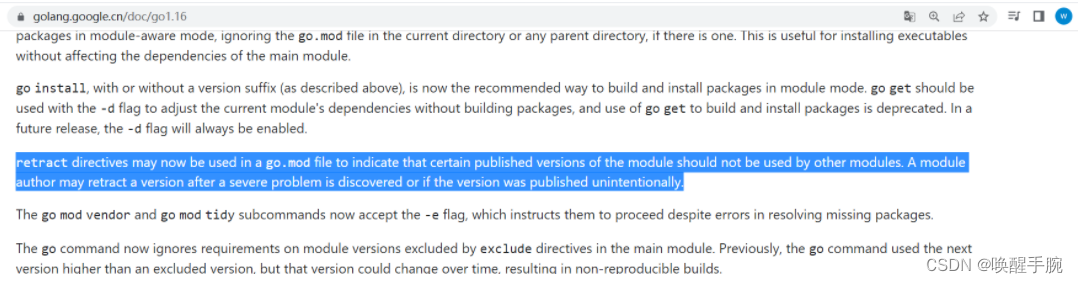
现在可以在一个go.mod文件中使用撤回指令,以表示该模块的某些已发布版本不应该被其他模块使用。模块作者可能会在发现严重问题或版本在无意中发布后撤回版本。
retract是go1.16添加的内容。
Indicates that a version or range of versions of the module defined by go.mod should not be depended upon.
指定一个版本 一个版本范围
retract version

## Retracting a range of versions

retract [version-low,version-high]
高中 区间 [a, b]
sum.go GOSUMDB - checksum database 校验和数据库
如果系统配置了GOSUMDB,在依赖包版本被写入go.sum之前会向该数据库查询该依赖包版本的哈希值进行二次校验,校验无误后再写入go.sum。
如果系统禁用了GOSUMDB,在依赖包版本被写入go.sum之前则不会进行二次校验,go命令会相信所有下载到的依赖包,并把其哈希值记录到go.sum中。
package main

import (
	"context"
	"fmt"
	"go.mongodb.org/mongo-driver/bson"
	"go.mongodb.org/mongo-driver/mongo"
	"go.mongodb.org/mongo-driver/mongo/options"
	"log"
)

var client *mongo.Client

func initDB() {
	clientOptions := options.Client().ApplyURI("mongodb://localhost:27017")
	var err error
	client, err := mongo.Connect(context.TODO(), clientOptions)
	if err != nil {
		log.Fatal(err)
	}
	err = client.Ping(context.TODO(), nil)
	if err != nil {
		log.Fatal(err)
	}
	fmt.Println("MongoDB 连接成功")
	collection := client.Database("gobase").Collection("student")
	res, err := collection.InsertOne(context.Background(), bson.M{"hello": "world"})
	if err != nil {
		log.Fatal(err)
	}
	id := res.InsertedID
	fmt.Print(id)
}

func main() {
	initDB()
}
go mod
The commands are:

        download    download modules to local cache
        edit        edit go.mod from tools or scripts
        graph       print module requirement graph
        init        initialize new module in current directory
        tidy        add missing and remove unused modules
        vendor      make vendored copy of dependencies
        verify      verify dependencies have expected content
        why         explain why packages or modules are needed
0035、Go语言mod命令行常见操作
Mod Command 命令行操作介绍
download    download modules to local cache
edit        edit go.mod from tools or scripts
graph       print module requirement graph
init        initialize new module in current directory
tidy        add missing and remove unused modules
vendor      make vendored copy of dependencies
verify      verify dependencies have expected content
why         explain why packages or modules are needed
go mod download
Usage:
go mod download [-x] [-json] [-reuse=old.json] [modules]
Example:
$ go mod download
$ go mod download golang.org/x/mod@v0.2.0
The go mod download command downloads the named modules into the module cache. Arguments can be module paths or module patterns selecting dependencies of the main module or version queries of the form path@version. With no arguments, download applies to all dependencies of the main module.
go mod download [参数]
有参数 		=> 	下载 指定模块 于模块缓存 module cache
没有参数 	=> 	下载 main module 主模块所有的依赖包
The -json flag causes download to print a sequence of JSON objects to standard output, describing each downloaded module (or failure), corresponding to this Go struct:
type Module struct {
    Path     string // module path
    Query    string // version query corresponding to this version
    Version  string // module version
    Error    string // error loading module
    Info     string // absolute path to cached .info file
    GoMod    string // absolute path to cached .mod file
    Zip      string // absolute path to cached .zip file
    Dir      string // absolute path to cached source root directory
    Sum      string // checksum for path, version (as in go.sum)
    GoModSum string // checksum for go.mod (as in go.sum)
    Origin   any    // provenance of module
    Reuse    bool   // reuse of old module info is safe
}
The -x flag causes download to print the commands download executes to standard error.
The -reuse flag accepts the name of file containing the JSON output of a previous ‘go mod download -json’ invocation. The go command may use this file to determine that a module is unchanged since the previous invocation and avoid redownloading it. Modules that are not redownloaded will be marked in the new output by setting the Reuse field to true. Normally the module cache provides this kind of reuse automatically; the -reuse flag can be useful on systems that do not preserve the module cache.
注意:go 命令可以使用此文件来确定一个模块自上次调用以来没有改变,并避免重新下载它。
The -x flag causes download to print the commands download executes to standard error.
go mod download
PS C:\Users\Administrator\Desktop\project\wrist.com> go mod download -x
# get https://goproxy.cn/github.com/xdg-go/stringprep/@v/v1.0.3.zip
# get https://goproxy.cn/github.com/klauspost/compress/@v/v1.13.5.zip
# get https://goproxy.cn/github.com/montanaflynn/stats/@v/v0.0.0-20171201202039-1bf9dbcd8cbe.zip
# get https://goproxy.cn/github.com/xdg-go/scram/@v/v1.1.1.zip
# get https://goproxy.cn/go.mongodb.org/mongo-driver/@v/v1.11.3.zip
# get https://goproxy.cn/github.com/pkg/errors/@v/v0.9.1.zip
# get https://goproxy.cn/github.com/golang/snappy/@v/v0.0.1.zip
# get https://goproxy.cn/github.com/xdg-go/pbkdf2/@v/v1.0.0.zip
# get https://goproxy.cn/github.com/montanaflynn/stats/@v/v0.0.0-20171201202039-1bf9dbcd8cbe.zip: 200 OK (0.141s)
go mod tidy
整理现有的依赖,使用此命令来下载指定的模块,并删除已经不用的模块。
The -e flag (added in Go 1.16) causes go mod tidy to attempt to proceed despite errors encountered while loading packages.
=> 就算遇到 loading packages 问题仍然进行执行。
The -v flag causes go mod tidy to print information about removed modules to standard error.
go mod vendor
把我们项目需要依赖模块包备份到 当前项目 vendor 目录下
go mod vendor
Usage:
go mod vendor [-e] [-v] [-o]
The -e flag (added in Go 1.16) causes go mod vendor to attempt to proceed despite errors encountered while loading packages.
The -v flag causes go mod vendor to print the names of vendored modules and packages to standard error.
The -o flag (added in Go 1.18) causes go mod vendor to output the vendor tree at the specified directory instead of vendor. The argument can be either an absolute path or a path relative to the module root.
go mod edit
go mod edit -json
- The
-moduleflag changes the module’s path (thego.modfile’s module line). - The
-go=versionflag sets the expected Go language version. - The
-require=path@versionand-droprequire=pathflags add and drop a requirement on the given module path and version. Note that-requireoverrides any existing requirements onpath. These flags are mainly for tools that understand the module graph. Users should prefergo get path@versionorgo get path@none, which make othergo.modadjustments as needed to satisfy constraints imposed by other modules. Seego get. - The
-exclude=path@versionand-dropexclude=path@versionflags add and drop an exclusion for the given module path and version. Note that-exclude=path@versionis a no-op if that exclusion already exists. - The
-replace=old[@v]=new[@v]flag adds a replacement of the given module path and version pair. If the@vinold@vis omitted, a replacement without a version on the left side is added, which applies to all versions of the old module path. If the@vinnew@vis omitted, the new path should be a local module root directory, not a module path. Note that-replaceoverrides any redundant replacements forold[@v], so omitting@vwill drop replacements for specific versions. - The
-dropreplace=old[@v]flag drops a replacement of the given module path and version pair. If the@vis provided, a replacement with the given version is dropped. An existing replacement without a version on the left side may still replace the module. If the@vis omitted, a replacement without a version is dropped. - The
-retract=versionand-dropretract=versionflags add and drop a retraction for the given version, which may be a single version (likev1.2.3) or an interval (like[v1.1.0,v1.2.0]). Note that the-retractflag cannot add a rationale comment for theretractdirective. Rationale comments are recommended and may be shown bygo list -m -uand other commands.
go mod edit -droprequire="github.com/gin-gonic/gin"
- The
-fmtflag reformats thego.modfile without making other changes. This reformatting is also implied by any other modifications that use or rewrite thego.modfile. The only time this flag is needed is if no other flags are specified, as ingo mod edit -fmt. - The
-printflag prints the finalgo.modin its text format instead of writing it back to disk. - The
-jsonflag prints the finalgo.modin JSON format instead of writing it back to disk in text format.
go mod graph
打印模块间的依赖关系图
go mod init
go mod init 初始化
如果在 $GOPATH 工作区外
go: cannot determine module path for source directory xxx (outside GOPATH, module path must be specified)
go mod init wrist.com/webproject
假如在 $GOPATH 工作区内
要进行初始化 模块,我们需要指定 模块名
go mod init 【module path】
$GOPATH/src/wrist.com/webproject => cmd => go mod init [模块名]
默认 会以 $GOPATH/src 后面这层路径 wrist.com/webproject 作为模块名
go mod verify
检查存储在本地下载源代码缓存中的当前模块的依赖,是否自从下载之后未被修改。
go mod why
想知道为什么会依赖某个 package,可以通过go mod why命令来查询原因。go mod why 命令默认会给出一个 main 包到要查询的packge的最短依赖路径。
如果 go mod why 使用 -m flag,则后面的参数将被看成是 module,并给出 main 包到每个 module 中每个 package 的最短依赖路径。


 被折叠的 条评论
为什么被折叠?
被折叠的 条评论
为什么被折叠?
 到【灌水乐园】发言


