


1.扩展springMVC
1.1@Configuration
我们要做的就是编写一个@Configuration注解类,并且类型要为WebMvcConfigurer,还不能标注@EnableWebMvc注解。我们新建一个包叫config,写一个类MyMvcConfig:
源码查看:WebMvcAutoConfiguration、WebMvcProperties
1.视图解析器
//扩展spring MVC,官方建议我们这样扩展
@Configuration
public class MyMvcConfig implements WebMvcConfigurer {
    //如果你想diy一些定制化功能,只要写这个组件交给spring boot,他就会帮我们自动装配
    @Bean
    public ViewResolver myViewResolver(){
        return new MyViewResolver();
    }
    //自定义一个视图解析器ViewResolver
    public static class MyViewResolver implements ViewResolver{
        @Override
        public View resolveViewName(String viewName, Locale locale) throws Exception {
            return null;
        }
    }
}
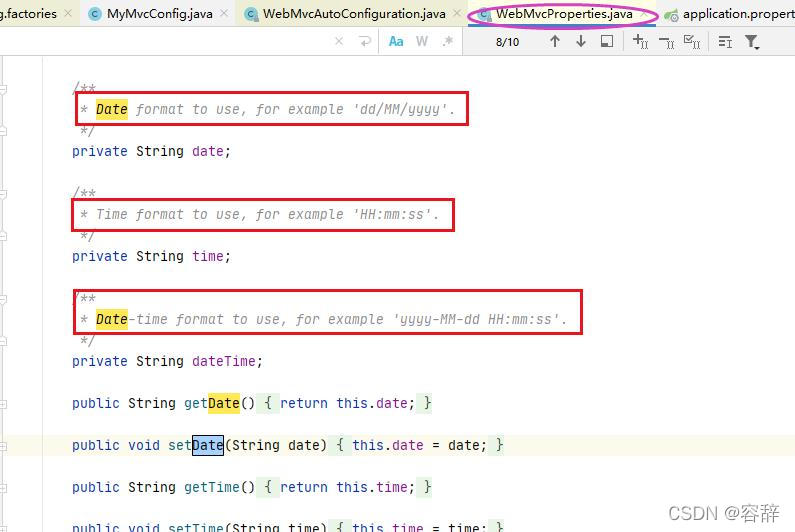
2.格式
spring.mvc.format.date=dd/MM/yyyy
源码:
3.视图跳转
@Configuration
public class MyMvcConfig implements WebMvcConfigurer {
    //重写方法
    public void addViewControllers(ViewControllerRegistry registry) {
        registry.addViewController("/hello").setViewName("test");
    }
}
1.2@EnableWebMvc
全面接管即:SpringBoot对SpringMVC的自动配置不需要了,所有都是我们自己去配置,只需在我们的配置类中要加一个@EnableWebMvc。
扩展springMVC不能加@EnableWebMvc的原因:


@ConditionalOnMissingBean(xxxx.class) 这个类不存在才生效
1.3自定义Starter
启动器模块是一个 空 jar 文件,仅提供辅助性依赖管理,这些依赖可能用于自动装配或者其他类库。
官方命名:spring-boot-starter-xxx
自定义命名:xxx-spring-boot-starter
1.3.1 编写启动器
1、在IDEA中新建一个空项目 springboot-04-starter
2、新建一个普通Maven模块:starter
3、新建一个Springboot模块:moli-spring-boot-starter-autoconfigure
4、在我们的 starter 中 导入 autoconfigure 的依赖!
<!-- 启动器 -->
<dependencies>
    <!--  引入自动配置模块 -->
    <dependency>
        <groupId>com.moli</groupId>
        <artifactId>moli-spring-boot-starter-autoconfigure</artifactId>
        <version>0.0.1-SNAPSHOT</version>
    </dependency>
</dependencies>
5、将 autoconfig 项目下多余的文件都删掉,Pom中只留下一个 starter,这是所有的启动器基本配置!
<dependencies>
    <dependency>
        <groupId>org.springframework.boot</groupId>
        <artifactId>spring-boot-starter</artifactId>
    </dependency>
    <dependency>
        <groupId>org.springframework.boot</groupId>
        <artifactId>spring-boot-configuration-processor</artifactId>
        <optional>true</optional>
    </dependency>
    <dependency>
        <groupId>org.junit.jupiter</groupId>
        <artifactId>junit-jupiter-api</artifactId>
        <version>5.8.2</version>
        <scope>test</scope>
    </dependency>
    <dependency>
        <groupId>org.springframework.boot</groupId>
        <artifactId>spring-boot-test</artifactId>
        <version>2.6.6</version>
        <scope>test</scope>
    </dependency>
</dependencies>
<build>
    <plugins>
        <plugin>
            <groupId>org.springframework.boot</groupId>
            <artifactId>spring-boot-maven-plugin</artifactId>
            <configuration>
                <!--
                    重要!spring boot工程创建时没有这一行,install前需要加入这一行设置!
                    否则打出来的包中会多一个BOOT-INF文件夹,导致别的工程无法引用我们的类
                -->
                <skip>true</skip>
            </configuration>
        </plugin>
    </plugins>
</build>
6、我们编写一个自己的服务
package com.moli;
import com.moli.HelloProperties;

public class HelloService {
    HelloProperties helloProperties;

    public HelloProperties getHelloProperties(HelloProperties helloProperties) {
        return this.helloProperties;
    }
    public void setHelloProperties(HelloProperties helloProperties) {
        this.helloProperties = helloProperties;
    }
    public String sayHello(String name){
        return helloProperties.getPrefix() + name + helloProperties.getSuffix();
    }
}
7、编写HelloProperties 配置类
package com.moli;
import org.springframework.boot.context.properties.ConfigurationProperties;

@ConfigurationProperties(prefix = "moli.hello")
public class HelloProperties {
    private String prefix;
    private String suffix;

    public String getPrefix() {
        return prefix;
    }
    public void setPrefix(String prefix) {
        this.prefix = prefix;
    }
    public String getSuffix() {
        return suffix;
    }
    public void setSuffix(String suffix) {
        this.suffix = suffix;
    }
}
8、编写我们的自动配置类并注入bean,测试!
package com.moli;
import org.springframework.beans.factory.annotation.Autowired;
import org.springframework.boot.autoconfigure.condition.ConditionalOnWebApplication;
import org.springframework.boot.context.properties.ConfigurationProperties;
import org.springframework.boot.context.properties.EnableConfigurationProperties;
import org.springframework.context.annotation.Bean;
import org.springframework.context.annotation.Configuration;

@Configuration
@ConditionalOnWebApplication
@EnableConfigurationProperties(HelloProperties.class)
public class HelloServiceAutoConfiguration {
    @Autowired
    HelloProperties helloProperties;
    @Bean
    public HelloService helloService(){
        HelloService helloService = new HelloService();
        helloService.getHelloProperties(helloProperties);
        return helloService;
    }
}
9、在resources编写一个自己的 META-INF\spring.factories
# Auto Configure
org.springframework.boot.autoconfigure.EnableAutoConfiguration=\
com.moli.HelloServiceAutoConfiguration
10、编写完成后,可以安装到maven仓库中!

1.3.2新建项目测试我们自己写的启动器
1、新建一个SpringBoot 项目
2、导入我们自己写的启动器
<dependency>
    <groupId>com.moli</groupId>
    <artifactId>moli-spring-boot-starter-autoconfigure</artifactId>
    <version>0.0.1-SNAPSHOT</version>
</dependency>
3、编写一个 HelloController 进行测试我们自己的写的接口!
@RestControllerpublic
pclass HelloController {
    @Autowired
    HelloService helloService;
    @RequestMapping("/hello")
    public String hello(){
        return helloService.sayHello("zxc");
    }
}
4、编写配置文件 application.properties
moli.hello.prefix="ppp"
moli.hello.suffix="sss"
2.员工管理系统
2.1准备工作
首先导入静态资源:可以自己去百度搜索bootstarap模板
实体类:
//部门表
@Data
@AllArgsConstructor
@NoArgsConstructor
public class Department {
    private Integer id;
    private String departmentName;
}
//员工表
@NoArgsConstructor
@Data
public class Employee {
    private Integer id;
    private String lastName;
    private String email;
    private Integer gender;//性别 0:女,1:男
    private Department department;
    private Date birth;

    public Employee(Integer id, String lastName, String email, Integer gender, Department department) {
        this.id = id;
        this.lastName = lastName;
        this.email = email;
        this.gender = gender;
        this.department = department;
        this.birth =new Date();
    }
}
dao层:
@Repository//被spring托管
public class DepartmentDao {
    //模拟数据库中的数据
    private static Map<Integer, Department> departments=null;
    static {
        departments= new HashMap<Integer,Department>();
        departments.put(101,new Department(101,"财务部"));
        departments.put(102,new Department(102,"人事部"));
        departments.put(103,new Department(103,"开发部"));
        departments.put(104,new Department(104,"管理部"));
        departments.put(105,new Department(105,"测试部"));
    }
    //获得所有部门信息
    public Collection<Department> getDepartments(){
        return departments.values();
    }
    //通过id获得信息
    public Department getDepartmentById(Integer id){
        return departments.get(id);
    }
}
@Repository
public class EmployeeDao {
    //模拟数据库中的数据
    private static Map<Integer, Employee> employees=null;
    @Autowired
    private DepartmentDao departmentDao;
    static {
        employees = new HashMap<Integer,Employee>();
        employees.put(1,new Employee(1,"a","1234@",0,new Department(102,"人事部")));
        employees.put(2,new Employee(2,"b","1232@",1,new Department(101,"财务部")));
        employees.put(3,new Employee(3,"c","12r@",1,new Department(103,"开发部")));
        employees.put(4,new Employee(4,"d","122344@",0,new Department(103,"开发部")));
        employees.put(5,new Employee(5,"e","123erfg@",0,new Department(105,"测试部")));
    }

    //主键自增
    private static Integer initId=6;
    //添加员工
    public void add(Employee employee){
        if (employee.getId()==null){
            employee.setId(initId++);
        }    employee.setDepartment(departmentDao.getDepartmentById(employee.getDepartment().getId()));
        employees.put(employee.getId(),employee);
    }
    //查询全部员工信息
    public Collection<Employee> All(){
        return employees.values();
    }
    //通过id查询员工
    public Employee getById(Integer id){
        return employees.get(id);
    }
    //删除员工
    public void delete(Integer id){
        employees.remove(id);
    }
}
2.2首页访问
config包下的MyMvcConfig :
@Configuration
public class MyMvcConfig implements WebMvcConfigurer {
    @Override
    public void addViewControllers(ViewControllerRegistry registry) {
        registry.addViewController("/").setViewName("index");
        registry.addViewController("/index.html").setViewName("index");
        registry.addViewController("/main.html").setViewName("dashboard");
    }
}
所有静态资源都需要thyme leaf模板接管,并把所有链接改为 @{} 形式才能获取到css样式。
#还要注意关闭模板引擎的缓存,否则可能css样式加载不过来
spring.thymeleaf.cache=false

2.3页面国际化
在resource目录下,建一个i18n包,然后建login.properties和login_zh.properties就会自动合并为一个文件夹,然后右键这个文件夹,添加其他语言en_US。

下载一个插件flagiarism,就会有Resource Bundle这个按钮,就可以可视化的去添加中英文标注,不下插件的话就直接写:
login.properties、login_zh.properties
login.tip=请登录
login.pwd=密码
login.username=用户名
login.remember=记住
login.sign=登录
login_en_US.properties
login.tip=Please sign in
login.pwd=Password
login.username=Username
login.remember=Remember me
login.sign=sign in
源码查看:MessageSourceAutoConfiguration
#我们配置文件放置的真实位置
spring.messages.basename=i18n.login
然后把静态资源中的国际化内容用 #{}
自定义国际化组件:源码查看WebMvcAutoConfiguration------>AcceptHeaderLocaleResolver
public class MyLocaleResolver implements LocaleResolver {
    //解析请求
    @Override
    public Locale resolveLocale(HttpServletRequest request) {
        String language = request.getParameter("l");
        Locale locale = Locale.getDefault();//如果没有就使用默认值
        //如果请求的参数带了国际化的参数
        if (!StringUtils.isEmpty(language)){
            String[] s = language.split("_");
            locale = new Locale(s[0], s[1]);
        }
        return locale;
    }

    @Override
    public void setLocale(HttpServletRequest request, HttpServletResponse response, Locale locale) {}
}
//自定义的国际化组件
@Bean
public LocaleResolver localeResolver(){
    return new MyLocaleResolver();
}
总结:
- 我们需要配置i18n文件
- 我们需要在项目中进行按钮自动切换,自定义一个组件MyLocaleResolver
- 将我们写的组件配置到spring容器中**@Bean**
- 用**#{}**获取国际化参数
2.4登录和拦截
1.登录
@Controller
public class LoginController {
    @RequestMapping("/user/login")
    public String login(@RequestParam("username") String username, @RequestParam("password") String password, Model model, HttpSession httpSession){
        if ("123456".equals(password)){
            httpSession.setAttribute("loginUser",username);
            return "redirect:/main.html";
        }else {
           model.addAttribute("msg","登陆失败");
           return "index";
        }
    }
}
2.拦截器
public class LoginHandlerInterceptor implements HandlerInterceptor {
    @Override
    public boolean preHandle(HttpServletRequest request, HttpServletResponse response, Object handler) throws Exception {
        Object loginUser = request.getSession().getAttribute("loginUser");
        if (loginUser==null) {
            request.setAttribute("msg", "没有权限,请先登录");
            request.getRequestDispatcher("/index.html").forward(request, response);
            return false;
        }else {
            return true;
        }
    }
}
在MyMvcConfig中配置拦截器组件:
@Override
public void addInterceptors(InterceptorRegistry registry) {
    //拦截哪些,不拦截哪些
    registry.addInterceptor(new LoginHandlerInterceptor()).addPathPatterns("/**").
            excludePathPatterns("/index.html","/user/login","/","/css/**","/js/**","/img/**");
}
最终的index.html
<!DOCTYPE html>
<html lang="en" xmlns:th="http://www.thymeleaf.org">
   <head>
      <meta http-equiv="Content-Type" content="text/html; charset=UTF-8">
      <meta name="viewport" content="width=device-width, initial-scale=1, shrink-to-fit=no">
      <meta name="description" content="">
      <meta name="author" content="">
      <title>Signin Template for Bootstrap</title>
      <!-- Bootstrap core CSS -->
      <link th:href="@{/css/bootstrap.min.css}" rel="stylesheet">
      <!-- Custom styles for this template -->
      <link th:href="@{/css/signin.css}" rel="stylesheet">
   </head>

   <body class="text-center">
      <form class="form-signin" th:action="@{/user/login}">
         <img class="mb-4" th:src="@{/img/bootstrap-solid.svg}" alt="" width="72" height="72">
         <h1 class="h3 mb-3 font-weight-normal" th:text="#{login.tip}">Please sign in</h1>
            <!--如果msg值为空,不显示信息-->
         <p th:text="${msg}" style="color: red" th:if="${not #strings.isEmpty(msg)}"></p>
         <input type="text" class="form-control" name="username" th:placeholder="#{login.username}" required="" autofocus="">
         <input type="password" class="form-control" name="password"  th:placeholder="#{login.pwd}" required="">
         <div class="checkbox mb-3">
            <label>
          <input type="checkbox" value="remember-me" > [[#{login.remember}]]
        </label>
         </div>
         <button class="btn btn-lg btn-primary btn-block" type="submit" th:text="#{login.sign}">Sign in</button>
         <p class="mt-5 mb-3 text-muted">© 2022</p>
         <a class="btn btn-sm" th:href="@{/index.html(l='zh_CN')}">中文</a>
         <a class="btn btn-sm" th:href="@{/index.html(l='en_US')}">English</a>
      </form>
   </body>
</html>
2.5展示员工列表
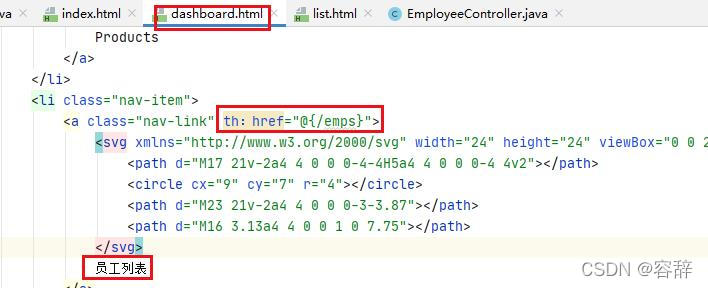
我们首先给dashboard.html和list.html页面添加href属性,实现点击该标签请求/emps路径跳转到list.html展示所有的员工信息。

@Controller
public class EmployeeController {
    @Autowired
    EmployeeDao employeeDao;
    @RequestMapping("/emps")
    public String list(Model model){
        Collection<Employee> employees = employeeDao.All();
        model.addAttribute("emps",employees);
        return "/emps/list";
    }
}
修改list.html中的员工列表:
<thead>
   <tr>
      <th>id</th>
      <th>lastName</th>
      <th>email</th>
      <th>gender</th>
      <th>department</th>
      <th>birth</th>
      <th>操作</th>
   </tr>
</thead>
<tbody>
    <tr th:each="emp:${emps}">
                             <td th:text="${emp.getId()}"></td>
      <td th:text="${emp.getLastName()}"></td>
      <td th:text="${emp.getEmail()}"></td>
      <td th:text="${emp.getGender()==0 ? '女':'男'}"></td>
      <td th:text="${emp.getDepartment().getDepartmentName()}"></td>
      <td th:text="${#dates.format(emp.getBirth(),'yyyy-MM-dd HH:mm:ss')}"></td>
      <td>
         <button class="btn  btn-sm btn-primary">增加</button>
         <button class="btn btn-sm btn-danger">删除</button>
      </td>
   </tr>
</tbody>
2.5.1提取公共页面
list.html和dashboard.html页面的侧边栏和顶部栏是相同的,可以抽取出来,放入commons.html,然后删除dashboard.html和list.html中顶部导航栏和侧边栏的代码。
利用th:fragment标签抽取公共部分,再利用th:replace引入到原来的位置


2.5.1高亮
th:class=“${active=‘list.html’? ‘nav-link active’:‘nav-link’}”


查询结果展示:

2.6增加员工
首先在list.html页面增添一个增加员工按钮,点击该按钮时发起一个请求/add


然后编写对应的controller,处理点击添加员工的请求
@GetMapping("/add")
public String toaddpage(Model model){
    Collection<Department> departments = departmentDao.getDepartments();
    model.addAttribute("departments", departments);
    return "emps/add";
}
@PostMapping("/add")
public String add(Employee employee){
    employeeDao.add(employee);
    return "redirect:/emps";//重定向到/emps,刷新列表,返回到list页面
}
添加页面:
<form th:action="@{/add}" method="post">
   <div class="form-group">
      <label>LastName</label>
      <input type="text" name="lastName" class="form-control" placeholder="海绵宝宝">
   </div>
   <div class="form-group">
      <label>Email</label>
      <input type="email" name="email" class="form-control" placeholder="234550@qq.com">
   </div>
   <div class="form-group">
      <label>Gender</label><br>
      <div class="form-check form-check-inline">
         <input class="form-check-input" type="radio" name="gender" value="1">
         <label class="form-check-label">男</label>
      </div>
      <div class="form-check form-check-inline">
         <input class="form-check-input" type="radio" name="gender" value="0">
         <label class="form-check-label">女</label>
      </div>
   </div>
   <div class="form-group">
      <label>department</label>
      <select class="form-control" name="department.id">
         <!--th:text是显示的值,th:value是实际取出来的值-->
         <option th:each="dep:${departments}" th:text="${dep.getDepartmentName()}" th:value="${dep.getId()}"></option>
      </select>
   </div>
   <div class="form-group">
      <label>Birth</label>
      <input type="text" name="birth" class="form-control" placeholder="嘤嘤嘤">
   </div>
   <button type="submit" class="btn btn-primary">添加</button>
</form>
2.7修改员工

@GetMapping("/add/{id}")
public String updata(@PathVariable("id") int id, Model model) {
    //查询指定id的员工,用于前端接收
    Employee employeeByID = employeeDao.getById(id);
    model.addAttribute("empByID", employeeByID);
    //查出所有的部门信息,添加到departments中,用于前端接收
    Collection<Department> departments = departmentDao.getDepartments();
    model.addAttribute("departments", departments);
    return "emps/updata";//返回到编辑员工页面
}
@PostMapping("/updata")
public String up(Employee employee){
    employeeDao.add(employee);
    return "redirect:/emps";
}
新建一个updata.html
<form th:action="@{/updata}" method="post">
   <input type="hidden" th:value="${empByID.getId()}">
   <div class="form-group">
      <label>LastName</label>
      <input th:value="${empByID.getLastName()}" type="text" name="lastName" class="form-control" placeholder="海绵宝宝">
   </div>
   <div class="form-group">
      <label>Email</label>
      <input th:value="${empByID.getEmail()}" type="email" name="email" class="form-control" placeholder="234550@qq.com">
   </div>
   <div class="form-group">
      <label>Gender</label><br>
      <div class="form-check form-check-inline">
         <input  th:checked="${empByID.getGender()==1}" class="form-check-input" type="radio" name="gender" value="1">
         <label class="form-check-label">男</label>
      </div>
      <div class="form-check form-check-inline">
         <input th:checked="${empByID.getGender()==0}" class="form-check-input" type="radio" name="gender" value="0">
         <label class="form-check-label">女</label>
      </div>
   </div>
   <div class="form-group">
      <label>department</label>
      <select class="form-control" name="department.id">
         <!--th:text是显示的值,th:value是实际取出来的值-->
         <option th:selected="${dep.getId()==empByID.getDepartment().getId()}" th:each="dep:${departments}" th:text="${dep.getDepartmentName()}" th:value="${dep.getId()}"></option>
      </select>
   </div>
   <div class="form-group">
      <label>Birth</label>
      <input th:value="${#dates.format(empByID.getBirth(),'yyyy-MM-dd HH:mm:ss')}text" name="birth" class="form-control" placeholder="嘤嘤嘤">
   </div>
   <button type="submit" class="btn btn-primary">修改</button>
</form>
2.8删除员工
<a class="btn btn-sm btn-danger" th:href="@{/delete/}+${emp.getId()}">删除</a>
@GetMapping("/delete/{id}")
public String delete(@PathVariable("id") int id, Model model) {
    employeeDao.delete(id);
    return "redirect:/emps";
}


 492
492


 被折叠的 条评论
为什么被折叠?
被折叠的 条评论
为什么被折叠?
 到【灌水乐园】发言


