


使用XML配置实现Bean
1.创建一个Maven项目
在Maven中导入我们需要的Spring
注 : spring 需要导入commons-logging进行日志记录 . 我们利用maven , 他会自动下载对应的依赖项 .
<dependency>
   <groupId>org.springframework</groupId>
   <artifactId>spring-webmvc</artifactId>
   <version>5.1.10.RELEASE</version>
</dependency>
为了测试需要再导入一个junit测试包
   <dependency>
            <!-- junit测试包-->
                <groupId>junit</groupId>
                <artifactId>junit</artifactId>
                <version>4.12</version>
        </dependency>
2.编写一个实体类,给属性set方法
package com.lei.test1;

public class Book {
    //创建Bookd的属性
    private String bname;
    private String bauthor;
    //set方法
    public void setBname(String bname) {
        this.bname = bname;
    }

    public void setBauthor(String bauthor) {
        this.bauthor = bauthor;
    }

    @Override
    public String toString() {
        return "Book{" +
                "bname='" + bname + '\'' +
                ", bauthor='" + bauthor + '\'' +
                '}';
    }
//    public static void main(String[] args) {
//        Book book=new Book();
//        book.setBname("水浒传");
//    }//这是原始方法,我们先注释掉
}
3.编写我们的spring,xml文件 , 这里我们命名为beans.xml

beans.xml添加如下
<?xml version="1.0" encoding="UTF-8"?>
<beans xmlns="http://www.springframework.org/schema/beans"
       xmlns:xsi="http://www.w3.org/2001/XMLSchema-instance"
       xsi:schemaLocation="http://www.springframework.org/schema/beans http://www.springframework.org/schema/beans/spring-beans.xsd">


    <!--配置Book对象创建,使用bean标签,标签例添加对应属性,
    id,唯一标识   class,类全路径
    <bean id="book" class="com.lei.test1.Book">完成对象创建
    bean就是java对象 , 由Spring创建和管理

    在实体类中set方法后,使用property标签完成对象属性的注入
    name:对象里属性名称   value:注入的值
    -->
    <bean id="book" class="com.lei.test1.Book">
        <property name="bname" value="红楼梦"></property>
        <property name="bauthor" value="曹雪芹"></property>
    </bean>

</beans>
4.去测试类下
package com.lei.test;

import com.lei.test1.Book;
import org.junit.Test;
import org.springframework.context.ApplicationContext;
import org.springframework.context.support.ClassPathXmlApplicationContext;

public class testBook {
    @Test
    public void addBook(){
        //加载Spring配置文件
        ApplicationContext context = new ClassPathXmlApplicationContext("beans.xml");

        //getBean : 参数即为spring配置文件中bean的id .
        Book book = context.getBean("book",Book.class);
        System.out.println(book);
    }
}
>结果

> 思考 ??
对象是谁创建的 ? 【hello 对象是由Spring创建的
对象的属性是怎么设置的 ? hello 对象的属性是由Spring容器设置的
这个过程就叫控制反转 :
控制 : 谁来控制对象的创建 , 传统应用程序的对象是由程序本身控制创建的 , 使用Spring后 , 对象是由Spring来创建的
反转 : 程序本身不创建对象 , 而变成被动的接收对象 .
依赖注入 : 就是利用set方法来进行注入的,接下来会写一个注释进行注入的案例
IOC是一种编程思想,由主动的编程变成被动的接收
注意点1:构造器问题
属性注入时,默认是空构造器注入,有参构造器时呢?,更改Spring.xml文件,改变如下

延伸点2:
p名称空间注入
添加p名称空间到配置中
xmlns:p="http://www.springframework.org/schema/p"
整体
<?xml version="1.0" encoding="UTF-8"?>
<beans xmlns="http://www.springframework.org/schema/beans"
       xmlns:xsi="http://www.w3.org/2001/XMLSchema-instance"
       xmlns:p="http://www.springframework.org/schema/p"
       xsi:schemaLocation="http://www.springframework.org/schema/beans http://www.springframework.org/schema/beans/spring-beans.xsd">

    <bean id="book" class="com.lei.test1.Book"
          p:bname="斗破苍穹" p:bauthor="天蚕土豆">
    </bean>

</beans>
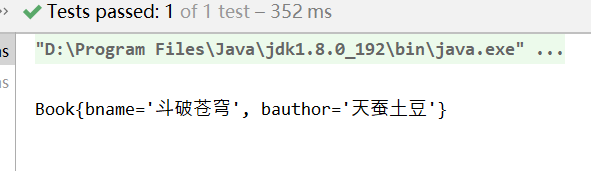
总结:通过对比–p名称空间最大的作用就是简化操作,当注入的属性过多时使用p名称空间是个不错的选择
延伸点3:注入null值和特殊符号

了解更多可以度娘哟!!!
延伸点4:外部bean的注入
案例为我们经常写的Dao和Service层
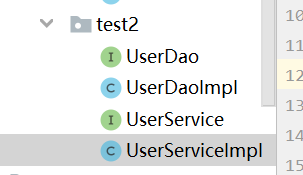
1.编写这些代码
package com.lei.test2;

public interface UserDao {
    public void adddate();
}
package com.lei.test2;

public class UserDaoImpl implements UserDao {
    public void adddate() {
        System.out.println("UserDao add...");
    }
}
package com.lei.test2;

public interface UserService {
}
package com.lei.test2;

public class UserServiceImpl implements UserService {

    public void add(){
        System.out.println("service add...");
        userDao.adddate();

        //原始方法---我们使用Spring的IOC实现,所以先注释掉
//        UserDao userDao=new UserDaoImpl();
//        userDao.adddate();
    }
    //将外部对象当做属性
    private UserDao userDao;
    //给外部对象set方法
    public void setUserDao(UserDao userDao){
        this.userDao=userDao;
    }
}
2.Spring.xml配置文件
<?xml version="1.0" encoding="UTF-8"?>
<beans xmlns="http://www.springframework.org/schema/beans"
       xmlns:xsi="http://www.w3.org/2001/XMLSchema-instance"
     xsi:schemaLocation="http://www.springframework.org/schema/beans http://www.springframework.org/schema/beans/spring-beans.xsd">

    <bean id="userDaoImpl" class="com.lei.test2.UserDaoImpl"></bean>
    <bean id="userServiceImpl" class="com.lei.test2.UserServiceImpl">
    <property name="userDao" ref="userDaoImpl"></property>
    </bean>

</beans>
3.测试:
 @Test
    public void testUser(){
        //加载Spring配置文件
        ApplicationContext context = new ClassPathXmlApplicationContext("beans.xml");

        //getBean : 参数即为spring配置文件中bean的id .
        UserServiceImpl userServiceImpl=context.getBean("userServiceImpl",UserServiceImpl.class);
        userServiceImpl.add();
    }
4.结果

延伸点5:内部bean的注入和级联赋值


Test同上,一,加载配置文件,二:获取配置对象
延伸点6:注入集合属性
1.创建对象类
package com.lei.test3;

import java.util.Arrays;
import java.util.List;
import java.util.Map;
import java.util.Set;

public class Stu {
    private String[] courses;
    private List<String> list;
    private Map<String,String> maps;
    private Set<String> sets;

    public void setCourses(String[] courses) {
        this.courses = courses;
    }

    public void setList(List<String> list) {
        this.list = list;
    }

    public void setMap(Map<String, String> maps) {
        this.maps = maps;
    }

    public void setSets(Set<String> sets) {
        this.sets = sets;
    }
    public void test(){
        System.out.println(Arrays.toString(courses));
        System.out.println(list);
        System.out.println(maps);
        System.out.println(sets);
    }
}
2.编写Spring.xml文件
<?xml version="1.0" encoding="UTF-8"?>
<beans xmlns="http://www.springframework.org/schema/beans"
       xmlns:xsi="http://www.w3.org/2001/XMLSchema-instance"
       xmlns:p="http://www.springframework.org/schema/p"
       xsi:schemaLocation="http://www.springframework.org/schema/beans http://www.springframework.org/schema/beans/spring-beans.xsd">

    <bean id="stu" class="com.lei.test3.Stu">
<!--        数组类型属性注入-->
        <property name="courses">
            <array>
                <value>数据库</value>
                <value>数据结构</value>
            </array>
        </property>
<!--        list类型属性注入-->
        <property name="list">
            <list>
                <value>张松</value>
                <value>雷某</value>
            </list>
        </property>
<!--        map类型属性注入-->
        <property name="map">
            <map>
                <entry key="Java" value="java"></entry>
                <entry key="PHP" value="php"></entry>
            </map>
        </property>
<!--    set类型属性注入-->
        <property name="sets">
            <set>
                <value>hadoop</value>
                <value>spark</value>
            </set>
        </property>
    </bean>

</beans>
3.测试类
    @Test
    public void testCollecton(){
        //加载Spring配置文件
        ApplicationContext context =
                new ClassPathXmlApplicationContext("beans.xml");
        //getBean
        Stu stu=context.getBean("stu",Stu.class);
        stu.test();
    }
结果

注:集合里面设置对象为属性???
1.新建一个类
package com.lei.test3;

public class Course {
    private String cname;

    public void setCname(String cname) {
        this.cname = cname;
    }
    @Override
    public String toString() {
        return "Course{" +
                "cname='" + cname + '\'' +
                '}';
    }
}
2.在Stu中写入
import java.util.List;
public class Stu {
    private List<Course> courseList;
    public void setCourseList(List<Course> courseList) {
        this.courseList = courseList;
    }
    public void test(){
        System.out.println(courseList);
    }
}
3.在Spring.xml中写入
<?xml version="1.0" encoding="UTF-8"?>
<beans xmlns="http://www.springframework.org/schema/beans"
xmlns:xsi="http://www.w3.org/2001/XMLSchema-instance"
xmlns:p="http://www.springframework.org/schema/p"
xsi:schemaLocation="http://www.springframework.org/schema/beans http://www.springframework.org/schema/beans/spring-beans.xsd">
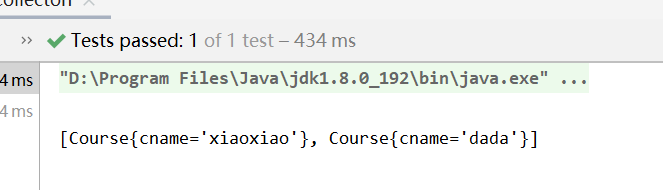
<bean id="course1" class="com.lei.test3.Course">
<property name="cname" value="xiaoxiao"></property>
</bean>
<bean id="course2" class="com.lei.test3.Course">
<property name="cname" value="dada"></property>
</bean>
<bean id="stu" class="com.lei.test3.Stu">
<property name="courseList">
<list>
<ref bean="course1"></ref>
<ref bean="course2"></ref>
</list>
</property>
</bean>
</beans>
4.测试类,
 @Test
    public void testCollecton(){
        //加载Spring配置文件
        ApplicationContext context =
                new ClassPathXmlApplicationContext("beans.xml");
        //getBean
        Stu stu=context.getBean("stu",Stu.class);
        stu.test();
    }
5.结果:
延伸点7:IOC操作Bean管理----工厂bean
Spring 中有两种Bean,一种普通bean,一种工厂bean(FactoryBean)
普通bean:在配置文件中定义类型和返回类型一致
工厂bean:在配置文件中定义类型和返回类型不一致
使用注解方式实现Bean
点击下一章哟!!!!


 289
289


 被折叠的 条评论
为什么被折叠?
被折叠的 条评论
为什么被折叠?
 到【灌水乐园】发言


