


目录
一、Fragment介绍
Activity界面中的一部分,可理解为模块化的Activity
1.Fragment不能独立存在,必须嵌入到Activity中
2.Fragment具有自己的生命周期,接收它自己的事件,并可以在Activity运行时被添加或删除
3.Fragment的生命周期直接受所在的Activity的影响。如:当Activity暂停时,它拥有的所有Fragment们都暂停
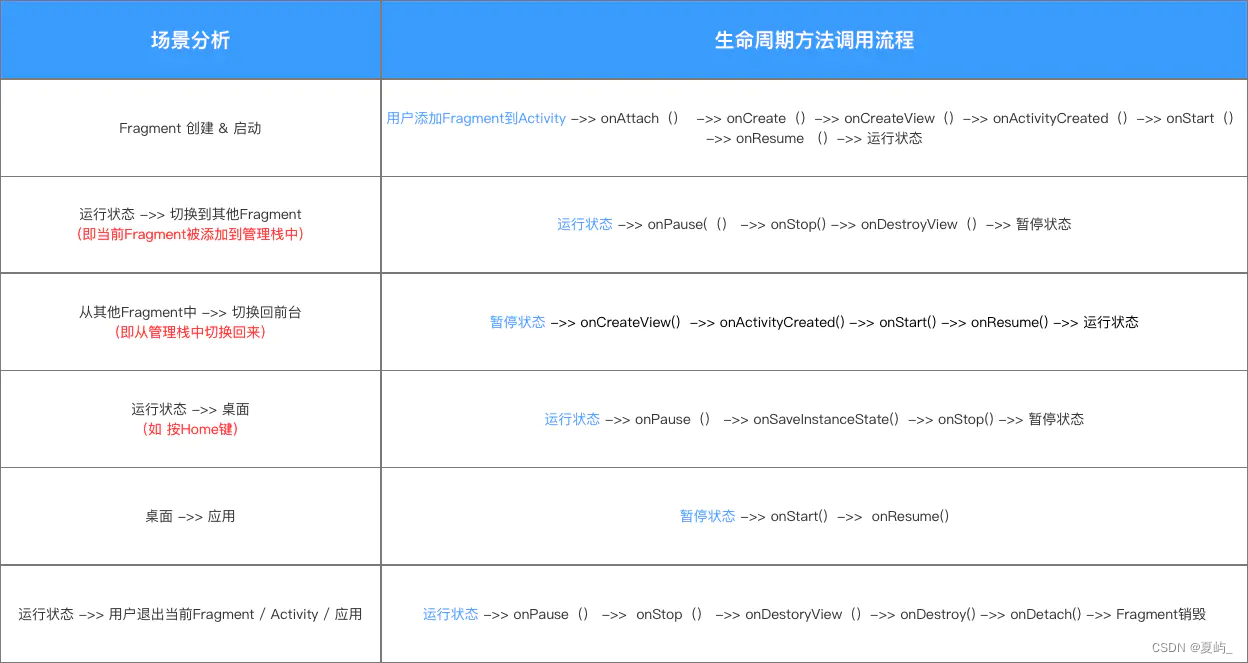
二、Fragment生命周期
1. 生命周期流程 & 方法详解
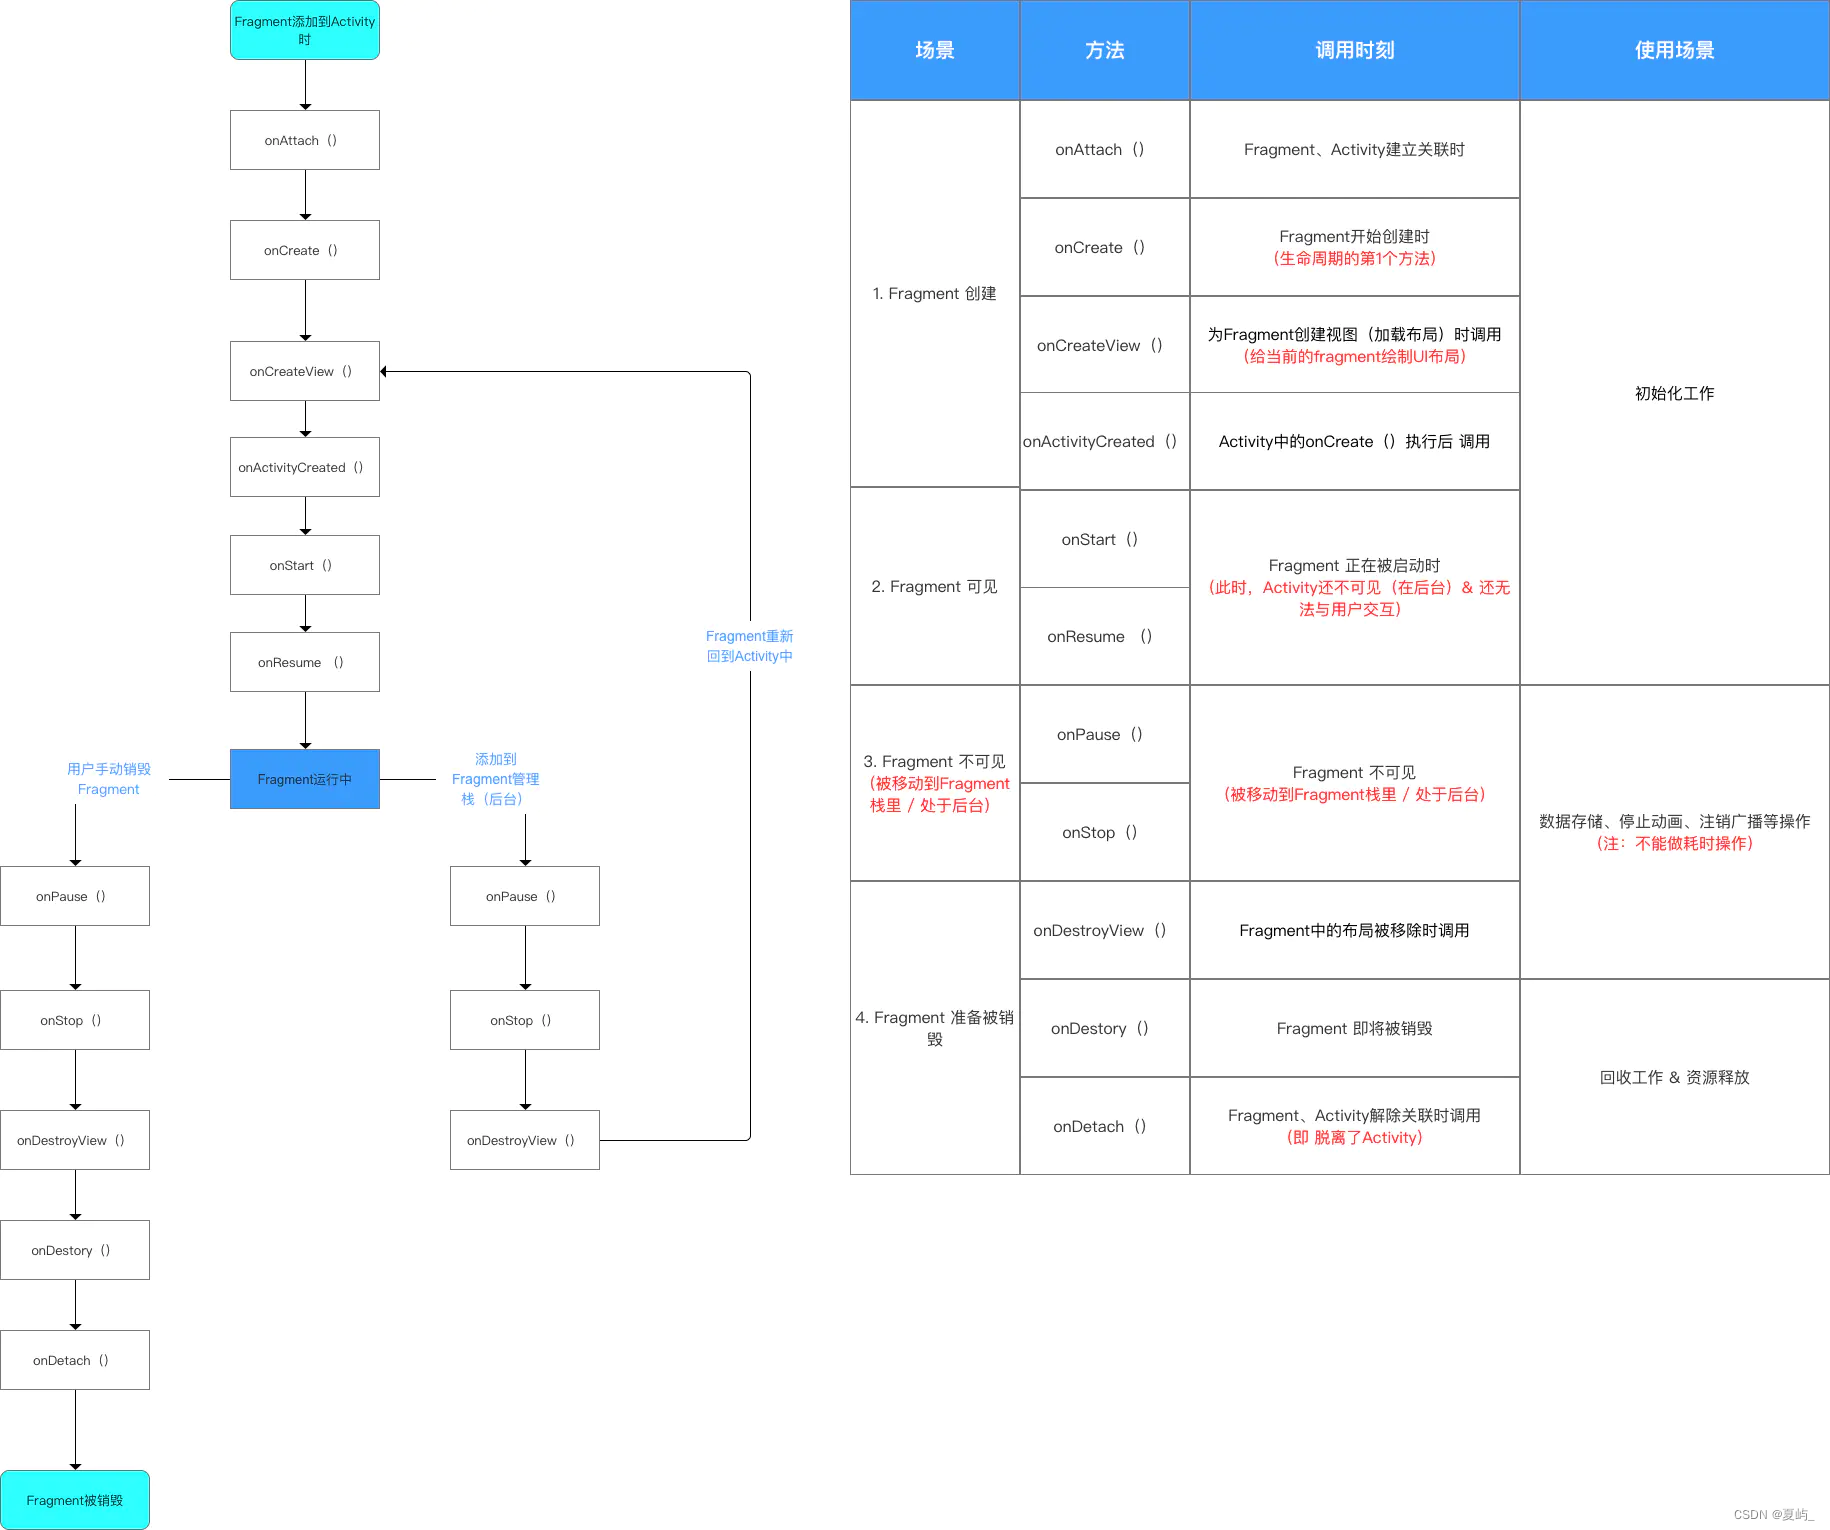
2. 常见场景的生命周期调用方式
三、Fragment具体使用
由于Fragment作为Activity一部分,所以Fragment的使用一般是添加到Activity中
将Fragment添加到Activity中一般有2种方法:
- 在Activity的layout.xml布局文件中静态添加
- 在Activity的.java文件中动态添加
方法1:静态加载Fragment
(1)创建Fragment布局文件
left_fragment.xml
<?xml version="1.0" encoding="utf-8"?>
<LinearLayout xmlns:android="http://schemas.android.com/apk/res/android"
    android:layout_width="match_parent"
    android:layout_height="match_parent">
    <Button
        android:id="@+id/button"
        android:layout_width="wrap_content"
        android:layout_height="wrap_content"
        android:layout_gravity="center"
        android:text="Button"/>
</LinearLayout>
right_fragment.xml
<?xml version="1.0" encoding="utf-8"?>
<LinearLayout xmlns:android="http://schemas.android.com/apk/res/android"
    android:layout_width="match_parent"
    android:layout_height="match_parent"
    android:background="#B9D6E3">
    <TextView
        android:layout_width="wrap_content"
        android:layout_height="wrap_content"
        android:layout_gravity="center"
        android:textSize="25sp"
        android:text="This is right Fragment"/>
</LinearLayout>
(2)自定义一个Fragment类
继承Fragment或者他的子类,重写onCreateView()方法 在该方法中调用:inflater.inflate()方法加载Fragment的布局文件,接着返回加载的view对象
public class LeftFragment extends Fragment {
    @Override
    public View onCreateView(@NonNull LayoutInflater inflater, @Nullable ViewGroup container, @Nullable Bundle savedInstanceState) {
        //加载布局
        View view = inflater.inflate(R.layout.left_fragment, container, false);
        return view;
    }
}
public class RightFragment extends Fragment {
    @Override
    public View onCreateView(@NonNull LayoutInflater inflater, @Nullable ViewGroup container, @Nullable Bundle savedInstanceState) {
        View view = inflater.inflate(R.layout.right_fragment,container,false);
        return view;
    }
}
inflate(int resource, @Nullable ViewGroup root, boolean attachToRoot) :加载布局文件
- 第一个参数:要加载的布局文件
- 第二个参数:第一个参数的父布局
- 第三个参数:
(1)true:表示将第一个参数表示的布局添加到第二个参数的布局中
(2)false:不把第一个参数的布局添加到第二个参数的布局中
(3)在需要加载Fragment的Activity对应的布局文件中添加fragment的标签
activity_main.xml
<LinearLayout xmlns:android="http://schemas.android.com/apk/res/android"
    android:orientation="horizontal"
    android:layout_width="match_parent"
    android:layout_height="match_parent">
    <fragment
        android:id="@+id/left_frag"
        android:name="com.example.fragmenttest.LeftFragment"
        android:layout_width="0dp"
        android:layout_height="match_parent"
        android:layout_weight="1"/>
    <fragment
        android:id="@+id/right_frag"
        android:name="com.example.fragmenttest.RightFragment"
        android:layout_width="0dp"
        android:layout_height="match_parent"
        android:layout_weight="1"/>
</LinearLayout>
<fragment>:在布局中添加碎片android:name:要添加的碎片的类名,该类名为全限定类名
(4)Activity在onCreate( )方法中调setContentView()加载布局文件即可MainActivity.java文件不修改
方法2:动态加载Fragment
(1)编写fragment布局文件
left_fragment.xml
<LinearLayout xmlns:android="http://schemas.android.com/apk/res/android"
    android:layout_width="match_parent"
    android:layout_height="match_parent"
    android:background="#E696B1">
    <TextView
        android:layout_width="wrap_content"
        android:layout_height="wrap_content"
        android:layout_gravity="center"
        android:textSize="40sp"
        android:layout_marginLeft="20dp"
        android:textColor="#000000"
        android:text="这是本地视频"/>
</LinearLayout>
right_fragment.xml
<LinearLayout xmlns:android="http://schemas.android.com/apk/res/android"
    android:layout_width="match_parent"
    android:layout_height="match_parent"
    android:background="#B9D6E3">
    <TextView
        android:layout_width="wrap_content"
        android:layout_height="wrap_content"
        android:layout_gravity="center"
        android:textSize="40sp"
        android:layout_marginLeft="20dp"
        android:textColor="#000000"
        android:text="这是网络视频"/>
</LinearLayout>
(2)自定义一个Fragment类
继承Fragment或者他的子类,重写onCreateView()方法 在该方法中调用:inflater.inflate()方法加载Fragment的布局文件,接着返回加载的view对象
代码同静态加载
(3)编写activity.main.xml
<LinearLayout xmlns:android="http://schemas.android.com/apk/res/android"
    android:orientation="vertical"
    android:layout_width="match_parent"
    android:layout_height="match_parent">
    <LinearLayout
        android:layout_width="match_parent"
        android:layout_height="wrap_content"
        android:orientation="horizontal">
        <TextView
            android:id="@+id/menu1"
            android:layout_width="0dp"
            android:layout_height="match_parent"
            android:layout_weight="1"
            android:text="本地视频"
            android:gravity="center"
            android:textSize="30sp"/>
        <TextView
            android:id="@+id/menu2"
            android:layout_width="0dp"
            android:layout_height="match_parent"
            android:layout_weight="1"
            android:text="网络视频"
            android:gravity="center"
            android:textSize="30sp"/>
    </LinearLayout>
    <FrameLayout
        android:id="@+id/content"
        android:layout_width="match_parent"
        android:layout_height="0dp"
        android:layout_weight="8"/>
</LinearLayout>
(4)编写MainActivity逻辑
获得FragementManager对象——>开启事务,获得FragmentTransaction对象——>调用replace()方法添加碎片到容器——>提交事务
public class MainActivity extends AppCompatActivity implements View.OnClickListener{
    private TextView menu1;
    private TextView menu2;
    private FrameLayout content;
    private FragmentManager fragmentManager;
    private FragmentTransaction transaction;
    private Fragment fragment1;
    private Fragment fragment2;

    @Override
    protected void onCreate(Bundle savedInstanceState) {
        super.onCreate(savedInstanceState);
        setContentView(R.layout.activity_main);
        initView();
        //获得FragmentManager对象
        fragmentManager = getSupportFragmentManager();
        //开启事务,获得FragmentTransaction对象
        transaction = fragmentManager.beginTransaction();
        //创建需要添加的Fragment
        fragment1 = new LeftFragment();
        fragment2 = new RightFragment();
        //向容器内添加或替换碎片,默认情况下为LeftFragment
        transaction.replace(R.id.content,fragment1);
        //提交事务
        transaction.commit();
    }
    //初始化控件
    private void initView() {
        menu1 = (TextView)findViewById(R.id.menu1);
        menu2 = (TextView)findViewById(R.id.menu2);
        content = (FrameLayout) findViewById(R.id.content);
        menu1.setOnClickListener(this);
        menu2.setOnClickListener(this);
    }

    @Override
    public void onClick(View view) {
        transaction = fragmentManager.beginTransaction();
        switch (view.getId()){
            case R.id.menu1:
                //点击menu1,内容替换为leftFragment
                transaction.replace(R.id.content,fragment1);
                break;
            case R.id.menu2:
                //点击menu1,内容替换为RightFragment
                transaction.replace(R.id.content,fragment2);
                break;
            default:
                break;
        }
        transaction.commit();
    }
}
方法详解:
getSupportFragmentManager():获得FragmentManager
beginTransaction():开启事务,获得FragmentTransaction对象
replace(int containerViewId, Fragment fragment):向容器内添加碎片
第一个参数:要添加Fragment的容器
第二个参数:添加的Fragment实例
commit():提交事务
四、Activity 与 Fragment 相互通信
4.1Activity如何传递数据到Fragment
- 采用 Bundle方式。具体Demo步骤如下:
步骤1:Activity的布局文件
activcity_2_fragment.xml
<LinearLayout xmlns:android="http://schemas.android.com/apk/res/android"
    android:orientation="vertical"
    android:layout_width="match_parent"
    android:layout_height="match_parent">

    <TextView
        android:id="@+id/text"
        android:layout_gravity="center"
        android:layout_width="wrap_content"
        android:layout_height="wrap_content"
        android:textSize="20dp"
        android:text="我是Activity" />

    <FrameLayout
        android:layout_below="@+id/button"
        android:id="@+id/fragment_container"
        android:layout_width="match_parent"
        android:layout_height="500dp"/>
</LinearLayout>
步骤2:设置 Fragment的布局文件
fragment.xml
<LinearLayout xmlns:android="http://schemas.android.com/apk/res/android"
    android:orientation="vertical"
    android:layout_width="match_parent"
    android:layout_height="match_parent"
    android:background="@color/colorAccent"
    >

    <TextView
        android:id="@+id/fragment"
        android:text="我是fragment"
        android:layout_gravity="center"
        android:textSize="30dp"
        android:layout_width="wrap_content"
        android:layout_height="wrap_content"
        />

    <TextView
        android:id="@+id/text"
        android:layout_gravity="center"
        android:layout_width="wrap_content"
        android:layout_height="wrap_content"
        android:textSize="20dp"
        android:text="等待Activity发送消息" />

    <Button
        android:id="@+id/button"
        android:layout_gravity="center"
        android:text="点击接收Activity消息"
        android:layout_centerInParent="true"
        android:textSize="20dp"
        android:layout_width="wrap_content"
        android:layout_height="wrap_content" />
</LinearLayout>
步骤3:设置Activity的类文件
Activity2Fragment
public class Activity2Fragment extends AppCompatActivity {

    TextView text;

    @Override
    protected void onCreate(Bundle savedInstanceState) {
        super.onCreate(savedInstanceState);
        setContentView(R.layout.activcity_2_fragment);

        text = (TextView) findViewById(R.id.text);

        // 步骤1:获取FragmentManager
        FragmentManager fragmentManager = getFragmentManager();

        // 步骤2:获取FragmentTransaction
        FragmentTransaction fragmentTransaction = fragmentManager.beginTransaction();

        // 步骤3:创建需要添加的Fragment
        final mFragment fragment = new mFragment();

        // 步骤4:创建Bundle对象
        // 作用:存储数据,并传递到Fragment中
        Bundle bundle = new Bundle();

        // 步骤5:往bundle中添加数据
        bundle.putString("message", "I love Google");

        // 步骤6:把数据设置到Fragment中
        fragment.setArguments(bundle);

        // 步骤7:动态添加fragment
        // 即将创建的fragment添加到Activity布局文件中定义的占位符中(FrameLayout)
        fragmentTransaction.add(R.id.fragment_container, fragment);
        fragmentTransaction.commit();


    }
}
步骤4:设置Fragment的类文件
mFragment.java
public class mFragment extends Fragment {
    Button button;
    TextView text;
    Bundle bundle;
    String message;

    @Override
    public View onCreateView(LayoutInflater inflater, ViewGroup container, Bundle savedInstanceState) {
        View contentView = inflater.inflate(R.layout.fragment, container, false);
        // 设置布局文件

        button = (Button) contentView.findViewById(R.id.button);
        text = (TextView) contentView.findViewById(R.id.text);

        // 步骤1:通过getArgments()获取从Activity传过来的全部值
        bundle = this.getArguments();

        // 步骤2:获取某一值
        message = bundle.getString("message");

        // 步骤3:设置按钮,将设置的值显示出来
        button.setOnClickListener(new View.OnClickListener() {
            @Override
            public void onClick(View v) {

                // 显示传递过来的值
                text.setText(message);

            }
        });

        return contentView;
    }
}

4.2Fragment如何传递数据到Activity
- 采用接口回调方式。
步骤1:在Activity的布局文件定义1占位符(FrameLayout)
activity_main.xml
<RelativeLayout xmlns:android="http://schemas.android.com/apk/res/android"
    xmlns:tools="http://schemas.android.com/tools"
    android:layout_width="match_parent"
    android:layout_height="match_parent"
    android:paddingBottom="@dimen/activity_vertical_margin"
    android:paddingLeft="@dimen/activity_horizontal_margin"
    android:paddingRight="@dimen/activity_horizontal_margin"
    android:paddingTop="@dimen/activity_vertical_margin"
    tools:context="scut.carson_ho.fragment_2_activity.MainActivity">

    <TextView
        android:id="@+id/text"
        android:layout_width="wrap_content"
        android:layout_height="wrap_content"
        android:textSize="20dp"
        android:text="等待Fragment发送消息" />

    <Button
        android:id="@+id/button"
        android:layout_below="@+id/text"
        android:text="点击接收Fragment消息"
        android:layout_centerInParent="true"
        android:textSize="10dp"
        android:layout_width="wrap_content"
        android:layout_height="wrap_content" />

    <FrameLayout
        android:layout_below="@+id/button"
        android:id="@+id/fragment_container"
        android:layout_width="match_parent"
        android:layout_height="500dp"/>

</RelativeLayout>
步骤2:设置Fragment的布局文件
fragment.xml
<?xml version="1.0" encoding="utf-8"?>
<LinearLayout xmlns:android="http://schemas.android.com/apk/res/android"
    android:orientation="vertical"
    android:layout_width="match_parent"
    android:layout_height="match_parent"
    >

    <TextView
        android:id="@+id/fragment"
        android:text="我是fragment"
        android:gravity="center"
        android:textSize="30dp"
        android:layout_width="match_parent"
        android:layout_height="match_parent"
        android:background="@color/colorAccent"/>

</LinearLayout>
步骤3:设置回调接口
该接口用于用于Activity与Fragment通信
ICallBack.java
public interface ICallBack {
    void get_message_from_Fragment(String string);

}
步骤4:设置Fragment的类文件
mFragment.java
public class mFragment extends Fragment {

    @Override
    public View onCreateView(LayoutInflater inflater, ViewGroup container, Bundle savedInstanceState) {
        View contentView = inflater.inflate(R.layout.fragment, container, false);
        // 设置布局文件
        return contentView;
    }

    // 设置 接口回调 方法
    public void sendMessage(ICallBack callBack){

        callBack.get_message_from_Fragment("消息:我来自Fragment");

    }
}
步骤5:设置Acticvity的类文件
Main_Activity.java
public class MainActivity extends AppCompatActivity {

    Button button;
    TextView text;

    @Override
    protected void onCreate(Bundle savedInstanceState) {
        super.onCreate(savedInstanceState);
        setContentView(R.layout.activity_main);

        button = (Button)findViewById(R.id.button);
        text = (TextView)findViewById(R.id.text);

        // 步骤1:获取FragmentManager
        FragmentManager fragmentManager = getFragmentManager();

        // 步骤2:获取FragmentTransaction
        FragmentTransaction fragmentTransaction = fragmentManager.beginTransaction();

        // 步骤3:创建需要添加的Fragment
        final mFragment fragment = new mFragment();

        // 步骤4:动态添加fragment
        // 即将创建的fragment添加到Activity布局文件中定义的占位符中(FrameLayout)
        fragmentTransaction.add(R.id.fragment_container, fragment);
        fragmentTransaction.commit();


        button.setOnClickListener(new View.OnClickListener() {
            @Override
            public void onClick(View v) {

                // 通过接口回调将消息从fragment发送到Activity
                fragment.sendMessage(new ICallBack() {
                    @Override
                    public void get_message_from_Fragment(String string) {
                            text.setText(string);
                    }
                });

            }
        });
    }
}

五、Fragment懒加载
一、要实现Fragment的懒加载需要满足三个条件
1、布局是否初始化
2、视图是否可见
3、是否加载过数据
综上所述,只要满足这三个条件就可以执行加载操作。
二、如何实现
1、定义一个 isPrepared变量,在初始化视图的时候赋值为true;
2、定义一个isVisibleToUser变量,在页面可见状态赋值为true;
3、定义一个isDataInitiated变量,在页面加载数据时赋值为true;
使用Fragment自带的setUserVisibleHint()来判断当前fragment是否对用户可见,根据回调的isVisibleToUser参数来进行相关的逻辑判断。创建一个变量isVisible来拿到fragment是否可见的标志。
但是直接根据isVisible判断就加载数据,很有可能很多控件在OnCreateView()方法还未执行完成的情况下出现NullPointerException空指针的情况。所以我们需要在控件初始化完成并且用户可见的时候,再去进行数据的加载。


 3378
3378

 被折叠的 条评论
为什么被折叠?
被折叠的 条评论
为什么被折叠?
 到【灌水乐园】发言


