


spring
- 搭建
- 给对象赋值
- 给属性赋值,及属性特殊值
- 给数组赋值
- ArrayList赋值
- Map赋值
- Spring引入数据库资源
- Bean的生命周期
- FactoryBean
- ByType和ByName
- 注解以及注解扫描
- 动态代理
- Aop
- Spring整合jdbcTemplate
- 事物
<dependency>
      <groupId>org.springframework</groupId>
      <artifactId>spring-context</artifactId>
      <version>5.2.10.RELEASE</version>
</dependency>
2:右键创建spring配置文件

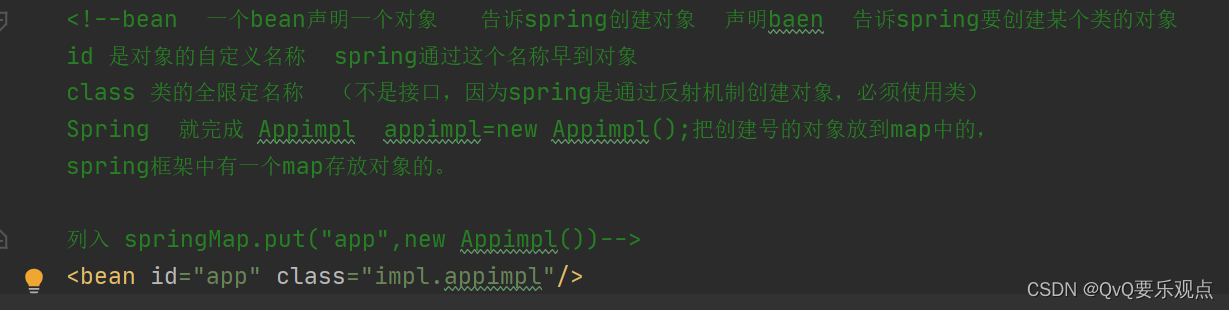
3:配置bean
<bean id="配置bean的名字" class="类的全限定名称,bean的定义类型"/>
4:创建初始化容器
@Test
    public void test02(){
        String config="book.xml";
        //  获取配置文件
        ApplicationContext atc=new ClassPathXmlApplicationContext(config);
        //  获取bean
        BookService bookService = (BookService)atc.getBean("bookService");
        //  调用bean的方法
        int num = bookService.num();
        System.out.println(num);
    }
给对象赋值
import Dao.BookDao;
import Dao.impl.BookDaoImpl;
import Service.BookService;

public class BookImpl implements BookService {

	//  这里我们想要依赖注入Bookdao这个对象   要去掉他的具体实现
    BookDao Dao;
	// BookDao Dao = new BookDaoImpl();

    @Override
    public String num() {
        int nums = Dao.nums();
        return nums + "1";
    }

	//  创建注入的set方法,否则无法完成注入
    public void setDao(BookDao dao) {
        Dao = dao;
    }
}
2:xml文件中,对Dao进行依赖绑定
    <bean id="bookDao" class="Dao.impl.BookDaoImpl" />

    <bean id="bookService" class="Service.Impl.BookImpl" >
<!--        property 代表service中的属性   ref指的是Dao的具体的实现对象-->
    <property name="dao" ref="bookDao" />
    </bean>
注入变量
<!--    set注入      <value><![CDATA[<王五>]]></value>  特殊值赋值   -->
    <bean id="student-02" class="com.qwq.Pojo.Student">
<!--       property:通过成员变量的set方法进行赋值
           name:设置需要赋值的属性名称   跟getxxx名称   setxxx名称相关
           value:指定属性值-->
        <property name="sid" value="11" />
<!--        可以输入  <王五>   -->
        <property name="sname" >
            <value><![CDATA[<王五>]]></value>
        </property>
        <property name="age" value="11" />
        <property name="gender" value="11" />
    </bean>
给数组赋值
<!--    1.赋值数组-->
    <bean id="student-03" class="com.qwq.Pojo.Student">
        <property name="sid" value="11" />
        <property name="sname" value="11"/>
        <property name="age" value="11" />
        <property name="gender" value="11" />
        <property name="hobby" >
<!--      private String[] Hobby;      -->
            <array>
                <value>1</value>
                <value>1</value>
                <value>1</value>
            </array>
        </property>
        <property name="clazz" ref="clazz" />
    </bean>

    <bean id="clazz" class="com.qwq.Pojo.Clazz">
        <property name="cid" value="11" />
        <property name="CName" value="11" />
    </bean>
给ArrayList赋值
    <!--    2 -1 List 赋值  ArrayList<Student> -->
    <bean id="clazz2" class="com.qwq.Pojo.Clazz">
        <property name="cid" value="11" />
        <property name="CName" value="11" />
        <property name="Students">
            <list>
             <ref bean="student-01"></ref>
                <ref bean="student-02"></ref>
            </list>
        </property>
    </bean>

    <!--    2 -2 List 赋值   ArrayList<Student> -->
    <bean id="clazz3" class="com.qwq.Pojo.Clazz">
        <property name="cid" value="11" />
        <property name="CName" value="11" />
        <property name="Students" ref="StudentList"></property>
    </bean>
<!--    ref指向student的bean-->
    <util:list id="StudentList">
        <ref bean="student-01" ></ref>
        <ref bean="student-02" ></ref>
    </util:list>
给Mapt赋值
    <!--    Map      private Map<String,Teacher> getTeacherMap   带ref是引用 已存在的对象bean    -->
    <bean id="student-05" class="com.qwq.Pojo.Student">
            <map>
                <entry key="10086" value-ref="Teacher1" ></entry>
                <entry key="10887" value-ref="Teacher2" ></entry>
            </map>
    </bean>


<!--    Map2       private Map<String,Teacher> getTeacherMap; -->
    <bean id="student-06" class="com.qwq.Pojo.Student">
        <property name="getTeacherMap" ref="StudcentMap"></property>
    </bean>
    <util:map id="StudcentMap">
        <entry key="10086" value-ref="Teacher1" />
        <entry key="10089" value-ref="Teacher2" />
        <entry key="10089" value="Teacher2" />
    </util:map>
Spring引入数据库资源
<?xml version="1.0" encoding="UTF-8"?>
<beans xmlns="http://www.springframework.org/schema/beans"
       xmlns:xsi="http://www.w3.org/2001/XMLSchema-instance"
       xmlns:context="http://www.springframework.org/schema/context"
       xsi:schemaLocation="http://www.springframework.org/schema/beans http://www.springframework.org/schema/beans/spring-beans.xsd http://www.springframework.org/schema/context https://www.springframework.org/schema/context/spring-context.xsd">

    <!-- 引入外部属性文件 -->
    <context:property-placeholder location="classpath:jdbc.properties"/>

    <bean id="druidDataSource" class="com.alibaba.druid.pool.DruidDataSource">
        <property name="url" value="${jdbc.url}"/>
        <property name="driverClassName" value="${jdbc.driver}"/>
        <property name="username" value="${jdbc.user}"/>
        <property name="password" value="${jdbc.password}"/>
    </bean>

</beans>
bean的生命周期
    /**
     *   Bean的生命周期
     *   1.实例化   容器寻找bean的定义信息并通过无参构造函数实例化
     *   2.依赖注入 调用属性的set方法注入属性  , 可以使用bean
     *   3.初始化  通过bean的init-method属性指定初始化方法
     *   4.销毁   通过bean的destroy-method属性指定销毁方法
     *
     */
<!--    scope="prototype": 标识获取该bean所对应的对象不是同一个-->
<!--    scope="singleton":表示获取该bean所对应的对象都是同一个-->


 FactoryBean
1.通过实现FactoryBean接口,重写方法
package com.qwq.Utils;

import com.qwq.Pojo.Teacher;
import org.springframework.beans.factory.FactoryBean;

public class TeacherFactoryBean implements FactoryBean {
//  通过一个对象,交由IOC容器
    public Object getObject() throws Exception {
        return new Teacher(1,"wang");
    }
//  设置提供对象的类型
    public Class<?> getObjectType() {
        return Teacher.class;
    }
}
2.注入bean
<bean class="com.qwq.Utils.TeacherFactoryBean" ></bean>
ByType 和 ByName
ByType :根据被赋值属性的类型,在IOC容器中匹配某个Bean , 为属性赋值
ByName: 根据被赋值的属性名称与IOC容器众寻找bean的id相同的,进行赋值
注解
   /**
     * @Component:将类标识为普通组件    普通
     * @Controller:将类标识为控制层组件
     * @Service:将类标识为业务层组件
     * @Repository:将类标识为持久层组件   Dao
     */
扫描
<?xml version="1.0" encoding="UTF-8"?>
<beans xmlns="http://www.springframework.org/schema/beans"
xmlns:xsi="http://www.w3.org/2001/XMLSchema-instance"
xmlns:context="http://www.springframework.org/schema/context"
xsi:schemaLocation="http://www.springframework.org/schema/beans http://www.springframework.org/schema/beans/spring-beans.xsd http://www.springframework.org/schema/context https://www.springframework.org/schema/context/spring-context.xsd">
<!-- 扫描组件 扫描包下的注解,排除设置的注解类型或类名的注解-->
<context:component-scan base-package="com.qwq" >
<!-- context:exclude-filter标签:指定排除规则 -->
<!--
type:设置排除或包含的依据
type="annotation",根据注解排除,expression中设置要排除的注解的全类名
type="assignable",根据类型排除,expression中设置要排除的类型的全类名
-->
<context:exclude-filter type="annotation" expression="org.springframework.stereotype.Controller"/>
<!-- context:include-filter标签:指定在原有扫描规则的基础上追加的规则 -->
<!-- use-default-filters属性:取值false表示关闭默认扫描规则 -->
<!-- 此时必须设置use-default-filters="false",因为默认规则即扫描指定包下所有类 -->
<!--
exclude-filter:设置排除
type="annotation",根据注解排除,expression中设置要排除的注解的全类名
type="assignable",根据类型排除,expression中设置要排除的类型的全类名
-->
<!-- <context:include-filter type="annotation" expression="org.springframework.stereotype.Controller"/>-->
</context:component-scan>
<!-- 不扫描qwq包下的所有注解,只扫描包含的注解或包含的类名注解-->
<!-- <context:component-scan base-package="com.qwq" use-default-filters="false" >-->
<!-- <!– context:include-filter标签:指定在原有扫描规则的基础上追加的规则 –>-->
<!-- <!– use-default-filters属性:取值false表示关闭默认扫描规则 –>-->
<!-- <!– –>-->
<!-- <!–-->
<!-- exclude-filter:设置包含-->
<!-- type="annotation",根据注解排除,expression中设置要包含的注解的全类名-->
<!-- type="assignable",根据类型排除,expression中设置要包含的类型的全类名-->
<!-- –>-->
<!-- <context:include-filter type="annotation" expression="org.springframework.stereotype.Controller"/>-->
<!-- </context:component-scan>-->
</beans>
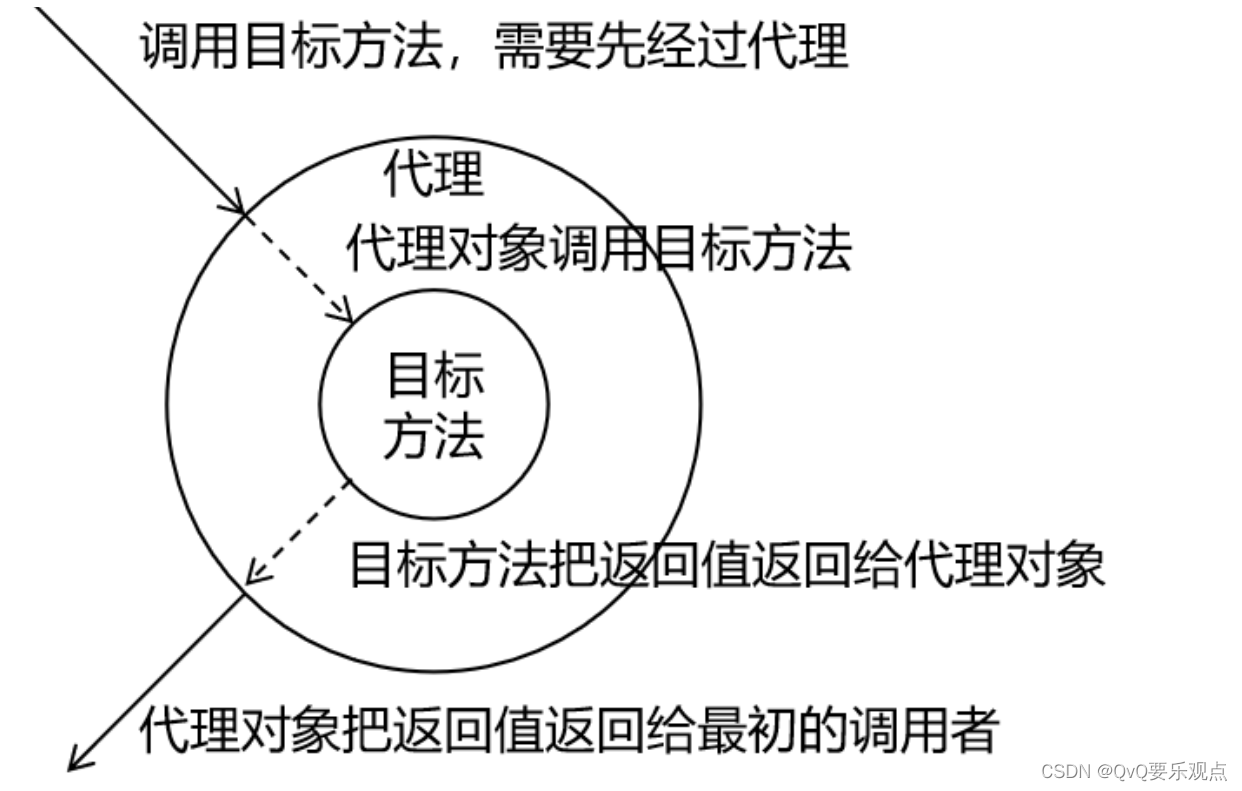
代理方法
在调用目标方法的时候,先通过代理对象方法,给目标方法增加其功能,代理方法再调用目标方法,目标方法将返回值交还给代理对象,再由代理对象返回给调用者
package com.qwq.utils;

import org.springframework.cglib.proxy.InvocationHandler;
import org.springframework.cglib.proxy.Proxy;

import java.lang.reflect.Method;
import java.util.Arrays;

public class ProxyFactory {

    private Object target;
    //  获取目标对象
    public ProxyFactory(Object target) {
        this.target = target;
    }

    //  看返回的结果
    public Object getProxy(){
//                              取得该Class对象的类装载器
                ClassLoader classLoader = target.getClass().getClassLoader();
//                             它能够获得这个对象所实现的所有接口
                Class<?>[] interfaces = target.getClass().getInterfaces();
                InvocationHandler invocationHandler = new InvocationHandler() {
                    //  代理对象如何执行方法
                    public Object invoke(Object proxy, Method method, Object[] args)
                            throws Throwable {
                        /**
                         * proxy:代理对象
                         * method:代理对象需要实现的方法,将调用的方法
                         * args:调用方法时,输入的参数
                         */
                        Object result = null;
                        try {
                            System.out.println("[动态代理][日志] "+method.getName()+",参数:"+ Arrays.toString(args));
                                    result = method.invoke(target, args);
                            System.out.println("[动态代理][日志] "+method.getName()+",结果:"+ result);
                        } catch (Exception e) {
                            e.printStackTrace();
                            System.out.println("[动态代理][日志] "+method.getName()+",异常:"+e.getMessage());
                        } finally {
                            System.out.println("[动态代理][日志] "+method.getName()+",方法 执行完毕");
                        }
                        return result;
                    }
                };
                return Proxy.newProxyInstance(classLoader, interfaces,
                        invocationHandler);
            }
        }
Aop
AOP(Aspect Oriented Programming)是一种设计思想,是软件设计领域中的面向切面编程,它是面
向对象编程的一种补充和完善,它以通过预编译方式和运行期动态代理方式实现在不修改源代码的情况
下给程序动态统一添加额外功能的一种技术。
横切关注点:抽取出的非核心业务代码
通知:将横切关注点都要写一个增加功能的方法,这个方法叫做通知
切面:封装通知方法的类
目标:被增加功能的对象
切入点:定位连接方式
作用:
简化代码,将重复的代码抽离出来,增加代码的复用性
依赖:
        <dependency>
        <groupId>org.springframework</groupId>
        <artifactId>spring-aspects</artifactId>
        <version>5.3.1</version>
        </dependency>
开启注解AOP
<!--    开启基于注解的AOP-->

<aop:aspectj-autoproxy />
设置注解
@Aspect   //  切面注解
public class AspectCalculor {
}
import org.aspectj.lang.Signature;
import org.aspectj.lang.annotation.*;
import org.springframework.stereotype.Component;

import java.util.Arrays;

@Component
@Aspect   //  切面注解
public class AspectCalculor {

//    前置通知           类、包都可以使用 * 代替
//    第一个*,表示任意访问修饰服和返回值类型
//    第二个*,类中的任意方法
//    ..表任意参数列表
    @Before("execution(* com.qwq.Dao.Impl.CalculatorImpl.*(..))")
/**
 *          JoinPoint joinPoint
 *          Signature 中可以获取到原始方法的信息 : Signature signature = joinPoint.getSignature();
 *          signature.getName() 获取方法名称    joinPoint.getArgs();  获取方法参数
 */

    public void BeforeAdviceMethod(JoinPoint joinPoint){
        Signature signature = joinPoint.getSignature();
//        int com.qwq.Dao.Calculator.add(int,int)
        System.out.println("连接点方法名称:"+signature.getName());
        Object[] args = joinPoint.getArgs();
        System.out.println("连接点参数:"+ Arrays.toString(args));
        System.out.println("这个是前置通知");
    }


    @Before("publicMethod()")
    public void BAfterAdviceMethodw(JoinPoint joinPoint){
        System.out.println("标题--------------------------");
    }


    @Pointcut("execution(* com.qwq.Dao.Impl.CalculatorImpl.*(..))")
    public void publicMethod(){}


//    后置通知   finally进行修饰的
    @After("publicMethod()")
    public void AfterAdviceMethodw(JoinPoint joinPoint) {
        Signature signature = joinPoint.getSignature();
        System.out.println("后置通知的方法:"+signature.getName());
    }

    /**
     * returning = "result" :指定参数作为接收对象的返回值
     */
    @AfterReturning(value = "publicMethod()" , returning = "result")
    public void AfterReturningAdviceMethodw(JoinPoint joinPoint, Object result){
        System.out.println("返回通知:"+result);
    }

    /**
     *  异常通知: 打印异常原因 , 出现异常 , 返回值异常所以返回值通知不显示
     */
    @AfterThrowing(value = "publicMethod()" , throwing = "ex")
    public void AfterThrowinAdviceMethodw(Throwable ex){
        System.out.println("异常的原因是"+ex);
    }


}
环绕通知
//    环绕通知  环绕通知方法的返回值要和目标对象方法的返回值一定要一致·
    @Around("publicMethod()")
    public Object AroundAdviceMethodw(ProceedingJoinPoint p){

        Object result = null;

        try {
            System.out.println("环绕通知-前置通知");
//            表示目标方法执行
             result = p.proceed();
            System.out.println("环绕通知-返回值通知");
        } catch (Throwable throwable) {
            System.out.println("环绕通知-异常通知");
            throwable.printStackTrace();
        }finally {
            System.out.println("环绕通知-后置通知");
        }

        return result;
    }
设置通知优先级
package com.qwq.utils;

import org.aspectj.lang.JoinPoint;
import org.aspectj.lang.Signature;
import org.aspectj.lang.annotation.After;
import org.aspectj.lang.annotation.Aspect;
import org.aspectj.lang.annotation.Before;
import org.springframework.core.annotation.Order;
import org.springframework.stereotype.Component;

@Component
@Aspect
@Order(1)  //  数字越小,优先级越高
public class verifyAspect {

    @Before("com.qwq.utils.AspectCalculor.publicMethod()")
    public void verifyBefore(JoinPoint joinPoint){
        System.out.println("验证前置方法");
    }
}
spring整合jdbcTemplate##
Aop
xml配置文件
<?xml version="1.0" encoding="UTF-8"?>
<beans xmlns="http://www.springframework.org/schema/beans"
       xmlns:xsi="http://www.w3.org/2001/XMLSchema-instance"
       xmlns:context="http://www.springframework.org/schema/context"
       xsi:schemaLocation="http://www.springframework.org/schema/beans http://www.springframework.org/schema/beans/spring-beans.xsd
       http://www.springframework.org/schema/context https://www.springframework.org/schema/context/spring-context.xsd">

    <!--    指定properties文件的位置-->
    <context:property-placeholder location="classpath:jdbc.properties"></context:property-placeholder>

<!--  数据源  -->
    <bean id="druidDataSource" class="com.alibaba.druid.pool.DruidDataSource" >

        <property name="driverClassName" value="${jdbc.driver}"/>
        <!--                连接数据库的url字符串-->
        <property name="url" value="${jdbc.url}"/>
        <!--                访问数据库的用户名-->
        <property name="username" value="${jdbc.user}"/>
        <!--                访问数据库的密码-->
        <property name="password" value="${jdbc.password}"/>

    </bean>

    <!-- 配置 JdbcTemplate -->
    <bean id="jdbcTemplate" class="org.springframework.jdbc.core.JdbcTemplate">
        <!-- 装配数据源 -->
        <property name="dataSource" ref="druidDataSource"/>

    </bean>

</beans>
import Pojo.user;
import org.junit.Test;
import org.junit.runner.RunWith;
import org.springframework.beans.factory.annotation.Autowired;
import org.springframework.jdbc.core.BeanPropertyRowMapper;
import org.springframework.jdbc.core.JdbcTemplate;
import org.springframework.test.context.ContextConfiguration;
import org.springframework.test.context.junit4.SpringJUnit4ClassRunner;

@RunWith(SpringJUnit4ClassRunner.class)   //当前测试类在Spring的测试环境下执行,可以通过注入的方式注解获取IOC容器中的bean
@ContextConfiguration("classpath:spring-jdbc.xml")  //设置Spring测试环境的配置文件
public class Test01 {

    @Autowired
    private JdbcTemplate jdbcTemplate;

//    新增
    @Test
    public void Inserttest(){
        String sql = "insert into user values(null,?,?,?,?,?)" ;
        int InsertUser = jdbcTemplate.update(sql, "1", "1", 666, "男", "user@qq.com");
        System.out.println(InsertUser);
    }

//    删除
    @Test
    public void Deletetest(){
        String sql = "DELETE FROM USER WHERE ID = ? " ;
        int Delete = jdbcTemplate.update(sql, 18);
        System.out.println(Delete);
    }


}
声明式事物
事物开启的条件 xml
1.spring配置文件配置事物管理器
2.开启事物的注解驱动
<!--    1.配置事物管理器-->
<bean id="transactionManager" class="org.springframework.jdbc.datasource.DataSourceTransactionManager">
<!--    配置数据源-->
    <property name="dataSource" ref="druidDataSource"></property>
</bean>
<!--    2.开启事物注解驱动
        使用@Transactional注解标识的方法或类中所有的方法进行事物的管理
        transaction-manager="transactionManager" 设置事务管理器的Id
-->
    <tx:annotation-driven transaction-manager="transactionManager"/>
使用@Transactional
1.在类上添加
2.在方法上添加
@Service
@Transactional
// 事物配置  : 1.spring配置文件配置事物管理器  2.开启事物的注解驱动
//  @Transactional 标识在方法上   方法上所有的方法都加上事物
public class BookserviceImpl implements Bookservice {
}
只读->方法均为查询时,才可以使用
    @Transactional(
//            只读  当前事物众至于查询功能才可以使用
            readOnly = true
    )
超时->方法在规定的时间没有执行完成,则强制回滚
    @Transactional(
//  在3秒内,没有执行完,则会回滚
            timeout = 3
    )
回滚策略
声明式事物,只针对运行时异常回滚,编译时异常不回滚
    @Transactional(
//            不造成回滚的异常    class
//            noRollbackFor = ArithmeticException.class
//            不造成回滚的异常    全类名
            noRollbackForClassName = "java.lang.ArithmeticException"
    )
事物的隔离级别
1.读未提交
程序有两个并发的事物,在当前A事物中,可以读取到b事物中,未提交的事物
(b新增一条数据,在没有提交的情况下,a就可以读取到这条数据。 如果a数据回滚,b数据仍然存在,脏读)
2.读已提交
(a和b两个事物,a只能读取到b中已提交的事物,当b新增数据,没有提交时,事物a获取不到该数据,只有b提交事物时,事物a才可以获取到该数据)
不可重复读->a读取事物b时,读取的数据不一样
3.可重复读
操作某一条数据的时候,事物a会对数据进行加锁,其他事物无法操作该数据,只有a提交了该数据,b就可以操作数据
mysql中,不会出现幻读的情况,每一次事物中,只能读取到当前事物读取到的结果
(幻读,事物a在操作数据的时候,b事物无法操作该数据,但是b事物可以操作其他的数据,从而影响事物a)
4.串行化
a事物在操作数据时,会对表加锁,其他事物无法操作表的增删改查
    @Transactional(
//          可重复读
            isolation = Isolation.DEFAULT
    )
事物的传播行为
一般使用调用者的事物
更改事物
    @Transactional(
//            执行自己的事物
            propagation = Propagation.REQUIRES_NEW
    )
xml事物的传播行为
<!--基于xml形式配置    要删除启事物注解驱动-->
<!--    xml配置事物通知  id唯一表示   transaction-manager事物管理器 -->
    <tx:advice id="interceptor" transaction-manager="transactionManager">
        <tx:attributes>
<!--            银河方法均开启事物-->
            <tx:method name="*"/>
        </tx:attributes>

    </tx:advice>

    <aop:config>
        <aop:advisor advice-ref="interceptor" pointcut="execution(* com.qwq.service.Impl.*.*(..))"></aop:advisor>
    </aop:config>


 7221
7221


 被折叠的 条评论
为什么被折叠?
被折叠的 条评论
为什么被折叠?
 到【灌水乐园】发言


