


· 1. springBoot的基础
2. @SpringBootApplication初始化
3. @Configuration配置bean
4. @Import()导入组件
5. @ConditionalOnBean 按照条件装配
6. @ImportResource导入spring配置文件
7. @ConfigurationProperties配置绑定 快速获取值
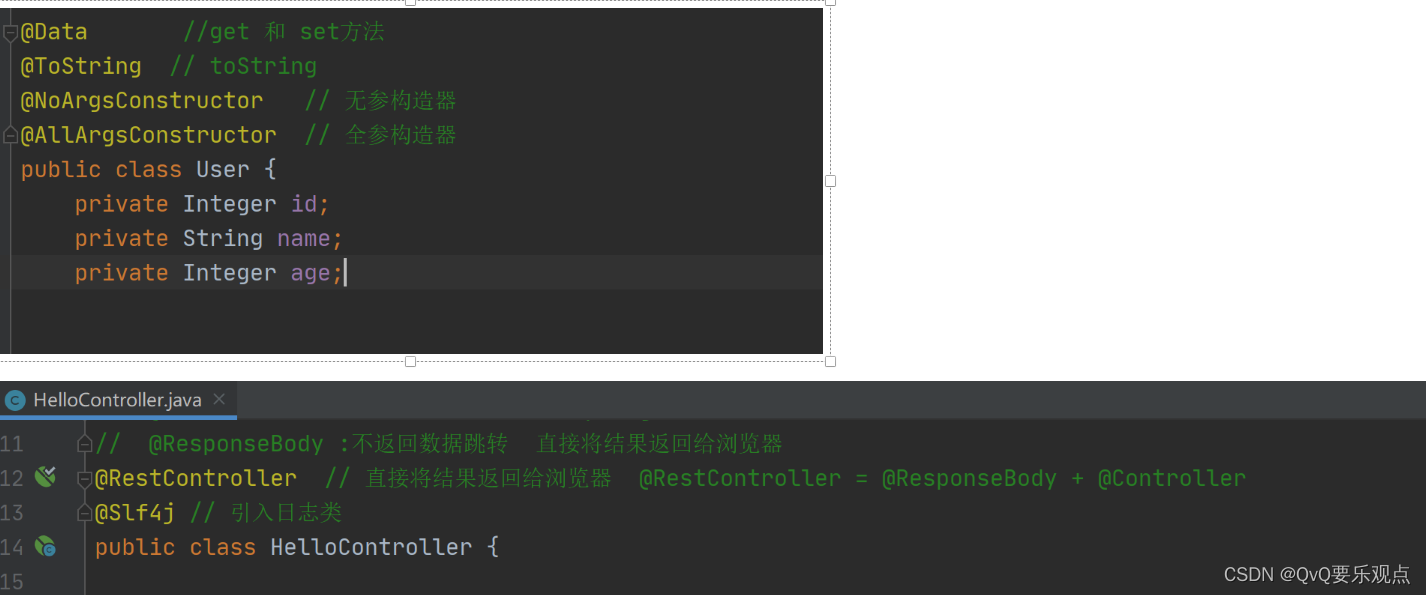
8. lombok
9. yaml语法格式
10. 自定义文件,yaml提示
11. 静态资源访问
12. @PathVariable(“xx”):路径变量、@RequestHeader(“xx”):获取请求头信息
13. @RequestParam(“xx”) 获取请求体的参数
14. @CookieValue(“xx”) 获取指定的cookie
15. @RequestBody xx, 获取请求体post的全部数据
16. @RequestAttribute 获取请求域的数据
17. 矩阵变量,处理请求参数中,带;;;的
18. thymeleaf使用
19. 拦截器
20. 文件上传
21. 异常处理
22. 注入原生组件Servlet、Filter、Listenter
23. 定制化原理
24. 数据访问-引入jdbc
25. 整合druid数据源
26. 整合mybatis
27. 整合mybatis-plus
28. 分页
29. 跳转
30. 整合redis
31. 单元测试
32. 指标监控
33. 多环境切换
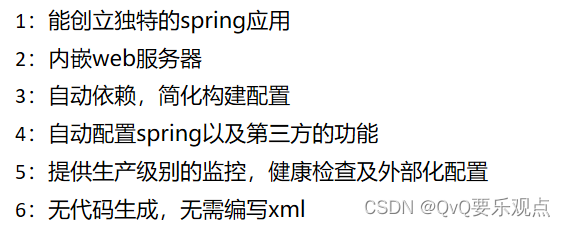
SpringBoot的优点
导入的jar包
<parent>
        <groupId>org.springframework.boot</groupId>
        <artifactId>spring-boot-starter-parent</artifactId>
        <version>2.3.4.RELEASE</version>
    </parent>


    <dependencies>
        <dependency>
            <groupId>org.springframework.boot</groupId>
            <artifactId>spring-boot-starter-web</artifactId>
        </dependency>

    </dependencies>
主程序类
/**
 *  主程序类
 */
@SpringBootApplication
public class Helloword {
//    启动主程序类
    public static void main(String[] args) {
        SpringApplication.run(Helloword.class,args);
    }
}
修改系统配置
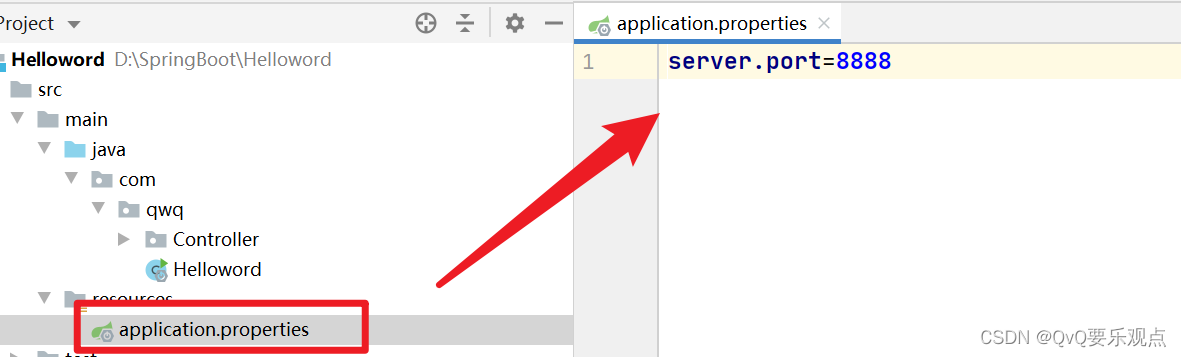
简化配置->把项目打包成jar包,直接在目标服务器
java -jar 包名

<!--    简化部署   -->
    <build>
        <plugins>
            <plugin>
                <groupId>org.springframework.boot</groupId>
                <artifactId>spring-boot-maven-plugin</artifactId>
            </plugin>
        </plugins>
    </build>
修改当前jar包的版本号
@SpringBootApplication
@SpringBootApplication
等同于
@SpringBootConfiguration
@EnableAutoConfiguration
@ComponentScan(“本包”)
将本包内的文件,或本包内的子文件全部扫描出来
如果更改文件配置
@SpringBootApplication(scanBasePackages=“com.atguigu”)
或者@ComponentScan 指定扫描路径
@Configuration 配置bean
import com.qwq.pojo.Pet;
import com.qwq.pojo.User;
import org.springframework.context.annotation.Bean;
import org.springframework.context.annotation.Configuration;

/**
/**
 *   1.配置类也是组件
 *   2.配置类里面使用@bean标注在容器上,注册组件,默认为单例
 */
@Configuration(proxyBeanMethods = true)
/**
 *    告诉springboot这是一个配置类
 *    true = 创建的对象都是单例的,Userbean中配置Pet的bean,那么user中的Pet和pet是同一个对象
 *    false= Userbean中配置Pet的bean,user中的Pet和pet不是同一个对象
 *    组件不依赖于其他组件时,设置为false
 *    组件依赖于其他组件,设置为true
 */
public class myconfig {

    /**
     *    <bean id = "user" class = "com.qwq.pojo.user">
     *        <property name="name" value="王强" />
     *        <property name="age" value="21" />
     *    </bean>
     *    无论获取多次组件,都是容器中的这个对象
     */
    @Bean
    public User user(){
        return new User("w", 21,Pet());
    }

    @Bean
    public Pet Pet(){
        return new Pet("Tomcat");
    }


}

@Import() 导入组件
Import通过快速导入的方式实现把实例加入spring的IOC容器中
@Import({User.class, Pet.class})  //快速实例化对象
@Controller
public class TestController {

    @Autowired
    User user;

    @Autowired
    Pet pet;


    @RequestMapping("/helloword")
    @ResponseBody
    public String test01(){
        System.out.println(user + " "+ pet);
        return "bean";
    }
}
@ConditionalOnBean 按照条件装配
加在方法上或类上
@ConditionalOnBean(name = "user")  //当容器中有这个bean为tom时,才会执行注入bean的操作,没用这个bean,则该类不会注入组件
@ConditionalOnMissingBean(name = "tom")  //当容器中没有这个bean为tom时,才会执行注入bean的操作,有这个bean,则该类不会注入组件
@ImportResource导入spring配置文件
//1.声明配置类   2.告诉bean文件的地址
@Configuration(proxyBeanMethods = true)
@ImportResource("classpath:SpirngConfig.xml")
public class config {
}
@ConfigurationProperties配置绑定 快速获取值
第一种方式
@Component        // 加入组件
@ConfigurationProperties(prefix = "mycar")  //properties绑定数据的前缀  mycar.name=Byd
public class Car {

 private String name;
........
}
第二种方式
//1.声明配置类   2.告诉bean文件的地址
@Configuration(proxyBeanMethods = true)
@ImportResource("classpath:SpirngConfig.xml")
@EnableConfigurationProperties(Car.class)  // 在配置类种声明   1.开启car的自动绑定功能  2.将car组件自动加入容器
public class config {
}
@ConfigurationProperties(prefix = "mycar")  //properties绑定数据的前缀  mycar.name=Byd
public class Car {
 private String name;
}
LOMBOK
        <dependency>
            <groupId>org.projectlombok</groupId>
            <artifactId>lombok</artifactId>
        </dependency>
Yaml语法格式
person:
  userName: "zhangsan \n  wang"
#  zhangsan \n  wang    json: "zhangsan \\n  wang"       控制台:zhangsan \n  wang
# 'zhangsan \n  wang'   json: "zhangsan \\n  wang"       控制台:zhangsan \n  wang
# "zhangsan \n  wang"   json: "zhangsan \n  wang"        控制台:zhangsan   换行   wang
#  单引号会将\n进行输出,会转义,双引号会对\n进行换行输出,不会转义
  boss: true
  birth: 2019/12/9
  age: 18
  interests: [aa,bb,cc]    #数组
  animal: [aa,bb,cc]    #集合   List
  score: {englist:80,math:100}  #  Map
  salarys: [111,222]     #set
  pet:            #对象
    name: 123
    weight: 123
  allPets:      # Map<String, List<Pet>>
    sick:
      - {name: 啊黄,weight: 99.99}
      - name: 啊黑
        weiht: 999
    health:
      - {name: 嘿嘿,weight: 99.99}
自定义文件,yaml提示 <div id = 10’’ />
        <dependency>
            <groupId>org.springframework.boot</groupId>
            <artifactId>spring-boot-configuration-processor</artifactId>
            <optional>true</optional>
        </dependency>
            <build>
        <plugins>
            <plugin>
                <!--    简化部署   打包方式-->
                <groupId>org.springframework.boot</groupId>
                <artifactId>spring-boot-maven-plugin</artifactId>
                <configuration>
                    <excludes>
                        <exclude>
<!--                       spring-boot-configuration-processor 引入的jar包,不参与打包-->
                            <groupId>org.springframework.boot</groupId>
                            <artifactId>spring-boot-configuration-processor</artifactId>
                        </exclude>
                    </excludes>
                </configuration>
            </plugin>
        </plugins>
    </build>
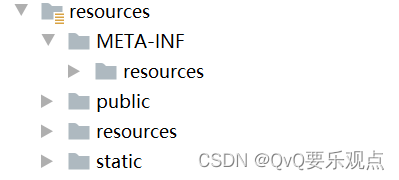
静态资源访问
请求进来,先去controller找请求裤裤能不能处理,不能处理的话再交给静态资源处理器,静态资源找不到页面404
静态资源目录
默认访问静态资源的路径
http://localhost:8080/c1.gif 直接输入静态资源的名称即可访问
修改默认资源访问路径
http://localhost:8080/res/c1.gif 修改默认访问路径
spring:
  mvc:
    static-path-pattern: /res/**
页面图标与index访问

@PathVariable(“xx”):路径变量 获取id、name "/car/{id}/owner/{name} @RequestHeader(“xx”):获取请求头信息
    /**   @PathVariable("xx"):路径变量 获取id、name  "/car/{id}/owner/{name}
     *    @RequestHeader("xx"):获取请求头信息
     */
    @RequestMapping("/car/{id}/owner/{name}")    // car/10/owner/lisi
    public Map<String,Object> getCar(@PathVariable("id") Integer id,  //获取路径变量中的ID值
                                     @PathVariable("name")String name, //获取路径变量种的name值
                                     @PathVariable Map<String,String> pv,
                                     @RequestHeader("Host") String Host, //获取请求头的Host信息
                                     @RequestHeader Map<String,String> header, //将所有的请求头信息封装到header里面
                                     @RequestParam("age") Integer age,
                                     @RequestParam("inters") List<String> inters,
                                     @RequestParam Map<String,String> params

    ){ //将所有的路径变量取出来
        Map<String,Object> map =new HashMap<>();
        map.put("age",age);
        map.put("inters",inters);
        map.put("params",params);
        map.put("id",id);
        map.put("name",name);
//        map.put("pv",pv);   //获取所有的请求参数,封装到map集合
//        map.put("Host",Host);  // 获取请求头的Host信息
//        map.put("hender",header);  // 将所有的请求头信息封装到header里面
        return map;
    }
@RequestParam(“xx”) 获取请求体的参数
/**
     * /a/3/owner/lisi(路径变量)?age=10&inters=basketball&inters=game"(请求体参数)
     * @RequestParam("xx") 获取请求体的参数
     */
    @RequestMapping("/a/{id}/owner/{name}")
    public Map<String,Object> getCar2( @RequestParam("age") Integer age,
//                                       获取请求体种的参数  age  inters  将参数值封装为params
                                       @RequestParam("inters") List<String> inters,
                                       @RequestParam Map<String,String> params
   ){
//        {"inters":["basketball","game"],"params":{"age":"10","inters":"basketball"},"age":10}
        Map<String,Object> map =new HashMap<>();
        map.put("age",age);
        map.put("inters",inters);
        map.put("params",params);
        return map;
    }
@CookieValue(“xx”) 获取指定的cookie
   /**
     *
     * @CookieValue("xx")  获取指定的cookie
     */
    @RequestMapping("/aaa/{id}")
    public Map<String,Object> Test01(HttpServletRequest request,
                                     @PathVariable Integer id,
                                     @CookieValue("cs") String cs, //根据键获取cookeie
                                     @CookieValue("JSESSIONID") String JSESSIONID, //根据键获取cookeie
                                     @CookieValue("cs") Cookie cookie  //获取cookie对象
                                     ) throws IOException {
        HttpSession session = request.getSession();
        String id1 = session.getId(); // 获取cookie
        Map <String,Object> map = new HashMap<>();
        map.put("id",id);
        map.put("cooke",id1);
        map.put("cs",cs);
        map.put("JSESSIONID",JSESSIONID);
        map.put("cookie对象",cookie);
        return map;
    }
@RequestBody xx, 获取请求体post的全部数据
/**
     *  @RequestBody xx, 获取请求体post的全部数据
     */
    @PostMapping("/post")   // 获取post请求体
    public Map postMeth(@RequestBody String body,
                        @RequestParam("username") String username,
                        @RequestParam("password") String password,
                        @RequestParam Map<String,String> params){
        Map <String,Object> map = new HashMap<>();
        map.put("body",body);         // "body":"username=12&password=12"
        map.put("user",username);     //  "user":"12"
        map.put("password",password); // "password":"12"
        map.put("params",params);    // params":{"username":"12","password":"12"}
        return map;
    }
@RequestAttribute 获取请求域的数据
@Controller
public class Test01 {

    @RequestMapping("/go")
    public ModelAndView forwardrequest(){
        ModelAndView mv = new ModelAndView();
        mv.addObject("msg","成功");
        mv.setViewName("forward:/success");
        return mv;
    }

    /**
     * @RequestAttribute 获取请求域的数据
     */
    @ResponseBody
    @RequestMapping("success")
    public Map succer(@RequestAttribute("msg") String msg){
        Map map = new  HashMap();
        map.put("msg",msg);  //成功
        return map;
    }

}
矩阵变量,处理请求中带有l的
1.需要重写一个方法,将方法修改为不排除
2.在配置类种,编写
@Configuration(proxyBeanMethods = false)
public class Myconfig {

    @Bean
    public WebMvcConfigurer webMvcConfigurer(){
        return new WebMvcConfigurer(){
            @Override
            public void configurePathMatch(PathMatchConfigurer configurer) {
                UrlPathHelper urlPathHelper = new UrlPathHelper();
//                不移除;后面的内容,矩阵变量功能可以正常生效
                urlPathHelper.setRemoveSemicolonContent(false);
                configurer.setUrlPathHelper(urlPathHelper);
            }
        };
    }
}
3.处理请求
@RestController
public class Test01 {

    /**
     *     矩阵变量绑定路径变量
     *     /cars/sell;low=34;brand=byd;;brand=yd
     *     /cars/sell;low=34;brand=byd;brand=yd
     */
    @GetMapping("/cars/{path}")
    public Map carsSell(@MatrixVariable("low") Integer low,
                        @MatrixVariable("brand") List<String> brand,
                        @PathVariable("path") String path){
        Map<String,Object> map = new HashMap<>();

        map.put("low",low);
        map.put("brand",brand);
        map.put("path",path);
        return map;
    }


    /**
     *   绑定pathVar属于哪个路径变量    /poss/1;age=20/2;age=10
     */
    @GetMapping("/poss/{bossId}/{empId}")
    public Map boss(@MatrixVariable(value = "age",pathVar = "bossId") Integer bossAge,
                    @MatrixVariable(value = "age",pathVar = "empId") Integer empAge){
        Map<String,Object> map = new HashMap<>();

        map.put("bossAge",bossAge);
        map.put("empAge",empAge);
        return map;
    }
}
thymeleaf使用
		<dependency>
            <groupId>org.springframework.boot</groupId>
            <artifactId>spring-boot-starter-thymeleaf</artifactId>
        </dependency>
加入名称空间
<html lang="en" xmlns:th="http://www.thymeleaf.org">
拦截器
第一步:配置拦截器,实现HandlerInterceptor接口
public class LoginInterceptor implements HandlerInterceptor {

    /**
     *   1.配置拦截器,实现HandlerInterceptor接口
     *   2.将拦截器注入到容器中,实现WebMvcConfigurer接口,重写addInterceptors方法
     *   3.放行静态资源 excludePathPattern()
     */
    @Override            //在方法目标方法执行前 执行
    public boolean preHandle(HttpServletRequest request, HttpServletResponse response, Object handler) throws Exception {
        HttpSession session = request.getSession();
        Object loginUser = session.getAttribute("loginUser");
        if (loginUser != null){
//            登录信息不为空,放行
            return true;
        }
//        拦截住,跳转到登录页面
//        session.setAttribute("msg","请先登录");
        request.setAttribute("msg","请先登录账号");
//        重定向回到页面   getRequestDispatcher 是请求转发    request、response也转发过去
        request.getRequestDispatcher("/").forward(request,response);
        return false;
    }
}
第二步:将拦截器注入到容器中,实现WebMvcConfigurer接口,重写addInterceptors方法
/**
 * 将拦截器注入到容器中,实现WebMvcConfigurer接口,重写addInterceptors方法
 */
@Configuration  // 告诉springboot这是一个配置类
public class AdminWebConfig implements WebMvcConfigurer {

    @Override
    public void addInterceptors(InterceptorRegistry registry) {
//        1. 加入一个拦截器
        InterceptorRegistration interceptorRegistration = registry.addInterceptor(new LoginInterceptor());
//        2.加入拦截器的请求路径   拦截所有请求
        interceptorRegistration.addPathPatterns("/**")
//        3. 加入放行的路径
                                .excludePathPatterns("/","/login","/css/**","/fonts/**","/images/**","/js/**");
    }
}
文件上传
@PostMapping("/upload")
    public String upload(@RequestParam("email") String email,
                         @RequestParam("username") String username,   // 请求体的参数
                         @RequestPart("headerImg") MultipartFile headerImg, //封装文件上传数据
                         @RequestPart("photos") MultipartFile[] photos) throws IOException {
        if (!headerImg.isEmpty()){    // headerImg判断是否为空
            String name = headerImg.getOriginalFilename(); // 获取上传的文件名称
            headerImg.transferTo( new File("D:\\Test\\"+name));  // 下载到文件目录
        }
        if (photos.length > 0){   //判断当前数组不为空
            for (MultipartFile j :photos){
                if (!j.isEmpty()){  //判断当前文件不为空
                    String originalFilename = j.getOriginalFilename();
                    j.transferTo(new File(new File("D:\\Test\\")+originalFilename));
                }
            }
        }
        return "form/form_layouts";
    }
appliction.properties需要设置一下上传文件的大小
#上传单个文件不超过10MB
spring.servlet.multipart.max-file-size=10MB
#上传多个文件不超过100MB
spring.servlet.multipart.max-request-size=100MB
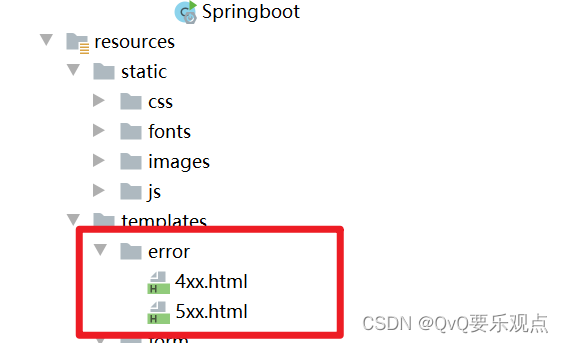
异常页面
静态资源文件下放入error文件夹,放入4xx,5xx,出现异常会自动解析
异常的返回结果为ModelAndView();
处理指定异常
@Slf4j
@ControllerAdvice    // 处理整个web的异常
public class GlobaExceptionHandler {

//    异常处理器    处理数学运算异常、空指针异常
    @ExceptionHandler({ArithmeticException.class,NullPointerException.class})
    public String handException(Exception e, HttpServletRequest request, HttpServletResponse response) {
        System.out.println("异常原因是:"+e);
        log.error("异常是"+e);
        return "login";
    }

}
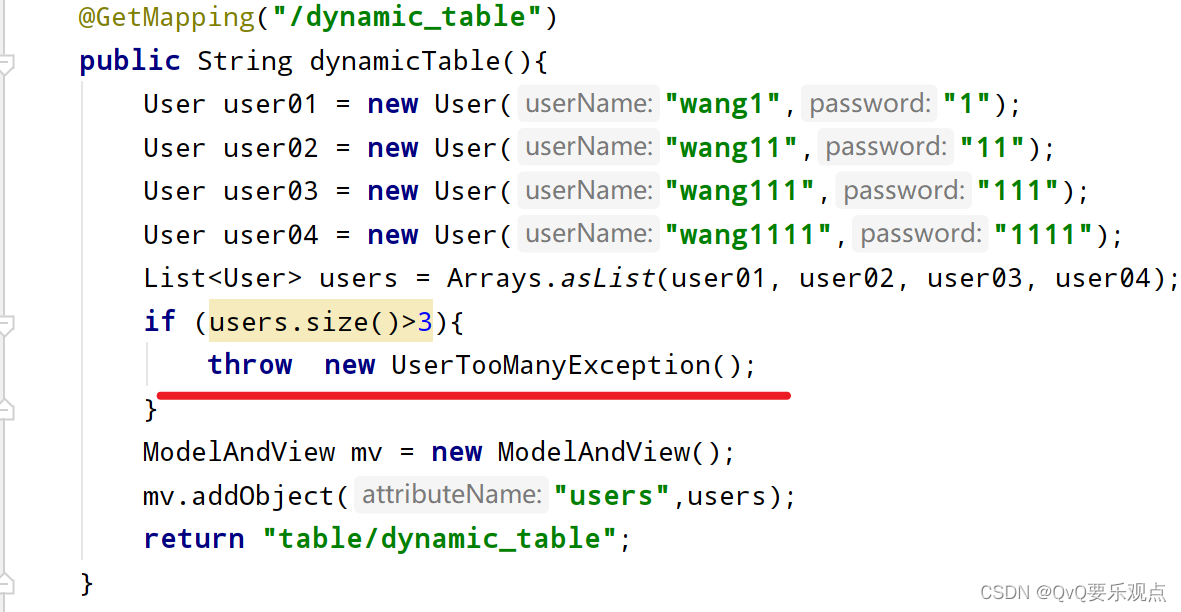
自定义异常
// 返回状态码信息
@ResponseStatus(value = HttpStatus.FORBIDDEN , reason = "用户的数量给太多了")
public class UserTooManyException extends RuntimeException {

    public UserTooManyException(){

    }

    public UserTooManyException(String message){
        super(message);
    }

}
 自定义全局异常
//自定义异常
@Order(value = Ordered.HIGHEST_PRECEDENCE) //定义优先级,数字越小,优先级越高
@Component  // 将容器添加到spring容器中
public class customHandlerException implements HandlerExceptionResolver {


    @Override
    public ModelAndView resolveException(HttpServletRequest request, HttpServletResponse response, Object handler, Exception ex) {

        try {
            response.sendError(511,"我喜欢的错误");
        } catch (IOException e) {
            e.printStackTrace();
        }
        return new ModelAndView();
    }
}
原生组件
原生servlet的请求不会被拦截
因为是两个servlet,自定义的servlet请求不会经过DispatcherServlet
@Configuration
public class MyRegistConfig {

    @Bean
    public ServletRegistrationBean myServlet(){
        MyServlet myServlet = new MyServlet();

        return new ServletRegistrationBean(myServlet,"/my","/my02");
    }


    @Bean
    public FilterRegistrationBean myFilter(){
        // 自定义拦截器
        MyFILTER myFilter = new MyFILTER();
//        return new FilterRegistrationBean(myFilter,myServlet());
        FilterRegistrationBean filterRegistrationBean = new FilterRegistrationBean(myFilter);
        //  设置拦截路径
        filterRegistrationBean.setUrlPatterns(Arrays.asList("/my","/css/*"));
        return filterRegistrationBean;
    }

    @Bean
    public ServletListenerRegistrationBean myListener(){
//        自定义的监听器
        MyListenter mySwervletContextListener = new MyListenter();
        return new ServletListenerRegistrationBean(mySwervletContextListener);
    }
}
定制化原理
自动配置:
导入场景的starter启动器,启动器会引入一系列的xxxxxAutoConfiguration自动配置,配置类中,会有一系列的@Bean导入一些组件,导入的一些组件会跟xxxxxproperties组件进行绑定,需要修改的时候,只需要修改配置文件
JDBC数据访问
引入jar包
<dependency>
<groupId>org.springframework.boot</groupId>
<artifactId>spring-boot-starter-data-jdbc</artifactId>
</dependency>
导入mysql版本
<dependency>
<groupId>mysql</groupId>
<artifactId>mysql-connector-java</artifactId>
<!-- 默认 <version>58.0.22</version>-->
</dependency>
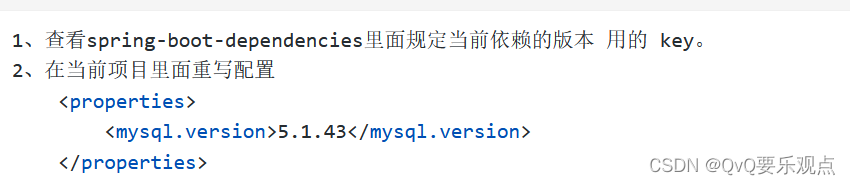
更换版本
<properties>
<java.version>1.8</java.version>
<mysql.version>5.1.49</mysql.version>
</properties>
application.properties文件修改配置项目
spring:
  datasource:
    url: jdbc:mysql://localhost:3306/ssm
    username: root
    password: 12345
    driver-class-name: com.mysql.jdbc.Driver
测试是否可以连接
class SpringbootWebDemoApplicationTests {

    @Autowired
    JdbcTemplate jdbcTemplate;

    @Test
    void contextLoads() {
        Long aLong = jdbcTemplate.queryForObject("Select count(*) from account_tbl", Long.class);
        log.info("长度为"+aLong);
    }
}
整合Druid
<dependency>
            <groupId>com.alibaba</groupId>
            <artifactId>druid</artifactId>
            <version>1.1.17</version>
        </dependency>
@Configuration
public class MyDataSource {

    @Bean  // 默认自动配置是判断容器种,没用,才会配置数据源
    @ConfigurationProperties("spring.datasource")
    public DataSource dataSource() throws SQLException {
        DruidDataSource druidDataSource = new DruidDataSource();
//        加入监控功能
        druidDataSource.setFilters("stat");
        return druidDataSource;
    }

    /**
     * 配置 druid的监控页功能
     * @return
     */
    @Bean
    public ServletRegistrationBean statViewServlet(){
        StatViewServlet statViewServlet = new StatViewServlet();
        ServletRegistrationBean<StatViewServlet> registrationBean = new ServletRegistrationBean<>(statViewServlet, "/druid/*");
//登录页面
        registrationBean.addInitParameter("loginUsername","admin");
        registrationBean.addInitParameter("loginPassword","123456");

        return registrationBean;
    }

    /**
     * WebStatFilter 用于采集web-jdbc关联监控的数据。
     */
//    @Bean
    public FilterRegistrationBean webStatFilter(){
        WebStatFilter webStatFilter = new WebStatFilter();

        FilterRegistrationBean<WebStatFilter> filterRegistrationBean = new FilterRegistrationBean<>(webStatFilter);
        filterRegistrationBean.setUrlPatterns(Arrays.asList("/*"));
        filterRegistrationBean.addInitParameter("exclusions","*.js,*.gif,*.jpg,*.png,*.css,*.ico,/druid/*");

        return filterRegistrationBean;
    }

http://localhost:8080/druid/index.html
}
第二种方法
		<dependency>
            <groupId>com.alibaba</groupId>
            <artifactId>druid-spring-boot-starter</artifactId>
            <version>1.1.17</version>
        </dependency>
application.properties
druid:
      aop-patterns: com.atguigu.admin.*  #springbean监控
      filters: stat,wall,slf4j  #所有开启的功能

      stat-view-servlet:  #监控页配置
        enabled: true
        login-username: admin
        login-password: admin
        resetEnable: false

      web-stat-filter:  #web监控
        enabled: true
        urlPattern: /*
        exclusions: '*.js,*.gif,*.jpg,*.png,*.css,*.ico,/druid/*'


      filter:
        stat: #sql监控
          slow-sql-millis: 1000
          logSlowSql: true
          enabled: true
        wall: #防火墙
          enabled: true
          config:
            drop-table-allow: false
整合mybatis
1.引入satater
				<dependency>
            <groupId>org.mybatis.spring.boot</groupId>
            <artifactId>mybatis-spring-boot-starter</artifactId>
            <version>2.1.4</version>
        </dependency>
配置版
2.设置mybatis的路径
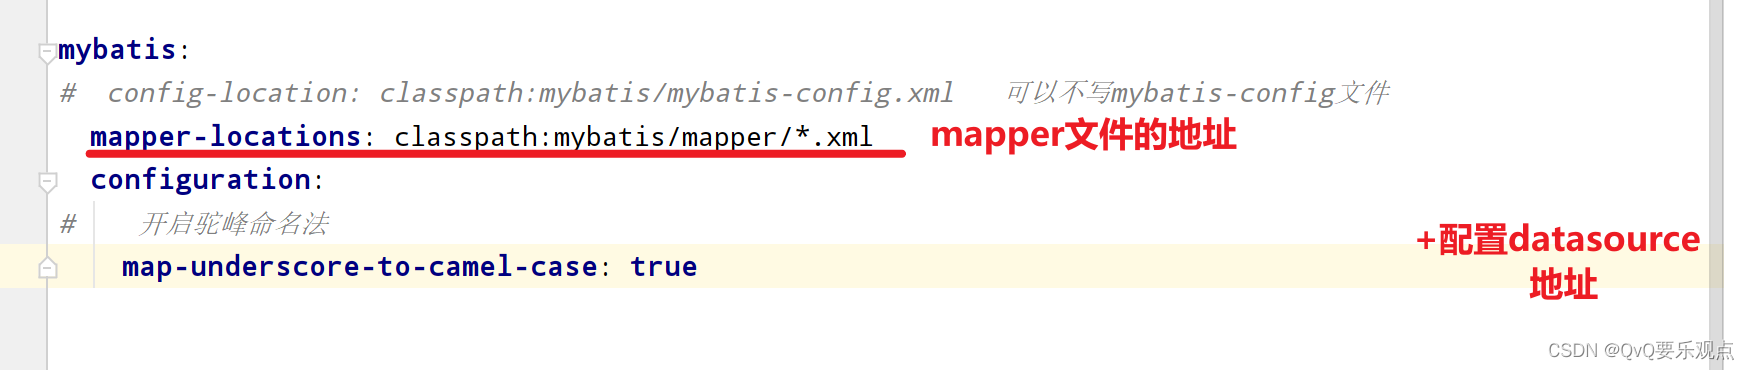
混合版
 可以使用 xml
<!--  useGeneratedKeys="true"->使用自增主键    keyProperty="id"   自增主键的id    -->
    <insert id="InsertEmo" useGeneratedKeys="true" keyProperty="id">
        insert into emp (username) values (#{username})
    </insert>
可以使用mapper.xml 可以使用注解
//    @Select("select * from emp where id = #{id}")
    public emp selectEmpId(int id);

    @Insert("insert into emp (username) values (#{username})")
    @Options(useGeneratedKeys = true , keyProperty = "id")
    public int InsertEmo(emp emp);
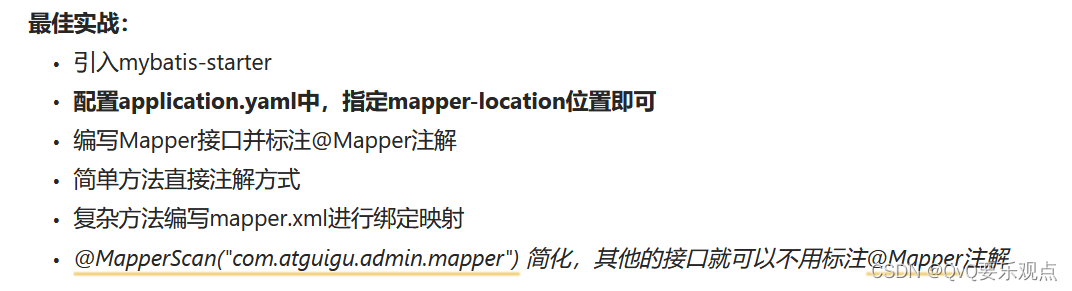
mybatis-plus
<dependency>
            <groupId>com.baomidou</groupId>
            <artifactId>mybatis-plus-boot-starter</artifactId>
            <version>3.4.1</version>
        </dependency>
1.引入依赖
2.设置数据源
3.classpath*:/mapper/**/*.xml mapper文件的映射路径
4.启动类 @MapperScan(“com.qwq.controller.mapper”) // 就不用在mapper文件中加注解了
    @TableField(exist = false)  // 这个字段在数据表中不存在
    private String userName;
    @TableField(exist = false)  // 这个字段在数据表中不存在
    private String password;
mapper
@TableName("user")  // 指定user表
public interface UserMapper extends BaseMapper<User> {
}
service
public interface Userservice extends IService<User> {
}
serviceImpl
public class UserServiceImpl extends ServiceImpl<UserMapper, User> implements Userservice {
}
不用写方法便可以调用其方法
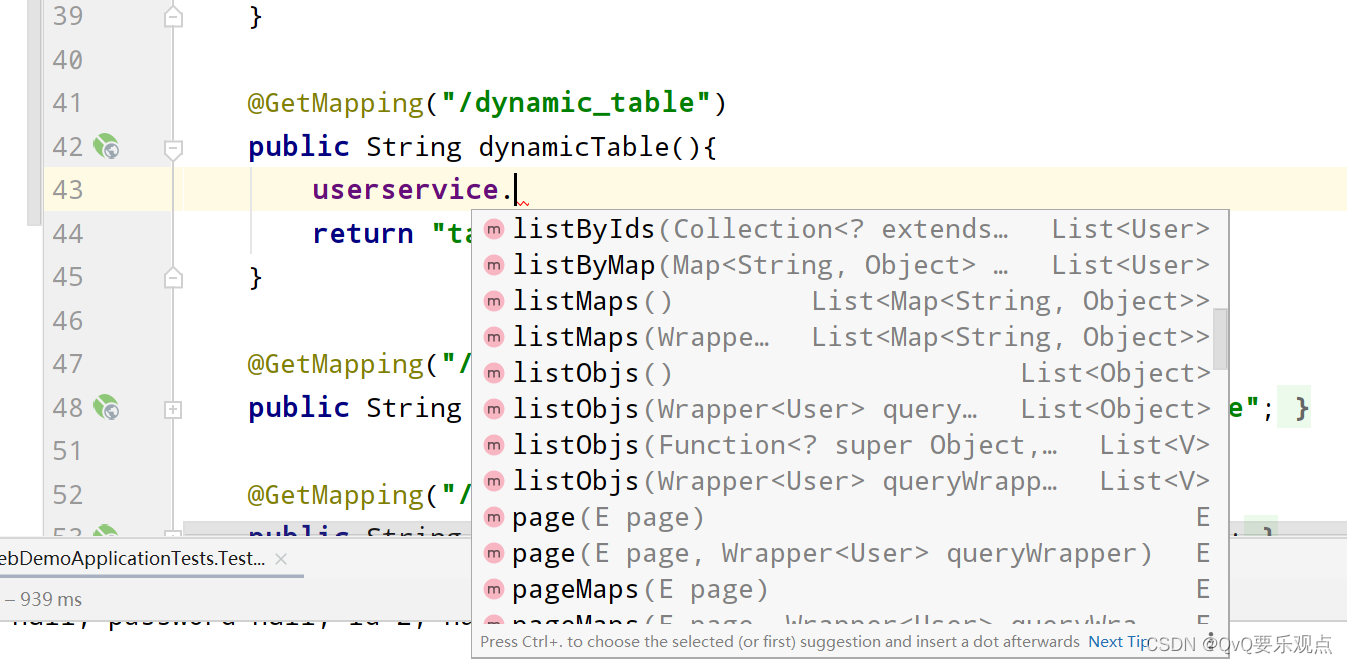
mybatis分页
步骤实现
    @GetMapping("/dynamic_table")    //  查询是否传递pn值(页码),不传递默认为1
    public ModelAndView dynamicTable(@RequestParam(value = "pn",defaultValue = "1") Integer pn ,ModelAndView mv){
//        List<User> list = userservice.list();

        //分页查询数据
        Page<User> userPage = new Page<>(pn,3);
        //分页查询结果
        Page<User> page = userservice.page(userPage);
        //分页的数据
        mv.addObject("users",page);
        System.out.println(page);
        mv.setViewName("table/dynamic_table");
        return mv;
    }
分页插件
@Configuration()
public class mybatisconfig {
   @Bean
    public MybatisPlusInterceptor mybatisPlusInterceptor() {
        MybatisPlusInterceptor interceptor = new MybatisPlusInterceptor();
        //添加分页插件
        PaginationInnerInterceptor paginationInnerInterceptor = new PaginationInnerInterceptor(DbType.MYSQL);
        paginationInnerInterceptor.setOverflow(true);
        interceptor.addInnerInterceptor(paginationInnerInterceptor);
        return interceptor;
    }
}
删除分页跳转
删除数据,跳转到第一页
 @GetMapping("/user/delete/{id}")
    public String deleteTable(@PathVariable("id") Integer id){
        userservice.removeById(id);
        return "redirect:/dynamic_table";
    }
删除数据,跳转到当前页面
   @GetMapping("/user/delete/{id}")
    public String deleteTable(@PathVariable("id") Integer id,
       @RequestParam(value = "pn",defaultValue = "1") Integer pn,  //查询是否传递pn值(页码),不传递默认为1
       RedirectAttributes ra) {   //RedirectAttributes ra   重定向页面携带的参数
        ra.addAttribute("pn",pn);
        userservice.removeById(id);
        return "redirect:/dynamic_table";
    }
整合 redis

 <dependency>
            <groupId>org.springframework.boot</groupId>
            <artifactId>spring-boot-starter-data-redis</artifactId>
        </dependency>
        <dependency>
            <groupId>redis.clients</groupId>
            <artifactId>jedis</artifactId>
        </dependency>
编写拦截器
@Component
public class RedisUrlCountInterceptor implements HandlerInterceptor {

    @Autowired
    StringRedisTemplate redisTemplate;

    @Override
    public boolean preHandle(HttpServletRequest request, HttpServletResponse response, Object handler) throws Exception {
        //  获取路径的URL
        String requestURI = request.getRequestURI();
        //  默认访问路径会+1
        redisTemplate.opsForValue().increment(requestURI);
        return true;
    }
}
加入拦截器
@Configuration  // 告诉springboot这是一个配置类
public class AdminWebConfig implements WebMvcConfigurer {


    @Autowired
    RedisUrlCountInterceptor redisUrlCountInterceptor;

    @Override
    public void addInterceptors(InterceptorRegistry registry) {

//        1.将redis的拦截器加入
        registry.addInterceptor(redisUrlCountInterceptor)
                .addPathPatterns("/**")
                .excludePathPatterns("/", "/login", "/css/**", "/fonts/**", "/images/**", "/js/**");
    }

}
    @Autowired
    StringRedisTemplate stringRedisTemplate;

    @RequestMapping("/main.html")
    public String redirect(HttpSession session,Model model) {
//        获取所有的路径
        ValueOperations<String, String> operations = stringRedisTemplate.opsForValue();
//        获取个别路径
        String s = operations.get("/sql");
        String s1 = operations.get("/main");
//        将路径信息保存
        model.addAttribute("mainCount",s);
        model.addAttribute("sqlCount",s1);
        return "main";
    }
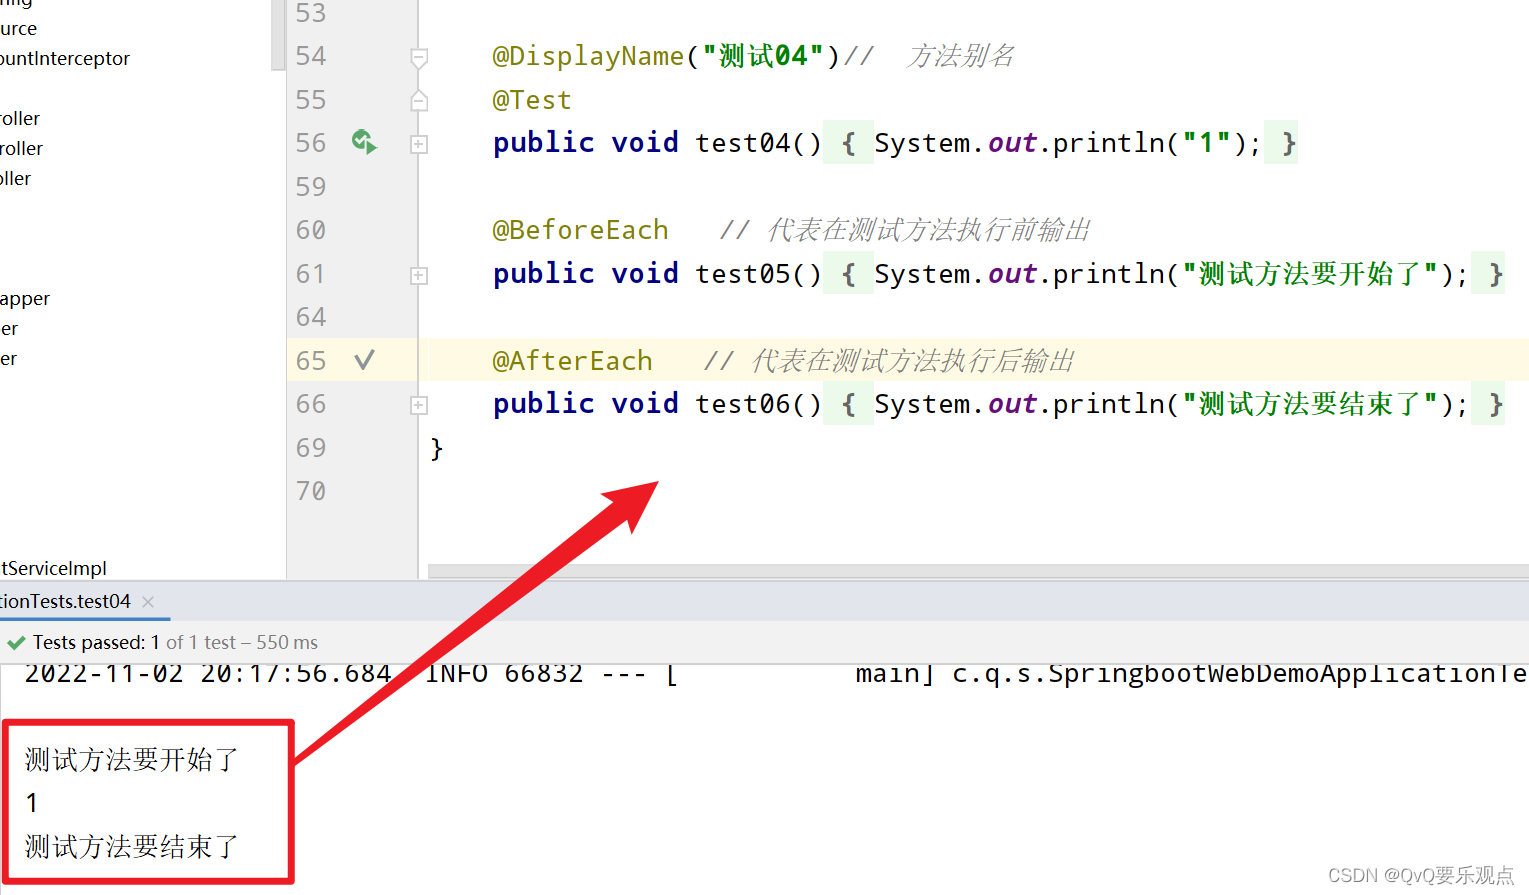
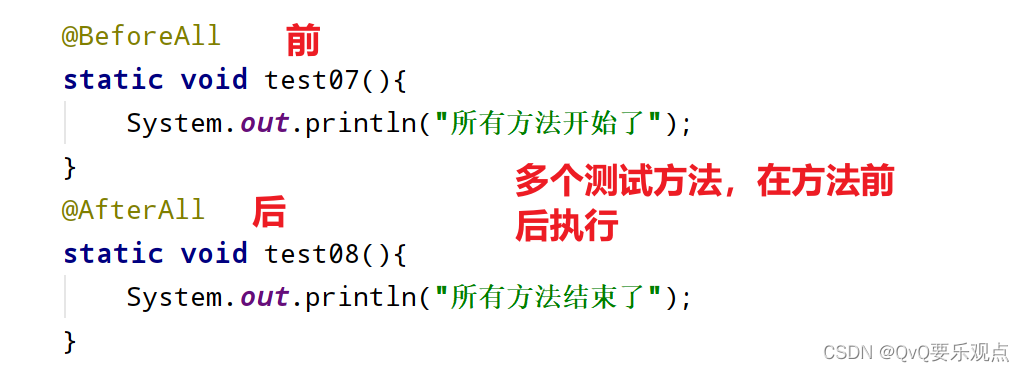
单元测试
注解
@Disabled 禁用测试方法
@RepeatedTest(5) // 该方法执行5次,输出5个1
public void test04(){
        System.out.println("1");
    }
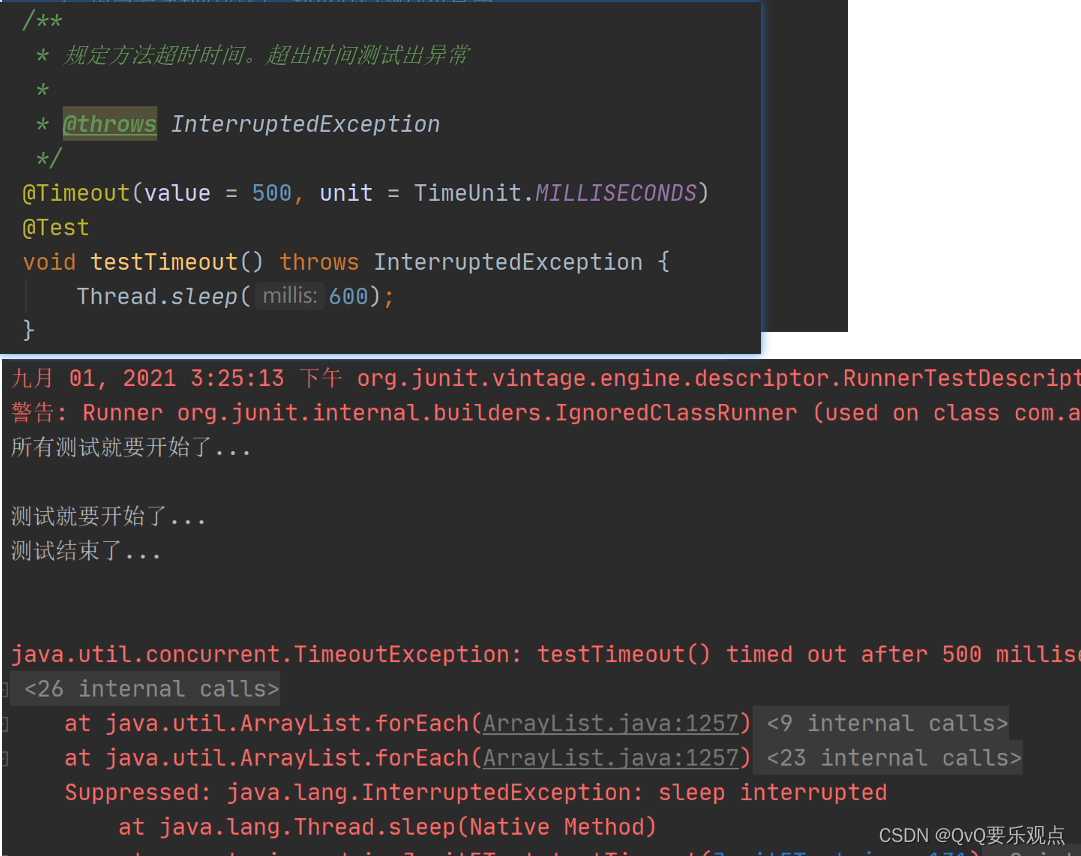
@Timeout(value = 500,unit = TimeUnit.MICROSECONDS) // 方法超过500毫秒发生异常
@DisplayName(“xx”) 可以添加到类上、可以添加到方法上,代表方法或类的别名

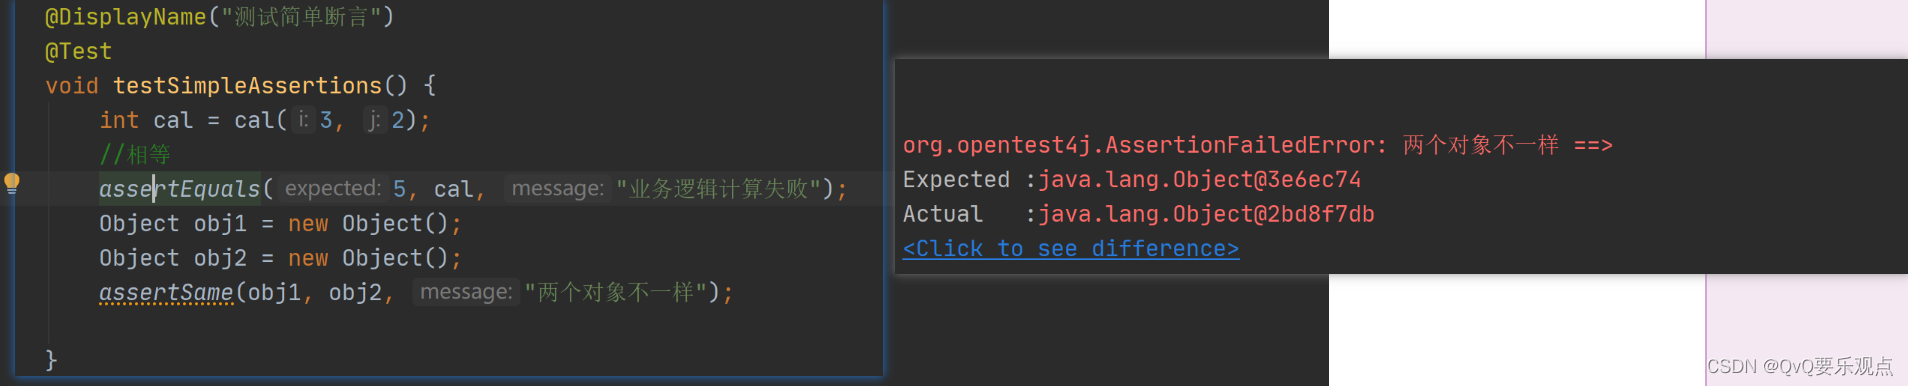
断言->不满足断言的方法,测试失败,出现在测试报告中。
前面断言失败,后面的代码不会执行.
简单断言 对象断言
 数组断言
数组断言
 组合断言
组合断言
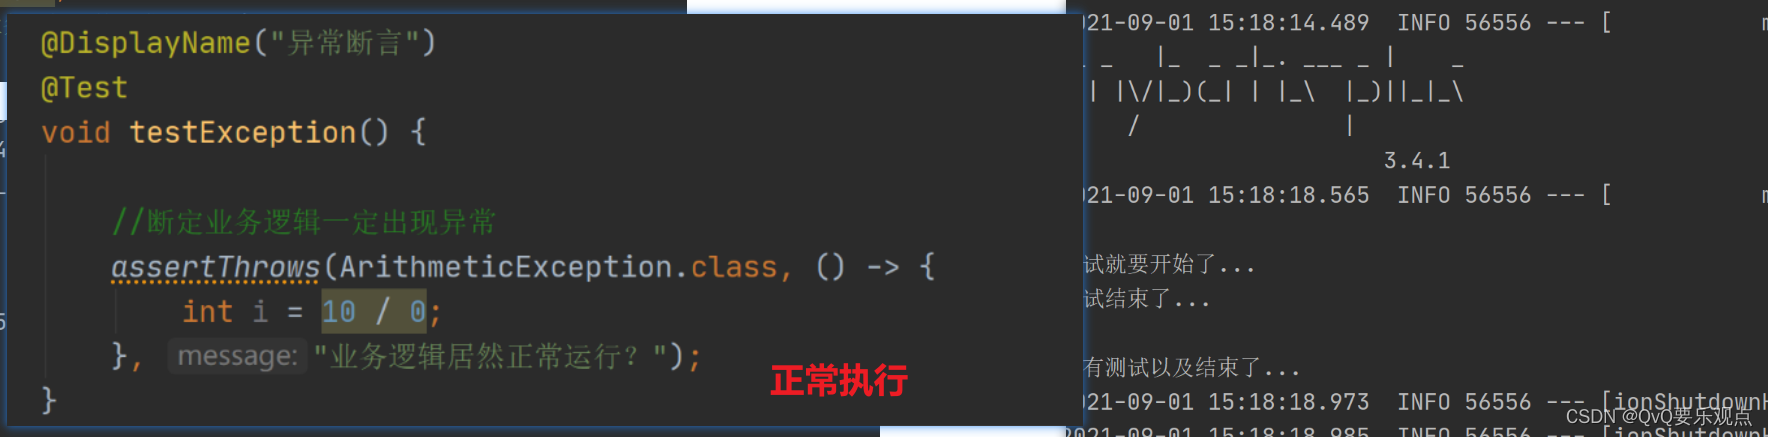
 异常断言
异常断言
 超出时间断言
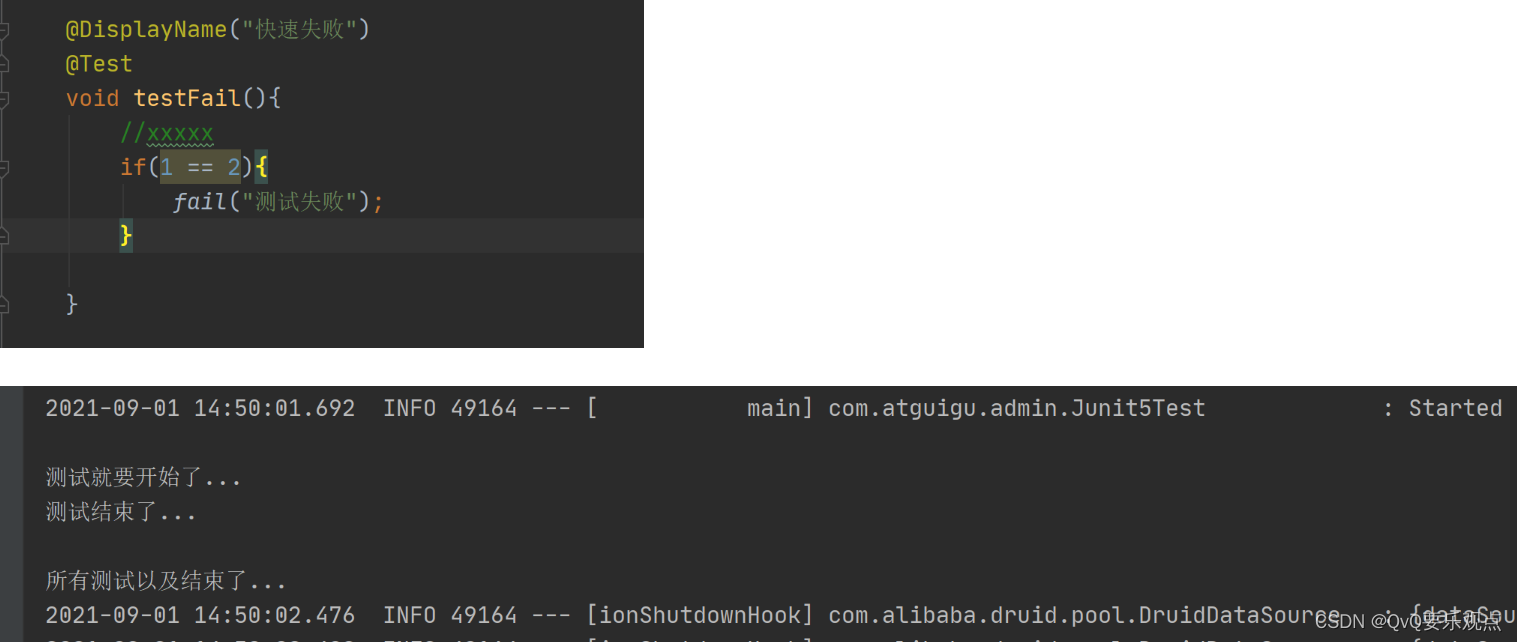
快速失败
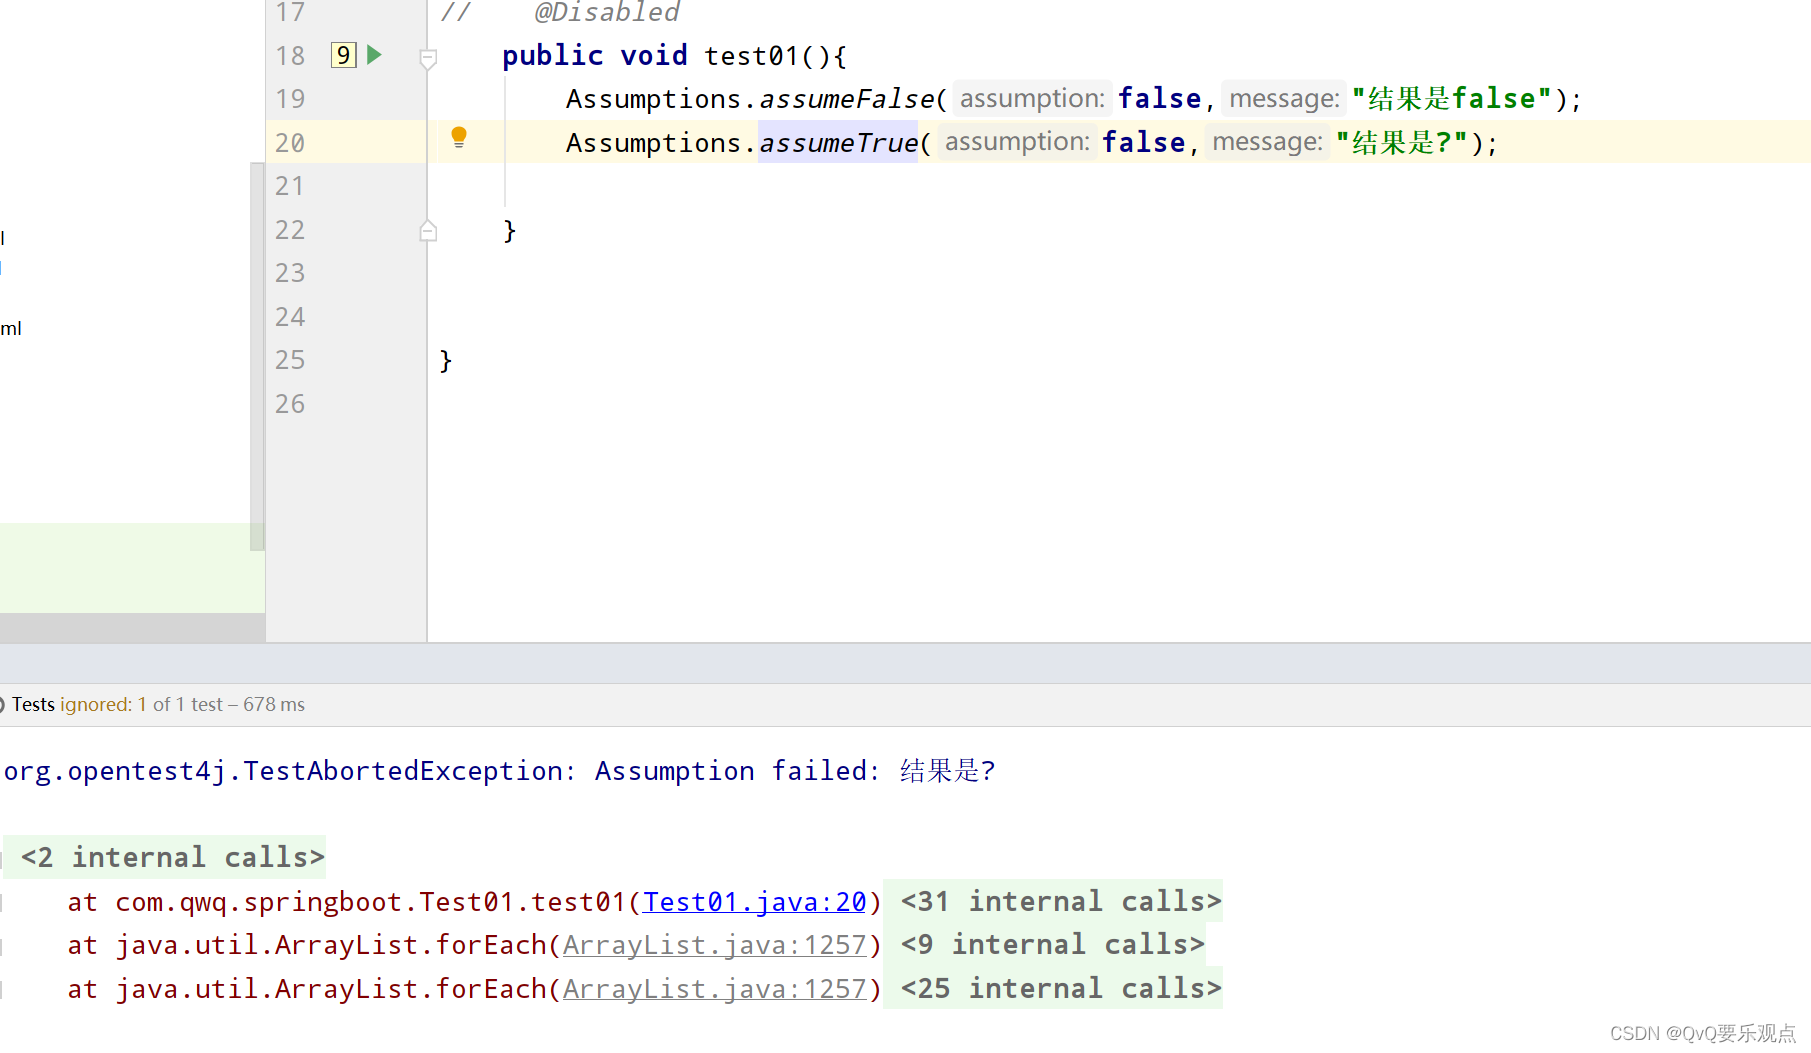
前置条件->不满足前置条件的测试,只会终止执行
正常执行
    @DisplayName("测试前置条件")
    @Test
//    @Disabled
    public void test01(){
        Assumptions.assumeFalse(false,"结果是false");

    }
参数化测试
    @DisplayName("参数化测试")
    @ParameterizedTest  //参数化测试
    @ValueSource(ints = {1,2,3,4,5})
    public void test02(int i){
        System.out.println(i);
    }
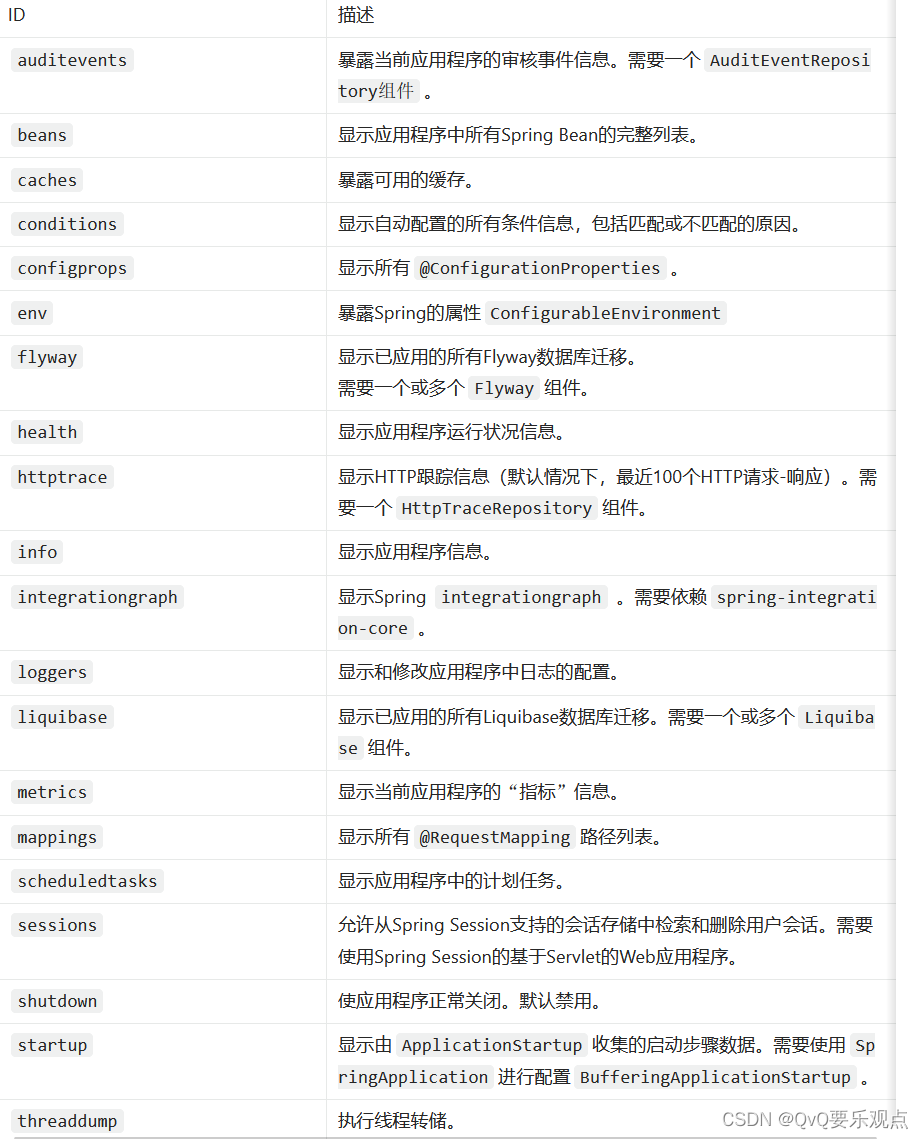
指标监控
<dependency>
            <groupId>org.springframework.boot</groupId>
            <artifactId>spring-boot-starter-actuator</artifactId>
        </dependency>
开启
management:
  endpoints:
    enabled-by-default: true  # 默认开启全部端点
    web:
      exposure:
        include: '*'
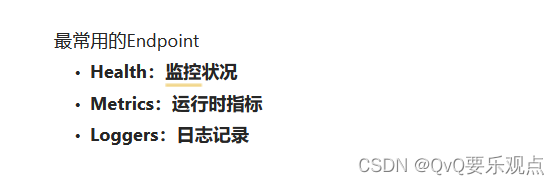
监控指标:
以http://localhost:8080/actuator/xx路径进行监控
http://localhost:8080/actuator/beans 监控bean
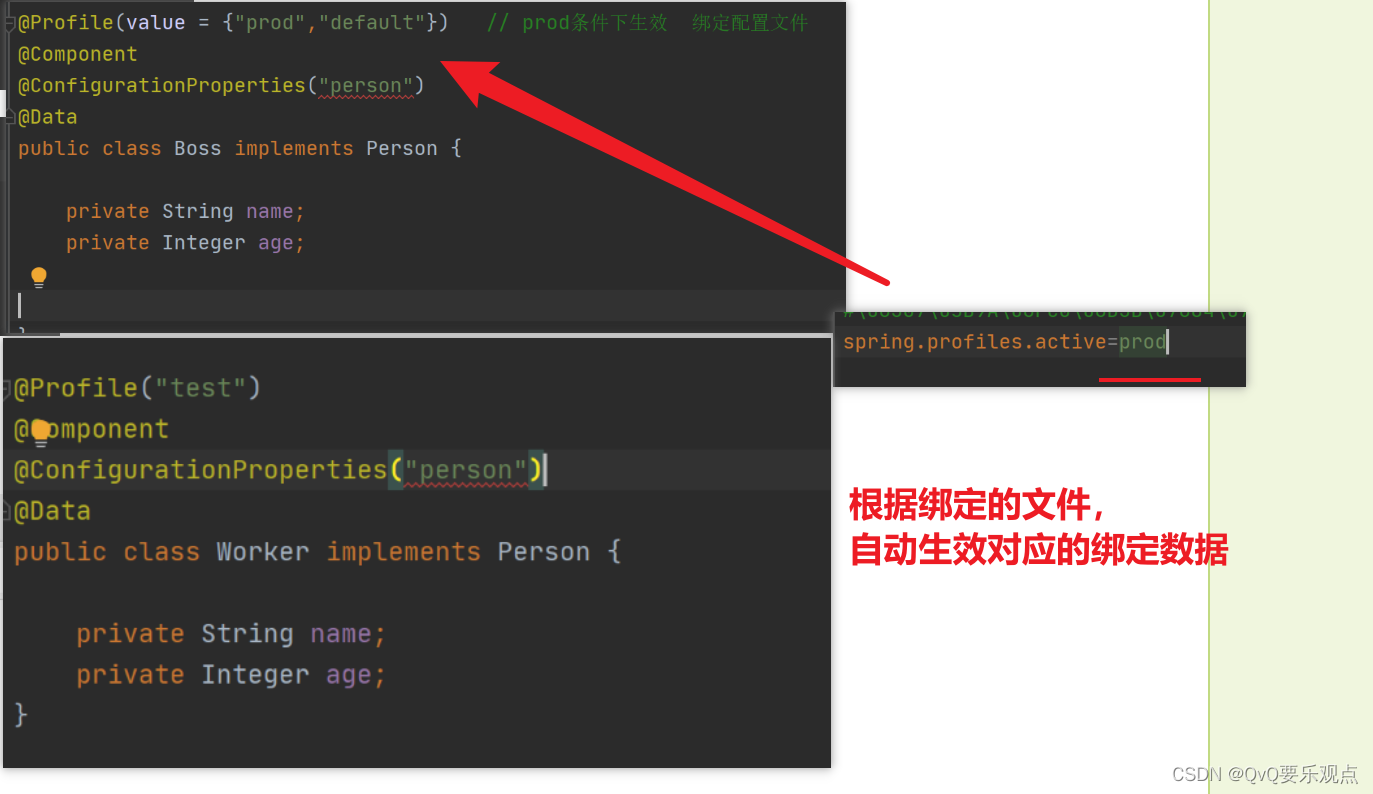
Profile多环境切换
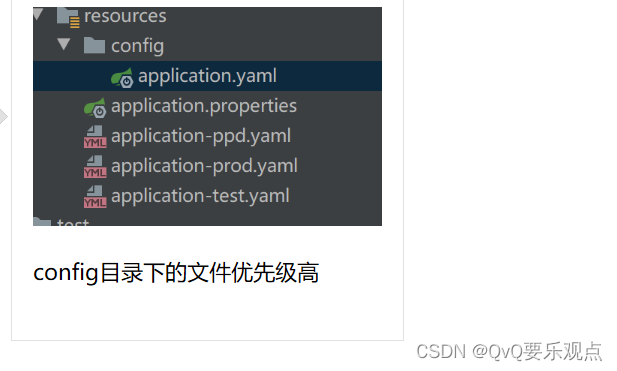
配置多个perperties文件 生产环境 测试环境
默认配置文件:什么时候都会加载,指定配置文件也会加载,同时生效,遇到相同的名称,以主配置文件为主
指定从哪一个配置文件取值
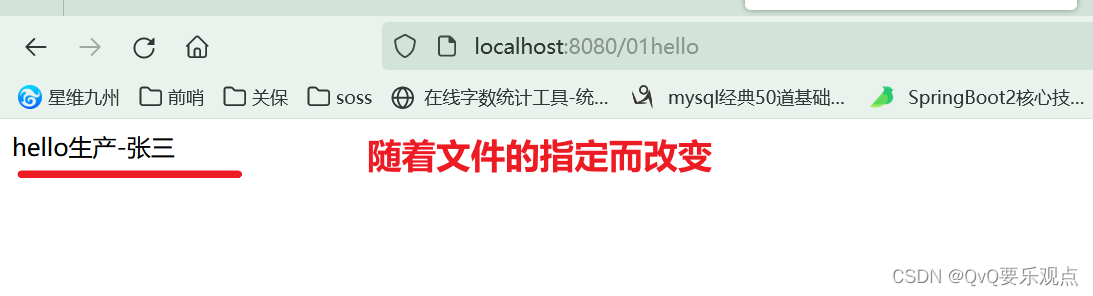
     spring.profiles.active=prod   //  获取的是prod文件中  person.name的值

//    ${person.name:  获取配置文件的name
    @Value("${person.name:李四}")
    private String name;

    @GetMapping("/01hello")
    public String Hello(){
        return "hello"+name;
    }
 可以修改指定文件配置 修改指定配置文件
java -jar springboot1-0.0.1-SNAPSHOT.jar --person.name=xx
指定配置文件仍然可以修改
java -jar springboot1-0.0.1-SNAPSHOT.jar spring.profiles.active=prod --person.name=haha

切换
@Profile(value = {“指定的配置文件名称”})
@ConfigurationProperties(“person”) //指定配置文件的属性
可以获取maven地址、当前系统等
    @Value("${MAVEN_HOME}")
    private String msg;

//    D:\java_maven\apache-maven-3.6.3
    @RequestMapping("a")
    public String mc(){
        return msg;
    }

    @Value("${os.name}")
    private String name;

    @RequestMapping("/")   //Windows 10
    public String mc1(){
        return name;
    }
配置文件优先级


 443
443


 被折叠的 条评论
为什么被折叠?
被折叠的 条评论
为什么被折叠?
 到【灌水乐园】发言


