vue与服务端交互

vue与服务端交互简单示例


前面我们在使用vue的时候,都是对客户端浏览器进行渲染,现在我们使用vue来和服务端进行简单的交互,客户端使用的技术是axios,服务端使用的是gin框架。

编写客户端代码

# 首先新建一个文件夹,然后打开cmd,使用vue-cli新建一个项目
vue create [项目名]
# 然后下载一些基本要用到的库
cnpm install axios --save  # axios库

cnpm install vue-router@3.2.0 # vue-router库 (这个版本对应vue2)

main.js

在main.js中我们需要创建一个vue对象,然后设置一些全局属性:

// 导入需要的库
import Vue from 'vue'
import App from './App.vue'
import router from './router'
import axios from 'axios'

// 创建axios对象,设置全局服务端URL
// 然后把axios对象设置为vue实例的全局属性,这样就不用在每个组件中单独导入axios了
const instance = axios.create({
  baseURL: "/api",
})
Vue.prototype.$axios = instance;

new Vue({
  router,
  render: h => h(App),
}).$mount('#app')

vue.config.js

这个文件主要管项目配置,这里我只设置一个允许跨域:

const { defineConfig } = require('@vue/cli-service')
module.exports = defineConfig({
  transpileDependencies: true,
  devServer: {
    proxy: {  //配置跨域
      '/api': {
        target: 'http://127.0.0.1:9090/',  //这里后台的地址模拟的;应该填写你们真实的后台接口
        changOrigin: true,  //允许跨域
        pathRewrite: {
          /* 重写路径,当我们在浏览器中看到请求的地址为:http://localhost:8080/hello 时
            实际上访问的地址是:http://127.0.0.1:9090/core/getData/hello,因为重写了 /api
           */
          '^/api': '' 
        }
      },
    }
  },
})

HelloWorld.vue

在componment目录下创建一个HelloWorld.vue组件

<template>
  <div class="hello">
    <h1>{{msg}}</h1>
  </div>
</template>

<script>
export default {
  name: 'HelloWorld',
  data() {
    return {
      msg:null,
    }
  },
  // 加载页面完成的时候 就向服务端发送请求
  // 然后将返回的数据渲染到页面上
  mounted() {
    this.$axios.get("/hello").then((res) => {
      this.msg = res.data.message;
      console.log(res.data.message);
    }).catch(function() {

    })
  }
}
</script>

router.js

编写前端路由:

import Vue from 'vue'
import VueRouter from 'vue-router'

Vue.use(VueRouter)
const routes = [
    {
        path: '/helloworld',
        name: 'helloworld',
        component: () => import('./components/HelloWorld.vue')
    }
    
]

const router = new VueRouter({
    mode: 'history',
    routes
})

export default router

App.vue

修改挂载的根组件,在router.js中定义的组件在访问的时候都会被放在这个根组件中,根组件上要加入<router-view></router-view>,不然子组件不会显示。

<template>
    <div id="app">
        <router-view></router-view>
    </div>
</template>

<script>
export default {
    name: "app",
}
</script>
<style>
    html, body {
        margin: 0;
        padding: 0;
    }
</style>

编写服务端代码

# 安装gin
go get -u github.com/gin-gonic/gin
package main

import (
	"github.com/gin-gonic/gin"
	"net/http"
)

func main() {
	r := gin.Default()
	r.GET("/hello", func(c *gin.Context) {
		c.JSON(http.StatusOK, gin.H{
			"message" : "success",
		})
	})
	r.Run(":9090")
}

测试

在这里插入图片描述

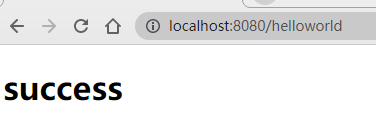
成功获取到服务端发来的数据,并渲染到页面上。


  • 0
    点赞
  • 10
    收藏
    觉得还不错? 一键收藏
  • 0
    评论
要实现Vue表单弹窗服务渲染,需要注意以下几点: 1.使用Vue SSR(服务渲染)来渲染模板,这样可以在服务Vue组件渲染成HTML字符串,然后将其发送到浏览器。 2.在应用程序中使用Vue的客户服务代码,并确保组件在两个环境中都可以运行。这意味着您需要将所有组件的依赖项作为外部资源加载到HTML中。 3.在服务使用Node.js来构建应用程序,使用Express或Koa等框架来处理HTTP请求和响应。 4.在客户使用Vue.js来处理用户交互和动态渲染。 下面是一个简单的示例代码,以Vue.js和Node.js为例: 首先,我们需要安装Vue.js和Vue Server Renderer: ``` npm install vue vue-server-renderer --save ``` 接下来,我们需要创建一个Vue组件来表示表单弹窗: ```vue <template> <div class="dialog-box" v-if="show"> <div class="dialog"> <h3>{{ title }}</h3> <form @submit.prevent="submit"> <div class="form-group"> <label for="username">Username</label> <input type="text" id="username" v-model="username"> </div> <div class="form-group"> <label for="password">Password</label> <input type="password" id="password" v-model="password"> </div> <button type="submit">Submit</button> </form> </div> </div> </template> <script> export default { data() { return { show: false, title: 'Login', username: '', password: '' } }, methods: { submit() { // handle form submission } } } </script> ``` 然后,我们需要创建一个服务渲染的入口文件: ```js const Vue = require('vue') const serverRenderer = require('vue-server-renderer').createRenderer() const express = require('express') const app = express() const App = require('./App.vue') app.get('*', (req, res) => { const vm = new Vue({ render: h => h(App) }) serverRenderer.renderToString(vm, (err, html) => { if (err) { res.status(500).send('Server Error') } else { res.send(` <!DOCTYPE html> <html lang="en"> <head> <meta charset="UTF-8"> <title>Vue Form Dialog SSR</title> <script src="/bundle.js"></script> </head> <body> ${html} </body> </html> `) } }) }) app.listen(3000, () => { console.log(`Server started at http://localhost:3000`) }) ``` 在这个文件中,我们首先引入了VueVue Server Renderer和Express。然后,我们创建了一个Express应用程序,并为所有路由配置了一个基本的处理程序。在处理程序中,我们创建了一个Vue实例,并使用Vue Server Renderer将其渲染为HTML字符串。最后,我们将HTML字符串包装在一个完整的HTML模板中,其中包含对我们应用程序的客户代码的引用。 最后,我们需要创建一个客户入口文件,该文件将启动Vue应用程序并挂载它到DOM中: ```js import Vue from 'vue' import App from './App.vue' new Vue({ render: h => h(App) }).$mount('#app') ``` 这里的代码很简单,我们只是从Vue导入Vue和我们的App组件,并创建了一个Vue实例,并使用它将我们的应用程序挂载到DOM中。 现在,我们可以使用以下命令来启动我们的应用程序: ``` node server.js ``` 这将启动我们的应用程序,并将其监听在口3000上。要在浏览器中查看它,请导航到http://localhost:3000。

“相关推荐”对你有帮助么?

  • 非常没帮助
  • 没帮助
  • 一般
  • 有帮助
  • 非常有帮助
提交
评论
添加红包

请填写红包祝福语或标题

红包个数最小为10个

红包金额最低5元

当前余额3.43前往充值 >
需支付:10.00
成就一亿技术人!
领取后你会自动成为博主和红包主的粉丝 规则
hope_wisdom
发出的红包
实付
使用余额支付
点击重新获取
扫码支付
钱包余额 0

抵扣说明:

1.余额是钱包充值的虚拟货币,按照1:1的比例进行支付金额的抵扣。
2.余额无法直接购买下载,可以购买VIP、付费专栏及课程。

余额充值