


SpringBoot
一、SpringBoot基本应用
1.约定优于配置
Build Anything with Spring Boot:Spring Boot is the starting point for building all Spring-based applications. Spring Boot is designed to get you up and running as quickly as possible, with minimal upfront configuration of Spring.
上面是引自官网的一段话,大概是说: Spring Boot 是所有基于 Spring 开发的项目的起点。SpringBoot 的设计是为了让你尽可能快的跑起来 Spring 应用程序并且尽可能减少你的配置文件。
约定优于配置(Convention over Configuration),又称按约定编程,是一种软件设计范式。
本质上是说,系统、类库或框架应该假定合理的默认值,而非要求提供不必要的配置。比如说模型中有一个名为User的类,那么数据库中对应的表就会默认命名为user。只有在偏离这一个约定的时候,例如想要将该表命名为person,才需要写有关这个名字的配置。
比如平时架构师搭建项目就是限制软件开发随便写代码,制定出一套规范,让开发人员按统一的要求进行开发编码测试之类的,这样就加强了开发效率与审查代码效率。所以说写代码的时候就需要按要求命名,这样统一规范的代码就有良好的可读性与维护性了
约定优于配置简单来理解,就是遵循约定
2.SpringBoot概念
①Spring优缺点分析
优点
- Spring是Java企业版(Java Enterprise Edition,JEE,也称J2EE)的轻量级代替品。无需开发重量级的Enterprise Java Bean(EJB),Spring为企业级Java开发提供了一种相对简单的方法,通过依赖注入和面向切面编程,用简单的Java对象(Plain Old Java Object,POJO)实现了EJB的功能
缺点
-
虽然Spring的组件代码是轻量级的,但它的配置却是重量级的。一开始,Spring用XML配置,而且是很多XML配 置。Spring 2.5引入了基于注解的组件扫描,这消除了大量针对应用程序自身组件的显式XML配置。Spring 3.0引入 了基于Java的配置,这是一种类型安全的可重构配置方式,可以代替XML。
-
所有这些配置都代表了开发时的损耗。因为在思考Spring特性配置和解决业务问题之间需要进行思维切换,所以编写配置挤占了编写应用程序逻辑的时间。和所有框架一样,Spring实用,但与此同时它要求的回报也不少。
-
除此之外,项目的依赖管理也是一件耗时耗力的事情。在环境搭建时,需要分析要导入哪些库的坐标,而且还需要分析导入与之有依赖关系的其他库的坐标,一旦选错了依赖的版本,随之而来的不兼容问题就会严重阻碍项目的开发进度
-
SSM整合:Spring、Spring MVC、Mybatis、Spring-Mybatis整合包、数据库驱动,引入依赖的数量繁多、容易存在版本冲突。
②SpringBoot解决上述spring问题
SpringBoot对上述Spring的缺点进行的改善和优化,基于约定优于配置的思想,可以让开发人员不必在配置与逻辑 业务之间进行思维的切换,全身心的投入到逻辑业务的代码编写中,从而大大提高了开发的效率,一定程度上缩短 了项目周期。
起步依赖
- 起步依赖本质上是一个Maven项目对象模型(Project Object Model,POM),定义了对其他库的传递依赖,这些东西加在一起即支持某项功能。
- 简单的说,起步依赖就是将具备某种功能的依赖坐标打包到一起,并提供一些默认的功能。
自动配置
- springboot的自动配置,指的是springboot,会自动将一些配置类的bean注册进ioc容器,我们可以需要的地方使用@autowired或者@resource等注解来使用它。
- “自动”的表现形式就是我们只需要引我们想用功能的包,相关的配置我们完全不用管,springboot会自动注入这些配置bean,我们直接使用这些bean即可
- springboot: 简单、快速、方便地搭建项目;对主流开发框架的无配置集成;极大提高了开发、部署效率
3.Spring Boot入门案例
案例需求:请求Controller中的方法,并将返回值响应到页面
①依赖管理
<!--
所用的springBoot项目都会直接或者间接的继承spring-boot-starter-parent
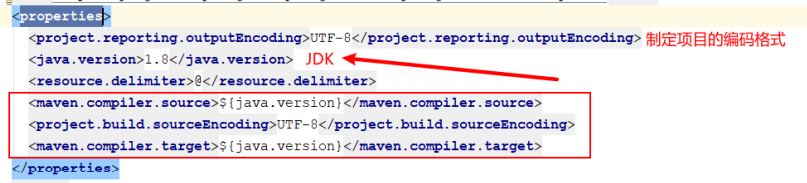
1.指定项目的编码格式为UTF-8
2.指定JDK版本为1.8
3.对项目依赖的版本进行管理,当前项目再引入其他常用的依赖时就需要再指定版本号,避免版本
冲突的问题
4.默认的资源过滤和插件管理
-->
<parent>
<groupId>org.springframework.boot</groupId>
<artifactId>spring-boot-starter-parent</artifactId>
<version>2.3.4.RELEASE</version>
</parent>
<dependencies>
<!--引入Spring Web及Spring MVC相关的依赖-->
<dependency>
<groupId>org.springframework.boot</groupId>
<artifactId>spring-boot-starter-web</artifactId>
</dependency>
</dependencies>
<!--可以将project打包为一个可以执行的jar-->
<build>
<plugins>
<plugin>
<groupId>org.springframework.boot</groupId>
<artifactId>spring-boot-maven-plugin</artifactId>
</plugin>
</plugins>
</build>
②启动类
/**
* SpringBoot的启动类通常放在二级包中,比如:com.lagou.SpringBootDemo1Application
* 因为SpringBoot项目在做包扫描,会扫描启动类所在的包及其子包下的所有内容。
*/
//标识当前类为SpringBoot项目的启动类
@SpringBootApplication
public class SpringBootDemo1Application {
	public static void main(String[] args) {
		//样板代码
		SpringApplication.run(SpringBootDemo1Application.class,args);
	}
}
③Controller
@RestController
@RequestMapping("/hello")
public class HelloController {
	@RequestMapping("/boot")
	public String hello(){
		return "Hello Spring Boot";
	}
}
4.SpringBoot 快速构建
案例需求:请求Controller中的方法,并将返回值响应到页面
①使用Spring Initializr方式构建SpringBoot项目
本质上说,Spring Initializr是一个Web应用,它提供了一个基本的项目结构,能够帮助我们快速构建一个基础的SpringBoot项目


Project SDK”用于设置创建项目使用的JDK版本,这里,使用之前初始化设置好的JDK版本即可;在“Choose Initializr Service URL(选择初始化服务地址)”下使用默认的初始化服务地址“https://start.spring.io”进行Spring Boot项目创建(注意使用快速方式创建Spring Boot项目时,所在主机须在联网状态下)

Spring Boot项目就创建好了。创建好的Spring Boot项目结构如图:

使用Spring Initializr方式构建的Spring Boot项目会默认生成项目启动类、存放前端静态资源和页面的文件夹、编写项目配置的配置文件以及进行项目单元测试的测试类
②创建一个用于Web访问的Controller
com.lagou包下创建名称为controller的包,在该包下创建一个请求处理控制类HelloController,并编写一个请求处理方法 (注意:将项目启动类SpringBootDemoApplication移动到com.lagou包下)
@RestController // 该注解为组合注解,等同于Spring中@Controller+@ResponseBody注解
@RequestMapping("/hello")
public class HelloController {
	@RequestMapping("/boot")
    public String hello(){
        return "Hello Spring Boot";
    }
}
③运行项目
运行主程序启动类SpringbootDemoApplication,项目启动成功后,在控制台上会发现SpringBoot项目默认启动的端口号为8080,此时,可以在浏览器上访问“http://localhost:8080/hello”
页面输出的内容是“hello Spring Boot”,至此,构建Spring Boot项目就完成了
5.单元测试与热部署
①单元测试
开发中,每当完成一个功能接口或业务方法的编写后,通常都会借助单元测试验证该功能是否正确。Spring Boot对项目的单元测试提供了很好的支持,在使用时,需要提前在项目的pom.xml文件中添加spring-boot-starter-test测试依赖启动器,可以通过相关注解实现单元测试
演示:
1.添加spring-boot-starter-test测试依赖启动器
在项目的pom.xml文件中添加spring-boot-starter-test测试依赖启动器,示例代码如下 :
	<dependency>
		<groupId>org.springframework.boot</groupId>
		<artifactId>spring-boot-starter-test</artifactId>
		<scope>test</scope>
	</dependency>
注意:使用Spring Initializr方式搭建的Spring Boot项目,会自动加入spring-boot-starter-test测试依赖
启动器,无需再手动添加
2.编写单元测试类和测试方法
使用Spring Initializr方式搭建的Spring Boot项目,会在src.test.java测试目录下自动创建与项目主程序启动类对应的单元测试类
/**
* SpringJUnit4ClassRunner.class:Spring运行环境
* JUnit4.class:JUnit运行环境
* SpringRunner.class:Spring Boot运行环境
*/
@RunWith(SpringRunner.class) //@RunWith:运行器
@SpringBootTest //标记为当前类为SpringBoot测试类,加载项目的ApplicationContext上下文环境
class Springbootdemo2ApplicationTests {
	/**
     * 需求:调用HelloController的hello方法
     */
    @Autowired
    private HelloController helloController;
    @Test
    void contextLoads() {
        String result = helloController.hello();
        System.out.println(result);
    }
}
上述代码中,先使用@Autowired注解注入了DemoController实例对象,然后在contextLoads()方法中调用了DemoController类中对应的请求控制方法contextLoads(),并输出打印结果
②热部署
在开发过程中,通常会对一段业务代码不断地修改测试,在修改之后往往需要重启服务,有些服务需要加载很久才能启动成功,这种不必要的重复操作极大的降低了程序开发效率。为此,Spring Boot框架专门提供了进行热部署的依赖启动器,用于进行项目热部署,而无需手动重启项目 。
热部署:在修改完代码之后,不需要重新启动容器,就可以实现更新。
使用步骤:
1.添加SpringBoot的热部署依赖启动器
2.开启Idea的自动编译
3.开启Idea的在项目运行中自动编译的功能
演示:
1添加spring-boot-devtools热部署依赖启动器
在Spring Boot项目进行热部署测试之前,需要先在项目的pom.xml文件中添加spring-boot-devtools热部署依赖启动器:
	<!-- 引入热部署依赖 -->
	<dependency>
		<groupId>org.springframework.boot</groupId>
		<artifactId>spring-boot-devtools</artifactId>
	</dependency>
由于使用的是IDEA开发工具,添加热部署依赖后可能没有任何效果,接下来还需要针对IDEA开发工具进行热部署相关的功能设置
2.IDEA工具热部署设置
选择IDEA工具界面的【File】->【Settings】选项,打开Compiler面板设置页面

选择Build下的Compiler选项,在右侧勾选“Build project automatically”选项将项目设置为自动编译,单击【Apply】→【OK】按钮保存设置
在项目任意页面中使用组合快捷键“Ctrl+Shift+Alt+/”打开Maintenance选项框,选中并打开Registry页面

列表中找到“compiler.automake.allow.when.app.running”,将该选项后的Value值勾选,用于指定IDEA工具在程序运行过程中自动编译,最后单击【Close】按钮完成设置
3.热部署效果测试
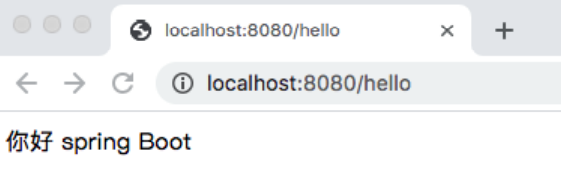
启动 http://localhost:8080/hello/boot
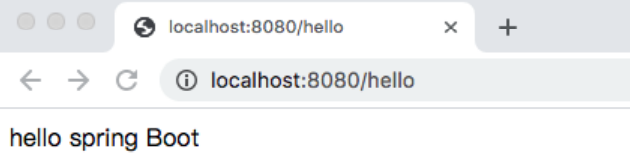
页面原始输出的内容是“hello Spring Boot”。
为了测试配置的热部署是否有效,接下来,在不关闭当前项目的情况下,将DemoController 类中的请求处理方法hello()的返回值修改为“你好,Spring Boot”并保存,查看控制台信息会发现项目能够自动构建和编译,说明项目热部署生效
6.全局配置文件
全局配置文件能够对一些默认配置值进行修改。Spring Boot使用一个application.properties或者application.yaml的文件作为全局配置文件,该文件存放在src/main/resource目录或者类路径的/config,一般会选择resource目录。
Spring Boot配置文件的命名及其格式:
- application.properties
- application.yaml
- application.yml
①application.properties配置文件
使用Spring Initializr方式构建Spring Boot项目时,会在resource目录下自动生成一个空的application.properties文件,Spring Boot项目启动时会自动加载application.properties文件。
我们可以在application.properties文件中定义Spring Boot项目的相关属性,当然,这些相关属性可以是系统属性、环境变量、命令参数等信息,也可以是自定义配置文件名称和位置
#配置tomcat端口号
server.port=8888
#定义数据库的连接信息 JdbcTemplate
spring.datasource.driver-class-name=com.mysql.jdbc.Driver
spring.datasource.url=jdbc:mysql://localhost:3306/lagou
spring.datasource.username=root
spring.datasource.password=123456
预先准备了两个实体类文件,后续会演示将application.properties配置文件中的自定义配置属性注入到
Person实体类的对应属性中
(1)先在项目的com.lagou包下创建一个pojo包,并在该包下创建两个实体类Pet和Person
public class Pet {
	private String type;
	private String name;
}
@Component
@ConfigurationProperties(prefix = "person")
public class Person {
	private int id; //id
	private String name; //名称
	private List hobby; //爱好
	private String[] family; //家庭成员
	private Map map;
	private Pet pet; //宠物
}
@ConfigurationProperties(prefix = “person”)注解的作用是将配置文件中以person开头的属性值通过setXX()方法注入到实体类对应属性中
@Component注解的作用是将当前注入属性值的Person类对象作为Bean组件放到Spring容器中,只有这样才能被@ConfigurationProperties注解进行赋值
(2)打开项目的resources目录下的application.properties配置文件,在该配置文件中编写需要对Person类设置的配置属性
#自定义配置信息
person.id=1
person.name=王二麻子
person.hobby=read,write
person.family=father,mather
person.map.key1=value1
person.map.key2=value2
person.pet.type=dog
person.pet.name=哈士奇
(3)查看application.properties配置文件是否正确,同时查看属性配置效果,打开通过IDEA工具创建的项目测试类,在该测试类中引入Person实体类Bean,并进行输出测试
@RunWith(SpringRunner.class) //@RunWith:运行器
@SpringBootTest //标记为当前类为SpringBoot测试类,加载项目的ApplicationContext上下文环境
class Springbootdemo2ApplicationTests {
	// 配置测试
    @Autowired
    private Person person;
    @Test
    void showPersonInfo() {
        System.out.println(person);
    }
}
(4)中文乱码问题解决
调整文件编码格式:

设置Tomcat及Http编码
#解决中文乱码
server.tomcat.uri-encoding=UTF-8
server.servlet.encoding.force=true
server.servlet.encoding.charset=UTF-8
server.servlet.encoding.enabled=true
②application.yaml配置文件
YAML文件格式是Spring Boot支持的一种JSON文件格式,相较于传统的Properties配置文件,YAML文件以数据为核心,是一种更为直观且容易被电脑识别的数据序列化格式。application.yaml配置文件的工作原理和application.properties是一样的,只不过yaml格式配置文件看起来更简洁一些。
- YAML文件的扩展名可以使用.yml或者.yaml。
- application.yml文件使用 “key:(空格)value”格式配置属性,使用缩进控制层级关系。
SpringBoot的三种配置文件是可以共存的:
这里,针对不同数据类型的属性值,介绍一下YAML
(1)value值为普通数据类型(例如数字、字符串、布尔等)
当YAML配置文件中配置的属性值为普通数据类型时,可以直接配置对应的属性值,同时对于字符串类型的属性值,不需要额外添加引号,示例代码如下
server:
	port: 8080
	servlet:
		context-path: /hello
(2)value值为数组和单列集合
当YAML配置文件中配置的属性值为数组或单列集合类型时,主要有两种书写方式:缩进式写法和行内式写法。
其中,缩进式写法还有两种表示形式,示例代码如下
person:
	hobby:
		- play
		- read
		- sleep
或者使用如下示例形式
person:
	hobby:
		play,
		read,
		sleep
上述代码中,在YAML配置文件中通过两种缩进式写法对person对象的单列集合(或数组)类型的爱好hobby赋值为play、read和sleep。其中一种形式为“-(空格)属性值”,另一种形式为多个属性值之前加英文逗号分隔(注意,最后一个属性值后不要加逗号)。
person:
	hobby: [play,read,sleep]
通过上述示例对比发现,YAML配置文件的行内式写法更加简明、方便。另外,包含属性值的中括号“[]”还可以进一步省略,在进行属性赋值时,程序会自动匹配和校对
(3)value值为Map集合和对象
当YAML配置文件中配置的属性值为Map集合或对象类型时,YAML配置文件格式同样可以分为两种书写方式:缩进式写法和行内式写法。
其中,缩进式写法的示例代码如下
person:
	map:
		k1: v1
		k2: v2
对应的行内式写法示例代码如下
person:
	map: {k1: v1,k2: v2}
在YAML配置文件中,配置的属性值为Map集合或对象类型时,缩进式写法的形式按照YAML文件格式编写即可,而行内式写法的属性值要用大括号“{}”包含。
接下来,在Properties配置文件演示案例基础上,通过配置application.yaml配置文件对Person对象进行赋值,具体使用如下
(1)在项目的resources目录下,新建一个application.yaml配置文件,在该配置文件中编写为Person类设置的配置属性
server:
  port: 8080
person:
  id: 1000
  name: 杜兰特
  hobby:
    - 篮球
    - 足球
    - 排球
  family:
    - father
    - mother
  map:
    k1: v1
    k2: v2
  pet:
    type: cat
    name: 加菲猫
(2)再次执行测试
可以看出,测试方法configurationTest()同样运行成功,并正确打印出了Person实体类对象。
需要说明的是,本次使用application.yaml配置文件进行测试时需要提前将application.properties配置文件中编写的配置注释,这是因为application.properties配置文件会覆盖application.yaml配置文件
7.配置文件属性值的注入
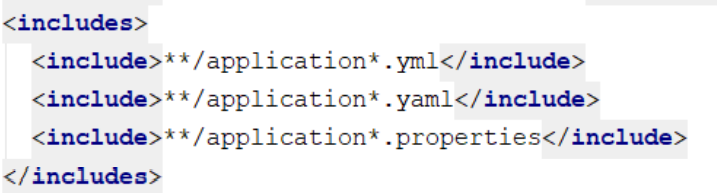
配置文件的优先级如下: 从低到高
<includes>
	<include>**/application*.yml</include>
	<include>**/application*.yaml</include>
	<include>**/application*.properties</include>
</includes>
使用Spring Boot全局配置文件设置属性时:
- 如果配置属性是Spring Boot已有属性,例如服务端口server.port,那么Spring Boot内部会自动扫描并读取这些配置文件中的属性值并覆盖默认属性。
- 如果配置的属性是用户自定义属性,例如刚刚自定义的Person实体类属性,还必须在程序中注入这些配置属性方可生效。
- Spring Boot支持多种注入配置文件属性的方式,下面来介绍如何使用注解@ConfigurationProperties和@Value注入属性
①使用@ConfigurationProperties注入属性
Spring Boot提供的@ConfigurationProperties注解用来快速、方便地将配置文件中的自定义属性值批量注入到某个Bean对象的多个对应属性中。假设现在有一个配置文件,如果使用@ConfigurationProperties注入配置文件的属性,示例代码如下:
@Component
//配置文件中所有以person开头的配置信息注入到当前类中
//前提1:必须保证配置文件中person.xx与当前Person类中的属性名一致
//前提2:必须保证当前Person类中的属性都具有set方法
@ConfigurationProperties(prefix = "person")
public class Person {
    private int id; //id
    private String name; //名称
    private List hobby; //爱好
    private String[] family; //家庭成员
    private Map map;
    private Pet pet; //宠物
    }
}
上述代码使用@Component和@ConfigurationProperties(prefix = “person”)将配置文件中的每个属性映射到person类组件中。
②使用@Value注入属性
@Value注解是Spring框架提供的,用来读取配置文件中的属性值并逐个注入到Bean对象的对应属性中,Spring Boot框架从Spring框架中对@Value注解进行了默认继承,所以在Spring Boot框架中还可以使用该注解读取和注入配置文件属性值。使用@Value注入属性的示例代码如下
@Component
public class Person {
	@Value("${person.id}")
	private int id;
}
上述代码中,使用@Component和@Value注入Person实体类的id属性。其中,@Value不仅可以将配置文件的属性注入Person的id属性,还可以直接给id属性赋值,这点是@ConfigurationProperties不支持的
演示@Value注解读取并注入配置文件属性的使用:
(1)在com.lagou.pojo包下新创建一个实体类Student,并使用@Value注解注入属性
@Component
public class Student {
    @Value("${person.id}")
    private int number;
    @Value("${person.name}")
    private String name;
}
Student类使用@Value注解将配置文件的属性值读取和注入。
从上述示例代码可以看出,使用@Value注解方式需要对每一个属性注入设置,同时又免去了属性的setXX()方法
(2)再次打开测试类进行测试
	@Autowired
	private Student student;
	@Test
	public void studentTest() {
		System.out.println(student);
	}
可以看出,测试方法studentTest()运行成功,同时正确打印出了Student实体类对象。需要说明的是,本示例中只是使用@Value注解对实例中Student对象的普通类型属性进行了赋值演示,而@Value注解对于包含Map集合、对象以及YAML文件格式的行内式写法的配置文件的属性注入都不支持,如果赋值会出现错误
8.自定义配置
spring Boot免除了项目中大部分的手动配置,对于一些特定情况,我们可以通过修改全局配置文件以适应具体生产环境,可以说,几乎所有的配置都可以写在application.yml文件中,Spring Boot会自动加载全局配置文件从而免除我们手动加载的烦恼。但是,如果我们自定义配置文件,Spring Boot是无法识别这些配置文件的,此时就需要我们手动加载。接下来,将针对Spring Boot的自定义配置文件及其加载方式进行讲解
①使用@PropertySource加载配置文件
对于这种加载自定义配置文件的需求,可以使用@PropertySource注解来实现。@PropertySource注解用于指定自定义配置文件的具体位置和名称当然,如果需要将自定义配置文件中的属性值注入到对应类的属性中,可以使用@ConfigurationProperties或者@Value注解进行属性值注入
演示:
(1)打开Spring Boot项目的resources目录,在项目的类路径下新建一个test.properties自定义配置文件,在该配置文件中编写需要设置的配置属性
#对实体类对象MyProperties进行属性配置
test.id=110
test.name=test
(2)在com.lagou.pojo包下新创建一个配置类MyProperties,提供test.properties自定义配置文件中对应的属性,并根据@PropertySource注解的使用进行相关配置
@Component // 自定义配置类
@PropertySource("classpath:test.properties") // 指定自定义配置文件位置和名称
@ConfigurationProperties(prefix = "test") // 指定配置文件注入属性前缀
public class MyProperties {
	private int id;
	private String name;
	// 省略属性getXX()和setXX()方法
	// 省略toString()方法
}
主要是一个自定义配置类,通过相关注解引入了自定义的配置文件,并完成了自定义属性值的注入。针对示例中的几个注解,具体说明如下
- @PropertySource(“classpath:test.properties”)注解指定了自定义配置文件的位置和名称,此示例表示自定义配置文件为classpath类路径下的test.properties文件;
- @ConfigurationProperties(prefix = “test”)注解将上述自定义配置文件test.properties中以test开头的属性值注入到该配置类属性中。
(3)进行测试
	@Autowired
	private MyProperties myProperties;
	@Test
	public void myPropertiesTest() {
		System.out.println(myProperties);
	}
②使用@Configuration编写自定义配置类
在Spring Boot框架中,推荐使用配置类的方式向容器中添加和配置组件
在Spring Boot框架中,通常使用@Configuration注解定义一个配置类,Spring Boot会自动扫描和识别配置类,从而替换传统Spring框架中的XML配置文件。
当定义一个配置类后,还需要在类中的方法上使用@Bean注解进行组件配置,将方法的返回对象注入到Spring容器中,并且组件名称默认使用的是方法名,当然也可以使用@Bean注解的name或value属性自定义组件的名称
演示:
(1)在项目下新建一个com.lagou.config包,并在该包下新创建一个类MyService,该类中不需要编写任何代码
public class MyService {
}
创建了一个空的MyService类,而该类目前没有添加任何配置和注解,因此还无法正常被Spring Boot扫描和识别
(2) 在项目的com.lagou.config包下,新建一个类MyConfig,并使用@Configuration注解将该类声明一个配置类,内容如下:
@Configuration // 定义该类是一个配置类````
public class MyConfig {
	@Bean // 将返回值对象作为组件添加到Spring容器中,该组件id默认为方法名
	public MyService myService(){
		return new MyService();
	}
}
MyConfig是@Configuration注解声明的配置类(类似于声明了一个XML配置文件),该配置类会被Spring Boot自动扫描识别;使用@Bean注解的myService()方法,其返回值对象会作为组件添加到了Spring容器中(类似于XML配置文件中的标签配置),并且该组件的id默认是方法名myService
(3)测试类
@Autowired
private ApplicationContext applicationContext;
@Test
public void iocTest() {
	System.out.println(applicationContext.containsBean("myService"));
}
上述代码中,先通过@Autowired注解引入了Spring容器实例ApplicationContext,然后在测试方法iocTest()中测试查看该容器中是否包括id为myService的组件。
执行测试方法iocTest() ,查看控制台输出效果,结果如下:

从测试结果可以看出,测试方法iocTest()运行成功,显示运行结果为true,表示Spirng的IOC容器中也已经包含了id为myService的实例对象组件,说明使用自定义配置类的形式完成了向Spring容器进行组件的添加和配置
二、SpringBoot原理深入及源码剖析
传统的Spring框架实现一个Web服务,需要导入各种依赖JAR包,然后编写对应的XML配置文件等,相较而言,Spring Boot显得更加方便、快捷和高效。那么,Spring Boot究竟如何做到这些的呢?
1.依赖管理
问题:(1)为什么导入dependency时不需要指定版本?
在Spring Boot入门程序中,项目pom.xml文件有两个核心依赖,分别是spring-boot-starterparent和spring-boot-starter-web,关于这两个依赖的相关介绍具体如下:
1.spring-boot-starter-parent依赖
在chapter01项目中的pom.xml文件中找到spring-boot-starter-parent依赖,示例代码如下:
<!-- Spring Boot父项目依赖管理 -->
<parent>
	<groupId>org.springframework.boot</groupId>
	<artifactId>spring-boot-starter-parent<11./artifactId>
	<version>2.2.2.RELEASE</version>
	<relativePath/> <!-- lookup parent from repository -->
</parent>
上述代码中,将spring-boot-starter-parent依赖作为Spring Boot项目的统一父项目依赖管理,并将项目版本号统一为2.2.2.RELEASE,该版本号根据实际开发需求是可以修改的
使用“Ctrl+鼠标左键”进入并查看spring-boot-starter-parent底层源文件,发现spring-bootstarter-parent的底层有一个父依赖spring-boot-dependencies,核心代码具体如下
<parent>
	<groupId>org.springframework.boot</groupId>
	<artifactId>spring-boot-dependencies</artifactId>
	<version>2.2.2.RELEASE</version>
	<relativePath>../../spring-boot-dependencies</relativePath>
</parent>
继续查看spring-boot-dependencies底层源文件,核心代码具体如下:
<properties>
	<activemq.version>5.15.11</activemq.version>
	...
	<solr.version>8.2.0</solr.version>
	<mysql.version>8.0.18</mysql.version>
	<kafka.version>2.3.1</kafka.version>
	<spring-amqp.version>2.2.2.RELEASE</spring-amqp.version>
	<spring-restdocs.version>2.0.4.RELEASE</spring-restdocs.version>
	<spring-retry.version>1.2.4.RELEASE</spring-retry.version>
	<spring-security.version>5.2.1.RELEASE</spring-security.version>
	<spring-session-bom.version>Corn-RELEASE</spring-session-bom.version>
	<spring-ws.version>3.0.8.RELEASE</spring-ws.version>
	<sqlite-jdbc.version>3.28.0</sqlite-jdbc.version>
	<sun-mail.version>${jakarta-mail.version}</sun-mail.version>
	<tomcat.version>9.0.29</tomcat.version>
	<thymeleaf.version>3.0.11.RELEASE</thymeleaf.version>
	<thymeleaf-extras-data-attribute.version>2.0.1</thymeleaf-extras-dataattribute.version>
	...
</properties>

从spring-boot-dependencies底层源文件可以看出,该文件通过标签对一些常用技术框架的依赖文件进行了统一版本号管理,例如activemq、spring、tomcat等,都有与Spring Boot 2.2.2版本相匹配的版本,这也是pom.xml引入依赖文件不需要标注依赖文件版本号的原因。
需要说明的是,如果pom.xml引入的依赖文件不是 spring-boot-starter-parent管理的,那么在pom.xml引入依赖文件时,需要使用标签指定依赖文件的版本号。
(2)问题2: spring-boot-starter-parent父依赖启动器的主要作用是进行版本统一管理,那么项目运行依赖的JAR包是从何而来的?
2.spring-boot-starter-web依赖
查看spring-boot-starter-web依赖文件源码,核心代码具体如下
<dependencies>
	<dependency>
		<groupId>org.springframework.boot</groupId>
		<artifactId>spring-boot-starter</artifactId>
		<version>2.2.2.RELEASE</version>
		<scope>compile</scope>
	</dependency>
	<dependency>
		<groupId>org.springframework.boot</groupId>
		<artifactId>spring-boot-starter-json</artifactId>
		<version>2.2.2.RELEASE</version>
		<scope>compile</scope>
	</dependency>
	<dependency>
		<groupId>org.springframework.boot</groupId>
		<artifactId>spring-boot-starter-tomcat</artifactId>
		<version>2.2.2.RELEASE</version>
		<scope>compile</scope>
	</dependency>
	<dependency>
		<groupId>org.springframework.boot</groupId>
		<artifactId>spring-boot-starter-validation</artifactId>
		<version>2.2.2.RELEASE</version>
		<scope>compile</scope>
		<exclusions>
			<exclusion>
				<artifactId>tomcat-embed-el</artifactId>
				<groupId>org.apache.tomcat.embed</groupId>
			</exclusion>
		</exclusions>
	</dependency>
	<dependency>
		<groupId>org.springframework</groupId>
		<artifactId>spring-web</artifactId>
		<version>5.2.2.RELEASE</version>
		<scope>compile</scope>
	</dependency>
	<dependency>
		<groupId>org.springframework</groupId>
		<artifactId>spring-webmvc</artifactId>
		<version>5.2.2.RELEASE</version>
		<scope>compile</scope>
	</dependency>
</dependencies>
从上述代码可以发现,spring-boot-starter-web依赖启动器的主要作用是提供Web开发场景所需的底层所有依赖
正是如此,在pom.xml中引入spring-boot-starter-web依赖启动器时,就可以实现Web场景开发,而不需要额外导入Tomcat服务器以及其他Web依赖文件等。当然,这些引入的依赖文件的版本号还是由spring-boot-starter-parent父依赖进行的统一管理。
有哪些starter:
https://github.com/spring-projects/spring-boot/tree/v2.1.0.RELEASE/spring-boot-project/spring-boot-starters
点击此处跳转查看
https://mvnrepository.com/search?q=starter
点击此处跳转查看
Spring Boot除了提供有上述介绍的Web依赖启动器外,还提供了其他许多开发场景的相关依赖,我们可以打开Spring Boot官方文档,搜索“Starters”关键字查询场景依赖启动器

列出了Spring Boot官方提供的部分场景依赖启动器,这些依赖启动器适用于不同的场景开发,使用时只需要在pox.xml文件中导入对应的依赖启动器即可。
需要说明的是,Spring Boot官方并不是针对所有场景开发的技术框架都提供了场景启动器,例如数据库操作框架MyBatis、阿里巴巴的Druid数据源等,Spring Boot官方就没有提供对应的依赖启动器。为了充分利用Spring Boot框架的优势,在Spring Boot官方没有整合这些技术框架的情况下,MyBatis、Druid等技术框架所在的开发团队主动与Spring Boot框架进行了整合,实现了各自的依赖启动器,例如mybatis-spring-boot-starter、druid-spring-boot-starter等。我们在pom.xml文件中引入这些第三方的依赖启动器时,切记要配置对应的版本号
2.自动配置
概念:能够在我们添加jar包依赖的时候,自动为我们配置一些组件的相关配置,我们无需配置或者只需要少量配置就能运行编写的项目
问题:Spring Boot到底是如何进行自动配置的,都把哪些组件进行了自动配置?
Spring Boot应用的启动入口是@SpringBootApplication注解标注类中的main()方法,
@SpringBootApplication : SpringBoot 应用标注在某个类上说明这个类是 SpringBoot 的主配置类, SpringBoot 就应该运行这个类的 main() 方法启动 SpringBoot 应用。
下面,查看@SpringBootApplication内部源码进行分析 ,核心代码具体如下
@SpringBootApplication
public class SpringbootDemoApplication {
	public static void main(String[] args) {
		SpringApplication.run(SpringbootDemoApplication.class, args);
	}
}
进入到 @SpringBootApplication 内,观察其做了哪些工作:
@Target({ElementType.TYPE}) //注解的适用范围,Type表示注解可以描述在类、接口、注解或枚举中
@Retention(RetentionPolicy.RUNTIME) //表示注解的生命周期,Runtime运行时
@Documented //表示注解可以记录在javadoc中
@Inherited //表示可以被子类继承该注解
@SpringBootConfiguration // 标明该类为配置类
@EnableAutoConfiguration // 启动自动配置功能
@ComponentScan(excludeFilters = { @Filter(type = FilterType.CUSTOM, classes =TypeExcludeFilter.class),
@Filter(type = FilterType.CUSTOM, classes = AutoConfigurationExcludeFilter.class) })
public @interface SpringBootApplication {
	// 根据class来排除特定的类,使其不能加入spring容器,传入参数value类型是class类型。
	@AliasFor(annotation = EnableAutoConfiguration.class)
	Class<?>[] exclude() default {};
	// 根据classname 来排除特定的类,使其不能加入spring容器,传入参数value类型是class的全类名字符串数组。
	@AliasFor(annotation = EnableAutoConfiguration.class)
	String[] excludeName() default {};
	// 指定扫描包,参数是包名的字符串数组。
	@AliasFor(annotation = ComponentScan.class, attribute = "basePackages")
	String[] scanBasePackages() default {};
	// 扫描特定的包,参数类似是Class类型数组。
	@AliasFor(annotation = ComponentScan.class, attribute ="basePackageClasses")
	Class<?>[] scanBasePackageClasses() default {};
}
从上述源码可以看出,@SpringBootApplication注解是一个组合注解,前面 4 个是注解的元数据信息, 我们主要看后面 3 个注解:@SpringBootConfiguration、@EnableAutoConfiguration、@ComponentScan三个核心注解,关于这三个核心注解的相关说明具体如下:
①@SpringBootConfiguration注解
@SpringBootConfiguration : SpringBoot 的配置类,标注在某个类上,表示这是一个 SpringBoot的配置类。
查看@SpringBootConfiguration注解源码,核心代码具体如下
@Target({ElementType.TYPE})
@Retention(RetentionPolicy.RUNTIME)
@Documented
@Configuration // 配置类的作用等同于配置文件,配置类也是容器中的一个对象
public @interface SpringBootConfiguration {
}
从上述源码可以看出,@SpringBootConfiguration注解内部有一个核心注解@Configuration,该注解是Spring框架提供的,表示当前类为一个配置类(XML配置文件的注解表现形式),并可以被组件扫描器扫描。由此可见,@SpringBootConfiguration注解的作用与@Configuration注解相同,都是标识一个可以被组件扫描器扫描的配置类,只不过@SpringBootConfiguration是被Spring Boot进行了重新封装命名而已
②@EnableAutoConfiguration注解
@EnableAutoConfiguration :开启自动配置功能,以前由我们需要配置的东西,现在由 SpringBoot帮我们自动配置,这个注解就是 Springboot 能实现自动配置的关键。
同样,查看该注解内部查看源码信息,核心代码具体如下
// 自动配置包
@AutoConfigurationPackage
// Spring的底层注解@Import,给容器中导入一个组件;
// 导入的组件是AutoConfigurationPackages.Registrar.class
@Import(AutoConfigurationImportSelector.class)
// 告诉SpringBoot开启自动配置功能,这样自动配置才能生效。
public @interface EnableAutoConfiguration {
	String ENABLED_OVERRIDE_PROPERTY = "spring.boot.enableautoconfiguration";
	// 返回不会被导入到 Spring 容器中的类
	Class<?>[] exclude() default {};
	// 返回不会被导入到 Spring 容器中的类名
	String[] excludeName() default {};
}
可以发现它是一个组合注解, Spring 中有很多以 Enable 开头的注解,其作用就是借助 @Import来收集并注册特定场景相关的 Bean ,并加载到 IOC 容器。@EnableAutoConfiguration就是借助@Import来收集所有符合自动配置条件的bean定义,并加载到IOC容器。
(1)@AutoConfigurationPackage注解
查看@AutoConfigurationPackage注解内部源码信息,核心代码具体如下:
@Target({ElementType.TYPE})
@Retention(RetentionPolicy.RUNTIME)
@Documented
@Inherited
@Import({Registrar.class}) // 导入Registrar中注册的组件
public @interface AutoConfigurationPackage {
}
从上述源码可以看出,@AutoConfigurationPackage注解的功能是由@Import注解实现的,它是spring框架的底层注解,它的作用就是给容器中导入某个组件类,例如@Import(AutoConfigurationPackages.Registrar.class),它就是将Registrar这个组件类导入到容器中,可查看Registrar类中registerBeanDefinitions方法,这个方法就是导入组件类的具体实现 :
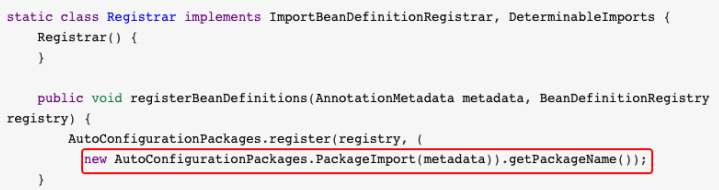
从上述源码可以看出,在Registrar类中有一个registerBeanDefinitions()方法,使用Debug模式启动项目,可以看到选中的部分就是com.lagou。也就是说,@AutoConfigurationPackage注解的主要作用就是将主程序类所在包及所有子包下的组件到扫描到spring容器中。
因此 在定义项目包结构时,要求定义的包结构非常规范,项目主程序启动类要定义在最外层的根目录位置,然后在根目录位置内部建立子包和类进行业务开发,这样才能够保证定义的类能够被组件扫描器扫描
(2)@Import({AutoConfigurationImportSelector.class})注解
将 AutoConfigurationImportSelector 这个类导入到 Spring 容器中,AutoConfigurationImportSelector 可以帮助 Springboot 应用将所有符合条件的 @Configuration配置都加载到当前 SpringBoot 创建并使用的 IOC 容器( ApplicationContext )中。
继续研究AutoConfigurationImportSelector这个类,通过源码分析这个类中是通过selectImports这个方法告诉springboot都需要导入那些组件:

深入研究loadMetadata方法

AutoConfigurationImportSelector类 getAutoConfigurationEntry方法
protected AutoConfigurationEntry getAutoConfigurationEntry(AutoConfigurationMetadata autoConfigurationMetadata,AnnotationMetadata annotationMetadata) {
	//判断EnabledAutoConfiguration注解有没有开启,默认开启
	if (!isEnabled(annotationMetadata)) {
		return EMPTY_ENTRY;
	}
	//获得注解的属性信息
	AnnotationAttributes attributes = getAttributes(annotationMetadata);
	//获取默认支持的自动配置类列表
	List<String> configurations = getCandidateConfigurations(annotationMetadata, attributes);
	//去重
	configurations = removeDuplicates(configurations);
	//去除一些多余的配置类,根据EnabledAutoConfiguratio的exclusions属性进行排除
	Set<String> exclusions = getExclusions(annotationMetadata, attributes);
	checkExcludedClasses(configurations, exclusions);
	configurations.removeAll(exclusions);
	//根据pom文件中加入的依赖文件筛选中最终符合当前项目运行环境对应的自动配置类
	configurations = filter(configurations, autoConfigurationMetadata);
	//触发自动配置导入监听事件
	fireAutoConfigurationImportEvents(configurations, exclusions);
	return new AutoConfigurationEntry(configurations, exclusions);
}
深入getCandidateConfigurations方法
这个方法中有一个重要方法loadFactoryNames,这个方法是让SpringFactoryLoader去加载一些组件的名字。

继续点开loadFactory方法
	public static List<String> loadFactoryNames(Class<?> factoryClass, @Nullable ClassLoader classLoader) {
		//获取出入的键
		String factoryClassName = factoryClass.getName();
		return (List)loadSpringFactories(classLoader).getOrDefault(factoryClassName,Collections.emptyList());
	}
	private static Map<String, List<String>> loadSpringFactories(@Nullable ClassLoader classLoader) {
		MultiValueMap<String, String> result = (MultiValueMap)cache.get(classLoader);
		if (result != null) {
			return result;
		} else {
			try {
		//如果类加载器不为null,则加载类路径下spring.factories文件,将其中设置的配置类的全路径信息封装 为Enumeration类对象
				Enumeration<URL> urls = classLoader != null ? classLoader.getResources("META-INF/spring.factories") : ClassLoader.getSystemResources("META-INF/spring.factories");
				LinkedMultiValueMap result = new LinkedMultiValueMap();
				//循环Enumeration类对象,根据相应的节点信息生成Properties对象,通过传入的键获取值,在将值切割为一个个小的字符串转化为Array,方法result集合中
				while(urls.hasMoreElements()) {
					URL url = (URL)urls.nextElement();
					UrlResource resource = new UrlResource(url);
					Properties properties = PropertiesLoaderUtils.loadProperties(resource);
					Iterator var6 = properties.entrySet().iterator();
					while(var6.hasNext()) {
						Entry<?, ?> entry = (Entry)var6.next();
						String factoryClassName = ((String)entry.getKey()).trim();
						String[] var9 = StringUtils.commaDelimitedListToStringArray((String)entry.getValue());
						int var10 = var9.length;
						for(int var11 = 0; var11 < var10; ++var11) {
							String factoryName = var9[var11];
							result.add(factoryClassName, factoryName.trim());
						}
					}
				}
			cache.put(classLoader, result);
			return result;
		}
会去读取一个 spring.factories 的文件,读取不到会表这个错误,我们继续根据会看到,最终路径的长这样,而这个是spring提供的一个工具类
public final class SpringFactoriesLoader {
	public static final String FACTORIES_RESOURCE_LOCATION = "METAINF/spring.factories";
}
它其实是去加载一个外部的文件,而这文件是在


@EnableAutoConfiguration就是从classpath中搜寻META-INF/spring.factories配置文件,并将其中org.springframework.boot.autoconfigure.EnableutoConfiguration对应的配置项通过反射(Java Refletion)实例化为对应的标注了@Configuration的JavaConfig形式的配置类,并加载到IOC容器中以刚刚的项目为例,在项目中加入了Web环境依赖启动器,对应的WebMvcAutoConfiguration自动配置类就会生效,打开该自动配置类会发现,在该配置类中通过全注解配置类的方式对Spring MVC运行所需环境进行了默认配置,包括默认前缀、默认后缀、视图解析器、MVC校验器等。而这些自动配置类的本质是传统Spring MVC框架中对应的XML配置文件,只不过在Spring Boot中以自动配置类的形式进行了预先配置。因此,在Spring Boot项目中加入相关依赖启动器后,基本上不需要任何配置就可以运行程序,当然,我们也可以对这些自动配置类中默认的配置进行更改
总结
因此springboot底层实现自动配置的步骤是:
- springboot应用启动;
- @SpringBootApplication起作用;
- @EnableAutoConfiguration;
- @AutoConfigurationPackage:这个组合注解主要是@Import(AutoConfigurationPackages.Registrar.class),它通过将Registrar类导入到容器中,而Registrar类作用是扫描主配置类同级目录以及子包,并将相应的组件导入到springboot创建管理的容器中;
- @Import(AutoConfigurationImportSelector.class):它通过将AutoConfigurationImportSelector类导入到容器中,AutoConfigurationImportSelector类作用是通过selectImports方法执行的过程中,会使用内部工具类SpringFactoriesLoader,查找classpath上所有jar包中的METAINF/spring.factories进行加载,实现将配置类信息交给SpringFactory加载器进行一系列的容器创建过程
③@ComponentScan注解
@ComponentScan注解具体扫描的包的根路径由Spring Boot项目主程序启动类所在包位置决定,在扫描过程中由前面介绍的@AutoConfigurationPackage注解进行解析,从而得到Spring Boot项目主程序启动类所在包的具体位置
总结:
@SpringBootApplication 的注解的功能就分析差不多了, 简单来说就是 3 个注解的组合注解:
|- @SpringBootConfiguration
|- @Configuration //通过javaConfig的方式来添加组件到IOC容器中
|- @EnableAutoConfiguration
|- @AutoConfigurationPackage //自动配置包,与@ComponentScan扫描到的添加到IOC
|- @Import(AutoConfigurationImportSelector.class) //到METAINF/spring.factories中定义的bean添加到IOC容器中
|- @ComponentScan //包扫描
三、SpringBoot数据访问
1.Spring Boot整合MyBatis
MyBatis 是一款优秀的持久层框架,Spring Boot官方虽然没有对MyBatis进行整合,但是MyBatis团队自行适配了对应的启动器,进一步简化了使用MyBatis进行数据的操作 因为Spring Boot框架开发的便利性,所以实现Spring Boot与数据访问层框架(例如MyBatis)的整合非常简单,主要是引入对应的依赖启动器,并进行数据库相关参数设置即可
基础环境搭建:
①数据准备
在MySQL中,先创建了一个数据库springbootdata,然后创建了两个表t_article和t_comment并向表中插入数据。其中评论表t_comment的a_id与文章表t_article的主键id相关联
# 创建数据库
CREATE DATABASE springbootdata;
# 选择使用数据库
USE springbootdata;
# 创建表t_article并插入相关数据
DROP TABLE IF EXISTS t_article;
CREATE TABLE t_article (
id INT(20) NOT NULL AUTO_INCREMENT COMMENT '文章id',
title VARCHAR(200) DEFAULT NULL COMMENT '文章标题',
content LONGTEXT COMMENT '文章内容',
PRIMARY KEY (id)
) ENGINE=INNODB AUTO_INCREMENT=2 DEFAULT CHARSET=utf8;
INSERT INTO t_article VALUES ('1', 'Spring Boot基础入门', '从入门到精通讲解...');
INSERT INTO t_article VALUES ('2', 'Spring Cloud基础入门', '从入门到精通讲解...');
# 创建表t_comment并插入相关数据
DROP TABLE IF EXISTS t_comment;
CREATE TABLE t_comment (
id INT(20) NOT NULL AUTO_INCREMENT COMMENT '评论id',
content LONGTEXT COMMENT '评论内容',
author VARCHAR(200) DEFAULT NULL COMMENT '评论作者',
a_id INT(20) DEFAULT NULL COMMENT '关联的文章id',
PRIMARY KEY (id)
) ENGINE=INNODB AUTO_INCREMENT=3 DEFAULT CHARSET=utf8;
INSERT INTO t_comment VALUES ('1', '很全、很详细', 'lucy', '1');
INSERT INTO t_comment VALUES ('2', '赞一个', 'tom', '1');
INSERT INTO t_comment VALUES ('3', '很详细', 'eric', '1');
INSERT INTO t_comment VALUES ('4', '很好,非常详细', '张三', '1');
INSERT INTO t_comment VALUES ('5', '很不错', '李四', '2');
②创建项目,引入相应的启动器

③编写与数据库表t_comment和t_article对应的实体类Comment和Article
public class Comment {
	private Integer id;
	private String content;
	private String author;
	private Integer aId;
}
public class Article {
	private Integer id;
	private String title;
	private String content;
}
④编写配置文件
(1)在application.properties配置文件中进行数据库连接配置
# MySQL数据库连接配置
spring:
	datasource:
		url: jdbc:mysql://localhost:3306/springbootdata?serverTimezone=UTC&characterEncoding=UTF-8
		username: root
		password: 123456
注解方式整合Mybatis
需求:实现通过ID查询Comment信息
(1)创建一个对t_comment表数据操作的接口CommentMapper
public interface CommentMapper {
	@Select("SELECT * FROM t_comment WHERE id =#{id}")
	public Comment findById(Integer id);
}
(2)在Spring Boot项目启动类上添加@MapperScan(“xxx”)注解
@SpringBootApplication
@MapperScan("com.lagou.mapper")
public class Springboot02MybatisApplication {
	public static void main(String[] args) {
		SpringApplication.run(Springboot02MybatisApplication.class, args);
	}
}
(3)编写测试方法
@RunWith(SpringRunner.class)
@SpringBootTest
class SpringbootPersistenceApplicationTests {
	@Autowired
	private CommentMapper commentMapper;
	@Test
	void contextLoads() {
		Comment comment = commentMapper.findById(1);
		System.out.println(comment);
	}
}
打印结果:

控制台中查询的Comment的aId属性值为null,没有映射成功。这是因为编写的实体类Comment中使用了驼峰命名方式将t_comment表中的a_id字段设计成了aId属性,所以无法正确映射查询结果。
为了解决上述由于驼峰命名方式造成的表字段值无法正确映射到类属性的情况,可以在Spring Boot全局配置文件application.properties中添加开启驼峰命名匹配映射配置,示例代码如下
#开启驼峰命名匹配映射
mybatis:
	configuration:
		map-underscore-to-camel-case: true
打印结果:

配置文件的方式整合MyBatis
第一、二步骤使用Free Mybatis plugin插件生成

(1)创建一个用于对数据库表t_article数据操作的接口ArticleMapper
@Mapper
public interface ArticleMapper {
	public Article selectArticle(Integer id);
}
(2)创建XML映射文件
resources目录下创建一个统一管理映射文件的包mapper,并在该包下编写与ArticleMapper接口方应的映射文件ArticleMapper.xml
<?xml version="1.0" encoding="UTF-8" ?>
<!DOCTYPE mapper PUBLIC "-//mybatis.org//DTD Mapper 3.0//EN"
"http://mybatis.org/dtd/mybatis-3-mapper.dtd">
<mapper namespace="com.lagou.mapper.ArticleMapper">
	<select id="selectArticle" resultType="Article">
		select * from Article
	</select>
</mapper>
(3)配置XML映射文件路径
在项目中编写的XML映射文件,Spring Boot并无从知晓,所以无法扫描到该自定义编写的XML配置文件,还必须在全局配置文件application.properties中添加MyBatis映射文件路径的配置,同时需要添加实体类别名映射路径,示例代码如下
mybatis:
	#配置MyBatis的xml配置文件路径
	mapper-locations: classpath:mapper/*.xml
	#配置XML映射文件中指定的实体类别名路径
	type-aliases-package: com.lagou.base.pojo
(4)编写单元测试进行接口方法测试
	@Autowired
	private ArticleMapper articleMapper;
	@Test
	void contextLoads2() {
		Article article = articleMapper.selectByPrimaryKey(1);
		System.out.println(article);
	}
打印结果:

2.Spring Boot整合Redis
①添加Redis依赖包
在项目的pom.xml中添加如下:
<!-- redis依赖包 -->
<dependency>
	<groupId>org.springframework.boot</groupId>
	<artifactId>spring-boot-starter-data-redis</artifactId>
</dependency>
②配置Redis数据库连接
在application.properties中配置redis数据库连接信息,如下:
spring:
	redis:
    host: 192.168.117.129 #Redis服务器地址
    port: 6379 #Redis服务器连接端口
    database: 0 #Redis数据库索引(默认为0)
    jedis:
      pool:
        max-active: 50 #连接池最大连接数(使用负值表示没有限制)
        max-wait: 3000 #连接池最大阻塞等待时间(使用负值表示没有限制)
        max-idle: 20 #连接池中的最大空闲连接
        min-idle: 2 #连接池中的最小空闲连接
    timeout: 5000 #连接超时时间(毫秒)
③编写Redis操作工具类
将RedisTemplate实例包装成一个工具类,便于对redis进行数据操作。
	@Component
	public class RedisUtils {
        @Autowired
        private RedisTemplate redisTemplate;
        /**
         * 读取缓存
         *
         * @param key
         * @return
         */
        public Object get(final String key) {
            return redisTemplate.opsForValue().get(key);
        }
        /**
         * 写入缓存
         */
        public boolean set( String key, Object value) {
            boolean result = false;
            try {
                redisTemplate.opsForValue().set(key, value,1, TimeUnit.DAYS);
                result = true;
            } catch (Exception e) {
                e.printStackTrace();
            }
            return result;
        }
        /**
         * 更新缓存
         */
        public boolean getAndSet(final String key, String value) {
            boolean result = false;
            try {
                redisTemplate.opsForValue().getAndSet(key, value);
                result = true;
            } catch (Exception e) {
                e.printStackTrace();
            }
            return result;
        }
        /**
         * 删除缓存
         */
        public boolean delete(final String key) {
            boolean result = false;
            try {
                redisTemplate.delete(key);
                result = true;
            } catch (Exception e) {
                e.printStackTrace();
            }
            return result;
        }
	}
④测试
写一个测试用例类来完成对redis的整合
	//写入 key:1 value:mysql数据库中id为1的article记录
    @Autowired
    private RedisUtils redisUtils;
    @Test
    public void writeRedis() {
        redisUtils.set("1",articleMapper.selectByPrimaryKey(1));
        System.out.println("success");
    }

    @Test
    public void readRedis() {
        Article article = (Article) redisUtils.get("1");
        System.out.println(article);
    }
四、SpringBoot视图技术
1.支持的视图技术
前端模板引擎技术的出现,使前端开发人员无需关注后端业务的具体实现,只关注自己页面的呈现效果即可,并且解决了前端代码错综复杂的问题、实现了前后端分离开发。Spring Boot框架对很多常用的模板引擎技术(如:FreeMarker、Thymeleaf、Mustache等)提供了整合支持
Spring Boot不太支持常用的JSP模板,并且没有提供对应的整合配置,这是因为使用嵌入式Servlet容器的Spring Boot应用程序对于JSP模板存在一些限制 :
- 在Jetty和Tomcat容器中,Spring Boot应用被打包成war文件可以支持JSP。但Spring Boot默认使用嵌入式Servlet容器以JAR包方式进行项目打包部署,这种JAR包方式不支持JSP。
- 如果使用Undertow嵌入式容器部署Spring Boot项目,也不支持JSP模板。(Undertow 是红帽公司开发的一款基于 NIO 的高性能 Web 嵌入式服务器)
- Spring Boot默认提供了一个处理请求路径“/error”的统一错误处理器,返回具体的异常信息。使用JSP模板时,无法对默认的错误处理器进行覆盖,只能根据Spring Boot要求在指定位置定制错误页面。
上面对Spring Boot支持的模板引擎进行了介绍,并指出了整合JSP模板的一些限制。接下来,对其中常用的Thymeleaf模板引擎进行介绍,并完成与Spring Boot框架的整合实现
2.Thymeleaf
Thymeleaf是一种现代的基于服务器端的Java模板引擎技术,也是一个优秀的面向Java的XML、XHTML、HTML5页面模板,它具有丰富的标签语言、函数和表达式,在使用Spring Boot框架进行页面设计时,一般会选择Thymeleaf模板
①Thymeleaf语法
常用标签
在HTML页面上使用Thymeleaf标签,Thymeleaf 标签能够动态地替换掉静态内容,使页面动态展示。
为了大家更直观的认识Thymeleaf,下面展示一个在HTML文件中嵌入了Thymeleaf的页面文件,示例代码如下:
<!DOCTYPE html>
<html lang="en" xmlns:th="http://www.thymeleaf.org">
<head>
	<meta charset="UTF-8">
	<link rel="stylesheet" type="text/css" media="all" href="../../css/gtvg.css" th:href="@{/css/gtvg.css}" />
	<title>Title</title>
</head>
<body>
	<p th:text="${hello}">欢迎进入Thymeleaf的学习</p>
</body>
</html>

上述代码中,“xmlns:th=“http://www.thymeleaf.org”“ 用于引入Thymeleaf模板引擎标签,使用关键字“th”标注标签是Thymeleaf模板提供的标签,其中,“th:href”用于引入外联样式文件,“th:text”用于动态显示标签文本内容。
除此之外,Thymeleaf模板提供了很多标签,接下来,通过一张表罗列Thymeleaf的常用标签

标准表达式
Thymeleaf模板引擎提供了多种标准表达式语法,在正式学习之前,先通过一张表来展示其主要语法及说明

1.变量表达式 ${…}
变量表达式${…}主要用于获取上下文中的变量值,示例代码如下:
<p th:text="${title}">这是标题</p>
示例使用了Thymeleaf模板的变量表达式${…}用来动态获取P标签中的内容,如果当前程序没有启动或者当前上下文中不存在title变量,该片段会显示标签默认值“这是标题”;如果当前上下文中存在title变量并且程序已经启动,当前P标签中的默认文本内容将会被title变量的值所替换,从而达到模板引擎页面数据动态替换的效果
同时,Thymeleaf为变量所在域提供了一些内置对象,具体如下所示
# ctx:上下文对象
# vars:上下文变量
# locale:上下文区域设置
# request:(仅限Web Context)HttpServletRequest对象
# response:(仅限Web Context)HttpServletResponse对象
# session:(仅限Web Context)HttpSession对象
# servletContext:(仅限Web Context)ServletContext对象
结合上述内置对象的说明,假设要在Thymeleaf模板引擎页面中动态获取当前国家信息,可以使用#locale内置对象,示例代码如下
The locale country is: <span th:text="${#locale.country}">US</span>.
上述代码中,使用th:text="${#locale.country}"动态获取当前用户所在国家信息,其中标签内默认内容为US(美国),程序启动后通过浏览器查看当前页面时,Thymeleaf会通过浏览器语言设置来识别当前用户所在国家信息,从而实现动态替换
2.选择变量表达式 *{…}
选择变量表达式和变量表达式用法类似,一般用于从被选定对象而不是上下文中获取属性值,如果没有选定对象,则和变量表达式一样,示例代码如下
<div th:object="${book}">
	<p>titile: <span th:text="*{title}">标题</span>.</p>
</div>
*{title} 选择变量表达式获取当前指定对象book的title属性值。
3.消息表达式 #{…}
消息表达式#{…}主要用于Thymeleaf模板页面国际化内容的动态替换和展示,使用消息表达式#{…}进行国际化设置时,还需要提供一些国际化配置文件。
4.链接表达式 @{…}
链接表达式@{…}一般用于页面跳转或者资源的引入,在Web开发中占据着非常重要的地位,并且使用也非常频繁,示例代码如下:
<a th:href="@{http://localhost:8080/order/details(orderId=${o.id})}">view</a>
<a th:href="@{/order/details(orderId=${o.id},pid=${p.id})}">view</a>
上述代码中,链接表达式@{…}分别编写了绝对链接地址和相对链接地址。在有参表达式中,需要按照@{路径(参数名称=参数值,参数名称=参数值…)}的形式编写,同时该参数的值可以使用变量表达式来传递动态参数值
5.片段表达式 ~{…}
片段表达式~{…}用来标记一个片段模板,并根据需要移动或传递给其他模板。其中,最常见的用法是使
用th:insert或th:replace属性插入片段,示例代码如下:
<div th:insert="~{thymeleafDemo::title}"></div>
上述代码中,使用th:insert属性将title片段模板引用到该标签中。thymeleafDemo为模板名称,Thymeleaf会自动查找“/resources/templates/”目录下的thymeleafDemo模板,title为片段名称
②基本使用
(1) Thymeleaf模板基本配置
首先 在Spring Boot项目中使用Thymeleaf模板,首先必须保证引入Thymeleaf依赖,示例代码如下:
<dependency>
	<groupId>org.springframework.boot</groupId>
	<artifactId>spring-boot-starter-thymeleaf</artifactId>
</dependency>
其次,在全局配置文件中配置Thymeleaf模板的一些参数。一般Web项目都会使用下列配置,示例代码如:
spring.thymeleaf.cache = true #启用模板缓存
spring.thymeleaf.encoding = UTF_8 #模板编码
spring.thymeleaf.mode = HTML5 #应用于模板的模板模式
spring.thymeleaf.prefix = classpath:/templates/ #指定模板页面存放路径
spring.thymeleaf.suffix = .html #指定模板页面名称的后缀
上述配置中,spring.thymeleaf.cache表示是否开启Thymeleaf模板缓存,默认为true,在开发过程中通常会关闭缓存,保证项目调试过程中数据能够及时响应;spring.thymeleaf.prefix指定了Thymeleaf模板页面的存放路径,默认为classpath:/templates/;spring.thymeleaf.suffix指定了Thymeleaf模板页面的名称后缀,默认为.html
(2)静态资源的访问
开发Web应用时,难免需要使用静态资源。Spring boot默认设置了静态资源的访问路径。
使用Spring Initializr方式创建的Spring Boot项目,默认生成了一个resources目录,在resources目录中新建public、resources、static三个子目录下,Spring boot默认会挨个从public、resources、static里面查找静态资源
③完成数据的页面展示
1.创建Spring Boot项目,引入Thymeleaf依赖

2.编写配置文件
打开application.properties全局配置文件,在该文件中对Thymeleaf模板页面的数据缓存进行设置
# thymeleaf页面缓存设置(默认为true),开发中方便调试应设置为false,上线稳定后应保持默认true
spring.thymeleaf.cache=false
使用“spring.thymeleaf.cache=false”将Thymeleaf默认开启的缓存设置为了false,用来关闭模板页面缓存
3.创建web控制类
在项目中创建名为com.lagou.controller的包,并在该包下创建一个用于前端模板页面动态数据替换效果测试的访问实体类LoginController
@Controller
public class LoginController {
	/**
	* 获取并封装当前年份跳转到登录页login.html
	*/
	@RequestMapping("/toLoginPage")
	public String toLoginPage(Model model){
		model.addAttribute("currentYear",
		Calendar.getInstance().get(Calendar.YEAR));
		return "login";
	}
}
toLoginPage()方法用于向登录页面login.html跳转,同时携带了当前年份信息currentYear。
4.创建模板页面并引入静态资源文件
在“classpath:/templates/”目录下引入一个用户登录的模板页面login.html
<!DOCTYPE html>
<html lang="en" xmlns:th="http://www.thymeleaf.org">
<head>
    <meta http-equiv="Content-Type" content="text/html; charset=UTF-8">
    <meta name="viewport" content="width=device-width, initial-scale=1,shrinkto-fit=no">
    <title>用户登录界面</title>
    <link th:href="@{/login/css/bootstrap.min.css}" rel="stylesheet">
    <link th:href="@{/login/css/signin.css}" rel="stylesheet">
</head>
<body class="text-center">
    <!-- 用户登录form表单 -->
    <form class="form-signin">
        <img class="mb-4" th:src="@{/login/img/login.jpg}" width="72" height="72">
        <h1 class="h3 mb-3 font-weight-normal">请登录</h1>
        <input type="text" class="form-control"
               th:placeholder="用户名" required="" autofocus="">
        <input type="password" class="form-control"
               th:placeholder="密码" required="">
        <div class="checkbox mb-3">
            <label>
                <input type="checkbox" value="remember-me"> 记住我
            </label>
        </div>
        <button class="btn btn-lg btn-primary btn-block" type="submit" >登录</button>
        <p class="mt-5 mb-3 text-muted">© <span
                th:text="${currentYear}">2019</span>-<span
                th:text="${currentYear}+1">2020</span></p>
    </form>
</body>
</html>
通过“xmlns:th=“http://www.thymeleaf.org””引入了Thymeleaf模板标签;
使用“th:href”和“th:src”分别引入了两个外联的样式文件和一个图片;
使用“th:text”引入了后台动态传递过来的当前年份currentYear
5.效果测试

可以看出,登录页面login.html显示正常,在文件4-3中使用“th:*”相关属性引入的静态文件生效,并且在页面底部动态显示了当前日期2019-2020,而不是文件中的静态数字2019-2020。这进一步说明了Spring Boot与Thymeleaf整合成功,完成了静态资源的引入和动态数据的显示
五、SpringBoot实战演练
实战技能补充:lombok
<dependency>
	<groupId>org.projectlombok</groupId>
	<artifactId>lombok</artifactId>
	<version>1.18.12</version>
	<!--只在编译阶段生效-->
	<scope>provided</scope>
</dependency>
1.创建springboot工程

2.导入pom.xml
<dependency>
	<groupId>com.alibaba</groupId>
	<artifactId>druid</artifactId>
	<version>1.1.3</version>
</dependency>
3.User实体类编写
@Data
public class User implements Serializable {
    private Integer id;
    private String username;
    private String password;
    private String birthday;
    private static final long serialVersionUID = 1L;
}
4.UserMapper编写及Mapper文件
public interface UserMapper {
    int deleteByPrimaryKey(Integer id);
    int insert(User record);
    int insertSelective(User record);
    User selectByPrimaryKey(Integer id);
    int updateByPrimaryKeySelective(User record);
    int updateByPrimaryKey(User record);
    List<User> queryAll();
}
<?xml version="1.0" encoding="UTF-8"?>
<!DOCTYPE mapper PUBLIC "-//mybatis.org//DTD Mapper 3.0//EN" "http://mybatis.org/dtd/mybatis-3-mapper.dtd">
<mapper namespace="com.lagou.mapper.UserMapper">
  <resultMap id="BaseResultMap" type="com.lagou.pojo.User">
    <id column="id" jdbcType="INTEGER" property="id" />
    <result column="username" jdbcType="VARCHAR" property="username" />
    <result column="password" jdbcType="VARCHAR" property="password" />
    <result column="birthday" jdbcType="VARCHAR" property="birthday" />
  </resultMap>
  <sql id="Base_Column_List">
    id, username, `password`, birthday
  </sql>
  <select id="selectByPrimaryKey" parameterType="java.lang.Integer" resultMap="BaseResultMap">
    select
    <include refid="Base_Column_List" />
    from user
    where id = #{id,jdbcType=INTEGER}
  </select>
  <select id="queryAll" resultType="com.lagou.pojo.User">
    select
    <include refid="Base_Column_List" />
    from user
  </select>
  <delete id="deleteByPrimaryKey" parameterType="java.lang.Integer">
    delete from user
    where id = #{id,jdbcType=INTEGER}
  </delete>
  <insert id="insert" keyColumn="id" keyProperty="id" parameterType="com.lagou.pojo.User" useGeneratedKeys="true">
    insert into user (username, `password`, birthday
      )
    values (#{username,jdbcType=VARCHAR}, #{password,jdbcType=VARCHAR}, #{birthday,jdbcType=VARCHAR}
      )
  </insert>
  <insert id="insertSelective" keyColumn="id" keyProperty="id" parameterType="com.lagou.pojo.User" useGeneratedKeys="true">
    insert into user
    <trim prefix="(" suffix=")" suffixOverrides=",">
      <if test="username != null">
        username,
      </if>
      <if test="password != null">
        `password`,
      </if>
      <if test="birthday != null">
        birthday,
      </if>
    </trim>
    <trim prefix="values (" suffix=")" suffixOverrides=",">
      <if test="username != null">
        #{username,jdbcType=VARCHAR},
      </if>
      <if test="password != null">
        #{password,jdbcType=VARCHAR},
      </if>
      <if test="birthday != null">
        #{birthday,jdbcType=VARCHAR},
      </if>
    </trim>
  </insert>
  <update id="updateByPrimaryKeySelective" parameterType="com.lagou.pojo.User">
    update user
    <set>
      <if test="username != null">
        username = #{username,jdbcType=VARCHAR},
      </if>
      <if test="password != null">
        `password` = #{password,jdbcType=VARCHAR},
      </if>
      <if test="birthday != null">
        birthday = #{birthday,jdbcType=VARCHAR},
      </if>
    </set>
    where id = #{id,jdbcType=INTEGER}
  </update>
  <update id="updateByPrimaryKey" parameterType="com.lagou.pojo.User">
    update user
    set username = #{username,jdbcType=VARCHAR},
      `password` = #{password,jdbcType=VARCHAR},
      birthday = #{birthday,jdbcType=VARCHAR}
    where id = #{id,jdbcType=INTEGER}
  </update>
</mapper>
5.UserService接口及实现类编写
public interface UserService {
    /**
     * 查询所有
     * @return
     */
    List<User> queryAll();

    /**
     * 通过ID查询
     * @param id
     * @return
     */
    User findById(Integer id);

    /**
     * 新增
     * @param user
     */
    void insert(User user);

    /**
     * 通过ID删除
     * @param id
     */
    void deleteById(Integer id);

    /**
     * 修改
     * @param user
     */
    void update(User user);
}
@Service
public class UserServiceImpl implements UserService {

    @Autowired
    private UserMapper userMapper;

    @Override
    public List<User> queryAll() {
        return userMapper.queryAll();
    }

    @Override
    public User findById(Integer id) {
        return userMapper.selectByPrimaryKey(id);
    }

    @Override
    public void insert(User user) {
        //userMapper.insert(user);        //将除id所有的列都拼SQL
        userMapper.insertSelective(user); //只是将不为空的列才拼SQL
    }

    @Override
    public void deleteById(Integer id) {
        userMapper.deleteByPrimaryKey(id);
    }

    @Override
    public void update(User user) {
        userMapper.updateByPrimaryKeySelective(user);
    }
}
6.UserController编写
@RestController
@RequestMapping("/user")
public class UserController {

    @Autowired
    private UserService userService;

    /**
     * restful格式进行访问
     * 查询:GET
     * 新增: POST
     * 更新:PUT
     * 删除: DELETE
     */

    /**
     * 查询所有
     * @return
     */
    @GetMapping("/query")
    public List<User> queryAll(){
        return userService.queryAll();
    }

    /**
     * 通过ID查询
     */
    @GetMapping("/query/{id}")
    public User queryById(@PathVariable Integer id){
        return userService.findById(id);
    }

    /**
     * 删除
     * @param id
     * @return
     */
    @DeleteMapping("/delete/{id}")
    public String delete(@PathVariable Integer id){
        userService.deleteById(id);
        return "删除成功";
    }

    /**
     * 新增
     * @param user
     * @return
     */
    @PostMapping("/insert")
    public String insert(User user){
        userService.insert(user);
        return "新增成功";
    }

    /**
     * 修改
     * @param user
     * @return
     */
    @PutMapping("/update")
    public String update(User user){
        userService.update(user);
        return "修改成功";
    }
}
7.application.yml
#服务器配置
server:
  port: 8090

#数据源配置
spring:
  datasource:
    name: druid
    type: com.alibaba.druid.pool.DruidDataSource
    url: jdbc:mysql://localhost:3306/springbootdata?characterEncoding=utf-8&serverTimezone=UTC&useSSL=false
    username: root
    password: 123456

#整合mybatis
mybatis:
  mapper-locations: classpath:mapper/*Mapper.xml
8.启动类
@SpringBootApplication
//使用的Mybatis,扫描com.boot.mapper
@MapperScan("com.boot.mapper")
public class SpringbootdemoApplication {
    public static void main(String[] args) {
        SpringApplication.run(SpringbootdemoApplication.class, args);
    }
}
9.使用Postman测试


六、Spring Boot项目部署
需求:将Spring Boot项目使用maven指令打成jar包并运行测试
分析:
- 需要添加打包组件将项目中的资源、配置、依赖包打到一个jar包中;可以使用maven的package ;
- 部署:java -jar 包名
步骤实现:
- 添加打包组件
<build>
	<plugins>
		<!-- 打jar包时如果不配置该插件,打出来的jar包没有清单文件 -->
		<plugin>
			<groupId>org.springframework.boot</groupId>
			<artifactId>spring-boot-maven-plugin</artifactId>
		</plugin>
	</plugins>
</build>
- 部署运行
java -jar 文件名


 1503
1503


 被折叠的 条评论
为什么被折叠?
被折叠的 条评论
为什么被折叠?
 到【灌水乐园】发言


