


本次实验使用Centos7.9作为PXE引导服务器,安装的镜像也是Centos7.9
我之前有搭建过两个pxe服务器,一个使用BIOS引导,一个使用UEFI引导,可以先搭建实验一下。
bios引导:https://blog.csdn.net/qq_50247813/article/details/138596629
uefi引导:https://blog.csdn.net/qq_50247813/article/details/141001128
一、PXE 引导服务器部署
1. 下载 dhcp,tftp-server,http,syslinux
- dhcp: 用于给客户端分配地址,并指定tftp地址
- tftp-server:用于传输引导文件
- http:用于传输镜像安装文件
- syslinux:提供bios引导文件
[root@192 ~]# yum -y install dhcp tftp-server httpd syslinux
2. 挂载镜像
上传镜像到服务器
[root@192 ~]# ls /root/
anaconda-ks.cfg  CentOS-7-x86_64-DVD-2009.iso
[root@192 ~]# mount -o loop CentOS-7-x86_64-DVD-2009.iso /media/
mount: /dev/loop0 is write-protected, mounting read-only
3. 将挂载的文件拷贝到/var/www/html/ 下面并重新命名为 Centos7.9
[root@192 ~]# cp -r /media /var/www/html/Centos7.9
4. 配置ks文件
新安装的系统/root 下面会生成一个anaconda-ks.cfg文件,这个就是ks文件,这个文件不能直接拿来用需要修改一下。
rootpw --iscrypted $1$WriG9jbZ$3HCtLDoIqcDg3juOGUrXK0: 指定加密后的密码
rootpw 123456: 指定明文密码
使用openssl passwd -1 "123456"生成加密的密码
4.1. 创建bios启动ks文件
/boot/efi是用于UEFI(统一可扩展固件接口)启动的分区。在bios引导模式下不需要。所以这两个ks文件的差别就是一个有 /boot/efi 一个没有。
[root@localhost ~]# mkdir /var/www/html/bios-ks/
[root@localhost ~]# cat /var/www/html/bios-ks/ks.cfg
#version=DEVEL
# System authorization information
auth --enableshadow --passalgo=sha512
# Use http installation media
url --url=http://192.168.25.146/Centos7.9               # 获取镜像文件的方式
# Use text install
text                                                                                    # 在命令行界面安装
# Run the Setup Agent on first boot
firstboot --enable
ignoredisk --only-use=sda
# Keyboard layouts
keyboard --vckeymap=us --xlayouts='us'
# System language
lang en_US.UTF-8                                                                # 系统语言

# Network information
network  --bootproto=dhcp --device=ens33 --ipv6=auto --no-activate
network  --hostname=localhost.localdomain

# Root password
rootpw --iscrypted $1$Vddi.yNq$ixCFRPKLOhBILDyYoWPBy.           # 加密后的密码
# System services
services --enabled="chronyd"
# System timezone
timezone Asia/Shanghai --isUtc                                  # 时区设置
# System bootloader configuration
bootloader --append=" crashkernel=auto" --location=mbr --boot-drive=sda  # 设置启动盘
# Partition clearing information
# clearpart --all --drives=sda    				        #  只清除sda分区
clearpart --all --initlabel                             # 清理所有分区,这个按需要修改

# Disk partitioning information
part /boot --fstype="xfs" --ondisk=sda --size=200               # boot 分区设置大小,默认为M,不可设置单位
part /boot/efi --fstype="efi" --ondisk=sda --size=200 --fsoptions="umask=0077,shortname=winnt"
part / --fstype="xfs" --ondisk=sda --grow       # --grow 将剩余的容量全部划分

%packages                       #安装的软件包
@^minimal
@core
chrony
kexec-tools

%end

%addon com_redhat_kdump --enable --reserve-mb='auto'

%end

%anaconda
pwpolicy root --minlen=6 --minquality=1 --notstrict --nochanges --notempty
pwpolicy user --minlen=6 --minquality=1 --notstrict --nochanges --emptyok
pwpolicy luks --minlen=6 --minquality=1 --notstrict --nochanges --notempty
%end

firewall --disable              # 不启动防护墙,默认是启动
selinux  --disable              # 不启动selinux,默认是启动
reboot                          # 安装完系统后重启
4.2. 创建uefi启动ks文件
[root@localhost html]# mkdir /var/www/html/uefi-ks/
[root@localhost ~]# cat /var/www/html/uefi-ks/ks.cfg
#version=DEVEL
# System authorization information
auth --enableshadow --passalgo=sha512
# Use http installation media
url --url=http://192.168.25.146/Centos7.9               # 获取镜像文件的方式
# Use text install
text                                                                                    # 在命令行界面安装
# Run the Setup Agent on first boot
firstboot --enable
ignoredisk --only-use=sda
# Keyboard layouts
keyboard --vckeymap=us --xlayouts='us'
# System language
lang en_US.UTF-8                                                                # 系统语言

# Network information
network  --bootproto=dhcp --device=ens33 --ipv6=auto --no-activate
network  --hostname=localhost.localdomain

# Root password
rootpw --iscrypted $1$Vddi.yNq$ixCFRPKLOhBILDyYoWPBy.           # 加密后的密码
# System services
services --enabled="chronyd"
# System timezone
timezone Asia/Shanghai --isUtc                                  # 时区设置
# System bootloader configuration
bootloader --append=" crashkernel=auto" --location=mbr --boot-drive=sda  # 设置启动盘
# Partition clearing information
clearpart --all --initlabel                             # 清理所有分区,这个按需要修改
# Disk partitioning information
part /boot --fstype="xfs" --ondisk=sda --size=200               # boot 分区设置大小,默认为M,不可设置单位
part /boot/efi --fstype="efi" --ondisk=sda --size=200 --fsoptions="umask=0077,shortname=winnt"
part / --fstype="xfs" --ondisk=sda --grow       # --grow 将剩余的容量全部划分

%packages                       #安装的软件包
@^minimal
@core
chrony
kexec-tools

%end

%addon com_redhat_kdump --enable --reserve-mb='auto'

%end

%anaconda
pwpolicy root --minlen=6 --minquality=1 --notstrict --nochanges --notempty
pwpolicy user --minlen=6 --minquality=1 --notstrict --nochanges --emptyok
pwpolicy luks --minlen=6 --minquality=1 --notstrict --nochanges --notempty
%end

firewall --disable              # 不启动防护墙,默认是启动
selinux  --disable              # 不启动selinux,默认是启动
reboot                          # 安装完系统后重启
5. 配置tftp-server配置
[root@localhost ~]# cat  /etc/xinetd.d/tftp
# default: off
# description: The tftp server serves files using the trivial file transfer \
#       protocol.  The tftp protocol is often used to boot diskless \
#       workstations, download configuration files to network-aware printers, \
#       and to start the installation process for some operating systems.
service tftp
{
        socket_type             = dgram
        protocol                = udp
        wait                    = yes
        user                    = root
        server                  = /usr/sbin/in.tftpd
        server_args             = -s /var/lib/tftpboot
        disable                 = no		# 将yes改为no
        per_source              = 11
        cps                     = 100 2
        flags                   = IPv4
}
6. 配置UEFI和BIOS引导和开启配置文件
6.1. 配置BIOS引导文件
将isolinux.cfg文件重命名为default,默认的default文件需要修改一下。default 文件就BIOS的开启配置文件。
[root@localhost ~]# mkdir -p /var/lib/tftpboot/pxelinux/pxelinux.cfg
[root@localhost ~]# cp /usr/share/syslinux/pxelinux.0  /var/lib/tftpboot/pxelinux/
[root@localhost ~]# cp /media/isolinux/isolinux.cfg /var/lib/tftpboot/pxelinux/pxelinux.cfg/default
[root@localhost pxelinux.cfg]# cat  /var/lib/tftpboot/pxelinux/pxelinux.cfg/default
default linux
prompt 1
timeout 3

display boot.msg

label linux
  menu label ^Install system
  menu default
  kernel vmlinuz
  append initrd=initrd.img inst.repo=http://192.168.25.146/Centos7.9 ks=http://192.168.25.146/bios-ks/ks.cfg  quiet
- kernel vmlinuz 指定内核文件位置,不加路径默认在 /var/lib/tftpboot/pxelinux/ 目录
- initrd=initrd.img 指定启动镜像路径,不加路径默认在 /var/lib/tftpboot/pxelinux/ 目录
6.2. 配置UEFI引导文件
grub.cfg 就是UEFI的开机配置文件,默认的需要修改一下。
[root@localhost ~]# mkdir /var/lib/tftpboot/uefi/
[root@localhost ~]# cp /media/EFI/BOOT/grub.cfg /var/lib/tftpboot/uefi/
[root@localhost ~]# cp /media/EFI/BOOT/grubx64.efi /var/lib/tftpboot/uefi/
[root@localhost uefi]# cat /var/lib/tftpboot/uefi/grub.cfg
set default=0
set timeout=3

echo -e "\nWelcome to the Red Hat Enterprise Linux 7.9 installer!\n\n"

menuentry 'Red Hat Enterprise Linux 7.9' {
  linuxefi  uefi/vmlinuz inst.repo=http://192.168.25.146/Centos7.9 ks=http://192.168.25.146/uefi-ks/ks.cfg  quiet
  initrdefi uefi/initrd.img
}
7. 将内核启动文件和启动镜像拷贝到 bios和uefi的 / 目录
[root@localhost ~]# cp /media/isolinux/{vmlinuz,initrd.img} /var/lib/tftpboot/uefi/
[root@localhost ~]# cp /media/isolinux/{vmlinuz,initrd.img} /var/lib/tftpboot/pxelinux/
8. dhcp服务器配置
if option architecture-type = 00:07 判断客户端架构 00:07 标识x86架构,00:26 是arm架构。 进入if 判断后 如果是uefi客户端就使用uefi引导,如果是bios客户端就使用bios引导。
[root@localhost ~]# cat /etc/dhcp/dhcpd.conf
#
# DHCP Server Configuration file.
#   see /usr/share/doc/dhcp*/dhcpd.conf.example
#   see dhcpd.conf(5) man page

option space pxelinux;
option pxelinux.magic code 208 = string;
option pxelinux.configfile code 209 = text;
option pxelinux.pathprefix code 210 = text;
option pxelinux.reboottime code 211 = unsigned integer 32;
option architecture-type code 93 = unsigned integer 16;

subnet 192.168.25.0 netmask 255.255.255.0 {
        option routers 192.168.25.2;
        range 192.168.25.10 192.168.25.20;

        class "pxeclients" {
          match if substring (option vendor-class-identifier, 0, 9) = "PXEClient";
          next-server 192.168.25.146;

          if option architecture-type = 00:07 {
            filename "uefi/grubx64.efi";
            } else {
            filename "pxelinux/pxelinux.0";
          }
        }
}
9. 启动dhcp,tftp-server,httpd服务
[root@localhost ~]# systemctl enable httpd --now
[root@localhost ~]# systemctl enable dhcpd --now
[root@localhost ~]# systemctl enable tftp --now
[root@localhost ~]# systemctl is-active httpd
active
[root@localhost ~]# systemctl is-active dhcpd
active
[root@localhost ~]# systemctl is-active tftp
active
10. 关闭防火墙,关闭selinux
[root@localhost ~]# setenforce 0 && sed -i 's/SELINUX=enforcing/SELINUX=disabled/g' /etc/selinux/config
[root@localhost ~]# systemctl disable firewalld --now
11. 客户端测试
客户端的内存必须 >= 2G
11.1 . BIOS客户端启动

正常安装
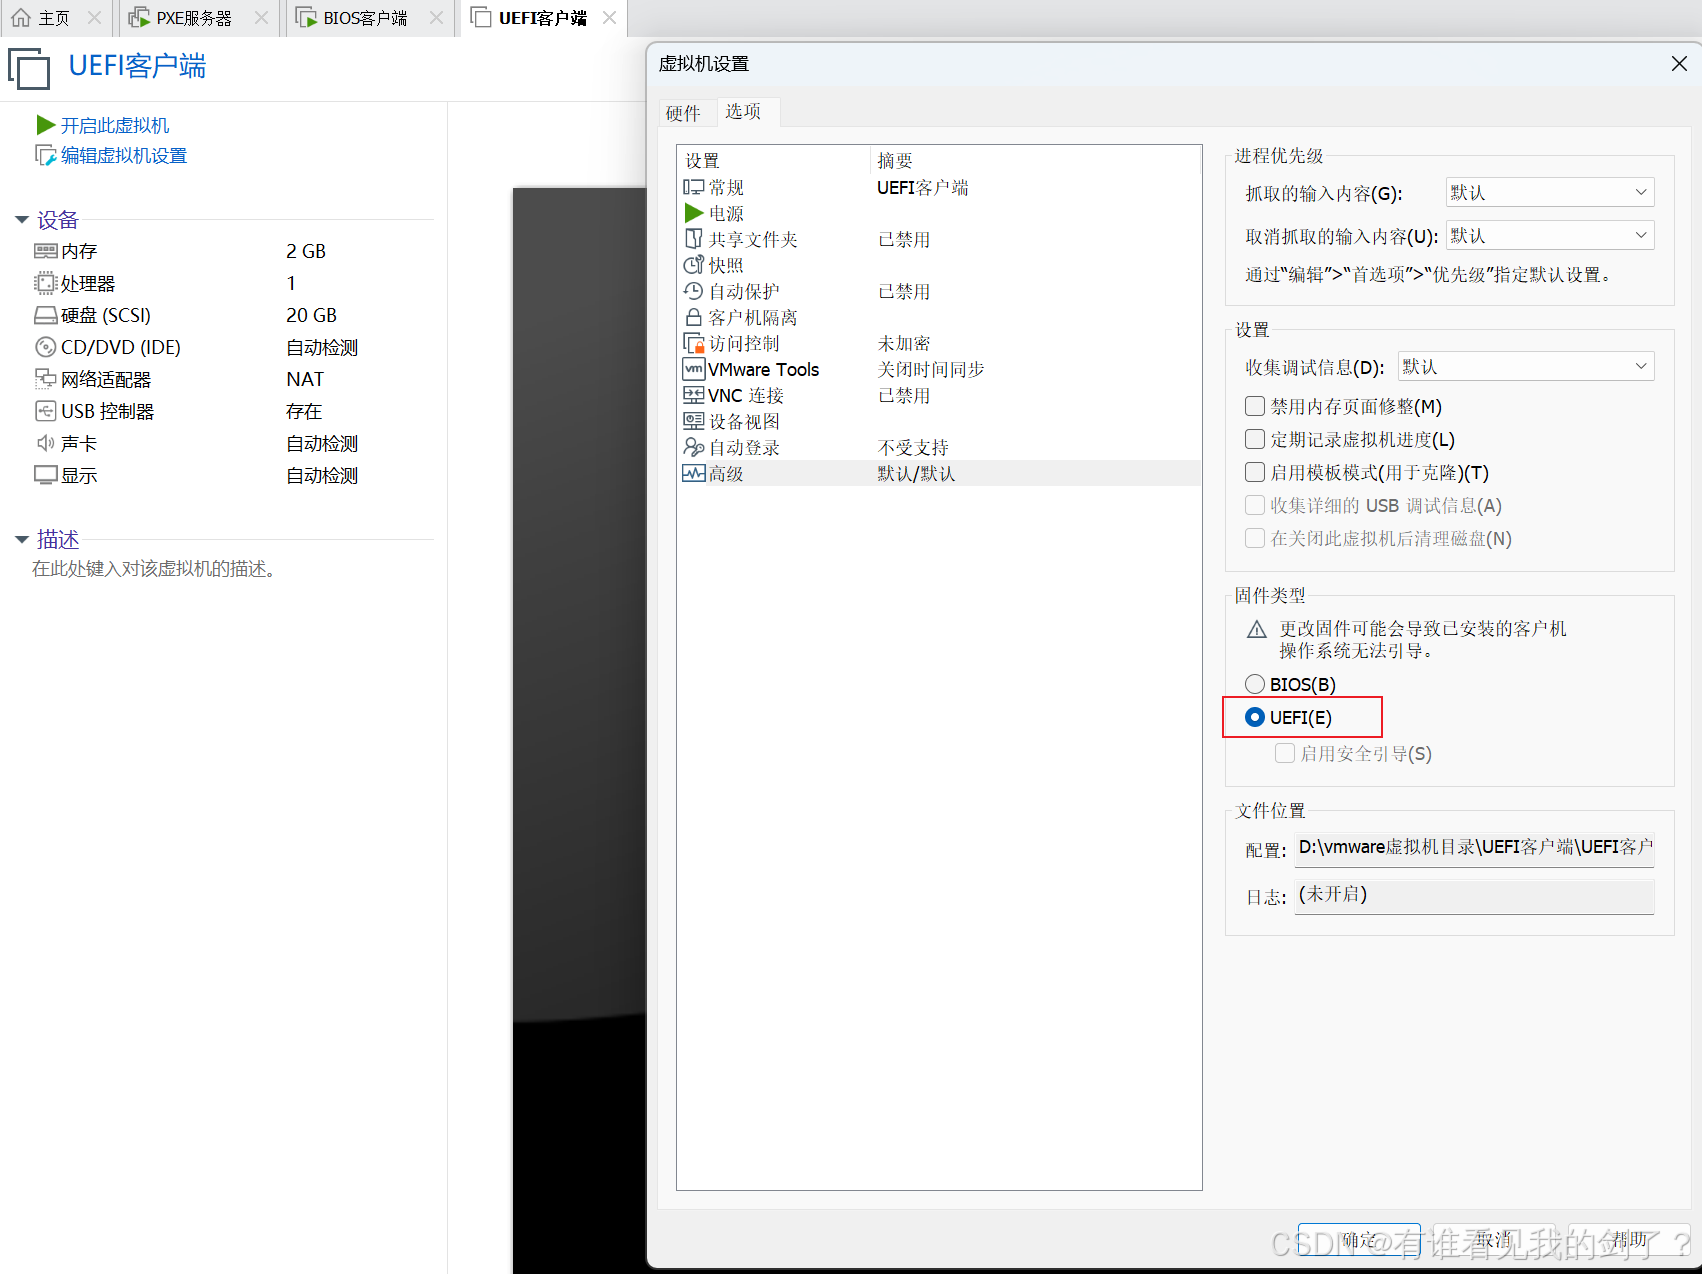
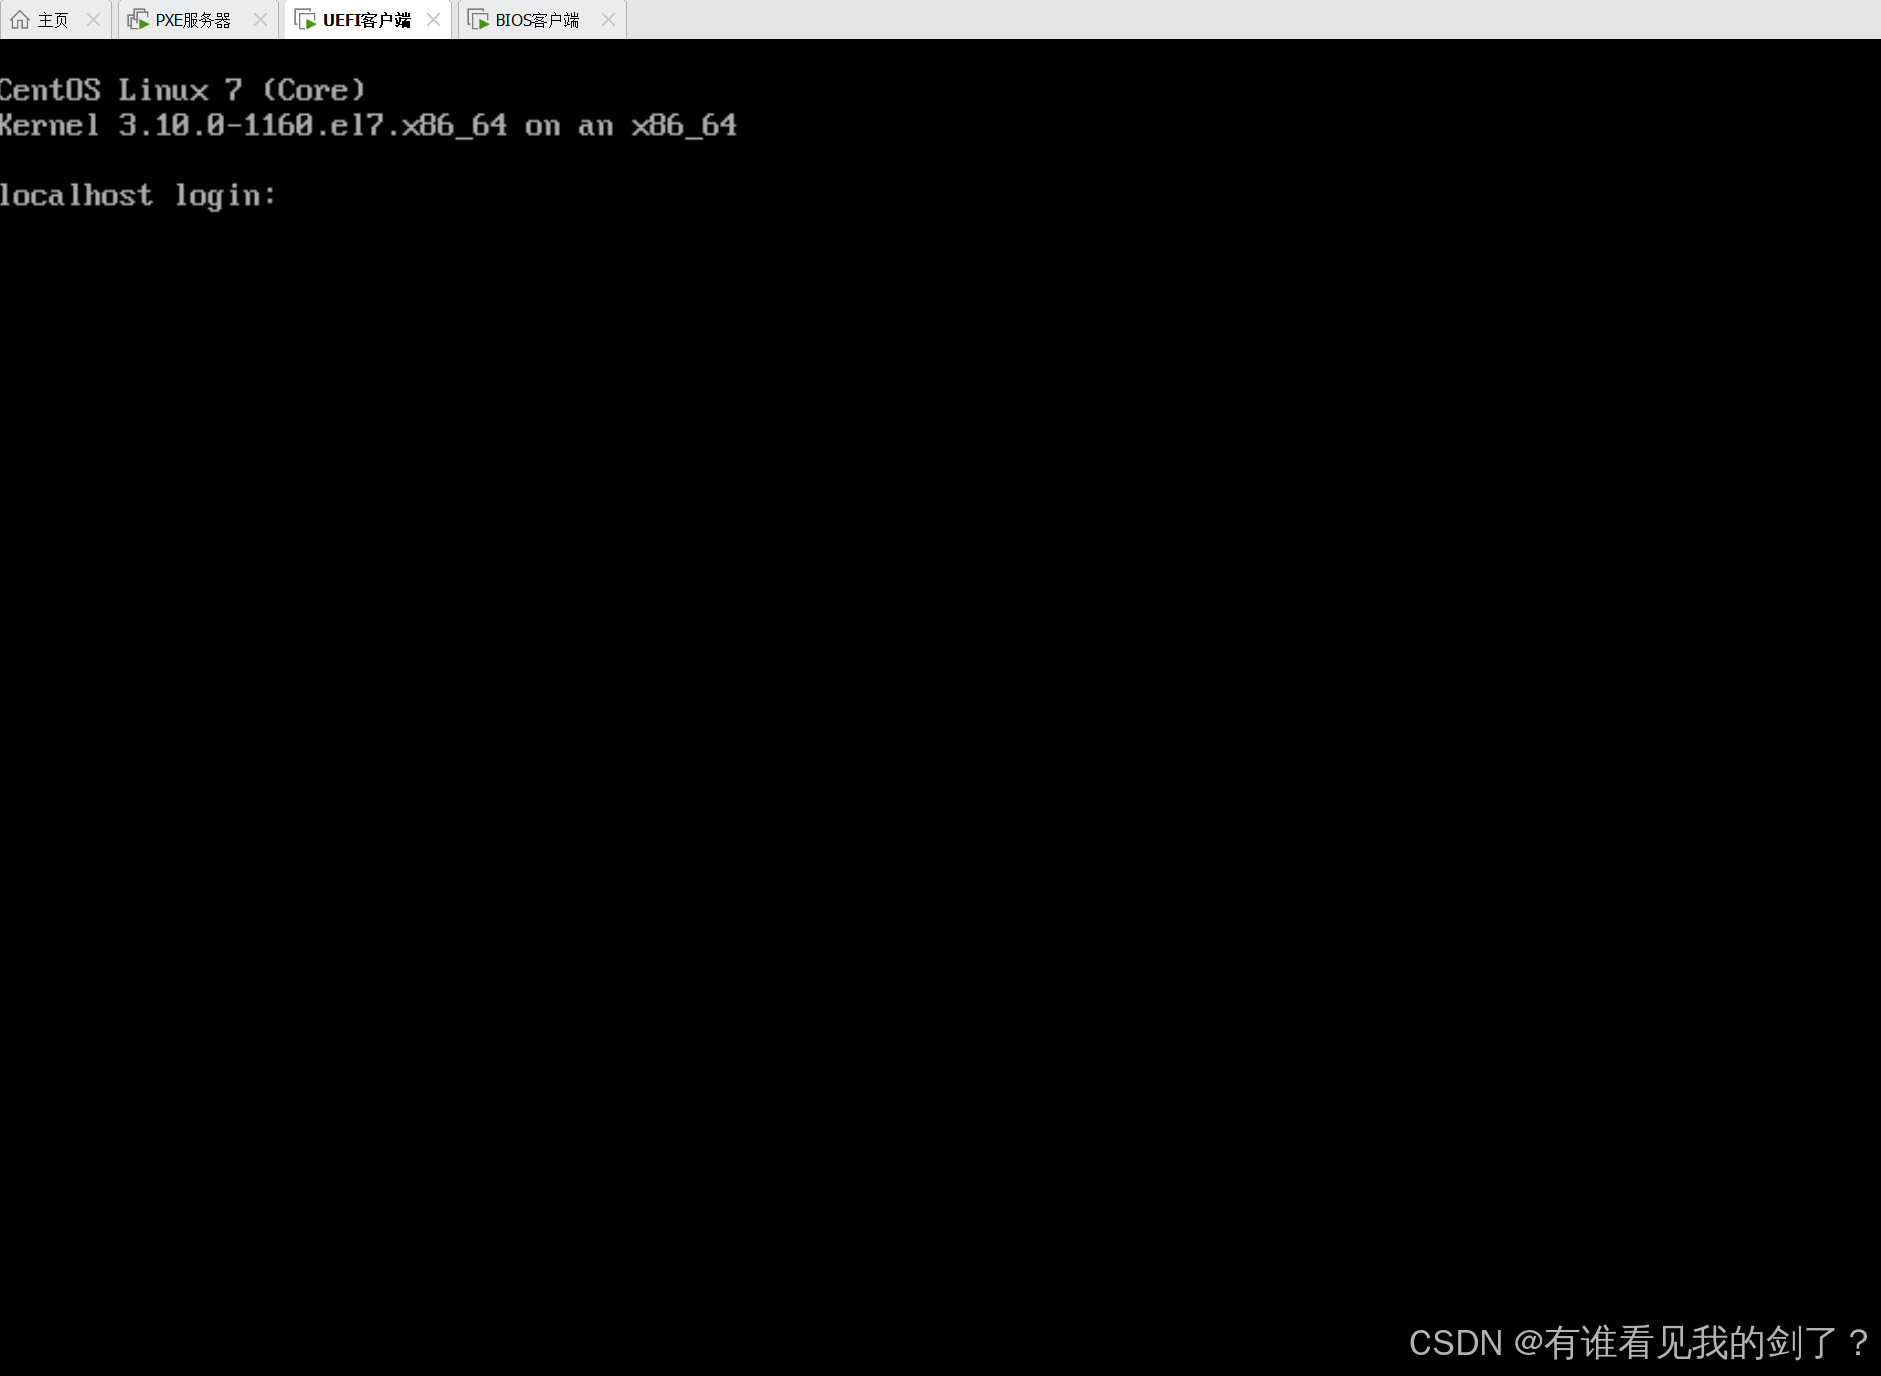
11.2 UEFI客户端启动
12. 资料参数
官网PXE安装配置:https://docs.redhat.com/zh-cn/documentation/red_hat_enterprise_linux/7/html/installation_guide/chap-installation-server-setup#sect-network-boot-setup
ks文件配置:https://docs.redhat.com/zh-cn/documentation/red_hat_enterprise_linux/7/html/installation_guide/chap-kickstart-installations
客户端要求: https://docs.redhat.com/zh-cn/documentation/red_hat_enterprise_linux/9/html/automatically_installing_rhel


 342
342

 被折叠的 条评论
为什么被折叠?
被折叠的 条评论
为什么被折叠?
 到【灌水乐园】发言


