


环境搭建
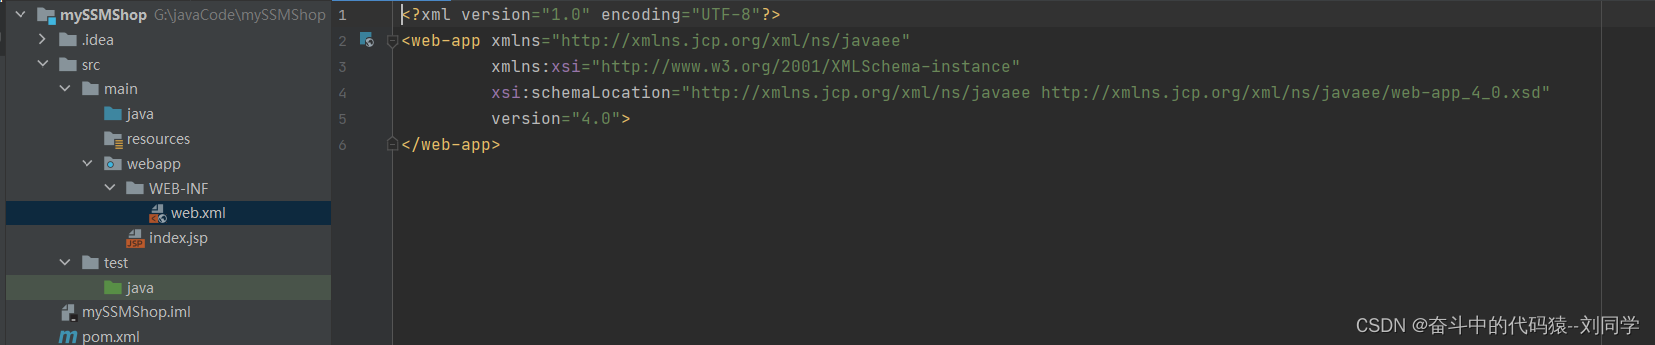
项目文件结构的修改
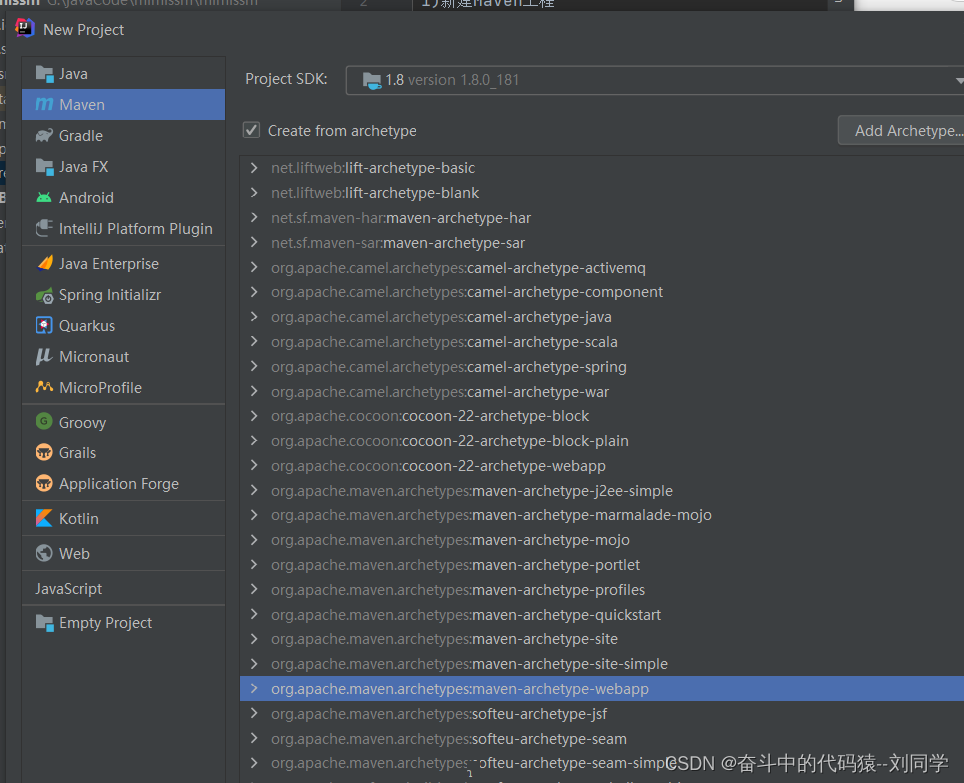
新建maven工程
修改目录和wex.xml
1)补全maven没有出现的目录 (src/main/java, src/main/rsource, src/test,src/test/java)
2)修改web.xml保证web.xml是4.0版本
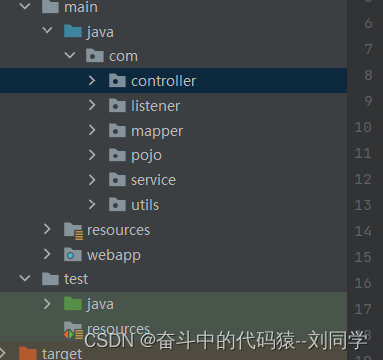
构思本项目的应该出现的基本目录
案例:基本实现项目增删改查的业务逻辑
1)pojo
javabean对象数据库的表的实体,pojo本意是简单的Java类
2)mapper
数据访问层dao,对表中数据的增删改查的接口和映射文件
3)service
业务处理层,负责处理复杂的业务逻辑
4)utils
工具包,需要的工具全部在里面
5)listener
监听器所在的包,在servlet中启动的时候干的事情
添加SSM所以的依赖和Maven插件
1)SSM依赖
集中配置依赖的版本
<!-- 集中定义依赖版本号 -->
  <properties>
<!--    单元测试-->
    <junit.version>4.12</junit.version>
<!--    spring依赖-->
    <spring.version>5.2.5.RELEASE</spring.version>
<!--    mybatis依赖-->
    <mybatis.version>3.5.1</mybatis.version>
<!--    mybatis-spring 整合依赖-->
    <mybatis.spring.version>1.3.1</mybatis.spring.version>
<!--    mybatis分页插件的版本-->
    <mybatis.paginator.version>1.2.15</mybatis.paginator.version>
<!--    mysql依赖版本-->
    <mysql.version>8.0.22</mysql.version>
<!--    日志文件依赖-->
    <slf4j.version>1.6.4</slf4j.version>
<!--    连接池依赖-->
    <druid.version>1.1.12</druid.version>
<!--    自己的分页插件版本-->
    <pagehelper.version>5.1.2</pagehelper.version>
<!--    jstl版本-->
    <jstl.version>1.2</jstl.version>
<!--    servlet依赖-->
    <servlet-api.version>3.0.1</servlet-api.version>
<!--    jsp依赖-->
    <jsp-api.version>2.0</jsp-api.version>
<!--    json工具依赖-->
    <jackson.version>2.9.6</jackson.version>
  </properties>
SSM所需要的依赖
<dependencies>
    <!-- spring -->

<!--    上下文-->
    <dependency>
      <groupId>org.springframework</groupId>
      <artifactId>spring-context</artifactId>
      <version>${spring.version}</version>
    </dependency>
<!--    spring的bean工程-->
    <dependency>
      <groupId>org.springframework</groupId>
      <artifactId>spring-beans</artifactId>
      <version>${spring.version}</version>
    </dependency>
<!--    mvc-->
    <dependency>
      <groupId>org.springframework</groupId>
      <artifactId>spring-webmvc</artifactId>
      <version>${spring.version}</version>
    </dependency>
<!--    jdbc-->
    <dependency>
      <groupId>org.springframework</groupId>
      <artifactId>spring-jdbc</artifactId>
      <version>${spring.version}</version>
    </dependency>
<!--    aop的实现-->
    <dependency>
      <groupId>org.springframework</groupId>
      <artifactId>spring-aspects</artifactId>
      <version>${spring.version}</version>
    </dependency>
    <dependency>
      <groupId>org.springframework</groupId>
      <artifactId>spring-jms</artifactId>
      <version>${spring.version}</version>
    </dependency>
<!--    上下文的支持-->
    <dependency>
      <groupId>org.springframework</groupId>
      <artifactId>spring-context-support</artifactId>
      <version>${spring.version}</version>
    </dependency>

<!--    spring 自己的测试-->
    <dependency>
      <groupId>org.springframework</groupId>
      <artifactId>spring-test</artifactId>
      <version>${spring.version}</version>
    </dependency>
    <!-- Mybatis -->

<!--    mybatis依赖-->
    <dependency>
      <groupId>org.mybatis</groupId>
      <artifactId>mybatis</artifactId>
      <version>${mybatis.version}</version>
    </dependency>
<!--    整合的依赖-->
    <dependency>
      <groupId>org.mybatis</groupId>
      <artifactId>mybatis-spring</artifactId>
      <version>${mybatis.spring.version}</version>
    </dependency>
<!--    分页有关的依赖-->
    <dependency>
      <groupId>com.github.miemiedev</groupId>
      <artifactId>mybatis-paginator</artifactId>
      <version>${mybatis.paginator.version}</version>
    </dependency>
<!--    本身分页插件的依赖-->
    <dependency>
      <groupId>com.github.pagehelper</groupId>
      <artifactId>pagehelper</artifactId>
      <version>${pagehelper.version}</version>
    </dependency>
    <!-- MySql -->
    <dependency>
      <groupId>mysql</groupId>
      <artifactId>mysql-connector-java</artifactId>
      <version>${mysql.version}</version>
    </dependency>
    <!-- 连接池 -->
    <dependency>
      <groupId>com.alibaba</groupId>
      <artifactId>druid</artifactId>
      <version>${druid.version}</version>
    </dependency>

    <!-- junit -->
    <dependency>
      <groupId>junit</groupId>
      <artifactId>junit</artifactId>
      <version>${junit.version}</version>
      <scope>test</scope>
    </dependency>
    <!-- JSP相关 -->
    <dependency>
      <groupId>jstl</groupId>
      <artifactId>jstl</artifactId>
      <version>${jstl.version}</version>
    </dependency>
<!--    servlet-->
    <dependency>
      <groupId>javax.servlet</groupId>
      <artifactId>javax.servlet-api</artifactId>
      <version>3.0.1</version>
      <scope>provided</scope>
    </dependency>
<!--    servlet-->
    <dependency>
      <groupId>javax.servlet</groupId>
      <artifactId>jsp-api</artifactId>
      <scope>provided</scope>
      <version>${jsp-api.version}</version>
    </dependency>
    <!-- Jackson Json处理工具包 -->
    <dependency>
      <groupId>com.fasterxml.jackson.core</groupId>
      <artifactId>jackson-databind</artifactId>
      <version>${jackson.version}</version>
    </dependency>
    <dependency>
      <groupId>org.json</groupId>
      <artifactId>json</artifactId>
      <version>20140107</version>
    </dependency>

    <!--    文件异步上传使用的依赖-->
    <dependency>
      <groupId>commons-io</groupId>
      <artifactId>commons-io</artifactId>
      <version>2.4</version>
    </dependency>
    <dependency>
      <groupId>commons-fileupload</groupId>
      <artifactId>commons-fileupload</artifactId>
      <version>1.3.1</version>
    </dependency>
  </dependencies>
识别所有的配置文件,资源文件的添加
   <resources>
      <resource>
        <directory>src/main/java</directory>
        <includes>
          <include>**/*.properties</include>
          <include>**/*.xml</include>
        </includes>
        <filtering>false</filtering>
      </resource>
      <resource>
        <directory>src/main/resources</directory>
        <includes>
          <include>**/*.properties</include>
          <include>**/*.xml</include>
        </includes>
        <filtering>false</filtering>
      </resource>
    </resources>
框架配置文件的创建
思路
数据访问层—>业务逻辑层—>控制层---->页面层
Mybatis框架的配置
1,jdbc.porperties到resources目录下
jdbc.driver=com.mysql.cj.jdbc.Driver
jdbc.url=jdbc:mysql://localhost:3306/xiaomissm?useSSL=false&serverTimezone=Asia/Shanghai&allowPublicKeyRetrieval=true
jdbc.username=root
jdbc.password=123456
解释为啥是,jdbc.开始的
1)让文件的名字能见知意,知道是那一name,pwd等等
2)是为了在读取配置文件中,可以直接读取(${jdbc.username})到jdbc.username,如果不加前缀,那么username就会默认是系统的名称,并不是数据库的usename
2, 配置mytatis.xml
<?xml version="1.0" encoding="UTF-8" ?>
<!DOCTYPE configuration PUBLIC "-//mybatis.org//DTD Config 3.0//EN"
        "http://mybatis.org/dtd/mybatis-3-config.dtd">
<configuration>
    <!--    分页插件的位置在sql执行前设置了拦截器,追加了limit分页-->
    <!--    mybatis的配置文件全部被整合到了spring的配置文件中去
    属性文件的读取,
    dbsource的创建,
    实体类文件的注册,
    mapper文件的注册,
    在spring的dao层xml
    -->
    <!--    开启日志-->
    <settings>
        <setting name="logImpl" value="STDOUT_LOGGING" />
    </settings>

    <!--配置插件-->
    <plugins>
        <plugin interceptor="com.github.pagehelper.PageInterceptor" />
    </plugins>


</configuration>
3.创建application_dao.xml配置使用spring连接数据库
原因是:spring已经整合了,mybatis连接数据库的配置全部在spring的配置文件里面
<?xml version="1.0" encoding="UTF-8"?>
<beans xmlns="http://www.springframework.org/schema/beans"
       xmlns:xsi="http://www.w3.org/2001/XMLSchema-instance"
       xmlns:context="http://www.springframework.org/schema/context"
       xsi:schemaLocation="http://www.springframework.org/schema/beans http://www.springframework.org/schema/beans/spring-beans.xsd http://www.springframework.org/schema/context https://www.springframework.org/schema/context/spring-context.xsd">
<!--读取jdbc.properties文件-->
<context:property-placeholder location="classpath:jdbc.properties"/>
<!--    创建数据源-->
<!--    加入jdbc的原因是,确保连接的是配置文件里面的username,而默认情况下不加jdbc.的话,获取的是本机的连接名字-->
<bean id="dataSource" class="com.alibaba.druid.pool.DruidDataSource" init-method="init" destroy-method="close">
    <property name="driverClassName" value="${jdbc.driver}"></property>
    <property name="url" value="${jdbc.url}"></property>
    <property name="username" value="${jdbc.username}"></property>
    <property name="password" value="${jdbc.password}"></property>
</bean>
<!--    创建sqlsessionFactoryBean, 不用添加id,只是拿出来直接使用-->
    <bean  class="org.mybatis.spring.SqlSessionFactoryBean">
<!--        配置数据源-->
        <property name="dataSource" ref="dataSource"/>
<!--        配置mybatis.xml配置-->
        <property name="configLocation" value="classpath:SqlMapConfig.xml"/>
<!--        配置实体类,就是为了给实体类起一个别名,pojo表示的是普通的Java类,现在没有,等一会,逆向工程出来-->
        <property name="typeAliasesPackage" value="com.pojo"/>
    </bean>

<!--    创建mapper文件的扫描器-->
<bean class="org.mybatis.spring.mapper.MapperScannerConfigurer">
    <!--        对应的dao类所在的包,mapper表示的是数据库的dao类,现在没有,等一会,逆向工程出来-->
    <property name="basePackage" value="com.mapper"></property>
</bean>

</beans>
service层的applicationContext_service.xml配置
内容:
1)扫描@service注解的包
2)添加项目中可能用的的事务
<?xml version="1.0" encoding="UTF-8"?>
<beans xmlns="http://www.springframework.org/schema/beans"
       xmlns:xsi="http://www.w3.org/2001/XMLSchema-instance"
       xmlns:context="http://www.springframework.org/schema/context" xmlns:tx="http://www.springframework.org/schema/tx"
       xmlns:aop="http://www.springframework.org/schema/aop"
       xsi:schemaLocation="http://www.springframework.org/schema/beans http://www.springframework.org/schema/beans/spring-beans.xsd http://www.springframework.org/schema/context https://www.springframework.org/schema/context/spring-context.xsd http://www.springframework.org/schema/tx http://www.springframework.org/schema/tx/spring-tx.xsd http://www.springframework.org/schema/aop https://www.springframework.org/schema/aop/spring-aop.xsd">
<!--业务逻辑层的配置文件-->
<!--    设置逻辑包扫描器,指定路径下,创建@service,创建对象,并且添加到spring容器里面-->
<context:component-scan base-package="com.service"/>
<!--    前台处理的时候,就需要,添加事务,订单的多表保存的时候等等-->

<!--    设置事务管理器-->
<!--    为啥会爆红,因为此时dao.xml和service.xml并不认识,解决的话可以使用import导入
dao.xml不建议,因为会导致,重复导入的现象,我们一般采用的是,在web.xml注册,保证在初始化的时候将两个文件都注入


-->
<!--    mybatis框架自己有一个事务的管理对象,里面必须设置,一个数据源属性-->
    <bean id="transactionManager" class="org.springframework.jdbc.datasource.DataSourceTransactionManager">
        <property name="dataSource" ref="dataSource"></property>

    </bean>
<!--    添加事务的切面-->
    <tx:advice id="myadvice" transaction-manager="transactionManager">

        <tx:attributes>
<!--            name是参加事务的方法,并且这些方法必须有统一命名的规范-->
<!--         select   只要有查询的过程中就是只读状态-->
            <tx:method name="*select*" read-only="true"/>
            <tx:method name="*find*" read-only="true"/>
            <tx:method name="*get*" read-only="true"/>
            <tx:method name="*search*" read-only="true"/>
<!--增,删,改,根据事务的传播行为必须是可以添加事务的-->
<!--            增加-->
            <tx:method name="*insert*" propagation="REQUIRED"></tx:method>
            <tx:method name="*add*" propagation="REQUIRED"></tx:method>
            <tx:method name="*save*" propagation="REQUIRED"></tx:method>
<!--            删除-->
            <tx:method name="*delete*" propagation="REQUIRED"></tx:method>
            <tx:method name="*remove*" propagation="REQUIRED"></tx:method>
            <tx:method name="*clear*" propagation="REQUIRED"></tx:method>
<!--            更新-->
            <tx:method name="*update*" propagation="REQUIRED"></tx:method>
            <tx:method name="*modify*" propagation="REQUIRED"></tx:method>
            <tx:method name="*set*" propagation="REQUIRED"></tx:method>
<!--如果都不是上述的方法,就是支持事务,就行-->
            <tx:method name="*" propagation="SUPPORTS"></tx:method>

        </tx:attributes>
    </tx:advice>
<!--    完成切面和切入点的绑定(织入)-->
<!--    确定在那个类中添加这些,切面中的方法-->
    <aop:config>
<!--        任意的返回值,在com.service下面的所有的类,下面的所有的方法(满足事务规范的命名的层),任意的参数-->
        <aop:pointcut id="mypointcut" expression="execution(* com.service.*.*(..))"/>
<!--        绑定-->
        <aop:advisor advice-ref="myadvice" pointcut-ref="mypointcut"></aop:advisor>
    </aop:config>

</beans>
控制层的配置文件springMVC.xml
内容:
1)包扫描器,负责扫描,@control注解所在的包
2)视图解析器,负责拼接响应后的地址
3)文件上传的核心组件
4)注解驱动,类型转换,json返回,等等
<?xml version="1.0" encoding="UTF-8"?>
<beans xmlns="http://www.springframework.org/schema/beans"
       xmlns:xsi="http://www.w3.org/2001/XMLSchema-instance"
       xmlns:context="http://www.springframework.org/schema/context"
       xmlns:mvc="http://www.springframework.org/schema/mvc"
       xsi:schemaLocation="http://www.springframework.org/schema/beans http://www.springframework.org/schema/beans/spring-beans.xsd http://www.springframework.org/schema/context https://www.springframework.org/schema/context/spring-context.xsd http://www.springframework.org/schema/mvc https://www.springframework.org/schema/mvc/spring-mvc.xsd">
<!--设置包扫描器-->
    <context:component-scan base-package="com.controller"/>


<!--    设置视图解析器-->
    <bean id="viewResolver" class="org.springframework.web.servlet.view.InternalResourceViewResolver">
        <property name="prefix" value="/admin/"/>
        <property name="suffix" value=".jsp"/>
    </bean>
<!--    设置文件上传的核心组件-->
<!--    文件上传必须使用 multipartResolver 小写这个名字-->
<bean id="multipartResolver" class="org.springframework.web.multipart.commons.CommonsMultipartResolver">

</bean>

<!--    设置注解驱动-->
<!--    数据类型的转换,json返回,都需要-->
<mvc:annotation-driven></mvc:annotation-driven>
</beans>
在web.xml注册spring和springMVC并且设置过滤器防止中文乱码
<?xml version="1.0" encoding="UTF-8"?>
<web-app xmlns="http://xmlns.jcp.org/xml/ns/javaee"
         xmlns:xsi="http://www.w3.org/2001/XMLSchema-instance"
         xsi:schemaLocation="http://xmlns.jcp.org/xml/ns/javaee http://xmlns.jcp.org/xml/ns/javaee/web-app_4_0.xsd"
         version="4.0">
<!--    post请求必须指定中文编码-->
<!--    添加字符编码过滤器-->
    <filter>
        <filter-name>encode</filter-name>
        <filter-class>org.springframework.web.filter.CharacterEncodingFilter</filter-class>
        <init-param>
            <param-name>encoding</param-name>
            <param-value>UTF-8</param-value>

        </init-param>
<!--        强制设置请求编码-->
        <init-param>
            <param-name>forceRequestEncoding</param-name>
            <param-value>true</param-value>
        </init-param>
<!--强制设置响应编码-->
        <init-param>
            <param-name>forceResponseEncoding</param-name>
            <param-value>true</param-value>
        </init-param>
    </filter>
    <filter-mapping>
        <filter-name>encode</filter-name>
        <url-pattern>/*</url-pattern>
    </filter-mapping>
<!--    注册springmvc配置文件-->
<!--    核心处理器-->
    <servlet>
        <servlet-name>spirngmvc</servlet-name>
        <servlet-class>org.springframework.web.servlet.DispatcherServlet</servlet-class>
<!--        设置配置文件路径-->
        <init-param>
            <param-name>contextConfigLocation</param-name>
            <param-value>classpath:springmvc.xml</param-value>
        </init-param>
    </servlet>
    <servlet-mapping>
        <servlet-name>spirngmvc</servlet-name>
<!--        在这里配置了*.action那么后台的映射文件RequestMapper(value="split")不用写出split.action,默认自己会加上.action去-->
        <url-pattern>*.action</url-pattern>
    </servlet-mapping>

<!--    注册spring配置文件-->
<!--    由监听器注册,在初始化的时候,创建,webApplication 对象并把它放到spring容器里面-->
    <listener>
<!--        默认读取spring.xml路径是web-inf路径下-->
        <listener-class>org.springframework.web.context.ContextLoaderListener</listener-class>

    </listener>
<!--    指定spring读取xml路径-->
    <context-param>
        <param-name>contextConfigLocation</param-name>
        <param-value>classpath:applicationContext_*.xml</param-value>
    </context-param>
</web-app>
以上就是ssm环境配置的所以
接下来有关ssm商城的项目可以一看


 848
848


 被折叠的 条评论
为什么被折叠?
被折叠的 条评论
为什么被折叠?
 到【灌水乐园】发言


