


一、Qt资源下载
Qt库(Qt Framework):Qt中的库文件
链接: https://download.qt.io/archive/qt/4.8/4.8.7/.
Qtcreator(IDE):也就是我们的集成开发环境
qtcreator的版本可以随意,我这里选择的是4.4.1的
链接: https://download.qt.io/archive/qtcreator/.

编译器使用RHEL7.3的,无需下载;操作位数都为64位

二、开始安装
因后续都需要root权限,这里直接
su
1.qtcreator安装
下载的安装包赋权才可以运行
chmod 777 qt-creator-opensource-linux-x86_64-4.4.1.run
./qt-creator-opensource-linux-x86_64-4.4.1.run
进入QtCreator安装界面,指定安装位置,我的位置是/opt/qtcreator-4.4.1
然后就是按照提示一直到安装结束
安装好了QtCreator后,可以运行,但是却什么也做不了,因为还没有安装Qt库也就是Qt4.8.7
2.安装Qt4.8.7(Qt的库)
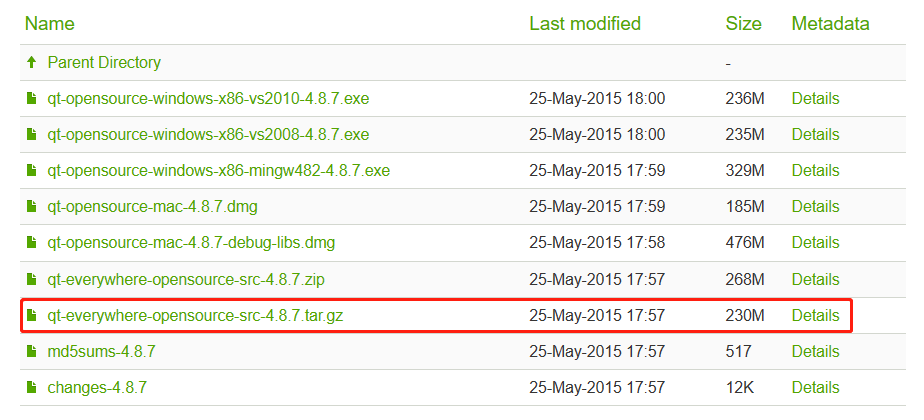
因为是源码,所以,我们需要对它进行编译,然后安装。
首先解压
tar -zxvf qt-everywhere-opensource-src-4.8.7.tar.gz
进入目录并配置
cd qt-everywhere-opensource-src-4.8.7
./configure
输入好配置命令后,会有一些提示
输入c并且回车,表示使用社区版
输入o并且回车,表示使用开源版
这里我选择o
然后输入yes并且回车,表示同意协议
3.出错处理

这个错误因为在一台机器上创建了文件,在另一台机器上运行,由于两台机器时间不同步,出项上述warning
使用date -s [time or date]修改时间
date -s 03/09/2023
date -s 17:00:10
接着再次出错
Basic XLib functionality test failed!
You might need to modify the include and library search paths by editing QMAKE_INCDIR_X11 and QMAKE_LIBDIR_X11 in /home/zhu/Qt/qt-x11 opensource-src-4.8.7/mkspecs/linux-g++
这个错误是因为,XLib库没有安装
解决办法:
yum install libX11-dev libXext-dev libXtst-dev
使用yum命令需要网络,开始配网
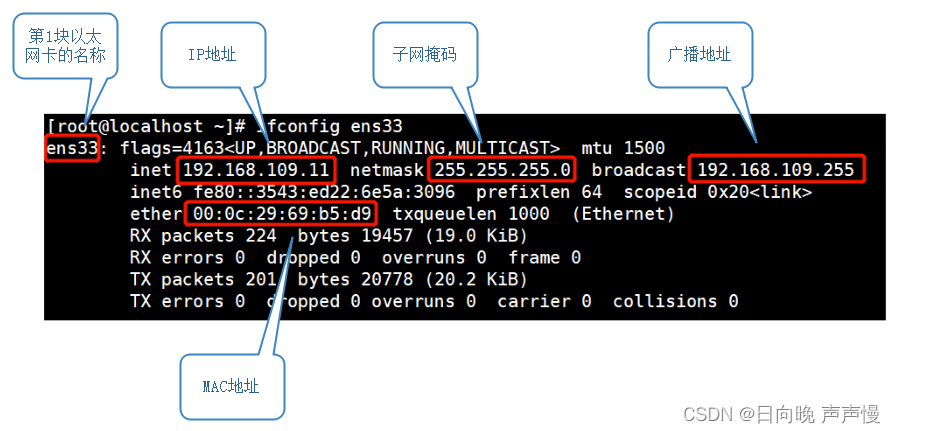
查看ip
ifconfig
修改ip
ifconfig enp4s0 192.168.186.99(下图是网上的,修改时以实际网卡、ip为准)
网络接口的配置
文件名格式为"ifcfg-XXX",其中"XXX"是网络接口的名称,例如:网卡ens33的配置文件是"ifcfg-ens33",回环接口lo的配置文件是"ifcfg-lo"
vi /etc/sysconfig/network-script/ifcfg-enp4s0
(下图是网上的,修改时以实际网卡、ip为准)

当修改了网络接口的配置文件以后,若要使新的配置生效,可以重新启动 network 服务或者重启主机
systemctl restart network
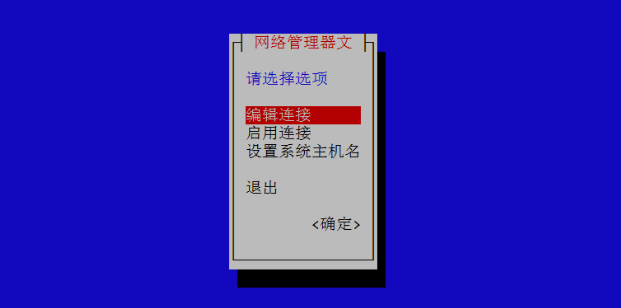
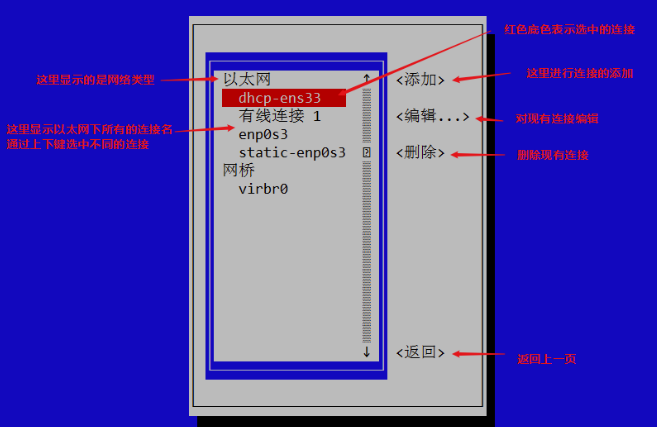
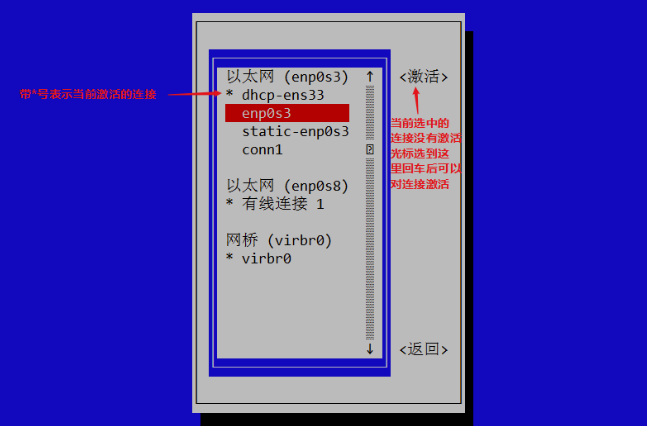
此外,在实际的使用中我还做了以下设置
nmtui
(下图是网上的,修改时以实际网卡、ip为准)


到这里网络配置就完成了,做一个检测
ping 192.168.186.1(ping 网关)
ping www.baidu.com(ping 8.8.8.8)
如果都可以ping通,网络就没有问题了
再次使用yum
yum install libX11-dev libXext-dev libXtst-dev
出现以下问题
[root@]localhost gt-everywhere-opensource-src-4.8.7]# yum nstal libx11-dev
http://mirror.centos.org/centos/5/addons/x86 64/repodata/repomd.xml: [Errno 14] HTTP Error 404 - Not FoundTrving other mirror.
To address this issue please refer to the below knowledge base article.https://access.redhat .com/articles/1320623
If above article doesn't help to resolve this issue please open a ticket with Red Hat Support
One of the confiqured repositories failedand yum doesn't have enough cached data to continue. At this point the onlysafe thing yum can do is fail. There are a few ways to work "fix" this!
1.Contact the upstream for the repository and get them to fix the problemfor the repository, to point to a working
2.Reconfigure the baseurl/etc.upstream. This is most often useful if you are using a newenelenseraentitoi yand thdistribution release than is supported by thepackages for the previous distributiom!
3.Run the command with the repositorytemporarily disable
...原因是redhat系统尽管默认带有yum,但是redhat的更新包只对注册用户有效(收费)。所以需要更换yum源
基本的流程就是:
1.删除redhat7.0系统自带的yum软件包;
2.自行下载所需要的软件包;
3.根据依赖项安装;
4.新建repo配置文件。
一般来说,之后就可以正常使用了。可能还会遇到一些依赖项的问题,后面会提到。
1.查看自带的yum软件包
rpm -qa | grep yum记下这些软件包名字
yum-utils-1.1.31-24.el7.noarch
yum-langpacks-0.4.2-3.el7.noarch
yum-metadata-parser-1.1.4-10.el7.x86_64
yum-rhn-plugin-2.0.1-4.el7.noarch
PackageKit-yum-0.8.9-11.el7.x86_64
yum-3.4.3-118.el7.noarch
2.卸载这些安装包
rpm -qa | grep yum | xargs rpm -e --nodeps3.保证上网正常
ping www.baidu.com
4.进入以下网站下载对应的rpm包
阿里云网络源地址:https://mirrors.aliyun.com/centos/7/os/x86_64/Packages/
网易163网络源地址:http://mirrors.163.com/
CentOS网络源地址:http://centos.ustc.edu.cn/centos/
使用CTRL+F输入关键字查找对应的安装包即可。
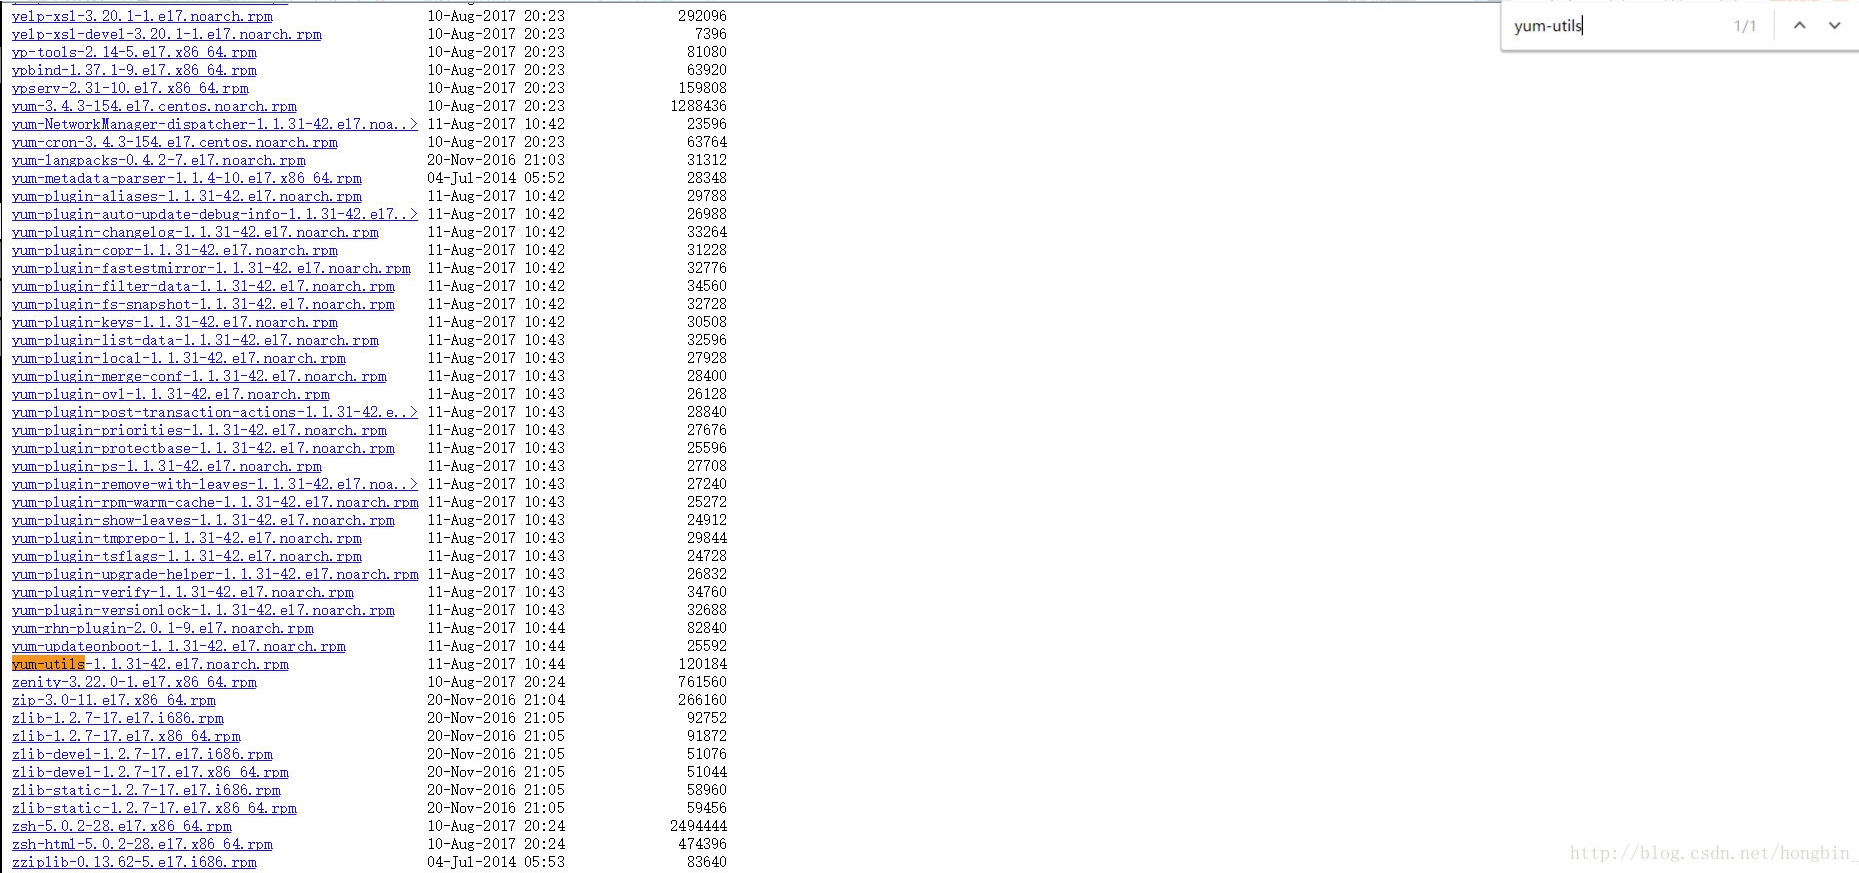
5.下载
因为镜像站中的安装包时常更新,所以下载链接有时效性。
正确的办法是在开源镜像站里搜索流程1中的包,找到对应的当前版本下载。
在找到的安装包链接处右键选择复制下载链接,然后在Linux终端使用wget + 复制的下载地址进行下载。
6.安装
输入指令rpm -ivh yum-*,遇到报错,依赖项问题。
[root@linuxprobe home]# rpm -ivh yum-*
warning: yum-3.4.3-158.el7.centos.noarch.rpm: Header V3 RSA/SHA256 Signature, key ID f4a80eb5: NOKEY
error: Failed dependencies:
    python-urlgrabber >= 3.10-8 is needed by yum-3.4.3-158.el7.centos.noarch
    rpm >= 0:4.11.3-22 is needed by yum-3.4.3-158.el7.centos.noarch
另外再回去找安装包下载下来:
wget http://mirrors.163.com/centos/7/os/x86_64/Packages/rpm-4.11.3-32.el7.x86_64.rpm
wget http://mirrors.163.com/centos/7/os/x86_64/Packages/python-urlgrabber-3.10-8.el7.noarch.rpm
输入指令更新rpm:
rpm -Uvh rpm-4.11.3-32.el7.x86_64.rpm --nodeps
rpm -Uvh python-urlgrabber-3.10-8.el7.noarch.rpm --nodeps
再次运行rpm -ivh yum-*
[root@linuxprobe home]# rpm -ivh yum-*
warning: yum-3.4.3-158.el7.centos.noarch.rpm: Header V3 RSA/SHA256 Signature, key ID f4a80eb5: NOKEY
Preparing...                          ################################# [100%]
Updating / installing...
   1:yum-metadata-parser-1.1.4-10.el7 ################################# [ 25%]
   2:yum-plugin-fastestmirror-1.1.31-4################################# [ 50%]
   3:yum-3.4.3-158.el7.centos         ################################# [ 75%]
   4:yum-utils-1.1.31-45.el7          ################################# [100%]
[root@linuxprobe home]#
如果在下载完依赖包后还是显示无法安装可以使用“rpm -ivh --force --nodeps yum-*”命令强制安装所下载的所有YUM相关安装包。
7.新建repo配置文件
vim /etc/yum.repos.d/CentOS-Base.repo输入以下内容:
**建议直接将/etc/yum.repos.d/CentOS-Base.repo中的文件直接替换成此文**
#CentOS-Base.repo
#
# The mirror system uses the connecting IP address of the client and the
# update status of each mirror to pick mirrors that are updated to and
# geographically close to the client.  You should use this for CentOS updates
# unless you are manually picking other mirrors.
#
# If the mirrorlist= does not work for you, as a fall back you can try the
# remarked out baseurl= line instead.
#
#
[base]
name=CentOS-$7 - Base - 163.com
#mirrorlist=http://mirrorlist.centos.org/?release=$7&arch=$basearch&repo=os
baseurl=http://mirrors.163.com/centos/7/os/$basearch/
gpgcheck=1
gpgkey=http://mirrors.163.com/centos/RPM-GPG-KEY-CentOS-7

#released updates
[updates]
name=CentOS-$7 - Updates - 163.com
#mirrorlist=http://mirrorlist.centos.org/?release=$7&arch=$basearch&repo=updates
baseurl=http://mirrors.163.com/centos/7/updates/$basearch/
gpgcheck=1
gpgkey=http://mirrors.163.com/centos/RPM-GPG-KEY-CentOS-7

#additional packages that may be useful
[extras]
name=CentOS-$7 - Extras - 163.com
#mirrorlist=http://mirrorlist.centos.org/?release=$7&arch=$basearch&repo=extras
baseurl=http://mirrors.163.com/centos/7/extras/$basearch/
gpgcheck=1
gpgkey=http://mirrors.163.com/centos/RPM-GPG-KEY-CentOS-7

#additional packages that extend functionality of existing packages
[centosplus]
name=CentOS-$7 - Plus - 163.com
baseurl=http://mirrors.163.com/centos/7/centosplus/$basearch/
gpgcheck=1
enabled=0
gpgkey=http://mirrors.163.com/centos/RPM-GPG-KEY-CentOS-7
到这里就成功了
yum install libX11-dev libXext-dev libXtst-dev
安装成功
然后再次配置
./configure
最终生成了我们需要的Makefile
然后编译安装
gmake(此过程大约1-2小时)
gmake install(会显示安装路径,记下)
设置环境变量
vim /etc/profile
export QTDIR=/usr/local/Trolltech/Qt-4.8.7
export PATH=$QTDIR/bin:$PATH
export MANPATH=$QTDIR/man:$MANPAT
export LD_LIBRARY_PATH=$QTDIR/lib:$LD_LIBRARY_PATH
保存,让环境变量生效
source /etc/profile
测试
qmake -v
QMake version 2.01a
Using Qt version 4.8.7 in /usr/local/Trolltech/Qt-4.8.7/lib
显示版本号,表示安装完成
三、Qt4.8.7+QtCreator4.4.1配置
上面只是完成了两个包的安装,但是想要让他们协作,还是需要再进行配置的
第一步:tools>options>Build and Run
然后选择Qt Versions,使用 Browse选择刚才安装的Qt库
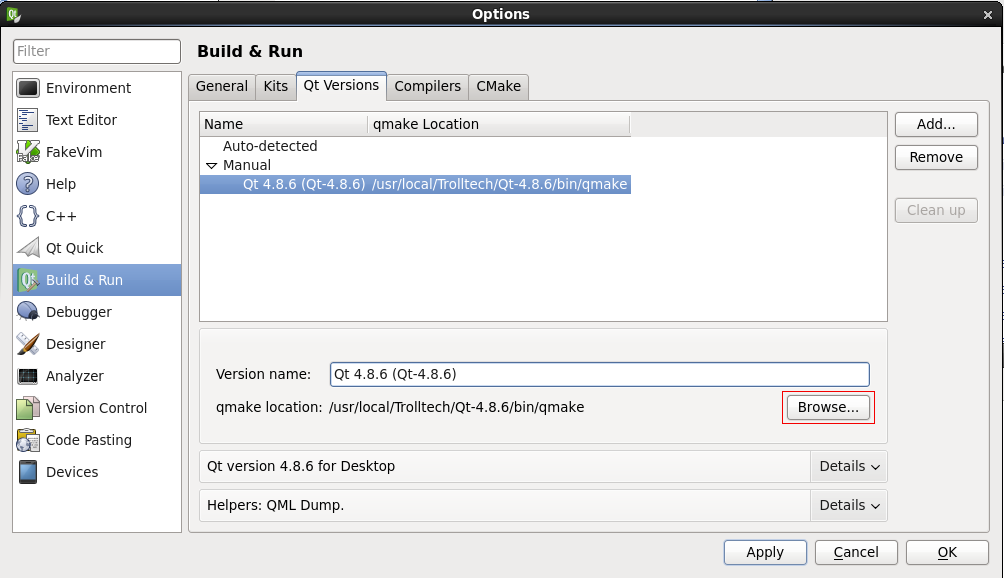
然后点击应用
第二步:选择Kits,手动添加一个,GCC,GDB会自动检测,这里需要指定Qt Version。
默认是None,选择我们刚才添加的Qt 4.8.7

然后点Apply,OK。
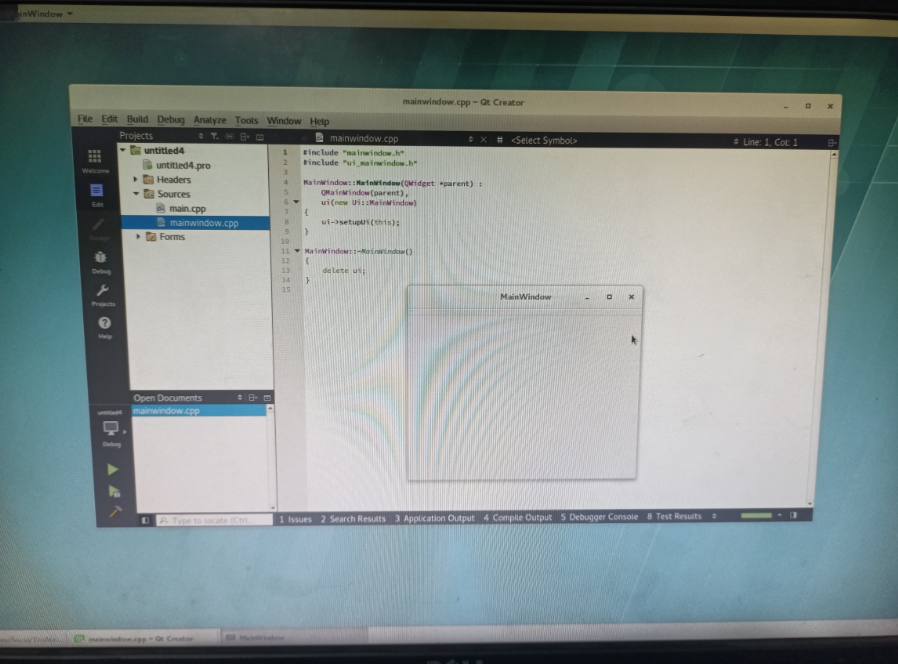
在Qt中创建工程,直接编译运行出现窗体,表示安装成功。
四、Qt4.8.7的移植
只需将Qt库生成的qmake拷贝到qtcreator中的Qt versions中
本文参考链接:
https://blog.csdn.net/qq_58397358/article/details/125128121
https://blog.csdn.net/weixin_32559261/article/details/116949081
https://blog.csdn.net/qq_45088125/article/details/124096257
https://www.cnblogs.com/pipci/p/12571469.html
https://blog.csdn.net/weixin_44025091/article/details/105372911
注:本文的配图部分来源于网络,以实际需求为准


 822
822

 被折叠的 条评论
为什么被折叠?
被折叠的 条评论
为什么被折叠?
 到【灌水乐园】发言


