


目录
4、测试使用sendMessage发送消息,服务器可以看到消息
一、安装RabbitMQ
见我的博客:windows 安装 RabbitMQ的安装包_编码语者 Dragon Wu的博客-CSDN博客
启动rabbitmq:windows rabbitmq 安装启动 - 张什么锋 - 博客园
一般访问路径: http://localhost:15672
rabbitmqctl status	//查看当前状态
rabbitmq-plugins enable rabbitmq_management	//开启Web插件
rabbitmq-server start	//启动服务
rabbitmq-server stop	//停止服务
rabbitmq-server restart	//重启服务
二、集成案例
1、为通信的服务添加依赖
        <!--依赖-->
        <dependency>
            <groupId>org.springframework.boot</groupId>
            <artifactId>spring-boot-starter-amqp</artifactId>
        </dependency>
2、配置yml
spring:
  rabbitmq:
    host: localhost
    username: guest
    password: guest
    port: 5672 # rabbitmq对外的服务端口是5672,对外的管理端口是15672
server:
  port: 8080
3、rabbitmq简单实现案例
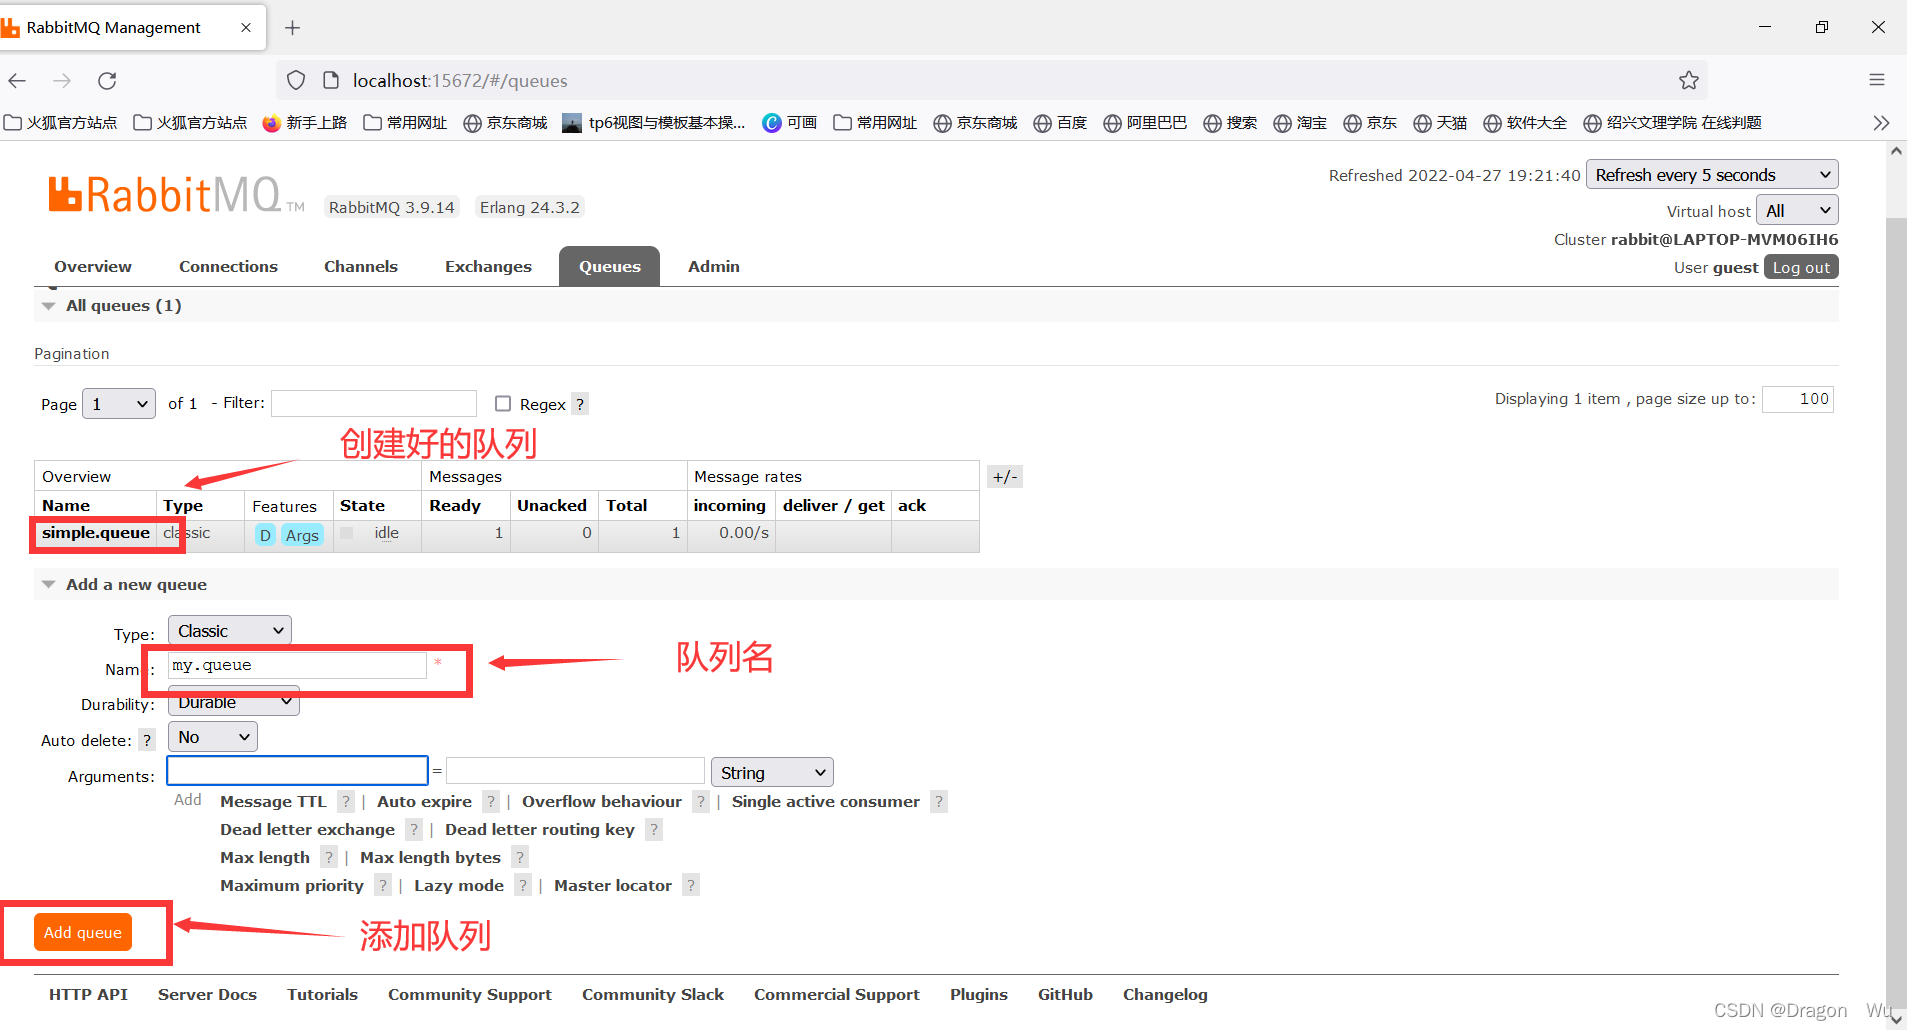
注意消息队列在控制台默认是需要手动添加的
消息发送者:
package com.wxl;

import org.junit.Test;
import org.junit.runner.RunWith;
import org.springframework.amqp.rabbit.core.RabbitTemplate;
import org.springframework.beans.factory.annotation.Autowired;
import org.springframework.boot.test.context.SpringBootTest;
import org.springframework.test.context.junit4.SpringRunner;

@SpringBootTest
@RunWith(SpringRunner.class)
public class RabbitMQTest {

    @Autowired
    private RabbitTemplate rabbitTemplate;

    @Test
    public void testSimpleQueue(){
        String queueName="simple.queue";
        String message="hello, spring amqp!";
        rabbitTemplate.convertAndSend(queueName,message);
    }
}
另起一个springboot服务就行数据监听:
package com.wxl.listener;

import org.springframework.amqp.rabbit.annotation.RabbitListener;
import org.springframework.stereotype.Component;

@Component
public class SpringRabbitListener {

    @RabbitListener(queues = "simple.queue")
    public void listenSimpleQueue(String msg) {
        System.out.println("消费者接收到simple.queue的消息:【" + msg + "】");
    }
}
启动服务:
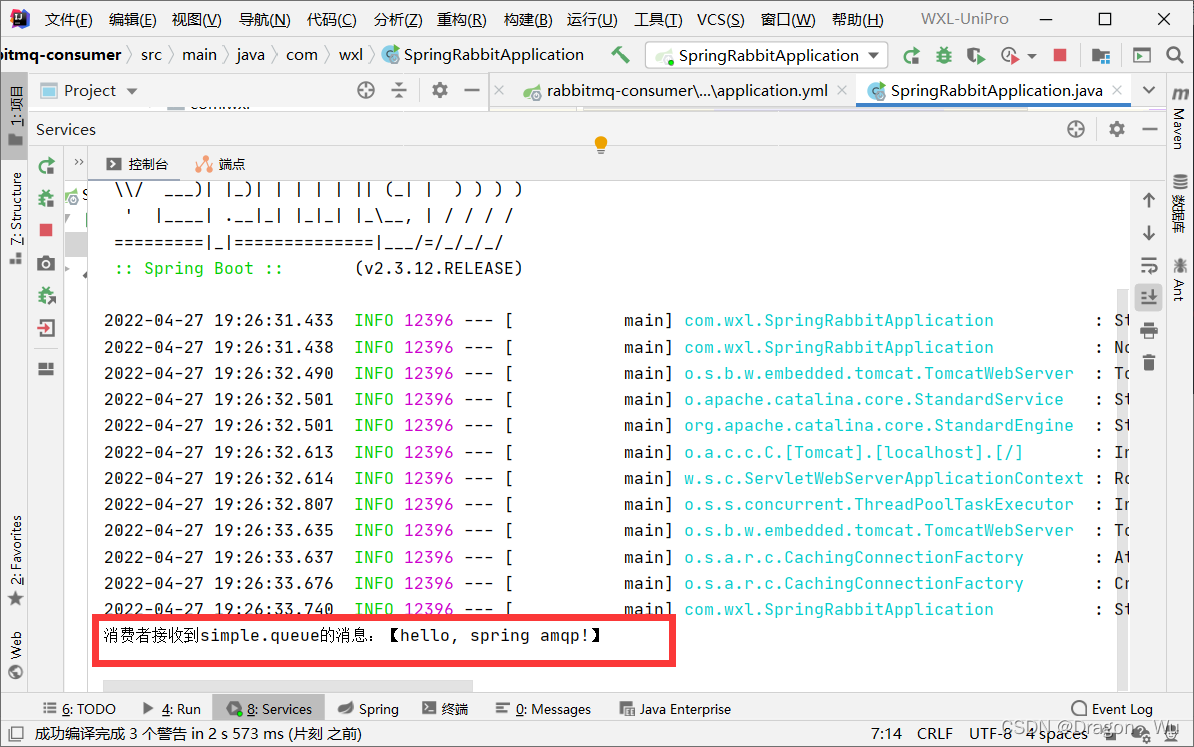
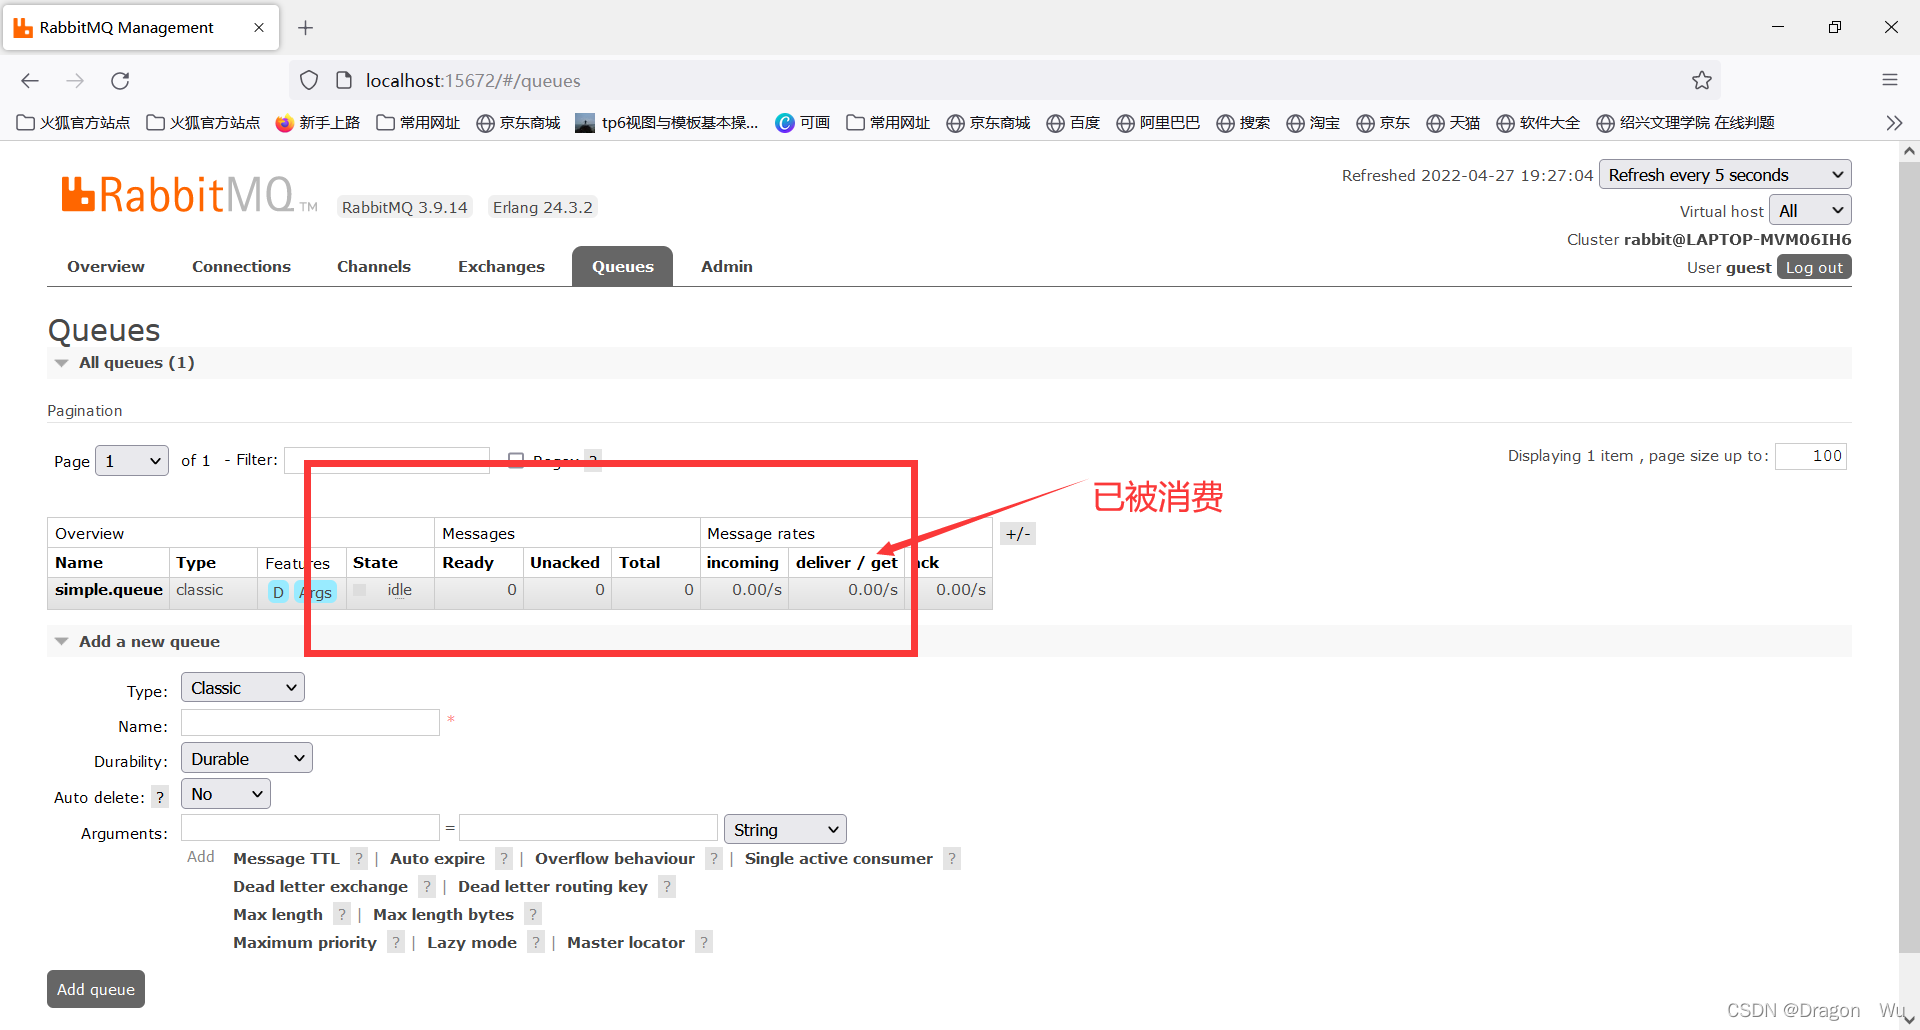
可以看到消息已接收到了
简单使用总结:

三、直连交换机实现
1、配置类
package com.wxl.rabbitmq.direct;

import org.springframework.amqp.core.Binding;
import org.springframework.amqp.core.BindingBuilder;
import org.springframework.amqp.core.DirectExchange;
import org.springframework.amqp.core.Queue;
import org.springframework.context.annotation.Bean;
import org.springframework.context.annotation.Configuration;

//直连模式的配置类
@Configuration
public class RabbitConfigDirect {
    @Bean
    public Queue directQueue(){
        //消息队列
        return new Queue("direct_queue");
    }

    @Bean
    public DirectExchange directExchange(){
        //直连交换机
        return new DirectExchange("directExchange");
    }

    @Bean
    public Binding bindingDirect(){
        //将队列和交换机绑定
        return BindingBuilder.bind(directQueue()).to(directExchange()).with("direct");
    }
}
如果你需要将多个队列绑定到一个交互机上还可以这样写

2、发送消息的类
package com.wxl.rabbitmq.direct;


import org.springframework.amqp.core.AmqpTemplate;
import org.springframework.beans.factory.annotation.Autowired;
import org.springframework.stereotype.Service;

@Service
//rabbitmq里的直连模式
public class MessageServiceRabbitmqDirect {

    @Autowired
    private AmqpTemplate amqpTemplate;

    public void sendMessage(String id){
        amqpTemplate.convertAndSend("directExchange","direct",id);
    }
}
3、接收消息的类
package com.wxl.rabbitmq.direct;

import org.springframework.amqp.rabbit.annotation.RabbitListener;
import org.springframework.stereotype.Component;

@Component
//消息接收类
public class MessageListener {

    @RabbitListener(queues = "direct_queue")
    public void receive(String id){
        System.out.println("已完成短信发送业务(rabbitmq direct)id:"+id);
    }
}
注意这里添加了@RabbitListener注解
4、测试使用sendMessage发送消息,服务器可以看到消息

 如果设置了多个监听,则会进行轮询的处理,
四、主题交换机实现
使用主题交互机模式同样可以实现直连交互机模式的效果,主题模式的好处就是即使同样使用一台交换机也能实现不同规则的队列放行。
1、匹配规则

2、主题模式的实现案例
与直连模式类似
(1)配置类
package com.wxl.rabbitmq.topic;

import org.springframework.amqp.core.Binding;
import org.springframework.amqp.core.BindingBuilder;
import org.springframework.amqp.core.DirectExchange;
import org.springframework.amqp.core.Queue;
import org.springframework.context.annotation.Bean;
import org.springframework.context.annotation.Configuration;

//直连模式的配置类
@Configuration
public class RabbitConfigTopic {
    @Bean
    public Queue topicQueue(){
        //消息队列
        return new Queue("topic_queue");
    }

    @Bean
    public Queue topicQueue2(){
        //消息队列
        return new Queue("topic_queue2");
    }

    @Bean
    public DirectExchange directExchange(){
        //直连交换机
        return new DirectExchange("topicExchange");
    }

    @Bean
    public Binding bindingTopic(){
        //将队列和交换机绑定
        return BindingBuilder.bind(topicQueue()).to(directExchange()).with("topic.*.id");//支持模糊匹配,如topic.order.id也能被匹配到
    }

    @Bean
    public Binding bindingTopic2(){
        //将队列和交换机绑定
        return BindingBuilder.bind(topicQueue2()).to(directExchange()).with("topic2");
    }
}
(2)服务调用
package com.wxl.rabbitmq.topic;


import org.springframework.amqp.core.AmqpTemplate;
import org.springframework.beans.factory.annotation.Autowired;
import org.springframework.stereotype.Service;

@Service
//rabbitmq里的主题模式
public class MessageServiceRabbitmqTopic {

    @Autowired
    private AmqpTemplate amqpTemplate;

    public void sendMessage(String id){
        amqpTemplate.convertAndSend("topicExchange","topic.order.id",id);//交换机名,绑定名
    }
}
(3)消息接收类
package com.wxl.rabbitmq.topic;

import org.springframework.amqp.rabbit.annotation.RabbitListener;
import org.springframework.stereotype.Component;

@Component
//消息接收类
public class MessageListener {

    @RabbitListener(queues = "topic_queue")
    public void receive(String id){
        System.out.println("已完成短信发送业务(rabbitmq topic1)id:"+id);
    }

    @RabbitListener(queues = "topic_queue2")
    public void receive2(String id){
        System.out.println("已完成短信发送业务(rabbitmq top2)id:"+id);
    }
}
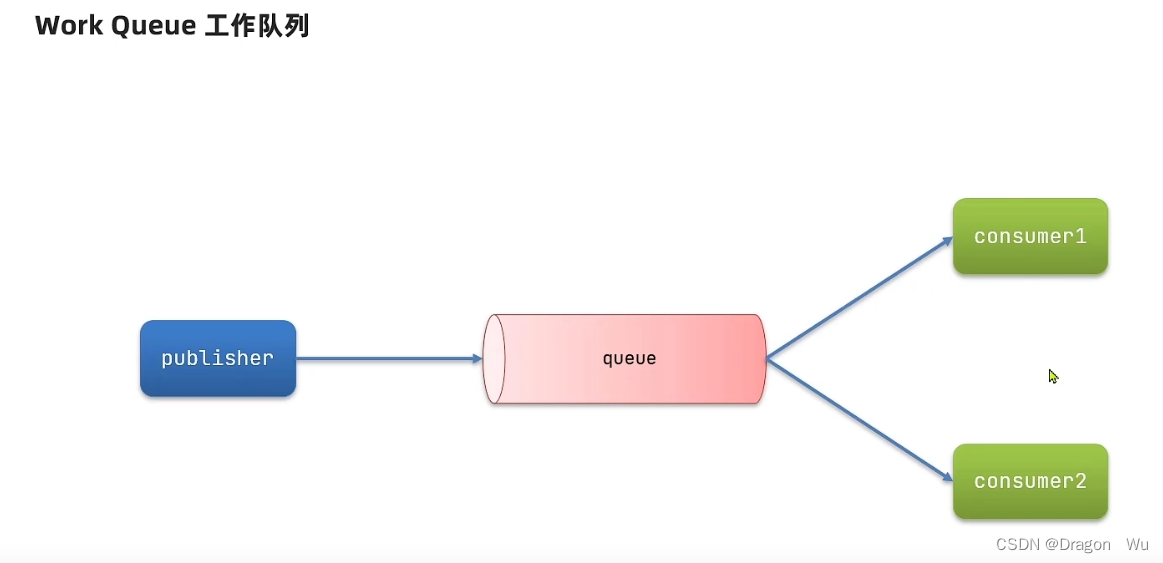
五、工作模式案例解读
1、工作模型实现案例——1对2

对简单案例的生产者进行修改:
package com.wxl;

import org.junit.Test;
import org.junit.runner.RunWith;
import org.springframework.amqp.rabbit.core.RabbitTemplate;
import org.springframework.beans.factory.annotation.Autowired;
import org.springframework.boot.test.context.SpringBootTest;
import org.springframework.test.context.junit4.SpringRunner;

@SpringBootTest
@RunWith(SpringRunner.class)
public class RabbitMQTest {

    @Autowired
    private RabbitTemplate rabbitTemplate;

    @Test
    public void testSimpleQueue(){
        String queueName="simple.queue";
        String message="hello, spring amqp!";
        rabbitTemplate.convertAndSend(queueName,message);
    }

    @Test
    //模拟发送50条消息
    public void testSendMessage2Queue() throws Exception{
        String queueName="simple.queue";
        String message="hello, spring amqp!";
        for(int i=1;i<=50;i++){
            rabbitTemplate.convertAndSend(queueName,message);
            Thread.sleep(20);
        }
    }
}
简单案例的消费者进行修改:
package com.wxl.listener;

import org.springframework.amqp.rabbit.annotation.RabbitListener;
import org.springframework.stereotype.Component;

import java.time.LocalTime;

@Component
public class SpringRabbitListener {

//    @RabbitListener(queues = "simple.queue")
//    public void listenSimpleQueue(String msg) {
//        System.out.println("消费者接收到simple.queue的消息:【" + msg + "】");
//    }

    @RabbitListener(queues = "simple.queue")
    public void listenWork1Queue(String msg) throws Exception {
        System.out.println("消费者1接收到simple.queue的消息:【" + msg + "】"+ LocalTime.now());
        Thread.sleep(20);
    }

    @RabbitListener(queues = "simple.queue")
    public void listenWork2Queue(String msg) throws Exception {
        System.out.println("消费者2接收到simple.queue的消息:【" + msg + "】"+LocalTime.now());
        Thread.sleep(20);
    }
}
开启消费者的服务。再开启生产者进程。
可以看到两个消费者已接收到消息:
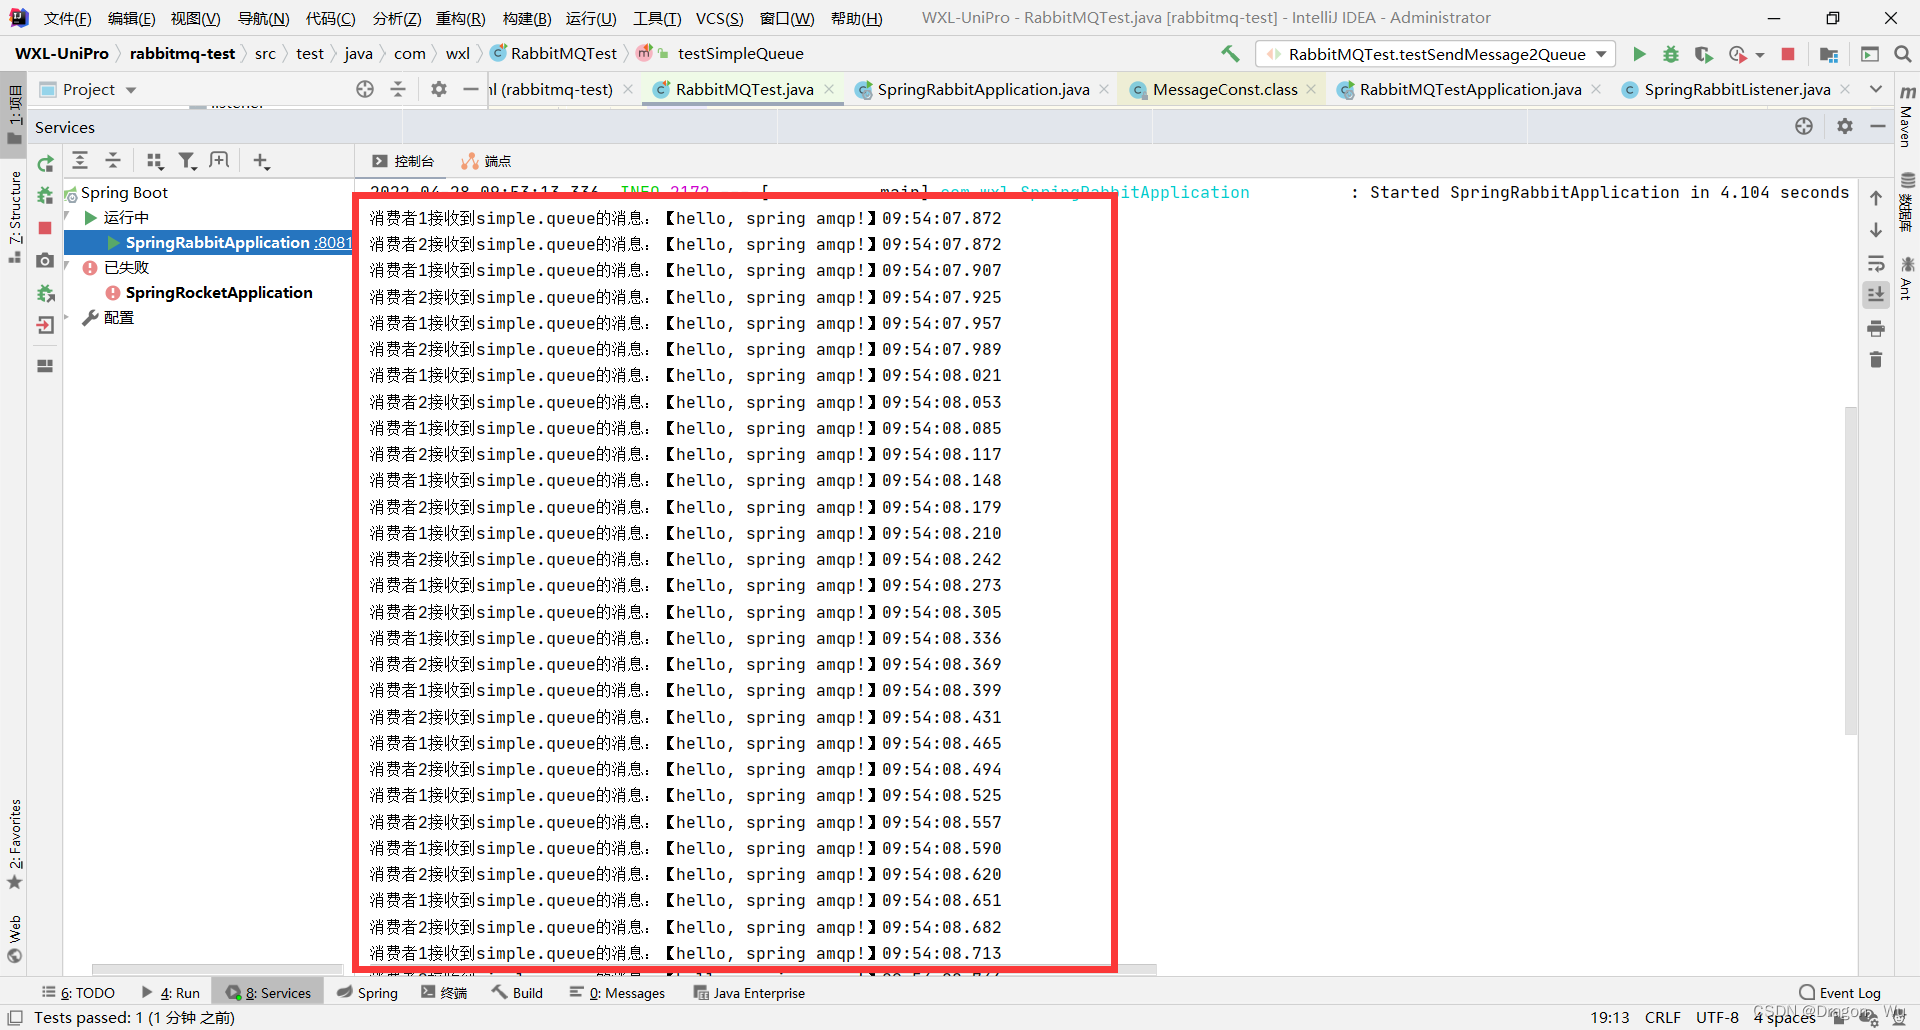
默认是平均分配消息数。
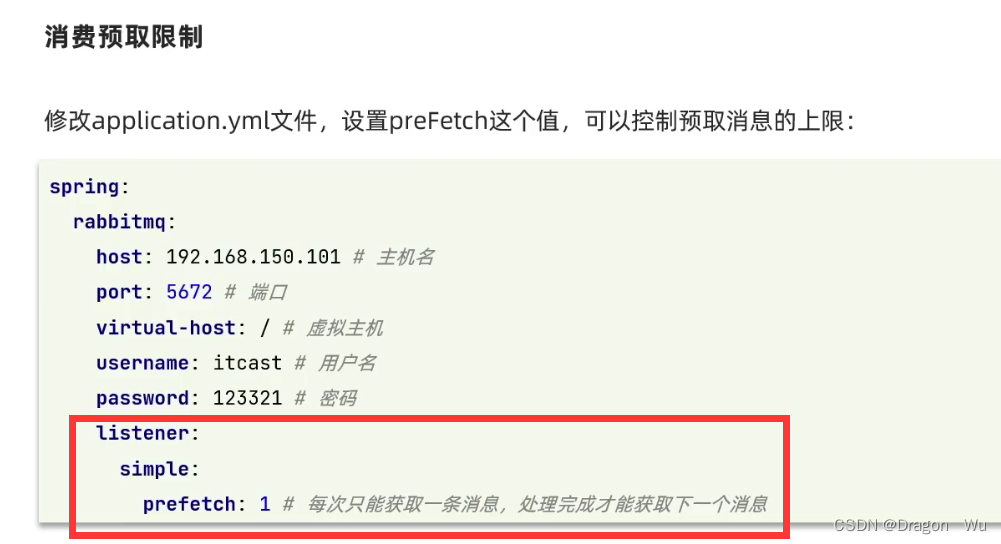
为了更好的分配消息给不同性能的消费者,可以设置preFetch
 我们这里通过睡眠时间的不同模拟消息处理性能不同的消费者。
一般都需要设置prefetch=1来防止消息堆积。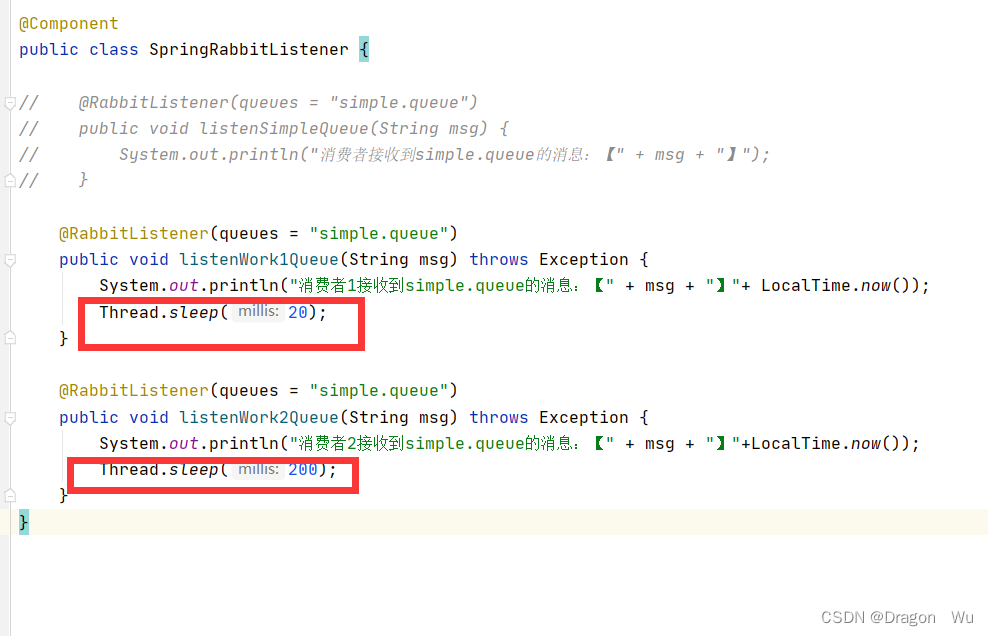
可以看到配置了prefetch以后,性能好的会处理多一些消息:

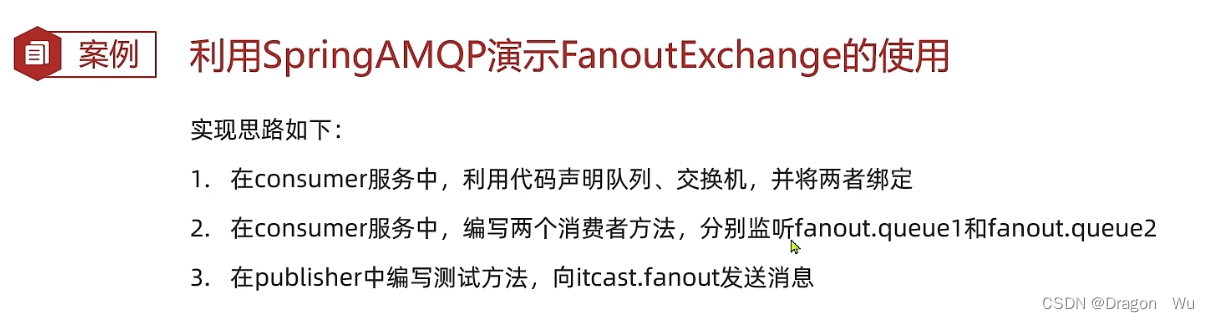
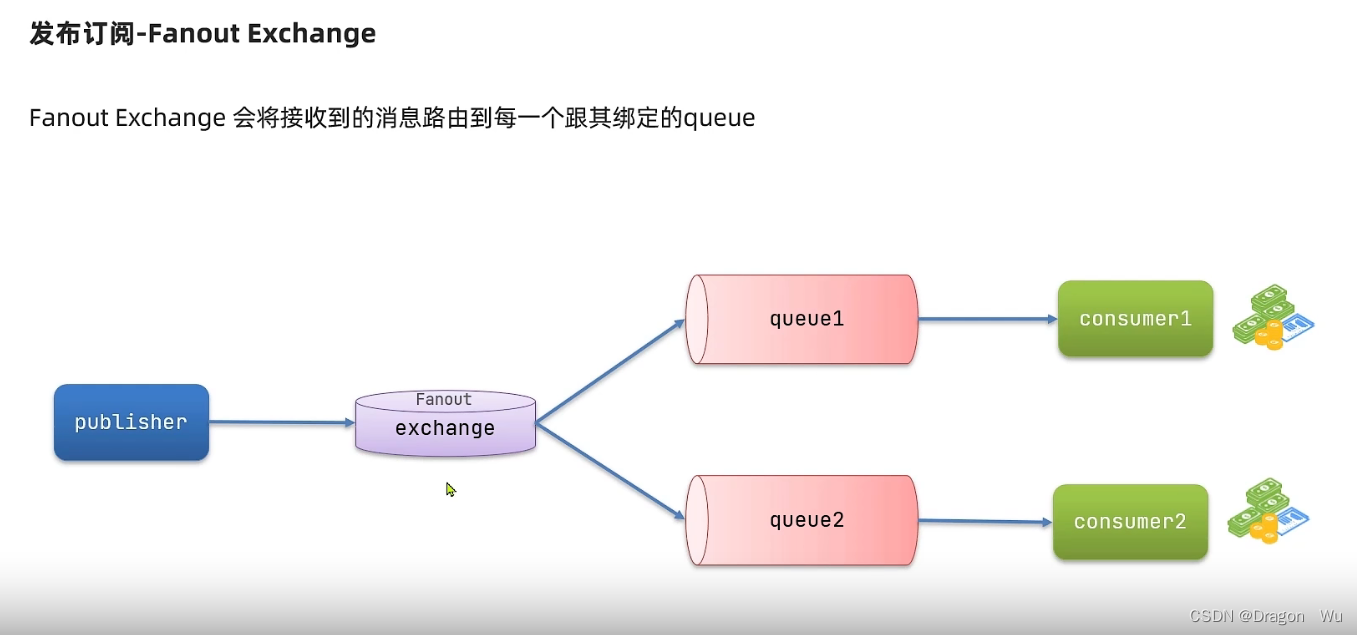
2、工作模型实现案例——交换机模型
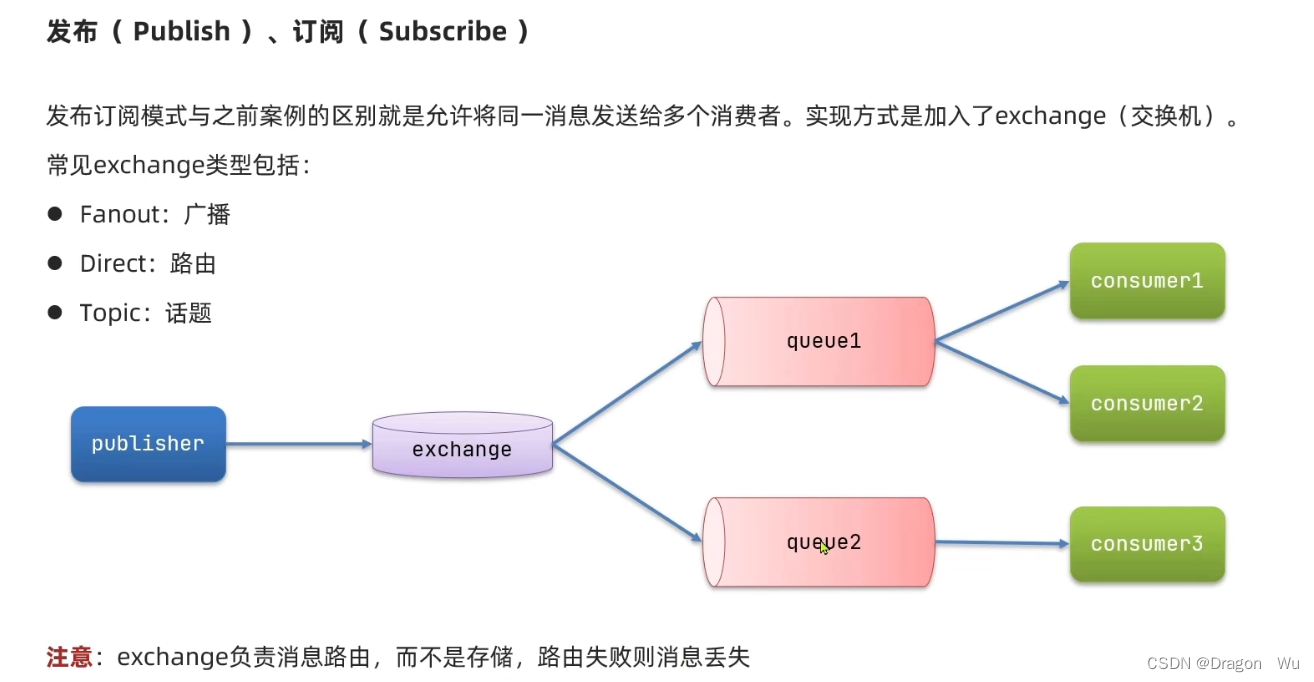
(1)交换机广播模式案例
在简单案例的基础配置上做实验,消费者服务里添加配置类:
package com.wxl.config;

import org.springframework.amqp.core.Binding;
import org.springframework.amqp.core.BindingBuilder;
import org.springframework.amqp.core.FanoutExchange;
import org.springframework.amqp.core.Queue;
import org.springframework.context.annotation.Bean;
import org.springframework.context.annotation.Configuration;

@Configuration
public class FanoutConfig {
    // itcast.fanout
    //设置交换机
    @Bean
    public FanoutExchange fanoutExchange(){
        return new FanoutExchange("itcast.fanout");
    }

    //fanout.queue1
    //设置队列1
    @Bean
    public Queue fanoutQueue1(){
        return new Queue("fanout.queue1");
    }

    //绑定队列1到交换机
    @Bean
    public Binding fanoutBinding1(Queue fanoutQueue1,FanoutExchange fanoutExchange){
        return BindingBuilder
                .bind(fanoutQueue1)
                .to(fanoutExchange);
    }

    //fanout.queue2
    //设置队列2
    @Bean
    public Queue fanoutQueue2(){
        return new Queue("fanout.queue2");
    }

    //绑定队列2到交换机
    @Bean
    public Binding fanoutBinding2(Queue fanoutQueue2,FanoutExchange fanoutExchange){
        return BindingBuilder
                .bind(fanoutQueue2)
                .to(fanoutExchange);
    }


}
服务运行后,spring会自动将bean类加入容器,再观察rabbitmq控制台:

添加消息接收监听:
package com.wxl.listener;

import org.springframework.amqp.rabbit.annotation.RabbitListener;
import org.springframework.stereotype.Component;

import java.time.LocalTime;

@Component
public class SpringRabbitListener {

//    @RabbitListener(queues = "simple.queue")
//    public void listenSimpleQueue(String msg) {
//        System.out.println("消费者接收到simple.queue的消息:【" + msg + "】");
//    }

//    @RabbitListener(queues = "simple.queue")
//    public void listenWork1Queue(String msg) throws Exception {
//        System.out.println("消费者1接收到simple.queue的消息:【" + msg + "】"+ LocalTime.now());
//        Thread.sleep(20);
//    }
//
//    @RabbitListener(queues = "simple.queue")
//    public void listenWork2Queue(String msg) throws Exception {
//        System.out.println("消费者2接收到simple.queue的消息:【" + msg + "】"+LocalTime.now());
//        Thread.sleep(200);
//    }

    @RabbitListener(queues = "fanout.queue1")
    public void listenFanout2Queue(String msg) throws Exception {
        System.out.println("消费者1接收到fanout.queue的消息:【" + msg + "】"+LocalTime.now());
        Thread.sleep(20);
    }

    @RabbitListener(queues = "fanout.queue2")
    public void listenFanout1Queue(String msg) throws Exception {
        System.out.println("消费者2接收到fanout.queue的消息:【" + msg + "】"+LocalTime.now());
        Thread.sleep(20);
    }
}
重启服务
编辑消息发送者:
    @Test
    public void testSendFanoutExchange(){
        //交换机名称
        String exchangeName="itcast.fanout";
        //消息
        String message="hello, every one!";
        //发送消息
        rabbitTemplate.convertAndSend(exchangeName,"",message);
    }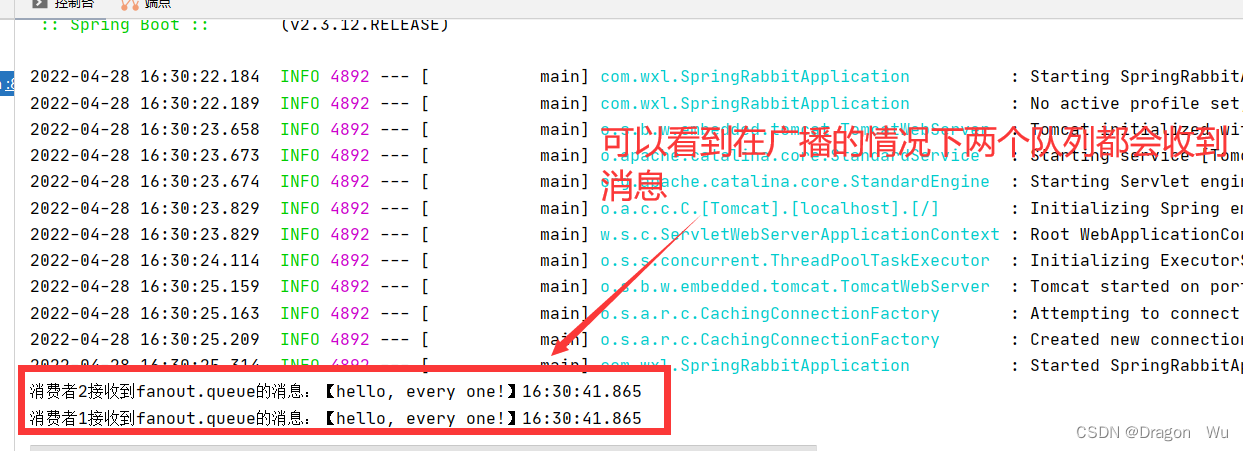
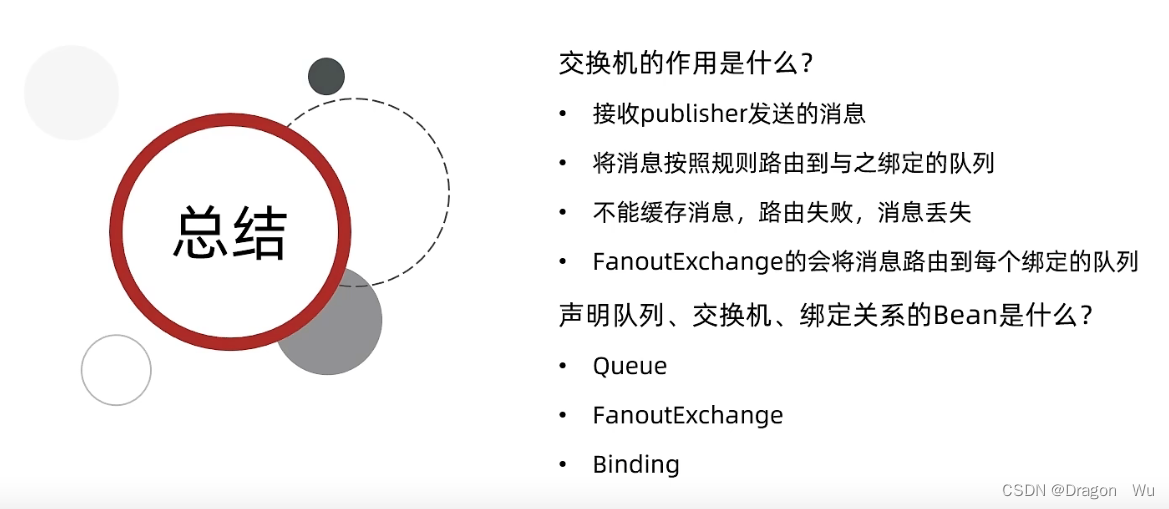
小结:
(2)交换机直连模式案例

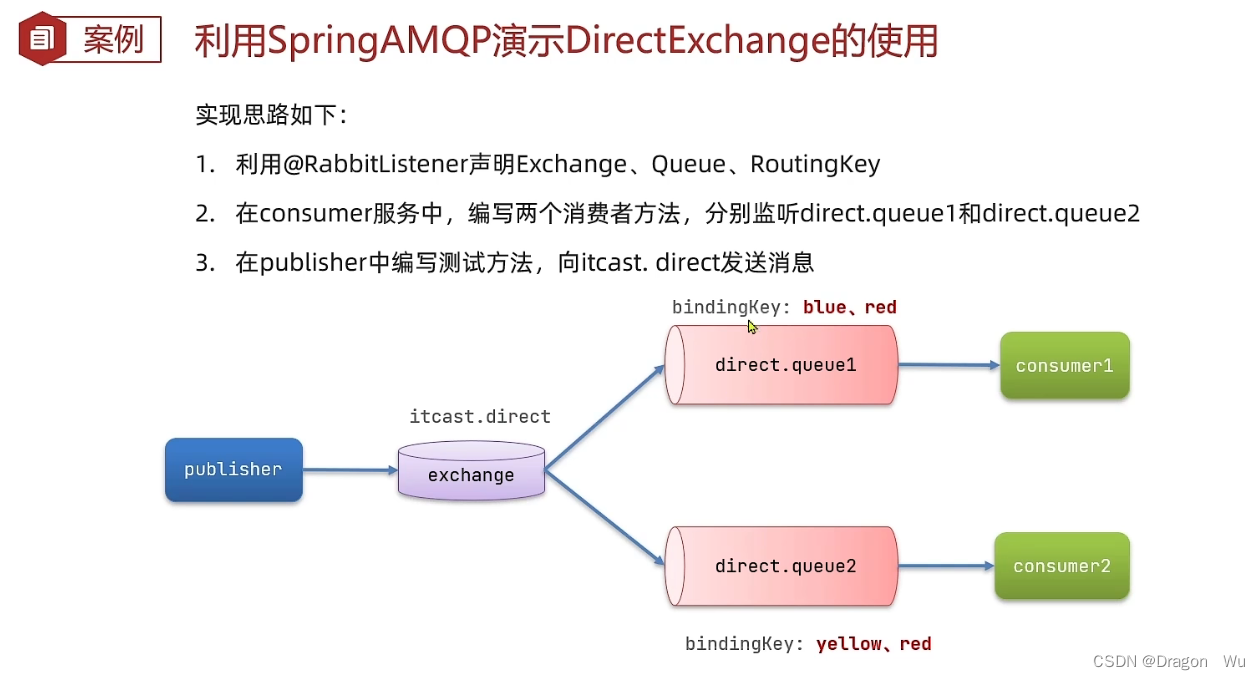 本次我们采用@RibbitListener来实现配置类的效果
@RabbitListener(bindings = @QueueBinding(
value = @Queue(name = "direct.queue1"),//队列
exchange = @Exchange(name="itcast.direct",type = ExchangeTypes.DIRECT),//交换机
key = {"red","blue"}//key
))
public void listenDirectQueue(String msg){
System.out.println("消费者接收到direct.queue1的消息:【" + msg + "】");
}
@RabbitListener(bindings = @QueueBinding(
value = @Queue(name = "direct.queue2"),
exchange = @Exchange(name="itcast.direct",type = ExchangeTypes.DIRECT),
key = {"red","yellow"}
))
public void listenDirectQueue2(String msg){
System.out.println("消费者接收到direct.queue2的消息:【" + msg + "】");
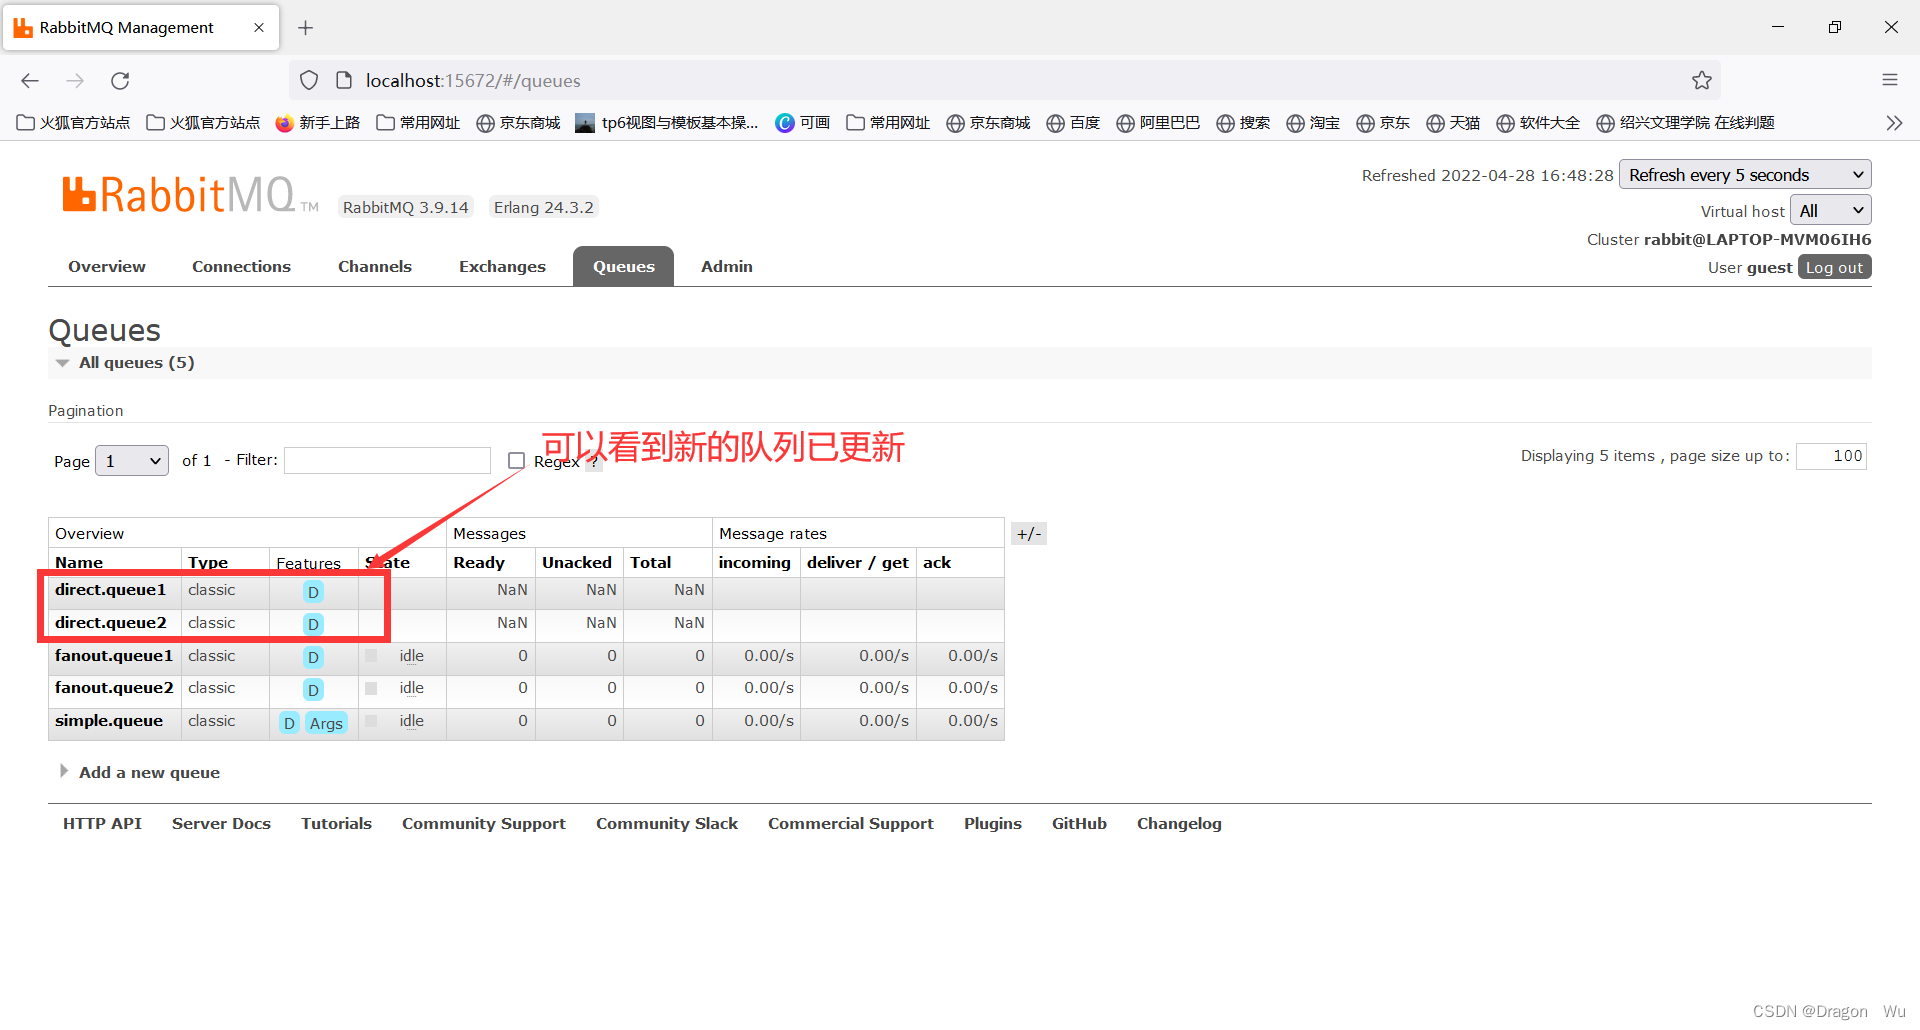
}重启服务。
查看rabbitmq控制面板:
消息发送者:
    @Test
    public void testSendDirectExchange(){
        //交换机名称
        String exchangeName="itcast.direct";
        //消息
        String message="hello, blue!";
        //发送消息
        rabbitTemplate.convertAndSend(exchangeName,"blue",message);
    }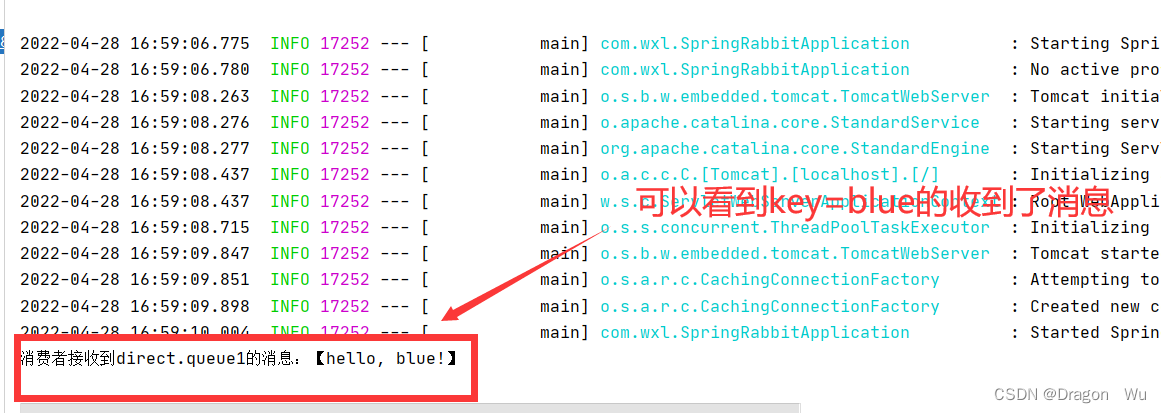
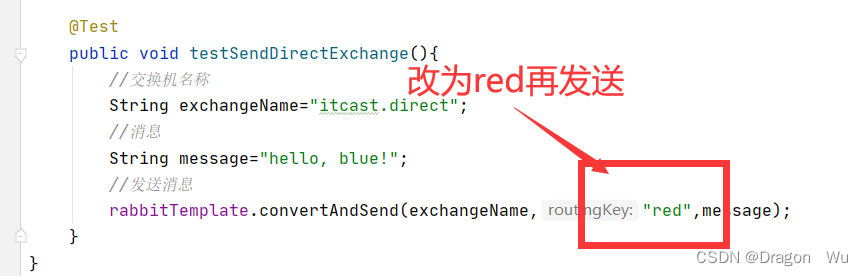

也就是说,direct模式下可以通过key值指定发给一个或多个队列。
小结:
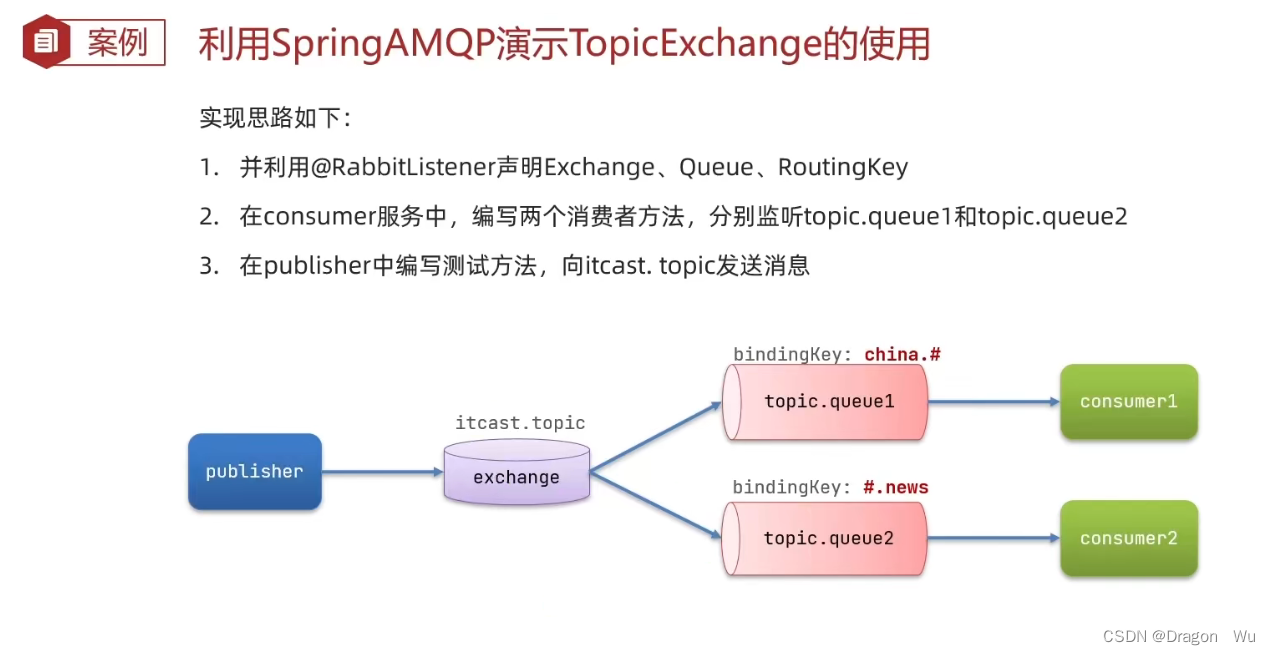
(3)Topic模式下的案例
简单来说就是通过通配符找到对应的队列

 消息监听:
消息监听:
    @RabbitListener(bindings =@QueueBinding(
            value = @Queue(name = "topic.queue1"),
            exchange = @Exchange(name = "itcast.topic",type = ExchangeTypes.TOPIC),
            key="china.#"
    ))
    public void listenTopicQueue1(String msg){
        System.out.println("消费者接收到topic.queue1的消息:【" + msg + "】");
    }

    @RabbitListener(bindings =@QueueBinding(
            value = @Queue(name = "topic.queue2"),
            exchange = @Exchange(name = "itcast.topic",type = ExchangeTypes.TOPIC),
            key="#.news"
    ))
    public void listenTopicQueue2(String msg){
        System.out.println("消费者接收到topic.queue2的消息:【" + msg + "】");
    }
重启服务

发送消息:
    @Test
    public void testSendTopicExchange(){
        //交换机名称
        String exchangeName="itcast.topic";
        //消息
        String message="今天是个好日子!";
        //发送消息
        rabbitTemplate.convertAndSend(exchangeName,"china.weather",message);
} 
简单的说topic模式类似于模糊查询。
(4)Object类型数据的接收
由于默认的序列化传输效率低,我们这里需要引入json依赖:
        <dependency>
            <groupId>com.fasterxml.jackson.dataformat</groupId>
            <artifactId>jackson-dataformat-xml</artifactId>
            <version>2.9.10</version>
        </dependency>
在配置类中添加如下:@Bean
package com.wxl;

import org.springframework.amqp.support.converter.Jackson2JsonMessageConverter;
import org.springframework.amqp.support.converter.MessageConverter;
import org.springframework.boot.SpringApplication;
import org.springframework.boot.autoconfigure.SpringBootApplication;
import org.springframework.context.annotation.Bean;

@SpringBootApplication
public class RabbitMQTestApplication {
    public static void main(String[] args) {
        SpringApplication.run(RabbitMQTestApplication.class, args);
    }

    @Bean
    public MessageConverter messageConverter(){
        return new Jackson2JsonMessageConverter();
    }
}
注意这里发送者和接收者都需要引入该Bean。
下面是发送对象信息:
消息消费者:
    @Bean
    public Queue objectQueue(){
        return new Queue("object.queue");
    }
重启服务

    @Test
    public void testSendObjectQueue(){
        Map<String,Object> msg=new HashMap<String, Object>();
        msg.put("name","Jack");
        msg.put("age",12);
        rabbitTemplate.convertAndSend("object.queue",msg);
    }
测试发送消息

监听:
    @RabbitListener(queues = "object.queue")
    public void listenObjectQueue(Map<String,Object> msg){
        System.out.println("object对象消息:"+msg.toString());
    }
效果已到达。
小结:


 1568
1568


 被折叠的 条评论
为什么被折叠?
被折叠的 条评论
为什么被折叠?
 到【灌水乐园】发言


