


目录
本次小结为最简单易懂的总结,适用于7版本。
一、依赖引入
<?xml version="1.0" encoding="UTF-8"?>
<project xmlns="http://maven.apache.org/POM/4.0.0"
         xmlns:xsi="http://www.w3.org/2001/XMLSchema-instance"
         xsi:schemaLocation="http://maven.apache.org/POM/4.0.0 http://maven.apache.org/xsd/maven-4.0.0.xsd">
    <modelVersion>4.0.0</modelVersion>

    <groupId>com.dragonwu</groupId>
    <artifactId>ES8-spring</artifactId>
    <version>1.0-SNAPSHOT</version>

    <parent>
        <groupId>org.springframework.boot</groupId>
        <version>2.3.2.RELEASE</version>
        <artifactId>spring-boot-starter-parent</artifactId>
        <relativePath/>
    </parent>

    <properties>
        <project.build.sourceEncoding>UTF-8</project.build.sourceEncoding>
        <project.reporting.outputEncoding>UTF-8</project.reporting.outputEncoding>
        <java.version>1.8</java.version>
    </properties>


    <dependencies>
        <dependency>
            <groupId>org.springframework.boot</groupId>
            <artifactId>spring-boot-starter-web</artifactId>
        </dependency>

        <dependency>
            <groupId>org.springframework.boot</groupId>
            <artifactId>spring-boot-starter-data-elasticsearch</artifactId>
        </dependency>

        <dependency>
            <groupId>org.projectlombok</groupId>
            <artifactId>lombok</artifactId>
        </dependency>
    </dependencies>
</project>
这里最主要的依赖就是:
        <dependency>
            <groupId>org.springframework.boot</groupId>
            <artifactId>spring-boot-starter-data-elasticsearch</artifactId>
        </dependency>
二、配置yml
spring:
  elasticsearch:
    rest:
      # 设置ES的地址
      uris: http://localhost:9200
  data:
    elasticsearch:
      repositories:
        # 设置springData自动创建表
        enabled: true
三、添加实体类
package com.dragonwu.entity;

import lombok.AllArgsConstructor;
import lombok.Data;
import lombok.NoArgsConstructor;
import org.springframework.data.annotation.Id;
import org.springframework.data.elasticsearch.annotations.Document;
import org.springframework.data.elasticsearch.annotations.Field;
import org.springframework.data.elasticsearch.annotations.FieldType;

/**
 * @author DragonWu
 * @date 2022-09-19 15:53
 **/
@Data
@AllArgsConstructor
@NoArgsConstructor
// Document设置ES里的索引名
@Document(indexName = "information")
public class Information {

    //store=true设置存储,index=false表示不进行索引搜索
    @Id
    @Field(type = FieldType.Long,store = true,index = false)
    private Long id;

    //analyzer设置分词器
    @Field(type = FieldType.Text,store = true,analyzer = "ik_max_word")
    private String data;
}
四、添加Dao层
集成抽象类,抽象类的第一个参数为对应的实体类,第二个参数为对应的id类型
package com.dragonwu.dao;

import com.dragonwu.entity.Information;
import org.springframework.data.elasticsearch.repository.ElasticsearchRepository;

/**
 * @author DragonWu
 * @date 2022-09-19 16:04
 **/
public interface InformationDao extends ElasticsearchRepository<Information,Long> {
}
五、渲染层
由于方便测试,我们这里直接忽略掉服务层
package com.dragonwu.controller;

import com.dragonwu.dao.InformationDao;
import com.dragonwu.entity.Information;
import org.springframework.beans.factory.annotation.Autowired;
import org.springframework.web.bind.annotation.DeleteMapping;
import org.springframework.web.bind.annotation.GetMapping;
import org.springframework.web.bind.annotation.PathVariable;
import org.springframework.web.bind.annotation.PostMapping;
import org.springframework.web.bind.annotation.RequestBody;
import org.springframework.web.bind.annotation.RequestMapping;
import org.springframework.web.bind.annotation.RestController;

/**
 * @author DragonWu
 * @date 2022-09-19 16:31
 **/
@RestController
@RequestMapping("/information")
public class InformationTestController {
    @Autowired
    private InformationDao informationDao;

    /**
     * 新增或修改
     */
    @PostMapping("/save")
    public String save(@RequestBody Information information){
        informationDao.save(information);
        return "ok";
    }

    /**
     * 删除
     */
    @DeleteMapping("/delete/{id}")
    public String delete(@PathVariable Long id){
        informationDao.deleteById(id);
        return "ok";
    }

    /**
     * 查询
     */
    @GetMapping("/queryAll")
    public Iterable<Information>  queryAll(){
        return informationDao.findAll();
    }


}
六、启动类
package com.dragonwu;

import org.springframework.boot.SpringApplication;
import org.springframework.boot.autoconfigure.SpringBootApplication;

/**
 * @author DragonWu
 * @date 2022-09-19 16:26
 **/
@SpringBootApplication
public class APP {
    public static void main(String[] args) {
        SpringApplication.run(APP.class,args);
    }
}
七、效果测试
运行启动类,加载程序后索引将会被自动创建。
这里我们通过ApiPost进行测试。
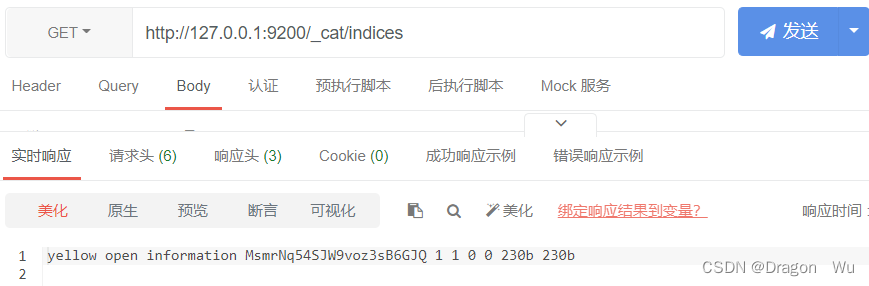
可以看到索引已经被创建。
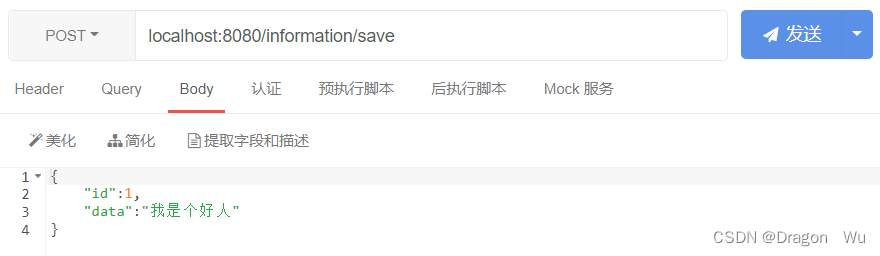
访问增加和修改的接口都是这个:
查询文档:
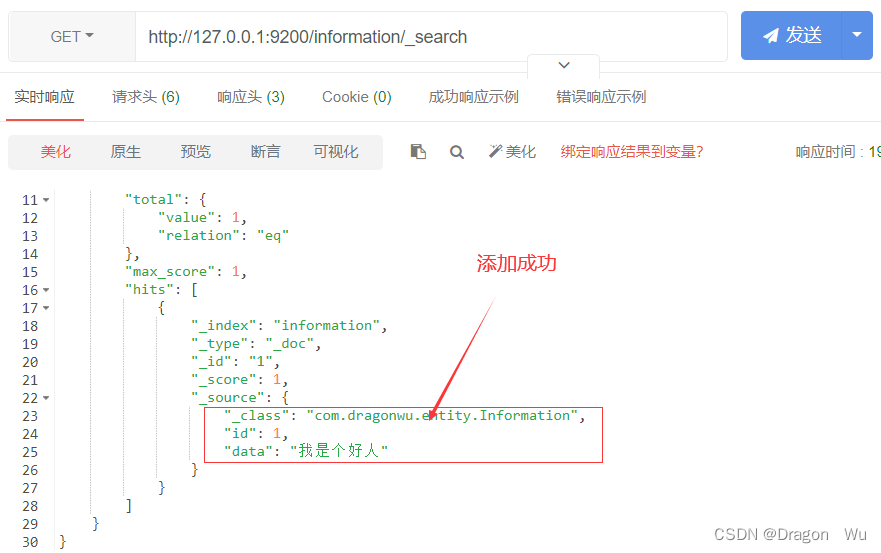
查询成功。
通过springboot的api进行查询:
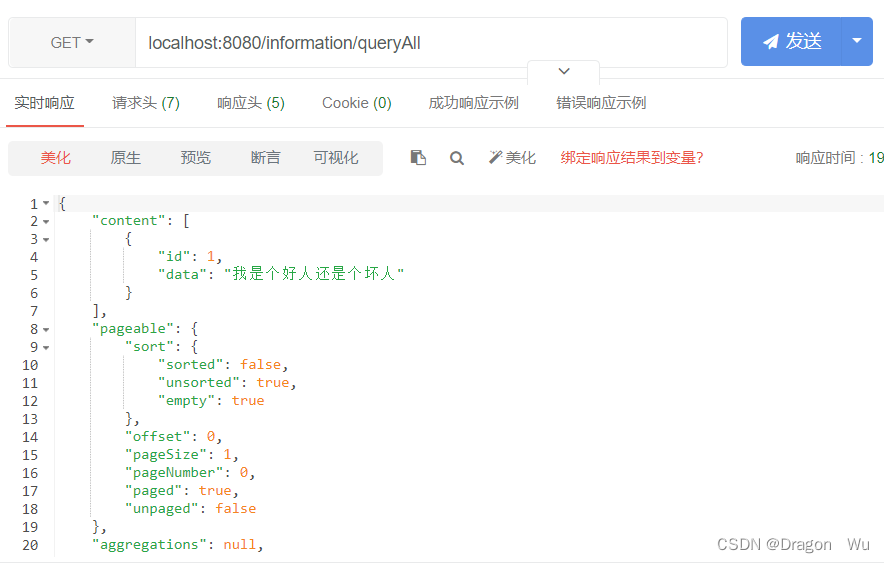
同样也是没问题的。
访问删除接口
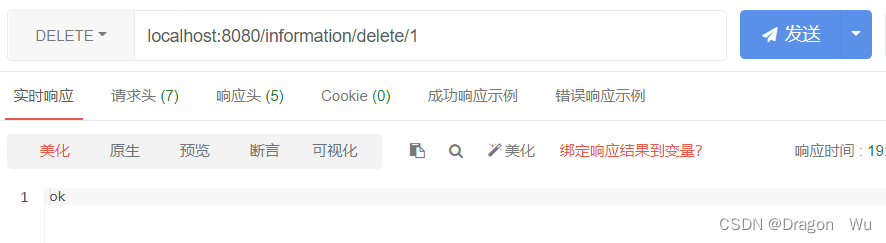
删除成功,再次查看文档
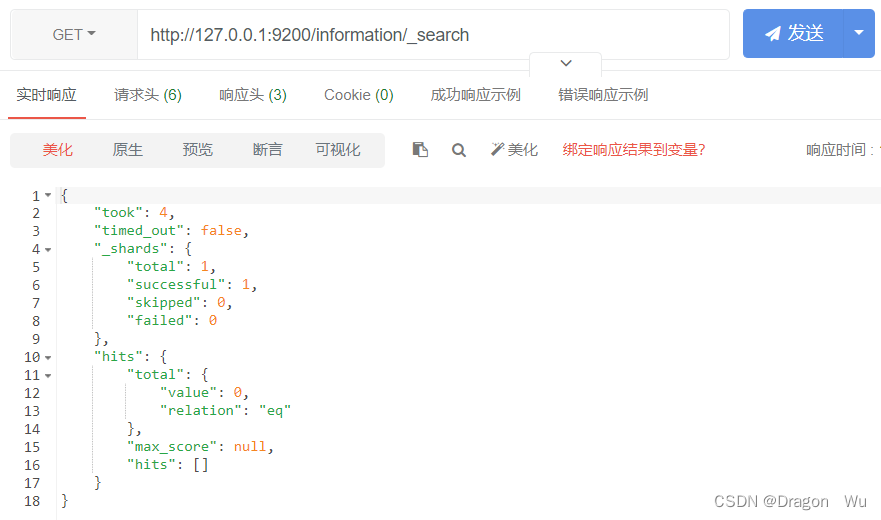
可以看到文档已经被删除了。
演示结束。


 1137
1137


 被折叠的 条评论
为什么被折叠?
被折叠的 条评论
为什么被折叠?
 到【灌水乐园】发言


