


目录
ip划分
| 主机名 | IP | 服务 |
|---|---|---|
| open-faclon-server | 192.168.150.200 | open-faclon-server |
| nginx-master | 192.168.150.199 | nginx、open-falcon-agent |
| nginx-backup | 192.168.150.198 | nginx、open-falcon-agent |
一、主机准备
操作系统
cat /etc/redhat-release
CentOS Stream release 8
ip规划
| 主机名 | IP | 服务 | |
|---|---|---|---|
| nginx_master | Nginx、open-falcon-agent | ||
| nginx_node | Nginx、open-falcon-agent、 | ||
| tomcat_node1 | Tomcat、open-falcon-agent、Redis | ||
| tomcat_node2 | Tomcat、open-falcon-agent、MySQL | ||
| openfalcon | 192.168.150.200 | open-falcon-server | |
二、环境配置
2.1修改主机名、修改hosts文件
修改主机名
hostnamectl set-hostname openfalcon
刷新环境,就可以看到修改后的主机名了
su -
追加重定向写入hosts文件中
echo "192.168.150.200 openfalcon" >> /etc/hosts

2.2配置阿里源,安装工具
安装基本工具
yum install -y wget yum-utils vim git net-tools lrzsz chrony unzip
配置阿里源
yum-config-manager --add-repo http://mirrors.aliyun.com/docker-ce/linux/centos/docker-ce.repo


yum makecache && yum clean all
yum makecache用于创建或刷新 Yum 软件包管理器的元数据缓存
yum clean all用于清理 Yum 软件包管理器的缓存和临时文件。
2.3关闭防火墙、selinux
# 关闭防火墙
systemctl stop firewalld
# 开机启动关闭
systemctl disable firewalld
# 临时关闭Selinux
setenforce 0
# 永久关闭
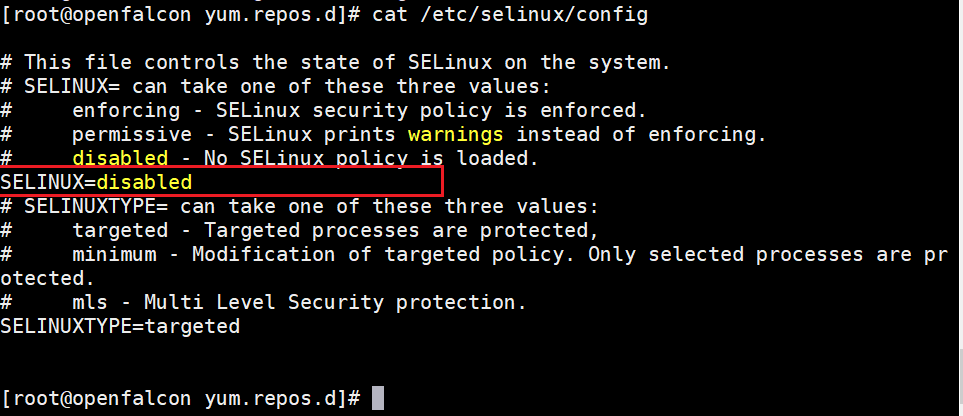
sed -i 's/SELINUX=enforcing/SELINUX=disabled/g' /etc/selinux/config
可以看到config文件已经修改好了。
2.4配置时间
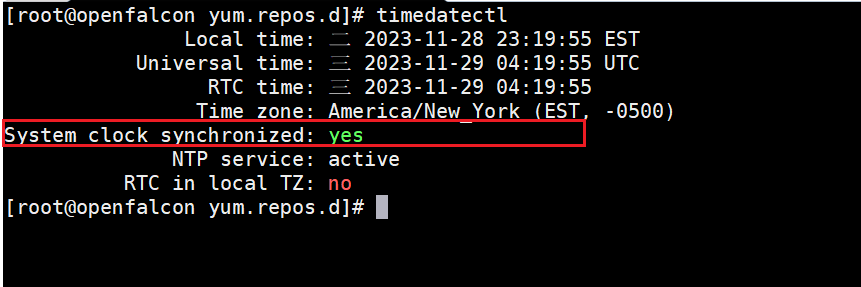
虚拟机上查看时间,与实际时间可能不对,需要调整,后面进行时间同步,同样需要确保时间是一样的。

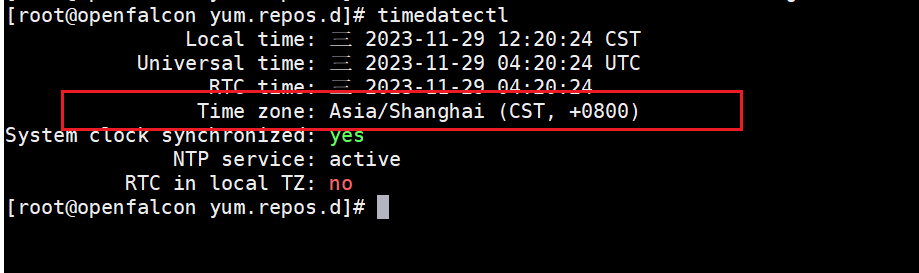
修改timedatectl中的时区,改为shanghai
timedatectl set-timezone Asia/Shanghai
开启ntp service,修/etc/chrony.conf,添加**“pool cn.pool.ntp.org iburst”**
vim /etc/chrony.conf
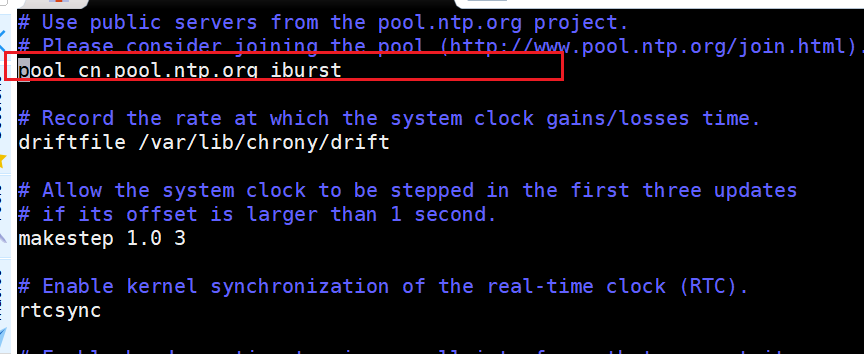
使用中国的 NTP 服务器地址:
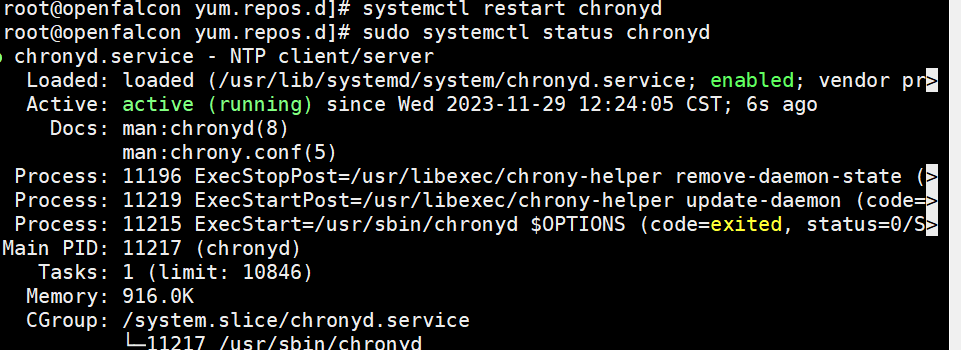
重新启动 chronyd 服务:
sudo systemctl restart chronyd
检查 chronyd 状态以确保服务正在运行:
sudo systemctl status chronyd
检查ntp是否开启
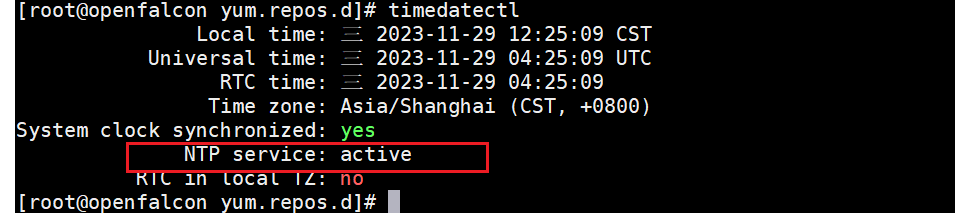
可以看到服务已经是活跃状态了。
2.5安装go
# 安装go语言开发包
yum install -y golang

#查看版本
[root@openfalcon opt]# go version
go version go1.20.6 linux/amd64


#查看go安装路径
[root@openfalcon opt]# find / -name go
/usr/bin/go
/usr/lib/golang/src/cmd/go  #需要这个路径
/usr/lib/golang/src/cmd/vendor/golang.org/x/tools/go
/usr/lib/golang/src/go
/usr/lib/golang/bin/go
2.6安装redis
#安装 redis
yum install redis -y
启动redis,运行在后端
redis-server &
看后台有哪些任务
jobs  #看后台作业有哪些

fg %1 #将后台作业切换到前台

bg %1 #从后台运行的作业继续在后台运行
2.7 安装mysql
安装mysql服务
#!/bin/bash
#mysql 5.7 安装

#创建数据盘
mkdir -p /opt/mysql
cd /opt


wget https://dev.mysql.com/get/Downloads/MySQL-5.7/mysql-5.7.39-linux-glibc2.12-x86_64.tar.gz

#解压
tar -xvf mysql-5.7.39-linux-glibc2.12-x86_64.tar.gz -C mysql


#再移动并重命名一下
 mv /opt/mysql/mysql-5.7.39-linux-glibc2.12-x86_64 /usr/local/mysql

#创建mysql用户组和用户并修改权限
groupadd mysql
useradd -r -g mysql mysql

#创建数据目录并赋予权限
 chown mysql:mysql -R /opt/mysql   #赋予权限


#配置my.cnf
cat >/etc/my.cnf <<EOF
[mysqld]
# Disabling symbolic-links is recommended to prevent assorted security risks
symbolic-links=0
# Settings user and group are ignored when systemd is used.
# If you need to run mysqld under a different user or group,
# customize your systemd unit file for mariadb according to the
# instructions in http://fedoraproject.org/wiki/Systemd
bind-address=0.0.0.0
port=3306
user=mysql
basedir=/usr/local/mysql
datadir=/opt/mysql
socket=/tmp/mysql.sock
log-error=/opt/mysql/mysql.err
pid-file=/opt/mysql/mysql.pid

#character config
character_set_server=utf8mb4
symbolic-links=0
explicit_defaults_for_timestamp=true

key_buffer_size = 16K
max_allowed_packet = 1M
table_open_cache = 4
sort_buffer_size = 64K
read_buffer_size = 256K
read_rnd_buffer_size = 256K
net_buffer_length = 2K
thread_stack = 256K

[mysqld_safe]
log-error=/opt/mysql/mysql.err
pid-file=/opt/mysql/mysql.pid
EOF

#进入mysql的bin目录
 cd /usr/local/mysql/bin/

#初始化
 ./mysqld --defaults-file=/etc/my.cnf --basedir=/usr/local/mysql/ --datadir=/opt/mysql/ --user=mysql --initialize


# 获得临时密码
tem_passwd=$(cat /opt/mysql/mysql.err |grep "temporary.*localhost"|awk '{print $NF}')

cp /usr/local/mysql/support-files/mysql.server /etc/init.d/mysqld

#给可执行权限
chmod +x /etc/init.d/mysqld

echo "export PATH=$PATH:/usr/local/mysql/bin" >>/etc/profile

source /etc/profile

#启动mysql
service mysqld start


 find / -name 'libncurses*'
 ln -s /usr/lib64/libncurses.so.6 /usr/lib64/libncurses.so.5

 find / -name libtinfo.so*
 ln -s /usr/lib64/libtinfo.so.6 /usr/lib64/libtinfo.so.5

#登录mysql并设置密码
mysql -uroot -p$tem_passwd --connect-expired-password -e "set password='123456';"

#验证上一步修改密码是否成功,如果有输出能看到mysql里的数据库,说明成了
mysql -uroot -p'123456' -e "show databases;"
初始化MySQL表结构
cd /tmp/ && git clone https://github.com/open-falcon/falcon-plus.git
cd /tmp/falcon-plus/scripts/mysql/db_schema/
mysql -h 127.0.0.1 -u root -p < 1_uic-db-schema.sql
mysql -h 127.0.0.1 -u root -p < 2_portal-db-schema.sql
mysql -h 127.0.0.1 -u root -p < 3_dashboard-db-schema.sql
mysql -h 127.0.0.1 -u root -p < 4_graph-db-schema.sql
mysql -h 127.0.0.1 -u root -p < 5_alarms-db-schema.sql
rm -rf /tmp/falcon-plus/
查看数据库
[root@openfalcon sh]# mysql -uroot -p123456
mysql: [Warning] Using a password on the command line interface can be insecure.
Welcome to the MySQL monitor.  Commands end with ; ...

mysql> show databases;
+--------------------+
| Database           |
+--------------------+
| information_schema |
| alarms             |
| dashboard          |
| falcon_portal      |
| graph              |
| mysql              |
| performance_schema |
| sys                |
| uic                |
+--------------------+
9 rows in set (0.00 sec)


 334
334


 被折叠的 条评论
为什么被折叠?
被折叠的 条评论
为什么被折叠?
 到【灌水乐园】发言


