


axios是一个专注于网络请求的库。 不同于jquery,功能复杂,既可以操作dom,又可以做动画,还可以发ajax请求。axios是一个专注于网络请求的库。
目录
一、基本使用
1.导入库文件
在js中导入axios的库文件后,会直接在全局挂载一个axios方法,就可以直接使用了。
<!-- 导入axios的库文件 -->
<script src="lib/axios.js"></script>
<script>
    console.log(axios);
</script>
在控制台打印axios可以看到,它是一个方法,我们现在就可以直接使用了。
2.基本语法
axios({ //请求方式,'GET'或者'POST' method: 'GET', //请求地址 url: '' }).then(res => {})axios方法获取的结果是一个Promise对象,测试如下:
const res = axios({
    method: 'GET',
    url: 'http://www.liulongbin.top:3006/api/getbooks'
})
console.log(res);
既然是一个Promise对象,那么就可以通过 .then的方式拿到获取成功后的结果了。
axios({
    method: 'GET',
    url: 'http://www.liulongbin.top:3006/api/getbooks'
}).then(res => console.log(res))
可以看到获取成功了。到此为对基本语法的使用解释。
3.结果分析
但是,axios方法拿到的结果就是服务器请求到的结果吗?我们使用postman来测试一下。
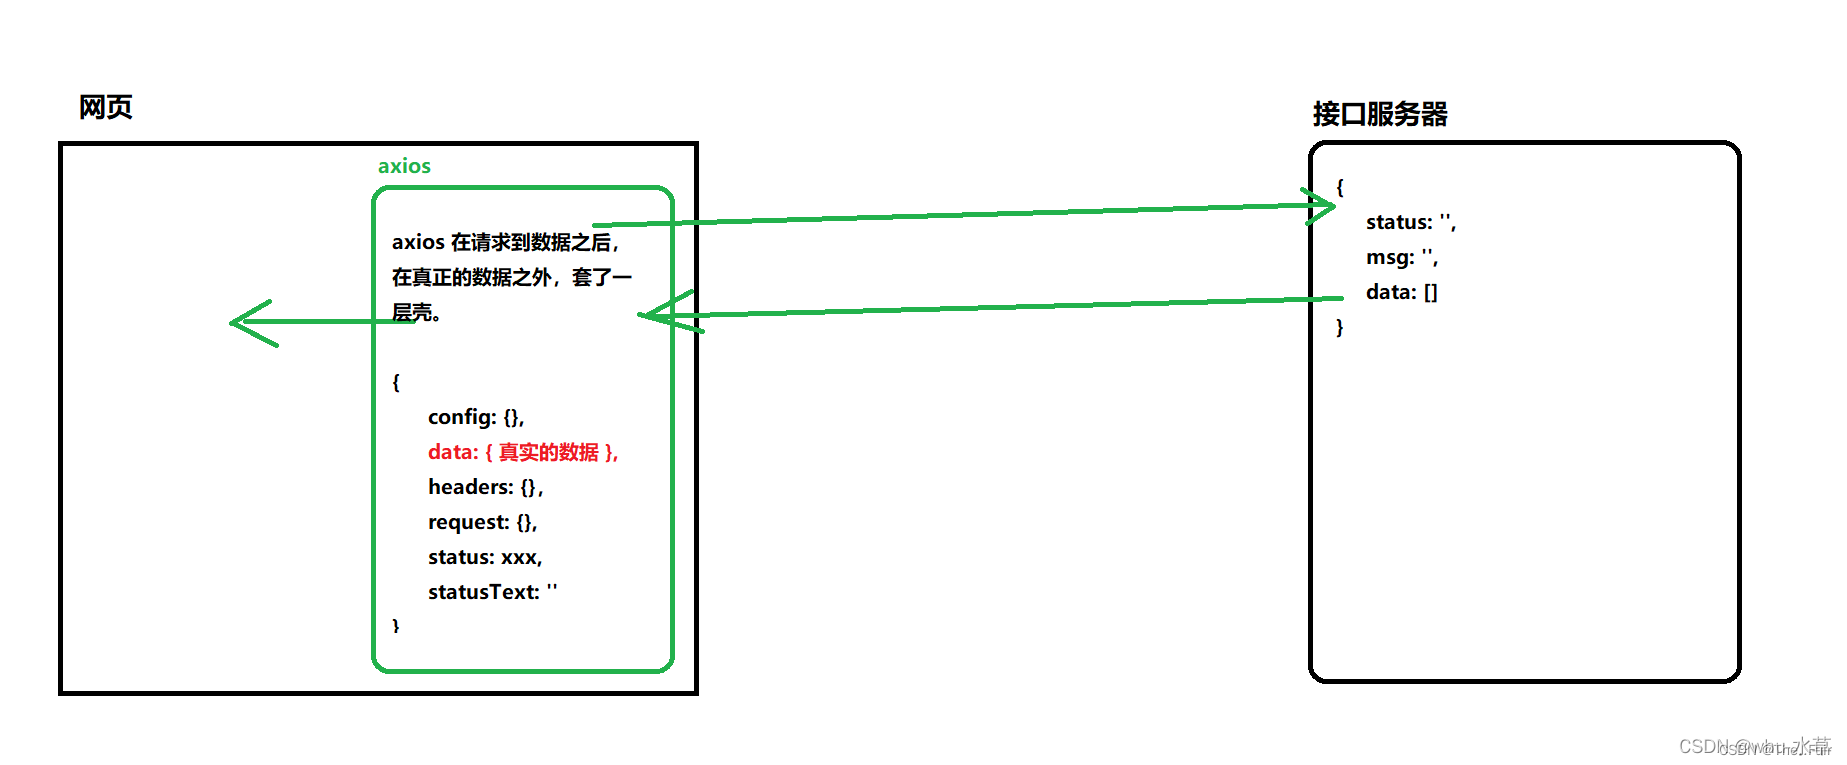
postman显示的是服务器请求后拿到的返回结果。我们可以看到,和axios拿到的结果并不一样,经过比对,我们可以发现,axios拿到的对象结果中有一个data属性,那里面放着的才是服务器请求的真正的返回结果。
到此,我们可以得到axios拿到的对象结果和服务器请求的真正的返回结果之间的关系:
要想直接拿到真实数据的格式,只需要res.data。
4.参数传递
【基本语法】 params中写GET方法的传参,data中写POST方法的传参。
axios({
    //请求方式,'GET'或者'POST'
    method: 'GET',
    //请求地址
    url: '',
    //url中的查询参数,GET方法的传参
    params: {},
    //请求体参数,POST方法的传参
    data: {}
}).then(res => {})
get传参演示:
post传参演示:
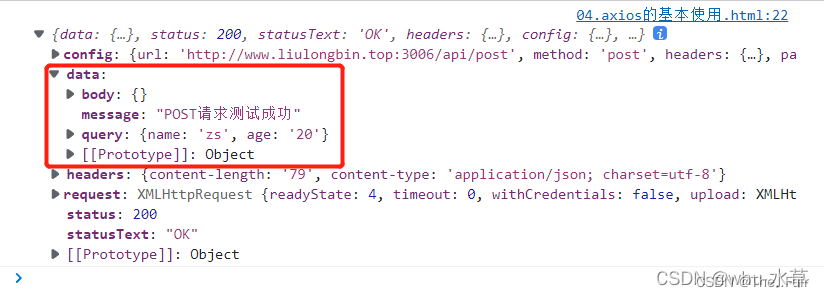
axios({
    method: 'POST',
    url: 'http://www.liulongbin.top:3006/api/post',
    data: {
        name: 'zs',
        age: 20
    },
}).then(res => console.log(res))
5.方法简化
(1)通过async和await的方式直接拿到返回值
因为axios方法获取的结果是一个Promise对象,所以我们可以通过async和await的方式直接拿到返回值,不需要再通过调用.then的方式了。
给’#btnGet’按钮绑定一个点击事件,点击后发起axios请求。通过async和await的方式可以直接拿到返回值。
document.querySelector('#btnGet').addEventListener('click', async function () {
    const res = await axios({
        method: 'GET',
        url: 'http://www.liulongbin.top:3006/api/getbooks',
        // params: {
        //     id: 1
        // }
    })
    console.log(res);
})
(2)解构赋值拿到服务器请求到的真正数据
由第3小节我们知道,axios拿到的对象结果在服务器请求到的真正数据外面套了一层壳子,存在它的data属性中,我们可以通过对象解构的方式直接拿到服务器请求到的真正数据。
document.querySelector('#btnGet').addEventListener('click', async function () {
    const {data} = await axios({
        method: 'GET',
        url: 'http://www.liulongbin.top:3006/api/getbooks',
    })
    console.log(data);
})
(3)解构赋值重命名
服务器请求到的真正数据有三个属性,data,status,msg,其中data是我们最关心的,存着需要的数据项,我们只希望取到这个data数组,这个比较简单,因为解构赋值已经拿到服务器请求到的真正数据了,并存在data变量中,所以只需要访问这个变量的data属性就能拿到,即data.data,但是这样很容易混淆, 所以我们在解构赋值的时候给data换个名字 { data: res } 。
document.querySelector('#btnGet').addEventListener('click', async function () {
    const { data: res } = await axios({
        method: 'GET',
        url: 'http://www.liulongbin.top:3006/api/getbooks',
    })
    console.log(res.data);
})
6.axios直接发起GET请求和POST请求
基本语法:
//axios直接发起GET请求
axios.get('url地址', {
    //GET参数
    params: {}
})
//axios直接发起POST请求
axios.post('url地址', { //POST参数 })
示例:
document.querySelector('#btnGet').addEventListener('click', async function () {
    const { data: res } = await axios.get('http://www.liulongbin.top:3006/api/getbooks', {
        params: {
            id: 1
        }
    })
    console.log(res.data);
})
document.querySelector('#btnPost').addEventListener('click', async function () {
    const { data: res } = await axios.post('http://www.liulongbin.top:3006/api/post', {
        name: 'zs',
        gender: '女'
    })
    console.log(res);
})
案例
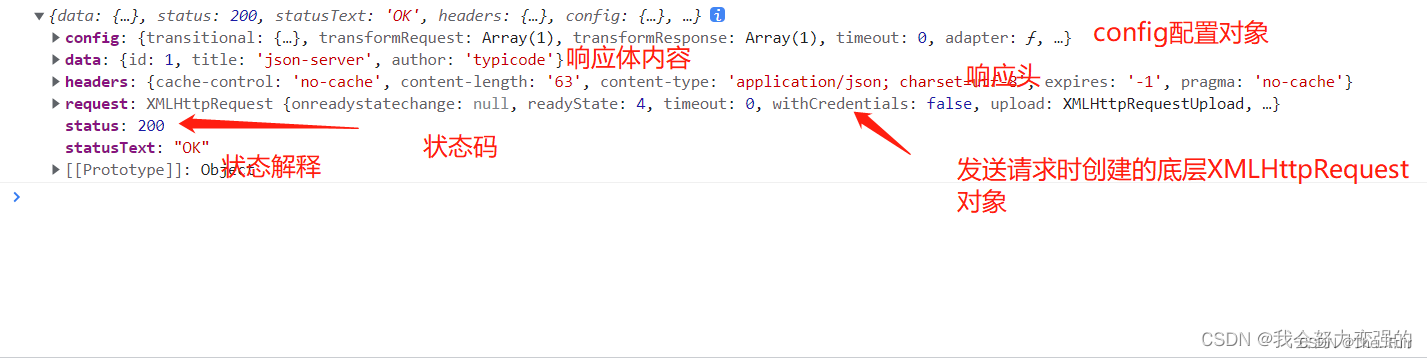
<!DOCTYPE html>
<html lang="en">
<head>
    <meta charset="UTF-8">
    <title>axios基本使用</title>
</head>
<body>
    <button id="btn1">发送get请求</button> <br><br>
    <button id="btn2">发送post请求</button><br><br>
    <button id="btn3">发送put请求</button><br><br>
    <button id="btn4">发送delete请求</button>

    <hr>

    <div>其他发送请求的api:</div><br><br>
    <button id="btn5">发送get请求1</button> <br><br>
    <button id="btn6">发送post请求1</button><br><br>
    <button id="btn7">发送put请求1</button><br><br>
    <button id="btn8">发送delete请求1</button>
</body>
<script src="https://cdn.jsdelivr.net/npm/axios/dist/axios.min.js"></script>
<script>
    //发送get
    document.getElementById("btn1").onclick = function(){
       axios({
        method:"GET",
        url:"http://localhost:3000/posts/1"
       }).then(response=>{
           console.log(response);
       })
    };

    //发送post
    document.getElementById("btn2").onclick = function(){
       axios({
        method:"POST",
        url:"http://localhost:3000/posts",
        data:{
            title:"axios学习",
            author:"Yehaocong"
        }
       }).then(response=>{
           console.log(response);
       })
    };
    //发送put
    document.getElementById("btn3").onclick = function(){
       axios({
        method:"PUT",
        url:"http://localhost:3000/posts/2",
        data:{
            title:"axios学习",
            author:"Liaoxiaoyan"
        }
       }).then(response=>{
           console.log(response);
       })
    };
    document.getElementById("btn4").onclick = function(){
       axios({
        method:"DELETE",
        url:"http://localhost:3000/posts/2",
       }).then(response=>{
           console.log(response);
       })
    };


    //其他发送请求的api


    document.getElementById("btn5").onclick = function(){
        //发送get,使用get,第一个参数时url,第二个参数时config配置对象
       axios.get("http://localhost:3000/posts/1")
       .then(response=>{
           console.log(response);
       })
    };

    //发送post
    document.getElementById("btn6").onclick = function(){
        //发送post请求,第一个参数时url,第二个参数时请求体,第三个参数时config配置对象
        axios.post("http://localhost:3000/posts",
        {title:"axios学习2",
            author:"Yehaocong2"})
            .then(response=>{
           console.log(response);
       })
    };
    //发送put,
    document.getElementById("btn7").onclick = function(){
        //发送put,接收三个参数,url  请求体 、 config配置对象
       axios.put("http://localhost:3000/posts/2",{title:"axios学习",
            author:"Liaoxiaoyan"})
       .then(response=>{
           console.log(response);
       })
    };
    document.getElementById("btn8").onclick = function(){
        //发送delete请求,接收2个参数, url config配置对象
        axios.delete("http://localhost:3000/posts/3")
       .then(response=>{
           console.log(response);
       })
    };

    //这个与axios({})基本相同
    // axios.request({

    // })
</script>
</html>
请求的响应结果结构分析:
配置对象常用的配置项:
{
  // 路径url
  url: '/user',

  // 请求方法,默认get
  method: 'get',

  //基础url,最终请求的url是 baseURL+url拼接,所以再全局设置默认,可以使得发送请求时的url变得简洁
  baseURL: 'https://some-domain.com/api/',

  //设置请求头
  headers: {'X-Requested-With': 'XMLHttpRequest'},

  //设置请求url的query参数,可以使得url简洁。
  //比如url是https://some-domain.com/api/user  然后params如下设置,那么最终的url是:
  //https://some-domain.com/api/user?ID=12345&name=Jack
  params: {
    ID: 12345,
    name:"Jack"
  },


 //设置请求体
  data: {
    firstName: 'Fred'
  },

  //设置请求的另外一种格式,不过这个是直接设置字符串的
  data: 'Country=Brasil&City=Belo Horizonte',

 //请求超时,单位毫秒,默认0,不超时。
  timeout: 1000,

  //响应数据类型,默认json
  responseType: 'json',

  //响应数据的编码规则,默认utf-8
  responseEncoding: 'utf8',


	//响应体的最大长度
  maxContentLength: 2000,

  // 请求体的最大长度
  maxBodyLength: 2000,

  //设置响应状态码为多少时是成功,调用resolve,否则调用reject失败
  //默认是大于等于200,小于300
  validateStatus: function (status) {
    return status >= 200 && status < 300;
  },
默认配置
可以设置全局默认配置,是为了避免多种重复配置在不同请求中重复,比如baseURL、timeout等,这里设置baseURL。
<!DOCTYPE html>
<html lang="en">
<head>
    <meta charset="UTF-8">
    <title>默认配置</title>
</head>
<body>
    <script src="https://cdn.jsdelivr.net/npm/axios/dist/axios.min.js"></script>
    <script>
        axios.defaults.baseURL="http://localhost:3000";

        //因为上面配置了baseURL,所以我们之后的请求只需要配置url不用像之前那样的全路径
        axios.get("/posts/1")
       .then(response=>{
           console.log(response);
       })


    </script>
</body>
</html>
axios拦截器
实质就是函数。
分为两种类型:1.请求拦截器:用于拦截请求,自定义做一个逻辑后再把请求发送,可以用于配置公用的逻辑,就不用每个请求都配一遍。
2. 响应拦截器:用于拦截响应,做一些处理后再出发响应回调。
<!DOCTYPE html>
<html lang="en">
<head>
    <meta charset="UTF-8">
    <title>axios拦截器</title>
</head>
<body>
    <script src="https://cdn.jsdelivr.net/npm/axios/dist/axios.min.js"></script>
    <script>
        //这个是设置请求拦截器的api,传入两个回调,第一个成功回调,第二个失败回调。
        axios.interceptors.request.use(
            function(config){
                console.log("请求拦截器1调用成功");
                return config;
            },
            function(error){
                console.log("请求拦截器1调用失败");
                return Promise.reject(error)
            }
        )

        //这个是设置响应拦截器的api,第一个成功回调,第二个失败回调
        axios.interceptors.response.use(
            function(response){
                console.log("响应拦截器1调用成功");
                return response;
            },
            function(error){
                console.log("响应拦截器1调用失败");
                return Promise.reject(error);
            }
        )

        axios.get("http://localhost:3000/posts/1")
        .then(function(response){
            //
            console.log("请求回调成功");
        }).catch(function(error){
            console.log("请求回调失败");
        })
    </script>
</body>
</html>
要理解这些个拦截器需要由一定的es6 Promise基础,出现上面效果的原因是,发送请求前,请求被请求拦截器拦截了,并且请求拦截器返回了一个非Promise实例的对象config,所以下一个拦截器是调用成功回调的,所以就打印响应拦截器成功,然后响应拦截器成功的回调返回的是非Promise实例的对象response,所以最终的请求回调是调用成功的回调,所以返回请求调用成功。
尝试以下再请求拦截器的成功回调中,返回reject状态的Promise。
出现上面效果的原因是,请求拦截器的成功回调中最后返回了reject状态的Promise实例对象,被判断为失败,到了回调链的下一回调,也就是响应拦截器的回调时,调用的时失败的回调,失败的回调中又返回了reject状态的Promise实例对象,所以到了真正请求的回调页调用了失败回调。
上面的效果与Promise如出一辙。
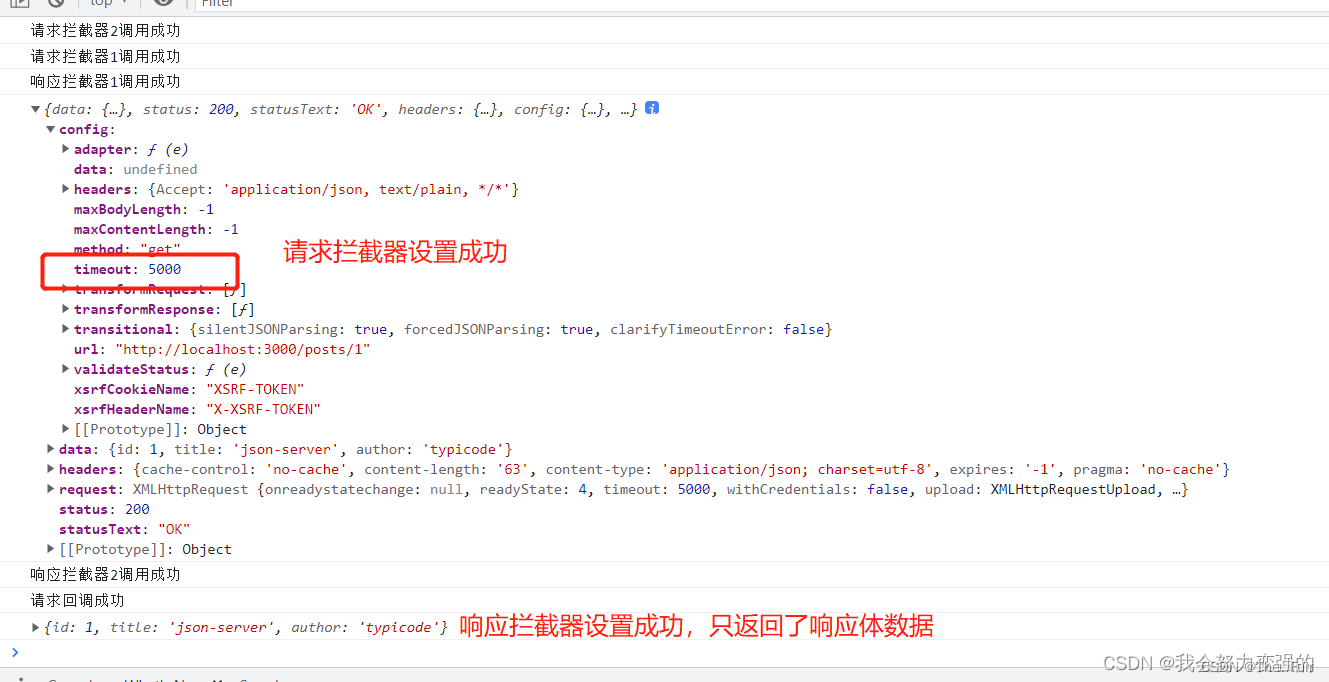
多个拦截器的效果:加了一个请求拦截器一个响应拦截器:
可以看到请求拦截器类似栈,后进先出,响应拦截器类似队列,先进先出。
可以在请求拦截器中对config进行调整,比如添加一个超时什么的,可以在响应拦截器中对response返回值进行调整,比如我返回到回调函数中只想要响应体部分。
<!DOCTYPE html>
<html lang="en">
<head>
    <meta charset="UTF-8">
    <title>axios拦截器</title>
</head>
<body>
    <script src="https://cdn.jsdelivr.net/npm/axios/dist/axios.min.js"></script>
    <script>
        //这个是设置请求拦截器的api,传入两个回调,第一个成功回调,第二个失败回调。
        axios.interceptors.request.use(
            function(config){
                console.log("请求拦截器1调用成功");
                return config;
            },
            function(error){
                console.log("请求拦截器1调用失败");
                return Promise.reject(error)
            }
        )

        axios.interceptors.request.use(
            function(config){
                //设置请求超时时间
                config.timeout = 5000;
                console.log("请求拦截器2调用成功");
                return config;
            },
            function(error){
                console.log("请求拦截器2调用失败");
                return Promise.reject(error)
            }
        )

        //这个是设置响应拦截器的api,第一个成功回调,第二个失败回调
        axios.interceptors.response.use(
            function(response){
                console.log("响应拦截器1调用成功");
                 console.log(response);
                //返回到请求回调时,只要data数据
                return response.data;
            },
            function(error){
                console.log("响应拦截器1调用失败");
                return Promise.reject(error);
            }
        )
        axios.interceptors.response.use(
            function(response){
                console.log("响应拦截器2调用成功");
                return response;
            },
            function(error){
                console.log("响应拦截器2调用失败");
                return Promise.reject(error);
            }
        )

        axios.get("http://localhost:3000/posts/1")
        .then(function(response){
            //
            console.log("请求回调成功");
            console.log(response);
        }).catch(function(error){
            console.log("请求回调失败");
        })
    </script>
</body>
</html>
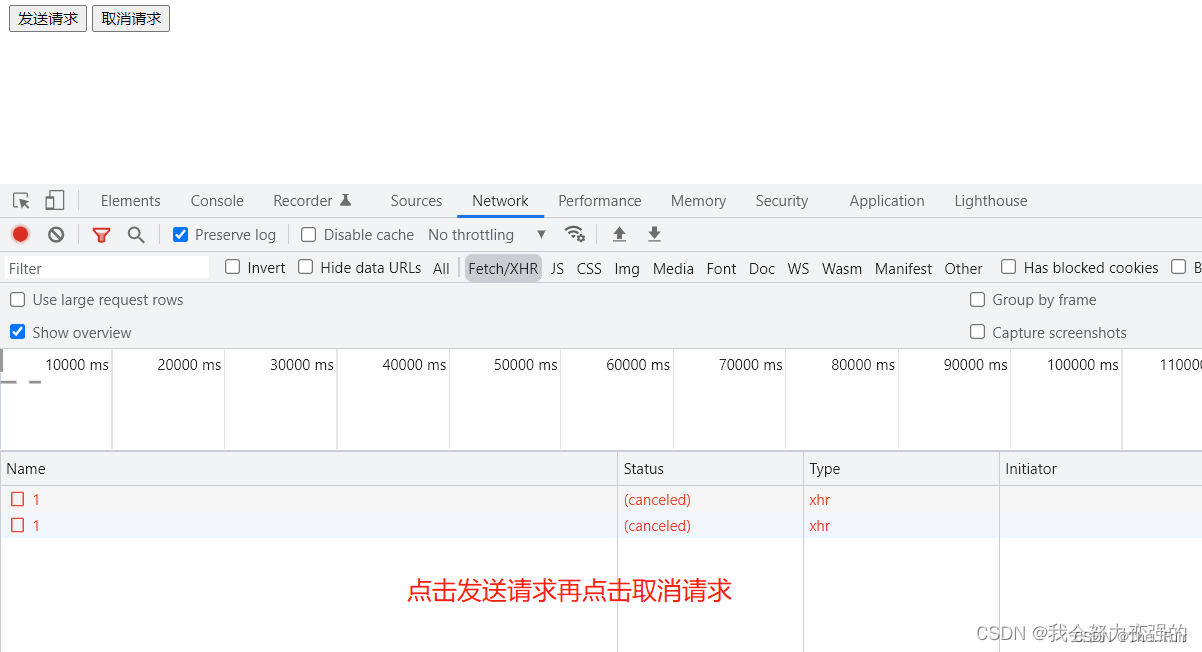
取消请求
取消请求就是发送了请求后,等待一段时间得不到回应,可以取消他。
<!DOCTYPE html>
<html lang="en">
<head>
    <meta charset="UTF-8">
    <title>axios取消请求</title>
</head>
<body>
    <button id="btn1">发送请求</button>
    <button id="btn2">取消请求</button>


    <script src="https://cdn.jsdelivr.net/npm/axios/dist/axios.min.js"></script>
    <script>
        //第一步:定义一个全局的cancel变量,初始值是null
        let cancel = null;
        document.getElementById("btn1").onclick = function(){
            axios.get("http://localhost:3000/posts/1",
            {
                //第二步:在请求的配置对象中,配置cancelToken属性值,并把函数的c参数赋值给全局变量cancel
                cancelToken:new axios.CancelToken(function(c){
                    cancel = c;
                })
            })
        .then(function(response){
            //
            console.log(response);
        }).catch(function(error){
            console.log("请求回调失败");
        })
        }

        document.getElementById("btn2").onclick = function(){
            //第三步:调用cancel函数就是取消请求接收
            cancel();
        }
    </script>
</body>
</html>


03-26
 260
260
260
11-04
1080
1080
“相关推荐”对你有帮助么?
-

 非常没帮助
非常没帮助 -

 没帮助
没帮助 -

 一般
一般 -

 有帮助
有帮助 -

 非常有帮助
非常有帮助
提交

 被折叠的 条评论
为什么被折叠?
被折叠的 条评论
为什么被折叠?
 到【灌水乐园】发言


