


WEB应用程序开发之客户端与浏览器交互
客户端与浏览器交互方式
1.同步交互
例如超链接,表单请求服务器程序,向客户端做出响应,响应的内容会覆盖原来的页面内容,会打断客户端正常操作,不友好.
2.异步交互(ajax)
客户端与服务器之间交互时,服务器向客户端响应内容,不影响客户端正常操作
Ajax 全称为:“Asynchronous JavaScript and XML”(异步JavaScript 和 XML)
使用 Ajax,我们可以无刷新状态更新页面,并且实现异步提交,提升了
用户体验。
举个栗子

通过异步交互的方式达到了与远端数据库内信息的交互,达到便捷的验证效果,相比原来最原始同步验证方式便捷了不少,也增加了注册用户的使用体验
Ajax其实质是利用浏览器提供的一个特殊的对象(XMLHttpRequest)异步地向服务器发送请求,服务器返回部分数据,浏览器让你去利用这些数据对页面做部分的更新,整个过程,页面无刷新,不打断用户的操作。
在上一回的基础上我们开始学习新的功能模块
创建XMLHttpRequest对象
XMLHttpRequest对象:发送请求到服务器并获得返回结果
所有现代浏览器 都内建了 XMLHttpRequest 对象,通过一行简单的JavaScript 代码,我们就可以创建 XMLHttpRequest 对象
第一步
在我们之前写过的超简易前端界面添加JavaScript代码,获取框内值
  //获取account,password的值
            var account=document.getElementsById("account").value();
            var password=document.getElementById("password").value();
第二步
在LoginServlet中重写的doPost方法中请求数据
 resp.setContentType("text/html;charset=utf-8");//响应格式设置
            req.setCharacterEncoding("utf-8");//设置post请求数据解码格式
            String account = req.getParameter("account");
            String password = req.getParameter("password");
第三步
这里需要添加mysql-connector-java-8.0.16.jar包,利用JDBC部分的知识进行数据库之间的链接交互
需要jar包的可以在网上自寻查找
或者
利用此链接:https://pan.baidu.com/s/17HvfN4YGEMulGi3nBemOzA 下载
提取码:acyl
需要学习/复习JDBC部分的内容可以看这个博客
https://blog.csdn.net/qq_51352148/article/details/118797329.
 LoginDao loginDao=new LoginDao();
            User user= loginDao.checkLogin(account,password);
LoginDao代码
package com.qn.firstweb.dao;

import com.qn.firstweb.mode.User;

import java.sql.*;

public class LoginDao {
    public User checkLogin(String account, String password) throws SQLException, ClassNotFoundException {
        Connection connection = null;
        PreparedStatement ps = null;
        ResultSet resultSet = null;
        User user = null;
        try {
            Class.forName("com.mysql.cj.jdbc.Driver");
            /* 创建与数据库连接的方式*/
            connection = DriverManager.getConnection("jdbc:mysql://127.0.0.1:3306/ssm?characterEncoding=utf8&useSSL=false&serverTimezone=Asia/Shanghai", "root", "root");
            ps = connection.prepareStatement("select account from t_student where account=?and password=?");
            ps.setString(1, account);
            ps.setString(2, password);
            resultSet = ps.executeQuery();
            if (resultSet.next()) {
                user = new User();
                user.setAccount(resultSet.getString("account"));
            }
        } finally {
            if (connection != null) {
                connection.close();
            }
            if (ps != null) {
                ps.close();
            }
            if (resultSet != null) {
                resultSet.close();
            }
        }
        return user;
    }

}
这个User对象使之前事先建好的代码如下,在后面我们还会用到
package com.qn.firstweb.mode;

import java.util.Date;

public class User {
    private int id;
    private String account;
    private String password;
    private Date reg_time;

    public int getId() {
        return id;
    }
    public void setId(int id) {
        this.id = id;
    }

    public String getAccount(String string) {
        return account;
    }

    public void setAccount(String account) {
        this.account = account;
    }

    public String getPassword(String string) {
        return password;
    }

    public void setPassword(String password) {
        this.password = password;
    }

    public Date getReg_time() {
        return reg_time;
    }

    public void setReg_time(Date reg_time) {
        this.reg_time = reg_time;
    }
    @Override
    public String toString() {
        return "User{" +
                "id=" + id +
                ", account='" + account + '\'' +
                ", password='" + password + '\'' +
                ", reg_time=" + reg_time +
                '}';
    }
}
最后我们在使用我们自己设置的标识码,发送给前端进行验证
LoginServlet全部代码如下
package com.qn.firstweb.servlet;

import com.qn.firstweb.dao.LoginDao;
import com.qn.firstweb.mode.User;

import javax.servlet.ServletException;
import javax.servlet.http.HttpServlet;
import javax.servlet.http.HttpServletRequest;
import javax.servlet.http.HttpServletResponse;
import java.io.IOException;
import java.io.PrintWriter;

public class LoginServlet extends HttpServlet {
    @Override
    protected void doPost(HttpServletRequest req, HttpServletResponse resp) throws ServletException, IOException {
        PrintWriter out = null;
        try {
            resp.setContentType("text/html;charset=utf-8");//响应格式设置
            req.setCharacterEncoding("utf-8");//设置post请求数据解码格式
            String account = req.getParameter("account");
            String password = req.getParameter("password");

            LoginDao loginDao=new LoginDao();
            User user= loginDao.checkLogin(account,password);

            out= resp.getWriter();
            if(user!=null){
                out.println(0);
            }else {
                out.println(1);
            }
        } catch (Exception e) {
            e.printStackTrace();
            System.out.println("服务器响应异常");
        }
    }
}
第四步
在前段进行与后端之间的交互响应

 //使用XMLHttpRequest对象,发起异步请求
            var httpobj=new XMLHttpRequest();
            httpobj.open("post","login",true);
            httpobj.setRequestHeader("Content-Type","application/x-www-form-urlencoded");
            httpobj.send("account"+account+"&password"+password);
接收到响应之后进行数据响应,我们这里需要使用onreadystatechange方法

再补充一些状态码数字代表的意义

//接收数据
            httpobj.onreadystatechange=function (){          //一旦异步触发就触发函数
                    if (httpobj.status==200&&httpobj.readyState==3){
                        if(httpobj.responseText==0){
                            alert("登陆成功");
                            location.assign("success.html");
                        }else if(httpobj.responseText==1){
                            alert("密码错误");
                        }
                        else {
                            alert("密码与账号都错误");
                        }
                    }
                }
下来开始实践
这里有我在数据库中事先加好的数据,我们直接验证即可


点击保存进行交互,密码成功后自动跳转界面


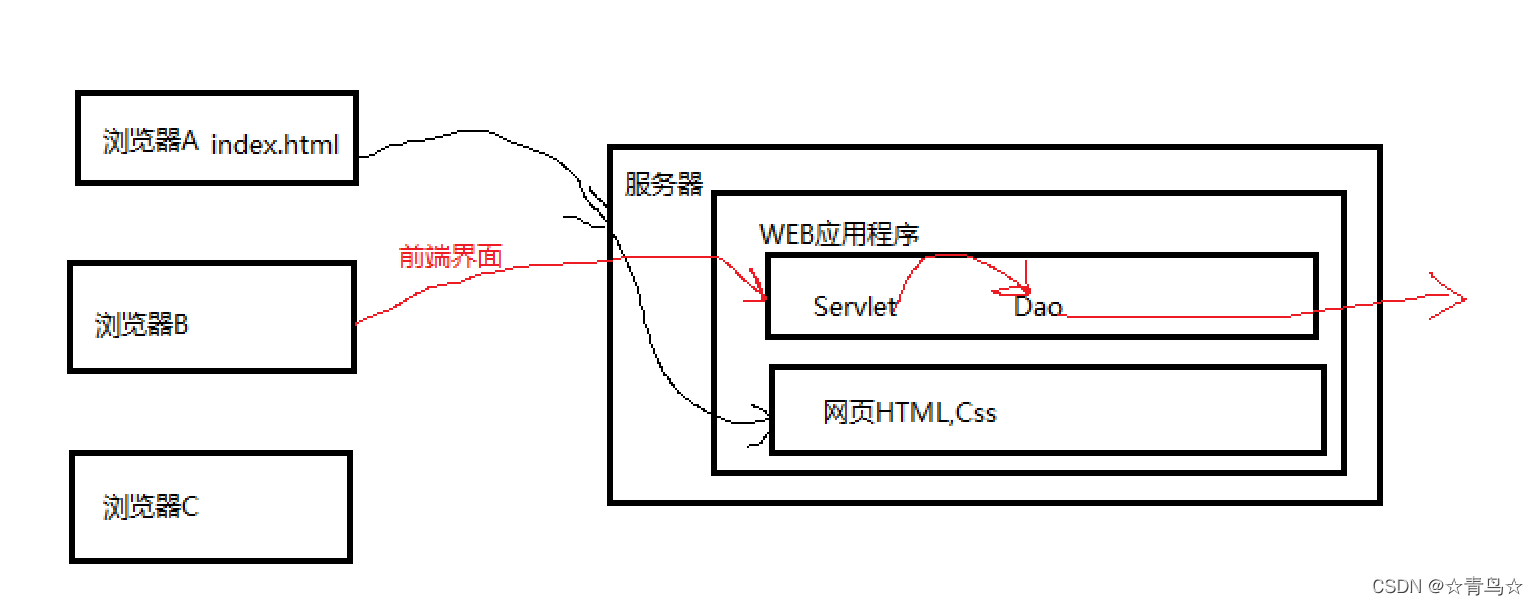
总结思绪图
核心的原理还是和之前一样的,多多品味吧


 151
151


 被折叠的 条评论
为什么被折叠?
被折叠的 条评论
为什么被折叠?
 到【灌水乐园】发言


