


文章目录
- 涉及到的主要技术栈:watermelon:
- 项目主要模块划分:watermelon:
- 1. 注册:strawberry:
- 2. 登录:strawberry:
- 3. 个人中心 | 基本资料:strawberry:
- 4. 个人中心 | 修改密码:strawberry:
- 5. 个人中心 | 常用乘车人 | 常用联系人:strawberry:
- 6. 个人中心 | 订单管理:strawberry:
- 7. 首页 | 车票查询:strawberry:
- 8. 首页 | 常见车站列表:strawberry:
- 9. 首页| 车站地图展示:strawberry:
- 10. 首页 | 热门线路:strawberry:
- 11. 车票查询:strawberry:
- 12. 提交订单:strawberry:
- 13. 查询用户是否支付成功:strawberry:
- 14. vuex中管理的状态::strawberry:
- 15. main.js配置:strawberry:
- 16. 设置路由以及路由拦截器:strawberry:
- 这篇文章是对前一段时间完成的客运站前端项目进行总结,,希望自己能坚持这个习惯,收获的更多。
- 项目暂时还没有时间进行优化,一些依赖或库都是全部引入等等,后期有时间会进行一次小优化。
- 项目实现中遇到的一些问题和最终解决办法,会另外整理,避免一篇文章太过臃肿
涉及到的主要技术栈🍉
::: tip
- vue2
- element-ui
- axios
- vue-router
- vuex
:::
项目主要模块划分🍉
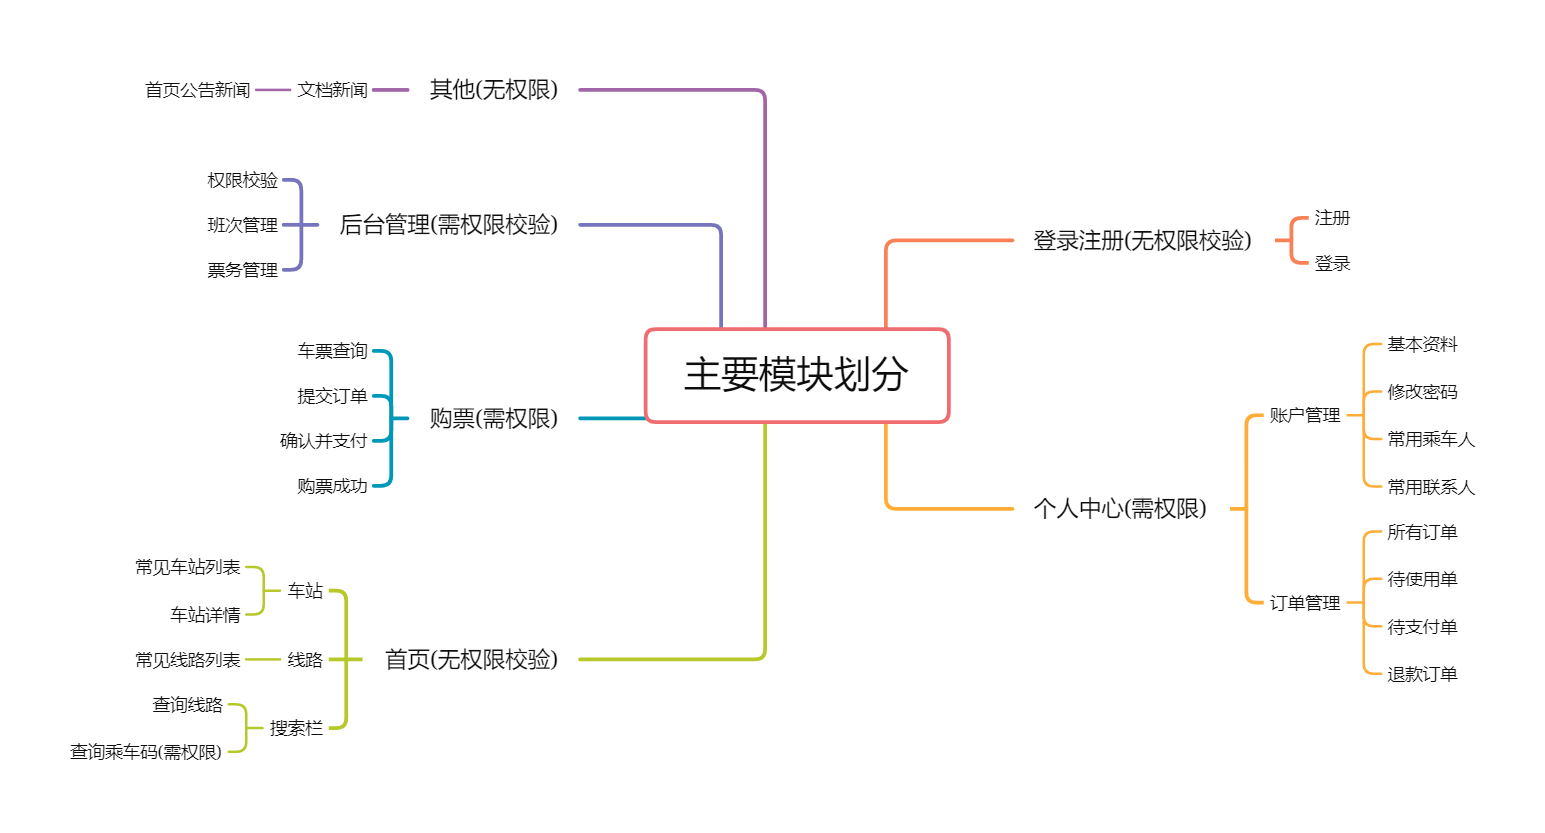
::: tip
一些常见的功能需求就不做整理了,只整理一下值得注意的地方或当时遇到困难的地方
:::
1. 注册🍓
页面:
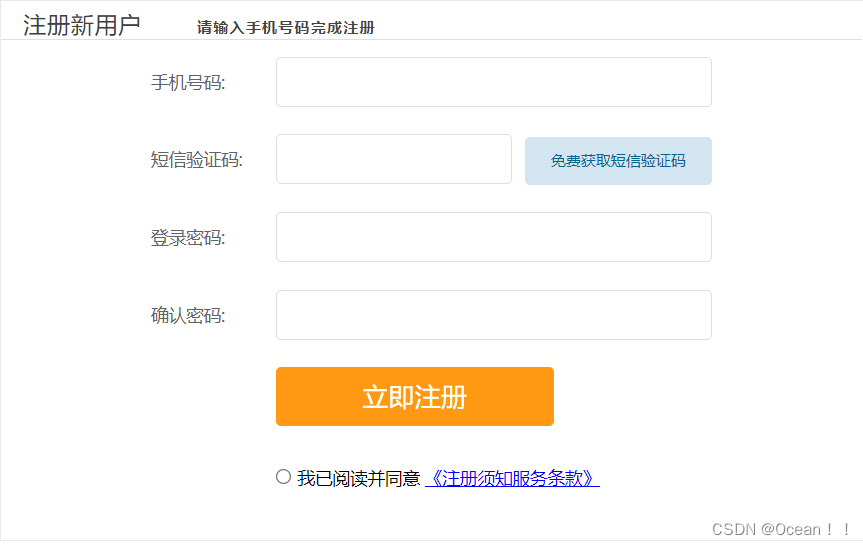
逻辑:
实现点击按钮发送短信验证码,限制频率,60s获取一次验证码并显示倒计时
<el-form-item label="短信验证码:" prop="phone_code">
        <div class="codeContainer">
          <div class="checkCode">
            <el-button
              type="primary"
              :disabled="isDisabled"
              @click="sendCode"
              width="100px"
              >{{ buttonText }}</el-button
            >
          </div>
          <el-input v-model="registerForm.phone_code"></el-input>
        </div>
      </el-form-item>
利用定时器控制发送频率
//发送验证码
    async sendCode() {
      // 正则判断手机号合法性
      if (this.checkMobile(this.registerForm.phone_number)) {
        const { data: res } = await this.$http.get(
          '/permissions/sendPhoneCode',
          {
            params: {
              phone_number: this.registerForm.phone_number,
            },
          }
        )
        if (res.code !== 10000) {
          // 请求失败
          return this.$message({
            type: 'error',
            message: res.message,
            duration: 2000,
          })
        }
        this.$message({
          type: 'success',
          message: '发送成功,请注意查收',
          duration: 2000,
        })
        // 设定时间间隔,最多60秒发一次
        let time = 60
        this.buttonText = '已发送'
        // 禁用发送按钮
        this.isDisabled = true
        if (this.flag) {
          this.flag = false
          let timer = setInterval(() => {
            time--
            this.buttonText = time + '秒'
            if (time === 0) {
              clearInterval(timer)
              this.buttonText = '重新获取'
              this.isDisabled = false
              this.flag = true
            }
          }, 1000)
        }
      }
    },

    //验证手机号
    checkMobile(str) {
      let re = /^1\d{10}$/
      if (re.test(str)) {
        return true
      } else {
        return false
      }
    },
2. 登录🍓
页面:
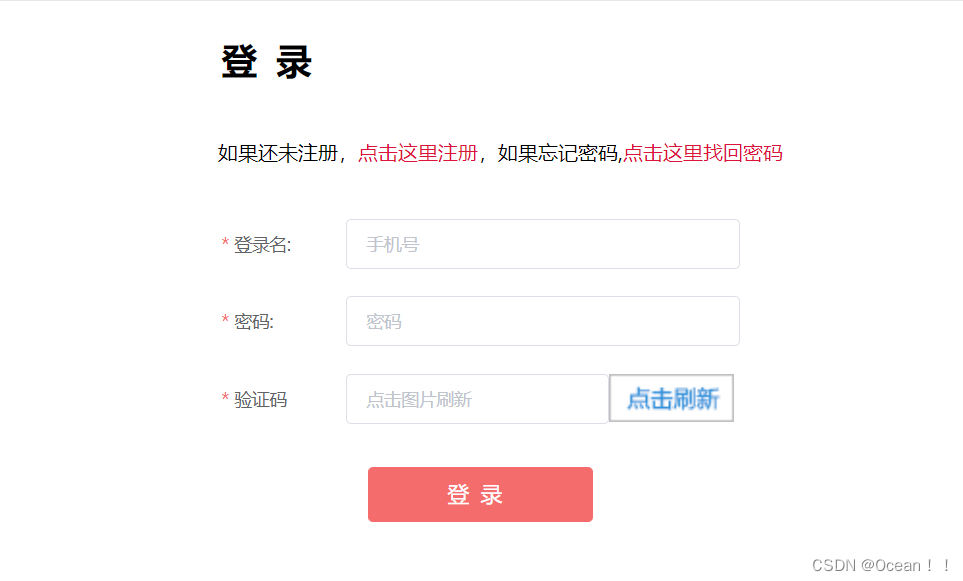
逻辑:
::: tip
发送请求获取验证码图片,需要注意的是这个接口后台返回的是验证码图片的二进制流,前端需要使用blob对象稍作处理
实现点击刷新和获得焦点刷新,绑定给相应的事件即可
:::
<el-form-item label="验证码" prop="check_code">
        <div class="RcodeContainer">
          <div class="checkcode" @click="refreshImg">
            <img :src="codeImgUrl" alt="图片验证码" width="100px" />
          </div>
          <el-input
            v-model="loginForm.check_code"
            placeholder="点击图片刷新"
            @focus="refreshImg"
          ></el-input>
        </div>
      </el-form-item>
// 点击刷新验证码图片
    refreshImg() {
      //发送请求获取验证码
      this.$http
        .request({
          url: `/permissions/getCheckCodePicture`,
          // 设置响应类型为blob
          responseType: 'blob',
          methods: 'get',
        })
        .then((res) => {
          // 将后台返回的二进制图片流转换
          const myBlob = new window.Blob([res.data], { type: 'image/png' })
          // 将转化后的URL赋值给图片的src属性
          this.codeImgUrl = window.URL.createObjectURL(myBlob)
          // 保存sessionid,供服务端判断验证码用
          window.sessionStorage.setItem('SessionId', res.headers['session-id'])
        })
        .catch((err) => {
          console.log(err)
        })
    },
::: tip
- 登录时,将用户密码进行MD5加密成16位之后再发送给后台
- 登陆成功后,保存返回的SessionId,以后所有的请求都要携带这个SessionId,以便服务端识别身份
- 同时改变用户的登录状态,用Vuex进行管理,供页面其他部分使用
- 将登录状态保存至sessionstroage,供后面路由拦截时进行判断
- 登录成功后,返回用户刚才浏览的页面
:::
// 登录
    login() {
      // 登录前的预校验
      this.$refs.loginFormRef.validate(async (valid) => {
        if (!valid) return
        // 拿到接口返回的数据
        const { data: res } = await this.$http.post('/permissions/login', {
          phone_number: this.loginForm.phone_number,
          // 将密码进行MD5的16位加密
          password: this.$utils.md5(this.loginForm.password, 16),
          check_code: this.loginForm.check_code,
        })
        // 判断是否登陆成功
        if (res.code !== 10000) {
          return this.$message({
            message: res.message,
            type: 'error',
            duration: 2000,
          })
        }

        // 保存返回的SessionId
        window.sessionStorage.setItem('SessionId', res.data.SessionId)
        // 改变用户的登录状态
        this.$store.dispatch('userLogin',true)
        // 用于之后路由守卫判断登录状态
        sessionStorage.setItem('isLogin',true)
        this.$message({
          message: '登录成功!',
          type: 'success',
          duration: 2000,
        })
        // 返回之前浏览的页面
        if(this.$route.query.redirectPath){
          return this.$router.go(-1)
        }
        this.$router.push('/first')
      })
    },
3. 个人中心 | 基本资料🍓
页面:
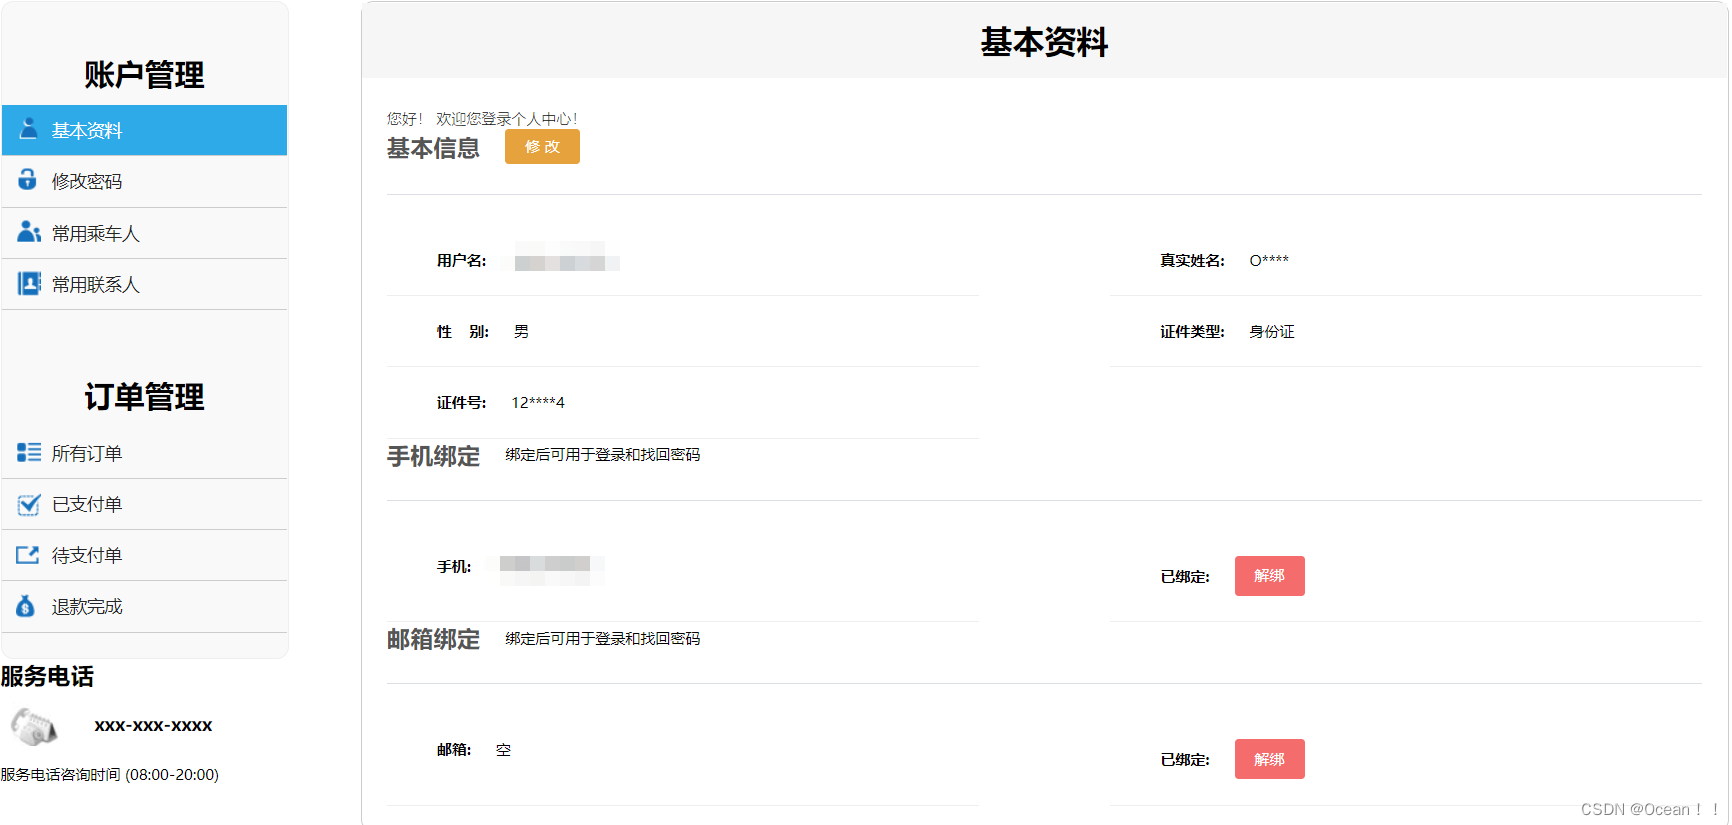
逻辑:
::: tip
获取用户信息和修改用户信息都是一些简单的增删改查,前端要做的事比较少
:::
<!-- 修改用户信息的对话框 -->
        <el-dialog
          title="修改信息"
          :visible.sync="EditDialogVisible"
          width="50%"
          @close="EditDialogClosed"
        >
          <!-- 用户信息的表单 -->
          <el-form
            :model="editForm"
            :rules="editFormRules"
            ref="editFormRef"
            class="editForm"
            label-width="100px"
          >
            <el-form-item label="用户名">
              <el-input v-model="editForm.phone_number" disabled></el-input>
            </el-form-item>
            <el-form-item label="真实姓名" prop="name">
              <el-input v-model="editForm.name"></el-input>
            </el-form-item>
            <el-form-item label="性别" prop="sex">
              <el-select
                v-model="editForm.sex"
                placeholder="请选择性别"
                style="width: 190px"
              >
                <el-option
                  v-for="sex in genderOpt"
                  :key="sex.name"
                  :label="sex.name"
                  :value="sex.value"
                >
                </el-option>
              </el-select>
            </el-form-item>
            <el-form-item label="证件类型" prop="card_type">
              <el-select
                v-model="editForm.card_type"
                placeholder="选择身份证类型"
                style="width: 190px"
              >
                <el-option
                  v-for="type in cardOpt"
                  :key="type.name"
                  :label="type.name"
                  :value="type.value"
                >
                </el-option>
              </el-select>
            </el-form-item>
            <el-form-item label="证件号" prop="card_number">
              <el-input v-model="editForm.card_number"></el-input>
            </el-form-item>
          </el-form>

          <span slot="footer" class="dialog-footer">
            <el-button @click="EditDialogVisible = false">取 消</el-button>
            <el-button type="primary" @click="this._setUserInfo">确 定</el-button>
          </span>
        </el-dialog>
// 显示修改信息的对话框
    showEditDialog(){
      //  给修改对话框中的表单赋初始值
      this.editForm = this.userInfo
      this.EditDialogVisible = true
    },
    // 修改用户信息
    _setUserInfo() {
      this.$refs.editFormRef.validate(async (valid) => {
        if (!valid) return

        const { data: res } = await this.$http.post(
          `/userCenter/modifyProfile`,
          this.editForm
        )

        if (res.code !== 10000) {
          return this.$message({
            type: 'error',
            message: res.message,
            duration: 2500,
          })
        }
        this.EditDialogVisible = false
        // 修改成功后重新获取用户信息 以达到刷新效果
        this._getUserInfo()
        this.$message.success('修改信息成功!')
      })
    },
    // 监听修改信息对话框关闭事件
    EditDialogClosed() {
      // 清空表单信息
      this.$refs.editFormRef.resetFields()
    },
4. 个人中心 | 修改密码🍓
::: tip
此页面很简单,就只有一个表单,修改密码成功后,直接清除登录状态和权限状态,让用户重新登录
:::
	// 判断两次密码输入是否一致
    let validatePass = (rule, value, callback) => {
      if (value === '') {
        callback(new Error('请再次输入密码!'))
      } else if (value !== this.modifyForm.password) {
        callback(new Error('两次输入不一致,请重新输入!'))
      } else {
        callback()
      }
    }


    // 修改密码
    _setPassword() {
      this.$refs.modifyFormRef.validate(async (valid) => {
        if (!valid) return

        const { data: res } = await this.$http.post(
          `/userCenter/modifyPassword`,
          {
            old_password: this.$utils.md5(this.modifyForm.old_password, 16),
            password: this.$utils.md5(this.modifyForm.password, 16),
          }
        )

        if (res.code !== 10000) {
          return this.$message.error(res.message)
        }
        this.$message.success('修改密码成功,请重新登录!')
        // 改变登录态
        this.$store.dispatch('userLogin', false)
        this.$store.dispatch('setPermissions', false)
        // 清除sessionid
        window.sessionStorage.clear()
        // 刷新页面
        if (this.$route.path == '/first') {
          this.$router.go(0)
        } else {
          this.$router.push('/first')
        }
      })
    },
5. 个人中心 | 常用乘车人 | 常用联系人🍓
::: tip
这个部分功能很单一,就是调用接口获得数据,然后展示在表格中,以及简单的修改和删除功能
:::
6. 个人中心 | 订单管理🍓
页面:
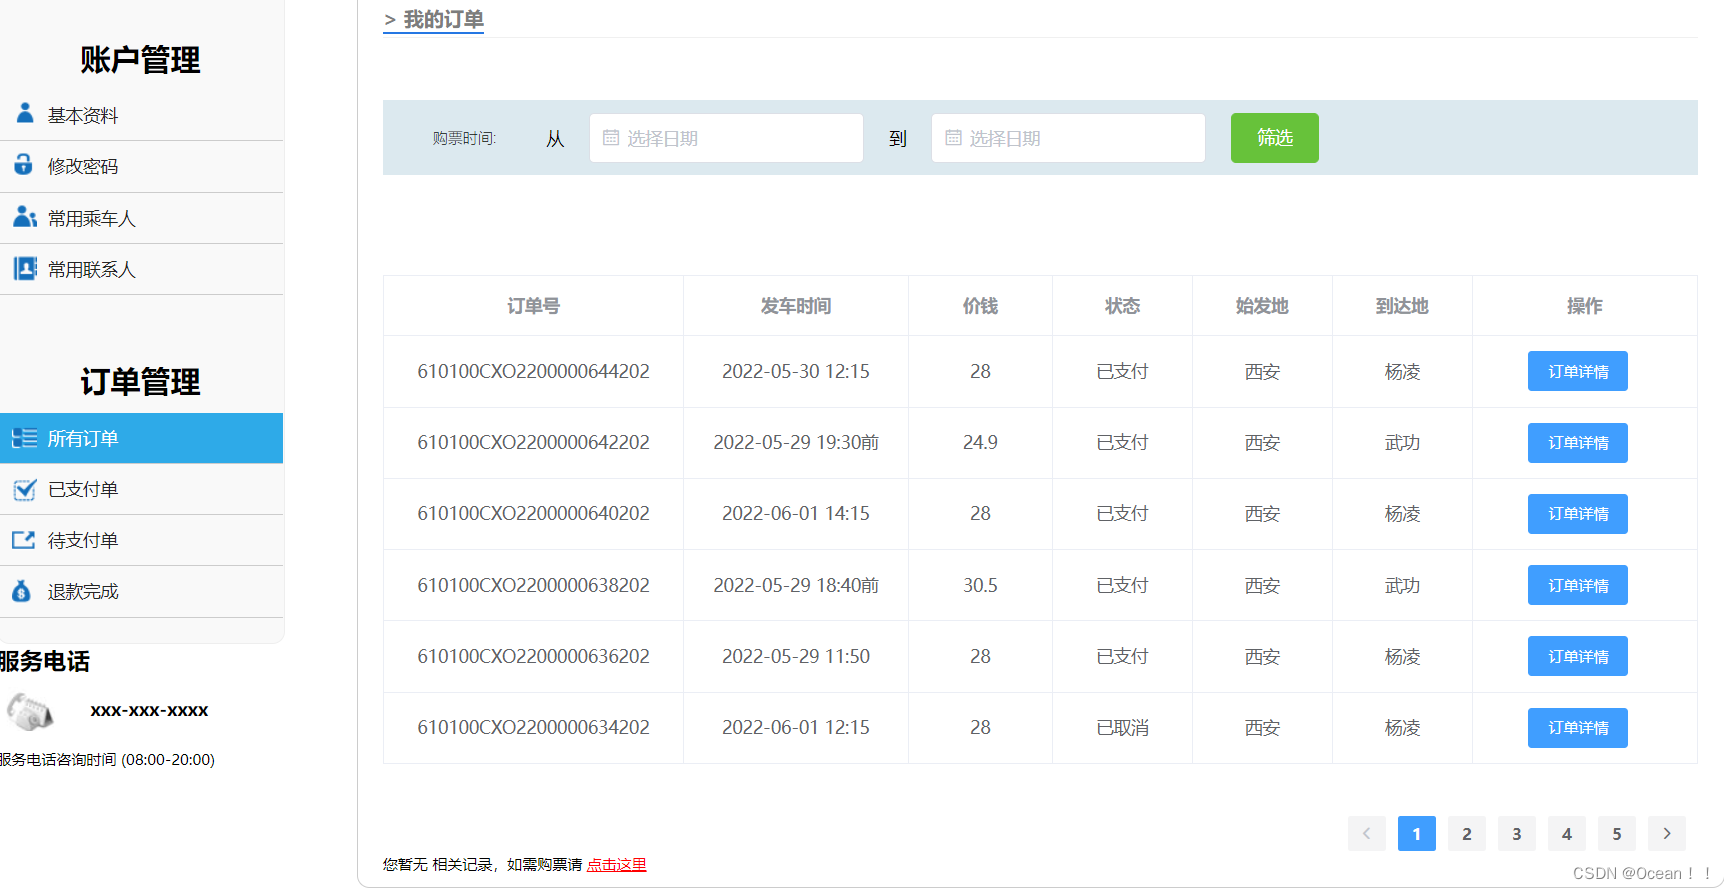
逻辑:
::: tip
这个模块感觉就是对一些数据的请求和简单渲染,很简单,跳过
:::
7. 首页 | 车票查询🍓
页面:
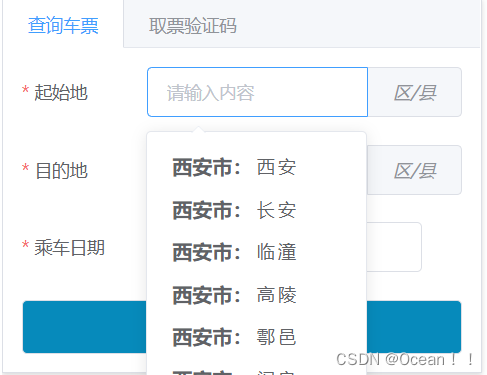
逻辑:
	<el-tab-pane label="查询车票">
        <!-- 查询车票的表单 -->
        <el-form
          :model="QueryForm"
          :rules="QueryRules"
          ref="QueryFormRef"
          label-width="100px"
          label-position="left"
        >
          <el-form-item label="起始地" prop="start_name">
            <!-- 带有输入建议的input -->
            <el-autocomplete
              v-model="QueryForm.start_name"
              :fetch-suggestions="querySearch"
              placeholder="请输入内容"
              @select="handleSelect1"
              :debounce="0"
            >
              <i slot="append">区/县</i>
              <template slot-scope="{ item }">
                <div class="cityName">{{ item.city_name + '市:' }}</div>
                <div class="regionName">{{ item.region_name }}</div>
              </template>
            </el-autocomplete>
          </el-form-item>
          <el-form-item label="目的地" prop="final_name">
            <!-- 带有输入建议的input -->
            <el-autocomplete
              v-model="QueryForm.final_name"
              :fetch-suggestions="querySearch"
              placeholder="请输入内容"
              @select="handleSelect2"
              :debounce="0"
            >
              <i slot="append">区/县</i>
              <template slot-scope="{ item }">
                <div class="cityName">{{ item.city_name + '市:' }}</div>
                <div class="regionName">{{ item.region_name }}</div>
              </template>
            </el-autocomplete>
          </el-form-item>
          <el-form-item label="乘车日期" prop="shuttle_shift_date">
            <el-date-picker
              v-model="QueryForm.shuttle_shift_date"
              align="left"
              type="date"
              placeholder="请选择日期"
              format="yyyy 年 MM 月 dd 日"
              value-format="yyyy-MM-dd"
            >
            </el-date-picker>
          </el-form-item>
          <el-button @click="QueryTickets">
            <i class="el-icon-search"></i> 查询</el-button
          >
        </el-form>
      </el-tab-pane>
::: tip
- 发送请求获取地区列表(用于输入建议)
:::
// 获取地区列表(用于输入建议)
    async getAllRegions() {
      // 发送请求
      const { data: res } = await this.$http.get(`/query/region/getAllRegions`)

      if (res.code !== 10000) {
        return this.$message.error('获取所有地区列表失败!')
      }

      // 保存数据
      this.regionsList = res.data.region_list
    },
::: tip
2. 利用el-autocomplete内置的一些方法完成输入建议的绑定
:::
	// 查找输入建议
    querySearch(queryString, cb) {
      let regionsList = this.regionsList
      let res = queryString
        ? regionsList.filter(this.createFilter(queryString))
        : regionsList

      cb(res)
    },
    // 输入建议的过滤器
    createFilter(queryString) {
      return (regionsList) => {
        return (
          // 不区分大小写
          regionsList.region_name
            .toLowerCase()
            .indexOf(queryString.toLowerCase()) >= 0 ||
          regionsList.region_english_name
            .toLowerCase()
            .indexOf(queryString.toLowerCase()) >= 0
        )
      }
    },
::: tip
3. 当输入建议被选中的时候需要查找并保存对应的id,供后续请求使用
:::
	// 输入建议被选中时触发的事件
    handleSelect1(item) {
      this.QueryForm.start_name = item.region_name
      this.QueryForm.start_region_id = item.region_id
    },
    handleSelect2(item) {
      this.QueryForm.final_name = item.region_name
      this.QueryForm.final_region_id = item.region_id
    },
	// 查询车票
    QueryTickets() {
      // 表单验证
      this.$refs.QueryFormRef.validate(async (valid) => {
        if (!valid) return

        const { data: res } = await this.$http.get(
          `/query/shuttle/getShuttleList`,
          {
            params: {
              shuttle_shift_date: this.QueryForm.shuttle_shift_date,
              start_region_id: this.QueryForm.start_region_id,
              final_region_id: this.QueryForm.final_region_id,
            },
          }
        )
        if (res.code !== 10000) {
          return this.$message.error(res.message)
        }
        this.$message.success('查询成功!')
        // 控制车票查询页面的默认状态
        let status = {
          shuttle_shift_date: this.QueryForm.shuttle_shift_date,
          startDate: this.$moment(this.QueryForm.shuttle_shift_date),
          activeTab: this.$moment(this.QueryForm.shuttle_shift_date).format(
            'MM-DD'
          ),
        }
        // 传递给车票查询页面的参数
        const info = JSON.stringify({
          start_region_id: this.QueryForm.start_region_id,
          final_region_id: this.QueryForm.final_region_id,
        })
        this.$store.commit('setSearchStatus', status)
        this.$refs.QueryFormRef.resetFields()
        this.$router.push({
          path: '/purchase',
          query: {
            result: JSON.stringify(res.data),
            info,
          },
        })
      })
    },
8. 首页 | 常见车站列表🍓
页面:
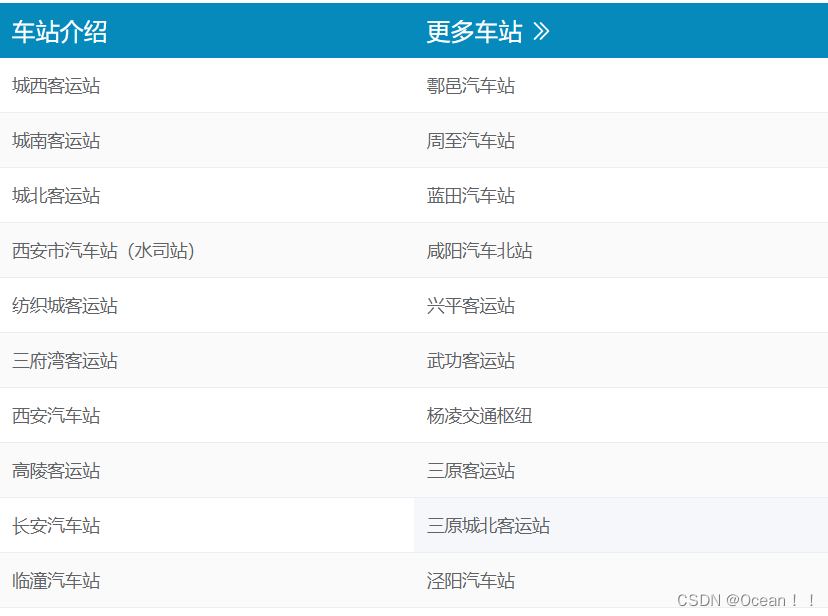
逻辑:
::: tip
1. 首先就是获取车站列表详情,然后展示在table中
2. 然后是当用户点击某个车站时,将这个车站的详情(经纬度,名称,id等)传给map组件
 	1. 这里可以通过父子组件传参,也可以通过路由传参,也可以通过Vuex管理,我这次选择了后者
3. map组件根据得到的车站信息进行地图展示,并将用户选中的车站设置为地图中心
4. 这里的地图用的是百度地图API,里面关于坐标系有一些转化问题,详细的操作可以去官方的开发文档了解一下,只是简单使用的话很容易上手
:::
	<el-table
        :data="stationList2"
        style="width: 50%"
        size="medium"
        stripe
        :show-header="false"
      >
        <el-table-column>
          <template slot-scope="scope">
            <span class="staInfo" @click="showMap(scope.row)">{{
              scope.row.station_name
            }}</span>
          </template>
        </el-table-column>
      </el-table>
	// 获取车站列表(详情及经纬度)
    async getStationList() {
      // 发送请求
      const { data: res } = await this.$http.get(
        `/query/station/getAllStations`
      )
      if (res.code !== 10000) {
          return this.$message({
              type: 'error',
              message: '获取车站列表失败!',
              duration: 2000
          })
      }

      // 保存数据
      this.stationList1 = res.data.station_list.slice(0,10)
      this.stationList2 = res.data.station_list.slice(10,20)
      this.$store.commit('setStationList',res.data.station_list)

    },
	// 点击车站跳转到地图页面
    showMap(activeStation) {
      // 设置车站的经纬度
      this.$store.commit('setPosition', activeStation)
      // 跳转页面
      this.$router.push('stationMap')
    },
9. 首页| 车站地图展示🍓
页面:
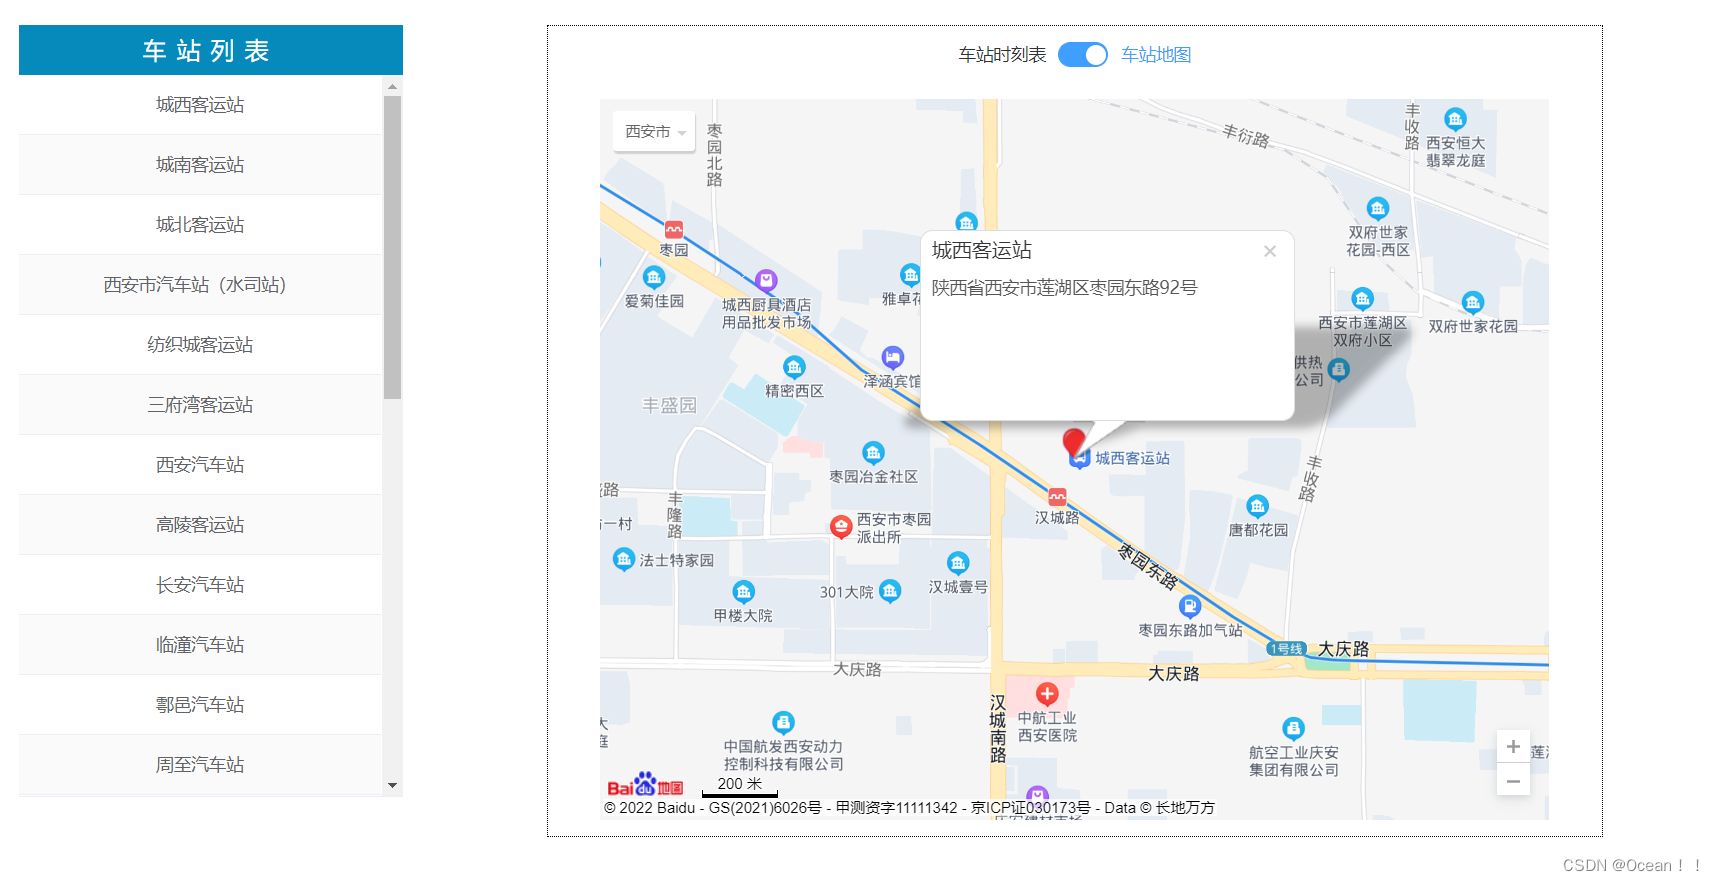
逻辑:
    <template>
      <div class="Map">
        <!-- 放置地图的容器 -->
        <div id="container"></div>
      </div>
    </template>
    export default {
      name: 'Map',
      mounted() {
        this.baiduMap()
      },
      methods: {
        baiduMap() {
          // 创建地图实例
          let map = new BMapGL.Map('container')
          // 定义中心坐标信息
          let x = this.$store.state.activeStation.longitude
          let y = this.$store.state.activeStation.latitude
          let address = this.$store.state.activeStation.station_address
          let title = this.$store.state.activeStation.station_name

          // 创建点坐标(GPS)
          let gpsPoint = new BMapGL.Point(x, y)

          // 初始化地图,设置中心点坐标和地图级别
          map.centerAndZoom(gpsPoint, 16)
          //开启鼠标滚轮缩放
          map.enableScrollWheelZoom(true)

          let scaleCtrl = new BMapGL.ScaleControl() // 添加比例尺控件
          map.addControl(scaleCtrl)
          let zoomCtrl = new BMapGL.ZoomControl() // 添加缩放控件
          map.addControl(zoomCtrl)
          let cityCtrl = new BMapGL.CityListControl() // 添加城市列表控件
          map.addControl(cityCtrl)

          // 转换GPS为BD坐标
          let translateCallback = function (data) {
            if (data.status === 0) {
              let marker = new BMapGL.Marker(data.points[0])
              map.addOverlay(marker)
              map.setCenter(data.points[0])
              var opts = {
                width: 300, // 信息窗口宽度
                height: 120, // 信息窗口高度
                title, // 信息窗口标题
              }
              var infoWindow = new BMapGL.InfoWindow(address, opts) // 创建信息窗口对象
              map.openInfoWindow(infoWindow, data.points[0]) //开启信息窗口
            }
          }
          setTimeout(() => {
            let convertor = new BMapGL.Convertor()
            let pointArr = []

            pointArr.push(gpsPoint)
            convertor.translate(pointArr, 3, 5, translateCallback)
          }, 200)
        },
      },
    }
::: tip
用户点击侧边车站列表,重置地图中心
:::
::: warning
需要注意的是,v-if是真正的条件渲染,而v-show仅仅只是简单的控制元素的display属性,所以需要频繁切换时最好使用v-show
::::
	<!-- 侧边车站列表 -->
    <div class="list">
      <div class="title">车站列表</div>
      <el-table
        :data="stationList"
        size="large"
        stripe
        :show-header="false"
        height="80vh"
      >
        <el-table-column align="center">
          <template slot-scope="scope">
            <span class="staInfo" @click="switchStation(scope.row)">{{
              scope.row.station_name
            }}</span>
          </template>
        </el-table-column>
      </el-table>
    </div>
// 用户点击车站列表,改变地图中心
    switchStation(activeStation) {
      if (activeStation === this.$store.state.activeStation) return
      this.$store.commit('setPosition', activeStation)
      // 在用户点击后实现强制刷新(利用了v-if,缺点就是相对于v-show来说性能不好)
      this.renderComponent = false
      this.$nextTick().then(() => {
        this.renderComponent = true
      })
    },
10. 首页 | 热门线路🍓
页面:
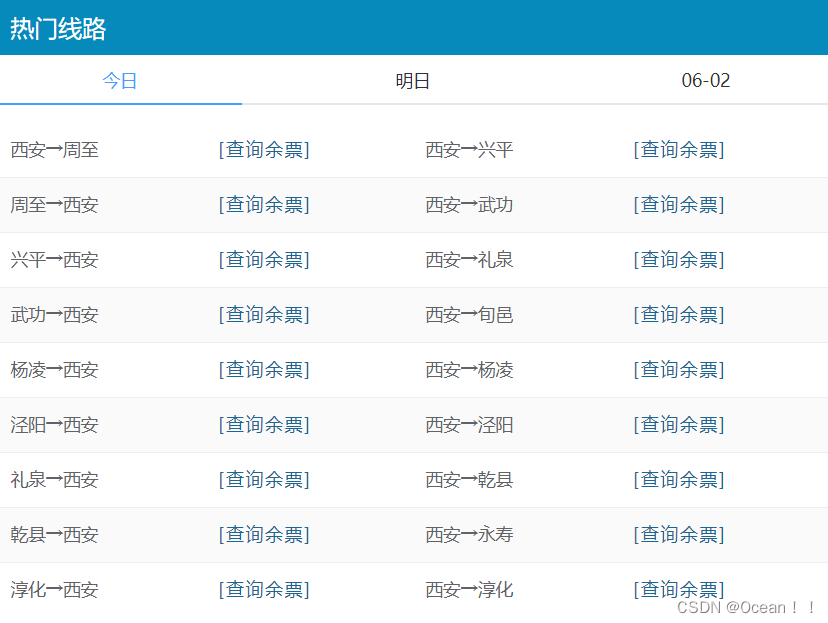
逻辑:
::: tip
2.项目中涉及到时间日期的最后都使用了moment这个依赖,npm并在入口文件引入,全局挂载之后就可以随心所欲的使用内置的方法了,非常方便
:::
	<!-- tabs标签页 -->
    <el-tabs stretch v-model="activeName" @tab-click="handleClick">
      <el-tab-pane :name="getCurrentDate(0)" label="今日"> </el-tab-pane>
      <el-tab-pane :name="getCurrentDate(1)" label="明日"> </el-tab-pane>
      <el-tab-pane :name="getCurrentDate(2)">
        <span slot="label">{{ getCurrentDate(2) }}</span>
      </el-tab-pane>
    </el-tabs>
computed: {
    getCurrentDate() {
      return function (num) {
        return this.$moment().add(num, 'days').format('MM-DD')
      }
    },
  },
::: tip
1. 因为点击线路或者"[查询余票]"都会跳转至车票查询页面并完成查询,所以在用户点击之后,将需要的参数通过路由传递给车票查询页面
:::
	handleClick(tab, e) {
      let status = {
        shuttle_shift_date: this.$moment().year() + '-' + tab.name,
        startDate: this.$moment(),
        activeTab: tab.name,
      }
      // 更改查询状态
      this.$store.commit('setSearchStatus', status)
    },

    created() {
        // 每次跳转到首页时,恢复车票查询
        let status = {
            shuttle_shift_date: this.$moment().format('YYYY-MM-DD'),
            startDate: this.$moment(),
            activeTab: this.$moment().format('MM-DD'),
          }
        this.$store.commit('setSearchStatus', status)
    }
::: tip
3. 为了实现页面刷新但请求参数不丢失,使用query进行传参
:::
	  <el-table-column>
        <template slot-scope="scope">
          <span class="yupiao" @click="showqueryheader(scope.row)"
            >[查询余票]</span
          >
        </template>
      </el-table-column>
	showqueryheader(info) {
      this.$router.push({
        path: '/purchase',
        query: {
          // 为了刷新不丢失,需要先将传递的参数对象转换成字符串
          info: JSON.stringify(info),
        }
      })
    },
11. 车票查询🍓
页面:
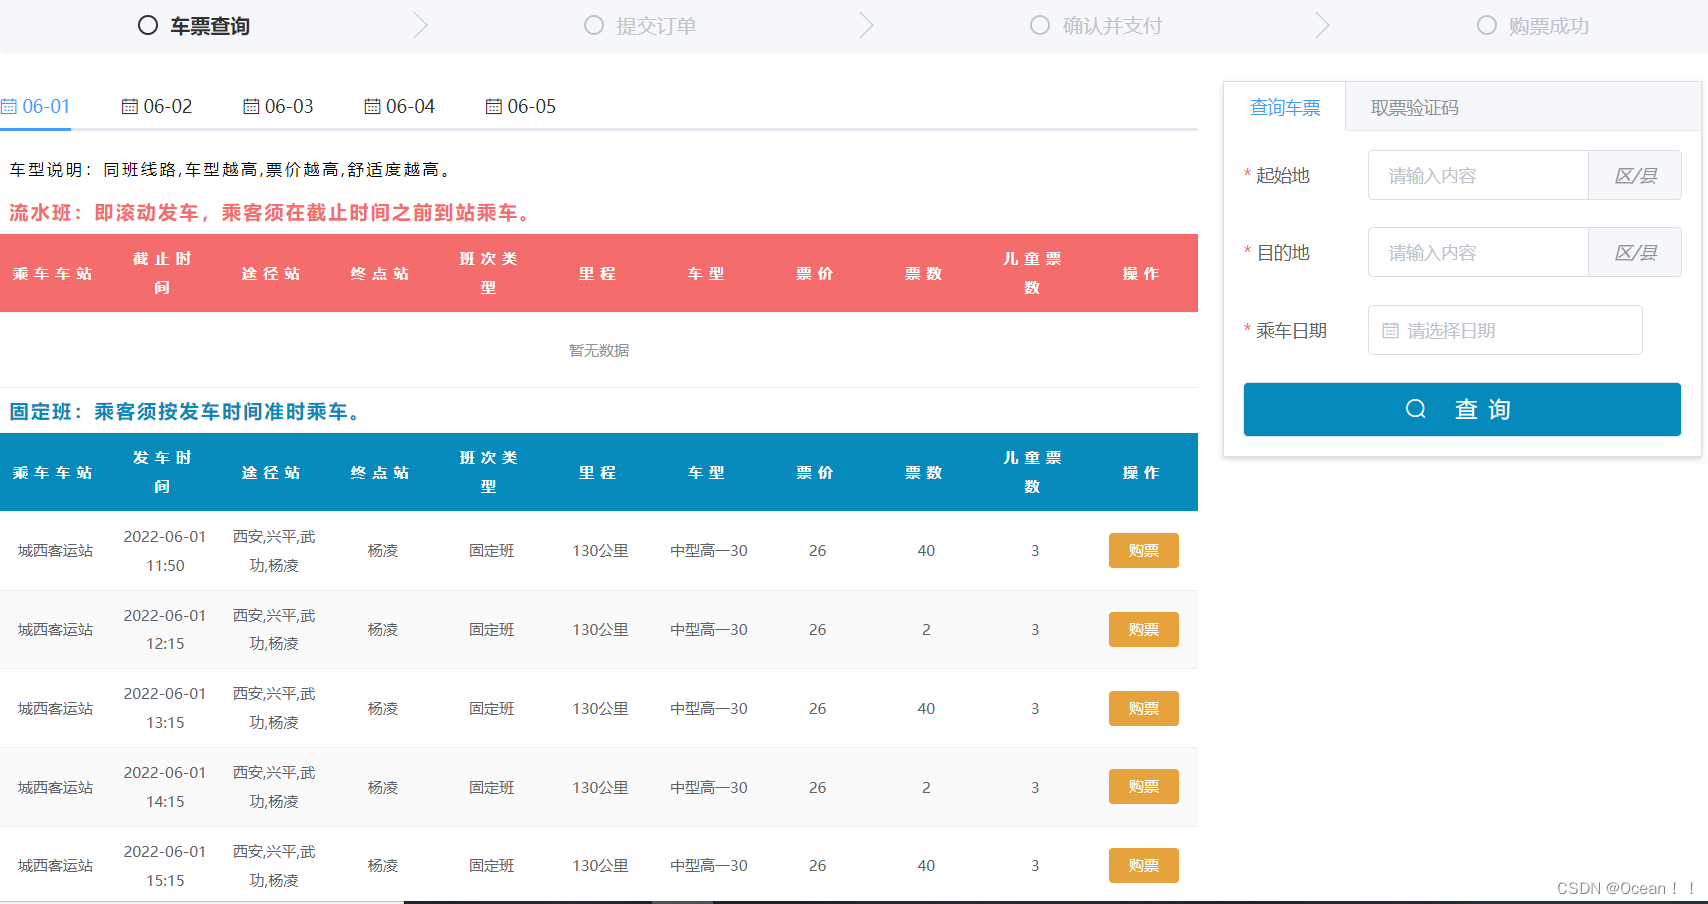
逻辑:
::: tip
1. 顶部的日期选项卡需要按照跳转页面时传递的 日期参数来动态渲染,如果未传则从当天的日期开始
1. 当点击日期选项卡时最后一个tab时,向后加载日期,点击第一个tabs时,向前加载日期
1. 当用户点击tabs选项时,根据对应的日期,重新发起请求并渲染
:::
::: danger
实现原理:1. 定义一个变量stratDate,用来表示计算的起始日期,默认是当天的日期
2. 给el-tab-pane动态绑定name属性,值为显示的日期
3. 当用户点击第一或最后一个选项卡时,通过handleDays方法,给startDate增加指定量,由于给el-tab-pane绑定了动态name的原因,这时候就实现了加载更多日期,且用户选中的那个选项激活以及处于中间位置
:::
		<!-- tabs部分 卡片化 -->
        <el-tabs v-model="activeName" @tab-click="handleClick">
          <el-tab-pane :name="getCurrentDate(0)">
            <span slot="label" @click="handleDays(-2)"
              ><i class="el-icon-date"></i> {{ getCurrentDate(0) }}</span
            >
          </el-tab-pane>
          <el-tab-pane :name="getCurrentDate(1)">
            <span slot="label"
              ><i class="el-icon-date"></i> {{ getCurrentDate(1) }}</span
            >
          </el-tab-pane>
          <el-tab-pane :name="getCurrentDate(2)">
            <span slot="label"
              ><i class="el-icon-date"></i> {{ getCurrentDate(2) }}</span
            >
          </el-tab-pane>
          <el-tab-pane :name="getCurrentDate(3)">
            <span slot="label"
              ><i class="el-icon-date"></i> {{ getCurrentDate(3) }}</span
            >
          </el-tab-pane>
          <el-tab-pane :name="getCurrentDate(4)">
            <span slot="label" @click="handleDays(2)"
              ><i class="el-icon-date"></i> {{ getCurrentDate(4) }}</span
            >
          </el-tab-pane>
        </el-tabs>
computed: {
    // 获取当天的日期 可以传参表示得到 当天+num 的日期
    getCurrentDate() {
      return function (num = 0) {
        return this.$moment(this.startDate).add(num, 'days').format('MM-DD')
      }
    },
  },
	// 用户点击最后一个或第一个tab的时候,通过此函数更新计算日期的 起点(默认是当天)
    handleDays(num) {
      this.startDate = this.$moment(this.startDate).add(num, 'days')
    },
    // tabs切换触发事件
    handleClick(tab, event) {
      // 点击tab的时候将路由参数result 也就是从HomeInquire传递过来的结果清空
      if (this.$route.query.result) {
        this.$route.query.result = ''
      }
      let status = {
        shuttle_shift_date: this.$moment().year() + '-' + tab.name,
        startDate: this.startDate,
        activeTab: tab.name,
      }

      this.$store.commit('setSearchStatus', status)
      // 重新查询班次
      this.getShuttleList()
    },

    // 查询符合条件的班次线路
    async getShuttleList() {

      const info = JSON.parse(this.$route.query.info)
      let shuttle_shift_date =
        this.$store.getters.searchStatus.shuttle_shift_date ||
        this.$moment().format('YYYY-MM-DD')

      const { data: res } = await this.$http.get(
        `/query/shuttle/getShuttleList`,
        {
          params: {
            start_region_id: info.start_region_id,
            final_region_id: info.final_region_id,
            shuttle_shift_date,
          },
        }
      )
      if (res.code !== 10000) {
        this.flow_shuttle_list = []
        this.regular_shuttle_list = []
        return this.$message.error(res.message)
      }
      // 保存返回的班次列表
      this.flow_shuttle_list = res.data.flow_shuttle_list
      this.regular_shuttle_list = res.data.regular_shuttle_list
      this.$emit('getSteps', 0)
    },
::: tip
4. 实现在右侧使用查询组件,在不刷新页面的前提下,重新获取数据并进行渲染
:::
::: danger
实现原理:1.利用watch监听$route,在用户使用右侧查询组件的时候,改变路由参数,把新的查询参数填充到路由中
2. 当路由发生变化,调用指定的hanldeRouteChange方法
:::
watch: {
    // 路由参数变化时,重新查询
    $route: 'hanldeRouteChange',
  },
	// 路由参数变化时的处理函数
    hanldeRouteChange() {
      // 如果参数中已有结果 则直接展示
      if (this.$route.query.result) {
        const routeParams = JSON.parse(this.$route.query.result)
        this.regular_shuttle_list = routeParams.regular_shuttle_list
        this.flow_shuttle_list = routeParams.flow_shuttle_list

        this.startDate =
          this.$store.getters.searchStatus.startDate || this.$moment()
        this.activeName =
          this.$store.getters.searchStatus.activeTab ||
          this.$moment().format('MM-DD')
        // 更改步骤条
        this.$emit('getSteps', 0)
        return
      }
      // 否则重新发起查询请求
      this.getShuttleList()
    },
12. 提交订单🍓
页面:
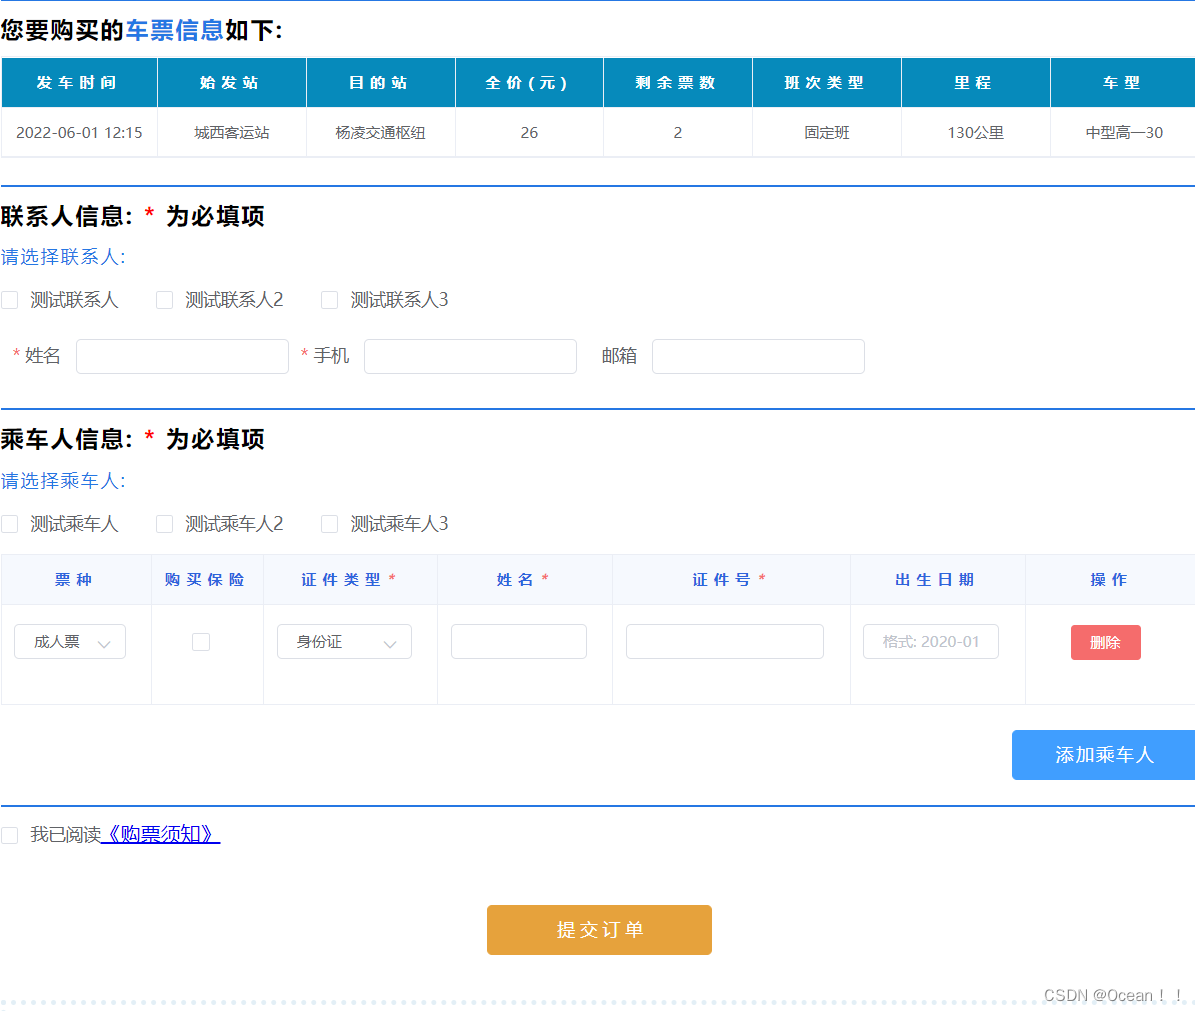
逻辑:
::: tip
1. 显示购买的车票信息
2. 选择常用联系人/填写联系人信息
3. 选择常用乘车人/填写乘车人信息
4. 乘车人信息的增删改
5. 根据身份证自动填写出生日期
:::
	// 车票查询页面跳转到提交订单页面
    toSubmitOrder(ticket) {
      this.$emit('getSteps', 1)
      this.$router.push({
        path: 'purchase/submitOrder',
        query: {
          //  用户购买的车票信息
          ticketInfo: JSON.stringify(ticket)
        }
      })
    },
	// 	 获取常用联系人和乘车人列表,供用户选择
	//   查询常用联系人
    async getContactPersons() {
      const { data: res } = await this.$http.get(
        `/userCenter/getContactPersons`
      )
      if (res.code !== 10000) {
        this.contact_list = []
        return this.$message.error(res.message)
      }
      this.contact_list = res.data.contact_person_list
    },
    // 查询常用乘车人
    async getPassagers() {
      const { data: res } = await this.$http.get(`/userCenter/getPassagers`)
      if (res.code !== 10000) {
        this.passager_list = []
        return this.$message.error(res.message)
      }
      this.passager_list = res.data.passager_list
    },
		<!-- 常用联系人选择区域 -->
        <el-checkbox-group
          v-model="checked_personList"
          @change="CheckedPersonChange"
          :max="1"
        >
          <el-checkbox
            v-for="person in contact_list"
            :key="person.contact_person_id"
            :label="person"
            @change="(checked) => contactBoxChange(checked, person)"
            >{{ person.name }}</el-checkbox
          >
        </el-checkbox-group>
        <!-- 手动填写联系人表单区域 -->
        <el-form
          :model="contactForm"
          :rules="contactRules"
          ref="contactFormRef"
          class="contactForm"
          label-width="60px"
        >
          <el-form-item label="姓名" prop="contact_person_name">
            <el-input
              v-model="contactForm.contact_person_name"
              size="mini"
            ></el-input>
          </el-form-item>
          <el-form-item label="手机" prop="contact_person_phone_number">
            <el-input
              v-model="contactForm.contact_person_phone_number"
              size="mini"
            ></el-input>
          </el-form-item>
          <el-form-item label="邮箱" prop="contact_person_email">
            <el-input
              v-model="contactForm.contact_person_email"
              size="mini"
            ></el-input>
          </el-form-item>
        </el-form>
当用户选择联系人,自动填写表单
	// 联系人checkbox值发生变化
    contactBoxChange(checked, person) {
      if (checked) {
        const { name, phone_number, email, contact_person_id } = person
        this.contactForm = {
          contact_person_name: name,
          contact_person_phone_number: phone_number,
          contact_person_email: email,
          contact_person_id,
        }
      } else {
        this.contactForm = {
          contact_person_name: '',
          contact_person_phone_number: '',
          contact_person_email: '',
          contact_person_id: null,
        }
      }
    },
当用户选择乘车人,自动填写表单
	// 乘车人checkbox值发生变化
    pasBoxChange(checked, passenger) {
      if (checked) {
        // 增加/填充 乘车人信息
        const { passenger_id, name, card_number, card_type } = passenger
        const info = {
          passenger_id,
          passenger_name: name,
          passenger_card_number: card_number,
          passenger_card_type: card_type,
          buying_insurance: false,
          ticket_type: '成人票',
        }
        this.add_passenger(info)
      } else {
        // 删除/取消 乘车人信息
        this.del_pasBycheckBox(passenger)
      }
    },
	// 根据身份证号获取出生日期
    getBirth(idCard) {
      let birth
      // 二代身份证
      if (idCard.length === 18) {
        birth =
          idCard.substring(6, 10) +
          '-' +
          idCard.substring(10, 12) +
          '-' +
          idCard.substring(12, 14)
      }
      // 一代身份证
      if (idCard.length === 15) {
        birth =
          '19' +
          idCard.substring(6, 8) +
          '-' +
          idCard.substring(8, 10) +
          '-' +
          idCard.substring(10, 12)
      }
      return birth
    },
	// 通过checkbox删除乘车人信息
    del_pasBycheckBox(row) {
      let arr = []
      const del_id = row.passenger_id
      this.addPasForm.passenger.forEach((item) => {
        if (item.passenger_id != del_id) {
          arr.push(item)
        }
      })
      this.addPasForm.passenger = arr
    },
    // 通过行内按钮删除信息
    del_pasBybutton(index, row) {
      const del_id = row.passenger_id
      let arr = []
      this.checked_passagerList.forEach((item) => {
        if (item.passenger_id != del_id) {
          arr.push(item)
        }
      })
      this.checked_passagerList = arr
      this.addPasForm.passenger.splice(index, 1)
    },
	// 添加乘车人信息
    add_passenger(info = null) {
      if (this.addPasForm.passenger.length === 5) {
        return this.$message.error('一个订单最多订购 5 张车票!')
      }
      if (info) {
        return this.addPasForm.passenger.push(info)
      }
      // 默认情况下,添加一个空的乘车人信息行
      let params = {
        passenger_id: null,
        passenger_name: '',
        passenger_card_number: '',
        passenger_card_type: '身份证',
        ticket_type: '成人票',
        buying_insurance: false,
      }
      this.addPasForm.passenger.push(params)
    },
	// 处理订单提交请求的参数
    handleBookParams() {
      let params = {
        shuttle_shift_id: this.ticketInfo[0].shift_id,
        contact_person_id: this.contactForm.contact_person_id,
        contact_person_phone_number:
          this.contactForm.contact_person_phone_number,
        contact_person_name: this.contactForm.contact_person_name,
        contact_person_email: this.contactForm.contact_person_name,
        passenger: this.addPasForm.passenger,
      }
      this.bookOrder(params)
    },
    // 提交订单并预订订单
    bookOrder(params) {
      this.$refs.contactFormRef.validate((valid) => {
        if (!valid) return
        this.$refs.addPasFormRef.validate(async (valid) => {
          if (!valid) return
          if(!this.if_know)
            return this.$message.error('请先同意购票须知!')
          const { data: res } = await this.$http.post(
            `/order/bookOrder`,
            params
          )
          if (res.code !== 10000) {
            return this.$message.error(res.message)
          }
          this.$message.success('提交订单成功!')

          this.$emit('getSteps', 2)
          this.$router.push({
            path: '/purchase/confirmOrder',
            query:{
              order: JSON.stringify(res.data)
            }
          })
        })
      })
    },
13. 查询用户是否支付成功🍓
	// 查询用户是否支付成功
	async payOrderVerify() {
      const { data: res } = await this.$http.get(
        `/order/payOrderVerify?master_order_number=${this.master_order_number}`
      )
      if (res.code === 10000) {
        // 支付成功
        this.$message.success('支付成功!')
        clearInterval(this.timer)
        this.$emit('getSteps', 4)
        this.$router.push({
          path: '/purchase/getRideCode',
          query: {
            master_order_number: this.master_order_number,
            totalPrice: this.totalPrice,
          },
        })
      }
    },
	created() {
        this.confirmAndPay()
        this.payOrderVerify()
        // 每10秒发送一次查询请求
        this.timer = setInterval(() => {
          this.payOrderVerify()
        }, 1000 * 10)
      },
	destroyed() {
        // 清除定时器
        clearInterval(this.timer)
      },
14. vuex中管理的状态:🍓
import Vue from 'vue'
import Vuex from 'vuex'
Vue.use(Vuex)

export default new Vuex.Store({
    state: {
        // 车站列表
        stationList: [],
        // 当前激活车站信息(地图页面)
        activeStation: {},
        // 用户的登录状态
        isLogin: false,
        // 用户权限
        isRoot: false,
        // 查询车票页面的状态
        searchStatus: {},
    },
    // 获取属性的状态
    getters: {
        // 获取登录状态
        isLogin: state => state.isLogin,
        // 获取权限状态
        isRoot: state => state.isRoot,
        // 获取车票查询页面的状态
        searchStatus: state => state.searchStatus
    },
    mutations: {
        // 修改车站信息为用户点击的车站
        setPosition(state, activeStation) {
            state.activeStation = activeStation
        },
        // 设置车站列表
        setStationList(state, list) {
            state.stationList = list
        },
        // 保存登录状态
        userStatus(state, flag) {
            state.isLogin = flag
        },
        // 保存用户权限
        userPermissions(state,flag) {
            state.isRoot = flag
        },
        // 设置车票查询页面的状态
        setSearchStatus(state,status){
            state.searchStatus = status
        },
    },
    actions: {
        // 设置登录状态
        userLogin({ commit }, flag) {
            commit('userStatus', flag)
        },
        // 设置权限状态
        setPermissions({commit},flag) {
            commit('userPermissions',flag)
        }
    },
})
15. main.js配置🍓
import Vue from 'vue'
import App from './App.vue'
import router from './router'
import axios from 'axios'
import store from './store/store'
import moment from 'moment'

// 引入ElementUi
import ElementUi from 'element-ui'
import 'element-ui/lib/theme-chalk/index.css'
// 引入全局样式文件
import '../src/assets/css/global.css'
Vue.use(ElementUi)
// 引入NProgress
import NProgress from 'nprogress'
// 引入nprogress样式文件
import 'nprogress/nprogress.css'
// 引入公共js函数 主要是一些公共的方法 比如MD5加密
import utils from '@/utils/utils.js'

Vue.config.productionTip = false
// 全局挂载axios
Vue.prototype.$http = axios
// 全局挂载
Vue.prototype.$utils = utils
Vue.prototype.$moment = moment
// 配置请求的根路径
axios.defaults.baseURL = 'http://stationapi.oceanh.top:8080'
// 设置request拦截器,在请求之前添加sessionid,展示进度条
axios.interceptors.request.use((config) => {
  // 展示进度条
  NProgress.start()
  // 添加SessionId到请求头中
  config.headers.SessionId = window.sessionStorage.getItem('SessionId')
  return config
})

// 设置response拦截器,关闭进度条
axios.interceptors.response.use((res) => {
  // 关闭进度条
  NProgress.done()
  return res
})

new Vue({
  router,
  render: (h) => h(App),
  store,
}).$mount('#app')
16. 设置路由以及路由拦截器🍓
import Vue from 'vue'
import VueRouter from 'vue-router'
import NProgress from 'nprogress'

// 解决报错
const originalPush = VueRouter.prototype.push
const originalReplace = VueRouter.prototype.replace
// push
VueRouter.prototype.push = function push(location, onResolve, onReject) {
  if (onResolve || onReject) return originalPush.call(this, location, onResolve, onReject)
  return originalPush.call(this, location).catch(err => err)
}
// replace
VueRouter.prototype.replace = function push(location, onResolve, onReject) {
  if (onResolve || onReject) return originalReplace.call(this, location, onResolve, onReject)
  return originalReplace.call(this, location).catch(err => err)
}

// 路由懒加载
const First = () => import('../views/first/first.vue')
const refund = () => import('../views/refund/refund.vue')
const help = () => import('../views/help/help.vue')
const advise = () => import('../views/advise/advise.vue')
const about = () => import('../views/about/about.vue')
const StaionMap = () => import('../views/stationMap/stationMap.vue')
const Login = () => import('@/components/content/Login/login.vue')
const Register = () => import('@/components/content/Register/register')
const purchase = () => import('../views/purchase/purchase.vue')
const searchTicket = () => import('../views/purchase/components/searchTicket.vue')
const submitOrder = () => import('../views/purchase/components/submitOrder.vue')
const confirmOrder = () => import('../views/purchase/components/confirmOrder.vue')
const payQrcode = () => import('../views/purchase/components/payQrcode.vue')
const getRideCode = () => import('../views/purchase/components/getRideCode.vue')
// 找回密码
const reback = () => import('@/components/content/rebackPsd/rebackPsd.vue')
// 后台管理模块相关组件
const shiftModule = () => import('../components/content/adminModule/shiftModule.vue')
const ticketModule = () => import('../components/content/adminModule/ticketModule.vue')

Vue.use(VueRouter)


const routes = [
  {
    path: '/',
    redirect: '/first'
  },
  {
    path: '/first',
    component: First,
    meta: {
      title: '首页'
    }
  },
  {
    path: '/refund',
    component: refund,
    meta: {
      title: '退票'
    }
  },
  {
    path: '/help',
    component: help,
    meta: {
      title: '帮助中心'
    }
  },
  {
    path: '/advise',
    component: advise,
    meta: {
      title: '投诉建议'
    }
  },
  {
    path: '/about',
    component: about,
    meta: {
      title: '关于我们'
    }
  },
  {
    path: '/stationMap',
    component: StaionMap,
    meta: {
      title: '车站地图'
    }
  },
  {
    path: '/login',
    component: Login,
    meta: {
      title: '登录'
    }
  },
  {
    path: '/rebackPsd',
    component: reback,
    meta: {
      title: '找回密码'
    }
  },
  {
    path: '/register',
    component: Register,
    meta: {
      title: '注册'
    }
  },
  {
    path: '/person',
    component: () => import('../views/person'),
    meta: {
      title: '个人中心',
      isNeedLogin: true,
    },
    children: [{
      path: '',
      meta: {
        title: '基本资料',
        isNeedLogin: true,
      },
      component: () => import('@/components/content/person/children/info'),
    },
    {
      path: 'changePassword',
      meta: {
        title: '修改密码',
        isNeedLogin: true,
      },
      component: () => import('@/components/content/person/children/changePassword'),
    },
    {
      path: 'passenger',
      meta: {
        title: '常用乘车人',
        isNeedLogin: true,
      },
      component: () => import('@/components/content/person/children/passenger'),
    },
    {
      path: 'contacts',
      meta: {
        title: '常用联系人',
        isNeedLogin: true,
      },
      component: () => import('@/components/content/person/children/contacts'),
    },

    {
      path: 'allOrder',
      meta: {
        title: '所有订单',
        isNeedLogin: true,
      },
      component: () => import('@/components/content/person/children/allOrder'),
    },
    {
      path: 'paidOrder',
      meta: {
        title: '已支付单',
        isNeedLogin: true,
      },
      component: () => import('@/components/content/person/children/paidOrder'),
    },
    {
      path: 'waitOrder',
      meta: {
        title: '待支付单',
        isNeedLogin: true,
      },
      component: () => import('@/components/content/person/children/waitOrder'),
    },
    {
      path: 'refundOrder',
      meta: {
        title: '退款完成',
        isNeedLogin: true,
      },
      component: () => import('@/components/content/person/children/refundOrder'),
    },
    ]
  },
  {
    path: '/purchase',
    component: purchase,
    meta: {
      title: '购票'
    },
    children: [
      {
        path:'',
        component: searchTicket,
        meta: {
          title: '购票 | 车票查询'
        }
      },
      {
        path: 'submitOrder',
        meta: {
          title: '购票 | 提交订单',
          isNeedLogin: true
        },
        component: submitOrder
      },
      {
        path: 'confirmOrder',
        meta: {
          title: '购票 | 确认订单',
          isNeedLogin: true
        },
        component: confirmOrder
      },
      {
        path: 'payQrcode',
        meta: {
          title: '购票 | 支付订单',
          isNeedLogin: true
        },
        component: payQrcode
      },
      {
        path: 'getRideCode',
        meta: {
          title: '购票 | 乘车码',
          isNeedLogin: true
        },
        component: getRideCode
      },
    ]
  },
  {
    path: '/shiftModule',
    meta: {
      title: '后台管理 | 班次管理',
      isNeedLogin: true,
      isNeedRoot: true
    },
    component: shiftModule,
  },
  {
    path: '/ticketModule',
    meta: {
      title: '后台管理 | 票务管理',
      isNeedLogin: true,
      isNeedRoot: true
    },
    component: ticketModule,
  }
]

const router = new VueRouter({
  mode: 'hash',
  base: process.env.BASE_URL,
  routes,
  // 通过路由跳转页面后,窗口始终位于页面顶部
  scrollBehavior(to, from, savedPosition) {
    return { x: 0, y: 0 }
  }
})


router.afterEach((to, from) => {

  // 关闭进度条
  NProgress.done()
})

router.beforeEach((to, from, next) => {
  // 开启进度条
  NProgress.start()

  const isLogin = sessionStorage.getItem('isLogin')
  const isRoot = sessionStorage.getItem('isRoot')
  if (to.meta.isNeedLogin && !isLogin) {
    alert('您还未登录,请先登录!')
    next(
      {
        path: '/login',
        query: {
          redirectPath: to.path
        }
      }
    )
  }

  if ( isLogin && to.meta.isNeedRoot && !isRoot) {
    alert('对不起,您无权访问!')
    next(
      {
        path: '/help'
      }
    )
  }


  // 根据路由动态设置网页标题
  if (to.meta.title) {
    document.title = to.meta.title
  }
  next()


})
export default router


 2300
2300


 被折叠的 条评论
为什么被折叠?
被折叠的 条评论
为什么被折叠?
 到【灌水乐园】发言


