


参考
一、基本情况说明
third.cc在second.cc的基础上,在拓扑图左侧的P2P节点上安装了新的网络设备(NetDevice),使之成为无线网络的接入点(AccessPoint)。可以通过配置参数修改有线和无线网络上创建的节点数量。默认情况下,有三个额外的CSMA节点和三个无线STA节点。
// Default Network Topology
//
//   Wifi 10.1.3.0
//                 AP
//  *    *    *    *
//  |    |    |    |    10.1.1.0
// n5   n6   n7   n0 -------------- n1   n2   n3   n4
//                   point-to-point  |    |    |    |
//                                   ================
//                                     LAN 10.1.2.0
二、third.cc结构及功能分析
1. 脚本基本结构
- 代码规范
- 头文件
- 命名空间
- 日志
- 主函数声明
- 主函数准备工作
- 构建网络拓扑
- 安装TCP/IP协议族
- 安装应用层
- 设置路由
- 数据追踪
- 启动与结束
2. 主函数详细分析
2.1 主函数准备工作
	//使用一个详细的标志来确定是否启用了客户端应用程序和客户端服务器应用程序日志记录组件
    bool verbose = true;

    //变量,用于定义csma网络中额外有多少个node,此处为3
    uint32_t nCsma = 3;

	//变量,用于定义wifi网络中有多少个station node,此处为3
    uint32_t nWifi = 3;

	//若要开启跟踪文件,则需改为true
    bool tracing = false;

	//配置可在命令行修改脚本参数
    CommandLine cmd(__FILE__);
    cmd.AddValue("nCsma", "Number of \"extra\" CSMA nodes/devices", nCsma);
    cmd.AddValue("nWifi", "Number of wifi STA devices", nWifi);

	//verbose参数设置是否开启logging
    cmd.AddValue("verbose", "Tell echo applications to log if true", verbose);
    cmd.AddValue("tracing", "Enable pcap tracing", tracing);

    cmd.Parse(argc, argv);

    //WiFi节点数量限制为18,这是网格位置分配器的配置,如果节点超过18个,网格布局将超过边框
    if (nWifi > 18)
    {
        std::cout << "nWifi should be 18 or less; otherwise grid layout exceeds the bounding box"
                  << std::endl;
        return 1;
    }

    if (verbose)
    {
        LogComponentEnable("UdpEchoClientApplication", LOG_LEVEL_INFO);
        LogComponentEnable("UdpEchoServerApplication", LOG_LEVEL_INFO);
    }
2.2 构建网络拓扑
2.2.1 P2P链路创建
    //创建两个P2P节点
 	NodeContainer p2pNodes;
    p2pNodes.Create(2);

    //配置P2P信道的延迟及数据传输速率
    PointToPointHelper pointToPoint;
    pointToPoint.SetDeviceAttribute("DataRate", StringValue("5Mbps"));
    pointToPoint.SetChannelAttribute("Delay", StringValue("2ms"));

    //安装P2P网卡到P2P网络节点
    NetDeviceContainer p2pDevices; //创建网络设备
    p2pDevices = pointToPoint.Install(p2pNodes); //连接节点与信道
2.2.2 csma网络创建
	//创建csma节点
	NodeContainer csmaNodes;
	//将两个P2P节点中的节点1(右侧节点)加入csma网络中
    csmaNodes.Add(p2pNodes.Get(1));
    //再额外创建3个节点
    csmaNodes.Create(nCsma);

	//配置csma节点的传输速率和延迟
    CsmaHelper csma;
    csma.SetChannelAttribute("DataRate", StringValue("100Mbps"));
    csma.SetChannelAttribute("Delay", TimeValue(NanoSeconds(6560)));

	//安装csma网卡到csma节点
    NetDeviceContainer csmaDevices;
    csmaDevices = csma.Install(csmaNodes);
2.2.3 WiFi网络创建
	//创建WiFi网络节点
	NodeContainer wifiStaNodes;
	//创建3个STA节点
    wifiStaNodes.Create(nWifi);
    //将两个P2P节点中的节点0(左侧节点)加入WiFi网络中作为AP
    NodeContainer wifiApNode = p2pNodes.Get(0);

	//使用默认的PHY层配置和通道模型
    YansWifiChannelHelper channel = YansWifiChannelHelper::Default();
    YansWifiPhyHelper phy;
    phy.SetChannel(channel.Create());

	//MAC层配置
    WifiMacHelper mac;
    //创建一个802.11服务集标识符(SSID:service set identifier)对象,将用于设置MAC层的“SSid”属性的值。
    Ssid ssid = Ssid("ns-3-ssid");
默认情况下,WifiHelper将把使用的标准配置为802.11ax(商业上称为Wi-Fi 6),并配置一个兼容的速率控制算法(IdealWifi管理器)。
WifiHelper wifi;
在节点上安装WiFi模型
	//为STA节点安装WiFi
    NetDeviceContainer staDevices;
    mac.SetType("ns3::StaWifiMac",
    			"Ssid", SsidValue(ssid),
    			//助手类创建的MAC将不会发送探测请求
    			"ActiveProbing", BooleanValue(false));
    //安装
    staDevices = wifi.Install(phy, mac, wifiStaNodes);

	//为AP节点安装WiFi
    NetDeviceContainer apDevices;
    mac.SetType("ns3::ApWifiMac",
    			"Ssid", SsidValue(ssid));
    //安装
    apDevices = wifi.Install(phy, mac, wifiApNode);
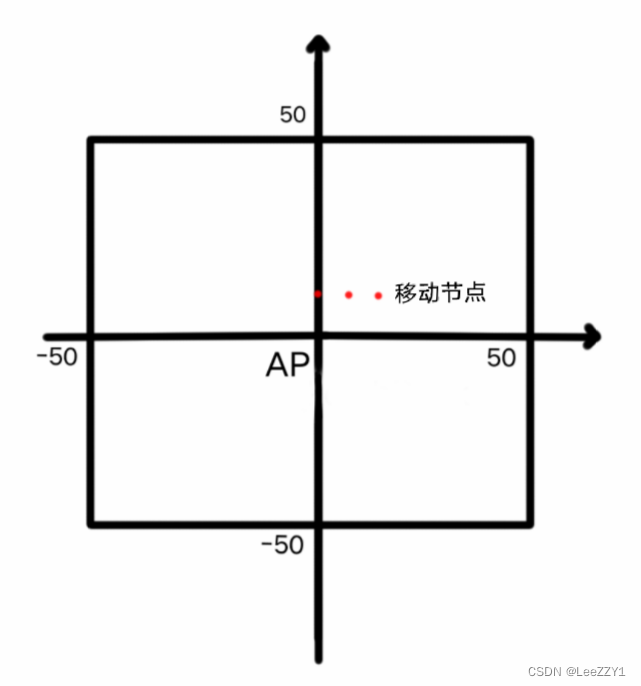
配置移动性模型:配置3个STA节点在固定范围内移动,AP节点保持静止
    MobilityHelper mobility;
	//固定一个移动范围
    mobility.SetPositionAllocator("ns3::GridPositionAllocator",
                                  "MinX", DoubleValue(0.0),
                                  "MinY", DoubleValue(0.0),
                                  //X轴节点间距:5m
                                  "DeltaX", DoubleValue(5.0),
                                  //Y轴节点间距:10m
                                  "DeltaY", DoubleValue(10.0),
                                  //每行最大节点数
                                  "GridWidth", UintegerValue(3),
                                  "LayoutType", StringValue("RowFirst"));
	//配置移动速度与方向随机
	//随机速度(默认取值范围是[2,4]m/s)
    mobility.SetMobilityModel("ns3::RandomWalk2dMobilityModel",
                              "Bounds",
                              RectangleValue(Rectangle(-50, 50, -50, 50)));
    mobility.Install(wifiStaNodes);

	//为AP节点设置移动模型
 	//使用固定位置移动模型ConstantPositionMobilityModel,这个模型的AP节点二维坐标为(0,0)
    mobility.SetMobilityModel("ns3::ConstantPositionMobilityModel");
    mobility.Install(wifiApNode);
节点分布示意图
2.3 安装TCP/IP协议族
    //安装TCP/IP协议栈
	InternetStackHelper stack;
    stack.Install(csmaNodes);
    stack.Install(wifiApNode);
    stack.Install(wifiStaNodes);

    //为设备接口分配IP地址
    Ipv4AddressHelper address;

    //为两个10.1.1.0网段的P2P设备分配IP
    address.SetBase("10.1.1.0", "255.255.255.0");
    Ipv4InterfaceContainer p2pInterfaces;
    p2pInterfaces = address.Assign(p2pDevices);

	//为三个10.1.2.0网段的CSMA设备分配IP
    address.SetBase("10.1.2.0", "255.255.255.0");
    Ipv4InterfaceContainer csmaInterfaces;
    csmaInterfaces = address.Assign(csmaDevices);

	//为三个10.1.3.0网段的WiFi设备分配IP
    address.SetBase("10.1.3.0", "255.255.255.0");
    address.Assign(staDevices);
    address.Assign(apDevices);
2.4 安装应用层
在有CSMA设备的节点上实例化服务器,在P2P节点上实例化客户端
	//配置服务器端口号为9
    UdpEchoServerHelper echoServer(9);
	//在节点4(最右侧节点)中安装服务端程序
    //csmaNodes节点容器中包含一个P2P节点和nCsma个CSMA节点,要Get的是最后一个extra节点,csmaNodes中的第0个节点是P2P节点
    ApplicationContainer serverApps = echoServer.Install(csmaNodes.Get(nCsma));
    serverApps.Start(Seconds(1.0));
    serverApps.Stop(Seconds(10.0));

    //配置客户端程序属性
    UdpEchoClientHelper echoClient(csmaInterfaces.GetAddress(nCsma), 9);
    echoClient.SetAttribute("MaxPackets", UintegerValue(1));
    echoClient.SetAttribute("Interval", TimeValue(Seconds(1.0)));
    echoClient.SetAttribute("PacketSize", UintegerValue(1024));

    //在节点7中安装客户端程序
    ApplicationContainer clientApps = echoClient.Install(wifiStaNodes.Get(nWifi - 1));
    clientApps.Start(Seconds(2.0));
    clientApps.Stop(Seconds(10.0));
2.5 设置路由
Ipv4GlobalRoutingHelper::PopulateRoutingTables();
2.6 模拟器停止
刚刚创建的模拟永远不会“自然”停止。这是因为要求无线接入点生成beacons。它将永远生成beacons,导致模拟器事件会无限期出现,所以必须告诉模拟器停止,否则会进入无限循环。
Simulator::Stop(Seconds(10.0));
2.7 Pcap数据追踪
需要tracing结果就将括号内的tracing改为1
    if (tracing)
    {
        phy.SetPcapDataLinkType(WifiPhyHelper::DLT_IEEE802_11_RADIO);
        pointToPoint.EnablePcapAll("third");
        phy.EnablePcap("third", apDevices.Get(0));
        csma.EnablePcap("third", csmaDevices.Get(0), true);
    }
2.7 运行和清理
    Simulator::Run();
    Simulator::Destroy();
3. 仿真结果分析
与文档中的输出不一致,why??
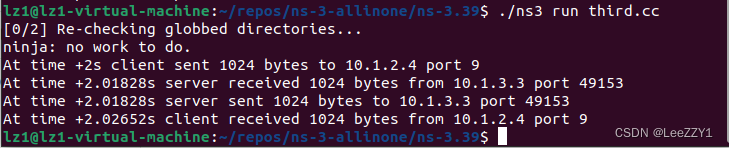
3.1 LOG结果分析
终端输出结果
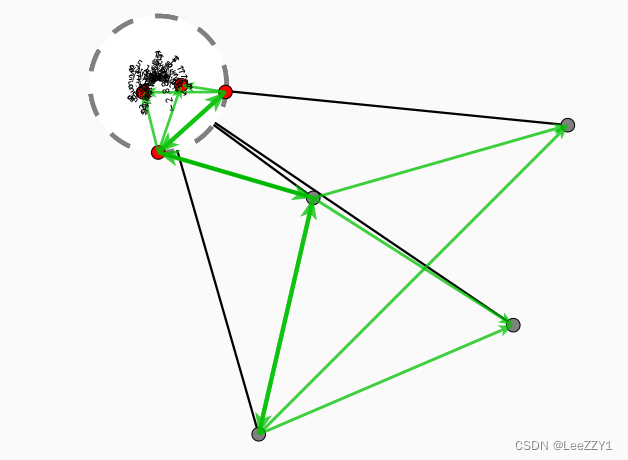
可视化结果
3.2 数据记录文件分析
// Default Network Topology
//
//   Wifi 10.1.3.0
//                 AP
//  *    *    *    *
//  |    |    |    |    10.1.1.0
// n5   n6   n7   n0 -------------- n1   n2   n3   n4
//                   point-to-point  |    |    |    |
//                                   ================
//                                     LAN 10.1.2.0
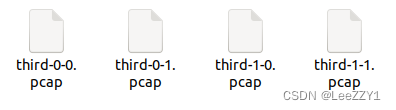
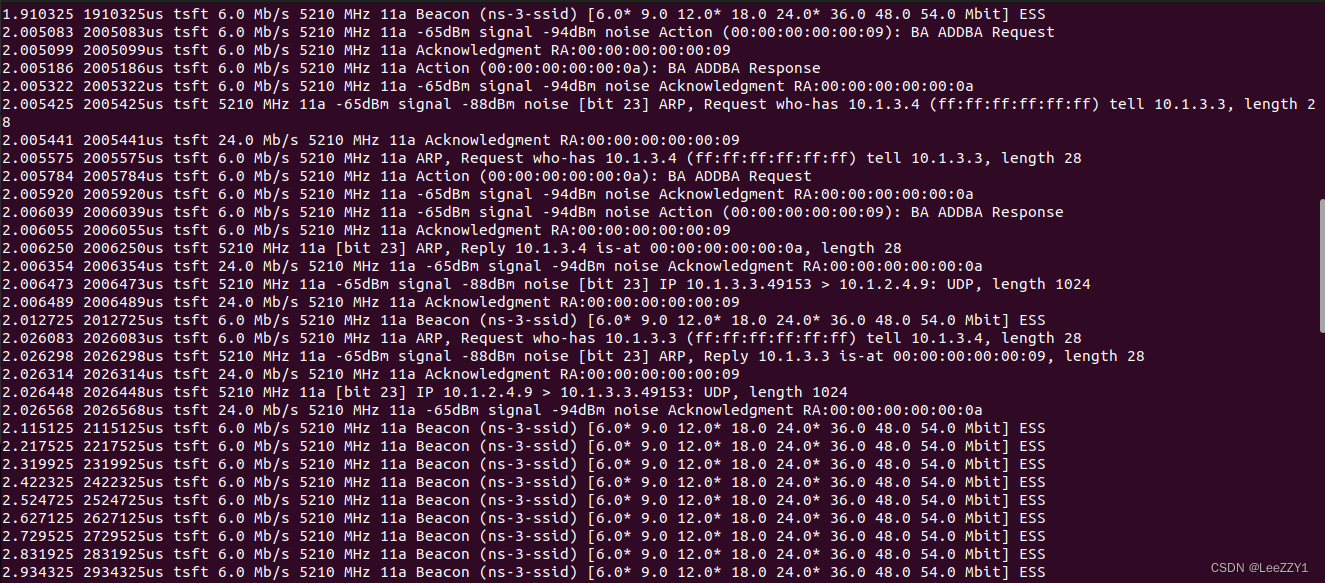
文件“third-0-0.pcap”对应于节点0上的点对点设备——“主干”的左侧。文件“third-1-0.pcap”对应于节点1上的点对点设备——“骨干网”的右侧。文件“third-0-1.pcap”是来自Wi-Fi网络的混杂(监视器模式)跟踪,文件“third-1-1.pcap”是来自CSMA网络的混杂跟踪。
tcpdump -nn -tt -r third-0-1.pcap
连接类型link-type IEEE802_11_RADIO代表无线通信,10.1.3.3为拓扑图中的可移动节点STA,n7,即客户端;10.1.2.4为拓扑图中csma节点n4,即服务器;10.1.3.4为拓扑图中固定节点AP,即n0。
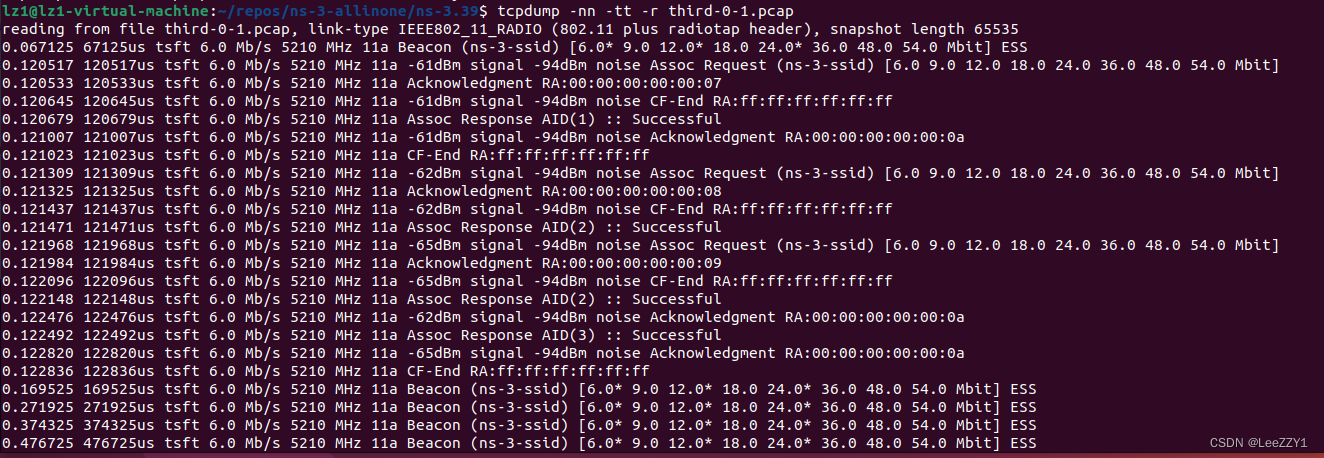
ARP为地址解析协议,10.1.3.3即客户端n7通过广播查找AP即10.1.3.4的MAC地址
tcpdump -nn -tt -r third-0-0.pcap

tcpdump -nn -tt -r third-1-0.pcap

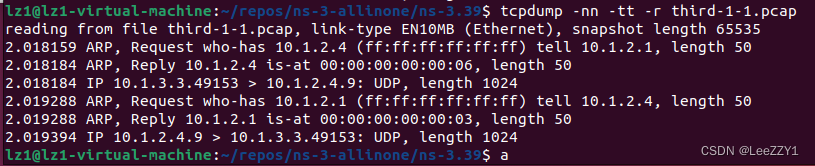
tcpdump -nn -tt -r third-1-1.pcap
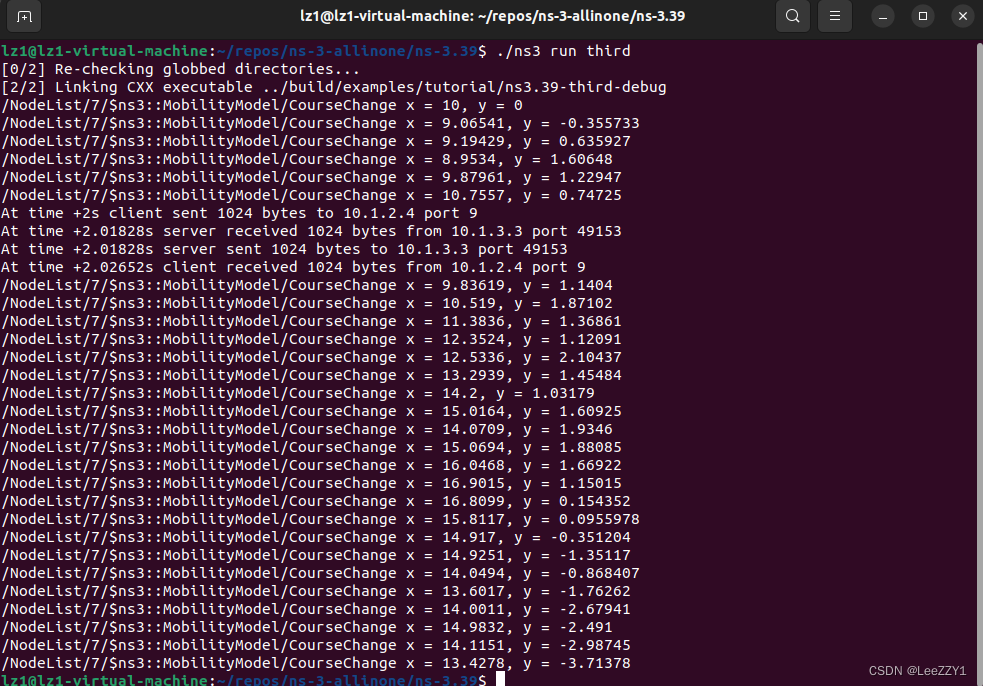
3.3 STA移动情况输出
在NS_LOG_COMPONENT_DEFINE("ThirdScriptExample");后加上这段代码:
void
CourseChange(std::string context, Ptr<const MobilityModel> model)
{
	Vector position = model->GetPosition();
	NS_LOG_UNCOND(context <<
				  " x = " << position.x << ", y = " << position.y);
}
这段代码只是从移动性模型中提取位置信息并无条件地记录节点的x和y位置。我们将在每次具有回显客户端的无线节点改变其位置时都调用这个函数。
在Simulator::Run();前添加以下代码:
std::ostringstream oss;
oss << "/NodeList/" << wifiStaNodes.Get(nWifi - 1)->GetId()
	<< "/$ns3::MobilityModel/CourseChange";

Config::Connect(oss.str(), MakeCallback(&CourseChange));
这里所做的是创建一个字符串,其中包含我们想要连接到的事件的跟踪名称空间路径。首先,我们必须使用前面描述的GetId方法来找出想要的节点。在CSMA和无线节点的默认数量的情况下,这个节点是7。
运行结果:


 5929
5929

 被折叠的 条评论
为什么被折叠?
被折叠的 条评论
为什么被折叠?
 到【灌水乐园】发言


