


2.1.Jedis客户端
Jedis的官网地址: https://github.com/redis/jedis
2.1.1.快速入门
我们先来个快速入门:
1)引入依赖:
<!--jedis-->
<dependency>
    <groupId>redis.clients</groupId>
    <artifactId>jedis</artifactId>
    <version>3.7.0</version>
</dependency>
<!--单元测试-->
<dependency>
    <groupId>org.junit.jupiter</groupId>
    <artifactId>junit-jupiter</artifactId>
    <version>5.7.0</version>
    <scope>test</scope>
</dependency>
2)建立连接
新建一个单元测试类,内容如下:
private Jedis jedis;

@BeforeEach
void setUp() {
    // 1.建立连接
    // jedis = new Jedis("192.168.150.101", 6379);
    jedis = JedisConnectionFactory.getJedis();
    // 2.设置密码
    jedis.auth("123321");
    // 3.选择库
    jedis.select(0);
}
3)测试:
@Test
void testString() {
    // 存入数据
    String result = jedis.set("name", "虎哥");
    System.out.println("result = " + result);
    // 获取数据
    String name = jedis.get("name");
    System.out.println("name = " + name);
}

@Test
void testHash() {
    // 插入hash数据
    jedis.hset("user:1", "name", "Jack");
    jedis.hset("user:1", "age", "21");

    // 获取
    Map<String, String> map = jedis.hgetAll("user:1");
    System.out.println(map);
}
4)释放资源
@AfterEach
void tearDown() {
    if (jedis != null) {
        jedis.close();
    }
}
2.1.2.连接池
Jedis本身是线程不安全的,并且频繁的创建和销毁连接会有性能损耗,因此我们推荐大家使用Jedis连接池代替Jedis的直连方式。
package com.heima.jedis.util;

import redis.clients.jedis.*;

public class JedisConnectionFactory {

    private static JedisPool jedisPool;

    static {
        // 配置连接池
        JedisPoolConfig poolConfig = new JedisPoolConfig();
        poolConfig.setMaxTotal(8);
        poolConfig.setMaxIdle(8);
        poolConfig.setMinIdle(0);
        poolConfig.setMaxWaitMillis(1000);
        // 创建连接池对象,参数:连接池配置、服务端ip、服务端端口、超时时间、密码
        jedisPool = new JedisPool(poolConfig, "192.168.150.101", 6379, 1000, "123321");
    }

    public static Jedis getJedis(){
        return jedisPool.getResource();
    }
}
2.2.SpringDataRedis客户端
SpringData是Spring中数据操作的模块,包含对各种数据库的集成,其中对Redis的集成模块就叫做SpringDataRedis,官网地址:https://spring.io/projects/spring-data-redis
- 提供了对不同Redis客户端的整合(Lettuce和Jedis)
- 提供了RedisTemplate统一API来操作Redis
- 支持Redis的发布订阅模型
- 支持Redis哨兵和Redis集群
- 支持基于Lettuce的响应式编程
- 支持基于JDK、JSON、字符串、Spring对象的数据序列化及反序列化
- 支持基于Redis的JDKCollection实现
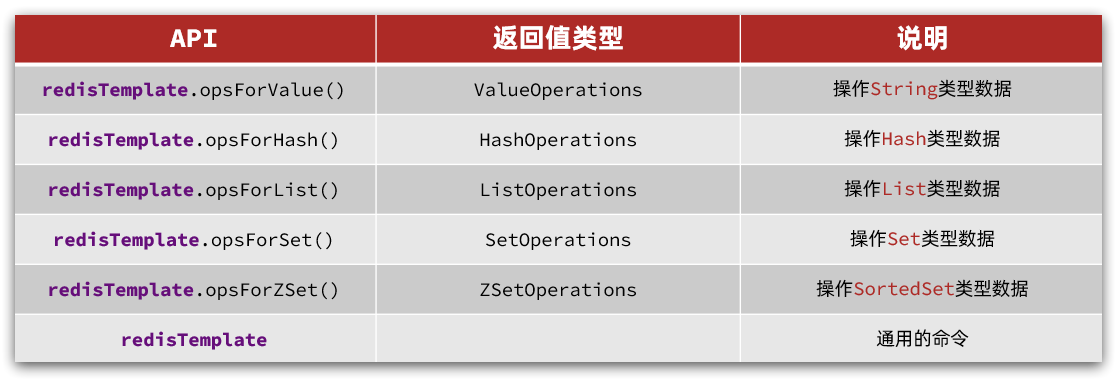
SpringDataRedis中提供了RedisTemplate工具类,其中封装了各种对Redis的操作。并且将不同数据类型的操作API封装到了不同的类型中:
2.2.1.快速入门
SpringBoot已经提供了对SpringDataRedis的支持,使用非常简单。
首先,新建一个maven项目,然后按照下面步骤执行:
1)引入依赖
<?xml version="1.0" encoding="UTF-8"?>
<project xmlns="http://maven.apache.org/POM/4.0.0" xmlns:xsi="http://www.w3.org/2001/XMLSchema-instance"
         xsi:schemaLocation="http://maven.apache.org/POM/4.0.0 https://maven.apache.org/xsd/maven-4.0.0.xsd">
    <modelVersion>4.0.0</modelVersion>
    <parent>
        <groupId>org.springframework.boot</groupId>
        <artifactId>spring-boot-starter-parent</artifactId>
        <version>2.5.7</version>
        <relativePath/> <!-- lookup parent from repository -->
    </parent>
    <groupId>com.heima</groupId>
    <artifactId>redis-demo</artifactId>
    <version>0.0.1-SNAPSHOT</version>
    <name>redis-demo</name>
    <description>Demo project for Spring Boot</description>
    <properties>
        <java.version>1.8</java.version>
    </properties>
    <dependencies>
        <!--redis依赖-->
        <dependency>
            <groupId>org.springframework.boot</groupId>
            <artifactId>spring-boot-starter-data-redis</artifactId>
        </dependency>
        <!--common-pool-->
        <dependency>
            <groupId>org.apache.commons</groupId>
            <artifactId>commons-pool2</artifactId>
        </dependency>
        <!--Jackson依赖-->
        <dependency>
            <groupId>com.fasterxml.jackson.core</groupId>
            <artifactId>jackson-databind</artifactId>
        </dependency>
        <dependency>
            <groupId>org.projectlombok</groupId>
            <artifactId>lombok</artifactId>
            <optional>true</optional>
        </dependency>
        <dependency>
            <groupId>org.springframework.boot</groupId>
            <artifactId>spring-boot-starter-test</artifactId>
            <scope>test</scope>
        </dependency>
    </dependencies>

    <build>
        <plugins>
            <plugin>
                <groupId>org.springframework.boot</groupId>
                <artifactId>spring-boot-maven-plugin</artifactId>
                <configuration>
                    <excludes>
                        <exclude>
                            <groupId>org.projectlombok</groupId>
                            <artifactId>lombok</artifactId>
                        </exclude>
                    </excludes>
                </configuration>
            </plugin>
        </plugins>
    </build>

</project>
2)配置Redis
spring:
  redis:
    host: 192.168.150.101
    port: 6379
    password: 123321
    lettuce:
      pool:
        max-active: 8
        max-idle: 8
        min-idle: 0
        max-wait: 100ms
3)注入RedisTemplate
因为有了SpringBoot的自动装配,我们可以拿来就用:
@SpringBootTest
class RedisStringTests {

    @Autowired
    private RedisTemplate redisTemplate;
}
4)编写测试
@SpringBootTest
class RedisStringTests {

    @Autowired
    private RedisTemplate edisTemplate;

    @Test
    void testString() {
        // 写入一条String数据
        redisTemplate.opsForValue().set("name", "虎哥");
        // 获取string数据
        Object name = stringRedisTemplate.opsForValue().get("name");
        System.out.println("name = " + name);
    }
}
2.2.2.自定义序列化
RedisTemplate可以接收任意Object作为值写入Redis:

只不过写入前会把Object序列化为字节形式,默认是采用JDK序列化,得到的结果是这样的:
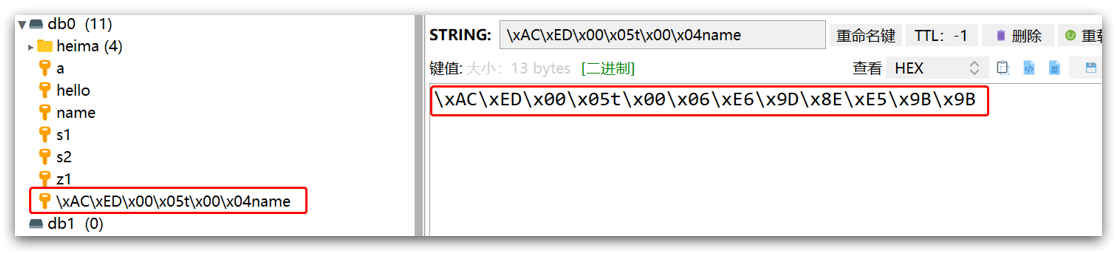
缺点:
- 可读性差
- 内存占用较大
我们可以自定义RedisTemplate的序列化方式,代码如下:
@Configuration
public class RedisConfig {

    @Bean
    public RedisTemplate<String, Object> redisTemplate(RedisConnectionFactory connectionFactory){
        // 创建RedisTemplate对象
        RedisTemplate<String, Object> template = new RedisTemplate<>();
        // 设置连接工厂
        template.setConnectionFactory(connectionFactory);
        // 创建JSON序列化工具
        GenericJackson2JsonRedisSerializer jsonRedisSerializer =
            							new GenericJackson2JsonRedisSerializer();
        // 设置Key的序列化
        template.setKeySerializer(RedisSerializer.string());
        template.setHashKeySerializer(RedisSerializer.string());
        // 设置Value的序列化
        template.setValueSerializer(jsonRedisSerializer);
        template.setHashValueSerializer(jsonRedisSerializer);
        // 返回
        return template;
    }
}
这里采用了JSON序列化来代替默认的JDK序列化方式。最终结果如图:

整体可读性有了很大提升,并且能将Java对象自动的序列化为JSON字符串,并且查询时能自动把JSON反序列化为Java对象。不过,其中记录了序列化时对应的class名称,目的是为了查询时实现自动反序列化。这会带来额外的内存开销。
2.2.3.StringRedisTemplate
为了节省内存空间,我们可以不使用JSON序列化器来处理value,而是统一使用String序列化器,要求只能存储String类型的key和value。当需要存储Java对象时,手动完成对象的序列化和反序列化。

因为存入和读取时的序列化及反序列化都是我们自己实现的,SpringDataRedis就不会将class信息写入Redis了。
这种用法比较普遍,因此SpringDataRedis就提供了RedisTemplate的子类:StringRedisTemplate,它的key和value的序列化方式默认就是String方式。
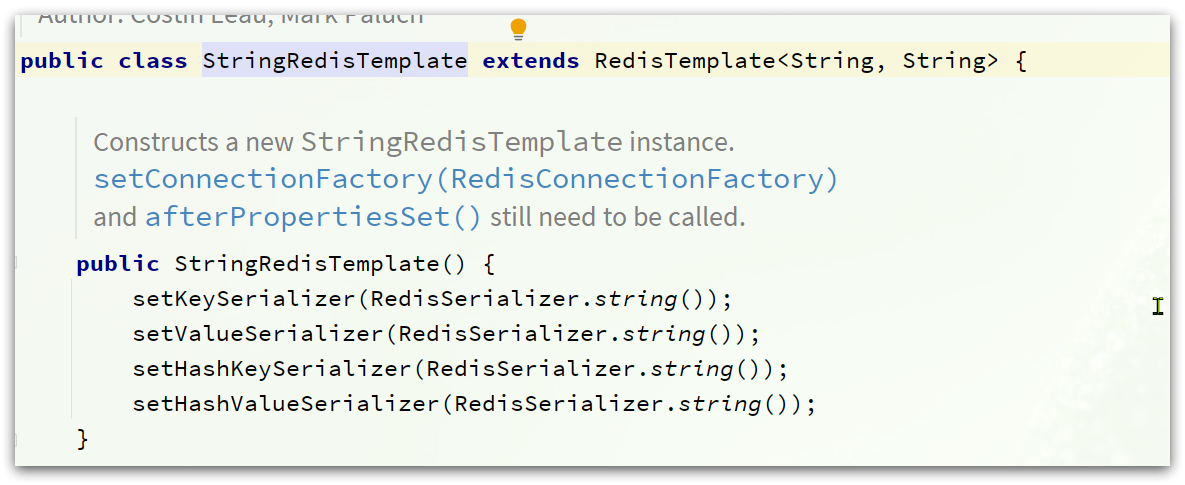
省去了我们自定义RedisTemplate的序列化方式的步骤,而是直接使用:
@Autowired
private StringRedisTemplate stringRedisTemplate;
// JSON序列化工具
private static final ObjectMapper mapper = new ObjectMapper();

@Test
void testSaveUser() throws JsonProcessingException {
    // 创建对象
    User user = new User("虎哥", 21);
    // 手动序列化
    String json = mapper.writeValueAsString(user);
    // 写入数据
    stringRedisTemplate.opsForValue().set("user:200", json);

    // 获取数据
    String jsonUser = stringRedisTemplate.opsForValue().get("user:200");
    // 手动反序列化
    User user1 = mapper.readValue(jsonUser, User.class);
    System.out.println("user1 = " + user1);
}


 1万+
1万+


 被折叠的 条评论
为什么被折叠?
被折叠的 条评论
为什么被折叠?
 到【灌水乐园】发言


