


文章目录
前言
以鸢尾花数据为例,介绍决策树及python实现
一、环境
操作系统: windows 10
IDE: pycharm(python 3.9)
浏览器:Microsoft Edge
二、运用决策树进行分类
1.数据预处理,划分数据集
代码如下:
import numpy as np
import pandas as pd
import matplotlib.pyplot as plt
import matplotlib as mpl
from sklearn import tree
from sklearn.tree import DecisionTreeClassifier, export_graphviz
from sklearn.model_selection import train_test_split
import pydotplus

# 花萼长度、花萼宽度,花瓣长度,花瓣宽度
iris_feature_E = 'sepal length', 'sepal width', 'petal length', 'petal width'
iris_feature_E_2 = 'sepal length', 'sepal width'
iris_feature = u'花萼长度', u'花萼宽度', u'花瓣长度', u'花瓣宽度'
iris_class = 'Iris-setosa', 'Iris-versicolor', 'Iris-virginica'
# 数据文件路径
path = 'iris.data'
data = pd.read_csv(path, header=None)
x = data[range(4)]
print(x)
# 非常有用的方法,获取不同元素的个数并标号0-2
y = pd.Categorical(data[4]).codes

# 为了可视化,仅使用前两列特征
x = x.iloc[:, :2]

# random_state=1表示随机划分
x_train, x_test, y_train, y_test = train_test_split(x, y, train_size=0.7, random_state=1)
print(y_test.shape)
2.调用决策树分类器进行分类
代码如下:
model = DecisionTreeClassifier(criterion='entropy')
model.fit(x_train, y_train)
y_test_hat = model.predict(x_test)  # 测试数据
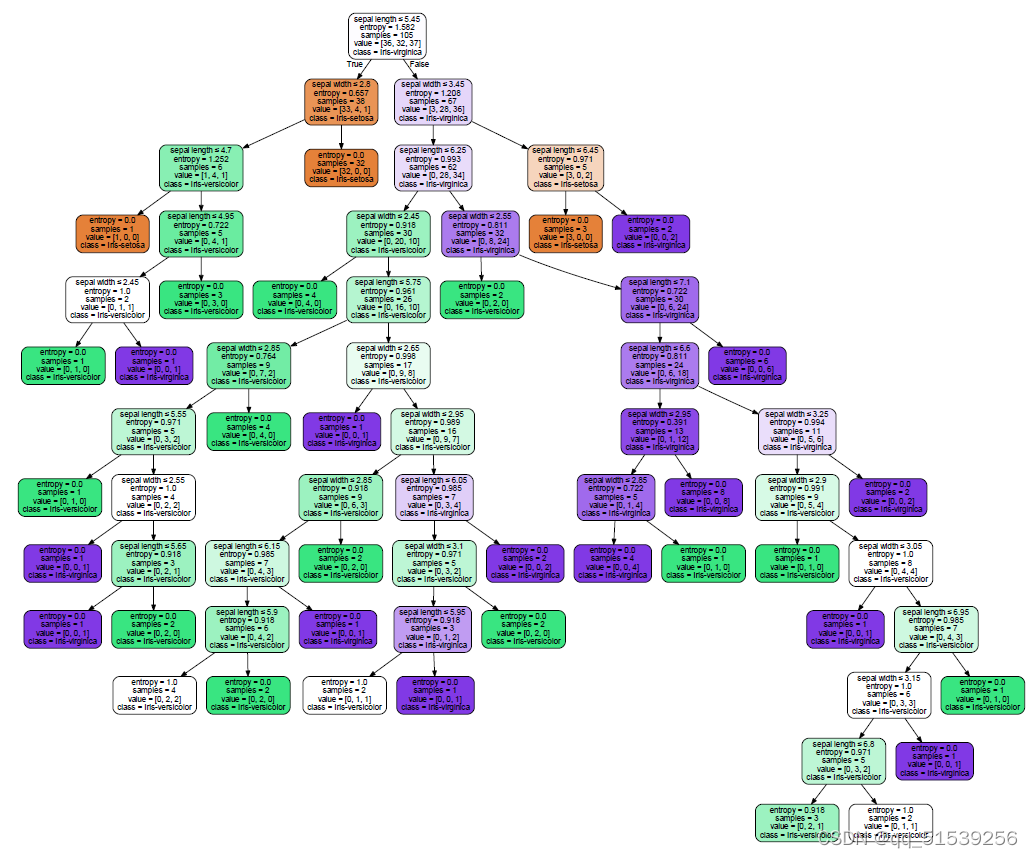
3.graphviz工具画决策树图像
代码如下:
# 保存
# dot -Tpng my.dot -o my.png
# 1、输出[方法一]
with open('iris.dot', 'w') as f:
    tree.export_graphviz(model, out_file=f)
# 1、输出[方法二]
# tree.export_graphviz(model, out_file='iris1.dot')
# 2、输出为pdf格式
# graph = pydotplus.graph_from_dot_file('iris.dot')
dot_data = tree.export_graphviz(model, out_file=None, feature_names=iris_feature_E_2, class_names=iris_class,
                               filled=True, rounded=True, special_characters=True)
graph = pydotplus.graph_from_dot_data(dot_data)
graph.write_pdf('iris.pdf')
# 3、生成图像
f = open('iris.png', 'wb')
f.write(graph.create_png())
f.close()
决策树如下:
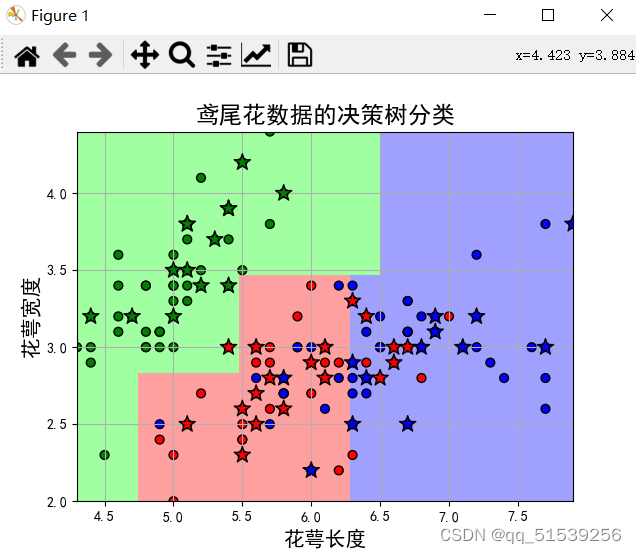
4.画出分类后样本点的分布图像
# 画图
N, M = 50, 50  # 横纵各采样多少个值
x1_min, x2_min = x.min()
x1_max, x2_max = x.max()
t1 = np.linspace(x1_min, x1_max, N)
t2 = np.linspace(x2_min, x2_max, M)
x1, x2 = np.meshgrid(t1, t2)  # 生成网格采样点
x_show = np.stack((x1.flat, x2.flat), axis=1)  # 测试点
print (x_show.shape)

cm_light = mpl.colors.ListedColormap(['#A0FFA0', '#FFA0A0', '#A0A0FF'])
cm_dark = mpl.colors.ListedColormap(['g', 'r', 'b'])
y_show_hat = model.predict(x_show)  # 预测值
y_show_hat = y_show_hat.reshape(x1.shape)  # 使之与输入的形状相同
print (y_show_hat)
plt.figure(facecolor='w')
plt.pcolormesh(x1, x2, y_show_hat, cmap=cm_light)  # 预测值的显示
plt.scatter(x_test[0], x_test[1], c=y_test.ravel(), edgecolors='k', s=150, zorder=10, cmap=cm_dark, marker='*')  # 测试数据
plt.scatter(x[0], x[1], c=y.ravel(), edgecolors='k', s=40, cmap=cm_dark)  # 全部数据
plt.xlabel(iris_feature[0], fontsize=15)
plt.ylabel(iris_feature[1], fontsize=15)
plt.xlim(x1_min, x1_max)
plt.ylim(x2_min, x2_max)
plt.grid(True)
plt.title(u'鸢尾花数据的决策树分类', fontsize=17)
plt.show()
样本点的分布:

5.模型评估
y_test = y_test.reshape(-1)
print (y_test_hat)
print (y_test)
result = (y_test_hat == y_test)   # True则预测正确,False则预测错误
acc = np.mean(result)
print ('准确度: %.2f%%' % (100 * acc))

# 过拟合:错误率
depth = np.arange(1, 15)
err_list = []
for d in depth:
    clf = DecisionTreeClassifier(criterion='entropy', max_depth=d)
    clf.fit(x_train, y_train)
    y_test_hat = clf.predict(x_test)  # 测试数据
    result = (y_test_hat == y_test)  # True则预测正确,False则预测错误
    if d == 1:
        print (result)
    err = 1 - np.mean(result)
    err_list.append(err)
    # print d, ' 准确度: %.2f%%' % (100 * err)
    print (d, ' 错误率: %.2f%%' % (100 * err))
plt.figure(facecolor='w')
plt.plot(depth, err_list, 'ro-', lw=2)
plt.xlabel(u'决策树深度', fontsize=15)
plt.ylabel(u'错误率', fontsize=15)
plt.title(u'决策树深度与过拟合', fontsize=17)
plt.grid(True)
plt.show()
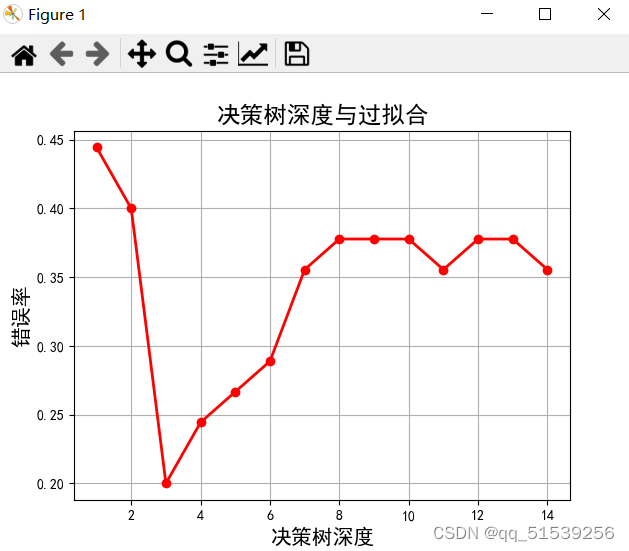
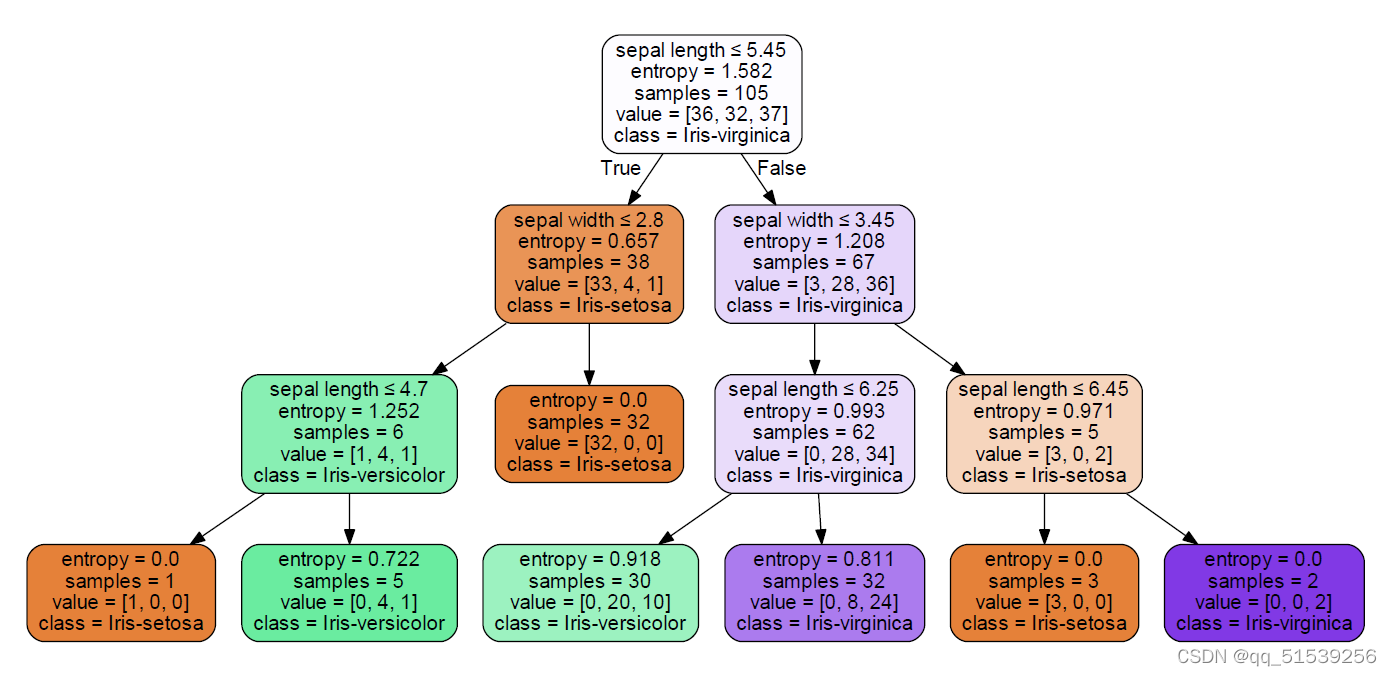
可以看到,决策树深度为3时正确率最高
决策树如下:
这个时候的样本点划分情况如下:
三、决策树进行回归(待更新)
部分图片/资料来自网络,仅供个人学习使用


 2155
2155


 被折叠的 条评论
为什么被折叠?
被折叠的 条评论
为什么被折叠?
 到【灌水乐园】发言


