


欢迎关注公众号——小东方不败
bean的生命周期(浅析)
0x01_Bean的5个生命周期
bean从创建到销毁经历的各个阶段以及每个阶段所调用的方法
- 1.通过构造方法创建bean实例 执行构造方法(一般执行的是空的构造方法)
- 2.为bean属性赋值 执行set方法 (如果第一步调用的是有参数构造方法,这一步可能没有)
- 3.初始化bean 调用bean的初始化方法,需要配置指定调用的方法 (这个需要在bean标签中指定对应的方法)
- 4.bean的获取 容器对象 getBean方法
- 5.容器关闭销毁bean 调用销毁方法,需要配置指定调用的方法(这个需要在bean标签中指定对应的方法)
0x02_测试bean的5个生命周期
准备实体类:
package com.bones.bean;
/**
 * @author : bones
 * @version : 1.0
 */
public class User {
    private Integer userid;
    private String username;
    private String password;

    public void initUser(){
        System.out.println("第3步:初始化bean");
    }

    public void destroyUser(){
        System.out.println("第5步:销毁bean");
    }

    public User(Integer userid, String username, String password) {
        System.out.println("allArgConstructor");
        this.userid = userid;
        this.username = username;
        this.password = password;
    }

    public User() {
        System.out.println("第1步:noArgConstructor");
    }

    public Integer getUserid() {
        System.out.println("getUserid");
        return userid;
    }

    public String getUsername() {
        System.out.println("getUsername");
        return username;
    }

    public String getPassword() {
        System.out.println("getPassword");
        return password;
    }

    @Override
    public String toString() {
        return "User{" +
                "userid=" + userid +
                ", username='" + username + '\'' +
                ", password='" + password + '\'' +
                '}';
    }

    public void setUserid(Integer userid) {
        System.out.println("第2步:setUserid");
        this.userid = userid;
    }

    public void setUsername(String username) {
        System.out.println("setUsername");
        this.username = username;
    }

    public void setPassword(String password) {
        System.out.println("setPassword");
        this.password = password;
    }
}
注:为了测试Bean的生命周期,可以加上输出语句,看到方法的调用。
applicationContext.xml
<?xml version="1.0" encoding="UTF-8"?>
<beans xmlns="http://www.springframework.org/schema/beans"
       xmlns:xsi="http://www.w3.org/2001/XMLSchema-instance"
        xmlns:p="http://www.springframework.org/schema/p"
        xmlns:c="http://www.springframework.org/schema/c"
        xmlns:util="http://www.springframework.org/schema/util"
       xsi:schemaLocation="http://www.springframework.org/schema/beans
       http://www.springframework.org/schema/beans/spring-beans.xsd
       http://www.springframework.org/schema/util
       http://www.springframework.org/schema/util/spring-util.xsd
">

    <bean id="user" class="com.bones.bean.User" init-method="initUser" destroy-method="destroyUser">
        <property name="userid" value="1"/>
    </bean>

</beans>
注:为了体现第3步(初始化Bean)和最后一步(销毁Bean),要在Bean标签处加上属性
init-method和destroy-method,指定在初始化bean和销毁bean的时候调用的方法。
测试方法:
package com.bones.test01;
import com.bones.bean.User;
import org.junit.Test;
import org.springframework.context.ApplicationContext;
import org.springframework.context.support.AbstractApplicationContext;
import org.springframework.context.support.ClassPathXmlApplicationContext;
/**
* @author : bones
* @version : 1.0
*/
public class TestBeanLifeCycle {
@Test
public void testBeanTag(){
//获取容器
AbstractApplicationContext applicationContext = new ClassPathXmlApplicationContext("applicationContext6.xml");
User user = applicationContext.getBean("user", User.class);
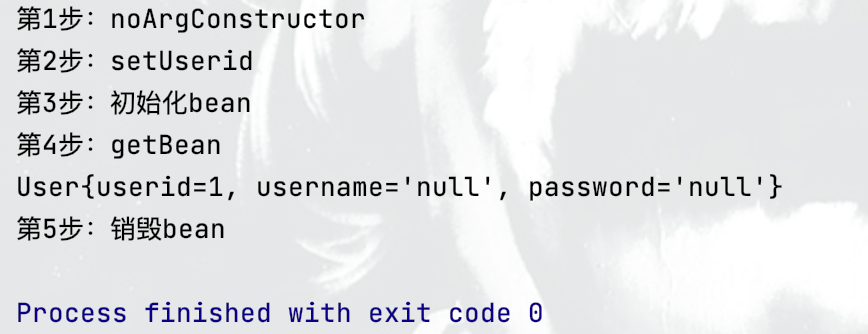
System.out.println("第4步:getBean");
System.out.println(user);
//销毁容器,要执行close方法,必须是AbstractApplicationContext或者其子类
applicationContext.close();
}
}
测试结果:
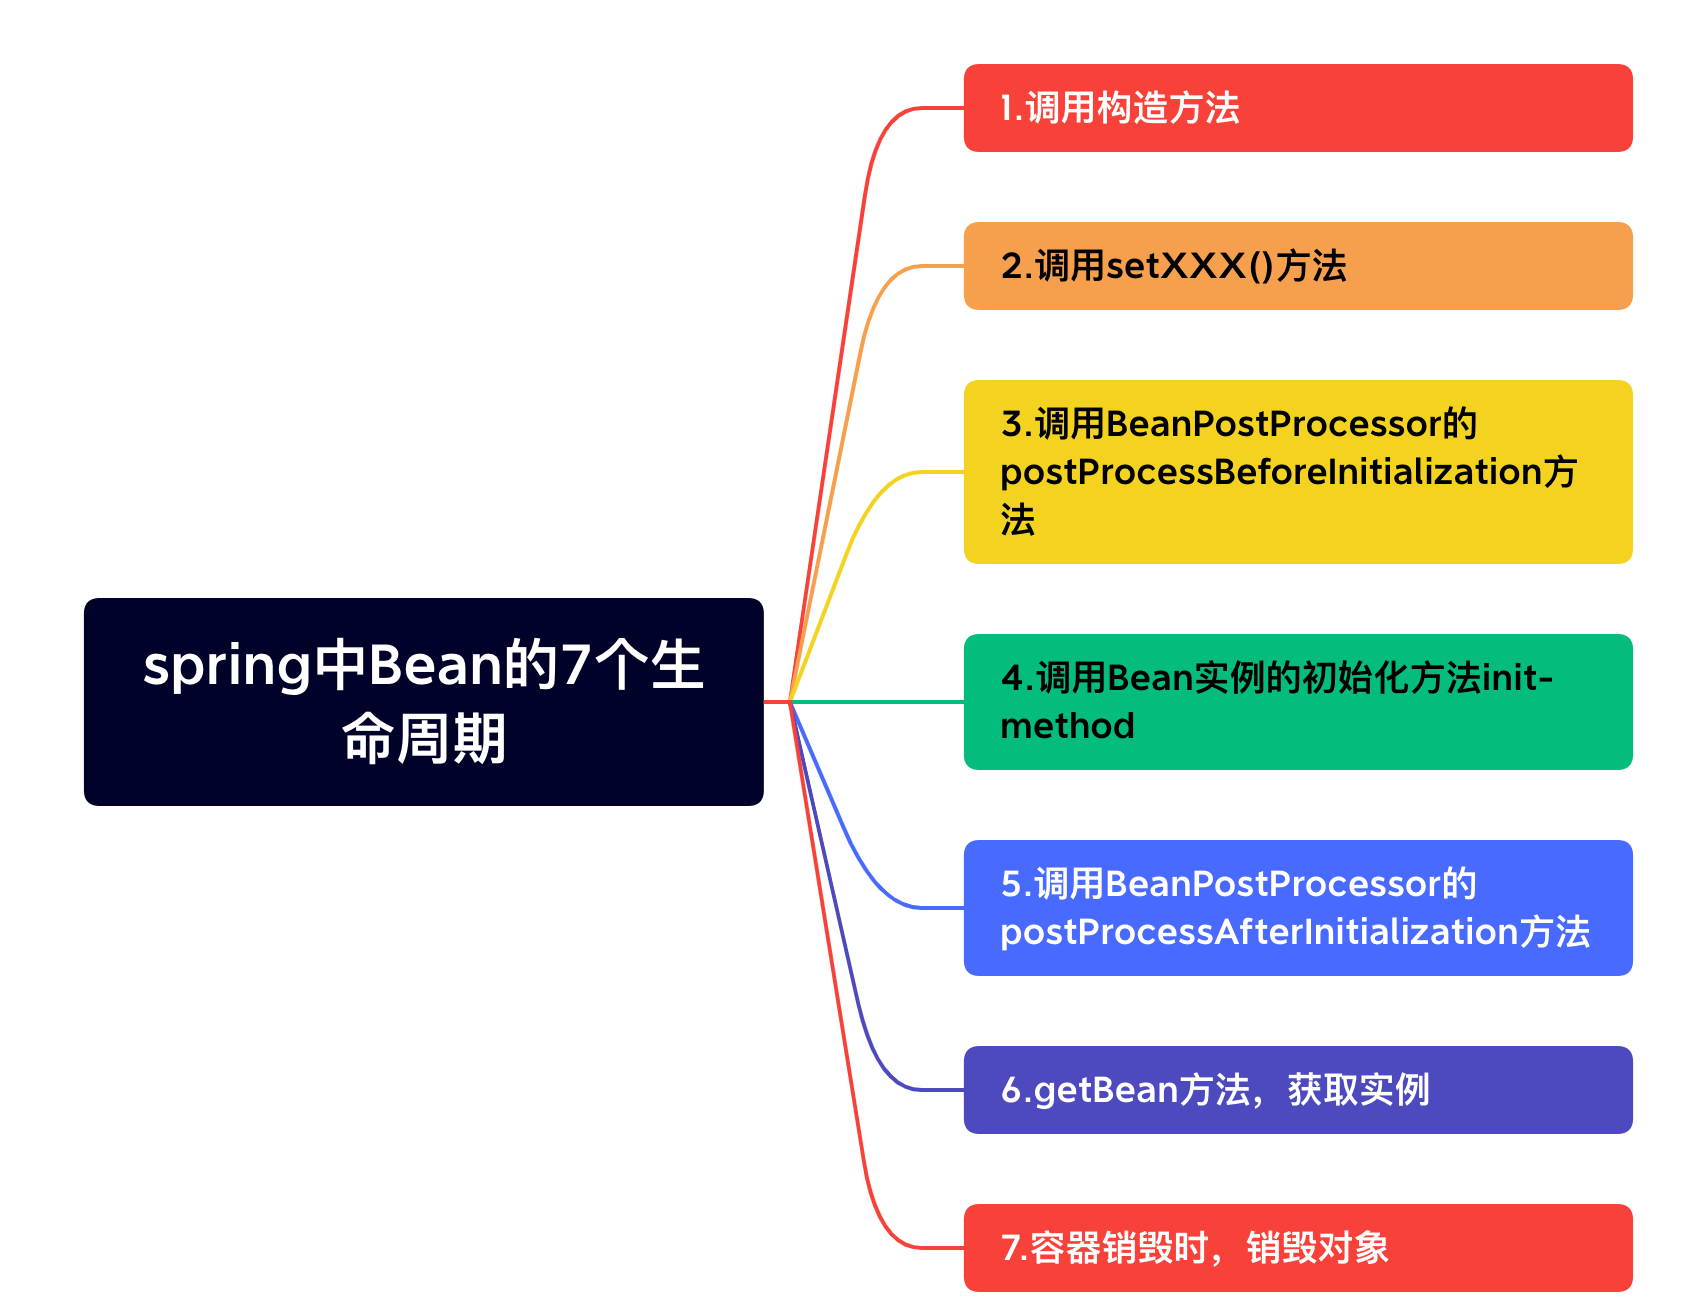
0x03_Bean的7个生命周期
7个?其实在初始化Bean前后还可以再有2个周期:
- 1.通过构造器创建bean实例 执行构造器
- 2.为bean属性赋值 执行set方法
- 3.把bean实例传递给bean的后置处理器的方法
- 4.初始化bean 调用bean的初始化方法,需要配置指定调用的方法
- 5.把bean实例传递给bean的后置处理器的方法
- 6.bean的获取 容器对象 getBean方法
- 7.容器关闭销毁bean 调用销毁方法,需要配置指定调用的方法
这里需要补充一下后置处理器-BeanPostProcessor接口
BeanPostProcessor是Spring IOC容器给我们提供的一个扩展接口。
先上源码:
package org.springframework.beans.factory.config;

import org.springframework.beans.BeansException;
import org.springframework.lang.Nullable;

public interface BeanPostProcessor {
	@Nullable
	default Object postProcessBeforeInitialization(Object bean, String beanName) throws BeansException {
		return bean;
	}
	@Nullable
	default Object postProcessAfterInitialization(Object bean, String beanName) throws BeansException {
		return bean;
	}
}
如上接口声明所示,
BeanPostProcessor接口有两个回调方法。当一个BeanPostProcessor的实现类注册到Spring IOC容器后,对于该Spring IOC容器所创建的每个bean实例在初始化方法(如afterPropertiesSet和任意已声明的init方法)调用前,将会调用BeanPostProcessor中的postProcessBeforeInitialization方法,而在bean实例初始化方法调用完成后,则会调用BeanPostProcessor中的postProcessAfterInitialization方法,整个调用顺序可以简单示意如下:
可以看到,Spring容器通过
BeanPostProcessor给了我们一个机会对Spring管理的bean进行再加工。比如:我们可以修改bean的属性,可以给bean生成一个动态代理实例等等。一些Spring AOP的底层处理也是通过实现BeanPostProcessor来执行代理包装逻辑的。
0x04_测试bean的7个生命周期
准备后置处理器类:MyPostProcessor implements BeanPostProcessor,重写里面的2个方法(注意返回对象是bean,否则bean就丢失了)
package com.bones.bean;

import org.springframework.beans.BeansException;
import org.springframework.beans.factory.config.BeanPostProcessor;

/**
 * @author : bones
 * @version : 1.0
 */
public class MyPostProcessor implements BeanPostProcessor {
    @Override
    public Object postProcessBeforeInitialization(Object bean, String beanName) throws BeansException {
        System.out.println("初始化之前:调用postProcessBeforeInitialization");
        //Object bean   就是实例化的对象
        //String beanName  就是实例化对象的id
        return bean;//如果重写BeanPostProcessor的方法,如果不返回bean,那原先实例化的对象就没了
    }

    @Override
    public Object postProcessAfterInitialization(Object bean, String beanName) throws BeansException {
        System.out.println("初始化之后:调用postProcessAfterInitialization");
        return bean;
    }
}
在applicationContext.xml中生命这个后置处理器:
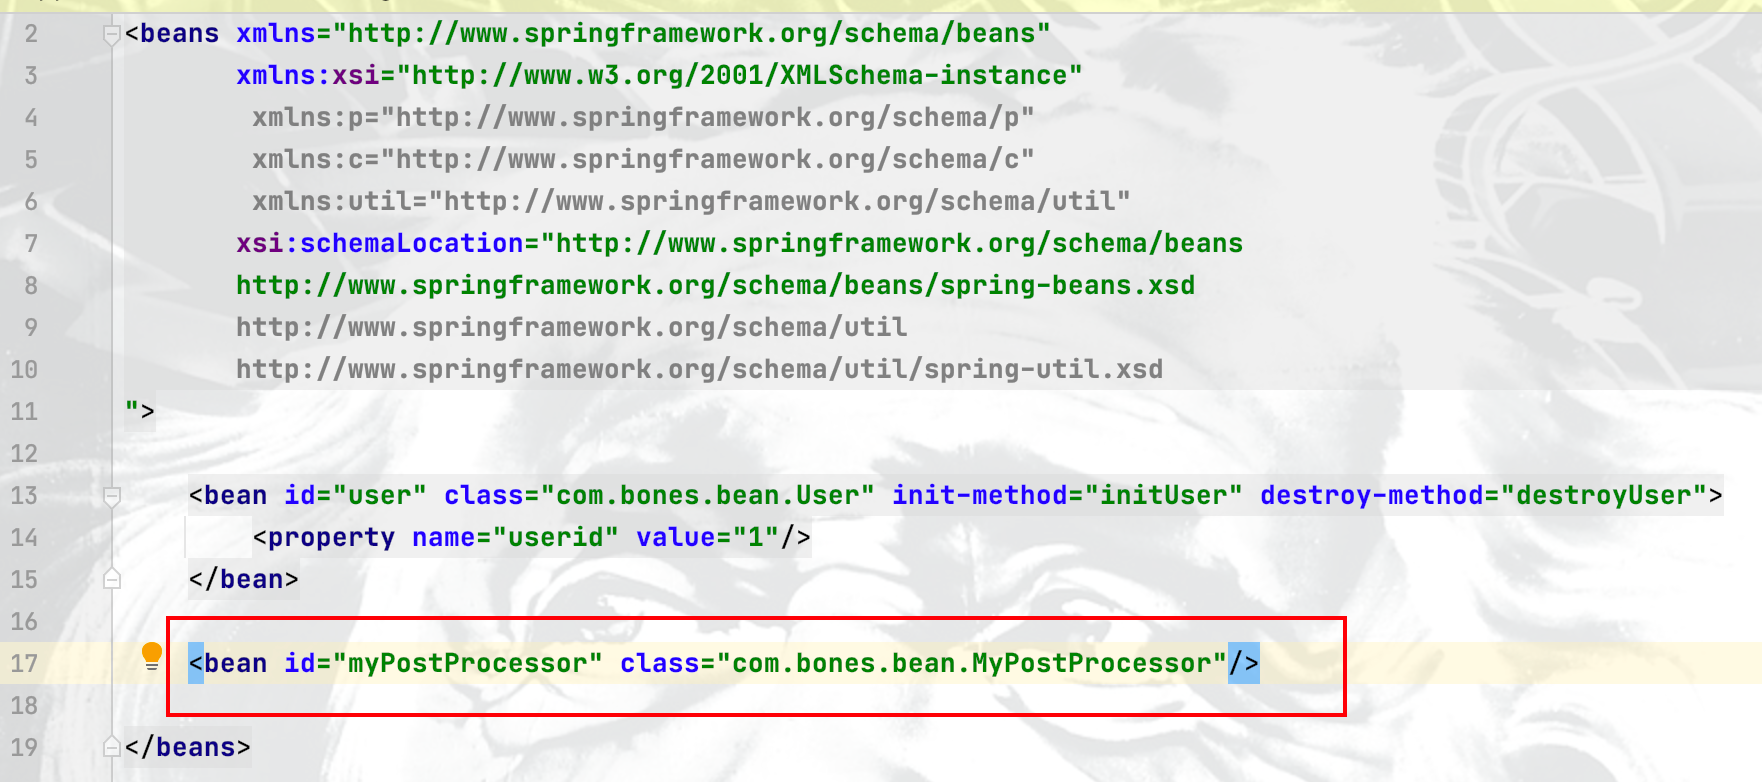
注:这个后置处理器会对这个容器中的所有bean对象都应用。
还是上面的测试方法,测试结果:

BeanPostProcessor接口作用:如果我们想在Spring容器中完成bean实例化、配置以及其他初始化方法前后要添加一些自己逻辑处理。我们需要定义一个或多个BeanPostProcessor接口实现类,然后注册到Spring IoC容器中。
1、接口中的两个方法都要将传入的bean返回,而不能返回null,如果返回的是null那么我们通过getBean方法将得不到目标。
2、
ApplicationContext会自动检测在配置文件中实现了BeanPostProcessor接口的所有bean,并把它们注册为后置处理器,然后在容器创建bean的适当时候调用它,因此部署一个后置处理器同部署其他的bean并没有什么区别。而使用BeanFactory实现的时候,bean 后置处理器必须通过代码显式地去注册,在IoC容器继承体系中的ConfigurableBeanFactory接口中定义了注册方法
0x05_推荐阅读
【Spring探秘|妙用BeanPostProcessor】https://www.jianshu.com/p/1417eefd2ab1


 10万+
10万+


 被折叠的 条评论
为什么被折叠?
被折叠的 条评论
为什么被折叠?
 到【灌水乐园】发言


