


教程1 wandb在kaggle中使用方法
解决kaggle上无法输入wandb的API Key问题
- 在kaggle的notebook中输入下述命令进行下载wandb模块
!pip install wandb
-
然后在wandb平台获取API Key
进入wandb网址:https://wandb.ai/home
在主页进行如下图操作:

-
接下来就可以看见如下的API Key

-
将得到的API Key保存后在kaggle中输入如下命令:
!wandb login 你的API Key
- 最后就可以在kaggle上登录wandb了
教程2 在kaggle中查看kaggle/working中某个文件的内容
- 使用如下命令在kaggle中查看文件具体内容
!cat 你要查看文件的路径
- 例如:查看kaggle/working下的data.yaml文件源码如下:
#方式一
!cat {dataset.location}/data.yaml
#方式二
!cat /kaggle/working/yolov5/dataset-2/data.yaml
- 方式二的路径可以直接复制,如下图所示
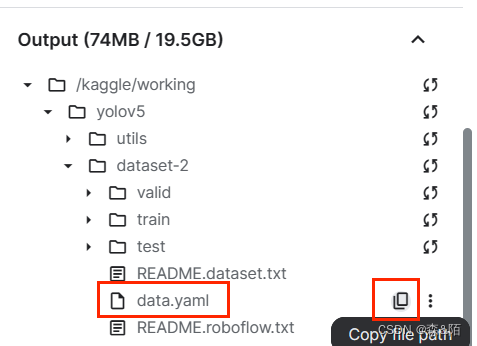
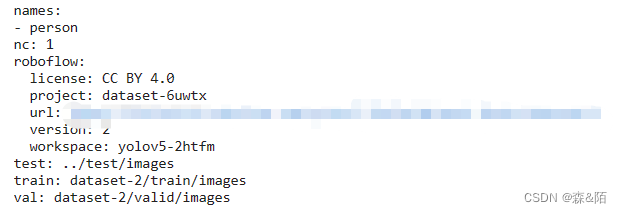
就可以查看data.yaml中的具体内容了,运行结果如下图所示:
教程3 在kaggle中修改kaggle/working中某个文件的具体内容
- 首先需要配置相关环境,配置源码如下:
#customize iPython writefile so we can write variables
from IPython.core.magic import register_line_cell_magic

@register_line_cell_magic
def writetemplate(line, cell):
    with open(line, 'w') as f:
        f.write(cell.format(**globals()))
- 运行上述源码后再进行内容修改,修改源码如下:
!writetemplate 你要修改的文件的保存路径
- 例如:我要修改YOLOv5中的yolov5n.yaml中的nc,则
- 定义要修改的内容
# define number of classes based on YAML
#导入yaml模块
import yaml
#打开YAML文件:使用 with open(...) 语句来打开一个YAML文件。这个文件的路径由 dataset.location 和 "/data.yaml" 拼接而成。'r' 参数表示以只读模式打开文件。
with open(dataset.location + "/data.yaml", 'r') as stream:
#读取YAML文件内容:yaml.safe_load(stream) 用于安全地加载YAML文件的内容。这里,stream 是打开的YAML文件的文件对象。获取YAML中的特定数据:yaml.safe_load(stream)['nc'] 从YAML文件的内容中提取键为 'nc' 的值。将获取的值转换为字符串:str(...) 将从YAML文件中获取的 'nc' 的值转换为字符串。这一步可能是为了确保后续处理的一致性,尽管通常“类别数量”是一个整数,但在这里它被转换为了字符串。
    num_classes = str(yaml.safe_load(stream)['nc'])
- 查看要修改内容的原文
#this is the model configuration we will use for our tutorial
!cat /kaggle/working/yolov5/models/yolov5n.yaml
运行结果如下:
# YOLOv5 🚀 by Ultralytics, GPL-3.0 license

# Parameters
nc: 80  # number of classes
depth_multiple: 0.33  # model depth multiple
width_multiple: 0.25  # layer channel multiple
anchors:
  - [10,13, 16,30, 33,23]  # P3/8
  - [30,61, 62,45, 59,119]  # P4/16
  - [116,90, 156,198, 373,326]  # P5/32

# YOLOv5 v6.0 backbone
backbone:
  # [from, number, module, args]
  [[-1, 1, Conv, [64, 6, 2, 2]],  # 0-P1/2
   [-1, 1, Conv, [128, 3, 2]],  # 1-P2/4
   [-1, 3, C3, [128]],
   [-1, 1, Conv, [256, 3, 2]],  # 3-P3/8
   [-1, 6, C3, [256]],
   [-1, 1, Conv, [512, 3, 2]],  # 5-P4/16
   [-1, 9, C3, [512]],
   [-1, 1, Conv, [1024, 3, 2]],  # 7-P5/32
   [-1, 3, C3, [1024]],
   [-1, 1, SPPF, [1024, 5]],  # 9
  ]

# YOLOv5 v6.0 head
head:
  [[-1, 1, Conv, [512, 1, 1]],
   [-1, 1, nn.Upsample, [None, 2, 'nearest']],
   [[-1, 6], 1, Concat, [1]],  # cat backbone P4
   [-1, 3, C3, [512, False]],  # 13

   [-1, 1, Conv, [256, 1, 1]],
   [-1, 1, nn.Upsample, [None, 2, 'nearest']],
   [[-1, 4], 1, Concat, [1]],  # cat backbone P3
   [-1, 3, C3, [256, False]],  # 17 (P3/8-small)

   [-1, 1, Conv, [256, 3, 2]],
   [[-1, 14], 1, Concat, [1]],  # cat head P4
   [-1, 3, C3, [512, False]],  # 20 (P4/16-medium)

   [-1, 1, Conv, [512, 3, 2]],
   [[-1, 10], 1, Concat, [1]],  # cat head P5
   [-1, 3, C3, [1024, False]],  # 23 (P5/32-large)

   [[17, 20, 23], 1, Detect, [nc, anchors]],  # Detect(P3, P4, P5)
  ]
- 配置修改相关环境
#customize iPython writefile so we can write variables
from IPython.core.magic import register_line_cell_magic

@register_line_cell_magic
def writetemplate(line, cell):
    with open(line, 'w') as f:
        f.write(cell.format(**globals()))
- 修改内容(复制yolov5n.yaml的原文,然后将nc处进行修改)并运行
!writetemplate /kaggle/working/yolov5/models/custom_yolov5n.yaml
# parameters
nc: {num_classes} # number of classes
depth_multiple: 0.33 # model depth multiple
width_multiple: 0.50 # layer channel multiple
# anchors
anchors:
- [10,13, 16,30, 33,23] # P3/8
- [30,61, 62,45, 59,119] # P4/16
- [116,90, 156,198, 373,326] # P5/32
# YOLOv5 backbone
backbone:
# [from, number, module, args]
[[-1, 1, Focus, [64, 3]], # 0-P1/2
[-1, 1, Conv, [128, 3, 2]], # 1-P2/4
[-1, 3, BottleneckCSP, [128]],
[-1, 1, Conv, [256, 3, 2]], # 3-P3/8
[-1, 9, BottleneckCSP, [256]],
[-1, 1, Conv, [512, 3, 2]], # 5-P4/16
[-1, 9, BottleneckCSP, [512]],
[-1, 1, Conv, [1024, 3, 2]], # 7-P5/32
[-1, 1, SPP, [1024, [5, 9, 13]]],
[-1, 3, BottleneckCSP, [1024, False]], # 9
]
# YOLOv5 head
head:
[[-1, 1, Conv, [512, 1, 1]],
[-1, 1, nn.Upsample, [None, 2, 'nearest']],
[[-1, 6], 1, Concat, [1]], # cat backbone P4
[-1, 3, BottleneckCSP, [512, False]], # 13
[-1, 1, Conv, [256, 1, 1]],
[-1, 1, nn.Upsample, [None, 2, 'nearest']],
[[-1, 4], 1, Concat, [1]], # cat backbone P3
[-1, 3, BottleneckCSP, [256, False]], # 17 (P3/8-small)
[-1, 1, Conv, [256, 3, 2]],
[[-1, 14], 1, Concat, [1]], # cat head P4
[-1, 3, BottleneckCSP, [512, False]], # 20 (P4/16-medium)
[-1, 1, Conv, [512, 3, 2]],
[[-1, 10], 1, Concat, [1]], # cat head P5
[-1, 3, BottleneckCSP, [1024, False]], # 23 (P5/32-large)
[[17, 20, 23], 1, Detect, [nc, anchors]], # Detect(P3, P4, P5)
]
通过上述四个步骤即完成整个修改内容。应该也可以直接复制其原文,然后直接修改yolov5n.yaml中的nc内容使其等于1。
教程4 在kaggle中安装包
!pip install -q 你要安装的包名称
#安装requirements.txt文件
!pip install -qr requirements.txt


 4983
4983

 被折叠的 条评论
为什么被折叠?
被折叠的 条评论
为什么被折叠?
 到【灌水乐园】发言


