


 SSH协议通过加密技术提供安全的远程连接,包括公钥/私钥认证。文章介绍了SSH服务的启动、客户端连接、SFTP和SCP的使用,以及如何配置SSH服务器和实现无密码登录。同时,讨论了公钥记录文件的管理和解决报错问题。
ssh服务器
在早期,远程连接服务器时常使用明文传输数据,这会存在安全问题。为了解决这些问题,SSH协议应运而生,逐渐取代了不安全的应用。SSH是secure Shell Protocol的简称,是一种基于安全加密协议的远程登录协议。它可以通过数据包加密技术将等待传输的数据包加密后再传输到网络上,因此,数据信息就比较安全。
在默认状态下,SSH协议本身就提供两个服务器功能
- 一个是类似Telnet的远程连接使用 Shell 的服务器,即俗称的SSH
- 另一个就是类似FTP服务的 Sftp-Server,提供更安全的FTP服务
telenet服务和openssh服务区别
| 服务 | 特点 | 应用场景 |
|---|---|---|
| telnet | 远程连接,23数据未加密/明文 | 更新openssh作为备用方案使用 |
| openssh服务 | 远程连接22,加密 | 默认就是使用openssh |
ssh服务介绍
ssh: secure shell protocol, 22/tcp, 安全的远程登录,实现加密通信,代替传统的 telnet 协议
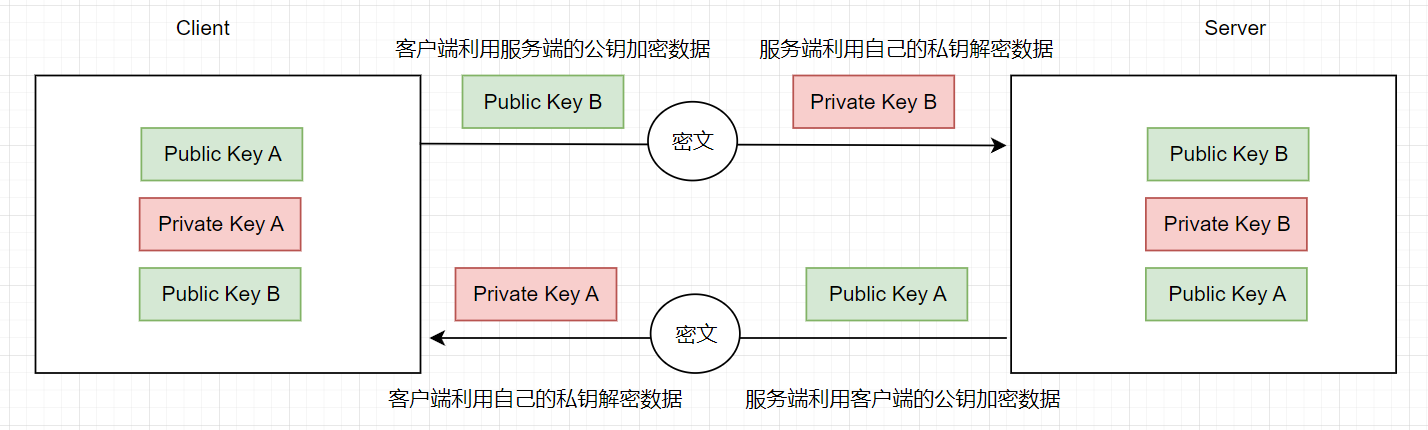
公钥交换原理
-
服务器建立公钥、私钥文件
-
客户端发起链接请求
-
服务端返回自己的公钥,以及一个会话ID(这一步客户端得到服务端公钥)
-
客户端生成密钥对
-
客户端用自己的公钥异或会话ID,计算出一个值Res,并用服务端的公钥加密
-
客户端发送加密后的值到服务端,服务端用私钥解密,得到Res
-
服务端用解密后的值Res异或会话ID,计算出客户端的公钥(这一步服务端得到客户端公钥)
-
最终:双方各自持有三个秘钥,分别为自己的一对公、私钥,以及对方的公钥,之后的所有通讯都会被加密

如何产生新的服务器端的SSH公钥与服务器自己使用的成对私钥?
[root@localhost ~]# rm -rf /etc/ssh/ssh_host_*
[root@localhost ~]# systemctl restart sshd
[root@localhost ~]# date; ll /etc/ssh/ssh_host*
2023年 06月 14日 星期三 17:51:23 CST
-rw-r-----. 1 root ssh_keys  227 6月  14 17:51 /etc/ssh/ssh_host_ecdsa_key
-rw-r--r--. 1 root root      162 6月  14 17:51 /etc/ssh/ssh_host_ecdsa_key.pub
-rw-r-----. 1 root ssh_keys  387 6月  14 17:51 /etc/ssh/ssh_host_ed25519_key
-rw-r--r--. 1 root root       82 6月  14 17:51 /etc/ssh/ssh_host_ed25519_key.pub
-rw-r-----. 1 root ssh_keys 1679 6月  14 17:51 /etc/ssh/ssh_host_rsa_key
-rw-r--r--. 1 root root      382 6月  14 17:51 /etc/ssh/ssh_host_rsa_key.pub
# 可以看到日期与文件的建立时间,刚刚建立的新的公钥、私钥系统。
ssh加密通讯原理
openssh服务
OpenSSH是SSH (Secure SHell) 协议的免费开源实现,一般在各种Linux版本中会默认安装,基于C/S结构
Openssh软件相关包:
-
openssh
-
openssh-clients
-
openssh-server
范例:openssh相关包
[root@localhost ~]# rpm -qa openssh*
openssh-help-8.2p1-16.p04.ky10.noarch
openssh-8.2p1-16.p04.ky10.x86_64
openssh-clients-8.2p1-16.p04.ky10.x86_64
openssh-server-8.2p1-16.p04.ky10.x86_64
[root@localhost ~]# rpm -ql openssh-server
/etc/pam.d/sshd
/etc/ssh/sshd_config
/etc/sysconfig/sshd
/usr/lib/systemd/system/sshd-keygen.target
/usr/lib/systemd/system/sshd-keygen@.service
/usr/lib/systemd/system/sshd.service
/usr/lib/systemd/system/sshd.socket
/usr/lib/systemd/system/sshd@.service
/usr/lib/tmpfiles.d/openssh.conf
/usr/lib64/fipscheck/sshd.hmac
/usr/libexec/openssh/sftp-server
/usr/libexec/openssh/sshd-keygen
/usr/sbin/ssh-change-mode
/usr/sbin/sshd
/var/empty/sshd
[root@localhost ~]# rpm -ql openssh-clients
/etc/ssh/ssh_config
/etc/ssh/ssh_config.d/05-redhat.conf
/usr/bin/scp
/usr/bin/sftp
/usr/bin/ssh
/usr/bin/ssh-add
/usr/bin/ssh-agent
/usr/bin/ssh-copy-id
/usr/bin/ssh-keyscan
/usr/lib64/fipscheck/ssh.hmac
/usr/libexec/openssh/ssh-pkcs11-helper
/usr/libexec/openssh/ssh-sk-helper
[root@localhost ~]# rpm -ql openssh
/etc/ssh
/etc/ssh/moduli
/usr/bin/ssh-keygen
/usr/libexec/openssh
/usr/libexec/openssh/ssh-keysign
/usr/share/doc/openssh
/usr/share/doc/openssh/CREDITS
/usr/share/doc/openssh/README.platform
/usr/share/licenses/openssh
/usr/share/licenses/openssh/LICENCE
客户端ssh命令
ssh命令是ssh客户端,允许实现对远程系统经验证地加密安全访问当用户远程连接ssh服务器时,会复制ssh服务器/etc/ssh/ssh_host*key.pub文件中的公钥到客户机的~/.ssh/know_hosts中。下次连接时,会自动匹配相对应的私钥,不能匹配,将拒绝连接
ssh客户端配置文件
主要配置
#StrictHostKeyChecking ask
#首次登录不显示检查提示
StrictHostKeyChecking no
#   IdentityFile ~/.ssh/id_rsa
#   IdentityFile ~/.ssh/id_dsa
#   IdentityFile ~/.ssh/id_ecdsa
#   IdentityFile ~/.ssh/id_ed25519
#   Port 22
ssh:直接登录远程主机的指令
ssh [-f] [-o 参数项目] [-p 非标准端口] [账户@]IP [命令]
选项:
-f:需要配合后面的[命令],不登录远程主机直接发送一个命令过去而已
-o 参数项目:主要的参数项目有:
    ConnectTimeout=秒数 :连接等待的秒数,减少等待的时间
    StrictHostKeyChecking=[yes|no|ask]:默认是ask,若要让public key
                                       主动加入known_hosts,则可以设置为no即可
-
-p:远程服务器监听的端口
[命令]:不登录远程主机,直接发送命令过去
使用案例
直接连接到对方主机的方法(以登录本机为例)
[root@localhost ~]# ssh 127.0.0.1
The authenticity of host '127.0.0.1 (127.0.0.1)' can't be established.
ECDSA key fingerprint is SHA256:RqzrG8xNGKffq5qmbutMp5lamqimrEb6P/W7pTdMa4M.
ECDSA key fingerprint is MD5:ac:18:e4:fe:0c:2b:27:4b:ff:35:8c:ce:56:b7:f0:5e.
Are you sure you want to continue connecting (yes/no)? yes
Warning: Permanently added '127.0.0.1' (ECDSA) to the list of known hosts.
root@127.0.0.1's password:    # 这里输入目标主机密码,这里是登录的是本机所以输入root密码即可
Last login: Wed Jun 14 23:01:58 2023 from 192.168.200.1
[root@localhost ~]# exit    # 离开这次的SSH连接
# 由于SSH后面没有加上账号,因此默认使用当前的账号来登录远程服务器
使用csq账号登录本机
[root@localhost ~]# ssh csq@127.0.0.1
csq@127.0.0.1's password:
Last login: Wed Jun 14 23:34:14 2023 from localhost
[csq@localhost ~]$ exit
# 由于有csq这个账号,因此切换身份成为了csq。因为127.0.0.1曾登录过
# 所以就不会再出现提示要添加主机公钥的信息了
登录csq的主机,执行命令后立刻离开的方式
[root@localhost ~]# ssh  csq@127.0.0.1 find / > ~/find1.log 2>&1
csq@127.0.0.1's password:
# 此时你会发现画面会卡顿,着是因为上面的命令造成的,你已经登录远程主机,但是执行的命令
# 尚未运行完,因此会再等待当中,那如何指定系统自己运行呢?
与上题相同,让对方主机自己运行该命令,你立刻回到本地端主机继续工作
[root@localhost ~]# ssh   -f csq@127.0.0.1 find / > ~/find1.log 2>&1
# 此时你会立刻注销 127.0.0.1 但 find 命令会自己在远程服务器运行
# 如果你想要让远程主机执行关机命令,加上-f参数 ssh -f root@IP shutdown -h now
删除 known_hosts 后,重新使用 root 连接到本机,且自动加上公钥记录
[root@localhost ~]# rm -rf ~/.ssh/known_hosts
[root@localhost ~]# ssh -o StrictHostKeyChecking=no root@192.168.200.30
Warning: Permanently added '192.168.200.30' (ECDSA) to the list of known hosts.
root@192.168.200.30's password:
# 如上所示,不会问你 YES或No了,直接写入到 ~/.ssh/known_hosts 中
安装sshpass,使用sshpass -p 指定密码,就可以省去输入密码
yum install -y sshpass
[root@ubuntu2204-m01 ~]# sshpass -p1 ssh -o StrictHostKeyChecking=no root@10.0.0.124
....
....
[root@web02 ~]#
服务器公钥记录文件
当你登录远程服务器时,本机会主动利用接收到的服务器的公钥去比对~/.ssh/known_hosts有无相关的公钥,然后进行下面的操作:
- 若接收的公钥未记录,本机会主动询问用户是否记录。若要记录(回答YES)则写入~/.ssh/known_hosts且执行后续工作:若不记录(回答No)则不写入该文件,并且退出登录工作
- 若接收到的公钥已有记录,则比对记录是否相同,若相同则继续登录动作:若不相同,则出现警告信息,离开登录的动作。这是客户端的自我保护功能,以避免你的服务器被别人伪装。
报错解决
测试服务器重新安装后,假设服务器使用相同的IP,造成相同IP的服务器公钥不同
删除原有的系统公钥,重新启动SSH让你的公钥更新
[root@localhost ~]# rm -rf /etc/ssh/ssh_host_*
[root@localhost ~]# systemctl restart sshd
然后重新使用下面的方式来进行连接的操作
[root@localhost ~]# ssh root@192.168.200.20
@@@@@@@@@@@@@@@@@@@@@@@@@@@@@@@@@@@@@@@@@@@@@@@@@@@@@@@@@@@
@    WARNING: REMOTE HOST IDENTIFICATION HAS CHANGED!     @
@@@@@@@@@@@@@@@@@@@@@@@@@@@@@@@@@@@@@@@@@@@@@@@@@@@@@@@@@@@
IT IS POSSIBLE THAT SOMEONE IS DOING SOMETHING NASTY!
Someone could be eavesdropping on you right now (man-in-the-middle attack)!
It is also possible that a host key has just been changed.
The fingerprint for the ECDSA key sent by the remote host is
SHA256:htL+PjqB+l2KTbeVoP2gCewZeuhKiJWvcXRc9A9a35U.
Please contact your system administrator.
Add correct host key in /root/.ssh/known_hosts to get rid of this message.
Offending ECDSA key in /root/.ssh/known_hosts:1  # 冒号后面接的数字就算有问题的数据行号
ECDSA host key for 192.168.200.20 has changed and you have requested strict checking.
Host key verification failed.
解决方法很简单,可以使用 vim 到 /root/.ssh/known_hosts,并将1行删除,之后重试SSH,那系统就会重新询问你要不要加上公钥。
ssh登陆验证方式介绍
ssh服务登录的常用验证方式
-
用户/口令
-
基于密钥
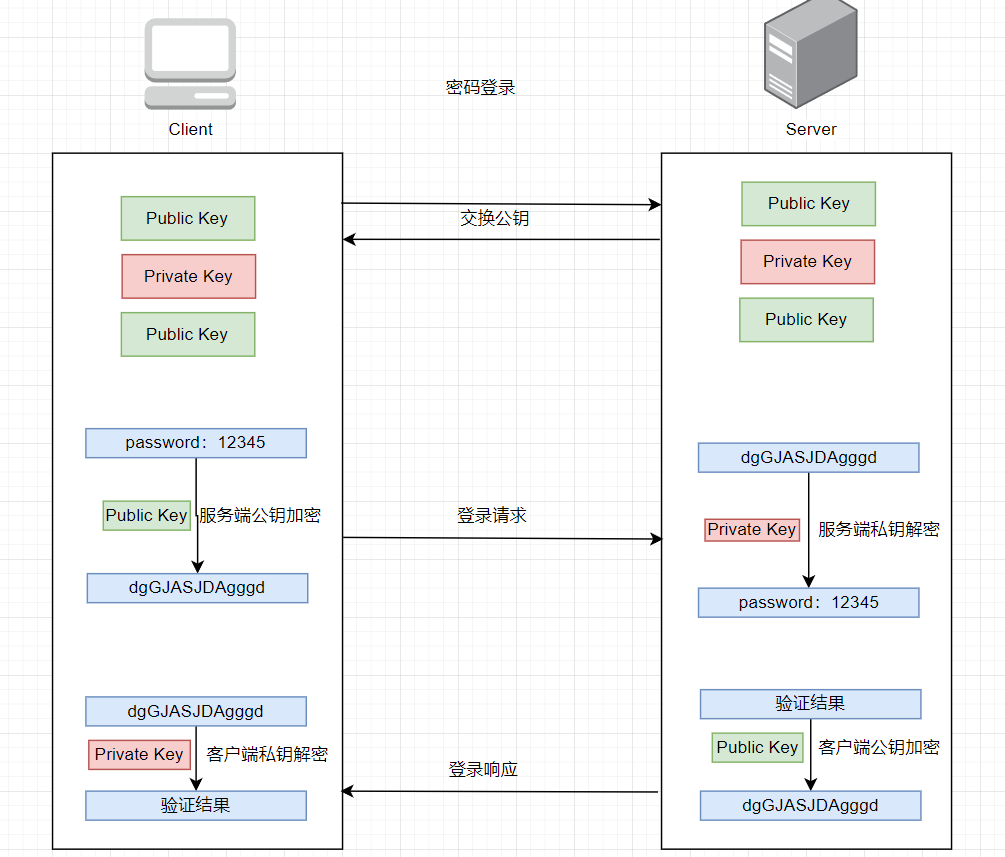
基于用户和口令登录验证
-
客户端发起ssh请求,服务器会把自己的公钥发送给用户
-
用户会根据服务器发来的公钥对密码进行加密
-
加密后的信息回传给服务器,服务器用自己的私钥解密,如果密码正确,则用户登录成功
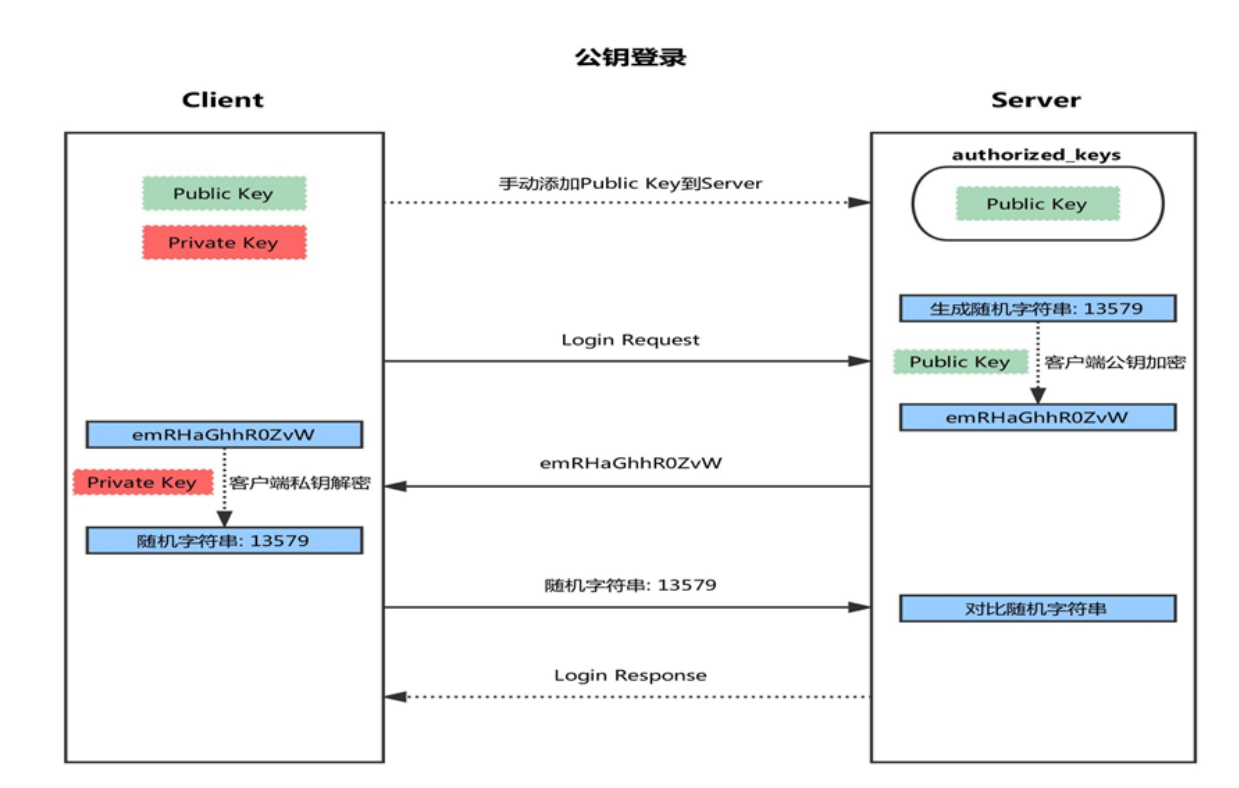
基于密钥的登陆方式
-
首先在客户端生成一对密钥(ssh-keygen)
-
并将客户端的公钥ssh-copy-id 拷贝到服务端
-
当客户端再次发送一个连接请求,包括ip、用户名
-
服务端得到客户端的请求后,会到authorized_keys中查找,如果有响应的IP和用户,就会随机生成一个字符串
-
服务端将使用客户端拷贝过来的公钥进行加密,然后发送给客户端
-
得到服务端发来的消息后,客户端会使用私钥进行解密,然后将解密后的字符串发送给服务端
-
服务端接受到客户端发来的字符串后,跟之前的字符串进行对比,如果一致,就允许免密码登录
其他ssh客户端工具(SFTP,SCP)
SFTP
SFTP(SSH File Transfer Protocol,SSH 文件传输协议)是一种基于 SSH(Secure Shell)协议的安全文件传输协议,主要用于在网络中安全地进行文件传输、管理等操作。它通过 SSH 的加密通道实现数据传输,确保传输过程中的机密性和完整性。
[root@localhost ~]# sftp csq@localhost
csq@localhost's password:    # 输入csq用户的密码
Connected to localhost.      # 已经连接到了localhost
sftp> exit                   # 这里就是在等待你的输入FTP相关命令的地方
SFTP 这个接口可使用的指令
针对远程服务器主机(Server)的行为
| 解释 | 命令 |
|---|---|
| 列出当前所在目录下的文件名 | ls |
| 建立目录 | mkdir 目录名(dir) |
| 删除目录 | rmdir 目录名 |
| 显示当前所在的目录 | pwd |
| 更改文件或目录的属组 | chgrp groupname PATH |
| 更改文件或目录的属主 | chown username PATH |
| 更改文件或目录的权限 | chmod 644 PATH |
| 建立连接文件 | ln oldname newname |
| 删除文件或目录 | rm PATH |
| 更改文件或目录名称 | rename oldname newname |
| 离开远程主机 | exit或者bye或者quit |
针对本机(Client)的行为(都加上l,L的小写)=
| 解释 | 命令 |
|---|---|
| 切换目录到本机的PATH当中 | lcd PATH |
| 列出当前本机所在目录下的文件名 | lls |
| 在本机建立目录 | lmkdir |
| 显示当前所在的本机目录 | lpwd |
针对资料上传/下载的操作
| 解释 | 命令 |
|---|---|
| 将文件由本机上传到远程主机 | put [本机目录或文件] [远程] put [本机目录或文件] 最后这种格式,文件会存储到当前远程主机的目录下 |
| 将文件由远程主机下载回来 | get [远程主机目录或文件] [本机] get [远程主机目录或文件] 若是最后一种格式,则文件会存储在当前本机所在的目录当中,可以使用通配符例如:get *,get *.txt 等 |
#1. 假设192.168.200.20为远程服务器,且服务器上有zhw这个用户,你想要将本机的 /etc/hosts
#   上传到 zhw用户主目录,并将 zhw 的 .bashrc 复制到本机的 /tmp 下面
[root@localhost ~]# sftp zhw@192.168.200.20
zhw@192.168.200.20's password:
Connected to 192.168.200.20.
sftp> lls /etc/hosts            # 先看本机有没有这个文件
/etc/hosts
sftp> put /etc/hosts            # 有就上传
Uploading /etc/hosts to /home/zhw/hosts
/etc/hosts                                                                                                                100%  158   163.8KB/s   00:00
sftp> ls                        # 查看zhw目录下是否有这个文件
hosts
sftp> ls -a                     # 看看有没有.bashrc文件
.              ..             .bash_logout   .bash_profile  .bashrc        hosts
sftp> lcd /tmp/                 # 本机切换到/tmp下面
sftp> lpwd                      # 查看是否切换成功
Local working directory: /tmp
sftp> get .bashrc               # 没问题就复制.bashrc文件到本机
Fetching /home/zhw/.bashrc to .bashrc
/home/zhw/.bashrc                                                                                                         100%  231   134.5KB/s   00:00
sftp> lls -al                   # 看本机是否有这个文件
总用量 4
drwxrwxrwt.  9 root root 221 6月  15 17:09 .
dr-xr-xr-x. 17 root root 224 4月   5 20:11 ..
-rw-r--r--.  1 root root 231 6月  15 17:09 .bashrc
drwxrwxrwt.  2 root root   6 4月   5 20:08 .font-unix
drwxrwxrwt.  2 root root   6 4月   5 20:08 .ICE-unix
drwx------.  3 root root  17 6月  15 16:06 systemd-private-8695af1948284db5b535bc5f312261ad-chronyd.service-aWFeRW
drwxrwxrwt.  2 root root   6 4月   5 20:08 .Test-unix
drwx------.  2 root root   6 6月  15 16:06 vmware-root_794-2991071843
drwxrwxrwt.  2 root root   6 4月   5 20:08 .X11-unix
drwxrwxrwt.  2 root root   6 4月   5 20:08 .XIM-unix
sftp> exit                     # 退出sftp
SCP
通常使用SFTP是因为可能不知道服务器上面已存在的文件名信息,如果已经知道服务器上面的文件名,那么最简单的文件传输是通过 SCP 这个指令。最简单的SCP用法如下
scp [-pr] [-l 速率] file [账号@]主机IP:目录名   # 上传
scp [-pr] [-l 速率] [账号@]主机IP:file 目录名    # 下载
选项:
-p:保留文件原有的权限信息
-r:复制来源为目录时,可以复制整个目录(含子目录)
-l:可以限制传输的速率,单位为 Kbits/s ,例如 [-l 800]代表传输速率 100kbytes/s
-P:指定端口

#1.将本机的 /etc/hosts* 全部复制到 192.168.200.20 上面的 zhw用户主目录内
[root@localhost ~]# scp /etc/hosts* zhw@192.168.200.20:~
zhw@192.168.200.20's password:
hosts          100%  158   150.6KB/s   00:00
hosts.allow    100%  370   271.1KB/s   00:00
hosts.deny     100%  460   405.8KB/s   00:00
# 文件名       进度   容量   传输速率     剩余时间


#2.将 192.168.200.20 这台远程主机的 /etc/bashrc 复制到本机的 /tmp 下面
[root@localhost ~]# scp 192.168.200.20:/etc/bashrc /tmp
root@192.168.200.20's password:
bashrc        100% 2853     1.4MB/s   00:00
[root@localhost ~]# ls /tmp/ |grep bashrc
bashrc
sshd服务详细配置
SSHD 服务的配置文件/etc/ssh/sshd_config。这个文件里面保存了 SSHD 服务的详细设置,比如登录时需要的用户名和密码,是否开启公钥认证等等。但是不同的 Linux 发行版可能会有不同的默认设置,所以我们需要了解每个设置的含义,并且注意到这个文件里面没有被注释的设置值都是默认值,你可以根据需要修改它们。
[root@localhost ~]# vim /etc/ssh/sshd_config
| 类别 | 配置项 | 说明 |
|---|---|---|
| 一、整体设置 | port 22 | SSH 默认端口,可重复设置多个端口(如添加Port 443),生成建议修改 |
| AddressFamily any | 配置支持的网络地址类型(IPv4、IPv6 等),注释掉表示支持所有类型 | |
| ListenAddress 0.0.0.0 | 0.0.0.0 为 IPv4地址,表示监听所有IPV4地址 | |
| PidFile /var/run/sshd.pid | SSHD 进程 PID 文件路径,默认值 | |
| Compression delayed | 指定压缩数据传输的启动时机 | |
| 二、主机私钥文件 | HostKey /etc/ssh/ssh_host_rsa_key | RSA 密钥文件路径,用于公钥认证和数据加密 |
| HostKey /etc/ssh/ssh_host_ecdsa_key | ECDSA 密钥文件路径,较新加密方式,安全性和效率较高 | |
| HostKey /etc/ssh/ssh_host_ed25519_key | Ed25519 密钥文件路径,较新加密方式,安全性和效率较高 | |
| 三、登录文件信息 | SyslogFacility AUTHPRIV | 发送日志的设施,AUTHPRIV 仅记录身份验证相关信息 |
| LogLevel INFO | 日志等级 | |
| 四、安全设置 - 登录设置 | LoginGraceTime 2m | 连接后输入密码的超时时间(无单位默认秒),超时则断开连接 |
| PermitRootLogin yes | 是否允许 root 登录 | |
| StrictModes yes | 检查用户主目录 / 文件权限,防止权限错误导致登录问题 | |
| PubkeyAuthentication yes | 启用公钥认证,默认开启,需用户预先上传公钥 | |
| MaxSessions 10 | 同一用户最大会话数,默认 10,超过则断开连接 | |
| MaxAuthTries 6 | 最大认证尝试次数,默认 6,超过则断开连接 | |
| AuthorizedKeysFile .ssh/authorized_keys | 指定用户公钥存储路径 | |
| PasswordAuthentication yes | 是否开启密码验证,默认开启 | |
| PermitEmptyPasswords no | 是否允许空密码登录,默认不允许 | |
| 四、安全设置 - 认证部分 | IgnoreRhosts yes | 忽略用户主目录下的.rhosts和.shosts文件,默认开启 |
| IgnoreUserKnownHosts no | 是否忽略用户的~/.ssh/known_hosts文件,默认不忽略 | |
| ChallengeResponseAuthentication yes | 允许 login.conf 规定的认证方式 | |
| UsePAM yes | 启用 PAM 管理用户认证,便于记录和管理,建议开启 | |
| 四、安全设置 - 登录后项目 | PrintMotd yes | 登录后显示/etc/motd内容(如欢迎信息),默认开启,安全考虑可设为no |
| PrintLastLog yes | 显示上次登录信息,默认开启 | |
| TCPKeepAlive yes | 启用 TCP 保活包检测连接状态,网络不稳定可设为no | |
| MaxStartups 10:30:100 | 最大连接数阈值:10 个并发连接,每分钟最多 30 次尝试,超 100 则拒绝所有连接 | |
| 四、安全设置 - 用户限制 | DenyUsers * | 限制登录的用户,*表示所有用户,可指定具体用户(如DenyUsers test) |
| DenyGroups test | 限制登录的组,格式为组名 | |
| 五、SFTP 服务 | Subsystem sftp /usr/libexec/openssh/sftp-server | 配置 SFTP 子系统,指定可执行文件路径 |
解决ssh登陆缓慢问题
vim /etc/ssh/sshd_config
UseDNS no
GSSAPIAuthentication no
systemctl restart sshd
在ubuntu上启用root远程ssh登陆
#修改sshd服务配置文件
vim /etc/ssh/sshd_config
#PermitRootLogin prohibit-password 注释掉此行
PermitRootLogin yes 修改为下面形式
systemctl restart sshd
设置ssh空闲60s自动注销
Vim /etc/ssh/sshd_config
ClientAliveInterval   60
ClientAliveCountMax   0
Service sshd restart
#注意:新开一个连接才有效
制作不用密码可立即登录的SSH用户
SSH 服务可以使用密钥系统来比对数据,并且可以提供用户数据的加密功能。有没有可能利用这个密钥来让用户不需要输入密码就可以登录主机呢?答案是可以的。我们可以把客户端产生的密钥复制到服务器上,这样以后客户端登录服务器时,由于双方在 SSH 连接时已经比对过密钥,所以可以直接进入数据传输接口,而不需要再输入密码。
具体的实现步骤如下
-
客户端建立两把钥匙:在密钥系统中,是公钥比较重要还是私钥比较重要?当然是私钥比较重要,因此私钥才是解密的关键啊,所以,这两把钥匙当然得在发起连接的客户端配置才对,利用命令ssh-keygen
-
客户端放置好私钥文件:将私钥放在Client 上面的用户主目录中,也就是$HOME/.ssh/,并且要注意权限
-
将公钥放置到服务器端的正确目录于文件中:最后,将私钥放在任何一个你想要用来登录的服务器的某User用户主目录的.ssh/里面的认证文件中即可完成整个程序。

客户端建立两把钥匙(ssh-keygen)
建立的方法很简单,在Client中使用ssh-keygen建立两把钥匙即可
ssh-keygen [-t dsa | ecdsa | ed25519 | rsa | rsa1] # 选择密钥类型

# 用默认的方法建立密钥
[root@localhost ~]# ssh-keygen
Generating public/private rsa key pair.  # 命令执行与密钥类型提示
Enter file in which to save the key (/root/.ssh/id_rsa):  # 询问私钥保存路径
Created directory '/root/.ssh'.                           # 自动创建 .ssh 目录
Enter passphrase (empty for no passphrase):               # 询问密码短语(Passphrase)
Enter same passphrase again:                              # 确认密码短语
Your identification has been saved in /root/.ssh/id_rsa.  # 私钥
Your public key has been saved in /root/.ssh/id_rsa.pub.  # 公钥
The key fingerprint is:                                   # 密钥指纹
SHA256:QkgzBeCV+HbFx12EyLNBEv+HUqXLK5s10griL1yOnVk root@localhost.localdomain

[root@localhost ~]# ls -ld ~/.ssh/ ; ls -l ~/.ssh/
drwx------. 2 root root 38 6月  15 21:23 /root/.ssh/
-rw-------. 1 root root 1679 6月  15 21:23 id_rsa         # 私钥文件
-rw-r--r--. 1 root root  408 6月  15 21:23 id_rsa.pub     # 公钥文件

# 使用命令跳过ssh-keygen交互
ssh-keygen -f ~/.ssh/id_rsa -P ''
#选项说明
-f    指定密钥保存路径
-P    指定私钥的密码短语,'' 表示空字符串(即不设置密码短语)
当执行ssh-keygen时,才会在我的主目录下的.ssh/目录里面产生需要的两把Keys,分别是私钥(id_rsa)与公钥(id_rsa.pub)。~/.ssh/目录必须是700权限才行。
另外一个需要特别注意的就算那个id_rsa的文件权限,它必须是-rw-------且属于自己才行,否则在未来密钥比对的过程中,可能会被判断为危险而无法成功的以公私钥成对文件的机制来实现连接。默认权限其实是正确的,你检查一下即可。
将公钥文件数据上传到服务器上(ssh-copy-id)
有两种上传方法
- 使用scp上传
- 使用ssh-copy-id上传
注意:不管哪种方法都必须先使用ssh-keygen生成密钥才能上传
第一种方法
[root@client ~]# ssh-keygen
#1. 上传至192.168.200.20的root主目录下面
[root@client ~]# scp .ssh/id_rsa.pub root@192.168.200.20:~
#2. 创建~/.ssh文件,权限700
[root@server ~]# ls
anaconda-ks.cfg  id_rsa.pub
[root@server ~]# ls -ld .ssh
ls: 无法访问.ssh: 没有那个文件或目录
[root@server ~]# mkdir .ssh;chmod 700 .ssh
[root@server ~]# ls -ld .ssh/
drwx------. 2 root root 6 6月  15 22:13 .ssh/
#3. 将公钥文件内的数据使用cat 转存到authorized_keys内
[root@server ~]# ls -l *pub
-rw-r--r--. 1 root root 408 6月  15 22:09 id_rsa.pub
[root@server ~]# cat id_rsa.pub >> .ssh/authorized_keys
[root@server ~]# chmod 644 .ssh/authorized_keys
[root@server ~]# ls -l .ssh/
-rw-r--r--. 1 root root 408 6月  15 22:15 authorized_keys
#4. 测试
[root@client ~]# ssh root@192.168.200.20
Last login: Thu Jun 15 22:08:59 2023 from 192.168.200.10
[root@server ~]# exit
# 这种方法很复杂
第二种方法
[root@client ~]# ssh-keygen
[root@client ~]# ssh-copy-id root@192.168.200.20
/usr/bin/ssh-copy-id: INFO: Source of key(s) to be installed: "/root/.ssh/id_rsa.pub"
The authenticity of host '192.168.200.20 (192.168.200.20)' can't be established.
ECDSA key fingerprint is SHA256:x0zykxgczs8wCrJNmANfJQoD2BXKlvkvXu5S6L2jKkE.
ECDSA key fingerprint is MD5:39:44:23:20:cf:e8:ad:01:a4:91:df:d8:c9:69:7e:48.
Are you sure you want to continue connecting (yes/no)? yes
/usr/bin/ssh-copy-id: INFO: attempting to log in with the new key(s), to filter out any that are already installed
/usr/bin/ssh-copy-id: INFO: 1 key(s) remain to be installed -- if you are prompted now it is to install the new keys
root@192.168.200.20's password:

Number of key(s) added: 1

Now try logging into the machine, with:   "ssh 'root@192.168.200.20'"
and check to make sure that only the key(s) you wanted were added.

[root@client ~]# ssh root@192.168.200.20
Last login: Thu Jun 15 22:15:58 2023 from 192.168.200.10
[root@server ~]# exit
# 推荐使用这种方法很迅速就配置完成了
两种方法选择一种即可,以后登录到 192.168.200.20就不需要密码了
批量配置密钥认证(脚本)
#!/bin/bash
##############################################################
# File Name:private_pulic.sh
# Version:V1.0
# Author:csq
# Organization: www.chenshiquan.xyz
# Desc:
##############################################################


########################### 变量 #############################
#存放IP的文件
ip_file=/opt/ip.txt
#这里填远程主机的密码
pass=xxx
#需要免密连接的用户
user=root

########################### 颜色库 #############################
function color_all(){
	echoread (){
        str=$*
        echo -e "\E[1;31m${str}\E[0m"
	}
	echoyellow (){
        str=$*
        echo -e "\E[1;33m${str}\E[0m"
	}
	echogreen (){
        str=$*
        echo -e "\E[1;32m${str}\E[0m"
	}
	echobule (){
        str=$*
        echo -e "\E[1;34m${str}\E[0m"
	}
}
########################### 错误输出和定位到空 #############################
echo_null(){
	"$@" >/dev/null 2>&1
}
echo_error(){
	echoread "Error: $1"
	exit  1
}
########################### 判断IP文件是否存在 #############################
check_ip_file(){

	echobule "正在检查IP文件是否存在..."
	if [  ! -f ${ip_file} ];then
		echo_error "${ip_file}不存在,请创建后在执行${0}脚本"
	else
		echogreen "${ip_file}存在"
		ips=`cat /opt/ip.txt`
	fi
}
########################### 创建密钥 #############################
create_key() {
	echobule "正在检查本机密钥是否创建..."
  	key_file="$HOME/.ssh/id_rsa"
  	if [ ! -f ${key_file}  ];then
  		echogreen "密钥不存在正在创建"
     	if echo_null ssh-keygen -t rsa -f ${key_file}   -P '';then
     		echogreen "密钥创建成功,在${HOME}/.ssh/下"
     	else
     		echo_error "密钥创建失败,请检查..."
     	fi
    else
     	echoyellow "密钥已存在"
    fi
}
########################### 检查命令是否存在 #############################
check_cmd(){
	local os=/etc/os-release
	if [ ! -f /${os} ];then
		echoread "${os}文件不存在"
	else
		source ${os}
		echogreen "初始化变量${os}完成..."
	fi
	case $ID in
		kylin|rocky|centos )
			if ! echo_null which sshpass;then
				if echo_null yum install -y sshpass;then
					echogreen "安装成功sshpass"
				else
					echo_error "安装失败sshpass"
				fi
			fi
			;;
			ubuntu )
			if ! echo_null which sshpass;then
				if echo_null apt install -y sshpass;then
					echogreen "安装成功sshpass"
				else
				echo_error "安装失败sshpass"
				fi
			fi
			;;
			* )
				echo_error "未识别的系统"
			;;
	esac
}
########################### 分发密钥 #############################
fenfa_key(){
	for ip in $ips
   	do
	  	if echo_null sshpass -p ${pass} ssh-copy-id -o StrictHostKeyChecking=no  ${user}@${ip};then
	  		echogreen "分发密钥成功$ip"
	  	else
	  		echo_error "分发密钥失败${ip},请检查密码"
	  	fi
   	done
}
########################### 检查密钥 #############################
fenfa_check(){
	echobule "检查密钥中..."
	for ip in $ips
   	do
	  	if ! ssh -o StrictHostKeyChecking=no  ${user}@${ip}  hostname -I;then
	  		echo_error "检查密钥失败..."
	  	fi
   	done
   	echogreen "检查成功!,可以使用ssh连接主机了"
}
########################### main #############################
main() {
  color_all
  check_ip_file
  create_key
  check_cmd
  fenfa_key
  fenfa_check
}
main
ssh其他相关工具
挂载远程ssh目录sshfs
由EPEL源提供,可以利用ssh协议挂载远程目录
#安装fuse-sshfs
yum install fuse-sshfs
#挂载远程主机10.0.0.109:/data目录
sshfs 10.0.0.109:/data /mnt/
#查看挂载
[root@m01 ~]# df -h /mnt/
文件系统          容量  已用  可用 已用% 挂载点
10.0.0.109:/data   46G  2.4G   44G    6% /mnt
自动登陆ssh工具sshpass
由EPEL源提供,ssh登陆不能在命令行中指定密码。sshpass的出现,解决了这一问题。sshpass用于非交互SSH的密码验证,一般用在sh脚本中,无须再次输入密码(本机known_hosts文件中有的主机才能生效)。它允许你用 -p 参数指定明文密码,然后直接登录远程服务器,它支持密码从命令行、文件、环境变量中读取。
格式
#安装sshpass
yum install -y sshpass
#格式
sshpass [option] command parameters
#选项
-p password #后跟密码它允许你用 -p 参数指定明文密码,然后直接登录远程服务器
-f filename #后跟保存密码的文件名,密码是文件内容的第一行
-e #将环境变量SSHPASS作为密码

#1.指定密码登陆远程主机10.0.0.126
sshpass -p 1 ssh -o StrictHostKeyChecking=no root@10.0.0.126
#2.在登陆远程主机10.0.0.126执行命令
sshpass -p 1 ssh -o StrictHostKeyChecking=no root@10.0.0.126 hostname -I
#3.指定密码文件登陆远程主机
sshpass -f pass.txt ssh root@10.0.0.126
#4.指定变量登陆远程主机
export SSHPASS=1
sshpass -e ssh root@10.0.0.126
轻量级自动化运维工具pssh、pscp.ssh
EPEL源中提供了多个自动化运维工具
-
pssh:基于python编写,可在多台服务器上执行命令的工具,也可实现文件复制,提供了基于ssh和scp的多个并行工具,项目:http://code.google.com/p/parallel-ssh/
-
pdsh:Parallel remote shell program,是一个多线程远程shell客户端,可以并行执行多个远程主机上的命令。 可使用几种不同的远程shell服务,包括rsh,Kerberos IV和ssh,项目: https://pdsh.googlecode.com/
-
mussh:Multihost SSH wrapper,是一个shell脚本,允许使用命令在多个主机上通过ssh执行命令。 可使用ssh-agent和RSA/DSA密钥,以减少输入密码,项目:http://www.sourceforge.net/projects/mussh
pssh:批量执行命令
pssh命令选项如下:
#安装
yum install -y pssh
#选项
-H:主机字符串,内容格式”[user@]host[:port]”
-h file:主机列表文件,内容格式”[user@]host[:port]”
-A:手动输入密码模式
-i:每个服务器内部处理信息输出
-l:登录使用的用户名
-p:并发的线程数【可选】
-o:输出的文件目录【可选】
-e:错误输出文件【可选】
-t:TIMEOUT 超时时间设置,0无限制【可选】
-O:SSH的选项
-P:打印出服务器返回信息
-v:详细模式
--version:查看版本


#1.获取10.0.0.109主机的IP
pssh -H "root@10.0.0.109" -A -i  hostname -I
#2.通过pssh批量控制远程主机安装tree
[root@m01 ~]# cat hosts.txt
10.0.0.109
10.0.0.108
pssh -h hosts.txt  -A  -i yum install -y tree
pscp.pssh:批量复制
#批量复制jar包
pscp.pssh  -t 0 -h hosts.txt -A ~/Python-3.11.14.tar.xz ~
漏扫与漏洞修复
-
安全扫描->报告->解决
-
目标
- 为了安全
- 为了等保测评 3等保 最高5级
-
统计服务,命令
- 解决升级(apt/yum,编译安装)
- 打补丁(商业软件才有,开源)
- 当前的版本与不受影响的版本
OpenSSH CVE-2021-28041 需升级到 8.5/8.6
OpenSSH9.1 有漏洞,需要升级到9.2
OpenSSH<9.6  CVE-2023-48795 CVE-2020-15778 多个漏洞 升级到OpenSSH 9.6或更高版本
- 常见漏洞升级
- openssh
- bash
- openssl
- python环境
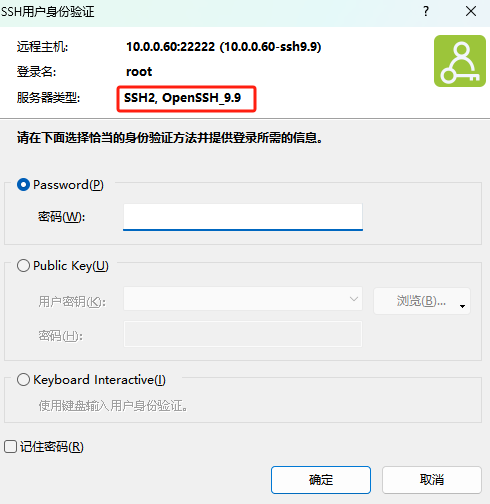
升级openssh9.9服务(使用编译安装升级)
| 操作系统 | 版本 | 节点 |
|---|---|---|
| 麒麟 | v10-sp3 | 10.0.0.60 |
启动telenet
- 安装telnet
yum install -y telnet-server
- 启动
systemctl start telnet.socket
ss -lntup
- telnet连接
#防火墙放行23端口
firewall-cmd --add-port=23/tcp --permanent
firewall-cmd --reload
#注销当前连接(ctrl+D)连接23端口
telnet 10.0.0.60 23
#输入账号密码
编译安装三步骤:
- 配置./configure 指定安装目录
- 编译 make (源代码==>二进制文件(命令))
- 安装make install 创建目录,复制文件,复制命令
步骤1:准备工作
#1.检查当前OpenSSH版本
ssh -V
#2.安装编译依赖
yum install -y gcc gcc-c++ make zlib-devel openssl-devel pam-devel libselinux-devel
#3.修改旧sshd关闭策略
vim /usr/lib/systemd/system/sshd.service
#KillMode=process 注释掉
#4.停止旧sshd
systemctl daemon-reload
systemctl stop sshd
步骤2:下载最新OpenSSH源码包
#1.进入临时目录
mkdir /download ; cd /download

#2.下载openssh-9.9软件包压缩包(源代码)
wget https://mirrors.aliyun.com/pub/OpenBSD/OpenSSH/portable/openssh-9.9p2.tar.gz

#3.解压
tar -zxvf openssh-9.9p2.tar.gz

#4.创建安装目录
mkdir -p /usr/local/openssh-9.9p2
步骤3:编译安装
# 1.编译要在安装目录中进行
cd openssh-9.9p2/

#2.编译安装-第1步骤 ./configure
###指定安装目录--prefix指定安装目录
./configure  --prefix=/usr/local/openssh-9.9p2/  && echo $?
  #检查上一个命令执行是否成功,输出0表示成,非0就是失败.

#3.编译安装-第2步骤-编译 make
nproc #查看系统核心总数.
make -j `nproc`  && echo $?
#-j后面指的是核心数,指定核心数进行加速.

#4.编译安装-第3步骤-安装 make install
make install  && echo $?

#5.创建软链接简化路径引用
ln -s /usr/local/openssh-9.9p2/ /usr/local/openssh
步骤4:修改配置文件
修改ssh配置文件 sshd_config
#注意:修改sshd配置文件 注意这里配置不在/etc/在/usr/local/openssh/etc下.

#1.修改新的openssh配置文件
vim /usr/local/openssh/etc/sshd_config
13:Port 22222
32:PermitRootLogin yes
57:PasswordAuthentication yes
步骤5:备份旧版本ssh并修改配置文件为新的ssh
# 1.创建目录备份已有的openssh8.2旧的命令.
mkdir -p /backup/openssh8.2/

mv /usr/bin/scp /usr/bin/sftp /usr/bin/ssh /usr/bin/ssh-add /usr/bin/ssh-agent \
 /usr/bin/ssh-copy-id /usr/bin/ssh-keyscan  /usr/bin/ssh-keygen /usr/sbin/ssh-change-mode  /usr/sbin/sshd /backup/openssh8.2/

# 2.修改配置文件为新的ssh
mv  /etc/ssh  /backup/openssh8.2/ssh-bak
ln -s  /usr/local/openssh/etc/  /etc/ssh
#后续修改/etc/ssh/sshd_config配置文件即可.
步骤6:配置环境变量
#1.配置PATH环境变量
echo 'export PATH=/usr/local/openssh/bin/:/usr/local/openssh/sbin/:/usr/local/openssh/libexec/:$PATH' >> /etc/profile

#2.生效环境变量
source  /etc/profile

#3.检查sshd版本(看看提示是否9.9)
sshd -V
步骤7:书写systemctl文件
#1.重新创建sshd的systemctl文件.
cat>/usr/lib/systemd/system/sshd.service<<'EOF'
[Unit]
Description=OpenSSH 9.9 server daemon
Documentation=man:sshd(8) man:sshd_config(5)
After=network.target

[Service]
Type=notify
ExecStart=/usr/local/openssh/sbin/sshd -D
ExecReload=/bin/kill -HUP $MAINPID
KillMode=process
Restart=on-failure
RestartSec=42s

[Install]
WantedBy=multi-user.target

EOF

#2.系统重新读取修改后的sshd.service文件.
systemctl daemon-reload
systemctl enable  --now  sshd

#3.防火墙放行端口
firewall-cmd --add-port=22222/tcp --permanent
firewall-cmd --reload
步骤8:复制ssh-copy-id命令
cp /download/openssh-9.9p2/contrib/ssh-copy-id /usr/local/openssh/bin/

#升级Openssh后没有ssh-copy-id解决方案.
chmod +x  /usr/local/openssh/bin/ssh-copy-id
步骤9:删除编译目录,删除telnet
rm -rf /download/openssh-9.9p2
#关闭服务
systemctl stop telnet.socket
#关闭端口
firewall-cmd --remove-port=23/tcp --permanent
firewall-cmd --reload
#删除文件
yum remove -y telnet-server && rpm -qa |grep telnet*
加密算法和协议
- 对称加密
- 非对称(公钥)加密
对称加密算法

对称加密:加密和解密使用同一个密钥
特性:
-
加密、解密使用同一个密钥,效率高
-
将原始数据分割成固定大小的块,逐个进行加密
缺陷:
-
密钥过多
-
密钥分发
-
数据来源无法确认
常见对称加密算法:
-
DES:Data Encryption Standard,56bits
-
3DES:
-
AES:Advanced (128, 192, 256bits)
-
Blowfish,Twofish
-
IDEA,RC6,CAST5
非对称加密算法
非对称加密算法介绍
非对称加密:密钥是成对出现
- 公钥:public key,公开给所有人,主要给别人加密使用
- 私钥:secret key,private key 自己留存,必须保证其私密性,用于自已加密签名
- 特点:用公钥加密数据,只能使用与之配对的私钥解密;反之亦然
功能:
- 数据加密:适合加密较小数据,比如: 加密对称密钥
- 数字签名:主要在于让接收方确认发送方身份
缺点:
- 密钥长,算法复杂
- 加密解密效率低下
常见算法:
-
RSA:由 RSA 公司发明,是一个支持变长密钥的公共密钥算法,需要加密的文件块的长度也是可变的,可实现加密和数字签名
-
DSA(Digital Signature Algorithm):数字签名算法,是一种标准的 DSS(数字签名标准)
-
ECC(Elliptic Curves Cryptography):椭圆曲线密码编码学,比RSA加密算法使用更小的密钥,提供相当的或更高等级的安全
非对称加密实现加密
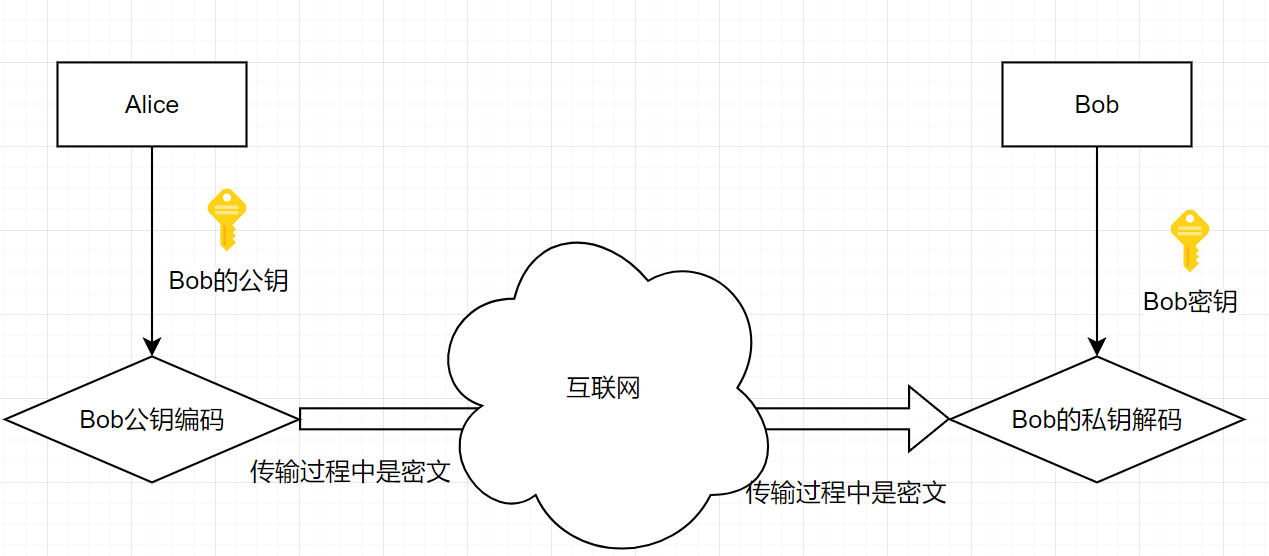
接收者
-
生成公钥/密钥对:P和S
开公钥P,保密密钥S
发送者
- 使用接收的公钥来加密消息M
- 将P(M)发送给接收者
接收者
- 使用密钥S来解密:M=S(P(M))
非对称加密实现数字签名
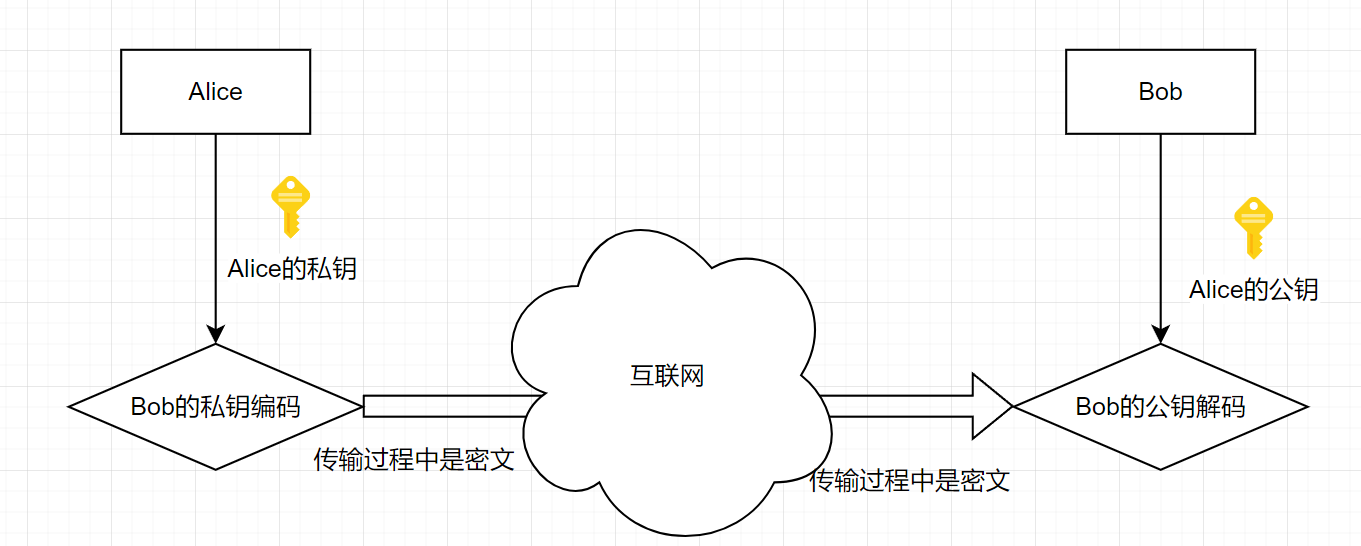
发送者
- 生成公钥/密钥对:P和S
- 公开公钥P,保密密钥S
- 使用密钥S来加密消息M
- 发送给接收者S(M)
接收者
- 使用发送者的公钥来解密M=P(S(M))
RSA和DSA
RSA 是 1977 年由麻省理工学院的 Ron Rivest、Adi Shamirh 和 LenAdleman 开发的公钥加密算法(得名于三者名字),后成立相关公司。它是目前最具影响力的公钥加密算法,能抵抗已知所有密码攻击,被 ISO 推荐为标准,其原理基于 “大素数相乘易、乘积因式分解难” 的数论事实,可用于加密、解密及密钥交换。
DSA 于 1991 年 7 月提交,归属于前 NSA 员工 David W. Kravitz,是 Schnorr 和 ElGamal 签名算法的变种,被美国 NIST 定为数字签名标准(DSS)。它基于整数有限域离散对数难题,安全性与 RSA 相当,但仅用于签名,不能加密、解密或密钥交换,且速度比 RSA 更快。


 1835
1835

 被折叠的 条评论
为什么被折叠?
被折叠的 条评论
为什么被折叠?
 到【灌水乐园】发言


