


LNMP架构搭建
LNMP是一种web服务器架构,与LAMP类似。它由Linux、Nginx、MySQL和PHP组成,这四个组合再一起提供了一个完整的Web服务器环境。
LNMP部署之Nginx1.24
nginx源码包下载地址:http://nginx.org/download/
# 安装依赖库
[root@csq ~]#  yum install -y make gcc-c++ pcre pcre-devel zlib-devel openssl  openssl-devel gd gd-devel

# 下载源码包
[root@csq ~]# mkdir /opt/mytools
[root@csq ~]# cd /opt/mytools/
[root@csq mytools]# wget http://nginx.org/download/nginx-1.24.0.tar.gz

# 解包
[root@csq mytools]# tar -zxvf nginx-1.24.0.tar.gz
[root@csq mytools]# cd nginx-1.24.0/
# 创建nginx用户
[root@csq nginx-1.24.0]# useradd -r -M -s /sbin/nologin nginx
[root@csq nginx-1.24.0]# cat /etc/passwd |grep nginx
nginx:x:997:995::/home/nginx:/sbin/nologin

# 预编译
[root@csq nginx-1.24.0]#  ./configure --prefix=/usr/local/nginx \
--user=nginx \
--group=nginx \
--with-mail \
--with-pcre \
--with-stream \
--with-threads \
--with-file-aio \
--with-http_v2_module \
--with-http_flv_module \
--with-http_mp4_module \
--with-http_ssl_module \
--with-http_sub_module \
--with-http_dav_module \
--with-mail_ssl_module \
--with-http_slice_module \
--with-stream_ssl_module \
--with-http_realip_module \
--with-http_gunzip_module \
--with-http_addition_module \
--with-http_secure_link_module \
--with-http_stub_status_module \
--with-http_gzip_static_module \
--with-http_random_index_module \
--with-http_auth_request_module \
--with-http_image_filter_module
# 编译安装
[root@csq nginx-1.24.0]# make  && make install

# 修改nginx配置文件内user
[root@csq nginx-1.24.0]# vim /usr/local/nginx/conf/nginx.conf
user  nginx;

# 设置软链接
[root@csq nginx-1.24.0]# ln -s /usr/local/nginx/sbin/nginx /usr/bin/nginx
######
nginx              # 启动Nginx
nginx -t           # 验证配置文件是正确
nginx -s reload    # 重启Nginx
nginx -s stop      # 停止Nginx
nginx -v           # 查看是否安装成功
nginx -c /etc/nginx/nginx.conf # 以特定目录下的配置文件启nginx
######

# 将nginx配置为服务
[root@csq nginx-1.24.0]# vim /usr/lib/systemd/system/nginx.service
[Unit]
Description=nginx - high performance web server
Documentation=http://nginx.org/en/docs/
After=network.target remote-fs.target nss-lookup.target
[Service]
Type=forking
PIDFile=/usr/local/nginx/logs/nginx.pid
ExecStartPre=/usr/local/nginx/sbin/nginx -t -c /usr/local/nginx/conf/nginx.conf
ExecStart=/usr/local/nginx/sbin/nginx -c /usr/local/nginx/conf/nginx.conf
ExecReload= /usr/local/nginx/sbin/nginx -s reload
ExecStop= /usr/local/nginx/sbin/nginx -s stop
PrivateTmp=true
[Install]
WantedBy=multi-user.target
[root@csq nginx-1.24.0]# systemctl daemon-reload
[root@csq nginx-1.24.0]# systemctl enable nginx --now
[root@csq nginx-1.24.0]# netstat -tlnp |grep nginx
tcp      0    0 0.0.0.0:80      0.0.0.0:*       LISTEN      5246/nginx: master

# 最后防火墙放行
firewall-cmd --add-port=80/tcp --permanent
firewall-cmd --reload
LNMP部署之MySQL8.0
安装mysql8需要cmake版本大于3.5
升级GCC高版本
# 编译安装cmake
[root@csq ~]# cd /opt/mytools/
[root@csq mytools]# wget https://github.com/Kitware/CMake/releases/download/v3.29.3/cmake-3.29.3.tar.gz
[root@csq mytools]# tar -zxvf cmake-3.29.3.tar.gz
[root@csq mytools]# cd cmake-3.29.3/
[root@csq cmake-3.29.3]# ./configure  && gmake && make install
[root@csq cmake-3.29.3]# cmake --version
cmake version 3.29.3
CMake suite maintained and supported by Kitware (kitware.com/cmake).

# 更新gcc,版本不确定,到预编译报错会提醒你
[root@csq cmake-3.29.3]# yum -y install centos-release-scl
[root@csq cmake-3.29.3]# yum -y install ncurses-devel make perl gcc autoconf automake zlib libxml2 libxml2-devel libgcrypt libtool bison devtoolset-10-gcc devtoolset-10-gcc-c++ devtoolset-10-binutils openssl openssl-devel
# 启动新版本GCC
[root@csq cmake-3.29.3]# scl enable devtoolset-11 bash
[root@csq cmake-3.29.3]# gcc --version
gcc (GCC) 11.2.1 20220127 (Red Hat 11.2.1-9)

# 下载mysql
[root@csq ~]# cd /opt/mytools/
[root@csq mytools]# wget https://dev.mysql.com/get/Downloads/MySQL-8.0/mysql-8.0.35.tar.gz
https://downloads.mysql.com/archives/get/p/23/file/mysql-8.0.35.tar.gz
# 解压
[root@csq mytools]# tar -zxvf mysql-8.0.35.tar.gz
[root@csq mytools]# cd mysql-8.0.35/

# 创建mysql用户
useradd -r mysql -M -s /sbin/nologin

# 下载boost库
# 报错提醒你下载就下载,可能预编译的时候,会给你自动装上去
[root@csq ~]# wget -O /usr/local/boost/boost_1_77_0.tar.bz2 https://boostorg.jfrog.io/artifactory/main/release/1.77.0/source/boost_1_77_0.tar.bz2

# 预编译
cmake  .  -DCMAKE_INSTALL_PREFIX=/usr/local/mysql/ \
-DMYSQL_UNIX_ADDR=/tmp/mysql.sock \
-DMYSQL_DATADIR=/data/mysql/ \
-DSYSCONFDIR=/etc \
-DMYSQL_USER=mysql \
-DMYSQL_TCP_PORT=3306 \
-DWITH_XTRADB_STORAGE_ENGINE=1 \
-DWITH_INNOBASE_STORAGE_ENGINE=1 \
-DWITH_PARTITION_STORAGE_ENGINE=1 \
-DWITH_BLACKHOLE_STORAGE_ENGINE=1 \
-DWITH_MYISAM_STORAGE_ENGINE=1 \
-DWITH_READLINE=1 \
-DENABLED_LOCAL_INFILE=1 \
-DWITH_EXTRA_CHARSETS=1 \
-DDEFAULT_CHARSET=utf8 \
-DDEFAULT_COLLATION=utf8_general_ci \
-DEXTRA_CHARSETS=all \
-DWITH_BIG_TABLES=1 \
-DWITH_DEBUG=0 \
-DDOWNLOAD_BOOST=1 \
-DWITH_BOOST=/usr/local/boost \
-DFORCE_INSOURCE_BUILD=1 \
-DWITH_SYSTEMD=1
# 我8.0.35版本预编译的时候出问题了按照他的提示装yum install devtoolset-11-gcc devtoolset-11-gcc-c++ devtoolset-11-binutils
# 然后继续预编译

# 编译安装
make -j 2 && make install

# 创建数据目录
[root@csq mysql-8.0.35]# mkdir -p /data/mysql

# 设置环境变量
[root@csq mysql-8.0.35]# ln -s /usr/local/mysql/bin/* /usr/bin/

# 初始化数据库
[root@csq mysql-8.0.35]# mysqld --initialize-insecure --user=mysql --basedir=/usr/local/mysql/ --datadir=/data/mysql/

# 把mysql设置服务
[root@csq mysql-8.0.35]# cp -rf /usr/local/mysql/usr/lib/systemd/system/mysqld.service /usr/lib/systemd/system/
[root@csq mysql-8.0.35]# systemctl daemon-reload

# 创建my.cnf文件
[root@csq mysql-8.0.35]# rpm -e --nodeps mariadb-libs
[root@csq mysql-8.0.35]# vim /etc/my.cnf
[mysqld]
basedir=/usr/local/mysql/
datadir=/data/mysql/
port=3306
pid-file=/data/mysql/mysql.pid
socket=/tmp/mysql.sock
[mysqld_safe]
log-error=/data/mysql/mysql.log

# 启动mysql
[root@csq mysql-8.0.35]# systemctl enable mysqld.service --now
[root@csq mysql-8.0.35]# netstat -ltnp |grep mysql
tcp6       0      0 :::3306      :::*        LISTEN      28014/mysqld
tcp6       0      0 :::33060     :::*        LISTEN      28014/mysqld

# 登陆mysql改密码
[root@csq mysql-8.0.35]# mysql
# 修改当前登陆的用户密码为
mysql> alter user user() identified by "123456";
mysql> exit

# 防火墙放行3306端口
firewall-cmd --add-port=3306/tcp --permanent
firewall-cmd --reload
LNMP部署之PHP8.0
# 安装php依赖
[root@csq ~]# yum -y install libxml2-devel sqlite-devel bzip2-devel libcurl-devel libpng-devel libjpeg-devel freetype-devel libicu-devel oniguruma-devel libxslt-devel
# 编译安装libzip-devel依赖报,因为yum版本的libzip-devel版本低
[root@csq ~]# cd /opt/mytools/
[root@csq mytools]# wget https://nih.at/libzip/libzip-1.2.0.tar.gz
[root@csq mytools]# tar -xvf libzip-1.2.0.tar.gz
[root@csq mytools]# cd libzip-1.2.0/
[root@csq libzip-1.2.0]# ./configure && make && make install
[root@csq libzip-1.2.0]# echo "export PKG_CONFIG_PATH=/usr/local/lib/pkgconfig:$PKG_CONFIG_PATH" >> /etc/profile && source /etc/profile
# 下载php8.0
[root@csq libzip-1.2.0]# cd ..
[root@csq ~]# wget https://www.php.net/distributions/php-8.0.0.tar.gz
# 解压
[root@csq mytools]# tar -zxvf php-8.0.0.tar.gz
[root@csq mytools]# cd php-8.0.0/
# 预编译
./configure --prefix=/usr/local/php-8.0.0 \
--with-config-file-path=/usr/local/php-8.0.0/etc \
--with-curl --with-freetype \
--enable-gd --with-jpeg \
--with-gettext \
--with-kerberos \
--with-libdir=lib64 \
--with-libxml \
--with-mysqli \
--with-openssl \
--with-pdo-mysql \
--with-pdo-sqlite \
--with-pear \
--enable-sockets \
--with-mhash \
--with-ldap-sasl \
--with-xsl \
--with-zlib \
--with-zip \
--with-bz2 \
--with-iconv \
--enable-fpm \
--enable-pdo \
--enable-bcmath \
--enable-exif \
--enable-ftp \
--enable-mbregex \
--enable-mbstring \
--enable-opcache \
--enable-pcntl \
--enable-shmop \
--enable-soap \
--enable-sockets \
--enable-sysvsem \
--enable-xml \
--enable-sysvsem \
--enable-cli \
--enable-opcache \
--enable-intl \
--enable-calendar \
--enable-static \
--enable-mysqlnd \
--enable-fileinfo
# 编译安装
make && make install
# 设置环境变量
[root@csq php-8.0.0]# echo "export PATH=${PATH}:/usr/local/php-8.0.0/bin/" >> /etc/profile
[root@csq php-8.0.0]# source /etc/profile
# 查看php版本
[root@csq php-8.0.0]# php --version
PHP 8.0.0 (cli) (built: May 8 2024 17:32:25) ( NTS )
Copyright (c) The PHP Group
Zend Engine v4.0.0-dev, Copyright (c) Zend Technologies
# 设置快捷链接
[root@csq php-8.0.0]# ln -s /usr/local/php-8.0.0/ /usr/local/php
# 生成各个配置文件
# 生成php.ini配置文件
[root@csq php-8.0.0]# cp /opt/mytools/php-8.0.0/php.ini-production /usr/local/php/etc/php.ini
# 生成www.conf配置文件
[root@csq php-8.0.0]# cd /usr/local/php/etc/php-fpm.d/
[root@csq php-fpm.d]# cp www.conf.default www.conf
# 生成php-fpm的配置文件
[root@csq php-fpm.d]# cd ..
[root@csq etc]# cp php-fpm.conf.default php-fpm.conf
# 配置php文件
[root@csq etc]# cd php-fpm.d/
[root@csq php-fpm.d]# vim www.conf
# 指定 PHP-FPM 进程的运行用户
user = nginx
# 指定 PHP-FPM 进程的运行用户组
group = nginx
[root@csq php-fpm.d]# vim ../php.ini
# 通过 POST 方法提交的整个请求的最大大小
post_max_size = 100M
# 指定了允许上传的单个文件的最大大小
upload_max_filesize = 100M
# 启动php-fpm
# 创建启动目录
[root@csq ~]# mkdir /usr/local/php/daemon
# 生成php-fpm启动文件
[root@csq ~]# cd /opt/mytools/
[root@csq mytools]# cp -rf php-8.0.0/sapi/fpm/init.d.php-fpm /usr/local/php/daemon
# 修改启动文件权限
[root@csq mytools]# chmod 740 /usr/local/php/daemon/init.d.php-fpm
# 配置systemd启动
[root@csq mytools]# vim /etc/systemd/system/php-fpm.service
[Unit]
Description=The PHP FastCGI Process Manager
After=syslog.target network.target
[Service]
Type=simple
PIDFile=/run/php-fpm.pid
ExecStart=/usr/local/php/sbin/php-fpm --nodaemonize --fpm-config /usr/local/php/etc/php-fpm.conf
ExecReload=/bin/kill -USR2 $MAINPID
ExecStop=/bin/kill -SIGINT $MAINPID
[Install]
WantedBy=multi-user.target
[root@csq ~]# systemctl daemon-reload
[root@csq ~]# systemctl enable php-fpm.service --now
[root@csq ~]# netstat -tlnp |grep php
tcp 0 0 127.0.0.1:9000 0.0.0.0:* LISTEN 28324/php-fpm: mast
# 配置nginx.conf文件
[root@csq mytools]# cd
[root@csq ~]# vim /usr/local/nginx/conf/nginx.conf
# server下面添加下面这条信息,主要用于上传主题
client_max_body_size 100m;
65 location ~ \.php$ {
66 root html;
67 fastcgi_pass 127.0.0.1:9000;
68 fastcgi_index index.php;
69 fastcgi_param SCRIPT_FILENAME $document_root$fastcgi_script_name;
70 # fastcgi_param SCRIPT_FILENAME /scripts$fastcgi_script_name;
71 include fastcgi_params;
72 }
[root@csq ~]# systemctl restart nginx
# 创建php的首页脚本文件,然后浏览器访问
[root@csq ~]# echo "<?php phpinfo(); ?>" > /usr/local/nginx/html/index.php
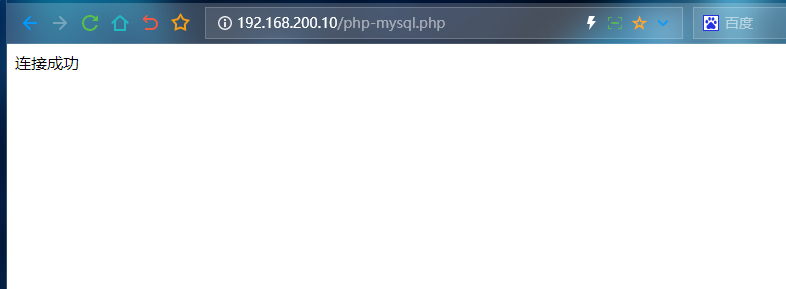
# php连接数据库测试
[root@csq ~]# cd /usr/local/nginx/html/
[root@csq html]# vim php-mysql.php
<?php
header("content-type:text/html;charset=utf-8");
$servername = "localhost"; # 本地连接
$username = "root"; # 用户
$password = "000000"; # 密码
$conn = new mysqli($servername,$username,$password);
if ($conn->connect_error) {
die("连接失败:". $conn->connect_error);
}
echo "连接成功";
?>
访问测试
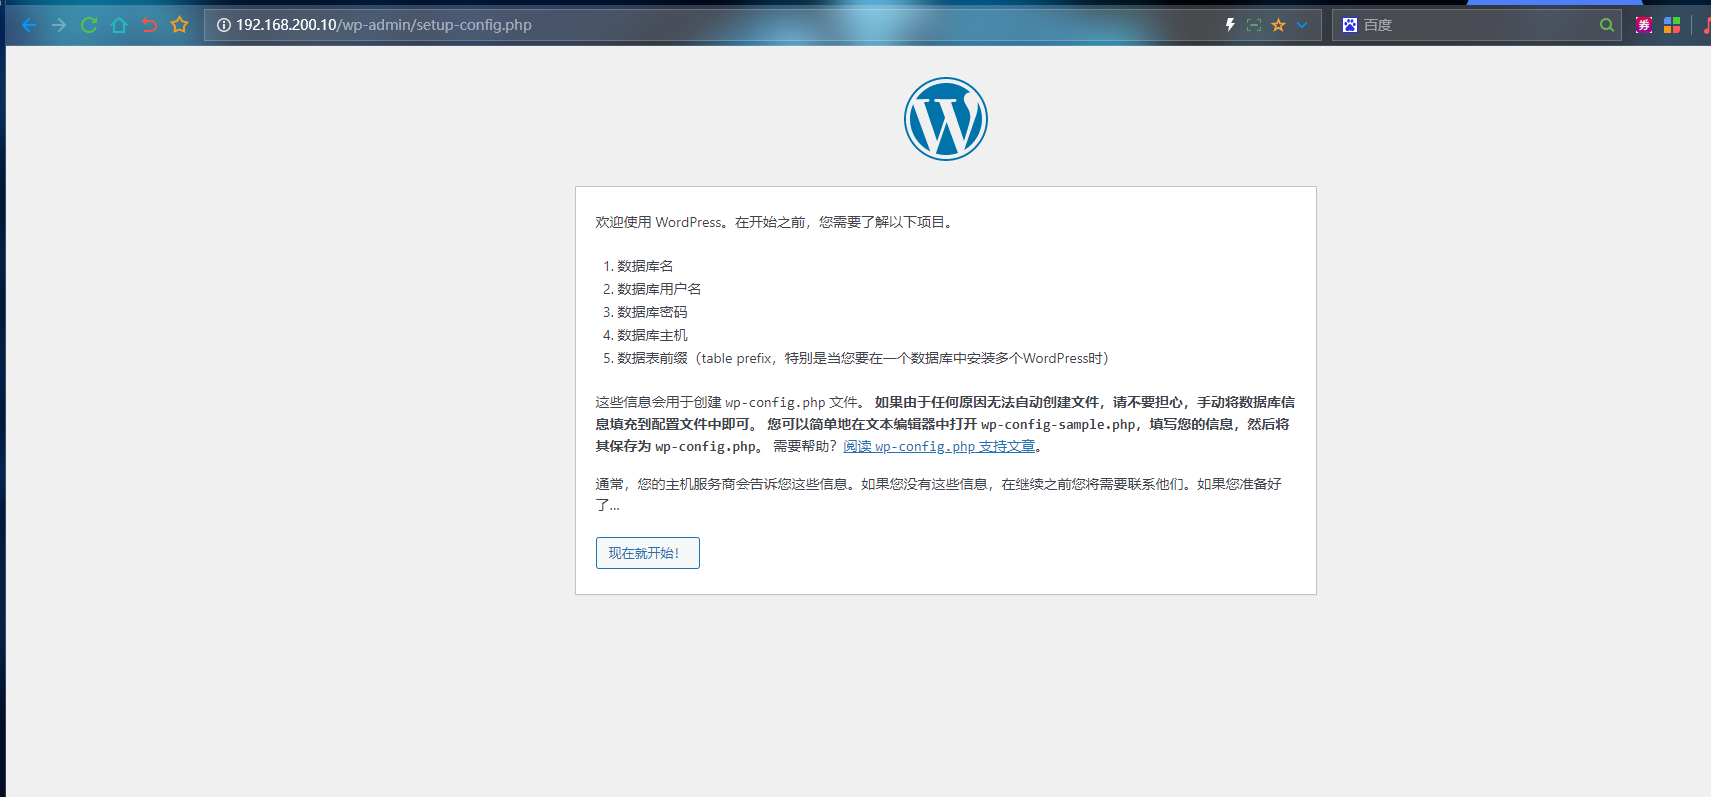
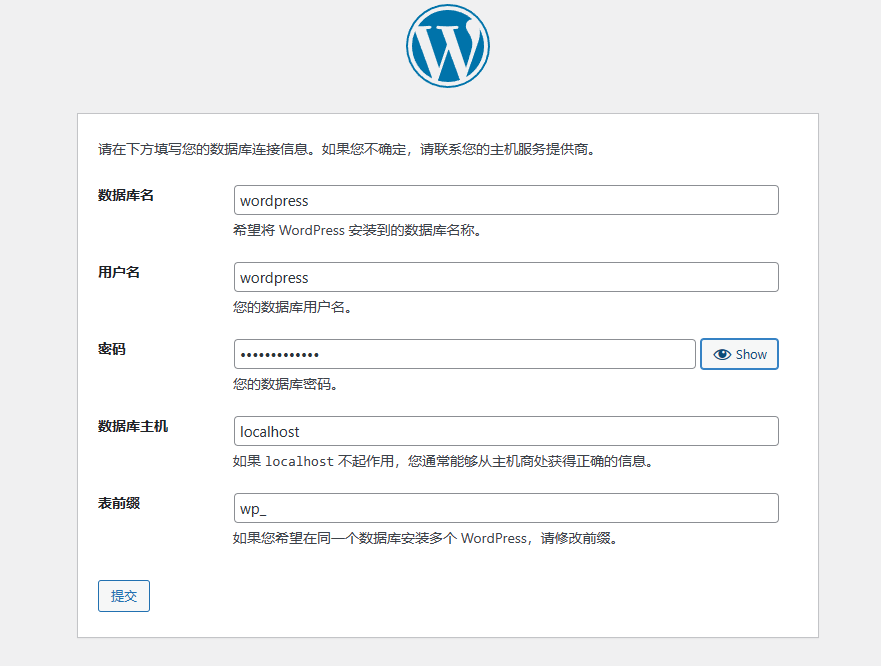
WordPress
# 启动MySQL数据库,创建用于wordpress的数据库
[root@csq ~]# mysql -u root -p
# 创建wordpress数据库
mysql> create database wordpress;
mysql> show databases;
+--------------------+
| Database           |
+--------------------+
| information_schema |
| WORDPRESS          |
| mysql              |
| performance_schema |
+--------------------+
# 创建用户
mysql> create user wordpress@'%' identified by '000000';
# 授权
mysql> grant all on wordpress.* to wordpress@'%';
# 刷新授权表
mysql> flush privileges;
# 查询刚刚创建的用户信息
mysql> select user,authentication_string,host from mysql.user;
# 退出数据库
mysql> exit;
# 下载 wordpress软件包
[root@csq ~]# cd /usr/local/nginx/html/ && wget https://cn.wordpress.org/latest-zh_CN.zip
# 解压
[root@csq html]# unzip latest-zh_CN.zip
[root@csq html]# vim /usr/local/nginx/conf/nginx.conf
# 编辑nginx配置文件
        location / {
            root   /usr/local/nginx/html/wordpress;
            index  index.html index.htm index.php;
        }
        error_page   500 502 503 504  /50x.html;
        location = /50x.html {
            root   html;
        }
        location ~ \.php$ {
            root           /usr/local/nginx/html/wordpress;
            fastcgi_pass   127.0.0.1:9000;
            fastcgi_index  index.php;
            fastcgi_param  SCRIPT_FILENAME  $document_root$fastcgi_script_name;
            include        fastcgi_params;
        }
# 修改wordpress目录权限
[root@csq html]# systemctl restart nginx
[root@csq html]# chown -R nginx:nginx wordpress/
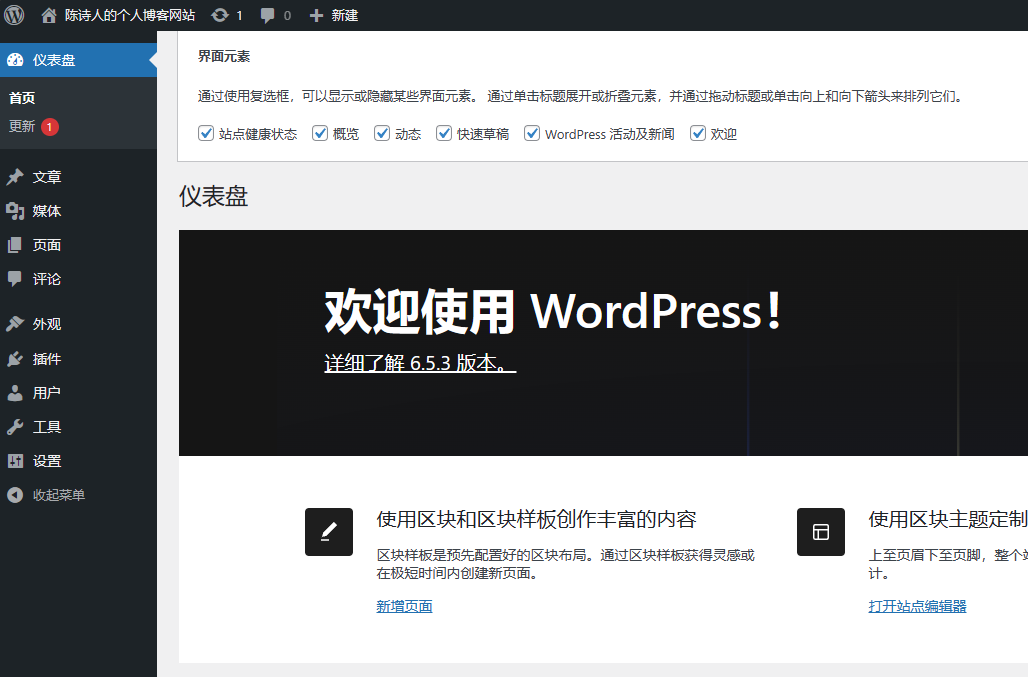
浏览器访问
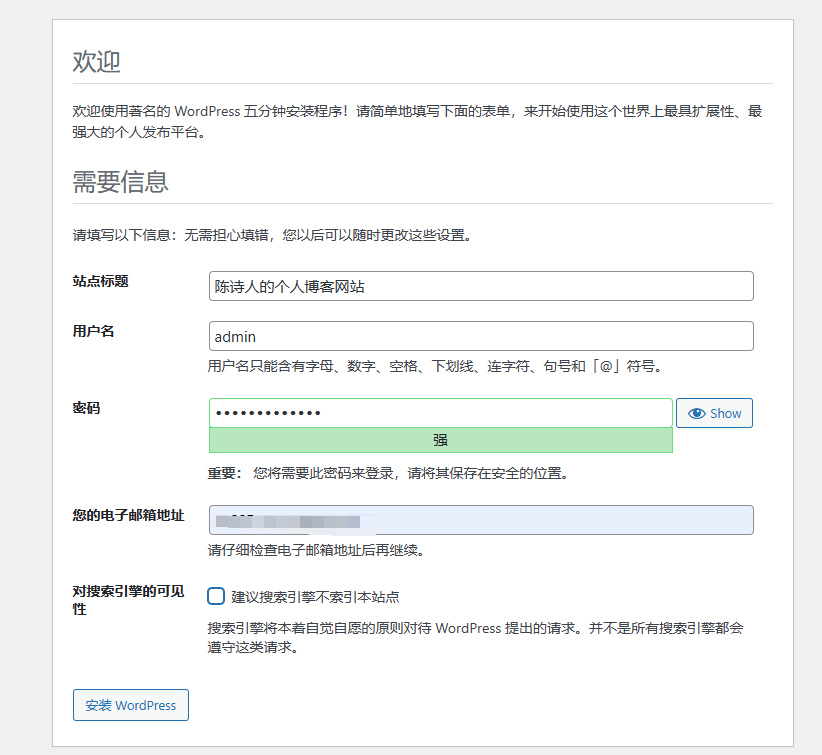
省略一系列安装步骤(按照自己设置的来就行了)


 102
102


 被折叠的 条评论
为什么被折叠?
被折叠的 条评论
为什么被折叠?
 到【灌水乐园】发言


