


项目创建步骤:
1.引入依赖
<!--        Redis依赖 -->
        <dependency>
            <groupId>org.springframework.boot</groupId>
            <artifactId>spring-boot-starter-data-redis</artifactId>
        </dependency>
<!--         连接池依赖-->
        <dependency>
            <groupId>org.apache.commons</groupId>
            <artifactId>commons-pool2</artifactId>
        </dependency>
<!--        json依赖-->
        <dependency>
            <groupId>com.fasterxml.jackson.core</groupId>
            <artifactId>jackson-databind</artifactId>
            <version>2.14.1</version>
        </dependency>
2.配置application.yml/yaml/properties文件
spring:
  redis:
    host: 192.168.22.128
    port: 6379
#    password: 123456 #有设置了密码就填,没有就不用写
    lettuce:
      pool:
        max-active: 8 #最大连接数
        max-idle: 8 #最大空闲连接数
        min-idle: 0 #最小空闲连接数
        max-wait: 100 #连接等待时间
3.注入RedisTemplate
@Autowied
private RedisTemplate redisTemplate;
4.编写测试
   @Test
    void testString() {
//        插入一条String类型的数据
        redisTemplate.opsForValue().set("name","Jack");
       //获取该数据
        Object name = redisTemplate.opsForValue().get("name");
        System.out.println(name);

    }
完整的项目:
项目截图:
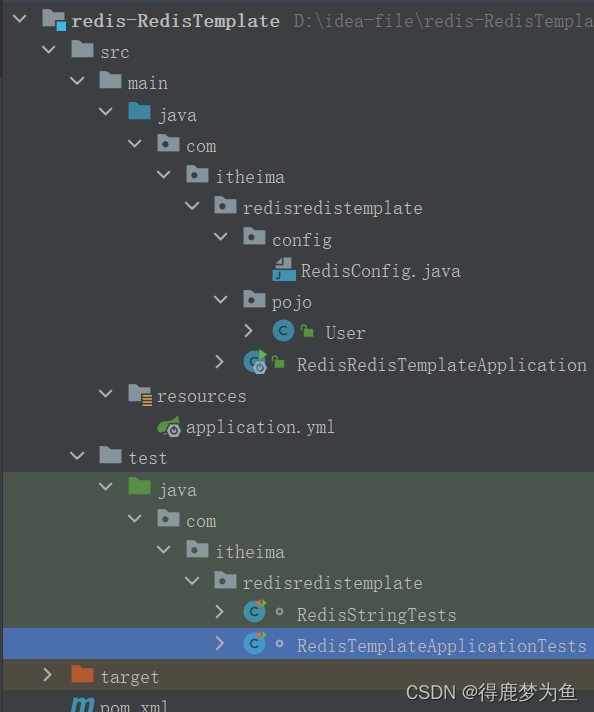
1.pom.xml文件:
 <dependencies>
<!--        Redis依赖 -->
        <dependency>
            <groupId>org.springframework.boot</groupId>
            <artifactId>spring-boot-starter-data-redis</artifactId>
        </dependency>
<!--         连接池依赖-->
        <dependency>
            <groupId>org.apache.commons</groupId>
            <artifactId>commons-pool2</artifactId>
        </dependency>
<!--        json依赖-->
        <dependency>
            <groupId>com.fasterxml.jackson.core</groupId>
            <artifactId>jackson-databind</artifactId>
            <version>2.14.1</version>
        </dependency>
        <dependency>
            <groupId>org.projectlombok</groupId>
            <artifactId>lombok</artifactId>
            <optional>true</optional>
        </dependency>
        <dependency>
            <groupId>org.springframework.boot</groupId>
            <artifactId>spring-boot-starter-test</artifactId>
            <scope>test</scope>
        </dependency>
    </dependencies>
2.User实体类:
package com.itheima.redisredistemplate.pojo;

import lombok.AllArgsConstructor;
import lombok.Data;
import lombok.NoArgsConstructor;

/**
 * @author :LTY
 * @date :Created in 2023/6/24 23:41
 * @description:实体类
 * @modified By:
 * @version: $
 */
@Data
@AllArgsConstructor
@NoArgsConstructor
public class User {

    private String name;

    private Integer age;
}
3.RedisRedisTemplateApplication主类:
package com.itheima.redisredistemplate;

import org.springframework.boot.SpringApplication;
import org.springframework.boot.autoconfigure.SpringBootApplication;

@SpringBootApplication
public class RedisRedisTemplateApplication {

    public static void main(String[] args) {
        SpringApplication.run(RedisRedisTemplateApplication.class, args);
    }

}
4.RedisTemplateApplicationTests测试类:
package com.itheima.redisredistemplate;

import com.itheima.redisredistemplate.pojo.User;
import org.junit.jupiter.api.Test;
import org.springframework.beans.factory.annotation.Autowired;
import org.springframework.boot.test.context.SpringBootTest;
import org.springframework.data.redis.core.RedisTemplate;


@SpringBootTest
class RedisTemplateApplicationTests {

    @Autowired
    private RedisTemplate redisTemplate;

    @Test
    void testString() {
//        插入一条String类型的数据
        redisTemplate.opsForValue().set("name","Jack2");
       //获取该数据
        Object name = redisTemplate.opsForValue().get("name");
        System.out.println(name);
    }

    @Test
    void testSaveUser() {
        //写入对象数据
        redisTemplate.opsForValue().set("user:4",new User("胡歌",34));
        //获取数据
        User user = (User) redisTemplate.opsForValue().get("user:4");
        System.out.println(user);
    }

}
5.application.yml配置文件:
spring:
  redis:
    host: 192.168.22.128  #这里需要改为你的虚拟机的ip地址
    port: 6379         #6379为默认端口
#    password: 123456  #redis没有设置密码,则不需要填写
    lettuce:
      pool:
        max-active: 8 #最大连接数
        max-idle: 8 #最大空闲数
        min-idle: 0 #最小空闲数
        max-wait: 100ms #最大等待时间
运行项目后,虽然成功运行了,但是在存入RDM内的数据为:
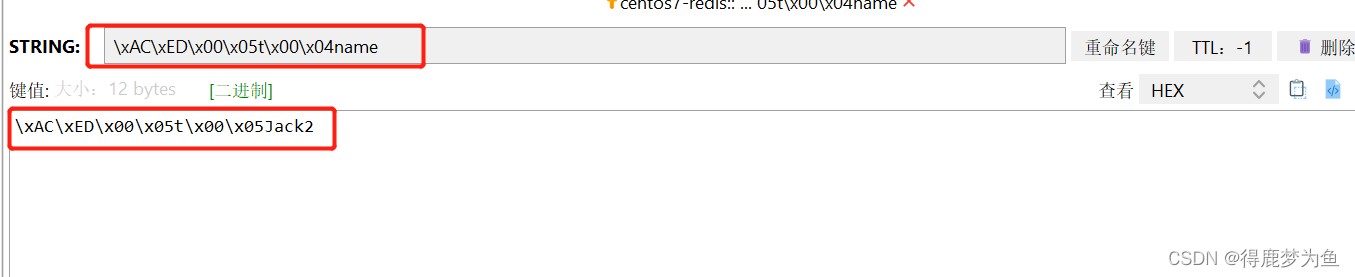
这是由于RedisTemplate没有对数据进行序列化。
RedisTeplate的两种序列化实践方法:
①方法一:
1.自定义RedisTemplate
2.修改RedisTemplate的序列化器为GenericJackson2JsonRedisSerializer
- 创建一个RedisConfig类用于RedisTemplate序列化:
package com.itheima.redisredistemplate.config;

import org.springframework.context.annotation.Bean;
import org.springframework.context.annotation.Configuration;
import org.springframework.data.redis.connection.RedisConnectionFactory;
import org.springframework.data.redis.core.RedisTemplate;
import org.springframework.data.redis.serializer.GenericJackson2JsonRedisSerializer;
import org.springframework.data.redis.serializer.RedisSerializer;

/**
 * @author :LTY
 * @date :Created in 2023/6/24 23:23
 * @description:RedisTemplate序列化
 * @modified By:
 * @version: $
 * 要注入connectionFactory须在该类上添加注释@Configuration
 */
@Configuration  //表示此类为配置类
public class RedisConfig {

    @Bean
    public RedisTemplate<String,Object> redisTemplate(RedisConnectionFactory connectionFactory) {
        //1.创建RedisTemplate对象
        RedisTemplate<String, Object> template = new RedisTemplate<>();
        //2.设置连接工厂
        template.setConnectionFactory(connectionFactory);
        //3.创建JSON序列化工具
        GenericJackson2JsonRedisSerializer jsonRedisSerializer = new GenericJackson2JsonRedisSerializer();
        //4.设置Key的序列化
        template.setKeySerializer(RedisSerializer.string());
        template.setHashKeySerializer(RedisSerializer.string());
        //5.设置Value的序列化
        template.setValueSerializer(jsonRedisSerializer);
        template.setHashValueSerializer(jsonRedisSerializer);
        return template;
    }
}
- 修改RedisTemplateApplicationTests测试类的代码:
@Autowired
    private RedisTemplate redisTemplate;
改为:
@Autowired
private RedisTemplate<String,Object> redisTemplate;在RDM显示的结果为:
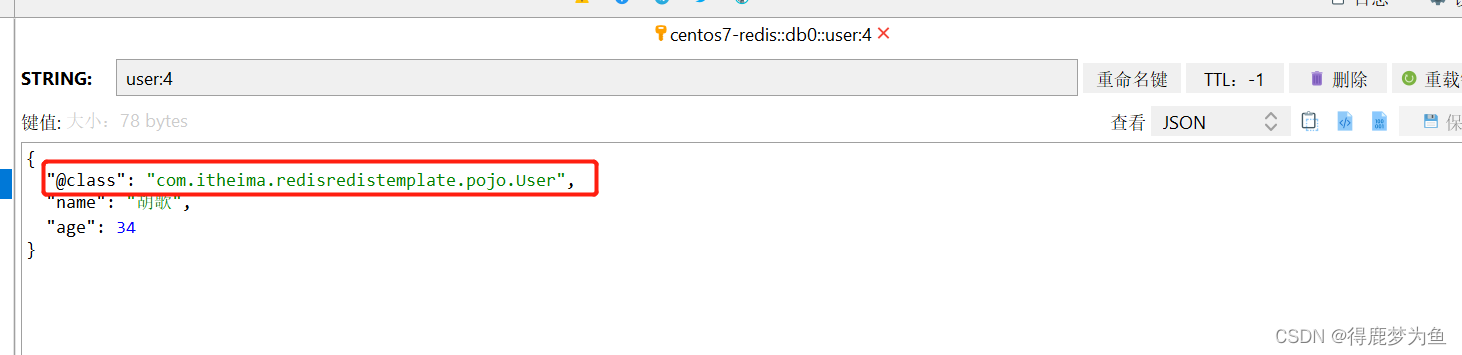
由于每次添加一条数据,都会生成一个@class,占用内存,故推荐使用第二种方法进行序列化。
②方法二:
1.使用StringRedisTemplate
2.写入Rediss时,手动把对象序列化为JSON
3.读取Redis时,手动把读取到的JSON反序列化为对象
- 为了方便对比两种方法达到的效果,新建一个RedisStringTests测试类:
package com.itheima.redisredistemplate;

import com.fasterxml.jackson.core.JsonProcessingException;
import com.fasterxml.jackson.databind.ObjectMapper;
import com.itheima.redisredistemplate.pojo.User;
import org.junit.jupiter.api.Test;
import org.springframework.beans.factory.annotation.Autowired;
import org.springframework.boot.test.context.SpringBootTest;
import org.springframework.data.redis.core.RedisTemplate;
import org.springframework.data.redis.core.StringRedisTemplate;

import java.util.Map;

@SpringBootTest
class RedisStringTests {

    @Autowired
    private StringRedisTemplate stringRedisTemplate;

    @Test
    void testString() {
//        插入一条String类型的数据
        stringRedisTemplate.opsForValue().set("name","Jack");
       //获取该数据
        Object name = stringRedisTemplate.opsForValue().get("name");
        System.out.println(name);
    }

    private static final ObjectMapper mapper = new ObjectMapper();
    @Test
    void testSaveUser() throws JsonProcessingException {
        //创建User对象
        User user = new User("胡歌",34);
        //手动序列化
        String json = mapper.writeValueAsString(user);
        //写入对象数据
        stringRedisTemplate.opsForValue().set("user:5",json);

        //获取数据
        String json2 =  stringRedisTemplate.opsForValue().get("user:5");
        //手动序列化
        User user1 = mapper.readValue(json2, User.class);
        System.out.println(user1);
    }

//    Hash
    @Test
    void testHash() {
//        插入hash数据
        stringRedisTemplate.opsForHash().put("user:6","name","彭于晏");
        stringRedisTemplate.opsForHash().put("user:6","age","32");

        //获取hash数据
        Map<Object, Object> entries = stringRedisTemplate.opsForHash().entries("user:6");
        System.out.println("entries = " + entries);


    }

}
在RDM显示的结果为:


 2341
2341


 被折叠的 条评论
为什么被折叠?
被折叠的 条评论
为什么被折叠?
 到【灌水乐园】发言


