


概念
控制反转(Inversion of Control)IOC,是面向对象编程中的一种设计原则,作用是用来减少计算机代码之间的耦合性。其最常见的方式叫做依赖注入(Dependency Injection,简称DI),还有一种方式叫“依赖查找”(Dependency Lookup)。通过控制反转,对象在被创建的时候,由一个调控系统内所有对象的外界实体将其所依赖的对象的引用传递给它。也可以说,依赖被注入到对象中。
其主要目的就是为了降低耦合度
底层原理(简单的)
(1)XML解析、工厂模式、反射
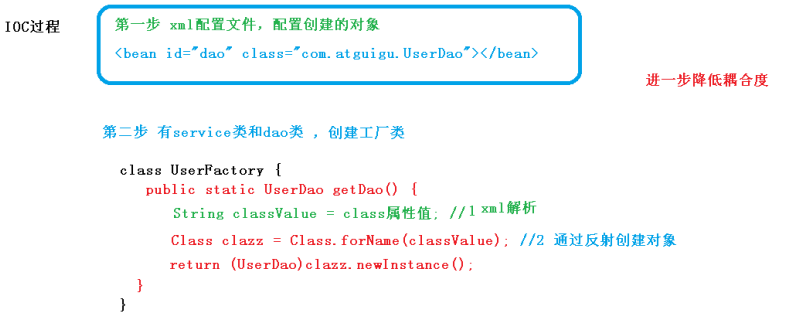
图片来源于尚硅谷
关于BeanFactory接口
1.思想基于IOC容器完成,IOC容器底层就是对象工厂
2.Spring提供IOC容器的两种实现方式:(两个接口)
(1)BeanFactory:IOC容器基本实现,是Spring内部使用的接口,不提供开发人员进行使用
特点:加载配置文件时候不会创建对象,在获取对象(使用)才回去创建
(2)ApplicationContext:BeanFactory接口的子接口,提供了更多强大的功能,一般由开发人员进行使用
特点:加载配置文件时候就会把在配置文件对象进行创建
为了实现通过通过工厂类创建对象,Spring提供了BeanFactory接口
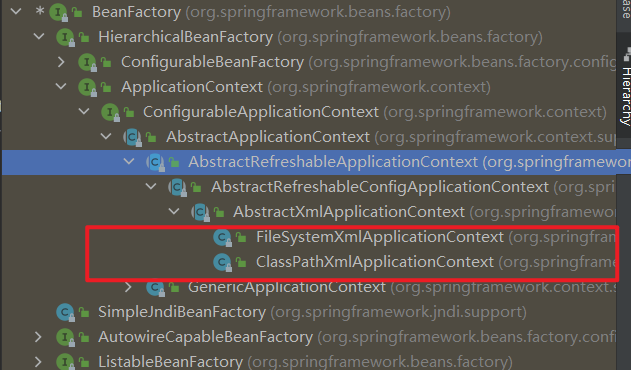
FileSystemXmlApplicationContext()是里面传入的是物理磁盘 上的路径
ClassPathXmlApplicationContext()传入的是配置文件的路径
IOC操作Bean管理
概念
Bean管理指的是两个操作:Spring创建对象,Spring注入属性
Bean管理操作有两种方法:基于xml配置文件方式实现,基于注解方式实现
基于xml配置文件
Spring创建对象
(1)在Spring配置文件中,使用bean标签,在标签里面添加对应的属性(最基本的两个属性是id 与 class),就可以实现对象的创建
(2)在bean标签有很多属性
- id属性:唯一标识
- class属性:类全路径
(3)创建对象的时候,默认也是执行无参数构造器方法完成对象创建
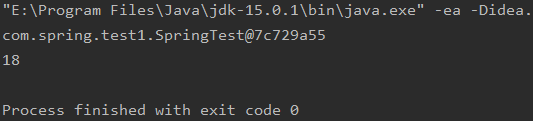
<bean id="springTest" class="com.spring.test1.SpringTest">
public class SpringTemp {
    @Test
    public void test1(){
        //1.加载spring配置文件
        BeanFactory context = new ClassPathXmlApplicationContext("bean1.xml");
        //2,获取配置创建的对象
        SpringTest springTest = context.getBean("springTest", SpringTest.class);
        System.out.println(springTest);
        springTest.setAge(18);
        System.out.println(springTest.getAge());
    }
}
Spring注入属性
DI:依赖注入,就是注入属性
第一种注入方式:使用set方法注入(利用property标签注入)
java文件:
public class Person {
    private int age;
    private String name;
    public void setAge(int age) {
        this.age = age;
    }
    public void setName(String name) {
        this.name = name;
    }

    @Override
    public String toString() {
        return "Person{" +
                "age=" + age +
                ", name='" + name + '\'' +
                '}';
    }
}
xml文件的设置:
<!--   set方法注入属性     -->
        <bean id="person" class="demo1.Person">
<!--   使用property完成属性注入 name:类里面的属性名称  value:向属性中注入的值     -->
                <property name="age" value="18"></property>
                <property name="name" value="Tom"></property>
        </bean>
获取用对象
@Test
public void test(){
        ApplicationContext Context = new ClassPathXmlApplicationContext("bean2.xml");
        Person person = Context.getBean("person", Person.class);
        System.out.println(person.toString());
    }
输出

p名称空间注入
使用p名称空间注入,可以简化基于xml配置方式
第一步添加p名称空间在配置文件中。

这个时候我们在bean标签中添加p:字段名的属性,这个字段名就是我们设置的属性的名字
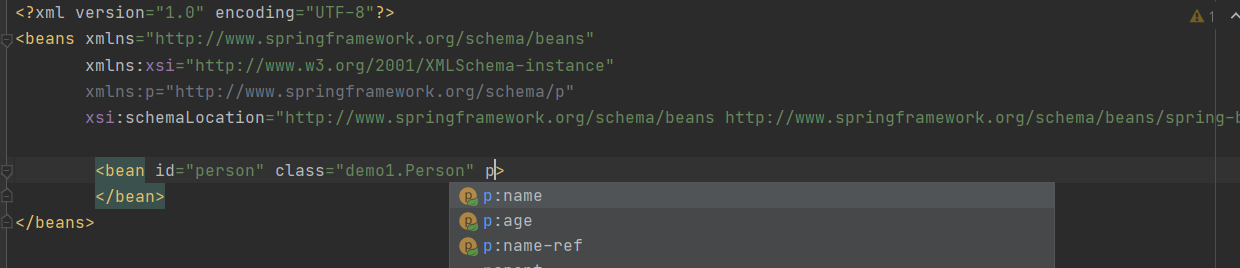
第二步进行属性注入,在bean标签中进行操作
        <bean id="person" class="demo1.Person" p:age="18" p:name="Tom">
        </bean>
java代码
public class Person {
    public int age;
    public String name;
    public void setAge(int age) {
        this.age = age;
    }
    public void setName(String name) {
        this.name = name;
    }

    @Override
    public String toString() {
        return "Person{" +
                "age=" + age +
                ", name='" + name + '\'' +
                '}';
    }
}
测试类
    @Test
    public void test(){
        ClassPathXmlApplicationContext context = new ClassPathXmlApplicationContext("bean3.xml");
        Person person = context.getBean("person", Person.class);
        System.out.println(person.toString());
    }

null值的注入
xml代码
    <bean id="person" class="demo1.Person">
        <property name="name">
            <null></null>
        </property>
        <property name="age" value="18"> </property>
    </bean>
javabean都一致
测试类
    @Test
    public void test(){
        ClassPathXmlApplicationContext context = new ClassPathXmlApplicationContext("bean4.xml");
        Person person = context.getBean("person", Person.class);
        System.out.println(person.toString());
    }

注入的属性为一个类的对象
java代码
public class Person {
    private int age;
    private String name;
    private Animal animal;
    public void setAnimal(Animal animal) {
       this.animal = animal;
    }
    public void setAge(int age) {
        this.age = age;
    }
    public void setName(String name) {
        this.name = name;
    }

  @Override
  public String toString() {
      return "Person{" +
              "age=" + age +
              ", name='" + name + '\'' +
              ", animal=" + animal +
              '}';
  }
}
xml代码
第一种方式
xml配置文件中通过属性ref来指向另外一个已经创建好的对象
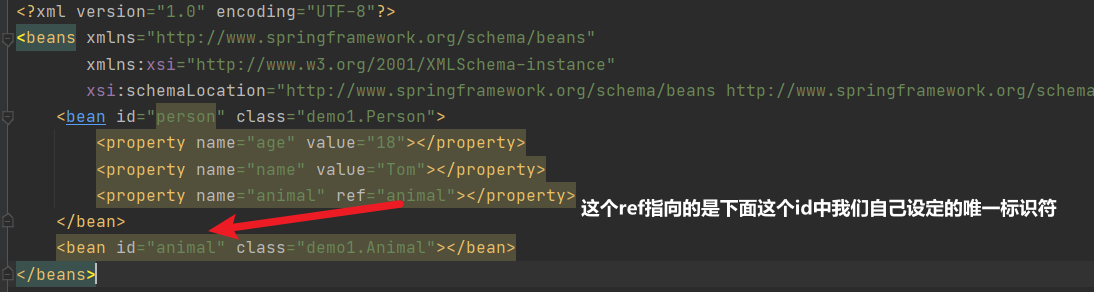
    <bean id="person" class="demo1.Person">
        <property name="age" value="18"></property>
        <property name="name" value="Tom"></property>
        <property name="animal" ref="animal"></property>
    </bean>
    <bean id="animal" class="demo1.Animal"></bean>
第二中方式
    <bean id="person" class="demo1.Person">
        <property name="age" value="18"></property>
        <property name="name" value="Tom"></property>
        <property name="animal">
            <bean id="animal" class="demo1.Animal"></bean>
        </property>
    </bean>
最后的效果都相似
测试类
    @Test
    public void test(){
        ClassPathXmlApplicationContext context = new ClassPathXmlApplicationContext("bean5.xml");
        Person person = context.getBean("person", Person.class);
        System.out.println(person.toString());
    }

注入的属性是集合
javaBean
public class CollectionDemo {
    public void setAnimals(String[] animals) {
        this.animals = animals;
    }

    public void setName(List<String> name) {
        this.name = name;
    }

    public void setId(Set<Integer> id) {
        this.id = id;
    }

    public void setOwner(Map<String, String> owner) {
        this.owner = owner;
    }

    private String[] animals;
    private List<String> name;
    private Set<Integer> id;
    private Map<String,String> owner;

    @Override
    public String toString() {
        return "CollectionDemo{" +
                "animals=" + Arrays.toString(animals) +
                ", name=" + name +
                ", id=" + id +
                ", owner=" + owner +
                '}';
    }
}
xml配置文件
    <bean id="demo" class="demo1.CollectionDemo">
<!--        数组用array标签-->
        <property name="animals">
            <array>
                <value>cat</value>
                <value>dog</value>
            </array>
        </property>
<!--        Set集合用set标签-->
        <property name="id">
            <set>
                <value>1001</value>
                <value>1002</value>
            </set>
        </property>
<!--        List集合用list标签-->
        <property name="name">
            <list>
                <value>大猫</value>
                <value>旺财</value>
            </list>
        </property>
<!--        Map集合用map标签,但添加属性的时候用的是entry标签-->
        <property name="owner">
            <map>
                <entry key="大猫" value="Tom"></entry>
                <entry key="旺财" value="Jack"></entry>
            </map>
        </property>
    </bean>
测试类
@Test
public void test(){
    ClassPathXmlApplicationContext context = new ClassPathXmlApplicationContext("bean6.xml");
    CollectionDemo demo = context.getBean("demo", CollectionDemo.class);
    System.out.println(demo.toString());
}

当我们的集合中的属性值是一个对象的时候,则需要通过ref标签来使用
    <bean id="person" class="demo2.Person">
        <property name="name" value="二哈"></property>
        <property name="animals">
            <list>
                <ref bean="animal1"></ref>
                <ref bean="animal2"></ref>
                <!-- 通过ref指向下面用xml创建的两个对象-->
            </list>
        </property>
    </bean>

    <bean id="animal1" class="demo2.Animals"></bean>
    <bean id="animal2" class="demo2.Animals"></bean>
通过名称空间来注入集合对象
需要配置名称空间util
javabean
public class Person {
    private List<Animals> animals;
    private String name;
    public void setAnimals(List<Animals> animals) {
        this.animals = animals;
    }
    public void setName(String name) {
        this.name = name;
    }
    @Override
    public String toString() {
        return "Person{" +
                "animals=" + animals +
                ", name='" + name + '\'' +
                '}';
    }
}
xml配置文件
    <bean id="person" class="demo2.Person">
        <property name="animals" ref="animals"></property>
    </bean>
    <util:list id="animals">
        <ref bean="animal4"></ref>
        <ref bean="animal3"></ref>
        <ref bean="animal5"></ref>
        <!-- 与之前在集合中写xml配置中的写法一致-->
    </util:list>
    <bean id="animal3" class="demo2.Animals"></bean>
    <bean id="animal4" class="demo2.Animals"></bean>
    <bean id="animal5" class="demo2.Animals"></bean>
测试代码
    @Test
    public void test(){
        ApplicationContext context = new ClassPathXmlApplicationContext("bean9.xml");
        Person person = context.getBean("person", Person.class);
        System.out.println(person.toString());
    }

工厂bean
Spring中有两种类型的bean, 一种是普通的bean,另一种是工厂bean(FactoryBean)
- 普通bean:在配置文件中定义bean类型就是返回类型
- 工厂bean:在配置文件中定义bean类型可以和返回类型不一值。与工厂模式一致
要获得工厂bean,需要实现接口FactoryBean
javaBean
public class Person {
    private int id;
    private String name;
    public void setId(int id) {
        this.id = id;
    }
    public void setName(String name) {
        this.name = name;
    }
    @Override
    public String toString() {
        return "Person{" +
                "id=" + id +
                ", name='" + name + '\'' +
                '}';
    }
}
FactoryBean实现类
public class PersonFactory implements FactoryBean<Person> {

    @Override
    public Person getObject() throws Exception {
        Person person = new Person();
        person.setId(1001);
        person.setName("杰克");
        return person;
    }

    @Override
    public Class<?> getObjectType() {
        return null;
    }

    @Override
    public boolean isSingleton() {
        return false;
    }
}
xml配置文件
<bean id="person" class="demo2.PersonFactory"></bean>
测试代码
   @Test
    public void test(){
        ApplicationContext context = new ClassPathXmlApplicationContext("bean10.xml");
        Person person = context.getBean("person", Person.class);//我们发现我们xml配置文件中创建的文件是PersonFactory类型的,但是这里可以获得Person类型的对象,又降低了耦合度
        System.out.println(person.toString());
    }

bean的作用域
我们可以通过bean标签来创建对象,但每次我们获得该bean对象的时候是否是同一个bean对象呢?
javabean
public class Person {
    private int id;
    private String name;
    public void setId(int id) {
        this.id = id;
    }
    public void setName(String name) {
        this.name = name;
    }
}
xml配置文件
    <bean id="person" class="demo2.Person">
        <property name="name" value="乔治"></property>
        <property name="id" value="1001"></property>
    </bean>
测试代码
    @Test
    public void test(){
        ApplicationContext context = new ClassPathXmlApplicationContext("bean11.xml");
        Person person1 = context.getBean("person", Person.class);
        Person person2 = context.getBean("person", Person.class);
        System.out.println(person1);
        System.out.println(person2);
        System.out.println(person1.equals(person2));
    }
运行两次,我们发现无论哪次里面引用地址都是一样的,说明当我们加载spring配置文件的时候,这个对象就已经创建完成了

但是我们可以通过在bean标签中加入一个属性scope="prototype"
scope中有两个属性值,一个是singleton,另一个是prototype
- singleton:加载 spring 配置文件时候就会创建单实例对象
- prototype:不是在加载 spring 配置文件时候创建 对象,在调用getBean 方法时候创建多实例对象
当我们不加scope属性的时候,默认是singleton
修改上面的xml配置文件,其他不变
    <bean id="person" class="demo2.Person" scope="prototype">
        <property name="name" value="乔治"></property>
        <property name="id" value="1001"></property>
    </bean>

我们这是会发现两次获得的对象不一样。这就相当于java中的单例模式,singleton是饿汉式,prototype是懒汉式
bean的生命周期
bean的生命周期就是从他创建到销毁的过程
- 通过构造器创建bean实例(无参数构造)
- 为bean的属性设置值和对其他bean引用
- 把bean实例传递到bean前置处理器的方法postProcessBeforeInitialization(需要实现BeanPostProcessor接口)
- 调用bean的初始化方法
- 把bean实例传递到bean后置处理器的方法postProcessBeforeInitialization(需要实现BeanPostProcessor接口)
- 获取bean对象的时候
- 容器关闭,销毁bean实例的时候
基于注解方式创建对象
相对于利用xml配置文件来创建javabean,利用注解方式更加简单。但是需要引入另一个包spring-aop-5.2.6.RELEASE
下载的spring文件里面会有
Spring中针对Bean管理中创建对象提供了四个注解
- @Component
- @Service
- @Controller
- @Respository
这四种注解是加到类的上面的,效果都一样,都可以被spring框架所扫描然后注入spring容器中,只不过一般是用在不用层上的。
怎样写?
首先可以先利用xml开启组件扫描
属性base-package由名字可以知道,是用来找到扫描哪个包的
<context:component-scan base-package="demo3"></context:component-scan>
然后在javabean上加入一个注解@Component
注解里面的value属性相当于xml中的bean标签的id属性,但这个可有可无。
如果不写,则默认的属性值是类名的首字母小写;比如类名是PersonDmeo,则value的默认值则是personDemo
@Component(value = "person")
public class Person {
    public void sout(){
        System.out.println("ddddd");
    }
}
测试代码
    @Test
    public void test() {
        ClassPathXmlApplicationContext context = new ClassPathXmlApplicationContext("bean12.xml");
        Person person = context.getBean("person", Person.class);//
        person.sout();
    }

在组件扫描中,我们也可以设置规定它扫描那些类
use-default-filters="false" 表示现在不使用默认 filter,自己配置 filter
context:include-filter 在这里面需要填两个参数type和expression,
- tpye 里面填 annotation
- expression里面是该注解所在的包再加上该注解名

    <context:component-scan base-package="demo3" use-default-filters="false">
        <context:include-filter type="annotation" expression="org.springframework.stereotype.Controller">
        </context:include-filter>
    </context:component-scan>
如果我在包名后面加上的是Controller,则会报错

基于注解进行属性的自动装配
有四个注解**@Autowired、@Qualifer、@Resource、@Value**
- @Autowired:根据属性类型注入
- @Qualifer:根据名称注入
- @Resource:可以根据类型注入,也可以根据名称注入
- @Value:注入普通属性
这个需要利用到@Autowired这个注解,是添加到类的属性、形参上面的,且这样做还可以不用设置set方法
javabean
@Component(value = "person")
public class Person {
    @Autowired
    private Animals animals;

    @Override
    public String toString() {
        return "Person{" +
                "animals=" + animals +
                '}';
    }
}
另一个Animals类
@Component
public class Animals {
    public Animals() {
        System.out.println("Animals的对象创建了");
    }
}
xml配置文件,开启组件扫描就行
    <context:component-scan base-package="demo3">
    </context:component-scan>
测试类
public class PersonTest {
    @Test
    public void test() {
        ClassPathXmlApplicationContext context = new ClassPathXmlApplicationContext("bean12.xml");
        Person person = context.getBean("person", Person.class);
        System.out.println(person.toString());
    }
}

但是这样如果我们创建了两个javabean对象,@Autowire却不能分辨出是哪一个需要注入,则会报错.
    <context:component-scan base-package="demo3">
    </context:component-scan>
    <bean id="animal1" class="demo3.Animals"></bean>
    <bean id="animal2" class="demo3.Animals"></bean>

所以当这个时候我们可以使用@Qualifier
@Component(value = "person")
public class Person {
    @Autowired
    @Qualifier(value = "animal1")//里面需要有value的属性值需要与bean标签中的id一样

    private Animals animals;

    @Override
    public String toString() {
        return "Person{" +
                "animals=" + animals +
                '}';
    }
}
    @Test
    public void test() {
        ClassPathXmlApplicationContext context = new ClassPathXmlApplicationContext("bean12.xml");
        Person person = context.getBean("person", Person.class);
        Animals animal1 = context.getBean("animal1", Animals.class);
        System.out.println(animal1);
        System.out.println(person);
    }

@Resource呜呜呜我找不会
@Value是注入普通的属性
<context:component-scan base-package="demo3"></context:component-scan>
@Component(value = "person")
public class Person {
    @Value(value = "1001")
    private int id;
    @Value(value = "Tom")
    private String name;

    @Override
    public String toString() {
        return "Person{" +
                "id=" + id +
                ", name='" + name + '\'' +
                '}';
    }
}
    @Test
    public void test() {
        ClassPathXmlApplicationContext context = new ClassPathXmlApplicationContext("bean12.xml");
        Person person = context.getBean("person", Person.class);
        System.out.println(person.toString());
    }
不需要配置文件来获取bean
这种情况就需要我们使用配置类来代替配置文件
配置类中需要添加@Configuration 与@ComponentScan
@ComponentScan里有两个属性,由名字可以看出来是干甚么的

@Configuration
@ComponentScan(basePackages = {"demo4"})
public class SpringConfig {
}
javabean
@Component
public class Person {
    public Person(){
        System.out.println("Person对象已创建...");
    }
}
测试类
    @Test
    public void test(){
        AnnotationConfigApplicationContext context = new 	AnnotationConfigApplicationContext(SpringConfig.class);
        Person person = context.getBean("person", Person.class);
        System.out.println(person);
    }
这里需要使用创建类AnnotationConfigApplicationContext的对象,而不是ClassPathApplicationContext的对象.
里面的参数也就是配置类的类名,剩下的仍然是调用getBean方法。
String());
}
#### 不需要配置文件来获取bean

这种情况就需要我们使用配置类来代替配置文件

配置类中需要添加`@Configuration` 与`@ComponentScan`

@ComponentScan里有两个属性,由名字可以看出来是干甚么的

[外链图片转存中...(img-Ufz9BBHg-1645628237877)]

```java
@Configuration
@ComponentScan(basePackages = {"demo4"})
public class SpringConfig {
}
javabean
@Component
public class Person {
    public Person(){
        System.out.println("Person对象已创建...");
    }
}
测试类
    @Test
    public void test(){
        AnnotationConfigApplicationContext context = new 	AnnotationConfigApplicationContext(SpringConfig.class);
        Person person = context.getBean("person", Person.class);
        System.out.println(person);
    }
这里需要使用创建类AnnotationConfigApplicationContext的对象,而不是ClassPathApplicationContext的对象.
里面的参数也就是配置类的类名,剩下的仍然是调用getBean方法。


 3163
3163

 被折叠的 条评论
为什么被折叠?
被折叠的 条评论
为什么被折叠?
 到【灌水乐园】发言


