


15.1 SpringSecurity
小细节:在实际开发中,可能发现 存储的 date 不实时,总是差那么一天。或者几个小时,这是因为 时区的问题。DataSource 的 url 那里,建议设置为 Asia/Shanghai。这样就不会 有那么 大的 时差了。
在 WEB 开发中,安全肯定是第一位!要不然 也不可能 有过滤器,拦截器 这些东西。它们做一些简单的验证还可以。但是 光用它们来做安全还是远远不够的(毕竟咱们自己写的话,很难写的很好。)。所以 Spring 推出了 SpringSecurity
这里要注意的是:安全这个东西,是 非功能性需求,一个应用能不能跑不起来,其实跟 安全关系不大。所以设置不设置安全 也完全 凭开发者自己。(比如,你害怕网站被攻击,崩溃挂掉。或者是 网站存储的信息被泄露等等一系列问题时,那么你就肯定需要做 安全了。不过现在的应用都是直接在设计之初就开始做安全的。否则后期再想起来做安全,成本是很大的。)
shiro 和 SpringSecurity:它们之间 很像很像,除了类的名字、方法的名字不一样,剩下的都一样。
安全主要做两个方面:认证 授权
- 功能权限(哪些用户可以使用什么功能)
- 访问权限(有些人能访问这个页面,有些人访问不了)
- 菜单权限(有些人能看到 某个菜单,有些人看不到。)
- …… 这些东西 其实都可以 用 拦截器和 过滤器 来做。但是我们不希望 这种东西 去写 大量的原生代码。
记住下面这几个类 其实就可以了
WebSecurityConfigurerAdapter:自定义 Security 策略AuthenticationManagerBuilder:自定义认证策略@EnableWebSecurity:开启 WebSecurity 模式。我们在学习 SpringCloud 的时候,开启某个功能 基本上 都是 @Enable xxx 注解
Spring Security 的两个 主要目标 是 “认证” 和 “授权” (访问控制)
- 导入 security 包
        <dependency>
            <groupId>org.springframework.boot</groupId>
            <artifactId>spring-boot-starter-security</artifactId>
        </dependency>
- 继承
WebSecurityConfigurerAdapter类,写授权代码
package top.muquanyu.config;


import org.springframework.context.annotation.Configuration;
import org.springframework.security.config.annotation.authentication.builders.AuthenticationManagerBuilder;
import org.springframework.security.config.annotation.web.builders.HttpSecurity;
import org.springframework.security.config.annotation.web.configuration.WebSecurityConfigurerAdapter;
import org.springframework.security.crypto.bcrypt.BCryptPasswordEncoder;

@Configuration
public class SecurityConfig extends WebSecurityConfigurerAdapter {

    // 授权
    @Override
    protected void configure(HttpSecurity http) throws Exception {
        http.authorizeRequests()
                .antMatchers("/").permitAll()
                .antMatchers("/level1/**").hasAnyRole("vip1")
                .antMatchers("/level2/**").hasAnyRole("vip2")
                .antMatchers("/level3/**").hasAnyRole("vip3");

        // 没有权限的默认 会到登录页面,需要开启登录的页面
        http.formLogin();

        // 开启注销的功能
        http.logout(); // 默认 走的 请求 是 /logout
    }
一般情况下,都在这里写 访问 某个 页面,需要 的授权角色。和没有这个授权的角色情况下,是否跳到一个 登录页面。
- 写认证(认证 和 授权 没有直接关系,只不过认证的时候 可以 携带授权角色)
 // 认证
    @Override
    protected void configure(AuthenticationManagerBuilder auth) throws Exception {
        auth.inMemoryAuthentication().passwordEncoder(new BCryptPasswordEncoder())
                .withUser("mqy").password(new BCryptPasswordEncoder().encode("123")).roles("vip2")
                .and()
                .withUser("root").password(new BCryptPasswordEncoder().encode("123")).roles("vip1","vip2","vip3")
                .and().withUser("guest").password(new BCryptPasswordEncoder().encode("123")).roles("vip1");
    }
passwordEncoder(new BCryptPasswordEncoder()) 是必须得写的,现在的 SpringSecurity 做认证的话,密码 都需要进行 编码,否则 就会 报 500 错误!!
- 写一个 注销的功能
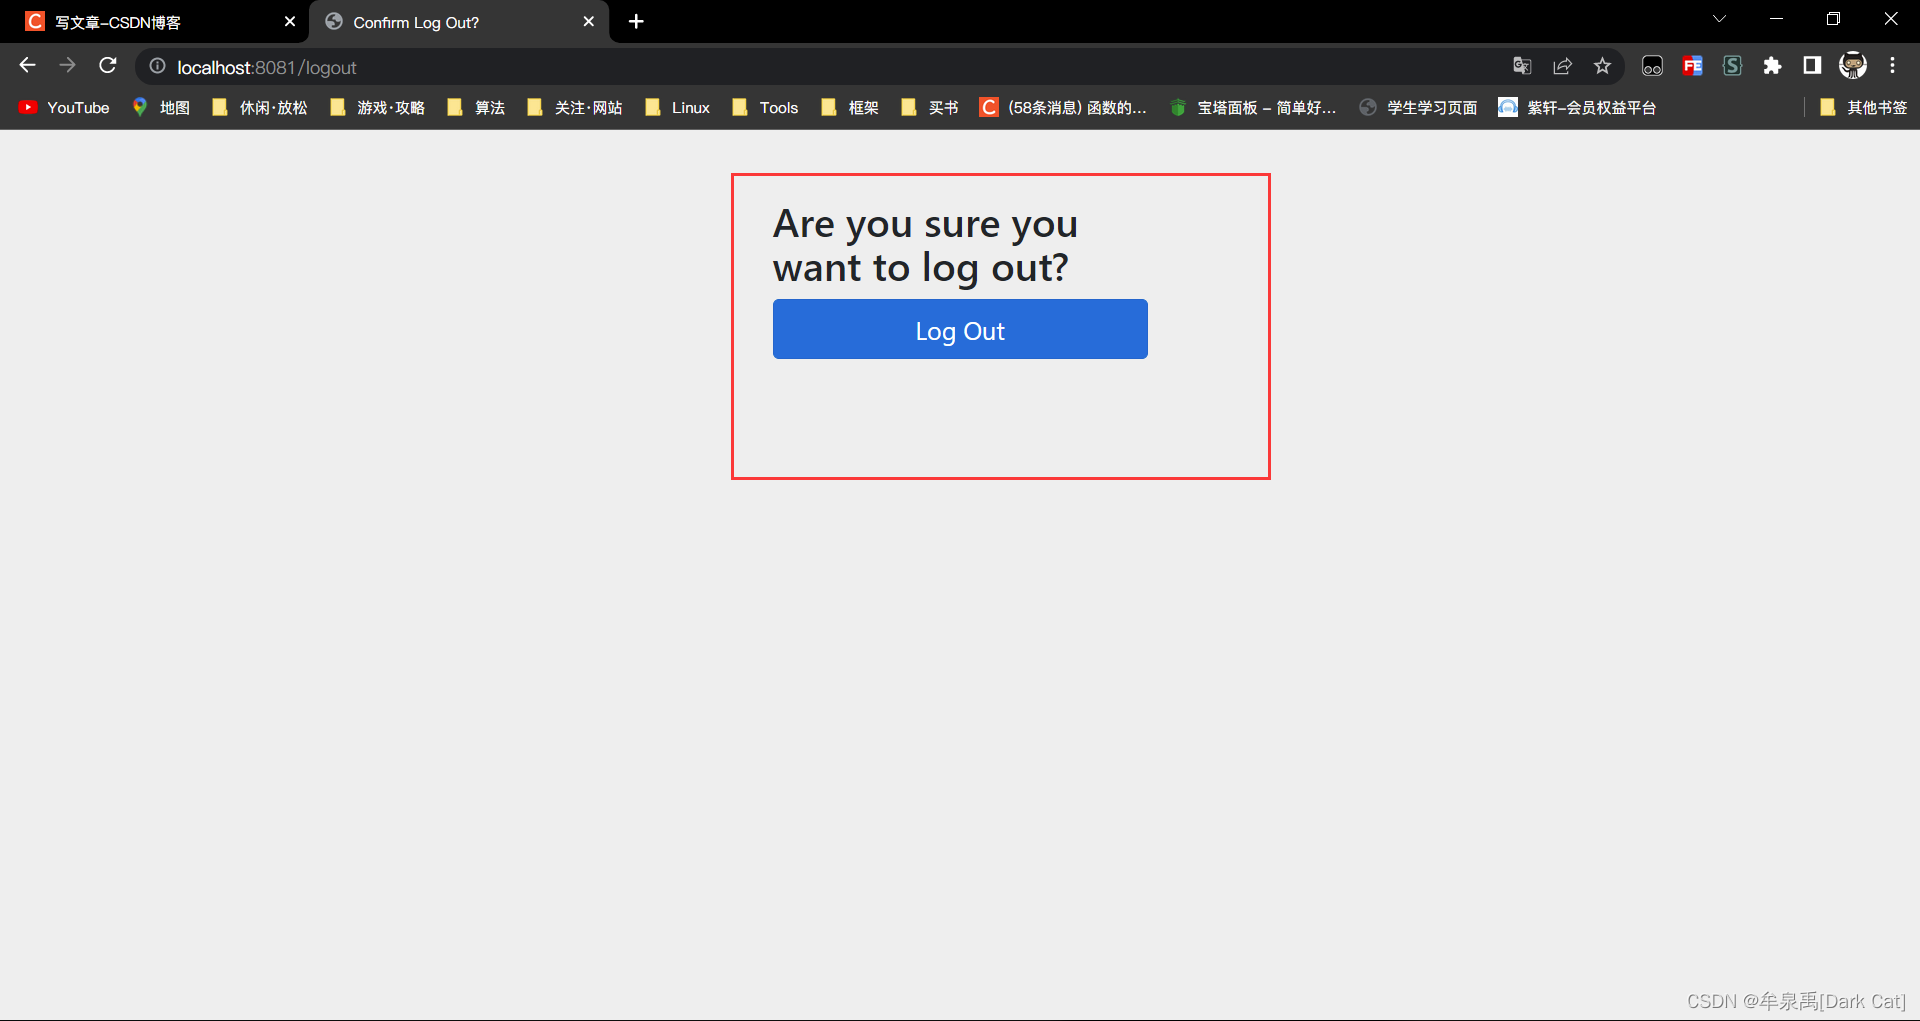
SpringSecurity 的 注销功能,默认 接收的 请求 是 \logout
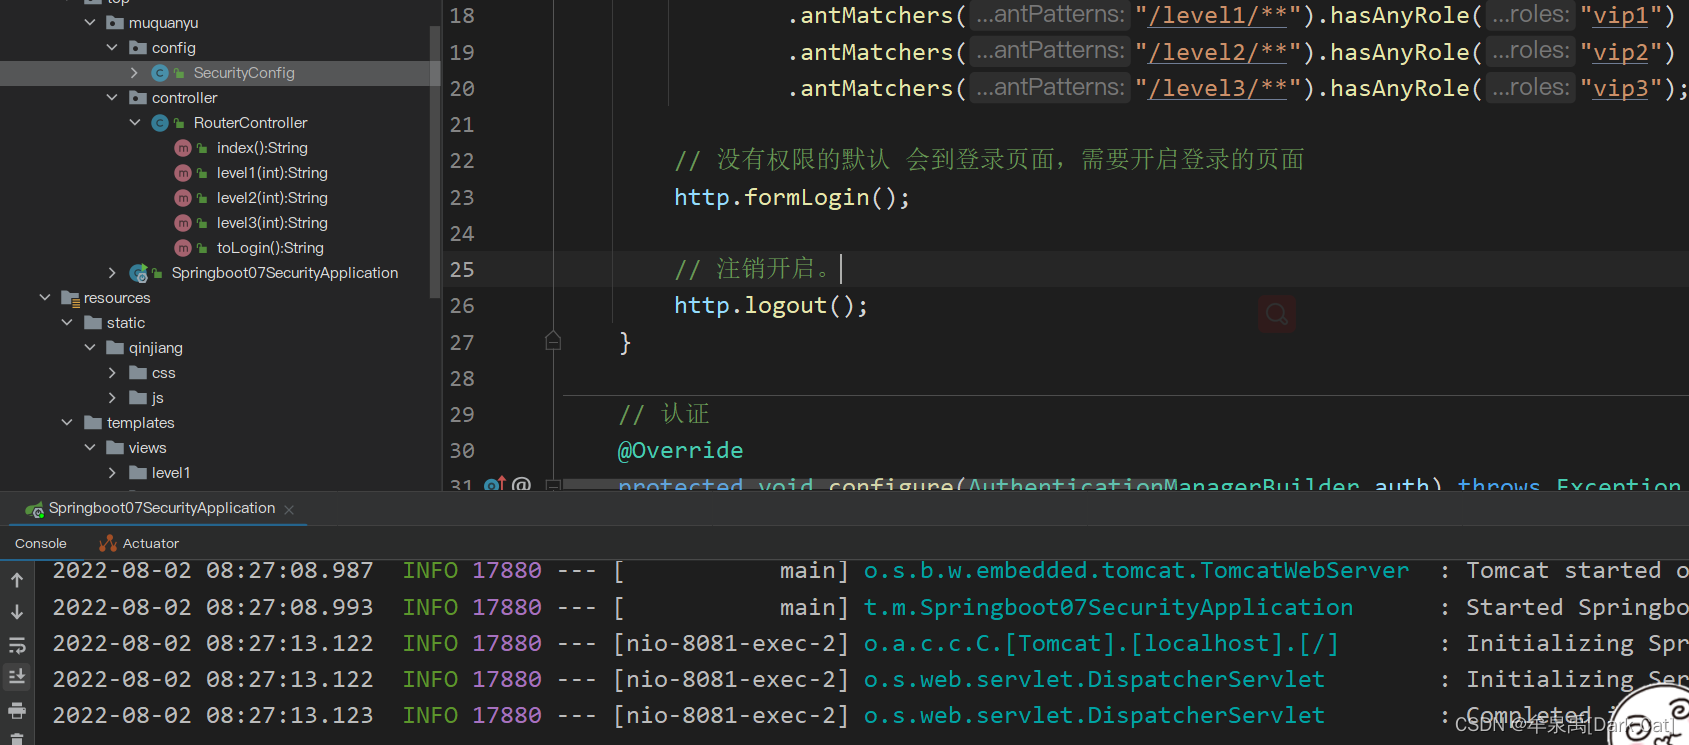
我们还可以 写 比较 完整的 logout(),详细请看它的源码
// 注销开启。
http.logout().deleteCookies("remove").invalidateHttpSession(true).logoutSuccessUrl("/");
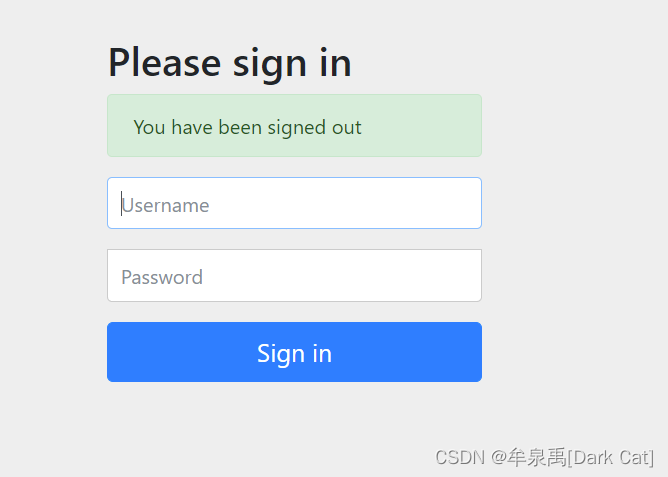
这样的话,我们 登出成功后,就可以 跳到 首页了。
- 权限控制 页面的渲染
导入 thymeleaf 和 SpringSecurity 的整合包 依赖
        <dependency>
            <groupId>org.thymeleaf.extras</groupId>
            <artifactId>thymeleaf-extras-springsecurity5</artifactId>
        </dependency>
再给 相关的页面 导入 sec 命名空间的支持
sec:authorize="hasRole('vip1')":判断 是否 有 这个角色授权,如果有 则 标签正常渲染。
sec:authorize="isAuthenticated()": 判断是否 安全登录过。
<html lang="en" xmlns:th="http://www.thymeleaf.org"
      xmlns:sec="http://www.thymeleaf.org/thymeleaf-extras-springsecurity5">
<!DOCTYPE html>
<html lang="en" xmlns:th="http://www.thymeleaf.org"
xmlns:sec="http://www.thymeleaf.org/thymeleaf-extras-springsecurity5">
<head>
<meta charset="UTF-8">
<meta name="viewport" content="width=device-width, initial-scale=1, maximum-scale=1">
<title>首页</title>
<!--semantic-ui-->
<link href="https://cdn.bootcss.com/semantic-ui/2.4.1/semantic.min.css" rel="stylesheet">
<link th:href="@{/qinjiang/css/qinstyle.css}" rel="stylesheet">
</head>
<body>
<!--主容器-->
<div class="ui container">
<div class="ui segment" id="index-header-nav" th:fragment="nav-menu">
<div class="ui secondary menu">
<a class="item" th:href="@{/index}">首页</a>
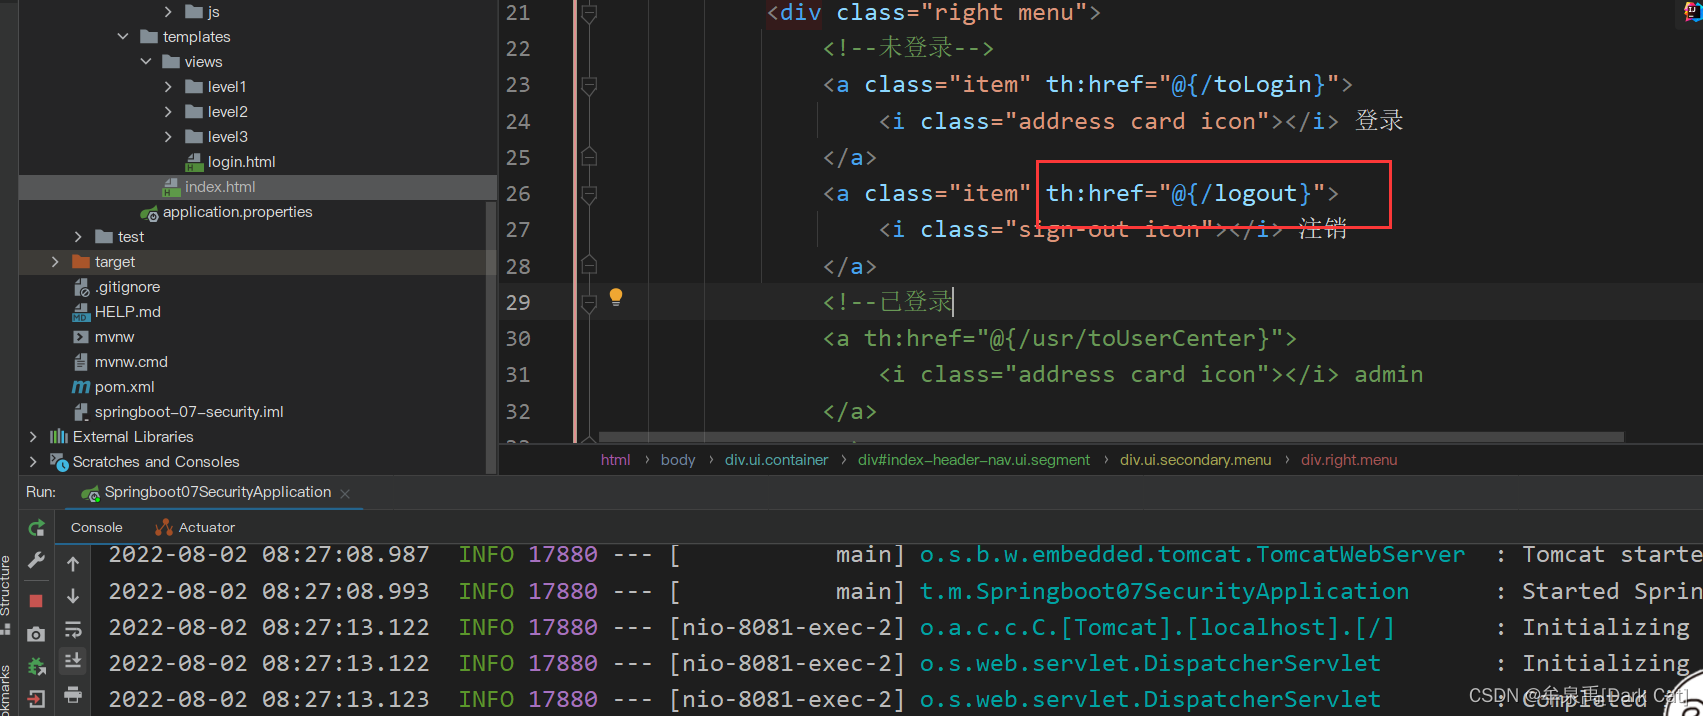
<!--登录注销-->
<div class="right menu">
<!--未登录-->
<div sec:authorize="!isAuthenticated()">
<a class="item" th:href="@{/toLogin}">
<i class="address card icon"></i> 登录
</a>
</div>
<div sec:authorize="isAuthenticated()">
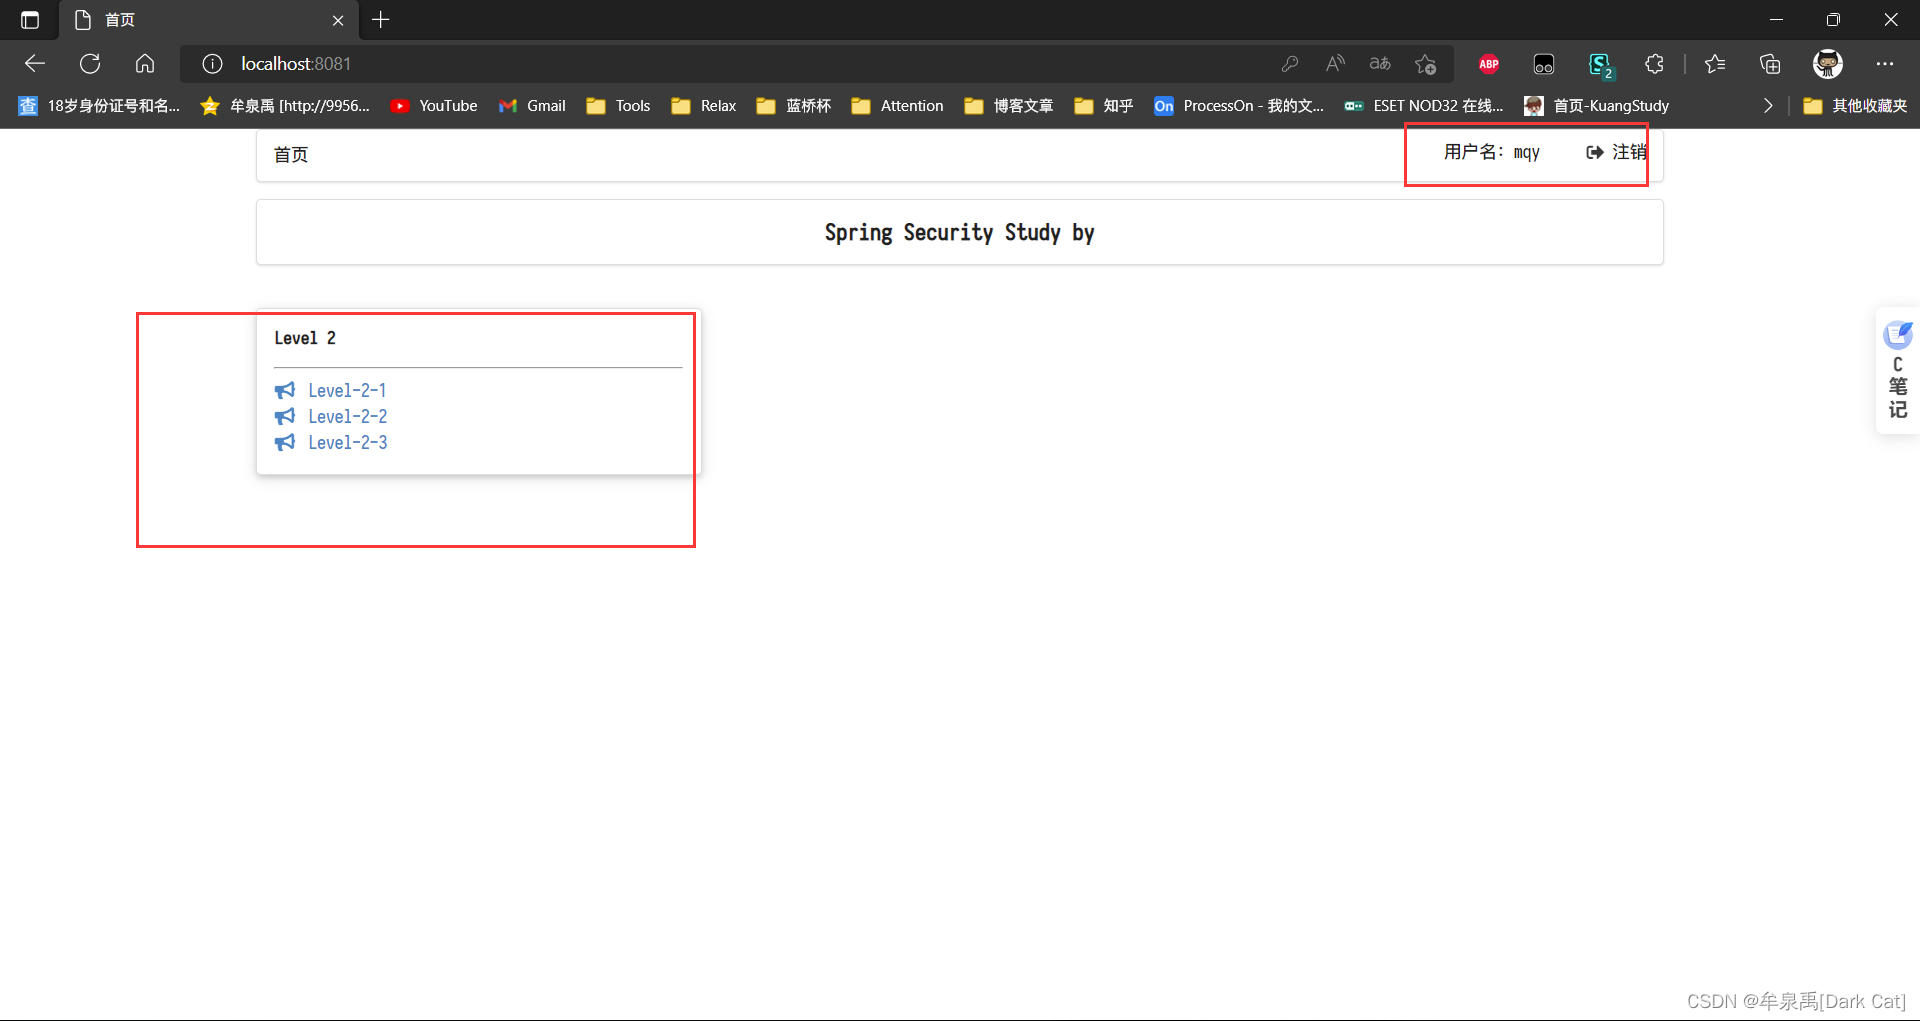
<a class="item">
用户名:<span sec:authentication="name"></span>
</a>
</div>
<div sec:authorize="isAuthenticated()">
<a class="item" th:href="@{/logout}">
<i class="sign-out icon"></i> 注销
</a>
</div>
</div>
</div>
</div>
<div class="ui segment" style="text-align: center">
<h3>Spring Security Study by </h3>
</div>
<div>
<br>
<div class="ui three column stackable grid">
<div class="column" sec:authorize="hasRole('vip1')">
<div class="ui raised segment">
<div class="ui">
<div class="content">
<h5 class="content">Level 1</h5>
<hr>
<div><a th:href="@{/level1/1}"><i class="bullhorn icon"></i> Level-1-1</a></div>
<div><a th:href="@{/level1/2}"><i class="bullhorn icon"></i> Level-1-2</a></div>
<div><a th:href="@{/level1/3}"><i class="bullhorn icon"></i> Level-1-3</a></div>
</div>
</div>
</div>
</div>
<div class="column" sec:authorize="hasRole('vip2')">
<div class="ui raised segment">
<div class="ui">
<div class="content">
<h5 class="content">Level 2</h5>
<hr>
<div><a th:href="@{/level2/1}"><i class="bullhorn icon"></i> Level-2-1</a></div>
<div><a th:href="@{/level2/2}"><i class="bullhorn icon"></i> Level-2-2</a></div>
<div><a th:href="@{/level2/3}"><i class="bullhorn icon"></i> Level-2-3</a></div>
</div>
</div>
</div>
</div>
<div class="column" sec:authorize="hasRole('vip3')">
<div class="ui raised segment">
<div class="ui">
<div class="content">
<h5 class="content">Level 3</h5>
<hr>
<div><a th:href="@{/level3/1}"><i class="bullhorn icon"></i> Level-3-1</a></div>
<div><a th:href="@{/level3/2}"><i class="bullhorn icon"></i> Level-3-2</a></div>
<div><a th:href="@{/level3/3}"><i class="bullhorn icon"></i> Level-3-3</a></div>
</div>
</div>
</div>
</div>
</div>
</div>
</div>
<script th:src="@{/qinjiang/js/jquery-3.1.1.min.js}"></script>
<script th:src="@{/qinjiang/js/semantic.min.js}"></script>
</body>
</html>
- 记住我功能 和 定制登录页
http.csrf().disable();//关闭csrf防御,有时候可能为了测试需要关闭它。
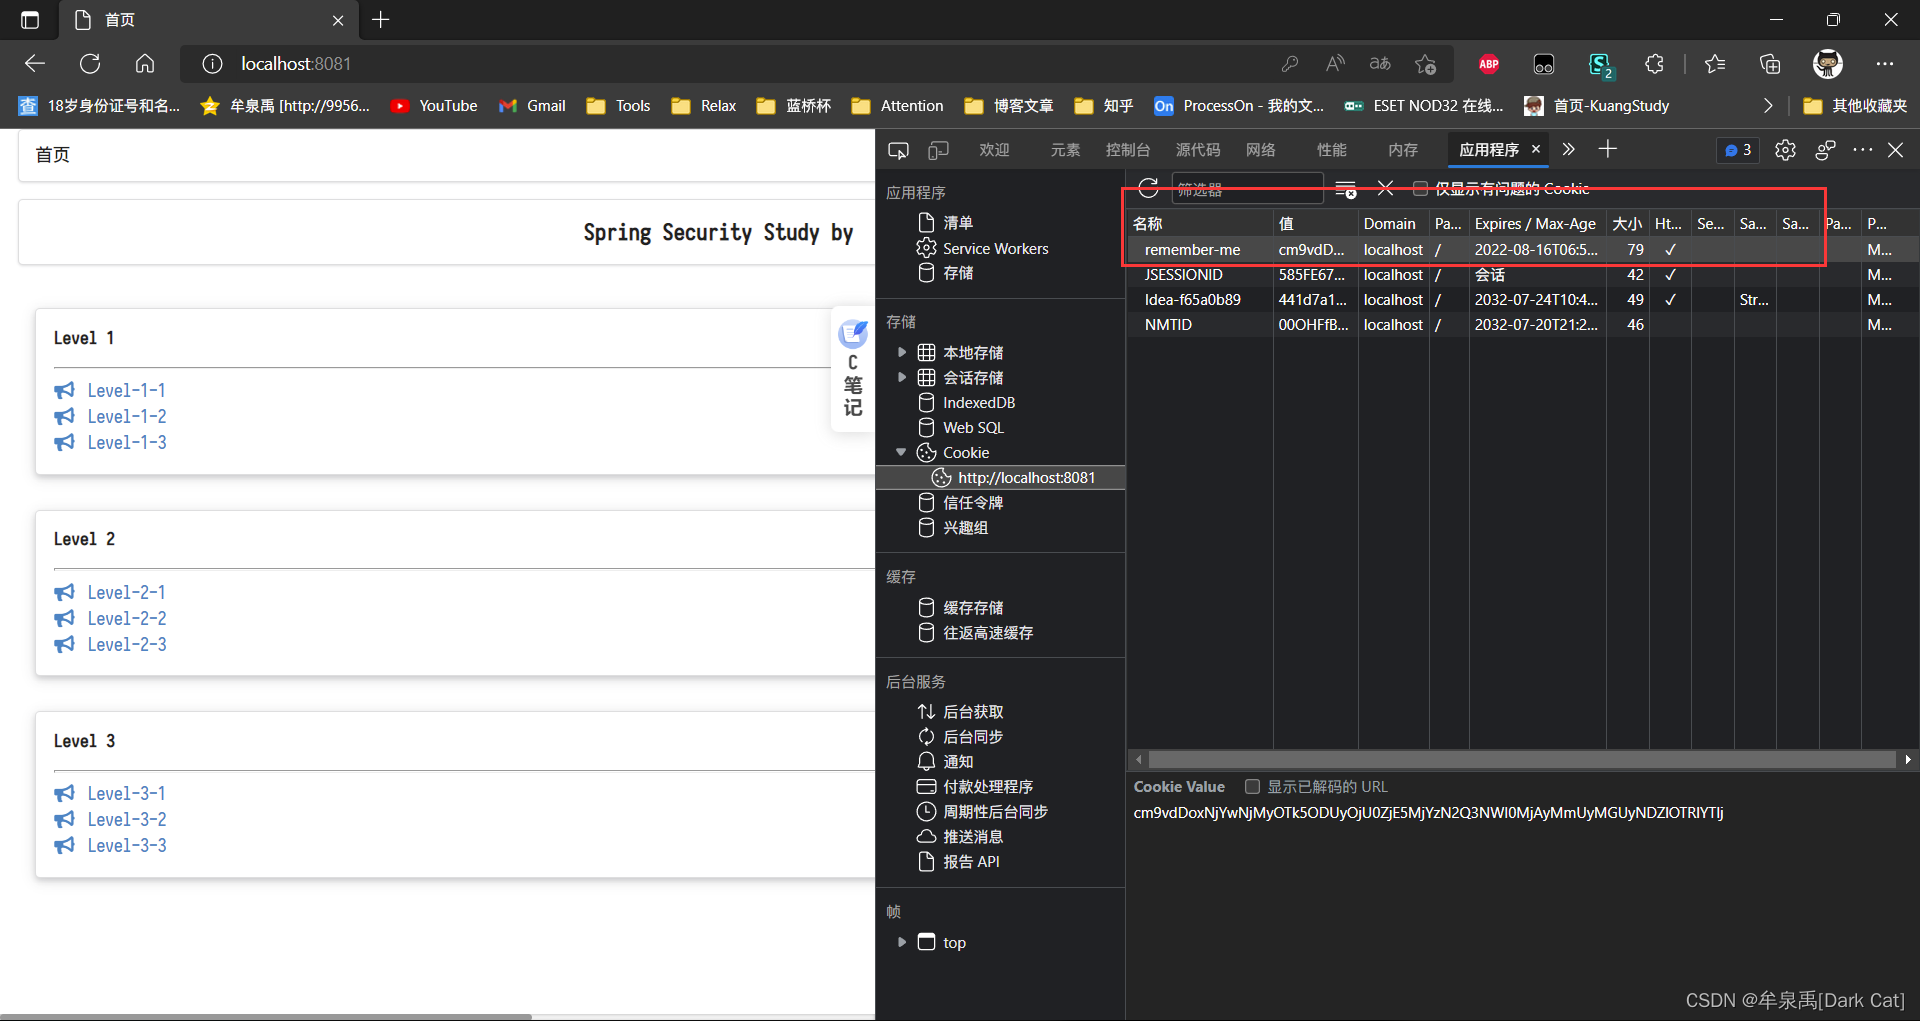
http.rememberMe() 开启 记住我功能 本质上 就是 保存了一个 cookie,默认是 保存两周。
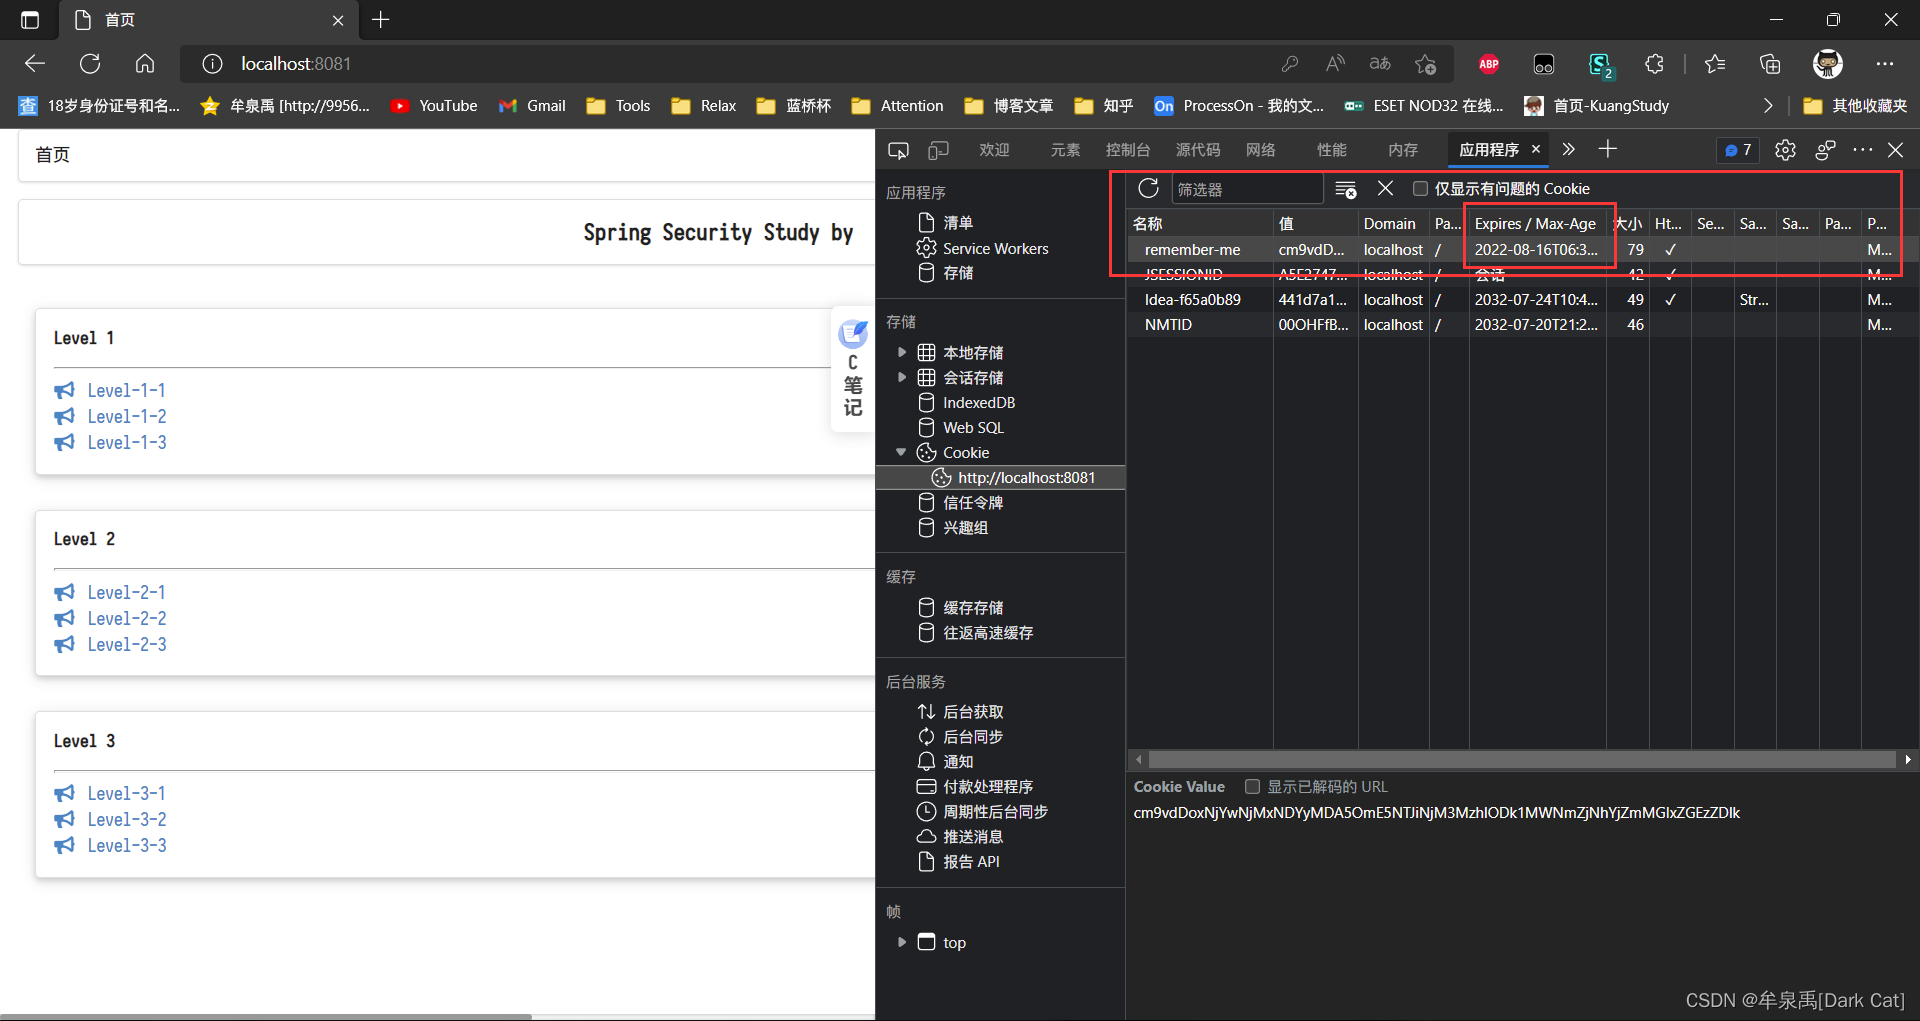
等你下次 再进入 网站的时候,默认 就 能 干掉很多 认证了。因为 我们 保存了 cookie 呀,就跟之前 自己 写 登录和认证一样。
定制 登录页面 如下:
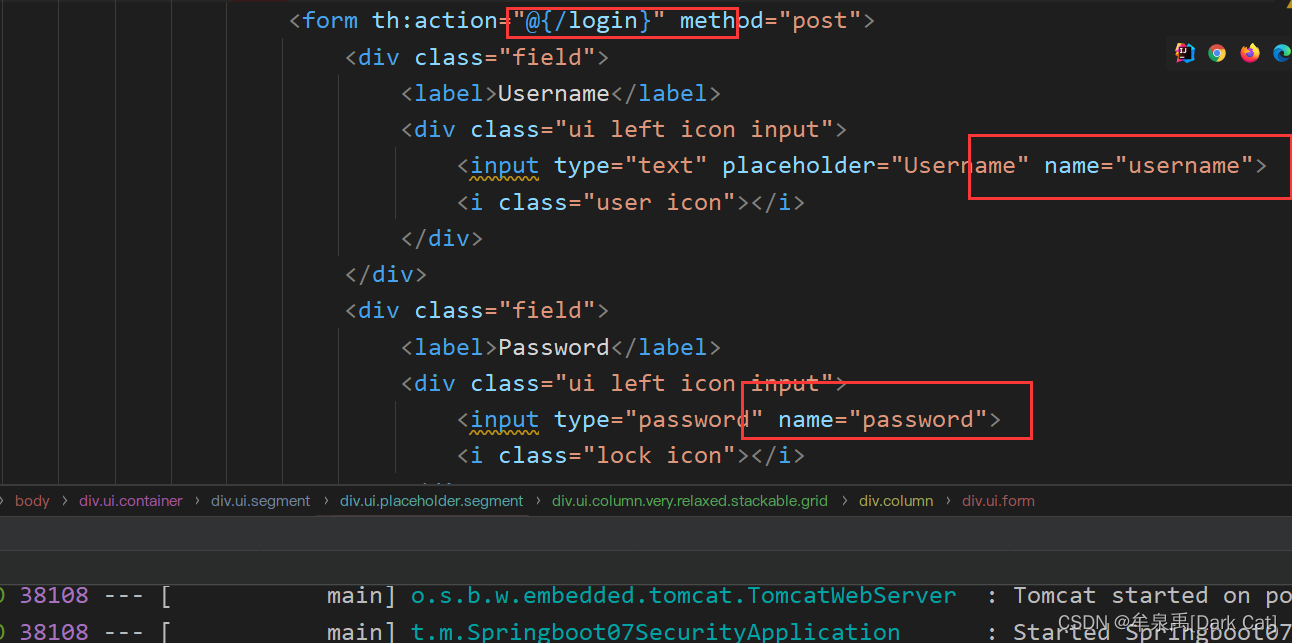
http.formLogin().loginPage("/toLogin").loginProcessingUrl("/login");
并且 我们 登录提交 走的 请求 必须是 loginProcessingUrl 提供的 url /toLogin、用户名输入框和密码输入框的name必须分别是 username 和 password 其实 不写 loginProcessingUrl 的话,默认 提供的 登录功能的 url 就跟 loginPage 提供的一致。
当然 这两个 用户名 可以不是 默认 的 username、password,是可以 自定义更改的。
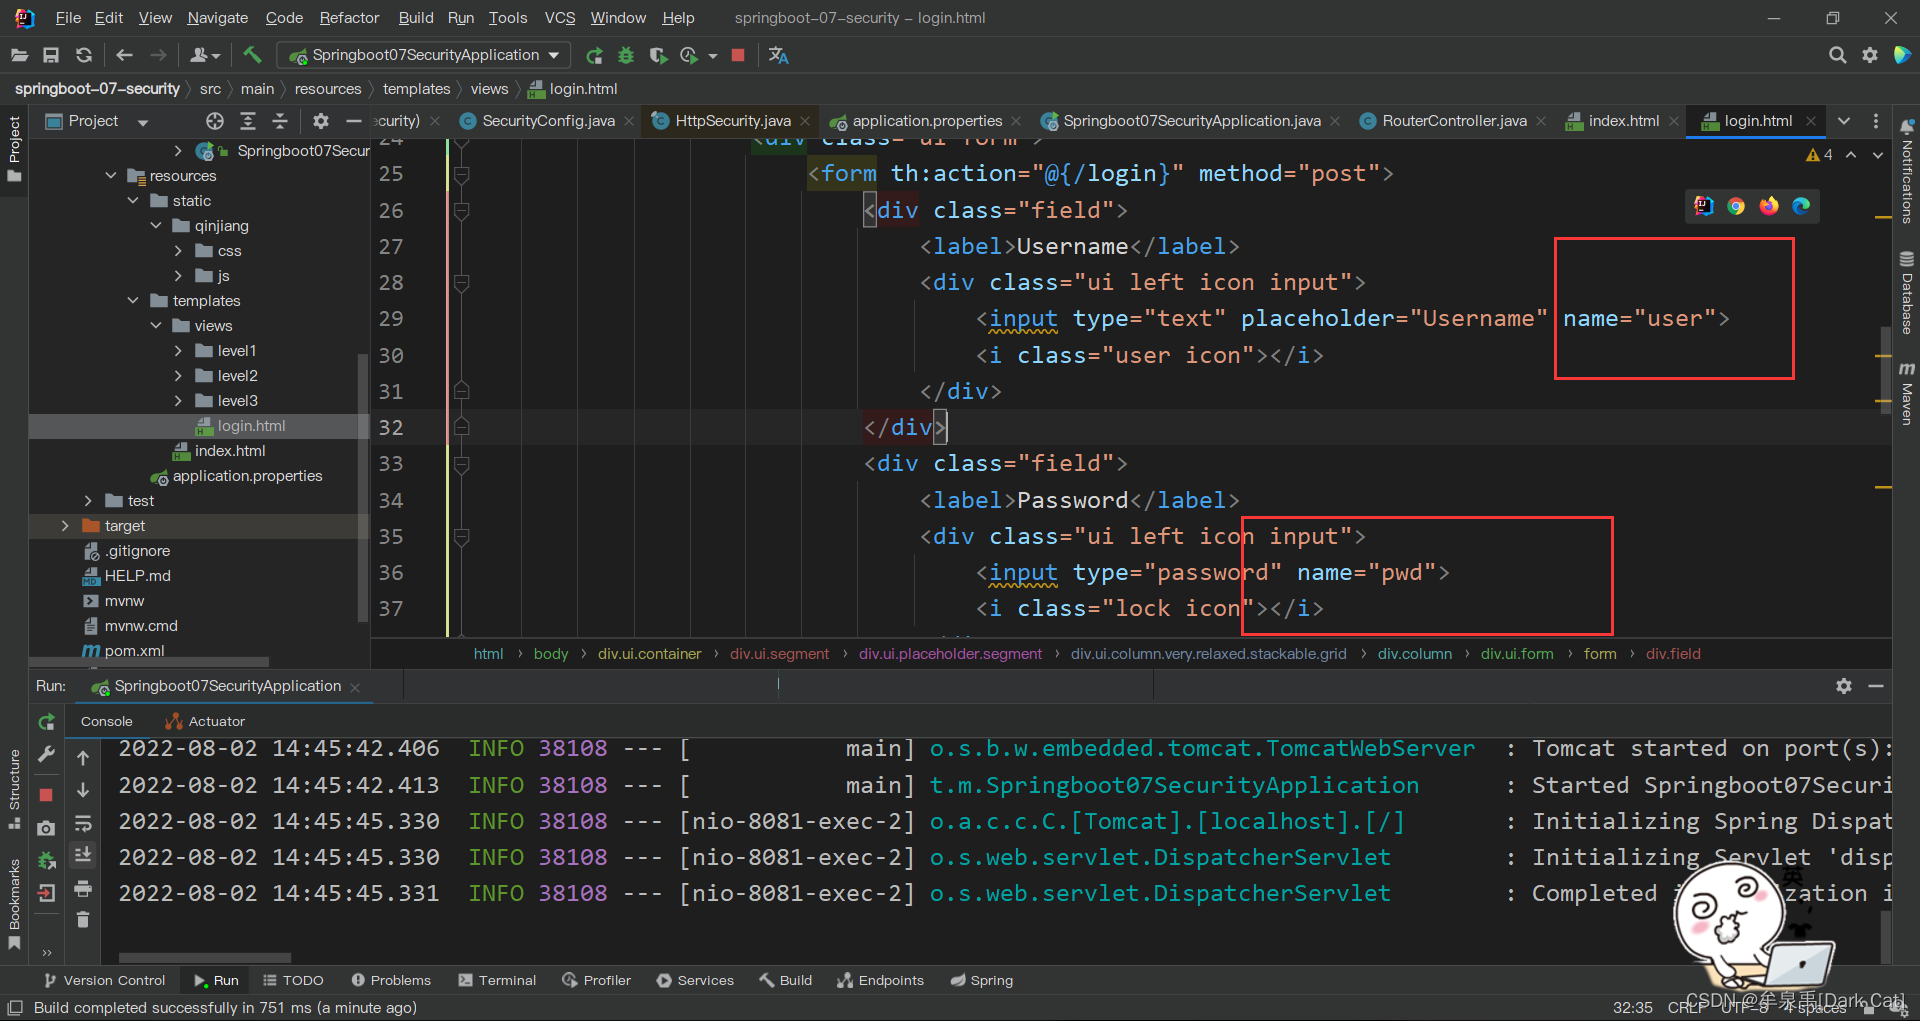
http.formLogin().loginPage("/toLogin").loginProcessingUrl("/login").usernameParameter("user").passwordParameter("pwd");
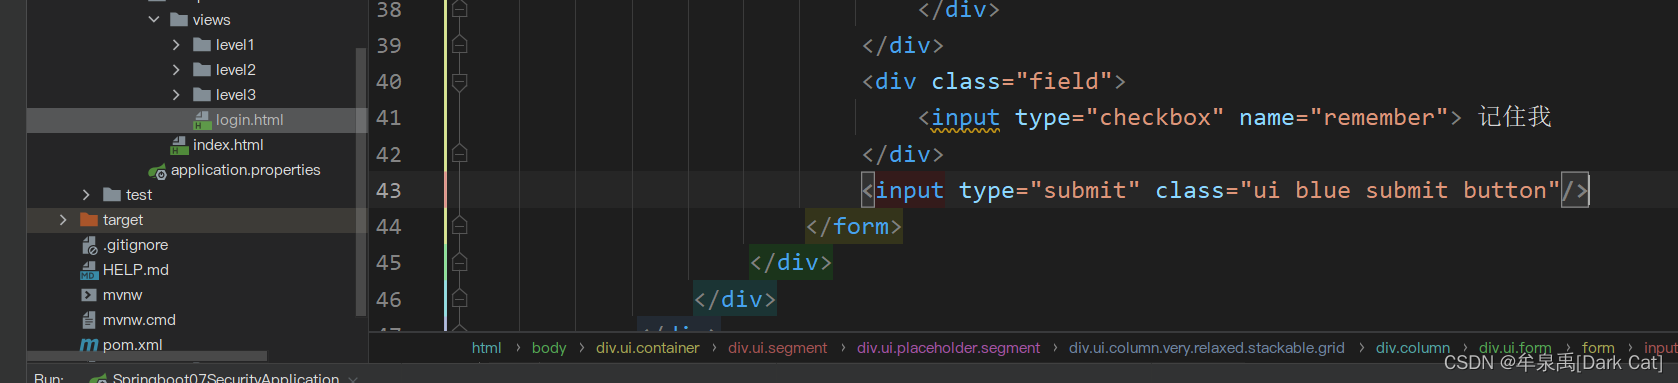
**把 记住我 绑定到 我们定制的 login 页面上 先设定一下 页面上 哪个 checkbox 是我们 要绑定的。
// 开启 记住我
http.rememberMe().rememberMeParameter("remember");
比如我们设定了 remember,那么就直接在 你的页面上 加一个 name = remember 的 checkbox 即可。 默认是 remember-me,也就是说 如果我们 不给定一个 Parameter 的话,你写一个 name = remember-me 的 checkbox 也能绑定成功。
15.2 小结
一般情况下,WEB 安全 就 做 三项:授权 认证 权限控制
授权:就是 给予 一些 网页授权信息。只有携带这些授权信息的才能访问。
认证:就类似于 拦截器跳转登录页面,你如果没有携带相关授权信息,我们就会先让你做 授权认证,认证完事后,才能 有授权信息。但是有些时候其实你认证完了,也没准不给你携带授权信息。
权限控制:携带不同授权信息的角色,看到的页面 是不一样的。这就是权限控制页面渲染的效果。拥有的功能项也是不同的。


 6304
6304


 被折叠的 条评论
为什么被折叠?
被折叠的 条评论
为什么被折叠?
 到【灌水乐园】发言


