


文章目录
1.读取图片
img = cv2.imread('images/5.png')
2.图片预处理
2.1 原图转换为灰度图
gray = cv2.cvtColor(img,cv2.COLOR_BGR2GRAY) # COLOR_BGR2RGB
2.2 高斯滤波处理,去除噪声点
blurred = cv2.GaussianBlur(gray, (3,3), 0)
作用:去除图片噪声点,图像预处理一般常用。
GaussianBlur函数:
void GaussianBlur(InputArray src, OutputArray dst, Size ksize, double sigmaX, double sigmaY=0, int borderType=BORDER_DEFAULT )
InputArray src:输入的图像
OutputArray dst:输出图像
Size ksize:高斯卷积核的大小,是奇数,可以是(3,3),(5,5),(9,9)
double sigmaX, double sigmaY=0, :表示x和y方向的方差,如果y=0则y方向的方差与x相等
int borderType=BORDER_DEFAULT :边界的处理方式,一般默认
2.3 增强亮度
#增强亮度
def imgBrightness(img1, c, b):
    rows, cols= img1.shape
    blank = np.zeros([rows, cols], img1.dtype)
    # addWeighted 实现两副相同大小的图像融合相加
    rst = cv2.addWeighted(img1, c, blank, 1-c, b)
    return rst
blurred = imgBrightness(blurred, 1.5, 3)
2.4 自适应二值化
blurred = cv2.adaptiveThreshold(blurred, 255, cv2.ADAPTIVE_THRESH_MEAN_C, cv2.THRESH_BINARY, 51, 2)
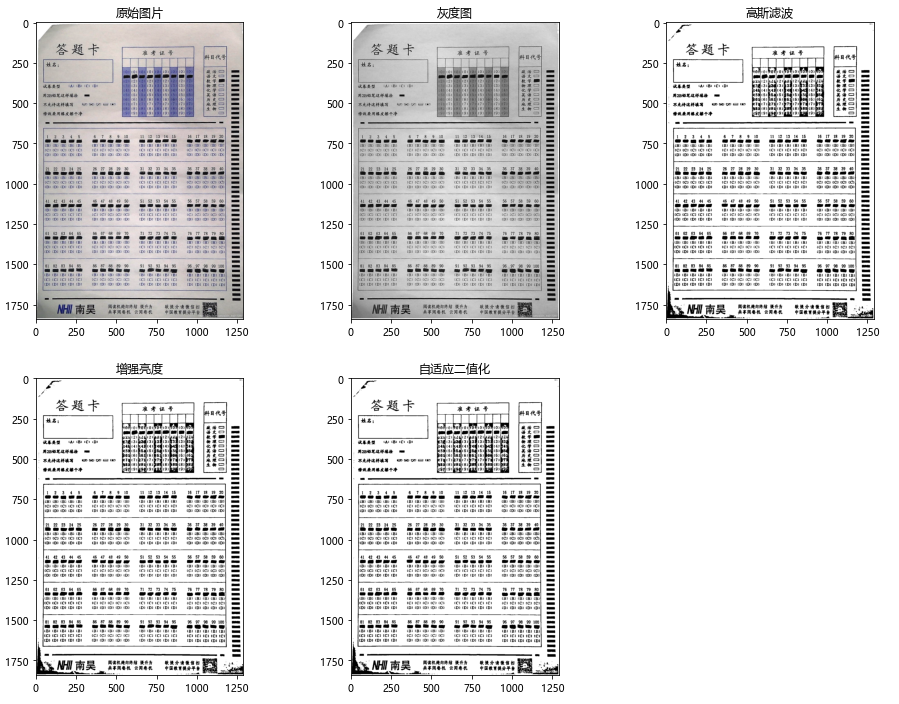
2.5 图片可视化
# 显示原来的和缩放后的图像
# Create a figure
fig = plt.figure(figsize=(16, 12))

# Subplot for original image
a=fig.add_subplot(2,3,1)
imgplot = plt.imshow(img)
a.set_title('原始图片')

# Subplot for resized image
a=fig.add_subplot(2,3,2)
imgplot = plt.imshow(gray, cmap='gray')
a.set_title('灰度图')

# Subplot for resized image
a=fig.add_subplot(2,3,3)
imgplot = plt.imshow(blurred, cmap='gray')
a.set_title('高斯滤波')

# Subplot for resized image
a=fig.add_subplot(2,3,4)
imgplot = plt.imshow(blurred, cmap='gray')
a.set_title('增强亮度')

# Subplot for resized image
a=fig.add_subplot(2,3,5)
imgplot = plt.imshow(blurred, cmap='gray')
a.set_title('自适应二值化')

plt.show()
3. 添加边框
3.1 使用copyMakeBorder添加边框
blurred = cv2.copyMakeBorder(blurred, 5, 5, 5, 5, cv2.BORDER_CONSTANT, value=(255,255,255))
“”"
为图像设置边框(填充)
如果要在图像周围创建边框(如相框),则可以使用cv.copyMakeBorder()。
但是它在卷积运算,零填充等方面有更多应用。此函数采用以下参数:
cv2.copyMakeBorder()
参数:
img:图像对象
top,bottom,left,right: 上下左右边界宽度,单位为像素值
borderType:
cv2.BORDER_CONSTANT, 带颜色的边界,需要传入另外一个颜色值
cv2.BORDER_REFLECT, 边缘元素的镜像反射做为边界
cv2.BORDER_REFLECT_101/cv2.BORDER_DEFAULT
cv2.BORDER_REPLICATE, 边缘元素的复制做为边界
CV2.BORDER_WRAP
value: borderType为cv2.BORDER_CONSTANT时,传入的边界颜色值,如[0,255,0]
“”"
3.2 可视化图片查看效果
fig = plt.figure(figsize=(16, 12))
plt.imshow(blurred,cmap='gray')
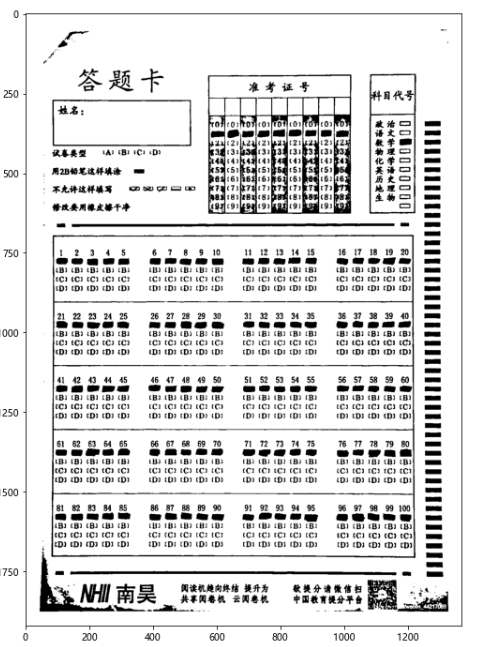
3.3 手动截取答题卡区域
blurred_max = cv2.copyMakeBorder(blurred.copy(), 5, 5, 280, 280, cv2.BORDER_CONSTANT, value=(255,255,255))
fig = plt.figure(figsize=(8, 8))
plt.imshow(blurred_max, cmap='gray')

fig = plt.figure(figsize=(8, 8))
plt.imshow(blurred[160:600, 560:1000], cmap='gray')


 2164
2164


 被折叠的 条评论
为什么被折叠?
被折叠的 条评论
为什么被折叠?
 到【灌水乐园】发言


