1. SpringBoot概念
SpringBoot提供了一种快速使用Spring的方式,基于约定优于配置的思想,可以让开发人员不必在配置与逻辑业务之间进行思维的切换,全身心的投入到逻辑业务的代码编写中,从而大大提高了开发的效率,一定程度上缩短了项目周期。 2014 年 4 月,Spring Boot 1.0.0 发布。Spring的顶级项目之一(https://spring.io)。
2. Spring 缺点
- 配置繁琐
虽然Spring的组件代码是轻量级的,但它的配置却是重量级的。一开始,Spring用XML配置,而且是很多XML配置。Spring 2.5引入了基于注解的组件扫描,这消除了大量针对应用程序自身组件的显式XML配置。Spring 3.0引入了基于Java的配置,这是一种类型安全的可重构配置方式,可以代替XML。所有这些配置都代表了开发时的损耗。因为在思考Spring特性配置和解决业务问题之间需要进行思维切换,所以编写配置挤占了编写应用程序逻辑的时间。和所有框架一样,Spring实用,但它要求的回报也不少。
- 依赖繁琐
项目的依赖管理也是一件耗时耗力的事情。在环境搭建时,需要分析要导入哪些库的坐标,而且还需要分析导入与之有依赖关系的其他库的坐标,一旦选错了依赖的版本,随之而来的不兼容问题就会严重阻碍项目的开发进度
3. SpringBoot功能
- 自动配置
Spring Boot的自动配置是一个运行时(更准确地说,是应用程序启动时)的过程,考虑了众多因素,才决定Spring配置应该用哪个,不该用哪个。该过程是SpringBoot自动完成的。
起步依赖
起步依赖本质上是一个Maven项目对象模型(Project Object Model,POM),定义了对其他库的传递依赖,这些东西加在一起即支持某项功能。简单的说,起步依赖就是将具备某种功能的坐标打包到一起,并提供一些默认的功能。
- 辅助功能
提供了一些大型项目中常见的非功能性特性,如嵌入式服务器、安全、指标,健康检测、外部配置等。
4. SpringBoot起步依赖原理分析
在spring-boot-starter-parent中定义了各种技术的版本信息,组合了一套最优搭配的技术版本。

打开spring-boot-dependencies—该父工程中主要用于版本控制


在各种starter中,定义了完成该功能需要的坐标合集,其中大部分版本信息来自于父工程,下面以spring-boot-starter-web为例子


引入springBoot-start-web之后,会引入web相关的所有jar
并且我们的工程继承parent,引入starter后,通过依赖传递,就可以简单方便获得需要的jar包,并且不会存在版本冲突等问题
总结:在自己的pom文件中引入spring-boot-starter-parent,在该父工程的pom文件中又引入了一个父工程spring-boot-dependencies,该父工程中主要用于各种start的版本控制。如:
 <dependency>
        <groupId>org.apache.activemq</groupId>
        <artifactId>activemq-amqp</artifactId>
        <version>${activemq.version}</version>
</dependency>
在pom文件中引入的各种start,主要是用于引入该start所需要的所有jar,并且对该start中的所有依赖做了版本控制,也就是说spring-boot-starter-parent用于start的版本控制,而start用于功能所需要的jar以及各个jar的版本控制
5.配置文件
SpringBoot是基于约定的,所以很多配置都有默认值,但如果想使用自己的配置替换默认配置的话,就可以使用 application.properties或者application.yml(application.yaml)进行配置。
properties:
server.port=8080
yaml:
server:
port: 8080
总结:
SpringBoot提供了2种配置文件类型:properteis和yml/yaml默认配置文件名称:application、
在同一级目录下优先级为:properties > yml > yaml
6. yaml
6.1 yaml定义
yaml:YAML全称是 YAML Ain’t Markup Language 。YAML是一种直观的能够被电脑识别的的数据数据序列化格式,并且容易被人类阅读,容易和脚本语言交互的,可以被支持YAML库的不同的编程语言程序导入,比如: C/C++, Ruby, Python, Java, Perl, C#, PHP等。YML文件是以数据为核心的,比传统的xml方式更加简洁。 YAML文件的扩展名可以使用.yml或者.yaml。
对比:
server.port=8080
server.address=127.0.0.1
<server>
    <port>8080</port>
    <address>127.0.0.1</address>
</server>
server:
port: 8080
address: 127.0.0.1
看出:对比其他两种方式,yaml更简洁,以数据为核心。
6.2 yaml基本语法
大小写敏感
数据值前边必须有空格,作为分隔符
使用缩进表示层级关系
缩进时不允许使用Tab键,只允许使用空格(各个系统 Tab对应的 空格数目可能不同,导致层次混乱)。
缩进的空格数目不重要,只要相同层级的元素左侧对齐即可#表示注释,从这个字符一直到行尾,都会被解析器忽略。
6.3 yaml数据格式
对象(map)
键值对的集合
person:
name: zhangsan
行内写法
person: {name: zhangsan}
数组
一组按次序排列的值
address:
  - beijing
  - shanghai
行内写法
address: [beijing,shanghai]
其他写法
address:
  zhangsan,
  lisi,
  wangwu
纯量:单个的,不可再分的值
msg1: 'hello \n world' # 单引忽略转义字符
msg2: "hello \n world" # 双引识别转义字符
6.4 yaml参数引用
name: lisi
person:
name: ${name} # 引用上边定义的name值
6.5 读取配置文件内容
先预先准备好测试的ymal文件:
name: xpp

person:
  name: ${name}
  age: 23
  address:

   - benjing
     - shanghai

address1:
  - benjing
  - shanghai

address2:
  zhangsan,
  lisi,
  wangwu

msg1: 'hello \n springboot'
msg2: "hello \n springboot"
6.5.1 @Value
@Value("${name}")
private String name;
@Value("${person.name}")
private String name1;
@Value(("${address1[0]}"))
private String address1;
@Value("${address2}")
private String[] address2;
@Value("${msg1}")
private String msg1;
@Value("${msg2}")
private String msg2;

@RequestMapping("/hello2")
public String hello2(){
    System.out.println(name);
    System.out.println(name1);
    System.out.println(address1);
    System.out.println(msg1);
    System.out.println(msg2);
    System.out.println(Arrays.toString(address2));
}
输出结果:
xpp
xpp
benjing
hello \n springboot
hello
springboot
[zhangsan, lisi, wangwu]
注意:数组不能通过@Value来获取全部
6.5.2 Environment
@Autowired
private Environment env;

@RequestMapping("/hello2")
public String hello2(){
    System.out.println(env.getProperty("name"));
    System.out.println(env.getProperty("person.age"));
    System.out.println(env.getProperty("address[0]"));
}
/**输出:
xpp
23
benjing
**/
6.5.3 @ConfigurationProperties
准备一个Person类:
@Component//表示这个类被spring识别了
@ConfigurationProperties(prefix = "person")//绑定前缀
//下面四个注解为LomBok提供的,简化开发,自动帮我们写好get,set,有参,无参和toString方法
@Data
@NoArgsConstructor
@AllArgsConstructor
@ToString
public class Person {
    private String name;
    private Integer age;
    private String[] address;
}
@Autowired
private Person person;

@RequestMapping("/hello2")
public String hello2(){
    System.out.println(person);
    return "Hello SpringBoot !";
}
输出结果:
Person(name=xpp, age=23, address=[benjing, shanghai])
7. profile动态切换配置文件
我们在开发Spring Boot应用时,通常同一套程序会被安装到不同环境,比如:开发、测试、生产等。其中数据库地址、服务器端口等等配置都不同,如果每次打包时,都要修改配置文件,那么非常麻烦。profile功能就是来进行动态配置切换的。
profile配置方式
多profile文件方式
提供多个配置文件,每一个代表一种环境:
- application-dev.properties/yml 开发环境
- application-test.properties/yml 测试环境
- application-pro.properties/yml 生产环境
注意!:格式必须为application-xxx.properties/yml

在主配置文件application.properties选择用哪种环境:
格式:spring.profiles.active=xxx
spring.profiles.active= dev
yaml多文档方式
也就是将多环境的配置都写在同一个配置文件中用—来划分yaml文件区域
---

server:
  port: 8081
spring:
  config:
    activate:
      on-profile: dev
---
server:
  port: 8082
spring:
  config:
    activate:
      on-profile: test
---
server:
  port: 8083
spring:
  config:
    activate:
      on-profile: pro
---
spring:
  profiles:
    active: test
profile激活方式
(1)配置文件
即上面所讲的:在配置文件中配置
spring.profiles.active=dev
(2)虚拟机
在VM options 指定:-Dspring.profiles.active=xxx


(3)命令行参数
直接在Program arguments配置
java –jar xxx.jar --spring.profiles.active=xxx

②打包方式配置

在jar包所在文件夹下输入java –jar xxx.jar启动SpringBoot项目
输入java –jar xxx.jar --spring.profiles.active=xxx即可更改环境
内置配置加载顺序
Springboot程序启动时,会从以下位置加载配置文件:
- file:./config/:当前项目下的/config目录下
- file:./ :当前项目的根目录
- classpath:/config/:classpath的/config目录
- classpath:/ :classpath的根目录(之前我们用的就是这种)
加载顺序为上文的排列顺序,高优先级配置的属性会生效
SpringBoo自动配置
8. Condition
Condition 是在Spring 4.0 增加的条件判断功能,通过这个功能可以实现选择性的创建 Bean 操作。
思考:
SpringBoot是如何知道要创建哪个Bean的?比如SpringBoot是如何知道要创建RedisTemplate的
8.1引出问题
看一个栗子:
当我们没导入redis-start时,会报错
@SpringBootApplication
public class SpringbootDemo01Application {
public static void main(String[] args) {
    //启动SpringBoot应用,返回Spring的IOC容器
    ConfigurableApplicationContext run = SpringApplication.run(SpringbootDemo01Application.class, args);
    //获取Bean,redisTemplate
    Object redisTemplate = run.getBean("redisTemplate");
    System.out.println(redisTemplate);

}
}
报错信息:
Caused by: org.springframework.beans.factory.NoSuchBeanDefinitionException: No bean named 'redisTemplate' available
当导入redis起步依赖后
<dependency>
    <groupId>org.springframework.boot</groupId>
    <artifactId>spring-boot-starter-data-redis</artifactId>
</dependency>
控制台打印
org.springframework.data.redis.core.RedisTemplate@b7ff25
问题:
SpringBoot是怎么知道我们导入redis坐标的呢?
8.2案例
需求:
在 Spring 的 IOC 容器中有一个 User 的 Bean,现要求:
- 导入Jedis坐标后,加载该Bean,没导入,则不加载。
- 将类的判断定义为动态的。判断哪个字节码文件存在可以动态指定。
创建User类
@Data
public class User implements Serializable {
    private Long id;
    //姓名
    private String name;
}
创建UserConfig
该类中主要是通过user方法创建Bean,在改法上加了 @Conditional() 注解,而该注解的作用就是判断是否需要创建该Bean
@Configuration
public class UserConfig {
    //条件
    @Conditional(MyCondition.class)
    @Bean
    public User user(){
        return new User();
    }
}
通过查看该注解的源码发现,需要传入一个继承了Condition的类,而该类中需重新mathes方法,该方法返回了一个boolean的值,通俗来说就是如果返回的是true则创建该bean,如果为false则不创建该bean


创建MyCondition类并实现Condition接口
该类的matches方法中,通过类路径判Jedis是否已加载,如果能获取到该bean,则返回true,否则返回false
public class MyCondition implements Condition {
    /**
     * 条件表达式
     * @param conditionContext 条件上下文
     * @param annotatedTypeMetadata  带注解的类型元数据
     * @return
     * 1.需求:导入指定坐标后创建Bean
     * 思路:判断指定坐标文件是否存在
     */
    @Override
    public boolean matches(ConditionContext conditionContext, AnnotatedTypeMetadata annotatedTypeMetadata) {
        boolean flag = true;
        try {
            Class.forName("redis.clients.jedis.Jedis");
        } catch (ClassNotFoundException e) {
            flag = false;
            throw new RuntimeException(e);
        }
        return flag;
    }
}
在启动类中测试
在项目的pom文件中分别加入和注视掉Jedis依赖进行测试
public static void main(String[] args) {
     ConfigurableApplicationContext context = SpringApplication.run(ReggieApplication.class, args);
     log.info("项目启动成功...");
     System.out.println(context.getBean("user"));
}
在springBoot的源码中体现:
在这里插入图片描述
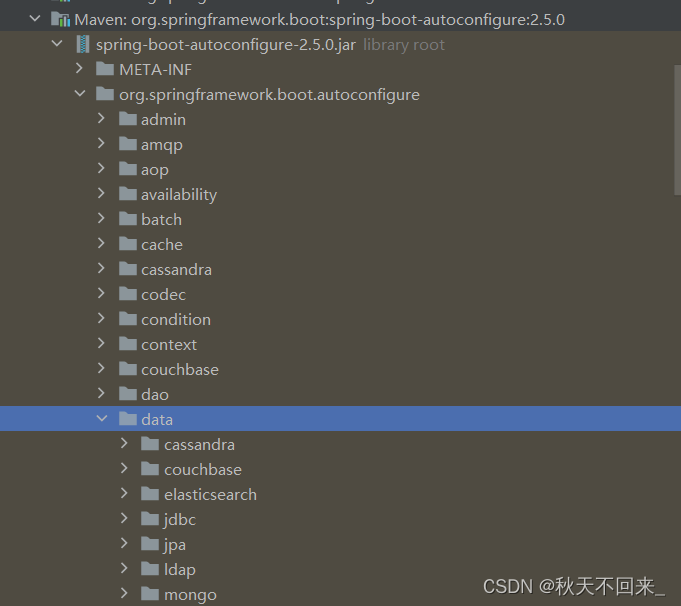
在org.springframework.boot.autoconfigure.data.jdbc包下,当存在NamedParameterJdbcOperations.class, PlatformTransactionManager.class这两个字节码文件则创建该Bean。有兴趣可以查看源码,逻辑类似

9. 常用条件注解:
在这里插入图片描述
springBoot的自动配置包:

ConditionalOnProperty:判断配置文件中是否有对应属性和值才初始化Bean
/**
* 当配置文件中存在键为name,值为zh
angsan的键值对的时候才创建该Bean
**/
@Bean
@ConditionalOnProperty(name = "name",havingValue = "zhangsan")
public User user1(){
return new User();
}
ConditionalOnClass:判断环境中是否有对应字节码文件才初始化Bean
ConditionalOnMissingBean:判断环境中没有对应Bean才初始化Bean
10. 切换内置web服务器
SpringBoot的web环境中默认使用tomcat作为内置服务器,其实SpringBoot提供了4中内置服务器供我们选择,我们可 以很方便的进行切换。

如果是web项目一般会引入spring-boot-starter-web这个依赖,而这个依赖中默认会引入spring-boot-starter-tomcat
如果要使用其他的服务器:
首先需要在spring-boot-starter-web这个依赖中排除tomacat,然后引入其他服务器的依赖
<dependency>
    <groupId>org.springframework.boot</groupId>
    <artifactId>spring-boot-starter-web</artifactId>
    <!--排除tomcat依赖-->
    <exclusions>
        <exclusion>
            <artifactId>spring-boot-starter-tomcat</artifactId>
            <groupId>org.springframework.boot</groupId>
        </exclusion>
    </exclusions>
</dependency>
<!--引入相应服务器的依赖-->
<dependency>
    <artifactId>spring-boot-starter-jetty</artifactId>
    <groupId>org.springframework.boot</groupId>
</dependency>
11. @Enable*注解
SpringBoot中提供了很多Enable 开头的注解。比如:@EnableTransactionManagement,@EnableAsync。这些注解都是用于动态启用某些功能的。而其底层原理是使用@Import注 解导入一些配置类,实现Bean的动态加载.
提问:SpringBoot 工程是否可以直接获取jar包中定义的Bean?
答:不可以
案例:两个子模块,①子模块要得到②子模块的User类的bean(这里用编号表示)
<dependency>
    <groupId>com.itheima</groupId>
    <artifactId>springboot-embal</artifactId>
    <version>0.0.1-SNAPSHOT</version>
</dependency>
①的引导类
/**
 * @ComponentScan扫描范围:当前引导类所在包及其子包
 * 1.使用@ComponentScan扫描com.itheima.springbooyembal包
 * 2.可以使用@Import注解,加载类,这些类都会被Spring创建,并放入IOC容器。
 * 3.可以对@Import注解进行封装
 **/
@SpringBootApplication
//@ComponentScan("com.itheima.springbooyembal")
//@Import(UserConfig.class)
@EnableUser
public class SpringbootDemo01Application {
    public static void main(String[] args) {
        //启动SpringBoot应用,返回Spring的IOC容器
        ConfigurableApplicationContext run = SpringApplication.run(SpringbootDemo01Application.class, args);
        Object user = run.getBean("user");
        System.out.println(user);
    }
}
②配置类
@Configuration
public class UserConfig {
    @Bean
    public User user(){
        return new User
    }
}
当我们直接用ConfigurableApplicationContext(上下文对象)获取ueser的时候,获取不到。原因是User所在的包是在子模块②的com.itheima.domain下,模块①中引导类所在的包为:com.itheima.springbootenable。而引导类中@SpringBootApplication注解的@ComponentScan注解扫的是当前引导类所在的包及其子包。所以获取不到。
要想解决这问题,有如下几种方案:
- 使用@ComponentScan扫描com.itheima.springbooyembal包 @ComponentScan(“com.itheima.springbooyembal”)
- 可以使用@Import注解,加载类,这些类都会被Spring创建,并放入IOC容器。@Import(UserConfig.class)
②的自定义@EnableUser注解
@Target({ElementType.TYPE})
@Retention(RetentionPolicy.RUNTIME)
@Documented
@Import(UserConfig.class)
public @interface EnableUser {
}
12. @Import注解
@Enable底层依赖于@Import注解导入一些类,使用@Import导入的类会被Spring加载到IOC容器中。而@Import提供4中用法:
- 导入Bean 【@Import(User.classs)】
- 导入配置类 【@Import(UserConfig.class)】
- 导入 ImportSelector 实现类。一般用于加载配置文件中的类
@Import(MyImportSelector.class)
//这种方式不知道bean的名称
public class MyImportSelector implements ImportSelector {
    @Override
    public String[] selectImports(AnnotationMetadata importingClassMetadata) {
        return new String[]{"com.itheima.springbooyembal.domain.User","com.itheima.springbooyembal.domain.Role"};
    }
}
- 导入 ImportBeanDefinitionRegistrar 实现类。
@Import(MyImportBeanDefinitionRegistrar.class)
public class MyImportBeanDefinitionRegistrar implements ImportBeanDefinitionRegistrar {
    @Override
    public void registerBeanDefinitions(AnnotationMetadata importingClassMetadata, BeanDefinitionRegistry registry) {
        AbstractBeanDefinition beanDefinition = BeanDefinitionBuilder.rootBeanDefinition(User.class).getBeanDefinition();
        registry.registerBeanDefinition("user",beanDefinition);
    }
}
13. @EnableAutoConfiguration
- @EnableAutoConfiguration 注解内部使用 @Import(AutoConfigurationImportSelector.class)来加载配置类。
- 配置文件位置:META-INF/spring.factories,该配置文件中定义了大量的配置类,当 SpringBoot 应用启动时,会自动加载 这些配置类,初始化Bean
- 并不是所有的Bean都会被初始化,在配置类中使用Condition来加载满足条件的Bean


14. 案例
需求
自定义redis-starter。要求当导入redis坐标时,SpringBoot自动创建Jedis的Bean
实现步骤
① 创建 redis-spring-boot-autoconfigure模块
<!--引入jedis依赖-->
<dependency>
    <groupId>redis.clients</groupId>
    <artifactId>jedis</artifactId>
</dependency>
② 创建 redis-spring-boot-starter 模块,依赖 redis-spring-boot-autoconfigure的模块
<!--引入自定义的autocongifure-->
<dependency>
    <groupId>com.ithiema</groupId>
    <artifactId>redis-spring-boot-autocongifure</artifactId>
    <version>0.0.1-SNAPSHOT</version>
</dependency>
③ 在 redis-spring-boot-autoconfigure 模块中初始化 Jedis 的 Bean。并定义META-INF/spring.factories 文件
org.springframework.boot.autoconfigure.EnableAutoConfiguration=\
  com.ithiema.redis.config.RedisAutoConfiguration
@ConfigurationProperties(prefix = "redis")
@Data
public class RedisProperties {
    private String host="localhost";
    private Integer port=6379;

}
@Configuration
@EnableConfigurationProperties(RedisProperties.class)
@ConditionalOnClass(Jedis.class)
public class RedisAutoConfiguration {
    /**
     *提供Jedis的bean
     */
    @Bean
    @ConditionalOnMissingBean(name="jedis")
    public Jedis jedis(RedisProperties redisProperties){
        System.out.println("xppmzz");
        return new Jedis(redisProperties.getHost(),redisProperties.getPort());
    }
}
④ 在测试模块中引入自定义的 redis-starter 依赖,测试获取 Jedis 的Bean,操作 redis。
<dependency>
    <groupId>com.itheima</groupId>
    <artifactId>redis-sping-boot-start</artifactId>
    <version>0.0.1-SNAPSHOT</version>
</dependency>
@SpringBootApplication
public class SpringbootEnablrApplication {
public static void main(String[] args) {
    ConfigurableApplicationContext run = SpringApplication.run(SpringbootEnablrApplication.class, args);
    Jedis jedis = run.getBean(Jedis.class);
    jedis.set("name11", "xppmzz");
    System.out.println(jedis);
}
}


 232
232

 被折叠的 条评论
为什么被折叠?


