


目录
环境:
1.idea2021
2.java8
3.springboot 2.6.13
spring boot概述
Spring Boot 是由 Pivotal 团队提供的全新框架,其设计目的是用来简化新 Spring 应用的初始搭建以及开发过程。该框架使用了特定的方式来进行配置,从而使开发人员不再需要定义样板化的配置。
Spring Boot 基于Spring开发,Spring Boot 本身并不提供Spring 框架的核心特性以及扩展功能,只是用于快速.敏捷的开发新一代基于Spring 框架的应用程序。 Spring Boot以约定大于配置的核心思想,默认帮我们进行了很多设置,多数Spring Boot应用只需要很少的Spring配置,几乎可以零配置开箱即用。
一,springboot快速入门
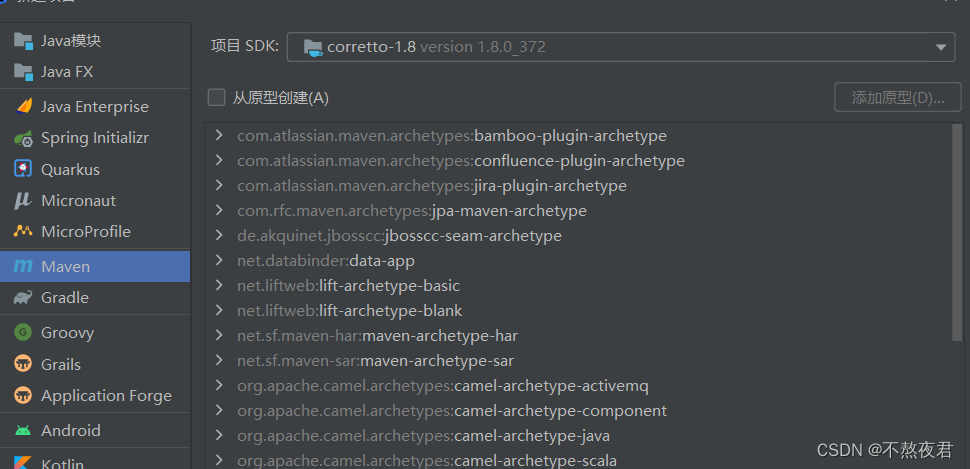
1.创建maven项目
选择使用maven创建项目,直接下一步,然后对工程命名后直接点击完成。
2.引入起步依赖
    <!--springboot工程需要继承的父工程-->
    <parent>
        <groupId>org.springframework.boot</groupId>
        <artifactId>spring-boot-starter-parent</artifactId>
        <version>2.1.8.RELEASE</version>
    </parent>

    <dependencies>
        <!--web开发的起步依赖-->
        <dependency>
            <groupId>org.springframework.boot</groupId>
            <artifactId>spring-boot-starter-web</artifactId>
        </dependency>
    </dependencies>
3.自定义controller
随便定义一个controller ,用于测试。
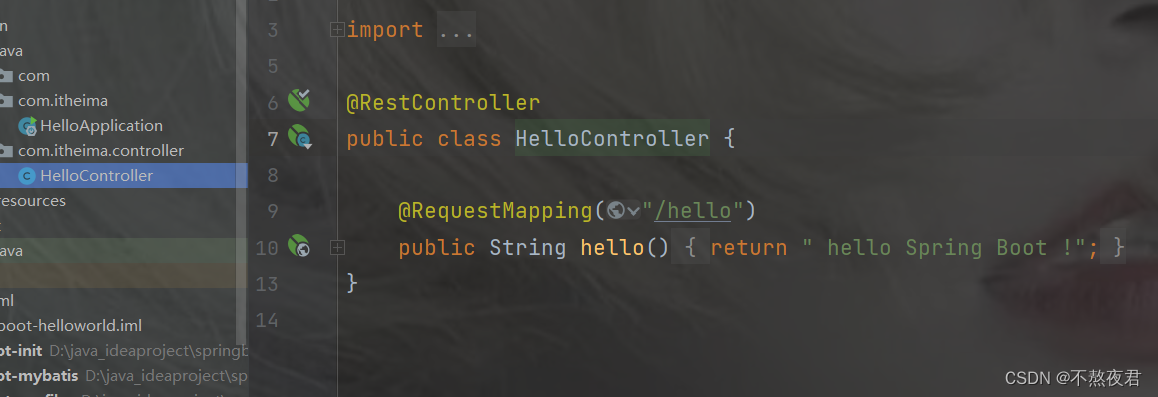
controller层,这里值得提一嘴的就是@Controller和@RestController注解的区别。@Controller控制器,处理http请求。@RestController注解相当于@ResponseBody+@Controller合在一起的作用,RestController使用的效果是将方法返回的对象直接在浏览器上展示成json格式.
package com.itheima.controller;

import org.springframework.web.bind.annotation.RequestMapping;
import org.springframework.web.bind.annotation.RestController;

@RestController
public class HelloController {

    @RequestMapping("/hello")
    public String hello(){
        return " hello Spring Boot !";
    }
}
4.编写启动类
启动类是springboot项目的入口。我们习惯都是以Apllication结尾。
@SpringBootApplication
public class HelloApplication {
public static void main(String[] args) {
SpringApplication.run(HelloApplication.class,args);
}
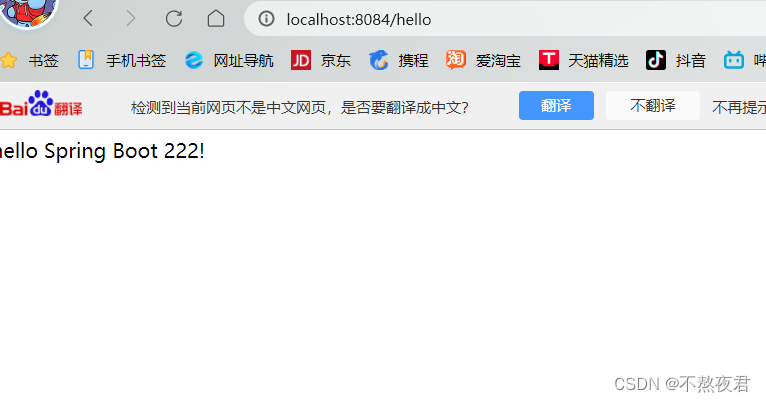
}5.开始测试
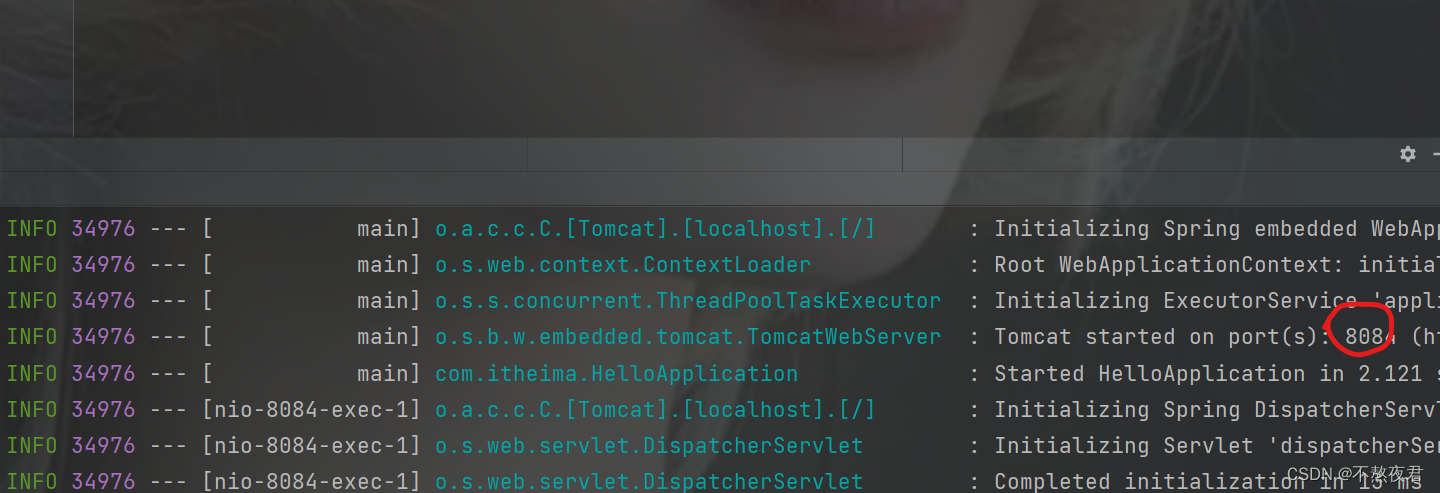
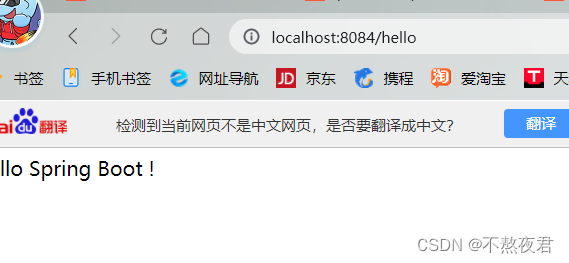
我们点击启动类,启动项目,然后就可以在浏览器地址访问到。
这个端口号我们可以在运行之后的命令行看到
补充:其实idea提供了一种更简便的方式创建springboot项目,这个我们在下面会讲到。
二.快捷方式创建sprinboot工程
首先选择Spring Initalizr,然后选择服务器,这里默认是一个start.spring.io的这么一个网址,但是我们一看就知道这是一个外国的网址,因为我们在中国的所见到的一级域名一般是.cn或者.com,(不多讲,这里也不重要)所以,我们可以使用国内的服务器,在国内,阿里云就提供了,相同的服务,网址:start.aliyun.com,所以,我们就将服务网址换为start.aliyun.com。然后写上项目名称,就可以点击下一步了。
注意:在这里我们为什么要选择网址呢?其实是因为创建springboot工程需要联网下载相关的模块(网上还有不用联网的方法,由于没试过,就不好说了)
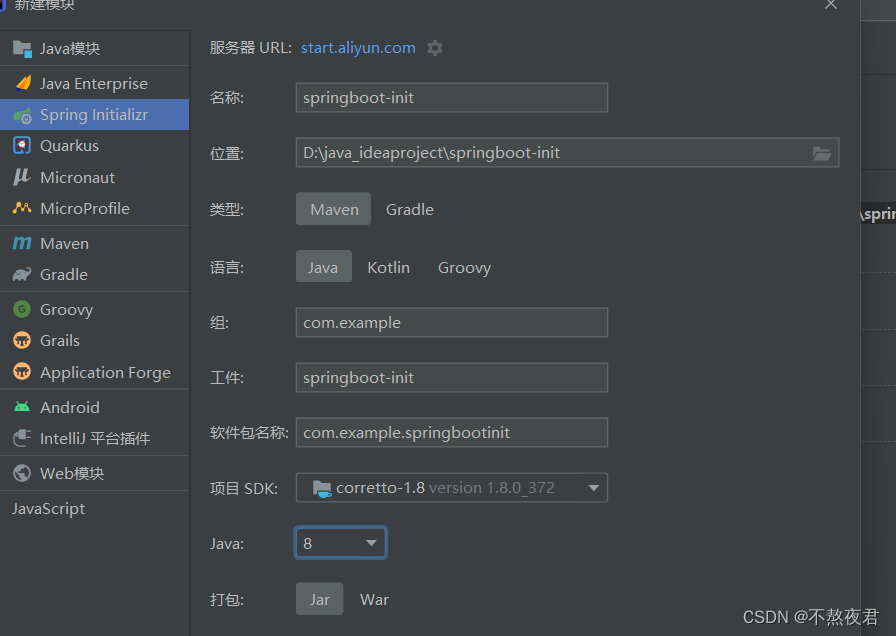
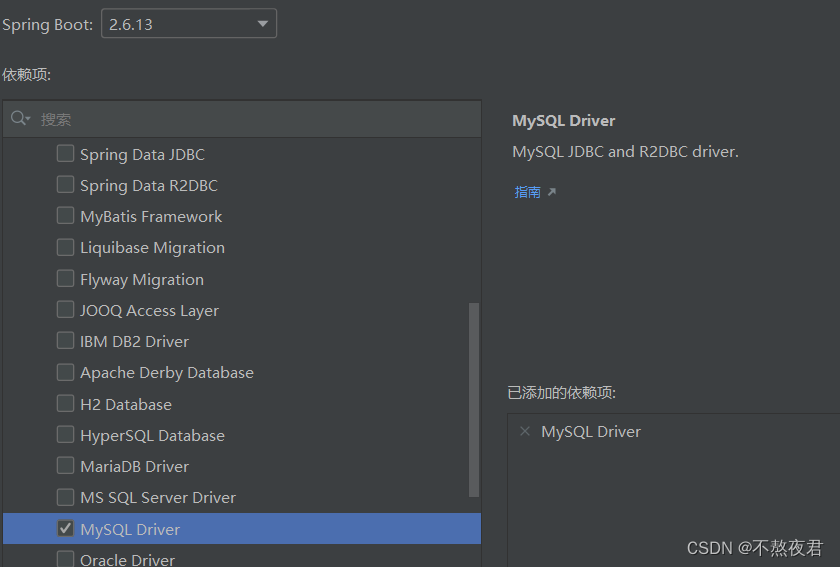
下一步,添加依赖,在这里我们可以选一个Mysql的驱动,然后再选一个web的spring web依赖,假如,有些依赖我们忘记添加了怎么办?对!我们可以自己之后在pom.xml文件中添加。
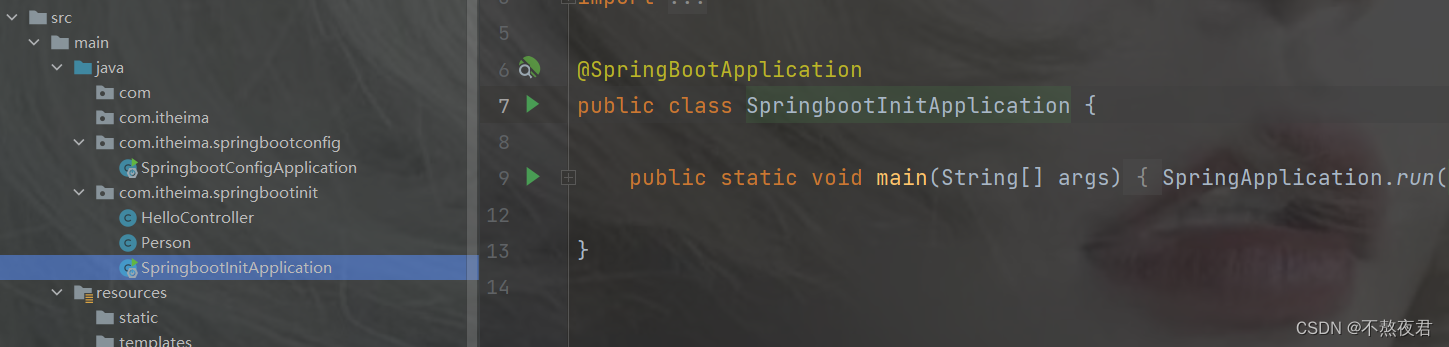
 然后,我们可以看到,在springbootinit目录下有我们的启动类用于起步依赖、自动配置。我们在springbootinit下面创建一个HelloController类用于测试。
package com.itheima.springbootinit;

import org.springframework.beans.factory.annotation.Autowired;
import org.springframework.beans.factory.annotation.Value;
import org.springframework.core.env.Environment;
import org.springframework.web.bind.annotation.RequestMapping;
import org.springframework.web.bind.annotation.RestController;

@RestController
public class HelloController {


    @RequestMapping("/hello")
    public String hello() {
        return "hello Spring Boot 222!";
    }
}
补充
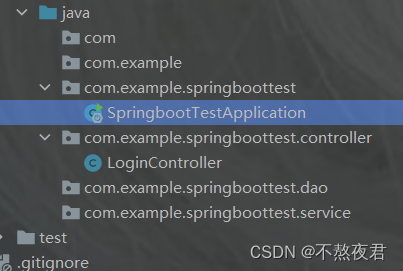
但是其实在正式开发的环境中,我们会在和启动类的同目录下创建controller,dao,service包,然后在controller包下面创建类LoginController,如下图。
注意:启动类要和controller,dao,service包在同一目录下,因为启动类会默认自动扫描和自己同一目录下的包。
开始测试,点击启动类启动springboot项目。
三,配置文件
1.配置文件之间的关系
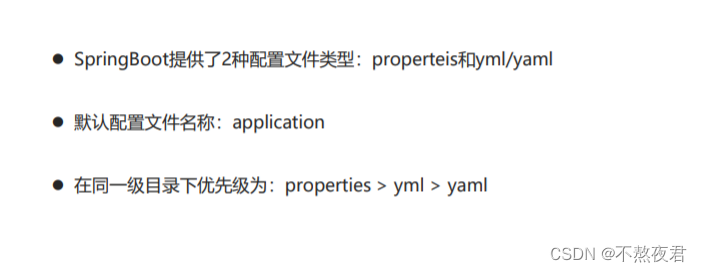
在springboot项目中我们可以通过以下两种配置文件去修改springboot的默认配置。但我们存在多个配置文件的时候,我们会优先使用优先级高的配置文件,里面的配置信息,但是如果低级别的文件配置的信息,在高级的配置文件里面没有定义,那么springboot还是会读取到低级别的配置文件信息,其实也就是说,springboot会读取所有的配置,不管是什么级别的配置文件。
比如说在properties配置文件中:
server.port=8089而在yml配置文件中:
person:
  name: zhangsan
  age: 20
  address:
  - beijing
  - shanghai

server:
  port: 8082
那么,springboot就会采取properties配置文件中的port信息,但是由于在properties配置文件中没有定义person信息,所以,springboot会采用yml的person信息。
2.yml配置文件
1.基本语法
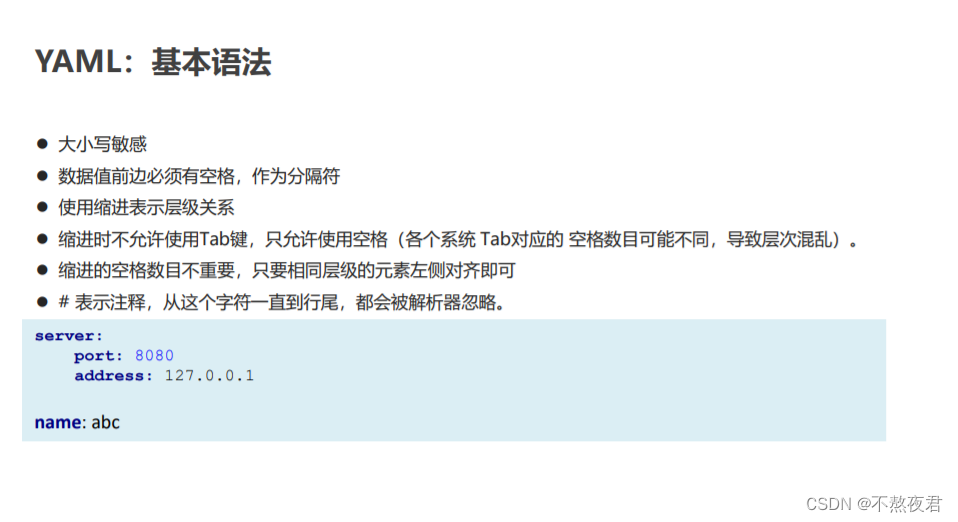
2.具体实现
#参数引用
name: nihao
#对象
person:
  name: ${name}
#  name: zhangsan
  age: 20
#对象行内写法
person2: {name: zhansang,age :20}
#数组
address:
  - beijing
  - shanghai
#数组行内写法
address1: [beijing,shanghai]

#纯量
msg1: 'hello \n world' #不会识别转义字符
msg2: 'hello \\n world' #会识别转义字符

server:
  port: 8082
3.读取配置文件的三种方式
1.首先通过@Value注解来注入
    @Value("${name}")
    private String name;

    @Value("${person.name}")
    private String name2;
    //注意对象和基本数据类型的注入方式的不同
2.通过Environment注入
首先定义一个Environment对象在类中,并且加上@Autwired注解,这样的话,springboot就会在项目初始化时就注入Environment对象。
    @Autowired
    private Environment env;
通过,.getProperty()方法去调用配置文件的值。
        System.out.println(env.getProperty("person.name"));
        System.out.println(env.getProperty("address[0]"));
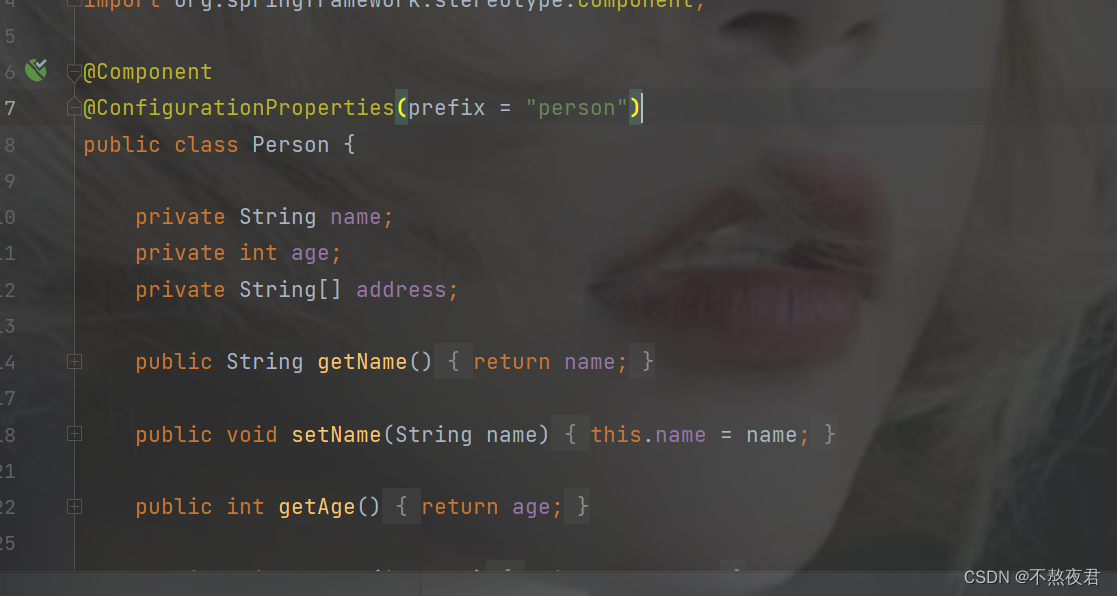
3.通过@ConfigurationPropertis
如下图:但是其实这里的prefix = "person"不加也没有关系,至少不会报错,只是他获取的就是,person之外的数据,而不是从我们在propertis配置定义的person获取数据,即:不从
person:
  name: ${name}
#  name: zhangsan
  age: 20
中获取数据。而是从配置文件person数据之外的地方获取数据。
四.profile
1.简介
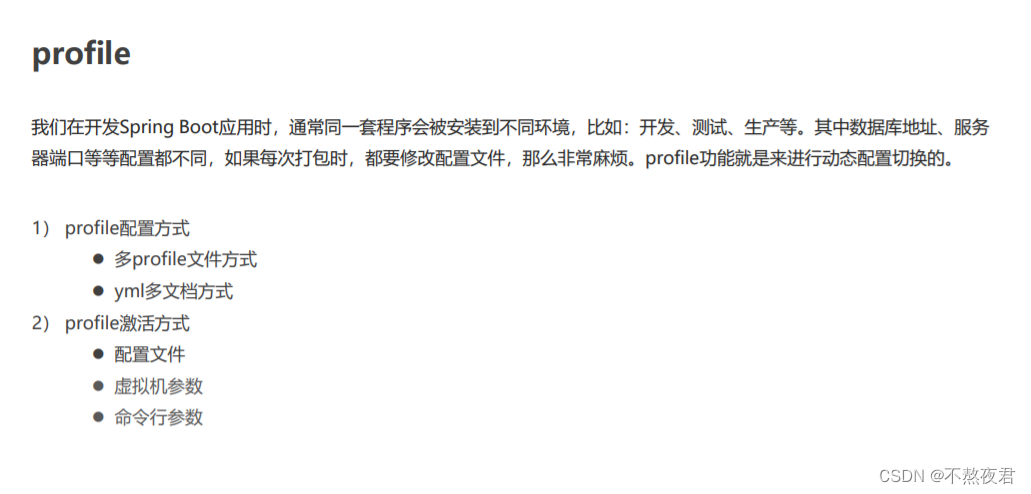
2.profile配置方式
1.多profile文件配置
首先我们先创建一下配置文件,application-dev.propertis(生产环境),application-pro.propertis(开发环境),application-test.propertis(测试环境)。这里先不用创建yml文件。

然后我们在各个配置文件中指定环境,比如说test.properties就是使用的8082,而pro.properties
使用的是8083,dev.properties就是8081
 然后我们在application.properties配置文件中激活生产环境,如果都不激活,那么还是使用默认的生产环境8080.现在我们激活dev
spring.profiles.active=dev
#spring.profiles.active=pro
#spring.profiles.active=test 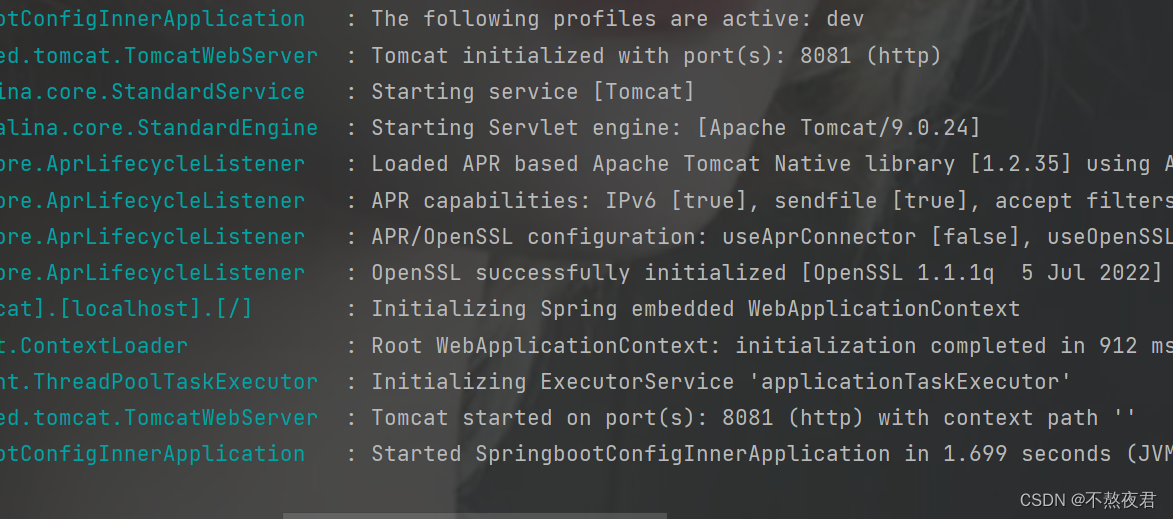
可以看到激活成功。
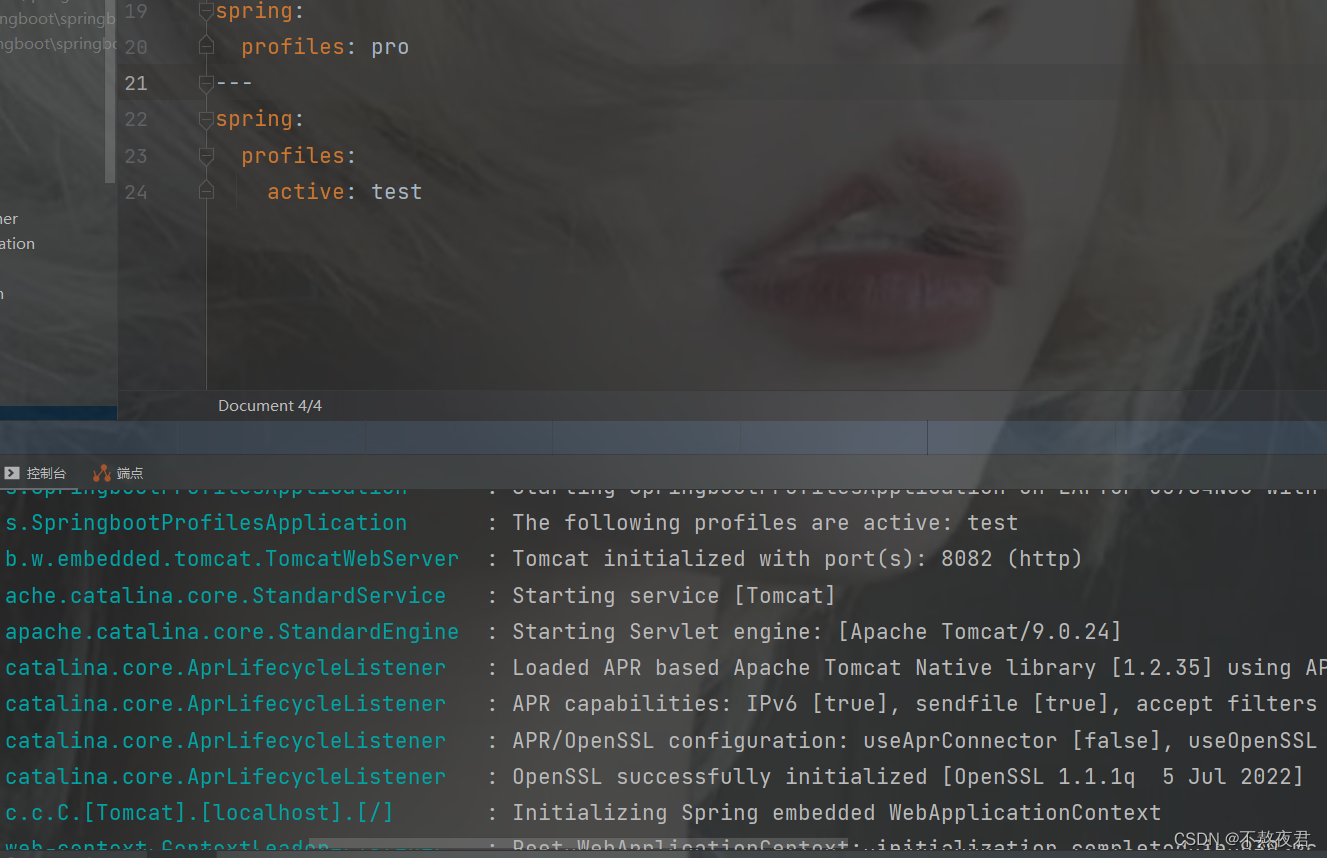
2.yml多文档方式
---

server:
  port: 8081

spring:
  profiles: dev
---

server:
  port: 8082

spring:
  profiles: test
---
server:
  port: 8083

spring:
  profiles: pro
---
#激活配置
spring:
  profiles:
    active: dev
比如说现在我使用test,运行发现激活成功
3.profile的激活方式
1.虚拟机参数
右键,选择编辑配置。

1. 我们在虚拟机选项上,写入-Dspring.profiles.active=test,注意先不要写下面的程序参数配置。之后我们会发现test配置文件生效。
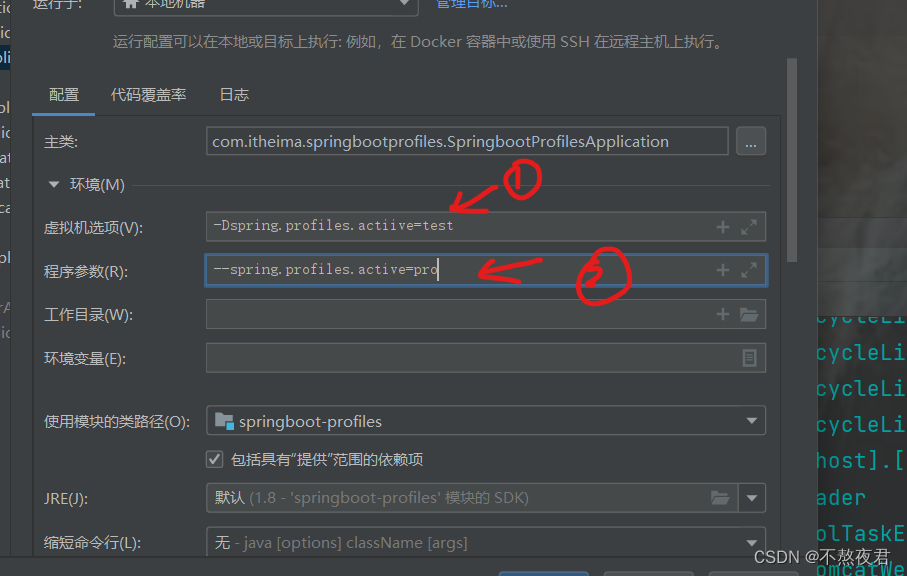
2.如上图,我们在程序参数的配置文件上写入--spring.profiles.active=pro(不要和上面的虚拟机参数同时写),然后我们启动,可以发现pro配置文件被激活。
2.命令行激活
在我们真实的测试和上线部署的时候,没有idea这样的图形化工具,那么我们就需要通过命令行的方式去激活配置文件,但是前提是我们先要将springboot项目打包成一个jar包。
1.打jar包
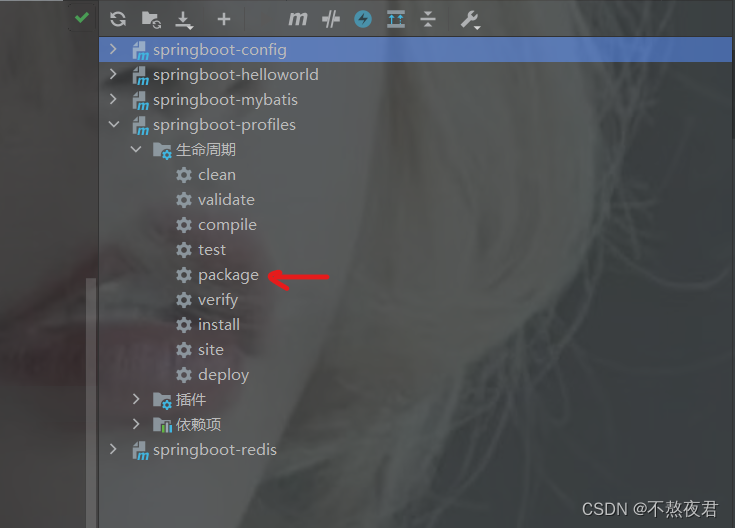
选择我们的项目,然后开始打包,点击package。
插曲:在这里我打jar包的时候出现了报错 Unable to find main class
解决方法是在插件中<artifactId>spring-boot-maven-plugin</artifactId>,添加如下配置,其实就是添加了启动类,因为那个报错的意思就是没有找到启动类。
        <plugins>
            <plugin>
                <groupId>org.springframework.boot</groupId>
                <artifactId>spring-boot-maven-plugin</artifactId>
                <configuration>
                    <mainClass>com.itheima.springbootprofiles.SpringbootProfilesApplication</mainClass>
                </configuration>
            </plugin>
        </plugins>
2,打包成功
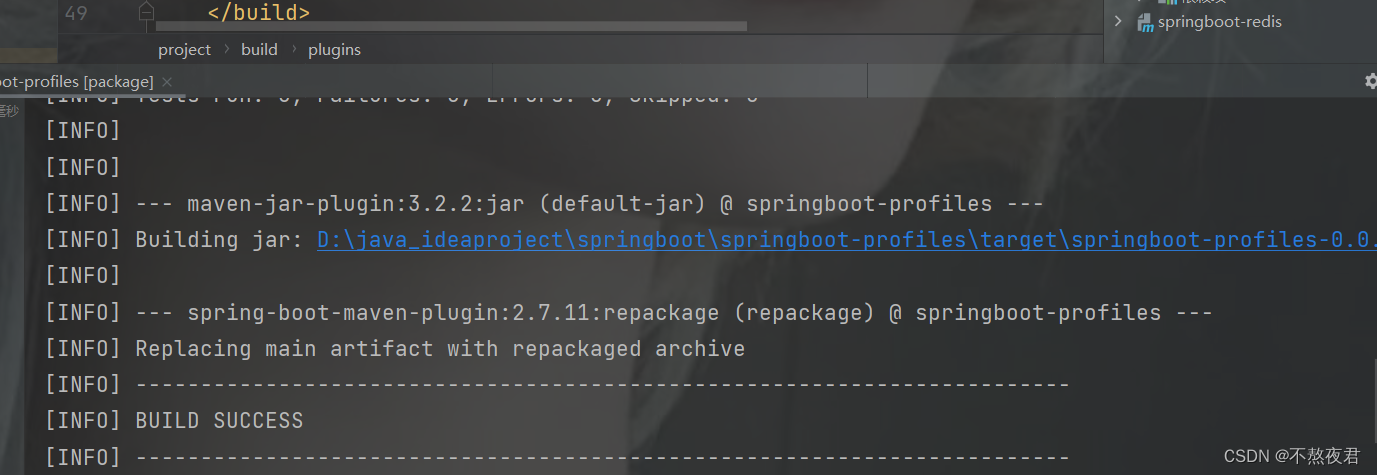
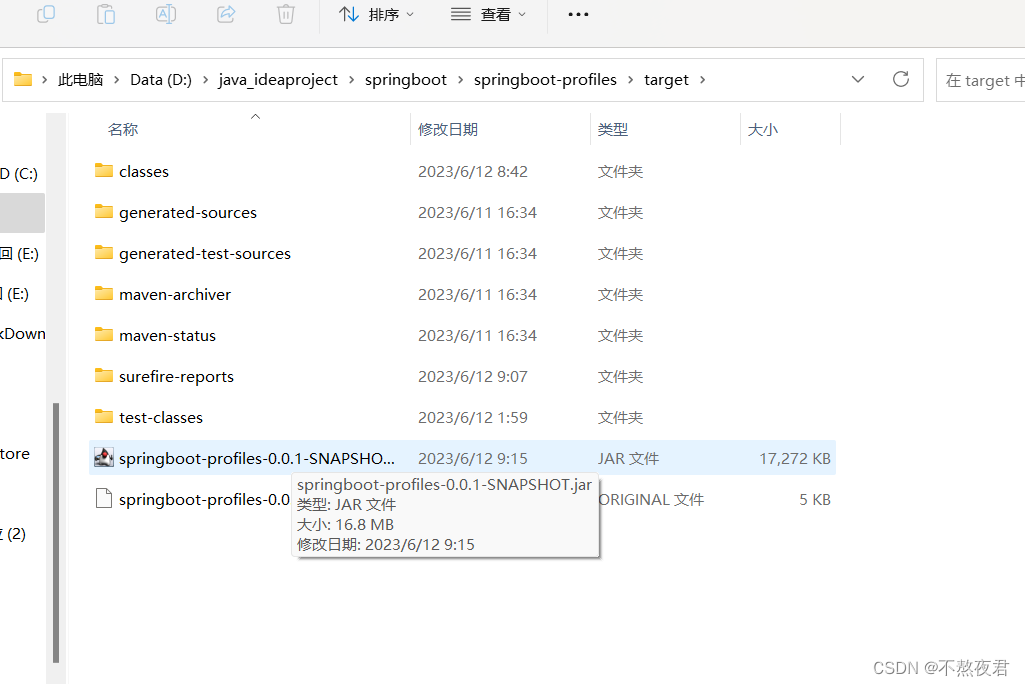
可以看到在当前模块的target目录下有我们打的jar包
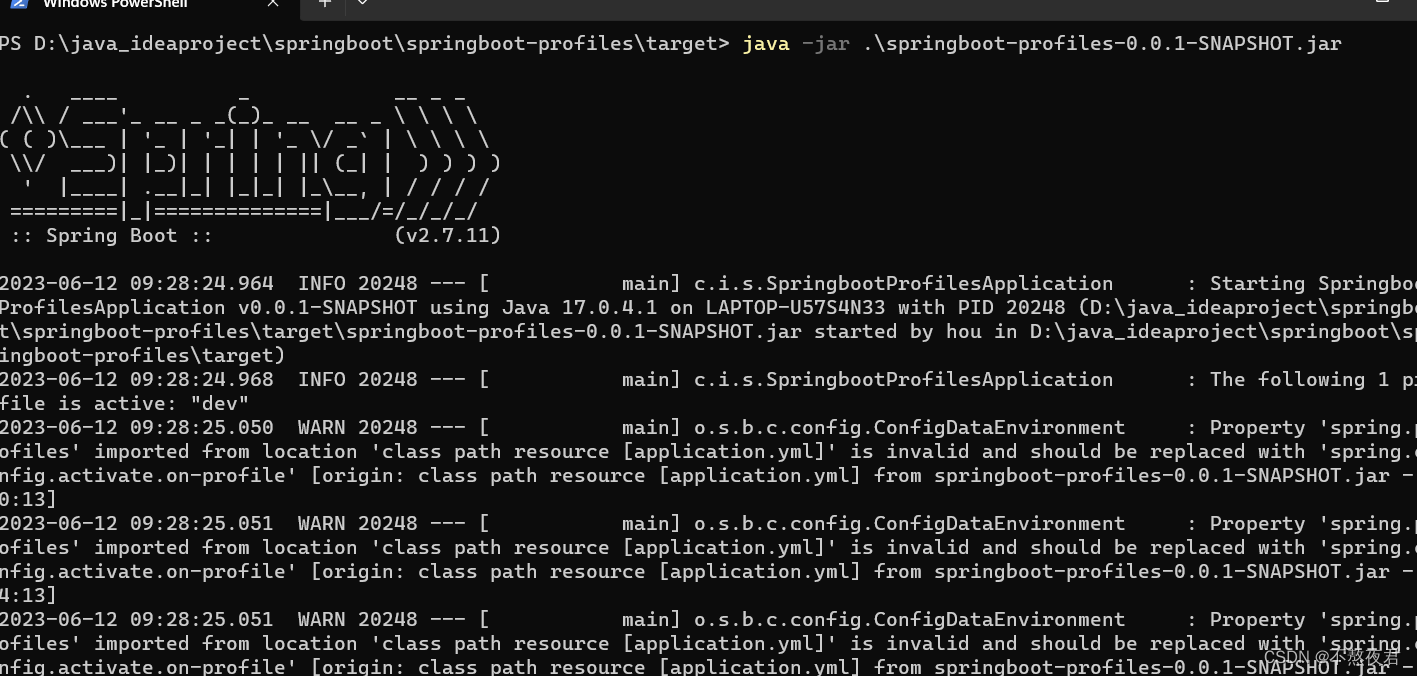
然后我们按住shift+右键 ,点击powershell文件,然后输入 java -jar .\springboot-profiles-0.0.1-SNAPSHOT.jar,回车后运行成功。(注意这里先停掉idea里面的项目,不然的话可能会出现端口占用的问题)。
3. 在命令行输入激活指令
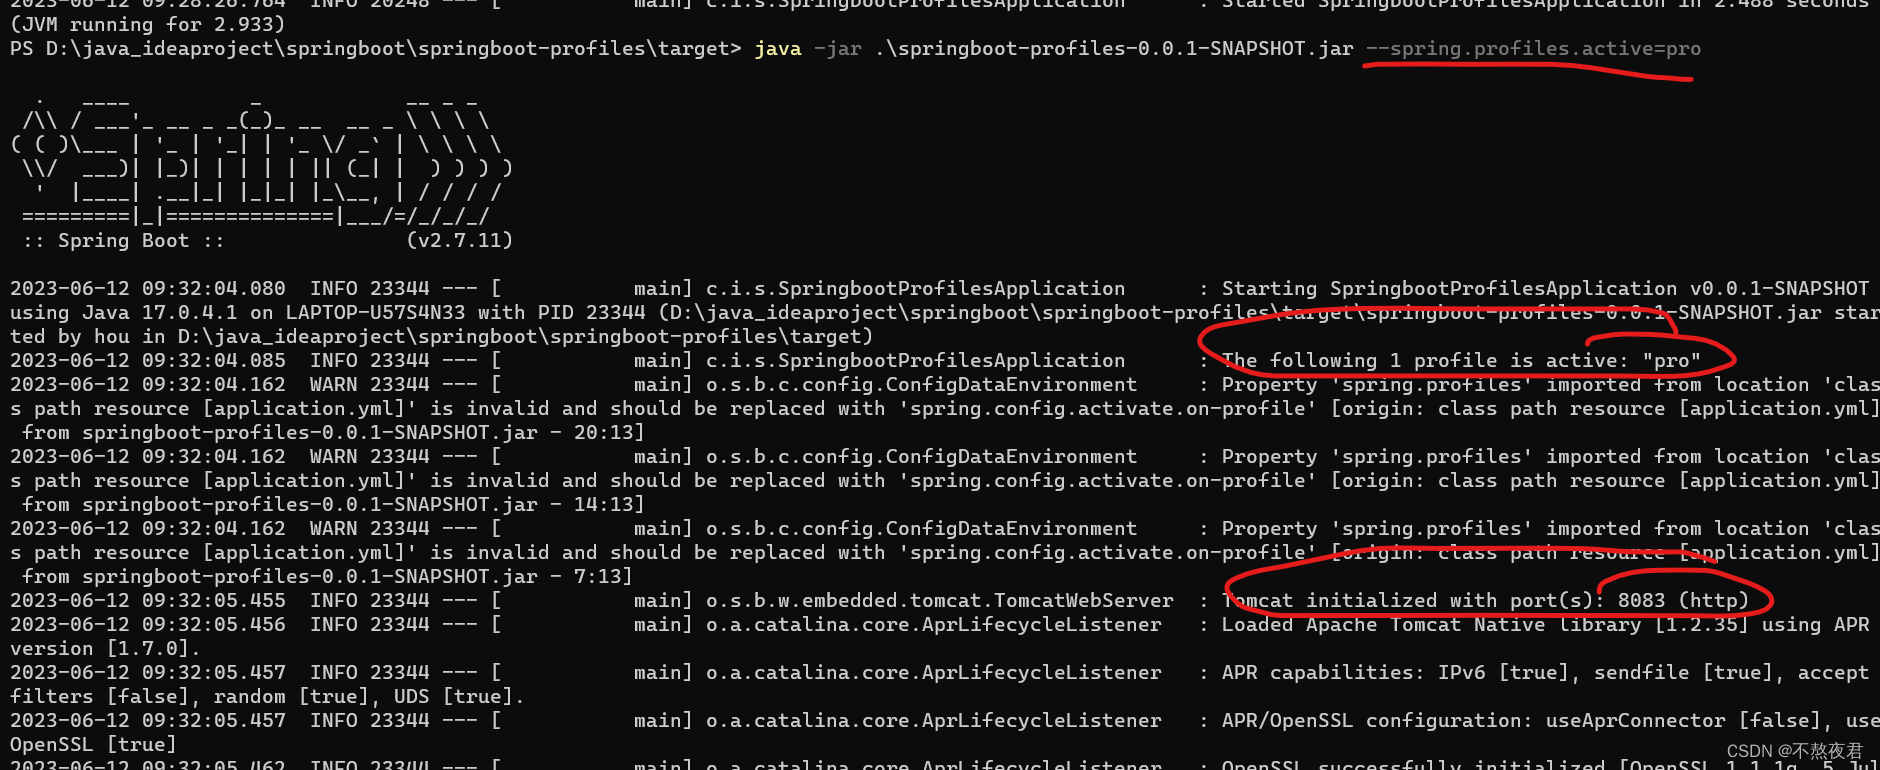
输入java -jar .\springboot-profiles-0.0.1-SNAPSHOT.jar --spring.profiles.active=pro
如下图,我们可以看到pro的配置生效了。
五,内部配置文件的加载顺序
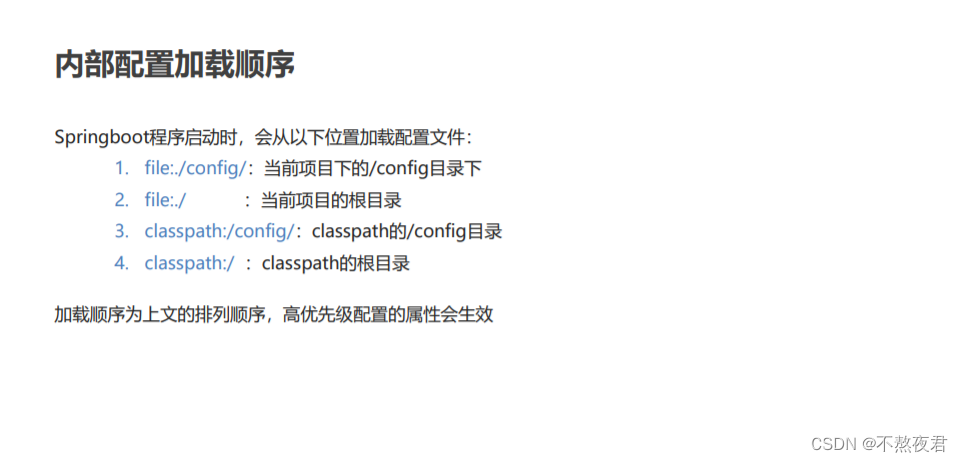
这个file就是你的项目,classpath可以理解为未打包前的项目里的Java和resource部分合在一起。比如说现在我们创建如下模块springboot-config,然后在添加如下配置。如下图,可以看到file下有一个properties配置文件,那么他的优先级是第二,file下面还有一个config文件夹,文件夹里的properties配置文件优先级是第一,然后resource下面的config文件夹里的配置文件优先级就是第三,resource下的配置文件优先级就是第四。
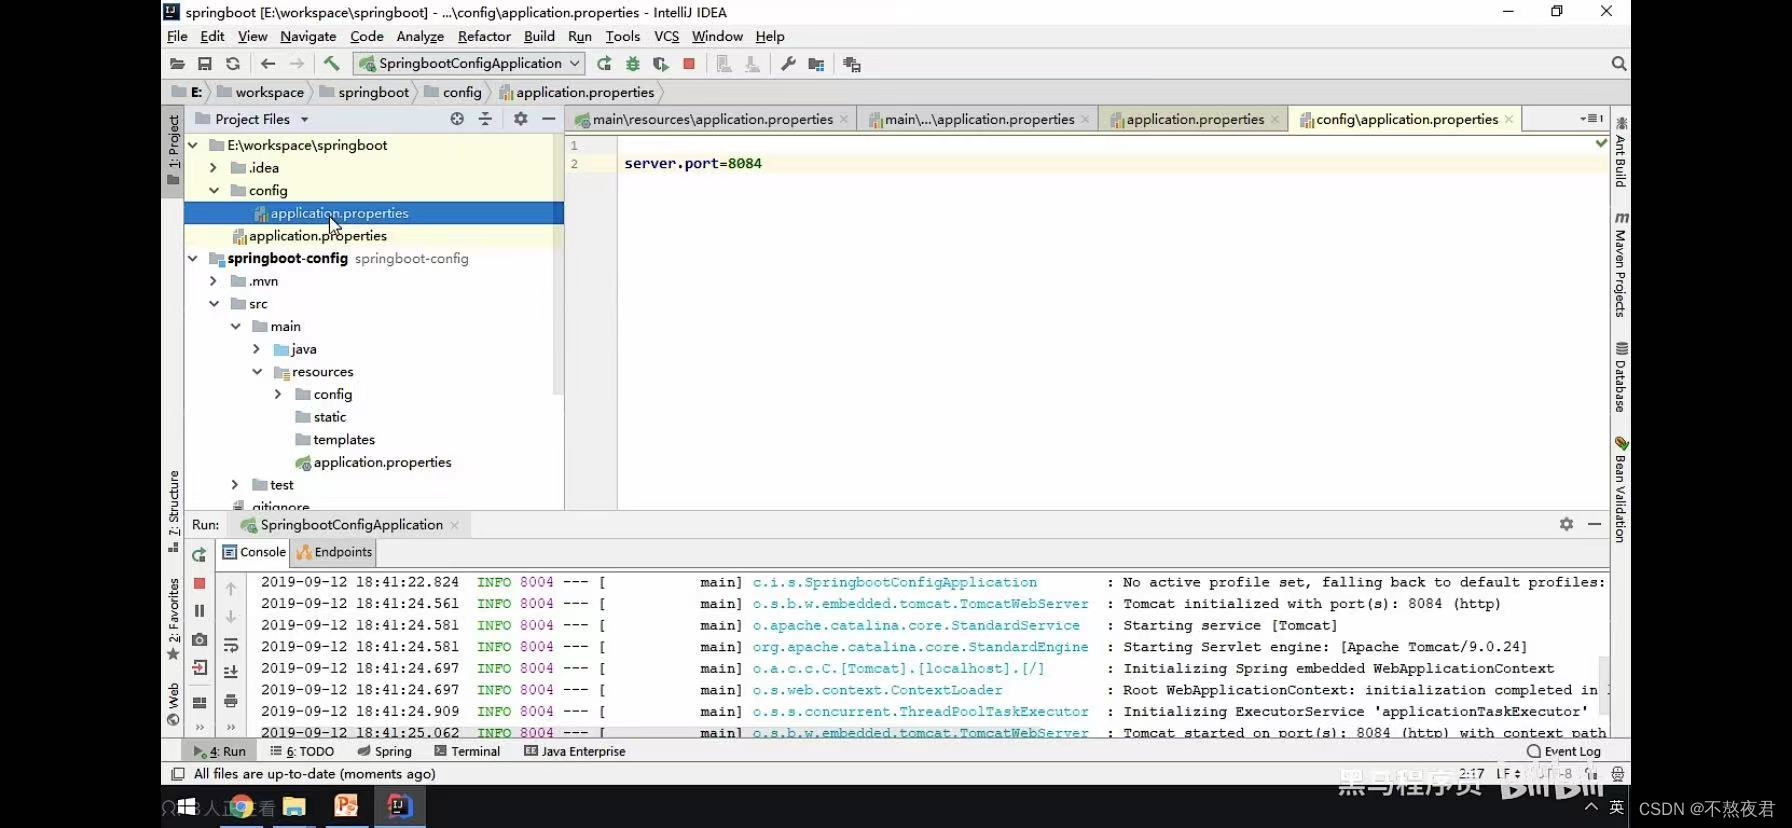
但是值得注意的是,因为file:配置文件和file:/config/配置文件是不会被打进jar里面的。所以在项目打包成jar包之后,先起作用的还是resource/config目录下的配置文件 ,其次在是resource下的配置文件。
六,命令行指定参数运行
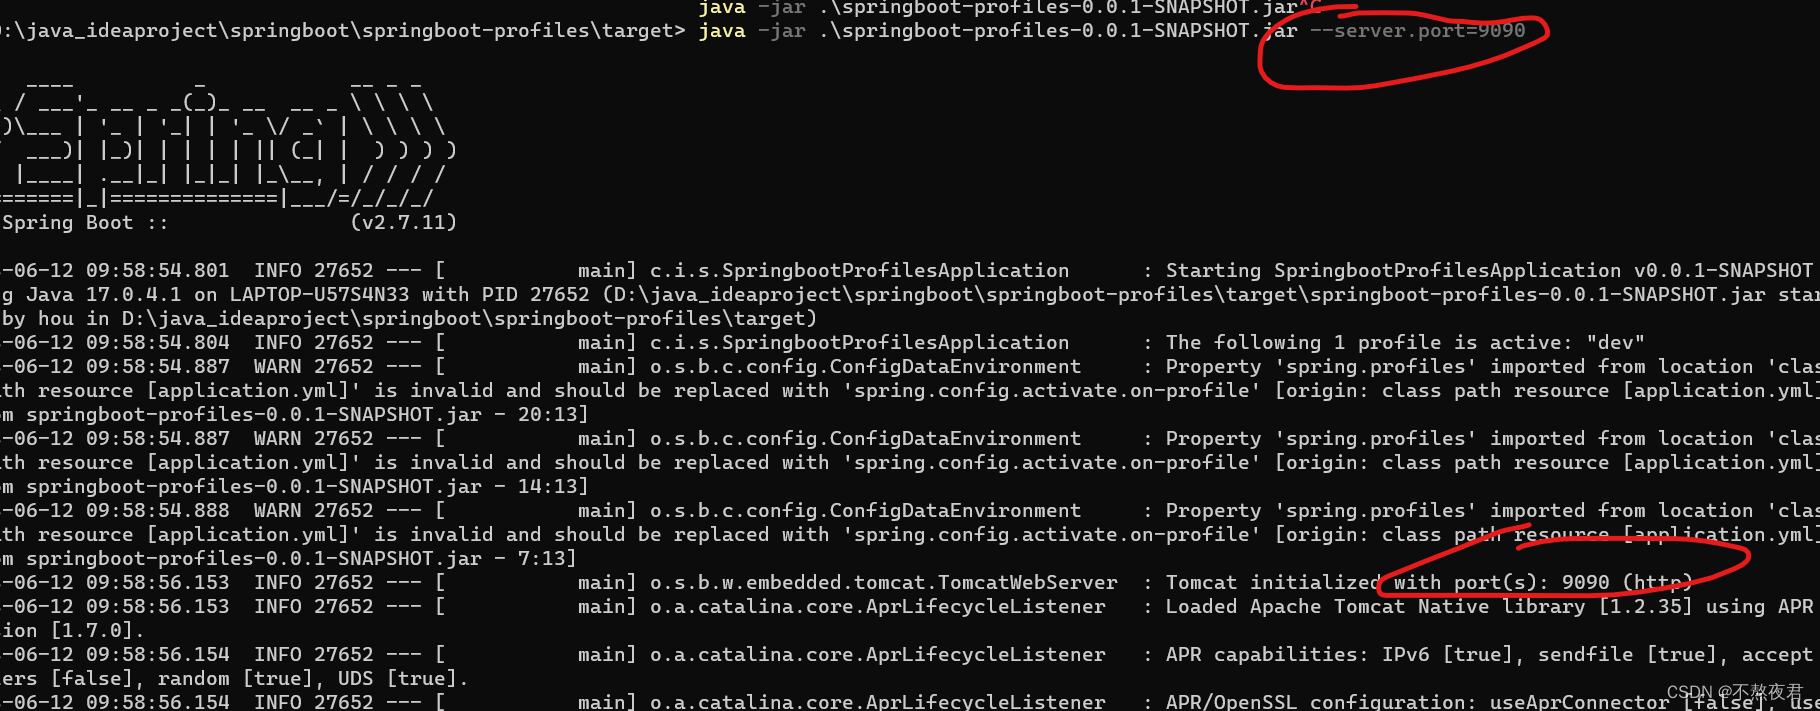
如下图输入java -jar .\springboot-profiles-0.0.1-SNAPSHOT.jar --server.port=9090,--server.port=9090就是我们临时指定的参数。
七,springboot整合其他框架
1.整合junit
1.首先创建工程,
创建如下图的类。
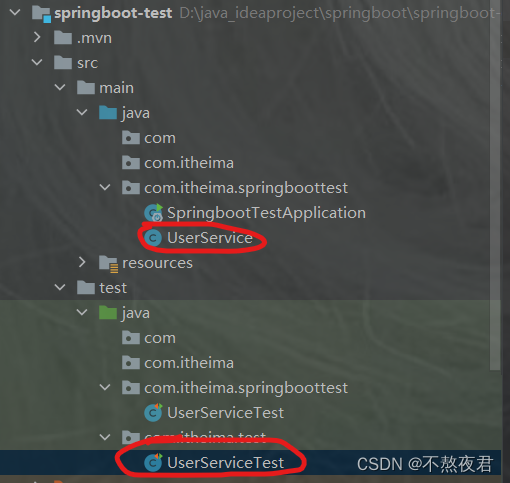
Userservice
package com.itheima.springboottest;

import org.springframework.stereotype.Service;

@Service
public class UserService {


    public void add() {
        System.out.println("add...");
    }
}
UserServiceTest
package com.itheima.test;
import com.itheima.springboottest.SpringbootTestApplication;
import com.itheima.springboottest.UserService;
import org.junit.Test;
import org.junit.runner.RunWith;
import org.springframework.beans.factory.annotation.Autowired;
import org.springframework.boot.test.context.SpringBootTest;
import org.springframework.test.context.junit4.SpringRunner;
/**
* userService的测试类
*/
@RunWith(SpringRunner.class)
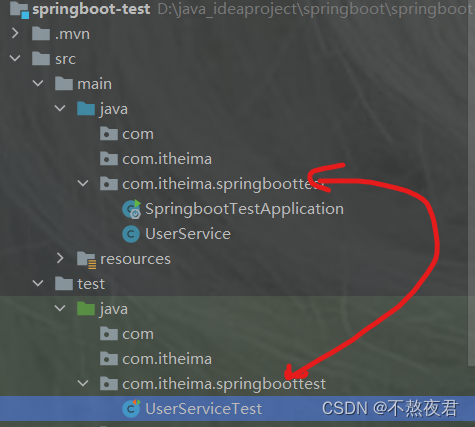
//当测试包和启动类在同一包下,下面的注解是不需要指定的
@SpringBootTest(classes = SpringbootTestApplication.class)
public class UserServiceTest {
@Autowired
private UserService userService;
//注意,要对测试方法加上@Test注解
@Test
public void testAdd() {
userService.add();
}
}当测试包和启动类在同一包下,下面的注解是不需要指定的,比如说,我把测试类和启动类放在同一包下,那么就可以不加@SpringBootTest(classes = SpringbootTestApplication.class)这一注解。
之后的测试方法
package com.itheima.springboottest;

import org.junit.Test;
import org.junit.runner.RunWith;
import org.springframework.beans.factory.annotation.Autowired;
import org.springframework.boot.test.context.SpringBootTest;
import org.springframework.test.context.junit4.SpringRunner;

/**
 * userService的测试类
 */

@RunWith(SpringRunner.class)
@SpringBootTest
public class UserServiceTest {

    @Autowired
    private UserService userService;

    @Test
    public void testAdd() {
        userService.add();
    }
}
注意:junit5之后@RunWith注解也不需要加了
点击测试方法, 运行成功

2.整合redis
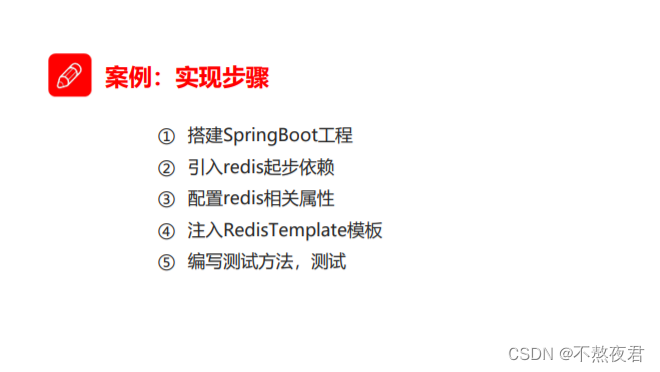
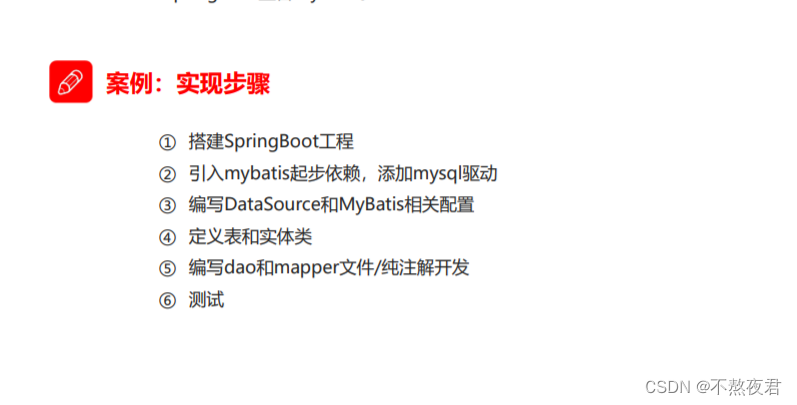
1.实现步骤
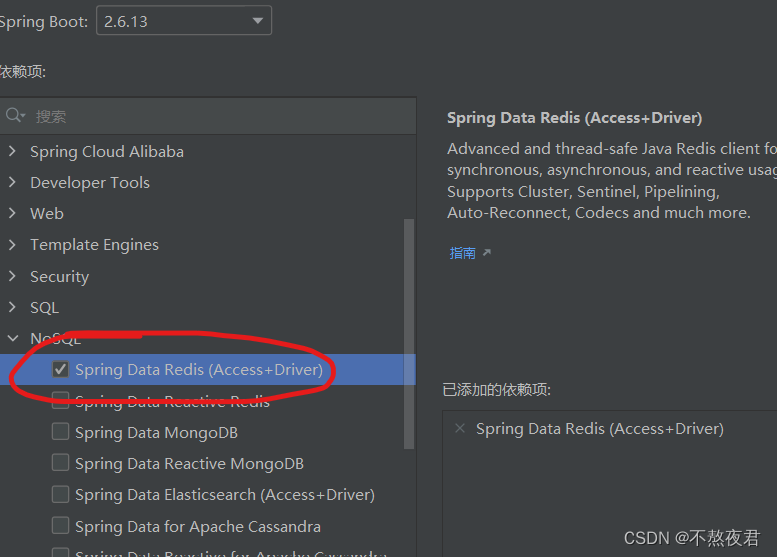
2.引入redis起步依赖
我们可以在创建工程的时候就直接引入redis,选择NoSQL,选择第一个
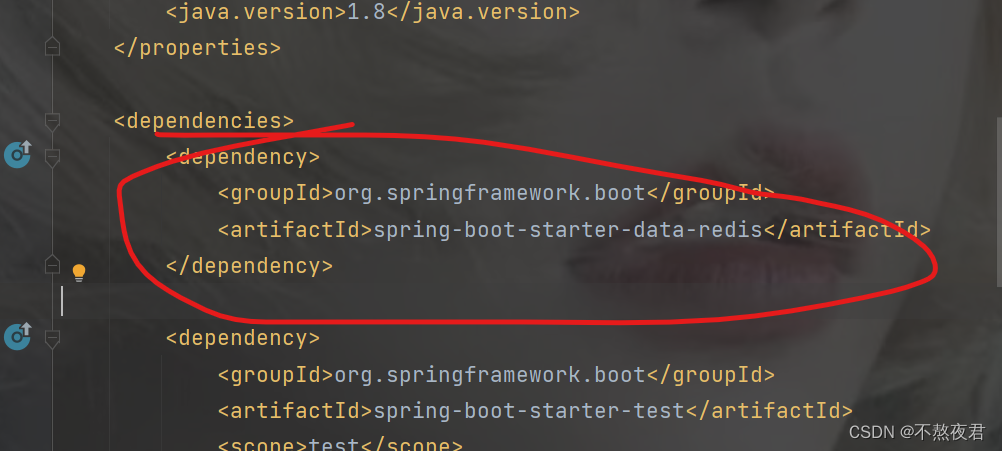
创建完成后,我们可以在pom文件中看到redis的依赖
3.进行测试
目录结构如下
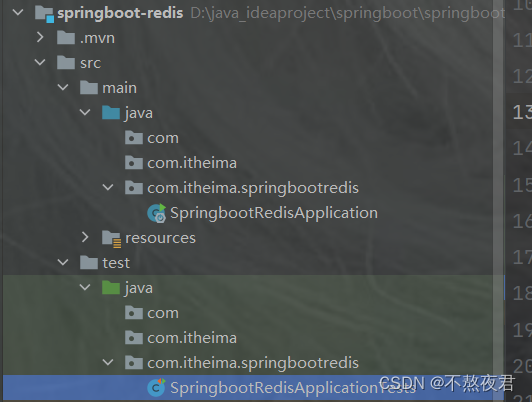
创建测试类SpringbootRedisApplicationTest
package com.itheima.springbootredis;

import org.junit.Test;
import org.junit.runner.RunWith;
import org.springframework.beans.factory.annotation.Autowired;
import org.springframework.boot.test.context.SpringBootTest;
import org.springframework.data.redis.core.BoundValueOperations;
import org.springframework.data.redis.core.RedisTemplate;
import org.springframework.test.context.junit4.SpringRunner;

@RunWith(SpringRunner.class)
@SpringBootTest
public class SpringbootRedisApplicationTests {
    //注入redis
    @Autowired
    private RedisTemplate redisTemplate;

    @Test
    public void testSet() {
        //存入数据
        redisTemplate.boundValueOps("name").set("zhangsan");
    }

    @Test
    public void testGet() {
        //获取数据
        Object name = redisTemplate.boundValueOps("name").get();
        System.out.println(name);
    }

}
默认springboot会在你本机没有启动redis或者没有redis服务的情况下,提供一个redis,但是如果你的本机存在redis而且redis服务已经开启,那么就会采用本机的redis进行存取数据,比如说我这里就已经在本机上启动来redis。
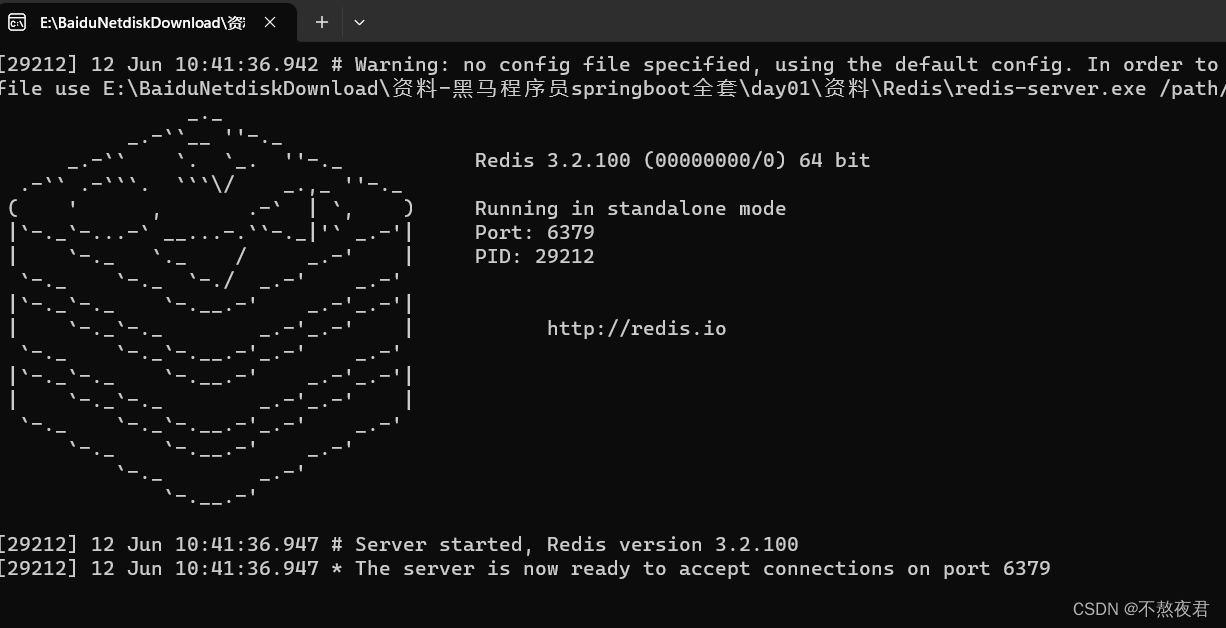
我们可以看到,连接还是正常的。

4,改变连接redis的位置
我们可以创建配置文件去指定我们连接redis的位置
spring:
  redis:
    host: 127.0.0.1 # redis的主机ip
    port: 6379
这样的话,我们就可以连接不同的redis服务。
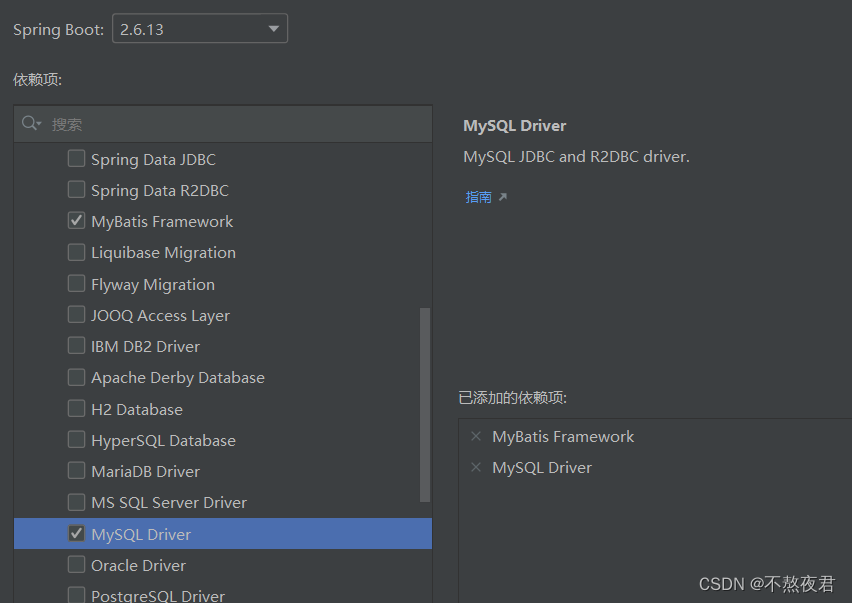
3.整合Mybatis
1.步骤
2.创建工程,引入起步依赖
3.编写配置文件
配置yml文件
# datasource
spring:
  datasource:
    url: jdbc:mysql:///springboot?serverTimezone=UTC
    username: root
    password: 123456
    driver-class-name: com.mysql.cj.jdbc.Driver


# mybatis,如果你是基于注解开发的,那么下面的配置是不用加的
mybatis:
  mapper-locations: classpath:mapper/*Mapper.xml # mapper映射文件路径
  type-aliases-package: com.itheima.springbootmybatis.domain

  # config-location:  # 指定mybatis的核心配置文件
那么什么是基于注解开发,就是没有mapper.xml,我就不多解释了,就给一段代码你们自己体会吧!
UserMapper接口
package com.itheima.springbootmybatis.mapper;

import com.itheima.springbootmybatis.domain.User;
import org.apache.ibatis.annotations.Mapper;
import org.apache.ibatis.annotations.Select;
import org.springframework.stereotype.Repository;

import java.util.List;

@Mapper
@Repository
public interface UserMapper {

    @Select("select * from t_user")
    public List<User> findAll();
}
假设你不是基于全注解开发,那么就需要xml文件。
UserMapper.xml
<?xml version="1.0" encoding="UTF-8" ?>
<!DOCTYPE mapper PUBLIC "-//mybatis.org//DTD Mapper 3.0//EN" "http://mybatis.org/dtd/mybatis-3-mapper.dtd">
<mapper namespace="com.itheima.springbootmybatis.mapper.UserXmlMapper">
    <select id="findAll" resultType="user">
        select * from t_user
    </select>
</mapper>
那么我们就需要在yml配置文件中去配置我们的Mapper信息。
# datasource
spring:
  datasource:
    url: jdbc:mysql:///springboot?serverTimezone=UTC
    username: root
    password: 123456
    driver-class-name: com.mysql.cj.jdbc.Driver


# mybatis
mybatis:
  mapper-locations: classpath:mapper/*Mapper.xml # mapper映射文件路径
  type-aliases-package: com.itheima.springbootmybatis.domain

  # config-location:  # 指定mybatis的核心配置文件
最后
本篇博客对springboot的使用就介绍搭配这里了,如果本篇博客对你有帮助的话,请点一个小赞支持一下,感谢!我们下篇博客再见!


 1万+
1万+


 被折叠的 条评论
为什么被折叠?
被折叠的 条评论
为什么被折叠?
 到【灌水乐园】发言


