


实验五 Java多线程程序设计
制作不易!点个关注!给大家创造更多的价值!
作业描述
实验目的
1. 掌握Runnable接口实现多线程的方法
2. 掌握Thread类实现多线程的用法
3. 掌握Java语言中多线程编程的基本方法
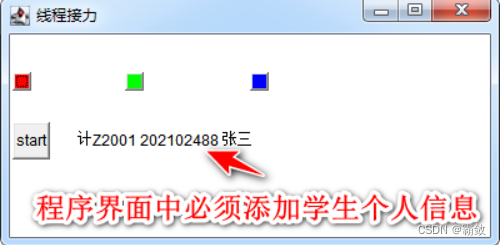
1. 线程接力(45分)
要求:编写一个应用程序,除了主线程外,还有三个线程:first、second和third。
first负责模拟一个红色的按钮从坐标(10,60)运动到(100,60);
second负责模拟一个绿色的按钮从坐标(100,60)运动到(200,60);
third线程负责模拟一个蓝色的按钮从坐标(200,60)运动到(300,60)。
程序运行界面如下图所示:
请参看实验指导书,阅读分析程序,将程序中的代码补充完整,编译并运行程序,查看结果。
2. 线程的控制(45分)
要求:编写一个程序,动画显示文本域中的字符串。在窗体的南面添加三个按钮,为程序添加线程控制功能。
点击开始按钮(startBtn),线程开始启动,文字逐个显示,并且将按钮状态改变为禁用(因为线程不能重复启动)
点击暂停按钮(pauseBtn),线程暂停,文字显示停止
点击恢复按钮(resumeBtn),线程恢复运行,文字继续显示
当线程执行完毕后,恢复开始按钮的状态为可用。
程序运行界面如下图所示:

请参看实验指导书,阅读分析程序,将程序中的代码补充完整,编译并运行程序,查看结果。
实验总结(10分)
报告提交要求:
1、程序运行截图(每题1张即可)。程序界面中应添加学生个人信息,如果没有,实验成绩记为0分。
2、程序代码提交采用markdown语法,不按要求提交,实验成绩记为0分。
第一个代码如下:
     package shiyan5;
    import java.awt.*;
    import java.awt.event.*;
    import javax.swing.JTextArea;
    public class MoveButton extends Frame implements Runnable, ActionListener {
     // 用Thread类声明first,second,third三个线程对象
     Thread first;
     Thread second;
     Thread third;
     Button redButton, greenButton, blueButton, startButton;
     JTextArea textArea;
     int distance = 10;
     MoveButton() {
      // 分别创建first,second,third三个线程,用当前窗口做为该线程的目标对象
      first = new Thread(this);
      second = new Thread(this);
      third = new Thread(this);
      redButton = new Button();
      greenButton = new Button();
      blueButton = new Button();
      redButton.setBackground(Color.red);
      greenButton.setBackground(Color.green);
      blueButton.setBackground(Color.blue);
      startButton = new Button("start");
      textArea=new JTextArea("计xxxxxx");
      startButton.addActionListener(this);
      setLayout(null);
      add(redButton);

      redButton.setBounds(10, 60, 15, 15);
      add(greenButton);
      greenButton.setBounds(100, 60, 15, 15);
      add(blueButton);
      blueButton.setBounds(200, 60, 15, 15);
      add(startButton);
      add(textArea);
      startButton.setBounds(10, 100, 30, 30);
      textArea.setBounds(60, 105, 200, 30);
      setTitle("线程接力");
      setBounds(0, 0, 400, 200);
      setVisible(true);
      validate();
      addWindowListener(new WindowAdapter() {
       public void windowClosing(WindowEvent e) {
        System.exit(0);
       }
      });
     }
     public void actionPerformed(ActionEvent e) {
      try {
       // 分别启动三个线程
       first.start();
       second.start();
       third.start();
      } catch (Exception exp) {
      }
     }
     public void run() {
      while (true) {
       // 判断当前占有CPU资源的线程是否是first
       if (Thread.currentThread() == first) {
        moveComponent(redButton);
        try {
         Thread.sleep(20);
        } catch (Exception exp) {
        }
       }
    // 判断当前占有CPU资源的线程是否是second
       if (Thread.currentThread() == second) {
        moveComponent(greenButton);
        try {
         Thread.sleep(10);
        } catch (Exception exp) {
        }
       }
    // 判断当前占有CPU资源的线程是否是third
       if (Thread.currentThread() == third) {
        moveComponent(blueButton);
        try {
         Thread.sleep(20);
        } catch (Exception e) {
        }
       }
      }
     }
     public synchronized void moveComponent(Component b) {
      if (Thread.currentThread() == first) {
       while (distance > 100 && distance <= 300)
        try {
         wait();
        } catch (Exception exp) {
        }
       distance = distance + 1;
       b.setLocation(distance, 60);
       if (distance >= 100) {
        b.setLocation(10, 60);
        notifyAll();
       }
      }
      if (Thread.currentThread() == second) {
       while (distance <= 100 || distance > 200)
        try {
         wait();
        } catch (Exception exp) {
        }
       distance = distance + 1;
       b.setLocation(distance, 60);
       if (distance > 200) {
        b.setLocation(100 , 60);
        notifyAll();
       }

      }
      if (Thread.currentThread() == third) {
       while (distance <= 200)
        try {
         wait();
        } catch (Exception exp) {
        }
       distance = distance + 1;
       b.setLocation(distance, 60);
       if (distance > 300) {
        distance = 10;
        b.setLocation(200, 60);
        notifyAll();
       }
      }
     }
     public static void main(String[] args) {
      new MoveButton().setLocationRelativeTo(null);
     }
    }
第二个代码如下:
    package shiyan5;
    import java.awt.*;
    import java.awt.event.ActionEvent;
    import java.awt.event.ActionListener;
    import javax.swing.*;
    import javax.swing.border.BevelBorder;
    public class RunnableDemo extends JFrame implements Runnable, ActionListener {
    private JTextArea textArea; // 文本域组件
    JLabel label;
    Button startBtn, pauseBtn, resumeBtn;
    Panel panel;
    Thread thread;
    boolean move = false;
    // 动画显示的文本字符串
    private String introduction = "现在大家已经对计算机很熟悉了,如今计算机的操作"
    + "系统可以同时执行多个任务,在听歌的同时能够打字、下载文件,在聊天窗口打"
    + "字的时候,对方同时还能通过视频看到你;听到你。这一切都是使用多任务实现"
    + "的,Java语言使用多线程实现一个程序中的多个任务同时运行。程序员可以在程"
    + "序中执行多个线程,每一个线程完成一个功能,并与其他线程并发执行,这种机"
    + "制被称为多线程。";
    public static void main(String args[]) {
    new RunnableDemo().setLocationRelativeTo(null); // 创建本类实例对象
    }
    public RunnableDemo() {
    setTitle("线程的控制");
    label = new JLabel("多线程简介:xxxxxxxxxxx"); // 标签组件
    getContentPane().add(label, BorderLayout.NORTH);// 添加标签到窗体
    textArea = new JTextArea("\t"); // 初始化文本域组件
    textArea.setBorder(new BevelBorder(BevelBorder.LOWERED));// 设置边框
    textArea.setLineWrap(true); // 设置自动折行
    getContentPane().add(textArea, BorderLayout.CENTER);// 添加文本域组件到文本框
    startBtn = new Button("开始");
    pauseBtn = new Button("暂停");
    resumeBtn = new Button("恢复");
    startBtn.addActionListener(this);
    pauseBtn.addActionListener(this);
    resumeBtn.addActionListener(this);
    panel = new Panel();
    panel.add(startBtn);
    panel.add(pauseBtn);
    panel.add(resumeBtn);
    getContentPane().add(panel, BorderLayout.SOUTH);
    setBounds(0, 0, 383, 225); // 设置窗体大小位置
    setDefaultCloseOperation(JFrame.EXIT_ON_CLOSE);
    setVisible(true); // 显示窗体
    }
    /**Runnable接口方法,是线程的执行方法*/
    @Override
    public void run() {
    textArea.setText("\t");
    String[] intros = introduction.split(""); // 将字符串分割为数组
    for (String ch : intros) { // ForEach遍历字符串数组
    while (!move) {
    try {
    synchronized (this) {
    wait();
    }
    } catch (InterruptedException e) {
    e.printStackTrace();
    }
    }
    textArea.append(ch); // 添加一个字符到文本域
    try {
    Thread.sleep(100); // 线程休眠0.1秒
    } catch (InterruptedException e) {
    e.printStackTrace();
    }
    }
    startBtn.setEnabled(true);
    }
    @Override
    public void actionPerformed(ActionEvent e) {
    if (e.getSource() == startBtn) {
    thread =new Thread(this);
    thread.start();
    move =true;
    startBtn.setEnabled(false);

    } else if (e.getSource() == pauseBtn) {
        move =false;
    } else if (e.getSource() == resumeBtn) {
    move=true;
    synchronized(this){
        notifyAll();
    }

    }
    }
    }


 1178
1178

 被折叠的 条评论
为什么被折叠?
被折叠的 条评论
为什么被折叠?
 到【灌水乐园】发言


