


一、ApiClient代码解读
这是一个简单的Spring Boot的RestTemplate客户端,用于执行HTTP请求。
首先,这个类被@Component注解标记,这意味着它是一个Spring组件,Spring的依赖注入框架会自动创建并管理这个类的实例。
类声明
public class ApiClient {
成员变量
private final RestTemplate restTemplate;
RestTemplate是Spring提供的一个HTTP客户端,用于发送HTTP请求。final`关键字表示这个成员变量一旦在构造函数中被赋值后,就不能再被修改。
无参构造函数
public ApiClient() {
    restTemplate = new RestTemplate();
}
这个无参构造函数是创建一个新的ApiClient实例的方式。它创建一个新的RestTemplate实例并将其赋值给restTemplate成员变量。
公共方法
public <T> T executeRequest(String url, HttpMethod method, Class<T> responseType) {
    ResponseEntity<T> response = restTemplate.exchange(url, method, null, responseType);
    return response.getBody();
}
这个方法是执行HTTP请求的主要方法。它接受一个URL、一个HTTP方法(GET、POST、PUT等)、以及一个表示预期响应类型的类,然后使用RestTemplate发送HTTP请求并返回响应的主体。这个方法是泛型的,所以它可以处理任意类型的响应。
在内部,RestTemplate.exchange()方法使用给定的URL、HTTP方法、实体(在这个例子中是null,因为没有要发送的实体)、以及响应类型来发送HTTP请求。这个方法返回一个ResponseEntity对象,该对象包含HTTP响应的状态码、头信息和主体。
然后,这个方法返回ResponseEntity.getBody(),这是响应的主体部分。因为executeRequest()方法是泛型的,所以返回的主体会是正确的类型(由responseType参数指定)。
二、ApiService代码解读
这是一个使用Spring框架的Java类,名为ApiService。这个类用于通过API与远程服务器进行交互。
类声明
public class ApiService {
这是类的基本声明,表明这是一个公开的类,可以在其他类中继承和引用。
成员变量
private final ApiClient apiClient;
这是一个私有常量成员变量,类型为ApiClient。这个变量是ApiService类使用的主要工具,用于执行API请求。final关键字表示这个变量一旦初始化就不能再改变。
构造函数
@Autowired
public ApiService(ApiClient apiClient) {
    this.apiClient = apiClient;
}
这是ApiService的构造函数,它接受一个ApiClient类型的参数。@Autowired注解表示这个构造函数将自动被Spring框架调用,以注入一个已经初始化的ApiClient实例。这个实例将被赋值给上面的成员变量。
公共方法
以下是两个公共方法:
getDataFromApi(String url, Class<T> responseType): 此方法使用GET方法从指定的URL获取数据,并根据响应类型返回结果。它通过调用ApiClient的executeRequest方法实现这一点。postDataToApi(String url, Object requestBody, Class<T> responseType): 此方法使用POST方法向指定的URL发送给定的请求体,并根据响应类型返回结果。它也通过调用ApiClient的executeRequest方法实现这一点。
这两个方法都是泛型的,因此可以处理任何类型的响应,这使得代码更加灵活和可重用。
总的来说,这个ApiService类是一个用于处理API请求的封装器,它简化了对API的使用,并确保所有请求都以一致的方式处理。
三、HomeController代码解读
这是一个Spring Boot的控制器类,用于处理特定的HTTP请求。让我们详细解释一下每行代码的作用。
类声明
@RestController
这是Spring的@RestController注解,它表明这个类将处理HTTP请求并直接返回HTTP响应,而不是通过页面渲染。
@RequestMapping("/hello")
这是@RequestMapping注解的一个应用,它指定了处理请求时的基本URL路径。在这种情况下,所有的请求都会有一个"/hello"的前缀。
成员变量
@Autowired
private ApiService apiService;
这是Spring的@Autowired注解,它告诉Spring自动装配这个成员变量。也就是说,Spring会查找一个名为ApiService的bean,并将其自动赋值给这个成员变量。
方法
@GetMapping("/api")
这是@GetMapping注解,它表示这个方法将处理GET请求,并且请求的URL需要包含"/api"。
public String callApi(@RequestParam String number) {
这是方法的签名。callApi是方法名,接受一个参数number,该参数通过@RequestParam注解进行标注,表示这个参数是从HTTP请求的参数中获取的。在这种情况下,HTTP请求需要包含一个名为"number"的参数。
String url = "https://tools.mgtv100.com/external/v1/logistics/query?no="+number;
这行代码创建了一个URL字符串,该字符串将从"number"参数获取值,并附加到URL的末尾。
return apiService.getDataFromApi(url,String.class);
这行代码调用ApiService的getDataFromApi方法,使用上面创建的URL和String.class作为参数。该方法将发送一个GET请求到这个URL,并返回响应的主体。然后,这个主体被返回给HTTP请求。
总的来说,这个控制器类的主要功能是接收包含特定参数"number"的GET请求,然后使用这个参数构造一个URL,并通过这个URL发送一个GET请求。然后返回响应的主体。
四、整体代码
import org.springframework.http.HttpMethod;
import org.springframework.http.ResponseEntity;
import org.springframework.stereotype.Component;
import org.springframework.web.client.RestTemplate;
@Component
public class ApiClient {
    private final RestTemplate restTemplate;

    public ApiClient() {
        restTemplate = new RestTemplate();
    }

    public <T> T executeRequest(String url, HttpMethod method, Class<T> responseType) {
        ResponseEntity<T> response = restTemplate.exchange(url, method, null, responseType);
        return response.getBody();
    }
}
import org.springframework.beans.factory.annotation.Autowired;
import org.springframework.http.HttpMethod;
import org.springframework.stereotype.Service;

@Service
public class ApiService {
    private final ApiClient apiClient;

    @Autowired
    public ApiService(ApiClient apiClient) {
        this.apiClient = apiClient;
    }

    public <T> T getDataFromApi(String url, Class<T> responseType) {
        return apiClient.executeRequest(url, HttpMethod.GET, responseType);
    }

    public <T> T postDataToApi(String url, Object requestBody, Class<T> responseType) {
        return apiClient.executeRequest(url, HttpMethod.POST, responseType);
    }
}
import org.springframework.beans.factory.annotation.Autowired;
import org.springframework.web.bind.annotation.GetMapping;
import org.springframework.web.bind.annotation.RequestMapping;
import org.springframework.web.bind.annotation.RequestParam;
import org.springframework.web.bind.annotation.RestController;

@RestController
@RequestMapping("/hello")
public class HomeController {


    @Autowired
    private ApiService apiService;

    @GetMapping("/api")
    public String callApi(@RequestParam String number) {
        String url = "https://tools.mgtv100.com/external/v1/logistics/query?no="+number;
        return apiService.getDataFromApi(url,String.class);
    }
}
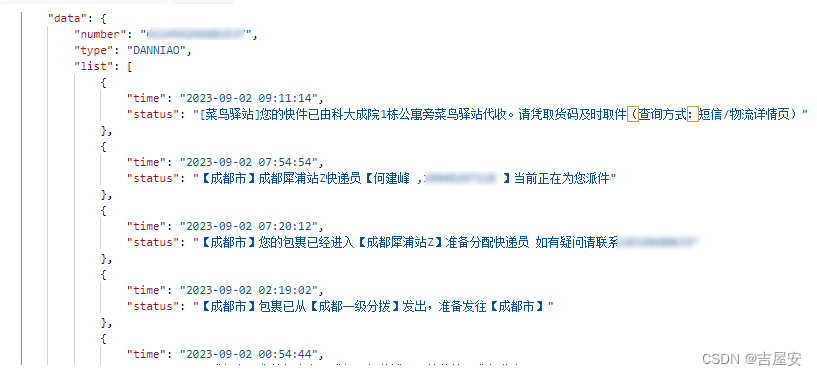
五、结果展示


 522
522


 被折叠的 条评论
为什么被折叠?
被折叠的 条评论
为什么被折叠?
 到【灌水乐园】发言


